While you might be running a decent website, you could be limiting users from becoming customers if your site is only in one language. Creating a multilingual website is simply better than having a single language site for a number of reasons.
A multilingual site will add extra value to your website. By having one, you’ll not only gain the upper hand over your competitors but you’ll also win the hearts of your customers in their native language. This is particularly true if you’re operating a local website and you never know which language that your customers are most comfortable with.
In this article, we’ll discuss why you need to have a multi language website and how Polylang can be used for free in Jupiter X to achieve this goal.
What is Polylang?
There are many translation plugins out there in the world of WordPress plugins. You have a plethora of options – from paid to free plans or for a particular reason or general use. For the purposes of this article, we’ll use use the popular plugin Polylang, which we highly recommend because it’s easy to use and free.
With Polylang, you can add as many languages as you want to your WordPress site, as well as create pages, posts, custom post types, or taxonomies and define different languages for them. It also supports the right to left languages (RTL).
Let’s identify the key features of this plugin:
- Manual translation of the content
- Unlimited amount of the supported languages
- Easy-to-use interface and easy-to-configure settings
translation services, and your content will be translated by language professionals.
How to setup Polylang
Now let’s try to create a multilingual site that is fully functional using Polylang and Jupiter X. I’d like to also mention that, in this case, the Jupiter X theme is not a special theme. All the plugin’s settings that work in Jupiter X will work in another theme as well. In other words, this tutorial isn’t only for Jupiter X.
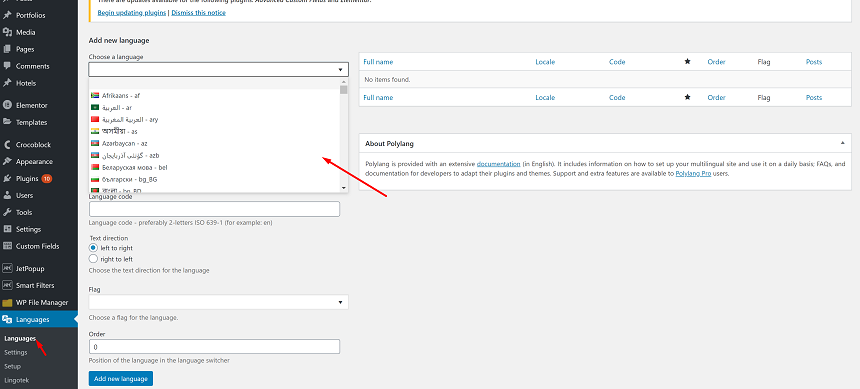
First of all, we need to install the plugin. This can be done from WordPress dashboard > Plugins > Add new. Then search for Polylang, install it, and activate. Right after activation go to settings and choose your language:
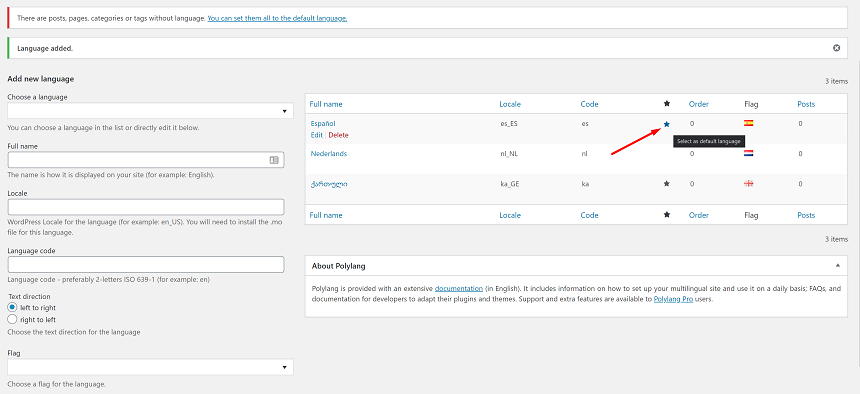
Once you add Languages, you may choose the default language of your site by clicking on the star icon here:
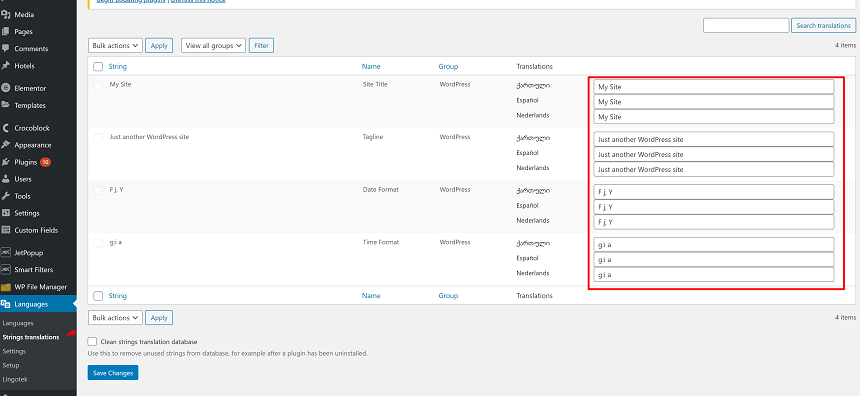
The next step in creating a multilingual site is to visit the Strings translation page, where you’ll be able to translate some of your sites important texts like the website’s name, site’s title and format of the date for different languages:
Basically, we are done with setting up the plugin and are now ready to work with the multilingual posts, pages, menus and other content types on the site:
Multilingual post types
Posts, pages, portfolios, and other post types are the main content of your website, the reason you are making a multilanguage website is your content, Polylang simplifies working with multi language content
To add a multi language page (post or any other post type), go ahead to your post type. In this case, we’ll use pages, open all pages, and on the right side of the page names you will see + sign at the page where you need to add another language, once you click on the button, you’ll be redirected to the page with the selected language for editing:

By opening this page, you’ll see a native screen where you’ll need to add the name of the page and the content.
Multilingual Menus
Needless to say, your site also needs multi language menus. When the user switches from one to another language, you might show them different content, but language in the menus must change as well.
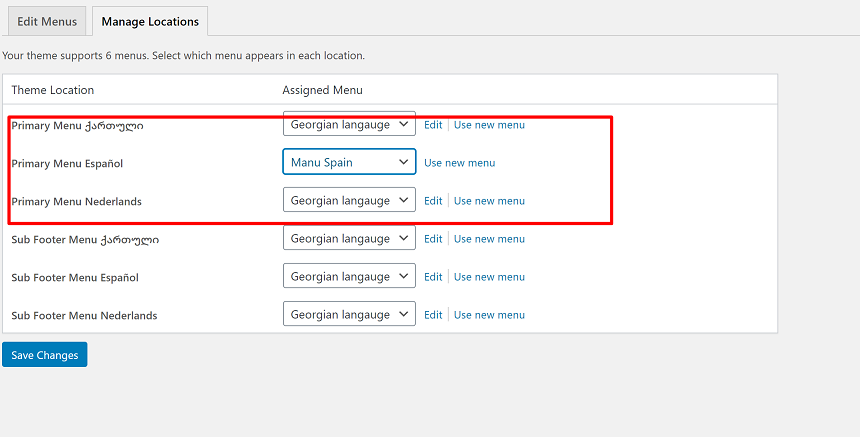
In order to add multi language menus to our site, open Appearance > Menu and create different menus for different languages. For instance, if you have 3 different languages on the site, you need to create 3 different menus and once you are done creating them, you can set them from the menu location. Here’s how it’s done:
Multilingual Widgets
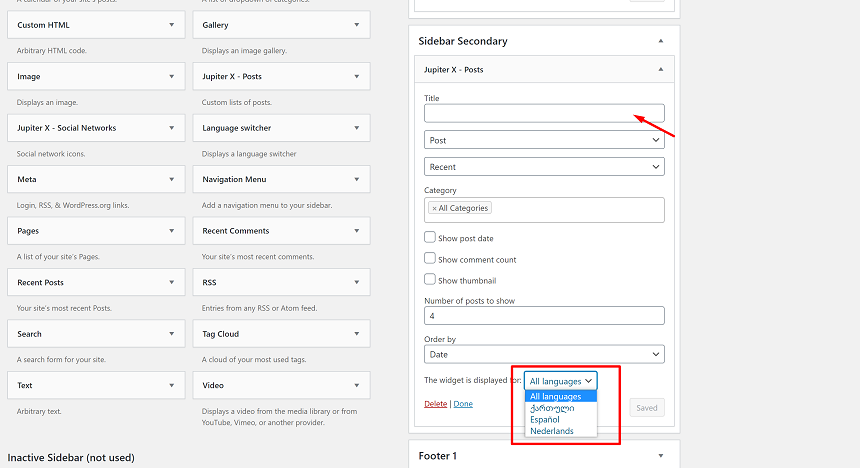
Now, let’s take a look at the widgets. They can be accessed in Appearance > Widgets. Once you add any widget in the sidebar or in the footer, you’ll notice that it has a dropdown language switcher. This feature allows you to set different parameters for different languages:
Language switcher
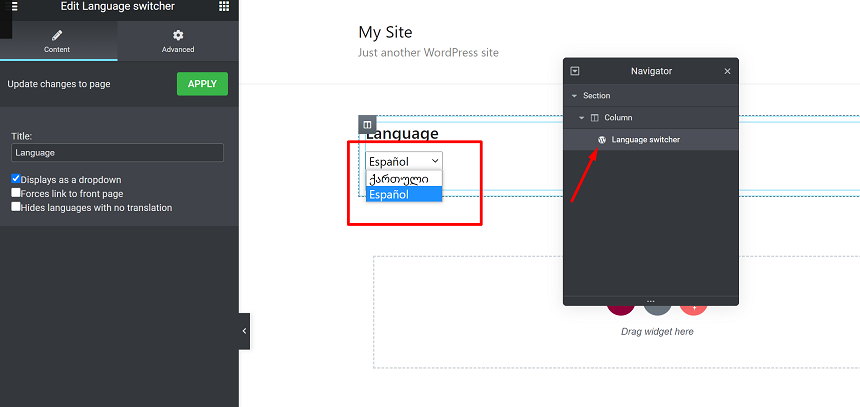
The Language switcher is probably the most important front page element on your multi language site. It’s an indicator that shows you the multilanguage site. Without this element, no one would be able to notice that your site is multi language, and switching from one to another language would be impossible.
The Language switcher can be accessed in the same location as a widget, in addition, it can be also accessed in the Elementor page builder. This feature in Jupiter X allows you to place the Language switcher anywhere you’d like to have a language selector on the site. It can be placed in the header or the footer.
Conclusion
What we’ve covered in this blog post were the general configuration steps and setup procedure for the Polylang plugin to create multilingual content that can be used on any kind of site. If you have a specific question that is related to the uncovered theme in this plugin, you may use official documentation of Polylang. We’d love to hear about your experiences with Polylang in the comments section below!


No comment yet, add your voice below!