More and more online businesses – such as retailers, service providers, restaurants, among others – utilize their visitor’s geolocations for a variety of purposes to tweak their pricing based on region, territorial licensing, to run advertising campaigns based on location, or to make use of SERP (search engine results page). Implementing geolocational marketing into your campaigns will get you one step closer to personalizing the entire user experience for your visitors throughout the world. In this post, we’ll tackle how you can use location to personalize your WordPress website.
Why use Geo-targeting in reaching out
You might be wondering why you would want to add another factor to take into consideration while ideating your marketing campaigns. Geo-targeting allows you to identify the geographical location of a visitor so you can personalize your marketing activities based on their particular location. And what you do with the content is up to you – it could be translating your site into the language spoken in that area or using cultural symbols or references that are location-specific.
Anyone working in marketing or advertising is always on the lookout for different avenues in conveying a message that’s as personalized as possible to set themselves apart from everyone else. In other words, standard cookie-cutter messages simply won’t do the job anymore. So if you want to hop onto the personalization bandwagon, using location to personalize your WordPress site is the first step to take.
How to begin geolocational marketing
Get into the regional mindset
Having a good grasp on the local context and executing that in your marketing campaigns is the key to grabbing a visitor’s attention. Take WordPress, for instance. WordPress has experienced such cross-cultural popularity due to its network of polyglots who have translated the CMS for users around the world. This is the byproduct of “thinking regionally.” To accomplish this, after understanding the local context, think about what role it could play in your overall business strategy. To put this into action, pinpoint your site’s locational funnels, enhance the ones that aren’t working well and improve the ones that are.
Continually expand your regional knowledge
After you’ve analyzed important locational funnels, ideate the best way of conveying messages about your product to visitors in those locations. At this stage, you might need to get into the thick of it and conduct deep market research – or you can reach out to local professionals who can help with that. Ask yourself these questions: What are some significant cultural markers in this particular location? How can you use these markers to market your product or service? How does your current pricing compare with the currency used in this particular location?
Run geomarketing tests yourself
Try to imagine your site the way your targeted visitor would. How does it look from their perspective? Would it really make a difference if they saw your site’s personalization or would it seem like you’re trying too hard to make a sale? What impact would it have on your engagement rate?
Now, it’s time to do the work and implement the concepts previously mentioned for localized personalization. We’ll use the Growmatik to do this. Growmatik is a cross-channel marketing automation tool for WordPress that uses user types and behavior to personalize your message across all touchpoints (website content, email and popup).
Step 1 > Identify the location of your visitors
The first step in using location to personalize your WordPress site is determining your site’s locational funnels. We’ll break this down into two parts:
1- Where is the most traffic coming from?
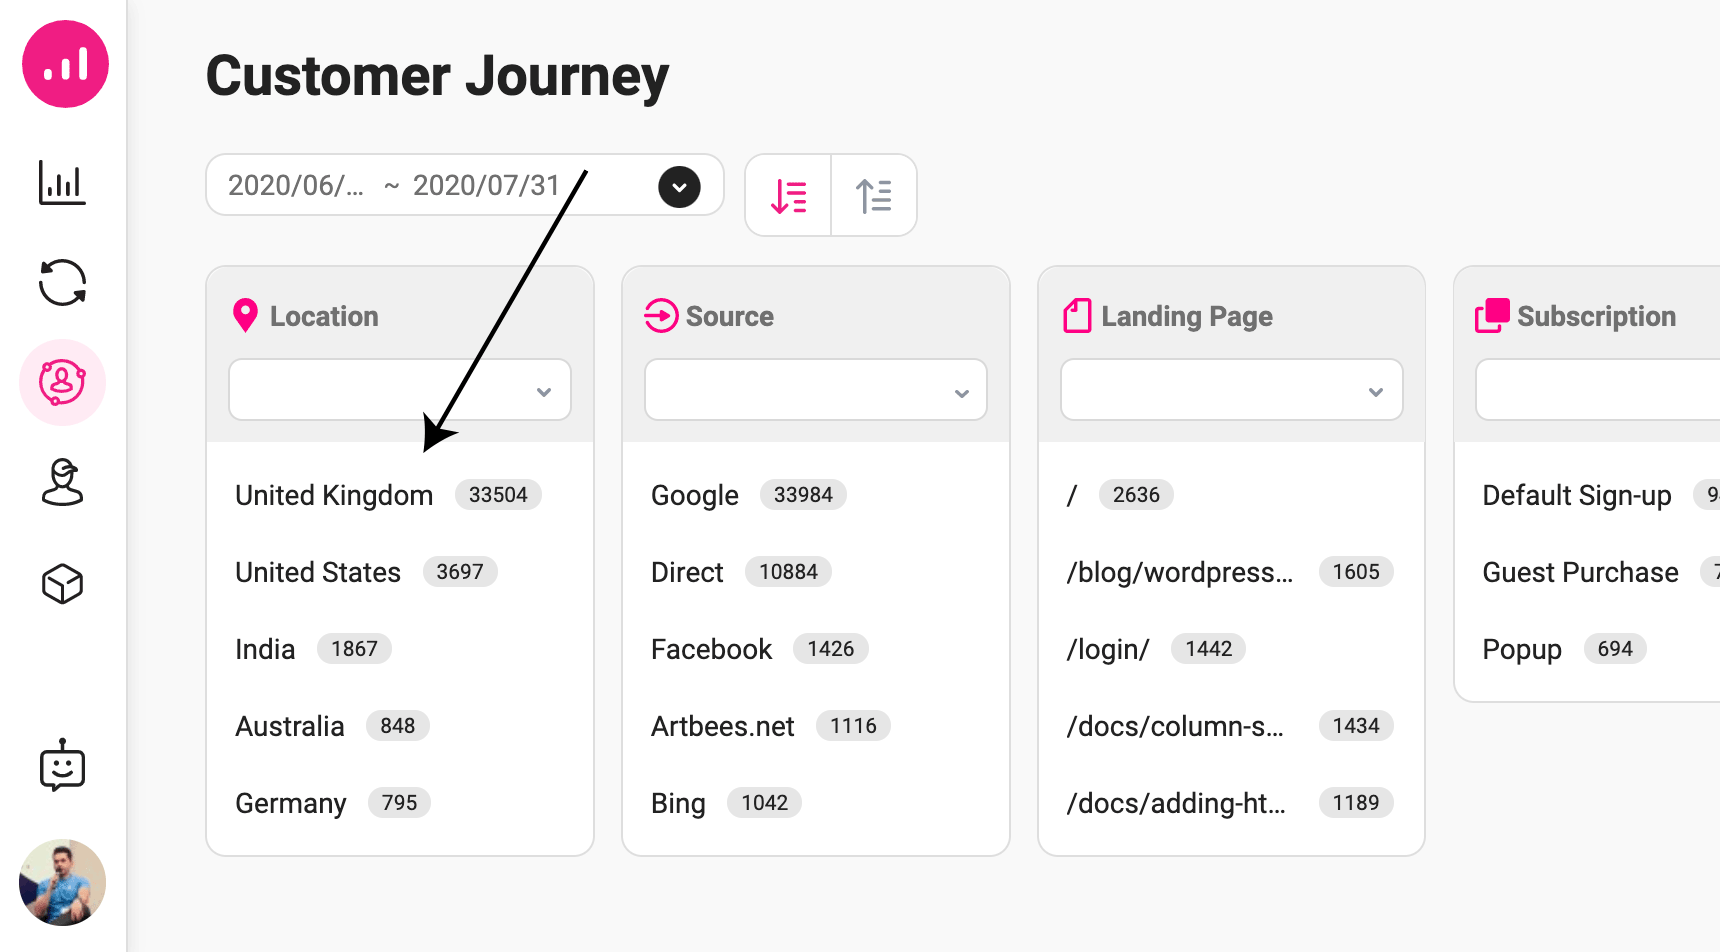
In Growmatik, you can get to the customer journey by going to Sidebar > Customer Journey. On the left, the first column is called Location, which provides a list of the top countries that refer the most traffic.
2- What actions are these visitors taking on your website after they arrive?
Growmatik’s customer journey feature also allows you to discover what visitors from various locations are doing on your site. Like the last step, find the customer journey by going to Sidebar > Customer Journey. The first column from the left is called Location, which lists the top countries based on the traffic they refer.
- From here, you can click on any of the countries listed to gain insight into what users from that location have by navigating through the columns: Source, Landing Page, Subscription and Purchase Product. For instance, if you select Canada, you can find out:
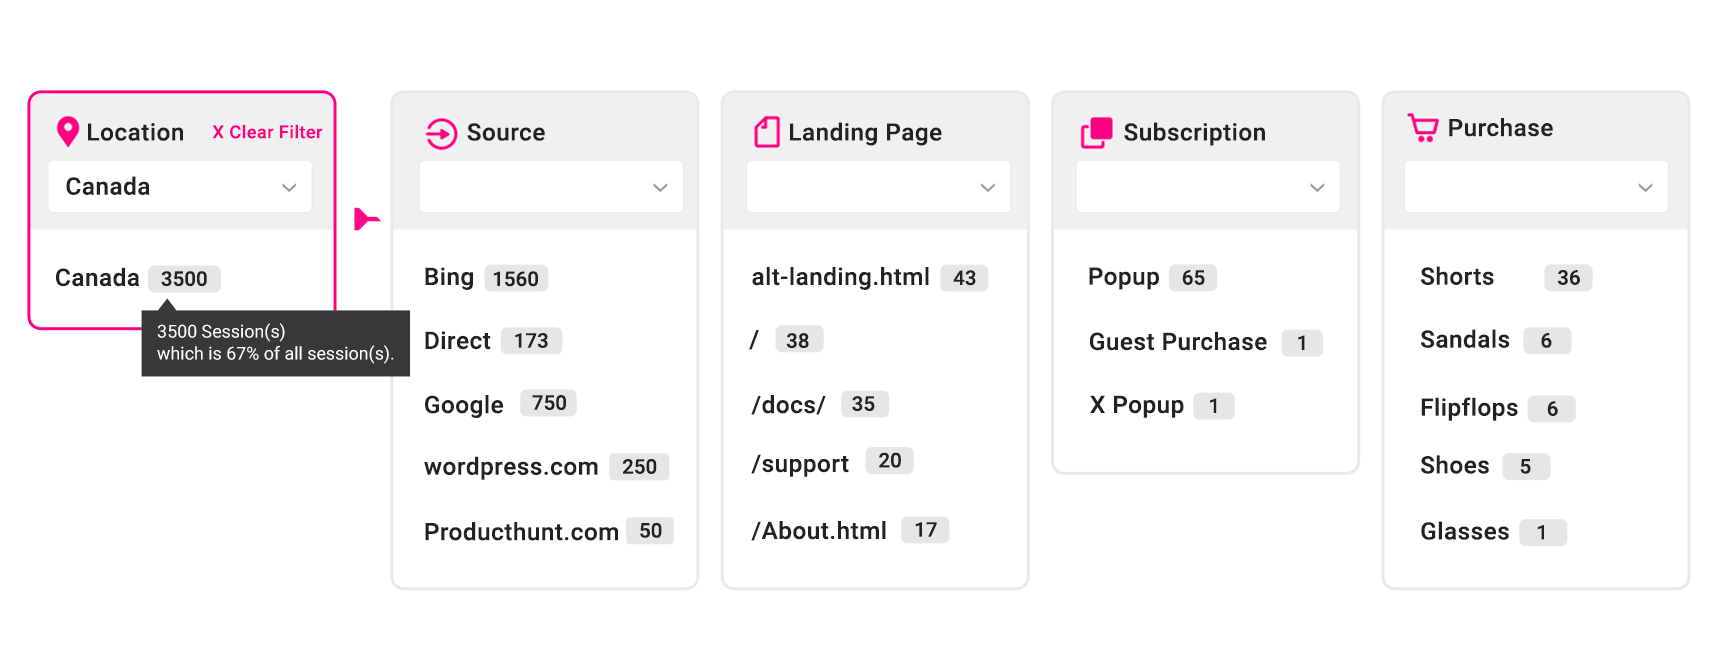
Canadians
→ were mostly referred by Bing, arrived in alt-landing.html, signed up via the popup form X and purchased shorts
- You can also narrow your focus to a certain funnel by using filters. For instance, once you’ve chosen a country from the Location column, select a specific landing page, like the following:
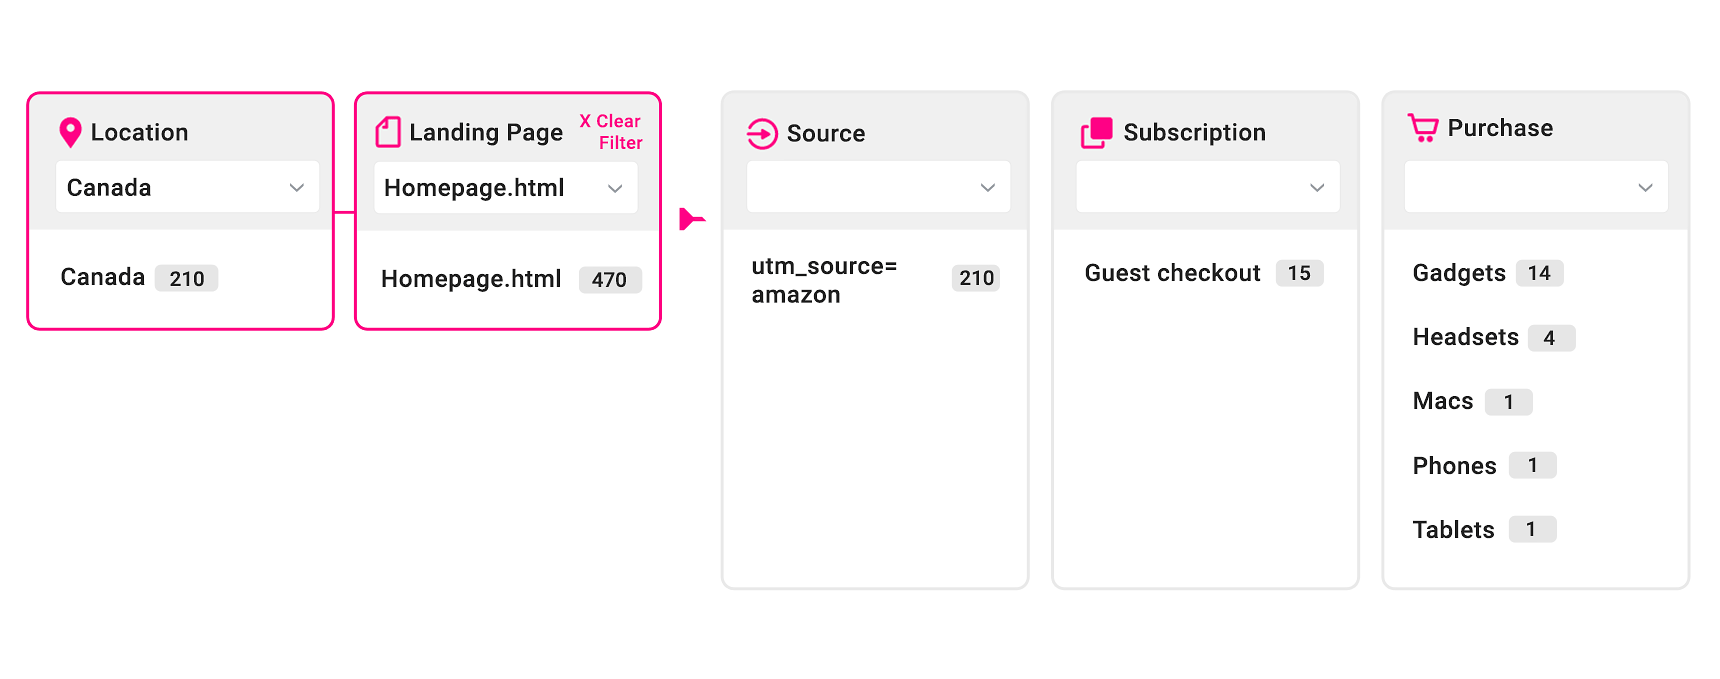
Users from Canada
+ that landed on homepage.html
→ are mostly referred by Amazon ads and have mostly bought gadgets.
Growmatik helps to uncover all funnels that include visitors from the most popular locations onto your site. On top of this, you can gain deeper insight by using one of several factors. After you’ve gotten a good picture of each location, you can start creating regional personalizations for locations that refer the most visitors to your site.
Step 2 > Implement geo-targeting onto a WordPress site
Gaining insight and creating a plan is one thing – implementing it is another. You’ll need to be able to automatically implement your desired action as soon as someone from a top location lands on your site. There are various ways of going about this. You can either do the coding yourself or use tools on the market. If you do the latter, make sure the tools allow you to automate your activities.
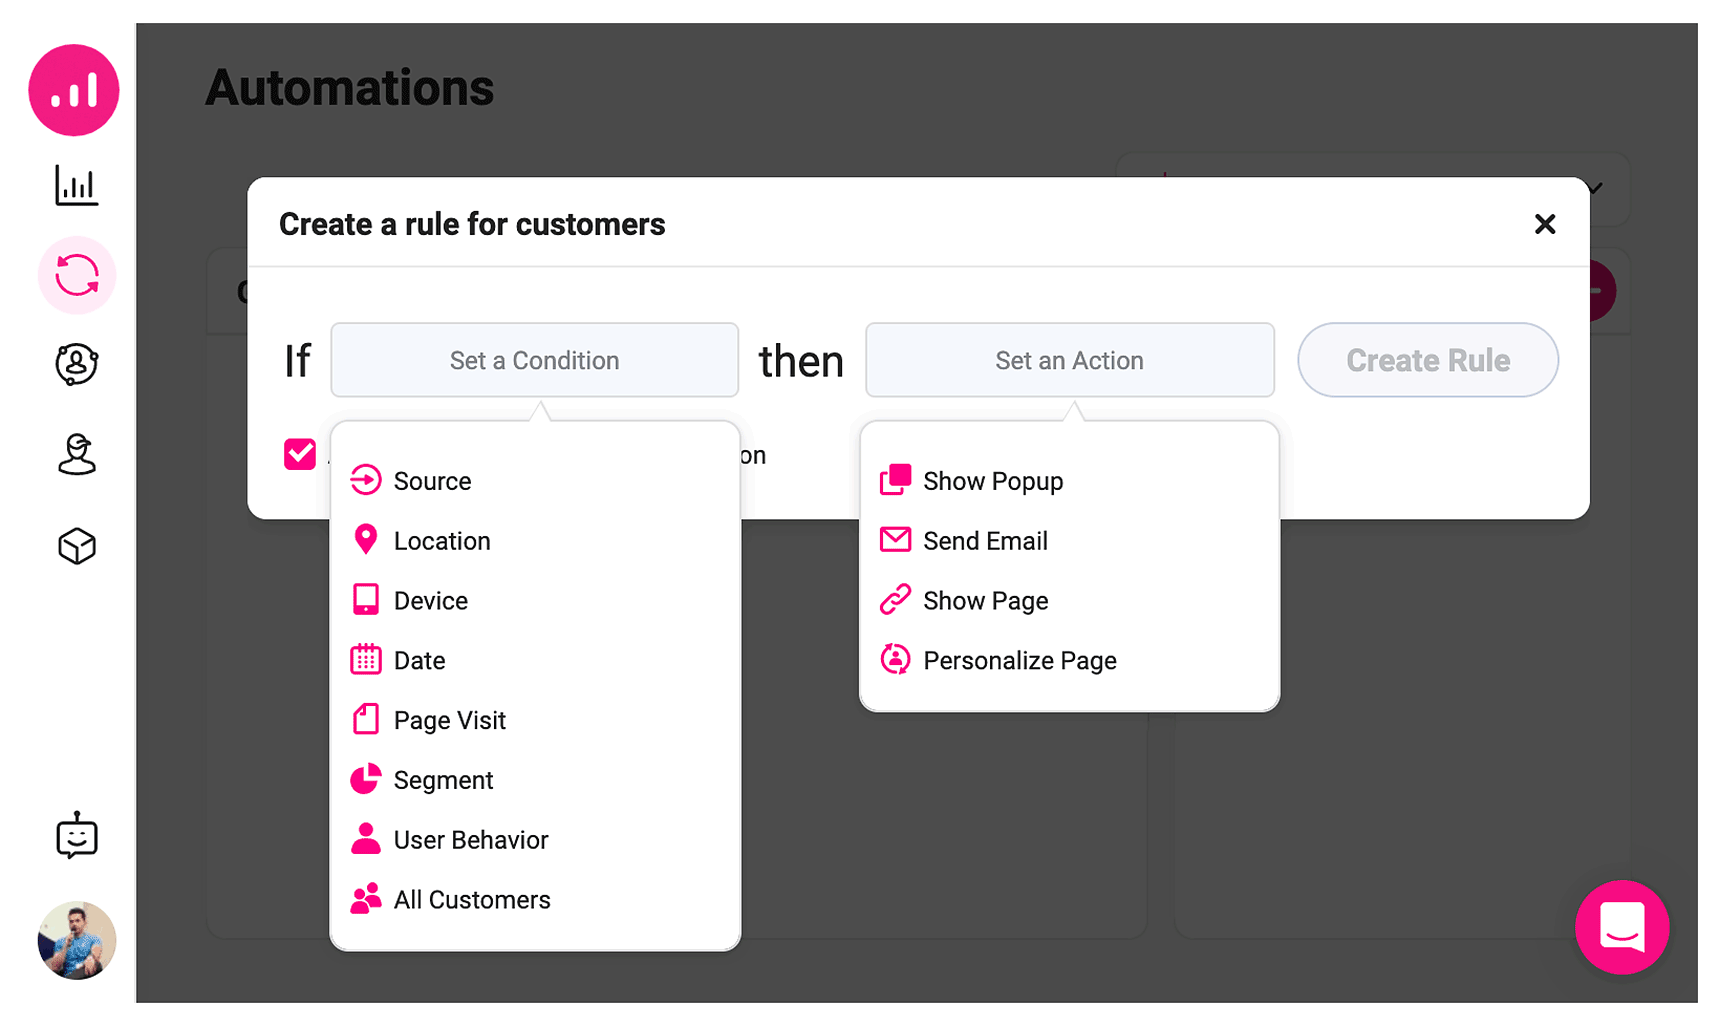
The best type of automation tool will allow you to set simple yet comprehensive rules – by using the “IF this THEN that” rationale – to allow for easy automation. You can assign locational segments and an action that you would like to be triggered for them:
There are two important actions required for your automation:
- Personalization
When choosing an automation tool, check to make sure it has in-page personalization capabilities that allow you to customize part of a page without the need to build up a new page. - Redirection
Let’s say that you’d like to redirect visitors from a specific location to a different domain or page. This is when you’d want to use redirection. The automation tool you choose should allow you to redirect in the browser (as opposed to HTTP level redirection). By going about it this way, your page SEO won’t be affected.
In the next section, we’ll take a look at some examples of how to use Growmatik to create locational personalizations for WordPress websites.
Examples of geolocational personalizations
Display a landing page that is geolocal
As part of using location to personalize your WordPress website, you can build up your site’s landing page to be personalized for visitors from the targeted countries. This might differ from using redirection to an independent domain or websites (that have a URL like yourbrand.de) with specific designs or content related to the region. Or you can even add other personalized content on the same landing page or translate the page’s content and change the design if needed.
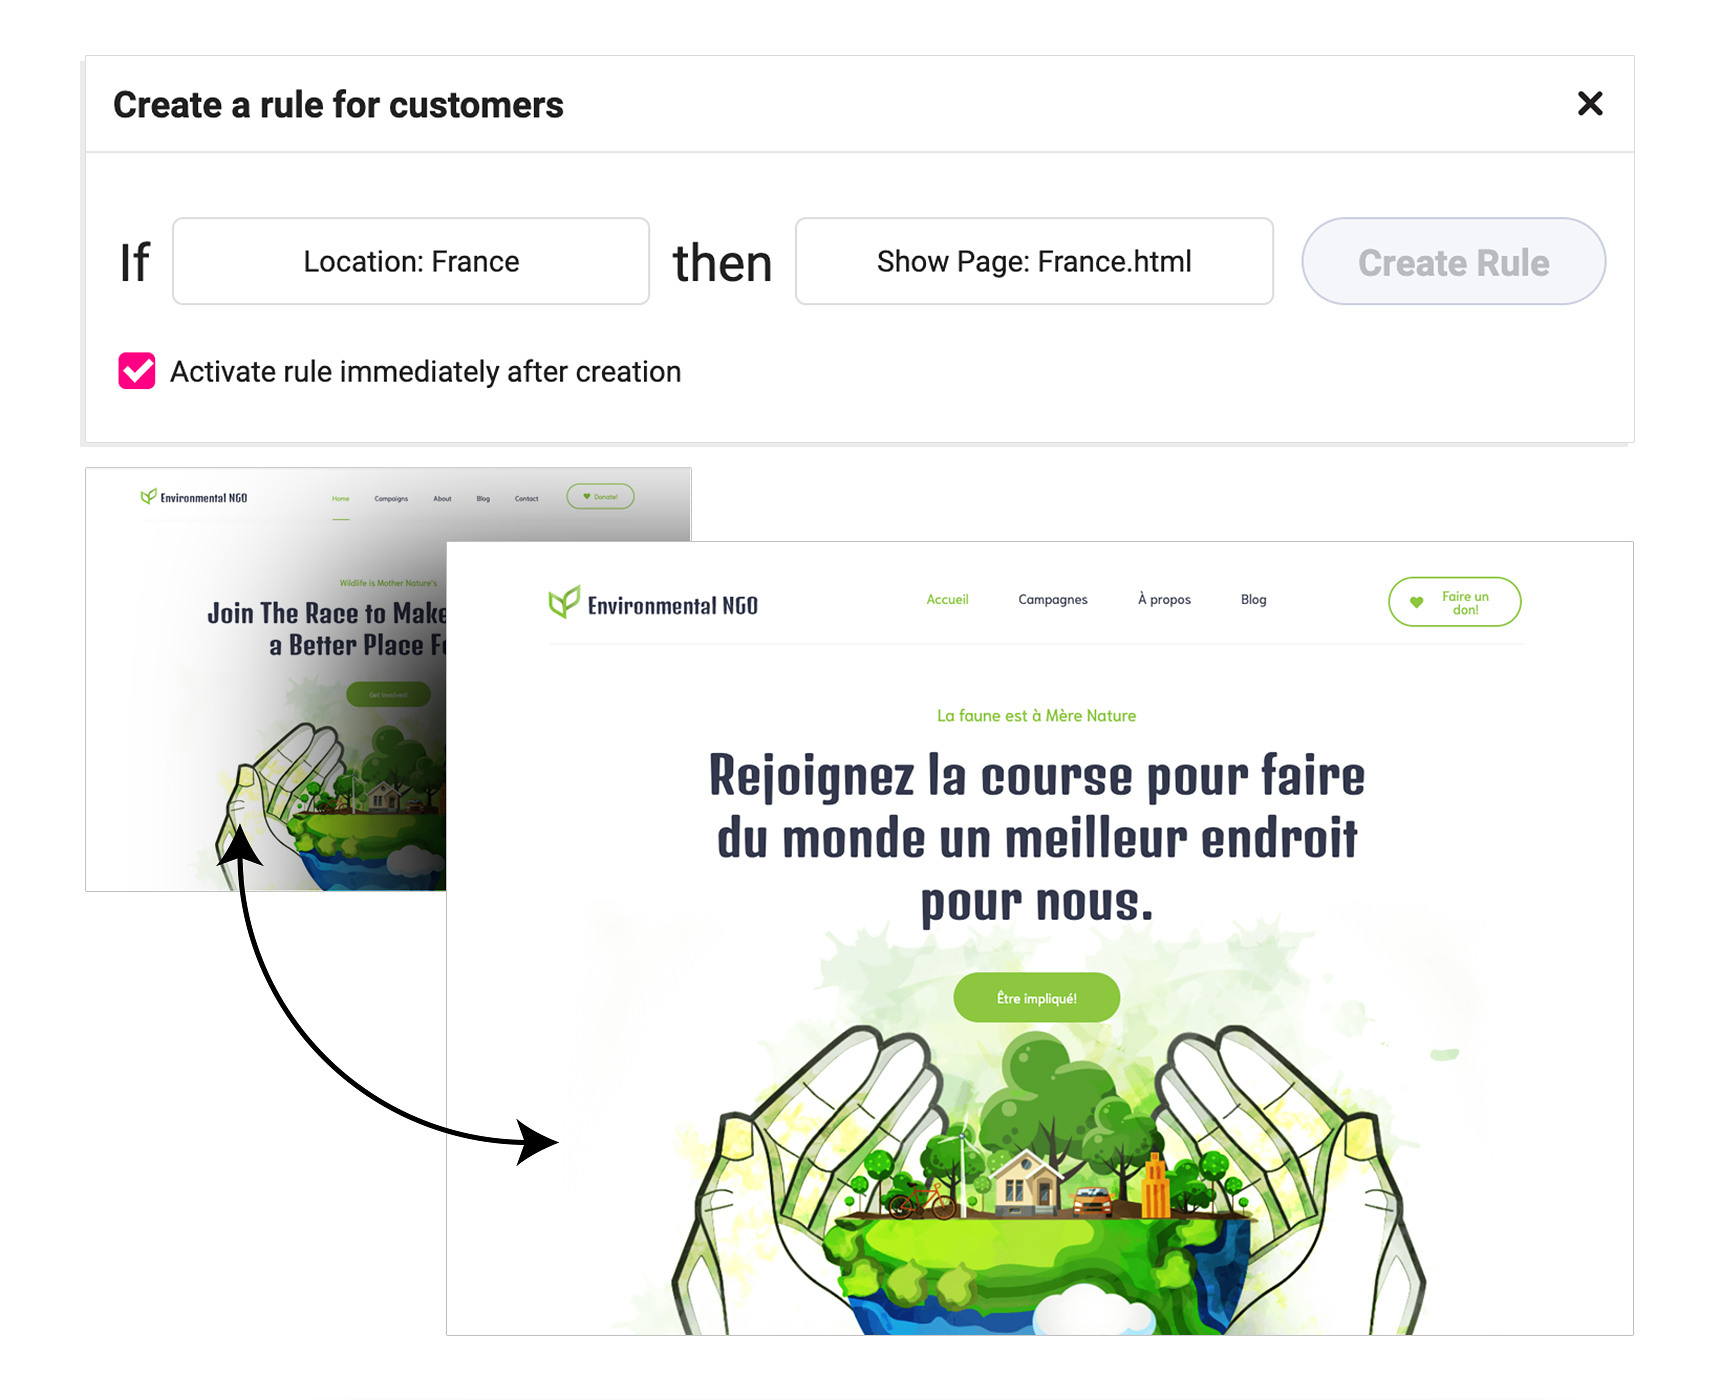
In Growmatik, you can set an action to Show Page to redirect visitors from a specific location to a page that is different from your default homepage.
Show a welcome message specific to a region
Personalizing the landing hero page and showing a localized welcome message to your user is a surefire way to make a lasting impression. For instance, you can set your greeting message to “welcome to Belgium’s online entertainment stop!” for a belgian visitor or “Fastest food delivery in the Bay Area” to a visitor from the Bay Area.
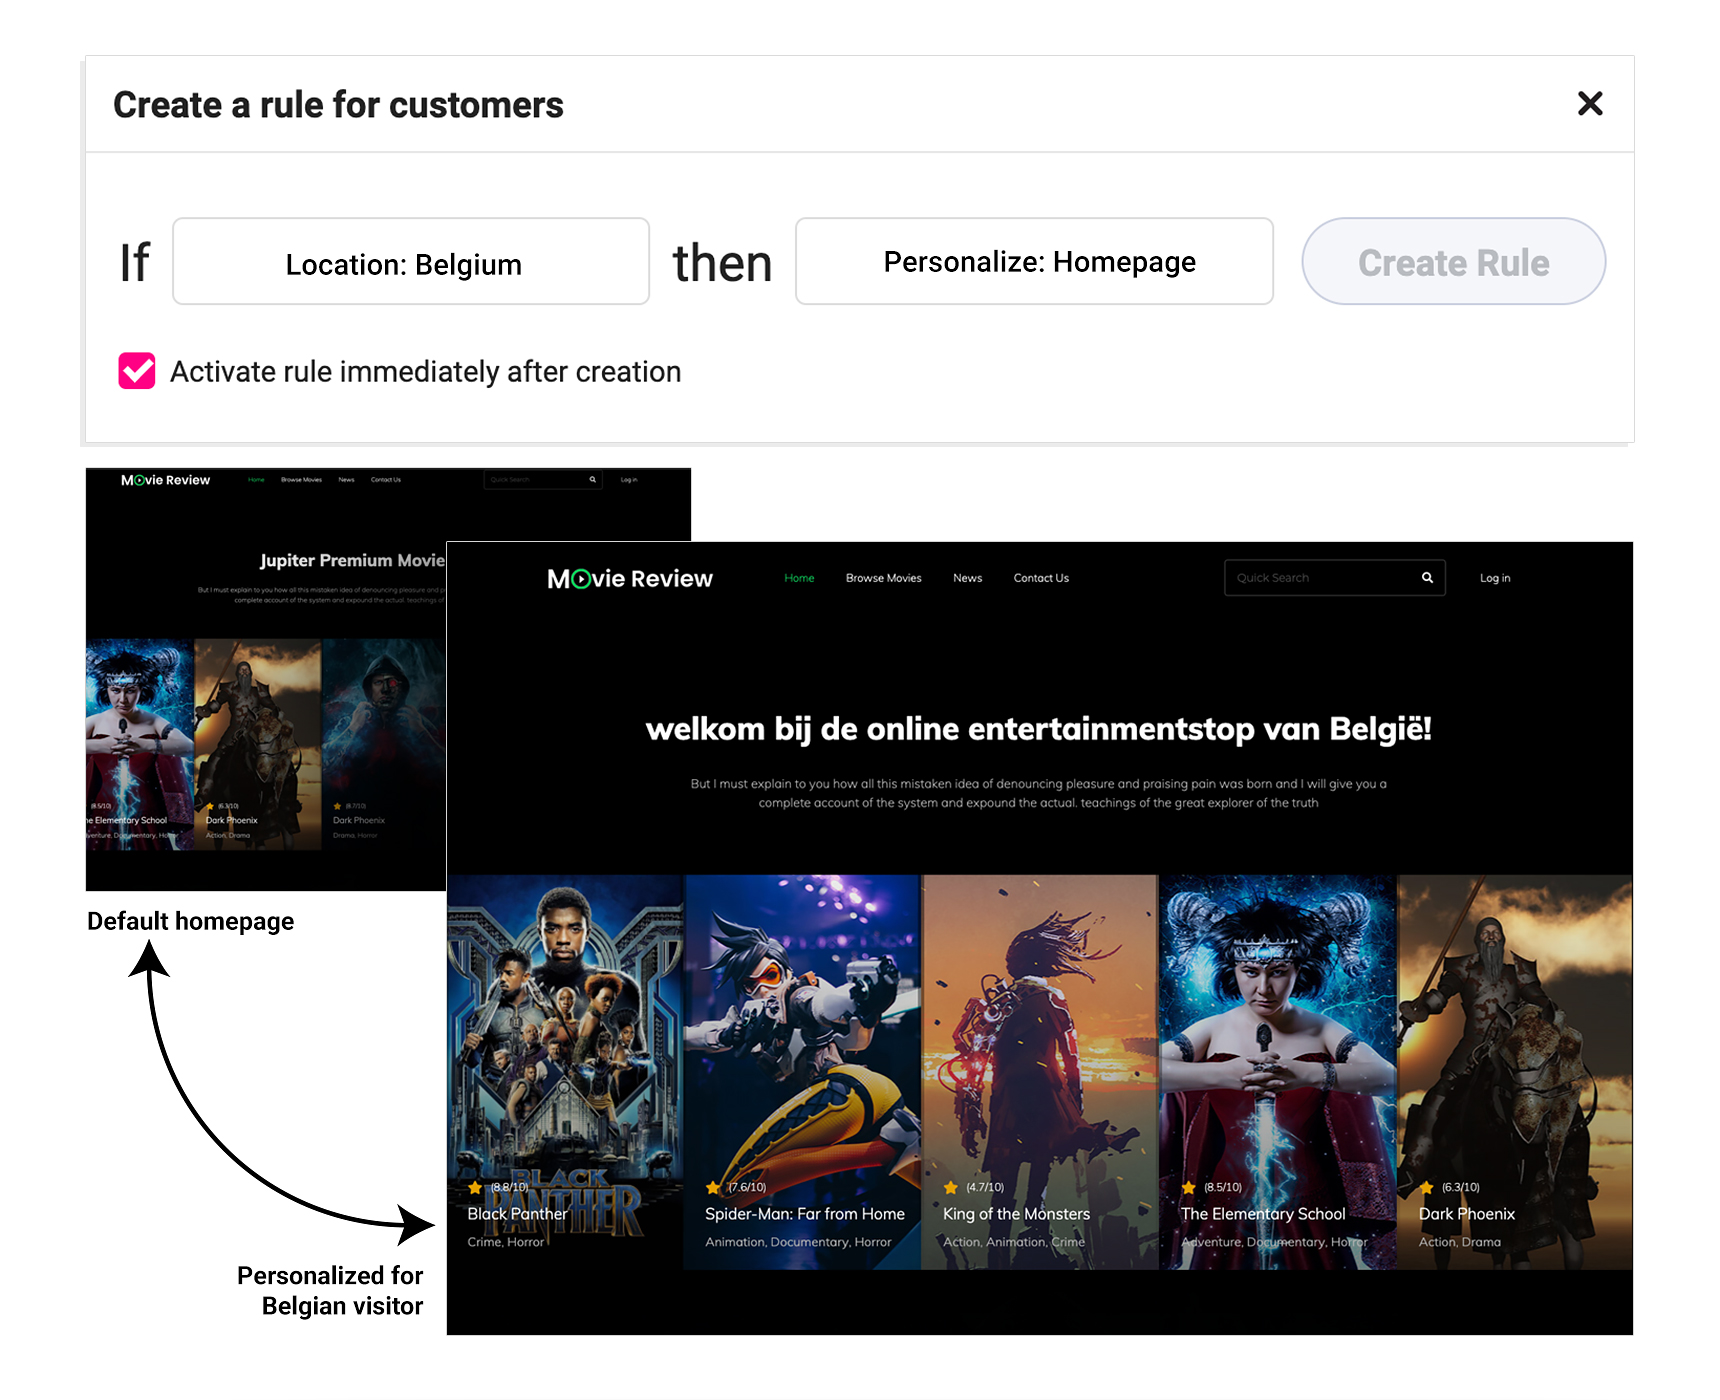
To replace your hero section’s header or text and set location-specific automation for it, you can use the Growmatik personalizer. When this action is triggered, your users from that particular location will see that version of the text.
Localize your logo
Adding a location-specific logo on your site is a good way to boost visitors’ trust in your brand and business. Great examples of this include Amazon Japan and Samsung France.

To go about doing this, you can make use of the webpage personalizer in Growmatik, substitute your site’s logo with another image and build an automation to display a customized page to users from the desired location.
Redirect to a custom domain
If you want to go the distance when it comes to localizing sales in your targeted geographical area, then you can build up a website via a custom domain such as de.band.com to redirect your visitors from this area. This is a great way for your localized website to be visible on search engines.
In order to do this, you’ll need to create an automation rule to redirect users from France to the subdomain.

Personalize call-to-actions
Depending on the landing page, a call-to-action might be the most crucial piece of content. Let’s say that you’re tight on time and resources and are unable to translate and/or localize a whole page on your site. In this case, the best thing to do would be to translate only the call-to-actions. It’s possible that visitors from your targeted location have some knowledge of English, but they would appreciate it if you take the time to translate the call-to-action into their language – and you could even include a deal or coupon specific to that region.

You can go to Growmatik’s webpage personalizer to tailor call-to-actions and then set it as an automation rule for users from that location.
Offer localized seasonal deals
Providing special pricing or discounts for regions – and showing them in bold – that are important for your business is another great way to use location in personalizing your WordPress website. The best way to schedule these campaigns is by adhering to the local calendar and special occasions.
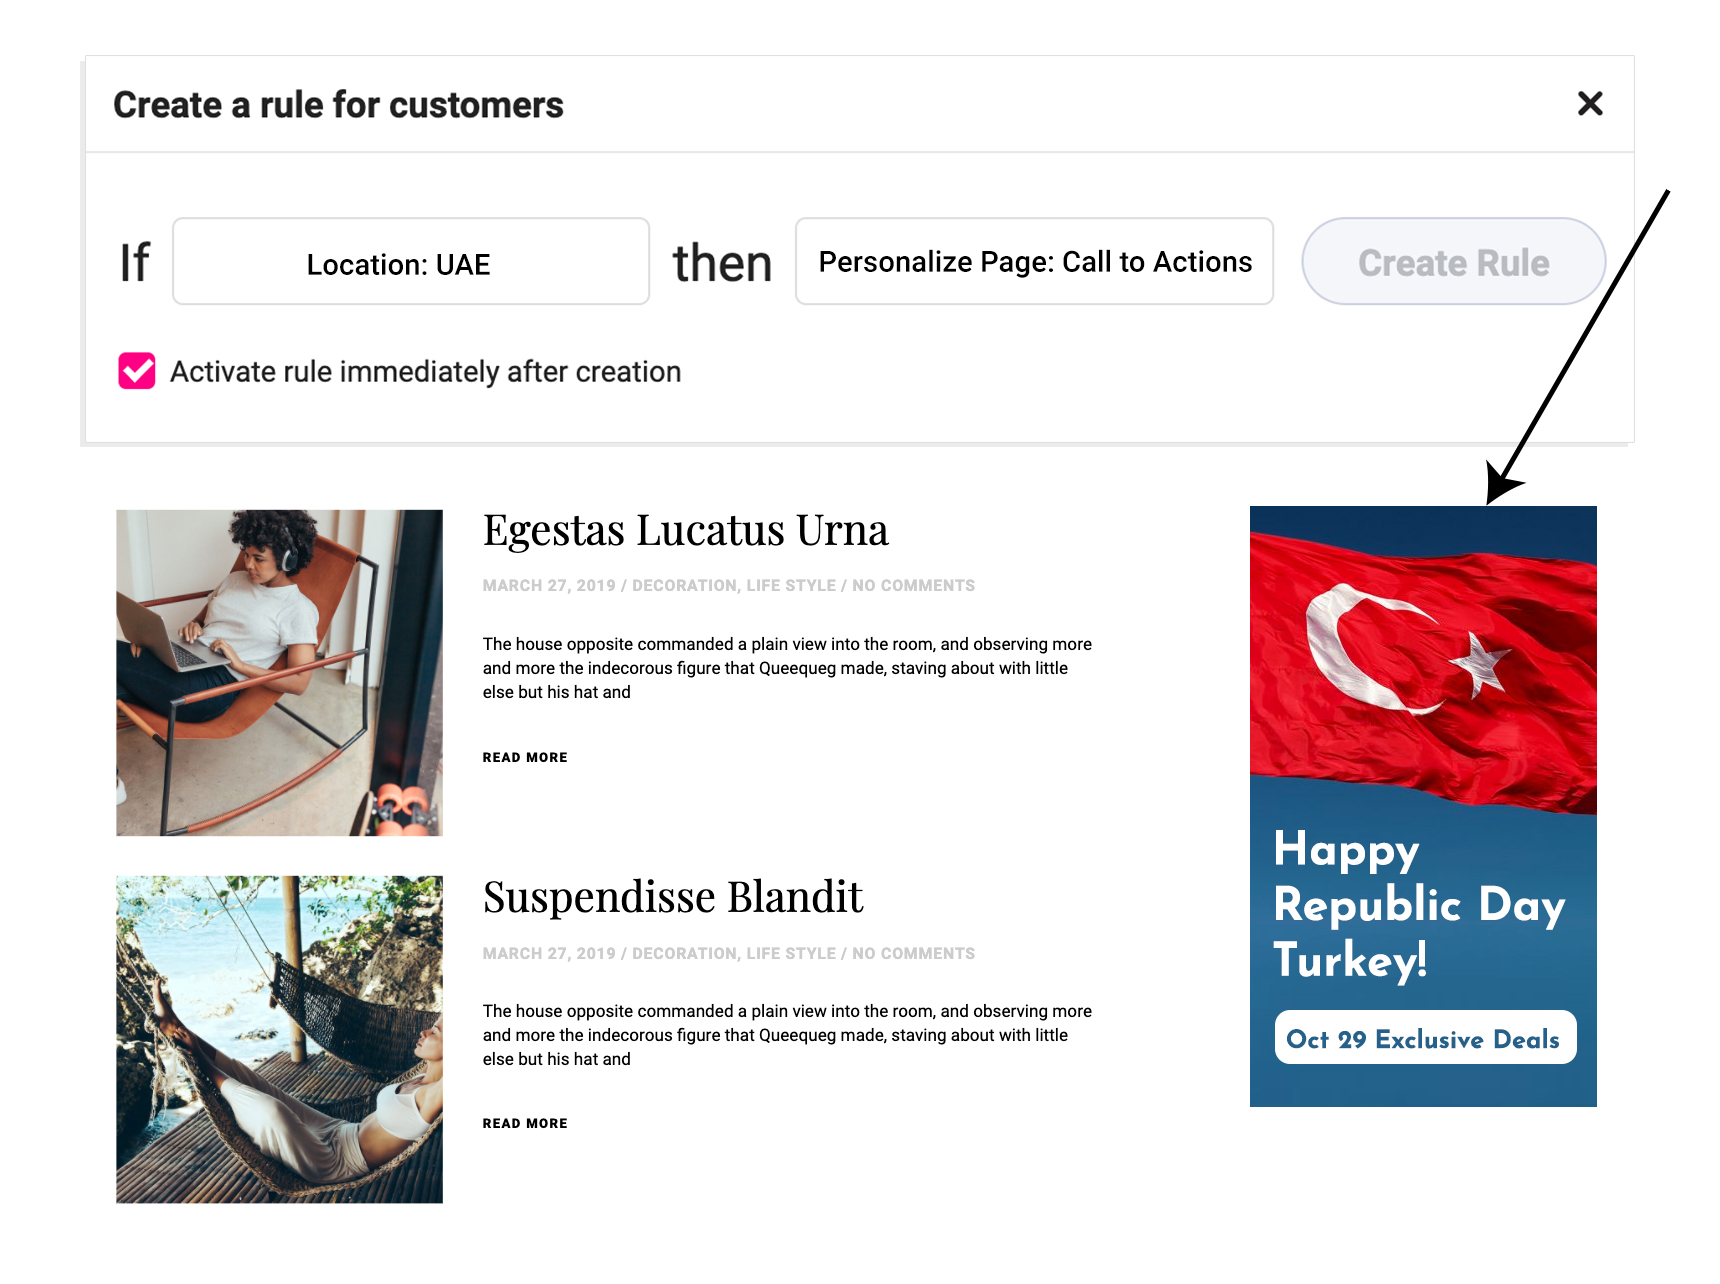
Use Growmatik’s personalizer to build a section on your homepage, which should include the region that will only be displayed to visitors from that specific location.
Display localized in-store popups
Show promotional popups that get sent to visitors from a specific area.

Growmatik’s popup builder allows you to easily make popups or select from one of its templates. Then, all you have to do is connect it with the location condition as an automation rule.
Wrap up
And that’s it. In this post, you learned how to find important location segments by analyzing website funnels and then created automated personalizations to personalize your WordPress website based on location. This will drive more engagements, help better relationships and eventually result in a higher lifetime value with your customer. With Growmatik’s free plan, you can create geolocational personalizations and customize your website for 10,000 visits every month.



No comment yet, add your voice below!