
Ok, the big bald rich man is waiting for me to deliver the website for his chain of hotels in one week – and there’s not much time left. In the first part of this series, we dove into creating a dynamic room listing with room attributes and a nice template that will include those custom attributes, both of which will be filled out by the receptionist. Picking up from where we left off, we’ll create a listing for an archive page in this part as part of building a dynamic hotel website.
As you’ll recall, we created a custom post type for our room called Rooms and then created a listing for it. A listing is an embodiment of the meta fields in a custom post type with a particular design. In the first part, we built the custom post for our rooms and a listing and beautiful design for a single page. The only thing is that the single page is not discoverable by visitors if it’s not inside a post feed. Someone should play with filters on your listing page and find the item they want, click on it and enter the single page for that item.
In order to understand and follow the instructions in this article, make sure to read the first part.
Before proceeding with the tutorial on how to build a dynamic hotel website, don’t forget to check if the following plugins are activated and have the minimum versions below:
- JetEngine plugin v2.1.4
- Jet Elements v2.1.2
- Elementor v2.7.5
- Raven v1.8
- JetSmartFilters v1.5
As you noticed, in addition to what we used in the first part, we need the JetSmartFilters plugin in this part to create the filters we require for our archive listing.
In this tutorial, we’ll cover the following:
- Creating a listing template for our custom post type
- Creating filters for our listing
- Creating a general listing template
1- Create a listing template for our custom post type
So first things first when it comes to building a dynamic hotel website. Just like the listing we built for the single page of our custom post type, we need to create a listing for the listing archive.
- In the WordPress dashboard, go to:
- JetEngine > Listings > Add New
- In the upcoming dialogue, set Listing Source to Posts, Post Type to Rooms and give it a Name such as “rooms-archive” and proceed. You’ll be taken to the Elementor environment to create a design template for the new listing.
- Clicking on the button will create a new listing for your custom post type. In the next step, you’ll be taken to the Elementor environment so you can create a design template for the Rooms archive page.
- Add a box section with 374px width and add 15px bottom padding (0,0,15,0).
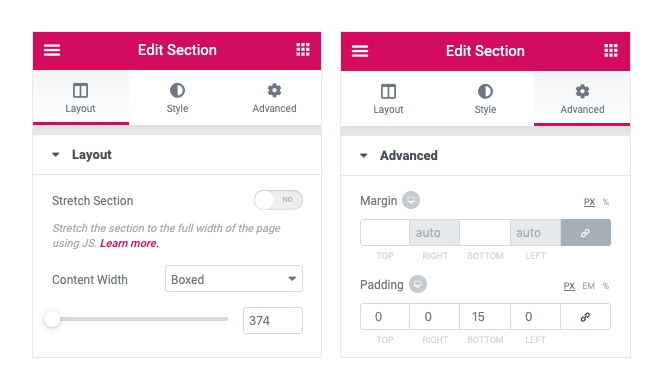
- Right-click on the column. From Styles set the background color as white (#fff) and from Advanced tab set the bottom padding for the column as 25px (0,0,25,0)
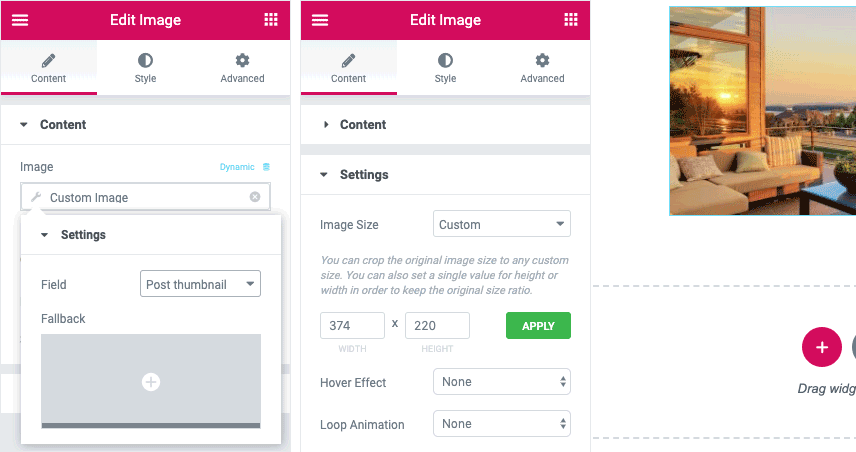
- Add an Image element inside the section (JX image element), set the image source as Dynamic/Custom Image and give it a custom size of 374 x 220 px
- Set a dynamic Image source and choose Field as Post Thumbnail.
- Add a Dynamic Field setting the Source to Post and the Object Field to Title.
- Centralize it and format it as you like. I’ll go with 20px Muli Bold #1d3239.
- Give some space to its top and bottom using 15, 0, 15, 0 padding from the Advanced tab
- Add a Dynamic Field, set the Source to Meta Data and the Meta Field to Beds.
- Centralize it and format it as you like. I’ll go with 16px Muli #636f74.
- Add a Dynamic Field, set the Source to Meta Data and the Meta Field to Price.
- In order to automatically add the $ sign before the price, in the Dynamic Field settings add $%s to the Field Format.
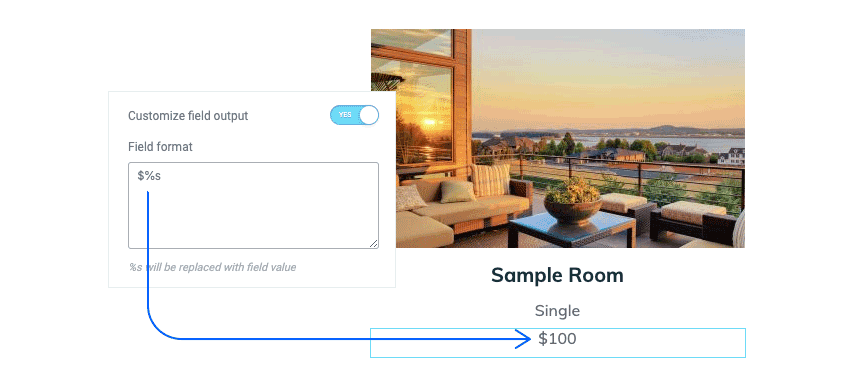
- Style it as you want. I’ll put 20px Muli Bold #006b93.
- Add a 20px Bottom Padding to the price.
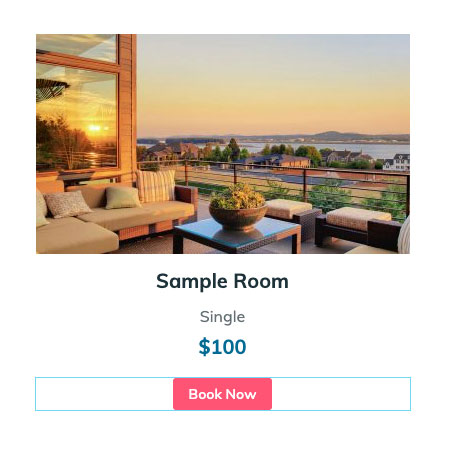
- Add a Dynamic Link element. Set the Source as Permalink. Label it as Book Now and centralize it.
- Format it as 14px Muli #fff and weight 600.
- In Normal state, set a #ff5374 colored background for it with #fff as text color. In Hover state, reverse color by giving #ff5374 as text color and #fff to background color.
- You should define a solid 1px border colored #ff5374, 3px border-radius in all corners and 7, 15,7 ,15 paddings.
In the WordPress dashboard, go to:
- Templates > Saved templates > Add New
- Select Archive as template type and give it a name (Room Archive)
- Add a Listing Grid element to your page. Set the rooms-archive as Listing Source and activate Use as Archive Template option.
- In the WordPress dashboard, go to Jupiter X > Customize > Post Types > Rooms > Rooms Archive and select the page you just saved and then publish the changes.
Ok, what’s next? We just designed how a room custom post type will appear in the listing. Now we need to put this inside a general template for the listing – but before that, let’s create the filters we need for the listing sidebar.
2- Create filters for our listing
Let’s say we need a price range filter and some checkbox filters for our room facilities. With JetSmartFilters v1.5 installed:
- In the WordPress dashboard, go to SmartFilters > Add New
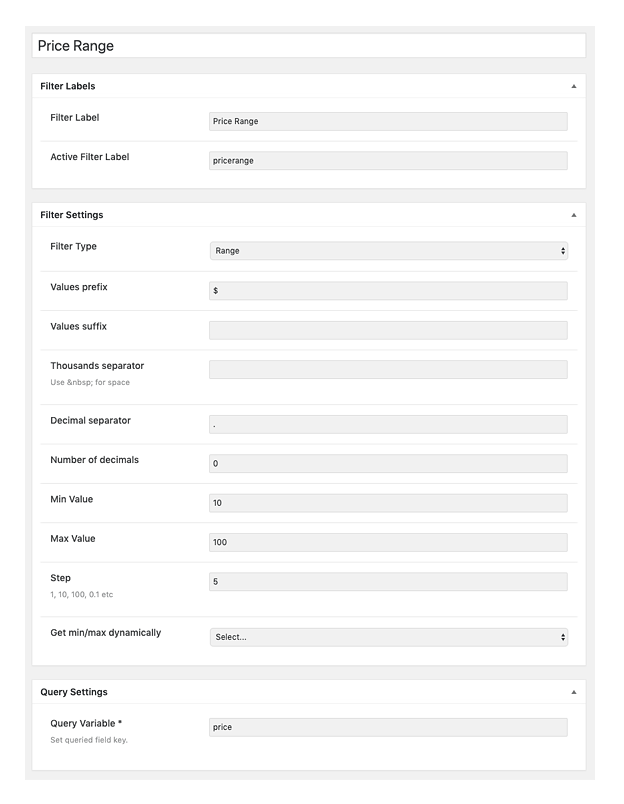
- We’ll give our filter a label and active filter label
- Set the filter type as Range
- Set Value Prefix as $
- Set the Minimum and Maximum Value as you wish (the price range of your rooms)
- Set a Step number. This is the amount added to the selected range everytime the visitor moves the indicator one step. For example, if set to 5, everytime you move the indicator to the right or left, an amount of 5 will be added or deducted to the range.
- And finally give the filter a Query Variable. This query variable will help us connect the filter to its results in the other hand of the listing page.
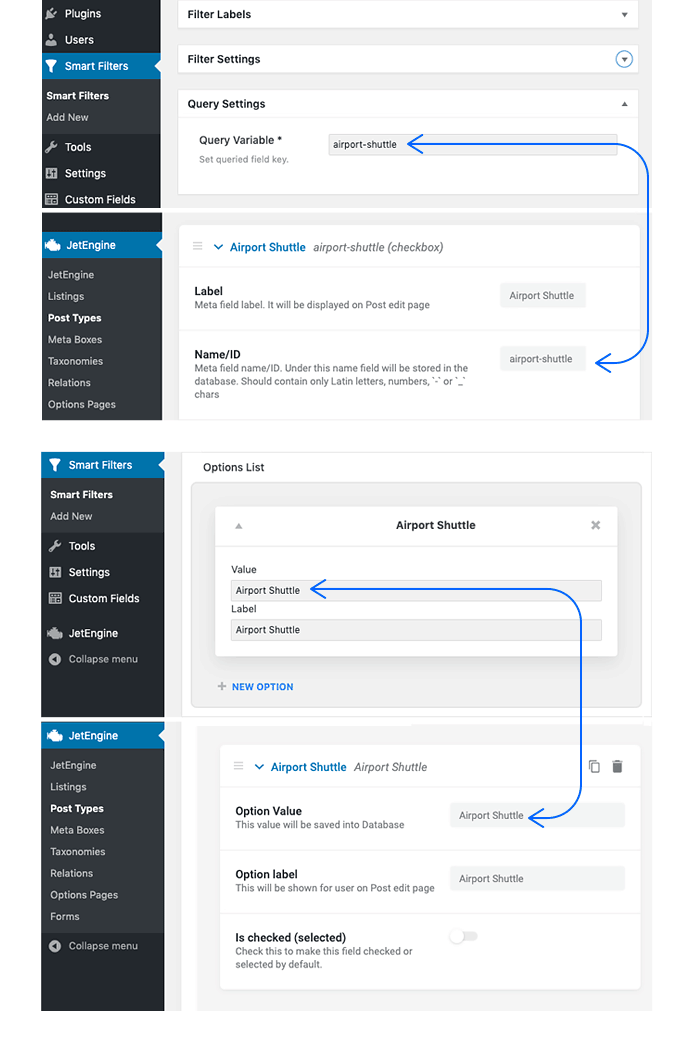
Using the same process, we should create checkbox filters for our room facilities. The only part that will be different is:
- Set the Filter Type as checkbox list and Data Source as manual input.
- Activate the Is Checkbox Meta Field (Jet Engine) to filter data from checkbox meta fields type, created with JetEngine plugin.
- In the Options List Box, add checkbox options for the filter. Each option should have a value and label.

Important: The value for a checkbox option should match with the checkbox value of the custom meta field it relates to. The query variable value should match with the Name/ID of the custom meta field it relates to.
3- Create a general listing template
With the filters created and the template designed for the individual listing, we can design a general template for the listing on our website where users can use the filters in the sidebar to define the room criteria they want and see the results on the other side.
- In the WordPress dashboard, go to Pages > Add New
- From the lower-left corner, click on Elementor settings (gear) icon and select Elementor Full Width as Page Layout.
- Give the main section should have 55, 0, 90, 0 px paddings from the Advanced tab.
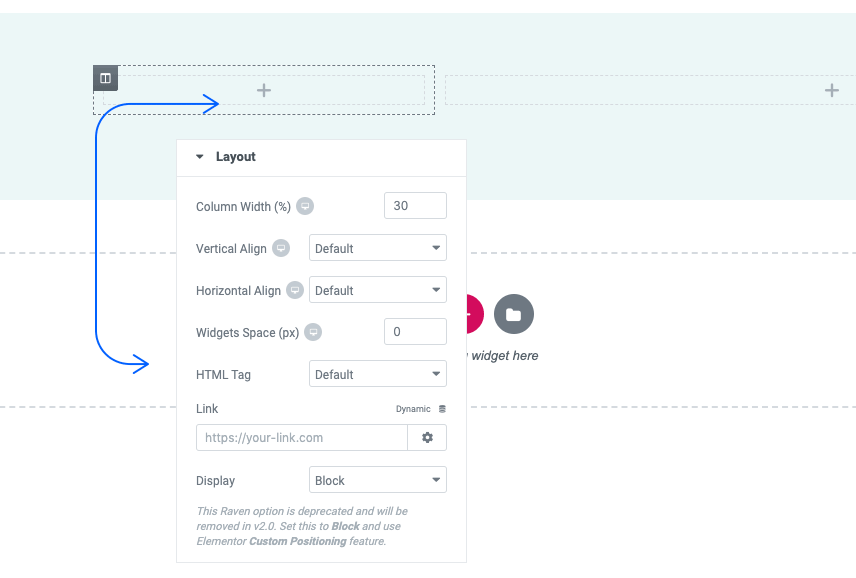
- We need a 30%-70% column pair. The 30% column in the right will contain the filters and the 70% column on the left will carry the filter results.
- Apply 0px Widget Space to the left column.
- From the Style tab, add a white background color to the column.
- From the Border section, add a 6px radius to all corners of the column.
- From the Advanced tab, add margins 5, 0, 580, 25 px and paddings 30, 32, 30, 32 px
- For the right column, from the Advanced tab, add 0, 0, 0, 25px paddings to it.
- Add a JX Heading element to the left column and edit it to Filter Listing.
- Format the heading as you like. We’ll input Muli Bold 24px colored with #006b93.
- From the Advanced tab, give it a 35px bottom-padding to it.
- Add another Heading element and edit it for the price and format as you like. We’ll go with Muli 20 Bold colored #1D3239.
- Give the second heading a 25px bottom-padding
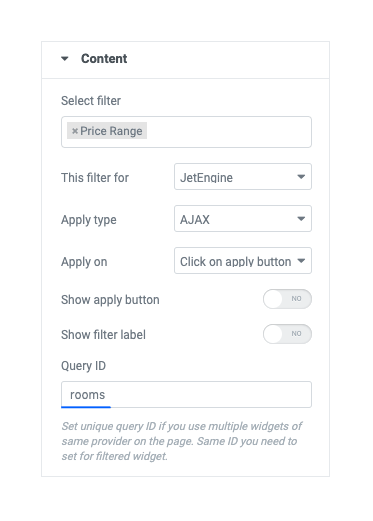
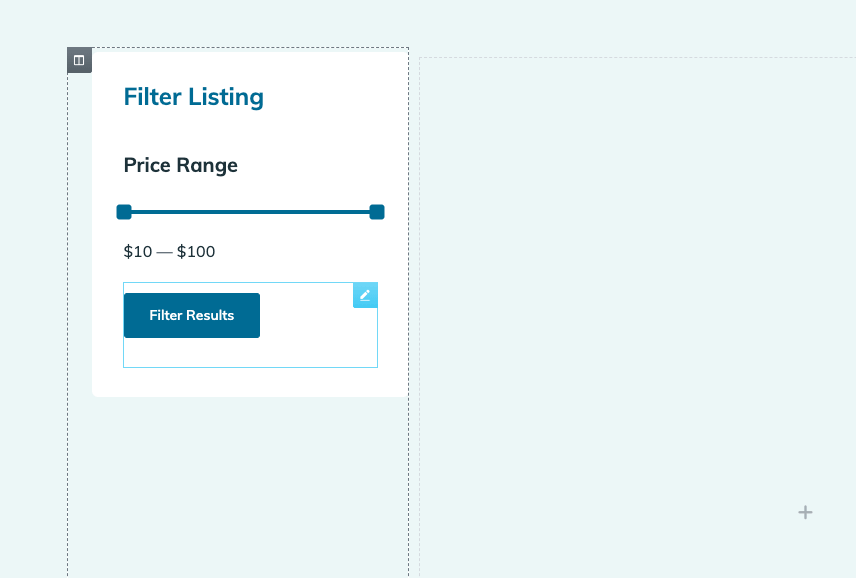
- Add a Range Filter element to the left column.
- Select Price Range as Filter and set JetEngine for This Filter For
- Apply On should be set on Click on apply button.
- Query ID should be set to Rooms.
- On the Styling tab, set the color to #EBF7F7 and Border Radius to 2 in all corners.
- Set the background color as Range Point. We’ll go with #006B93 and a Border Radius of 3px to all corners.
- In the Value section, format the text for value. We’ll go ahead and put Muli 16 #1D3239 with the top top-padding of 25px.
- From the Advanced tab, give the range filter a 20px bottom-padding.
- What’s left in this section of filters is a Filter Results button. Drag an Apply Button element below the price indicator.
- Set its query ID as Rooms and style it as you like.
- In the Style tab, for the Normal state button, we’ll go with a Mul 14px weight 600 with #fff as the color and #006b93 as the background color, a solid border of 1px with #006b93 color, a border-radius of 3px and a padding of 11, 25, 11, 25 px. For its Hover state, we’ll swap the color and background colors.
- Finally, in the Advanced tab, give the button a 30px bottom-padding.
This should be what you have built so far:
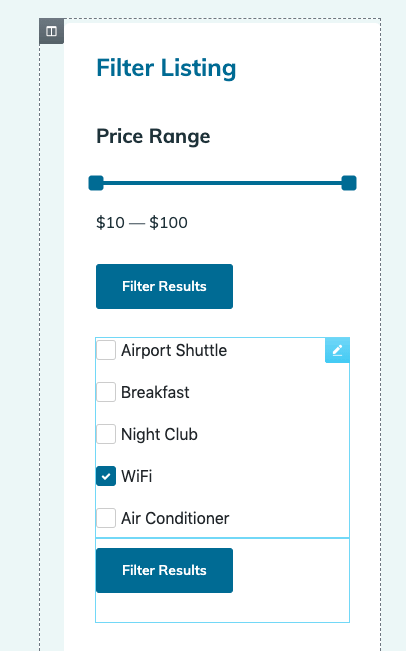
Ok, let’s move onto the next section of filter options: Facilities.
- Drag the Checkbox Filters element below the Filter button.
- Select the filters as needed.
- This filter for should be set as JetEngine. Apply Type is Ajax. Apply On is Click on Apply Button.
- Query ID should be set to hotels.
- In the Style tab, set 10 for both Space Between and Children Offset.
- Set the Checkbox size to 20px. Set the background color to any color such as #EBF7F7. Set #006B93 for its Hover background color. Give it a Solid border with 3px border-radius for all corners.
- Set a #EBF7F7 background color for the Checkbox icon and set its size to 10.
- Set #636F74 as background color for the Checkbox label.
Now let’s add an apply button to the checkboxes as well. Just duplicate the button we created above for price range and drag it down below the checkboxes.
Ok, what we’re going to do for the right column is to simply put a Listing Grid element.
- Set Listing to Rooms-archive and the Column Number to 2.
- In the Advanced tab, set the CSS ID to rooms. This will connect our listing grid to the filters on the left side.
And that’s it. We just created the listing page that holds the listing filters and the results. Give it a try and see how the filters set on the left side will result in the items on the right hand.
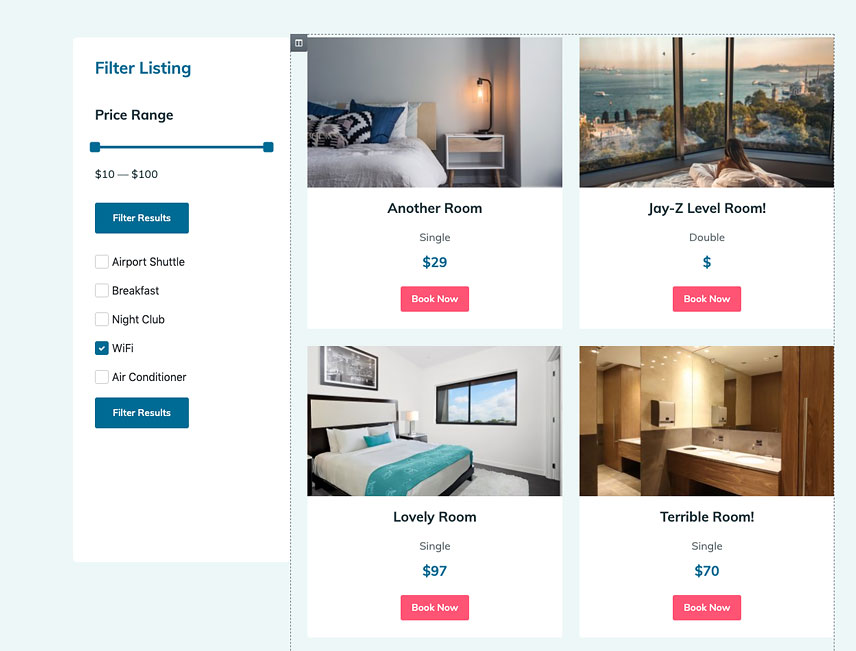
In the following episodes of this Crash Course, we’ll cover how to add a price calculator and booking module to the lower right corner of this template – as well as everything else remaining before we can deliver the hotel website to the Wolf of Wall Street!
Do make sure to watch the tutorial video alongside this post to better understand the process and ask any questions below in the comment section. Keep an eye out for the upcoming episode on how to build a dynamic hotel website.

No comment yet, add your voice below!