Working in a support team I often see requests from our clients about the vertical menu in Jupiter X. That’s why I decided to write this article and answer the most common questions regarding the topic. A menu is one of the most important parts in web design and has a fundamental role in helping visitors navigate a website. From the term vertical menu, it is clear that I’m referring to one where menu items are displayed vertically one below the other, in contrast to the classic version of the horizontal menu.
In Jupiter X there are several different types of menus available that can be classified as vertical. These include:
- Side menu
- Full Screen menu
- Vertical menu
- Vertical Mega menu
The first two types also can be called a “burger” menu and can be applied for mobile, tablet and desktop screen sizes. Let’s take a closer look at the process of creating the listed types of vertical menus in Jupiter X.
Side Menu
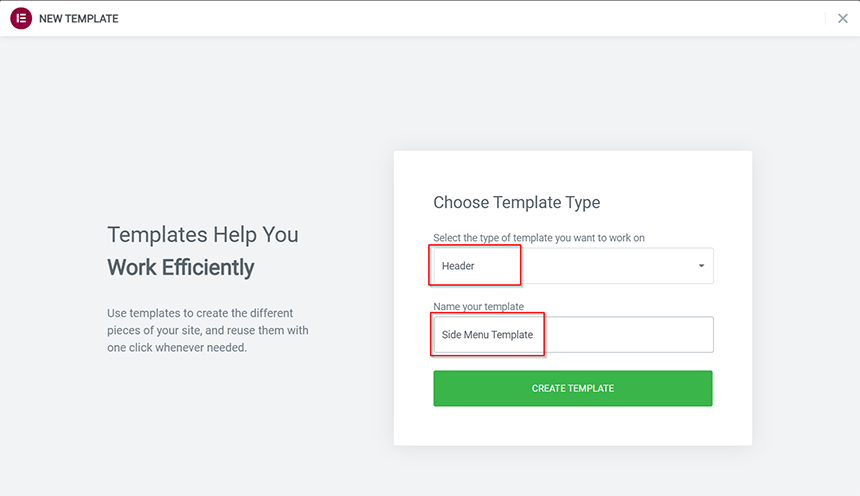
First of all we need to create a custom header template. To do this in WP Dashboard navigate to Templates > Add New. In the popup window, choose the template type as Header, name your template and click the Create Template button (more detailed information about creating custom header templates in Jupiter X can be found in this article).
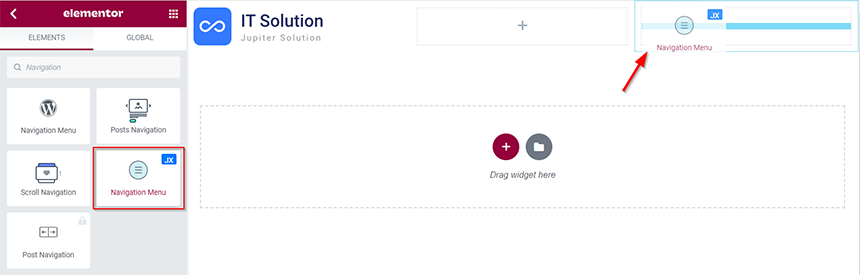
In the Elementor editor, find the Navigation Menu widget and add it to your template by dragging the element.
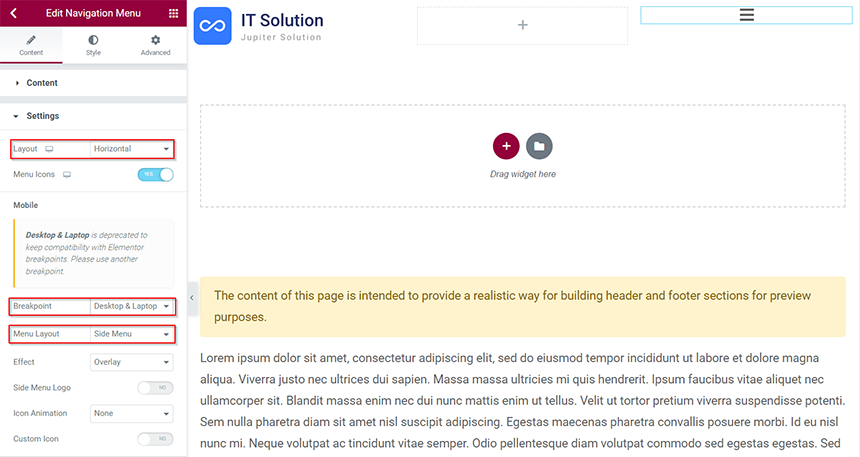
By doing this, the widget’s settings will appear on the left side. Open the Settings section in the Content tab and select Side Menu for the Menu Layout option. Also, choose the Breakpoint (Desktop & Laptop, Tablet, Mobile) specifying on which screen size the menu icon will be displayed. Make sure to leave the Layout option as Horizontal, otherwise the described options won’t be available.
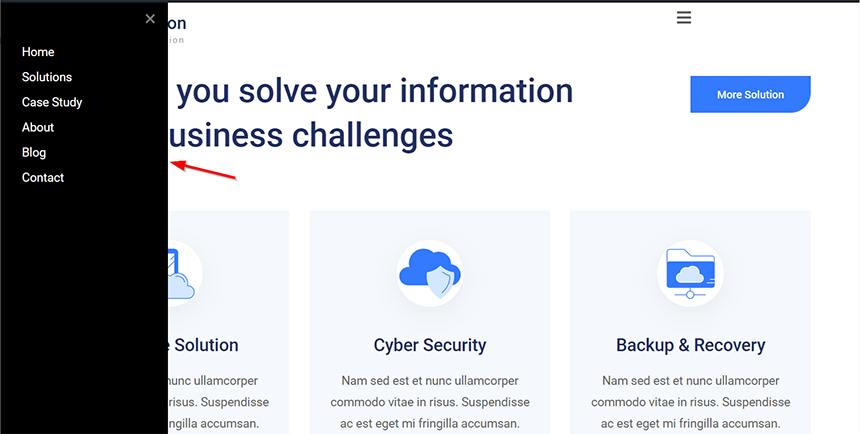
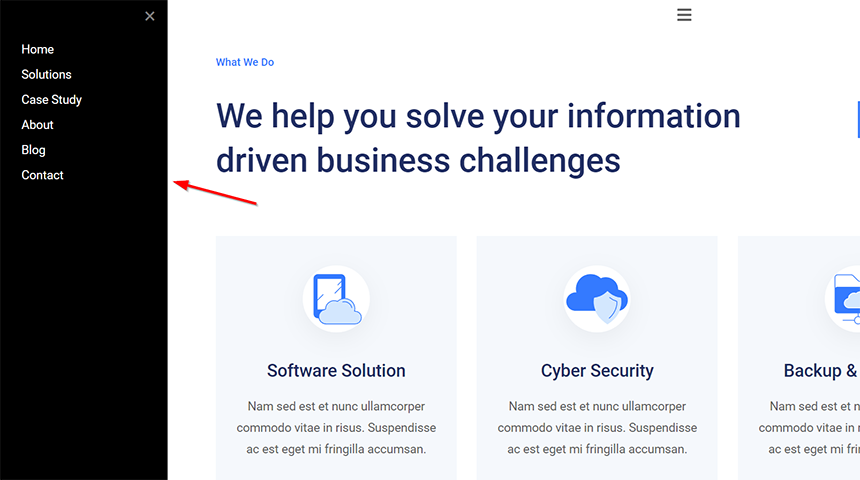
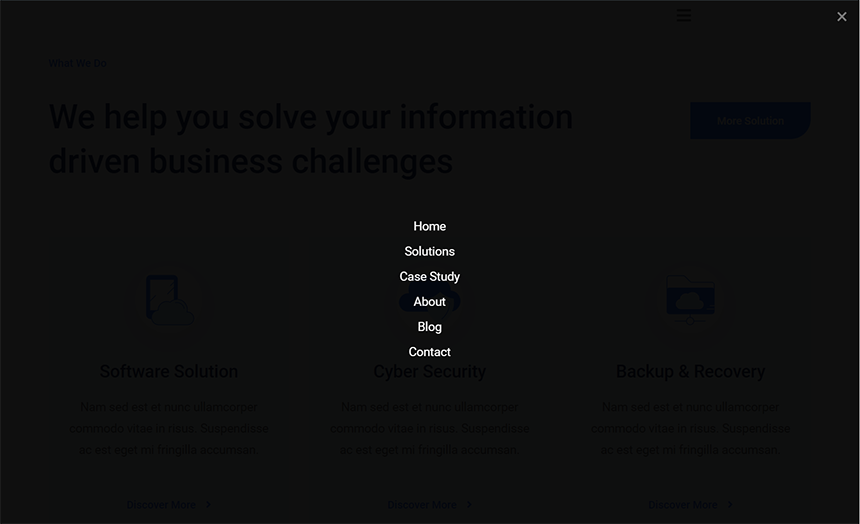
The Side Menu layout has two display effects when the menu icon is clicked: Overlay and Push.
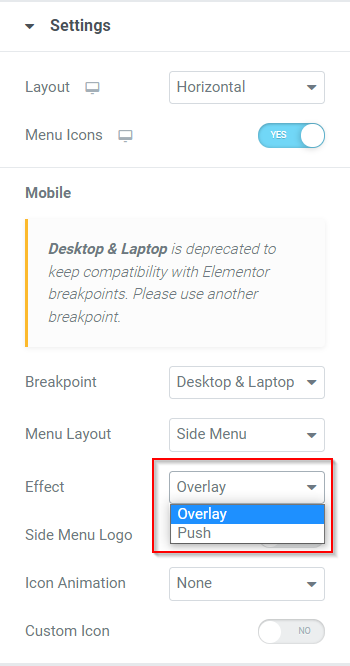
When the Overlay effect type is selected, the menu container will overlay the site’s content.
As for the Push effect, the site’s content will be shifted to the right by the menu container.
Full Screen Menu
The Navigation Menu widget has another type of menu layout in the Settings called Full Screen, which can be categorized as a vertical menu in Jupiter X. This menu layout can be selected in the same Settings section of the Navigation Menu widget, as described in the section on Side Menus.
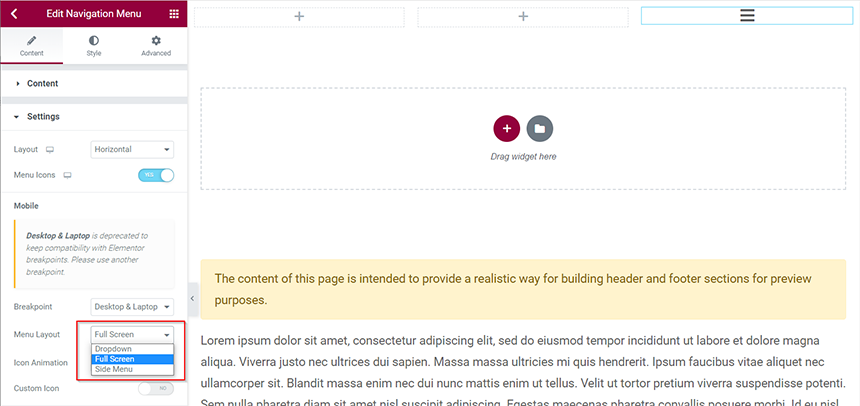
This menu type will display the full screen overlay background and the list of menu items in the center.
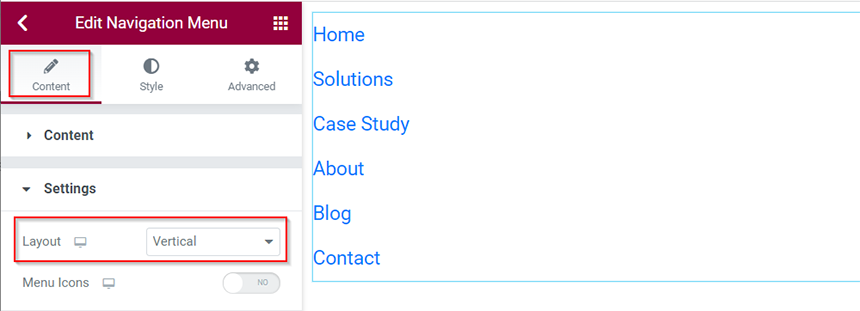
Vertical Menu
In the classical sense, the Vertical Menu, which is always displayed on the right or left side of the screen, is available in the Navigation Menu widget as well. After adding the widget, select the Vertical layout in the Settings section of the Content tab.
Vertical Mega Menu
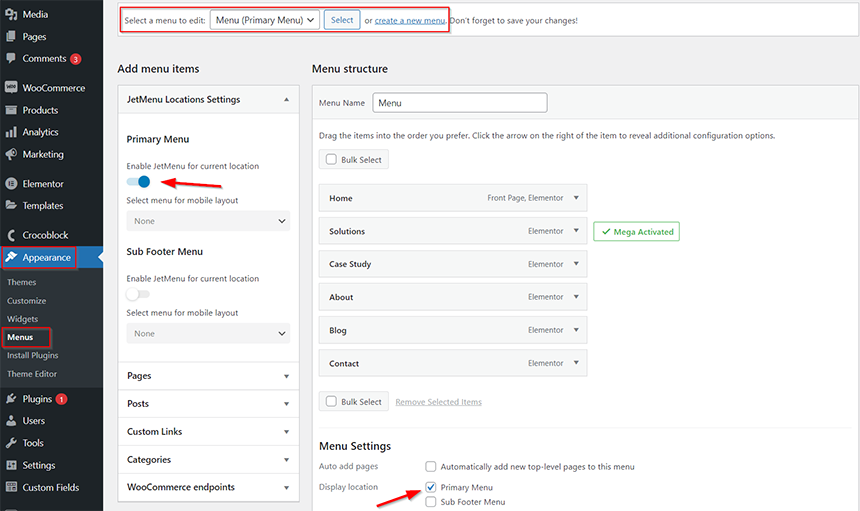
All the 3 previously mentioned types of vertical menus are available in the Jupiter X Navigation Menu widget. The Vertical Mega Menu can be created using the JetMenu plugin, which is bundled with the theme and can be installed via the Jupiter X > Control Panel > Plugins > Optional Plugins section. After installing the plugin, go to WP Dashboard > Appearance > Menus, select a menu to edit or create a new one, then choose the Display Location and turn on Enable JetMenu for this location.
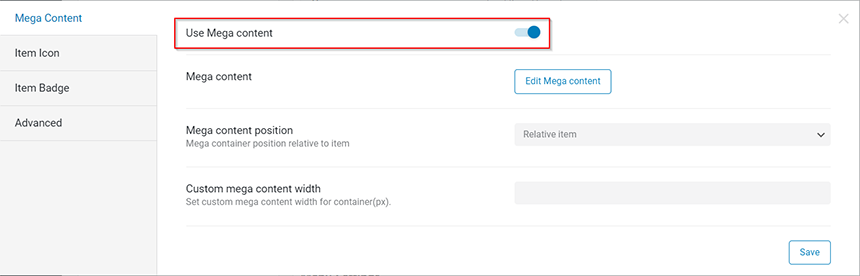
After that, choose the menu item to which you want to apply mega menu content and open the settings by clicking the Settings button.
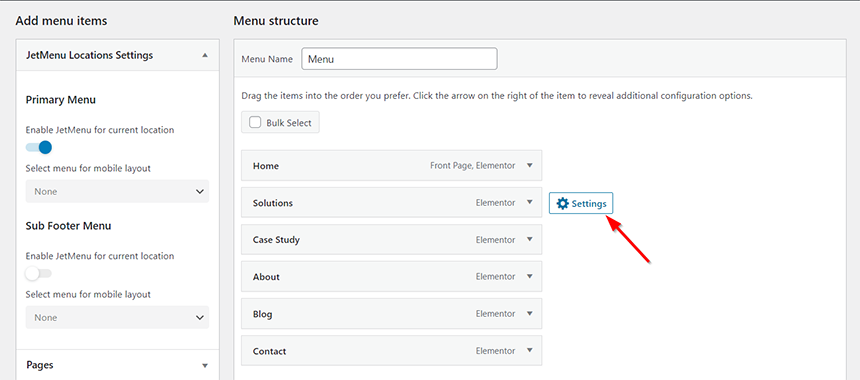
In the popup window, enable the Use Mega content option in the Mega Content tab and save changes. When it’s done you can start creating the mega menu content by clicking the Edit Mega content button.
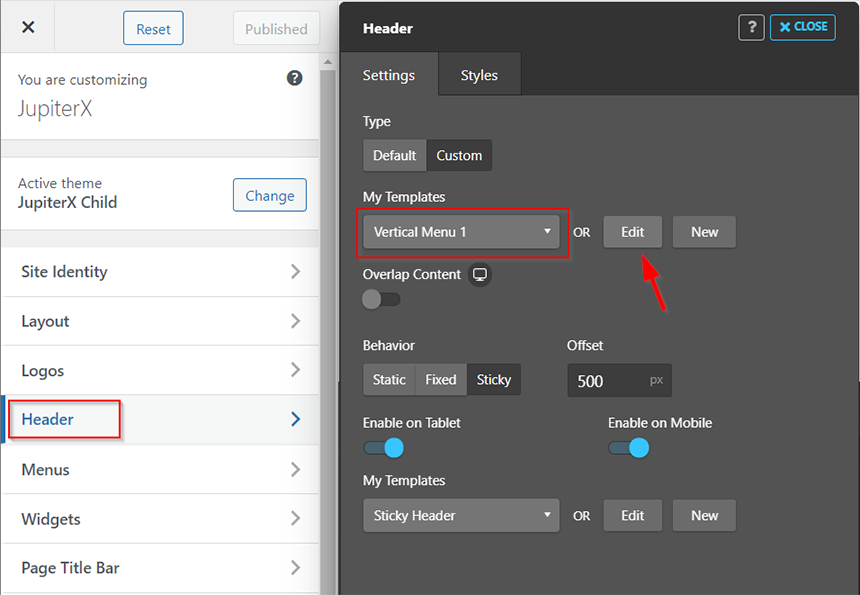
After you created the mega menu content, open your header template to edit by navigating to it in WP Dashboard > Jupiter X > Theme Styles > Header.
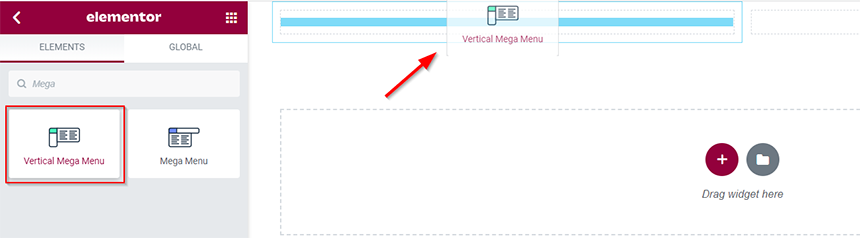
In the Elementor editor, search for the Vertical Mega Menu widget and drag it to your template.
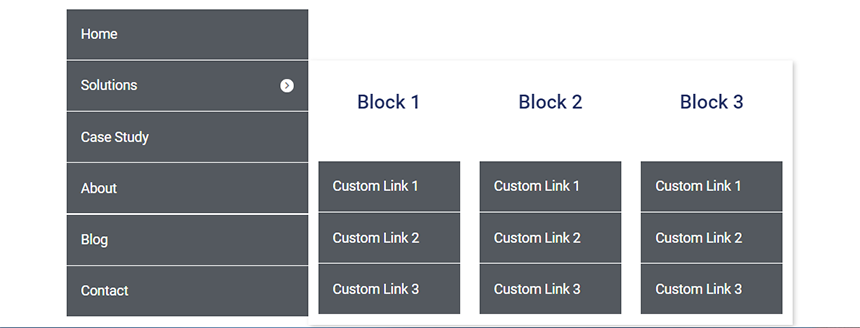
In the widget settings, choose the menu you want to display in the Content > Menu section and then select the Sub Menu Position, which determines the side where the mega menu submenu content you created before will be displayed (right side in our case), and the animation effect in the Settings section.

When all the settings are done, click the Update button and check the menu in the frontend of the site.
Conclusion
In the article we reviewed four types of vertical menus which are available in Jupiter X. Three of them can be created with the help of the Navigation Menu widget: Side Menu, Full Width Menu and Vertical Menu. The last option, called Vertical Mega Menu, is available from the JetMenu plugin. JetMenu is a theme bundled plugin and can be installed via the Jupiter X control panel without additional payment. All of the described menus have different features and settings, and after reading this article you can decide which type of a vertical menu in Jupiter X is the most suitable for your website.

No comment yet, add your voice below!