
If you’re running an ecommerce website, one of the main goals you should have is to increase revenue gained from existing customers. In fact, some studies say it costs up to 7 times more to sell to new customers than current ones. Besides setting up a simple and fast checkout, which is a must for any website that we’re going to talk about in detail in upcoming weeks, techniques that increase average order value and amount are essential for any WooCommerce checkout optimization strategy these days.
In this post, we want to outline some key optimization techniques and how to implement them in your WooCommerce store.
Upselling, suggesting an item via order bump and displaying engaging offers like free shipping or discounts for a higher cart value are some proven methods to increase order size during checkout. However, WooCommerce itself doesn’t offer these solutions, meaning that to have all of them you have to spend a good amount of money. Fortunately, Jupiter X2 offers all of them for free for its users. If you are interested in why we don’t charge for these features check out Why We Built Jupiter X2 from our CEO.
Now let’s dive into the details of some key WooCommerce checkout optimization strategies with Jupiter X2:
- Suggesting highly targeted order bumps
- Offering personalized upsell right before payment
- Displaying smart notices during checkout to trigger bigger sales
- Final words
1. Suggest Highly Targeted Order Bumps
A lot of hard work and sometimes money is required to bring a user for a product or service to your website and to keep your website afloat in this competitive ecommerce market. Your prices should be competitive as well. Wouldn’t you opt to save money and expand your profit margin if you could sell visitors an additional product while they are shopping on your website? Of course you would! A small increase in AOV can have a big impact on your profit margin, which is why you see chewing gum, drinks and chocolate near the checkout at supermarkets. But how can we do that in our WooCommerce store? The answer is an order bump.
What Is An Order Bump?
An order bump is a type of a cross-sell offer displayed in a recognizable box on the checkout page with a checkbox that bumps the value of the customer’s order when selected. Generally, the product that is offered via order bump complements the original product and can be bought on impulse; for example, offering a lens cleaner when the original item is a camera.
Tips on Making Your Order Bumps More Effective
It’s a good practice to apply a special discount or a one-time offer to your order bump to increase the chances the buyer adds it to their cart. Here are some ideas to get started with order bumps:
- Complementary product: Suggesting a product that adds something to the original item, like offering a mouse when a laptop is the original product, increases the chance of selling it.
- Extend maintenance or support service: If you are offering something that needs support service, the order bump of the checkout page can be a very good place to offer this service.
- Exclusive delivery: Users like to see an option that delivers their products in a careful and exclusive way, especially for fragile products.
- Protection or warranties: For expensive products like some home appliances or electronic devices, you have a higher chance of selling extra protection and warranties in one-click order bumps.
How to Create an Order Bump in Jupiter X2
Jupiter X2 allows you to create and edit your order bumps in a powerful yet simple way. Let’s discuss the process in detail.
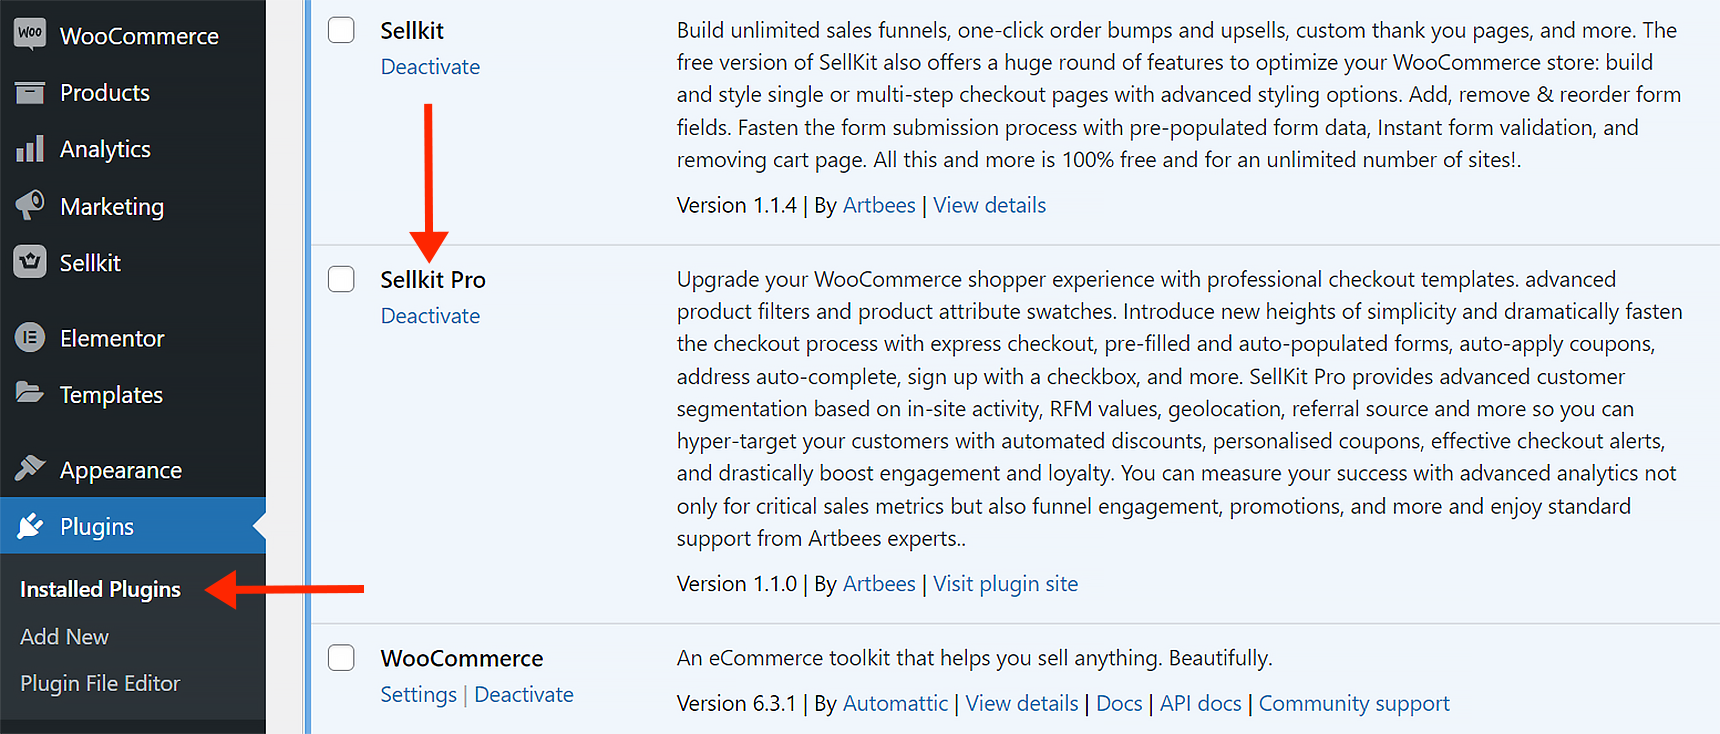
First, make sure your Artbees SellKit plugin is installed and active via WP dashboard > Plugins. If you can’t find it there, you can find it on WP dashboard > Jupiter X > Bundled Plugins > Optional Plugins. This plugin is included in your Jupiter X license for free.
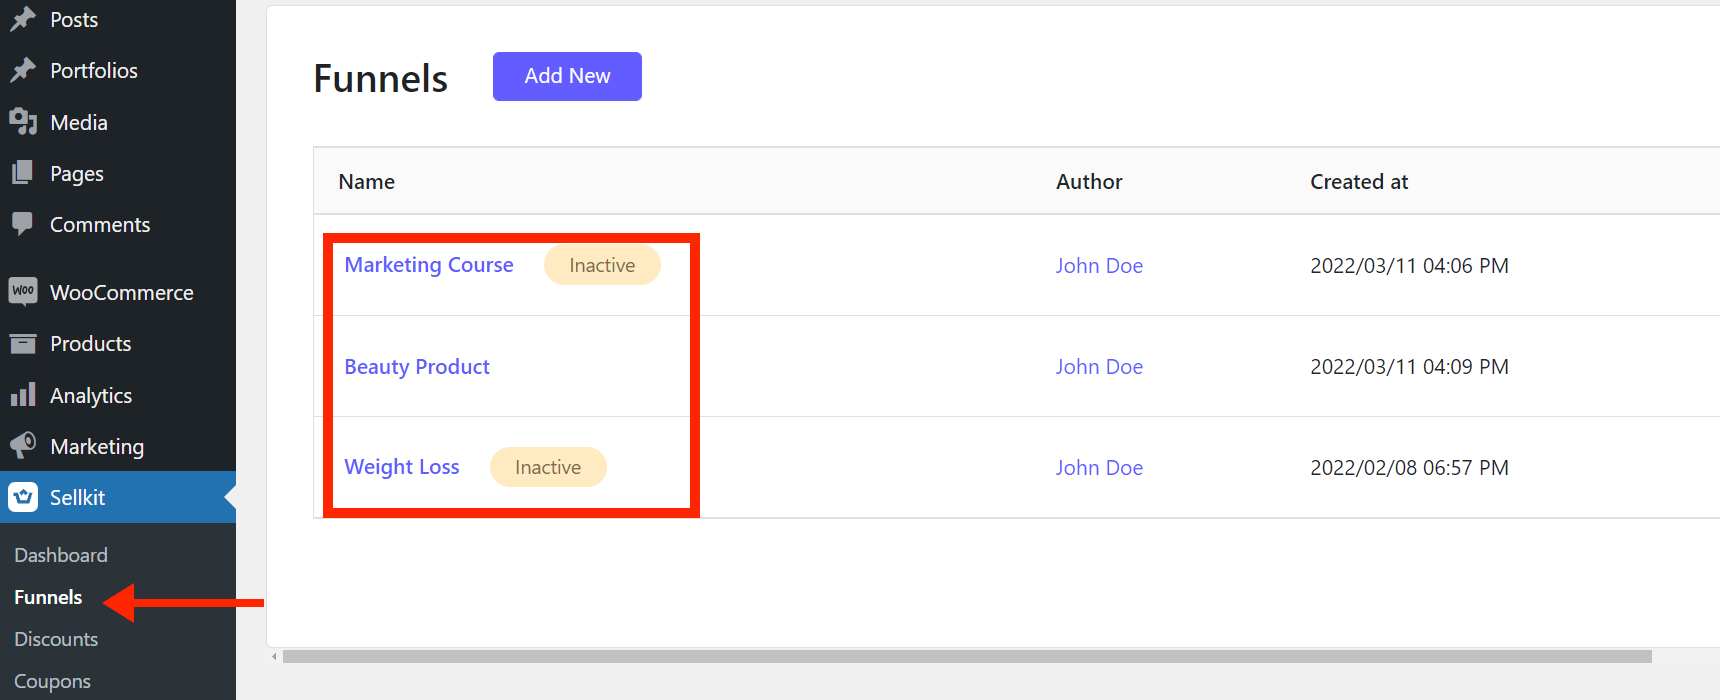
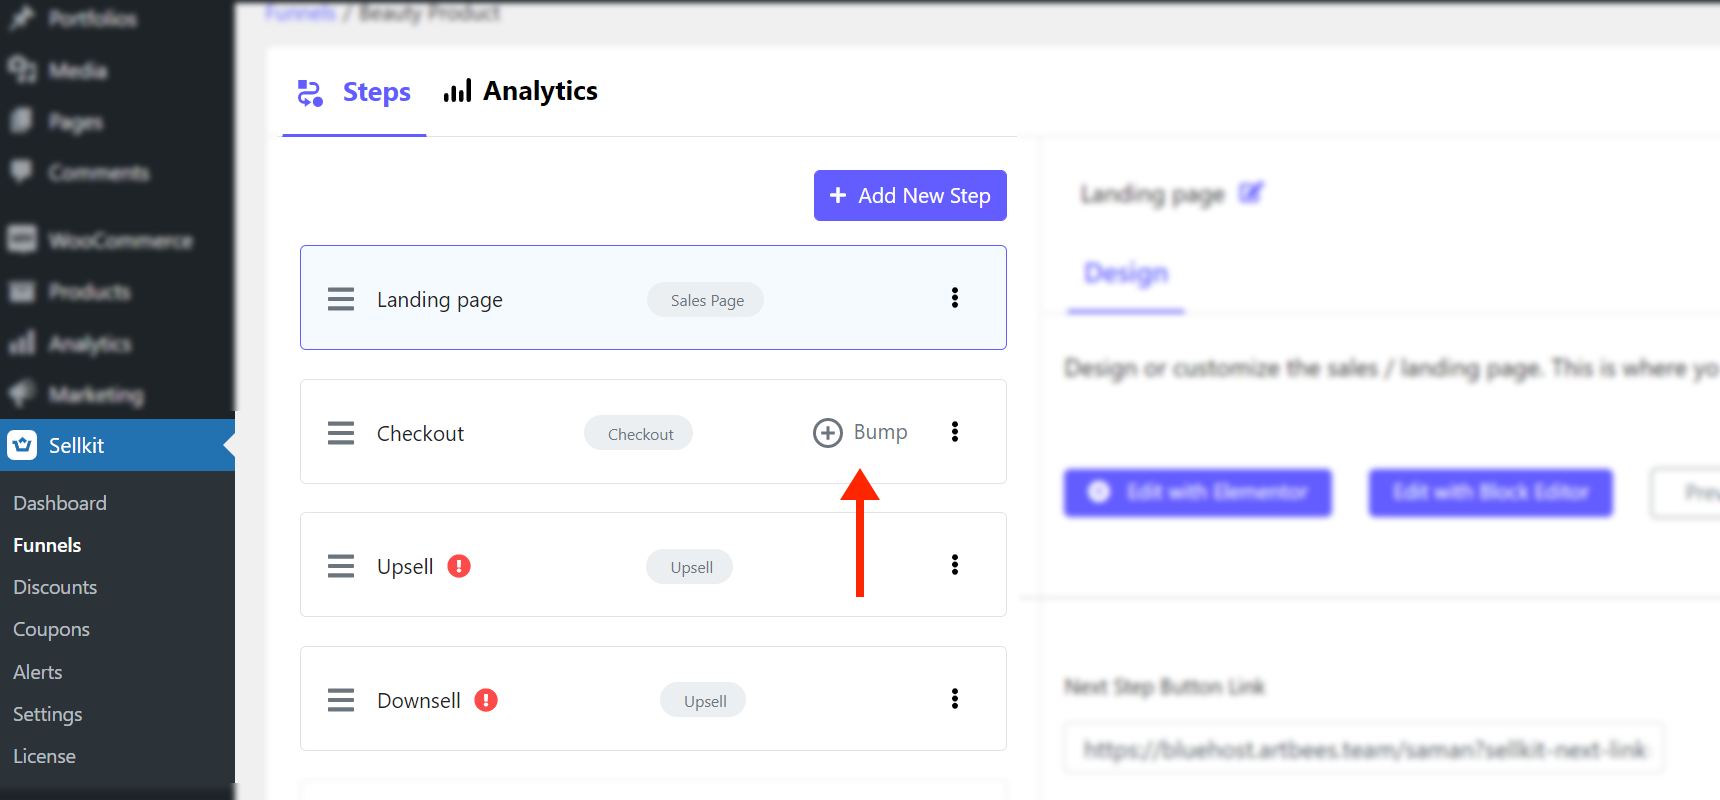
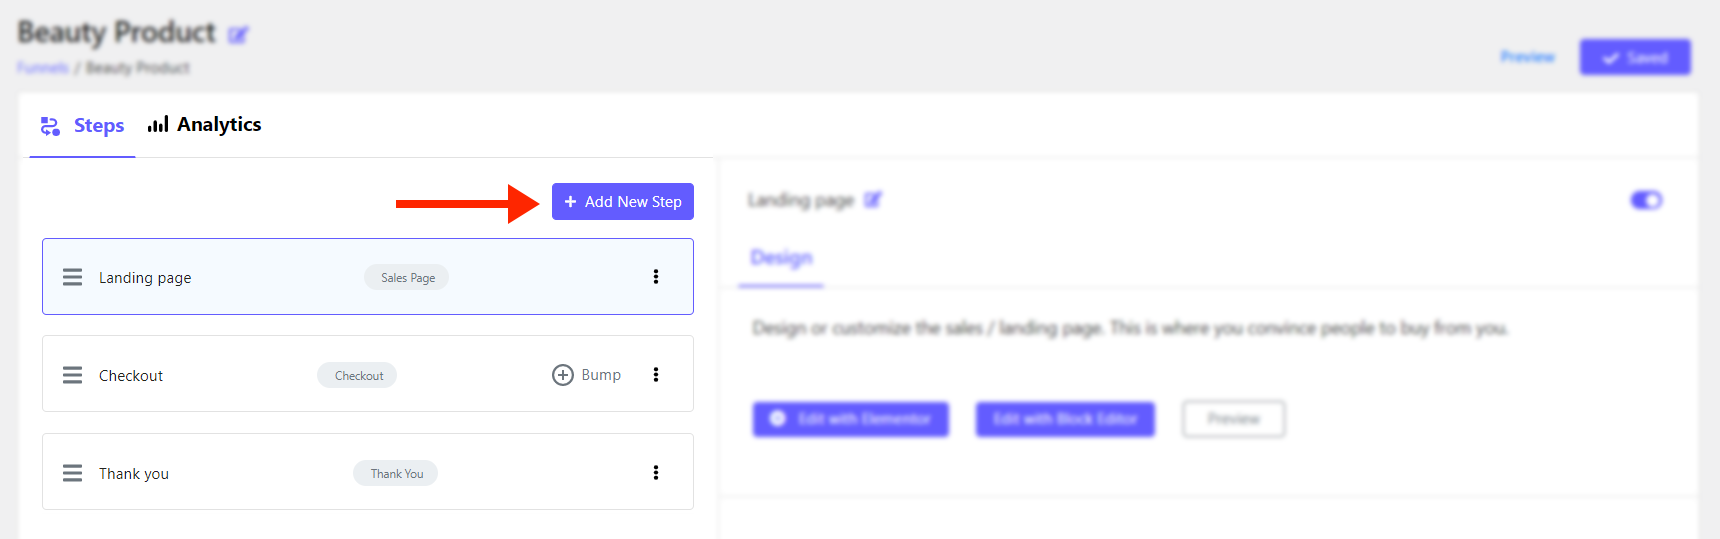
From the WP dashboard go to SellKit > Funnels and click on the funnel you want to add order bump to.
Then, click on the + Order Bump on the checkout step of the funnel.
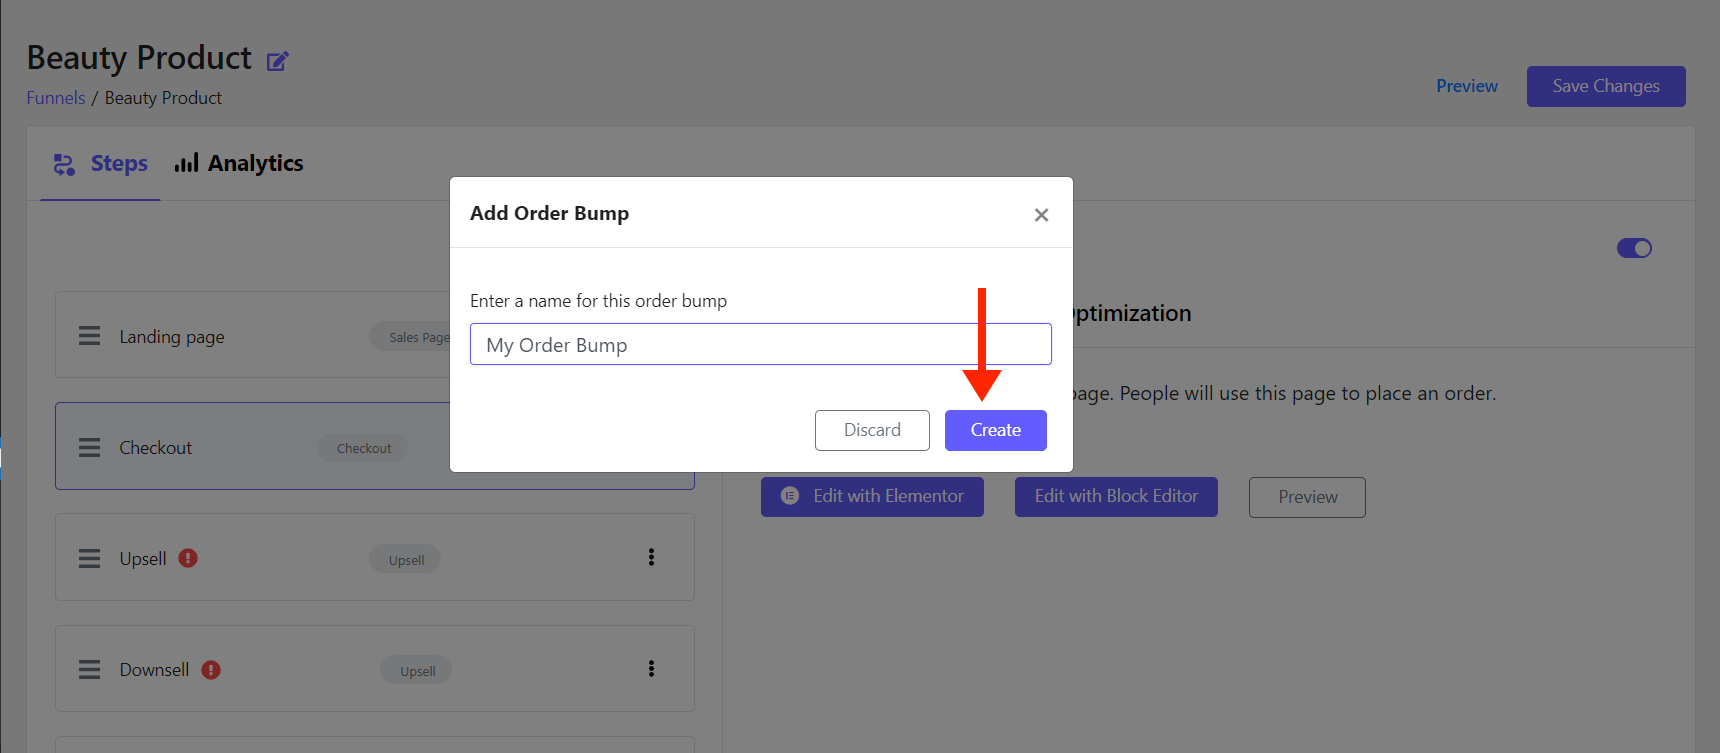
Next, give a name to your order bump and click on the Create button.
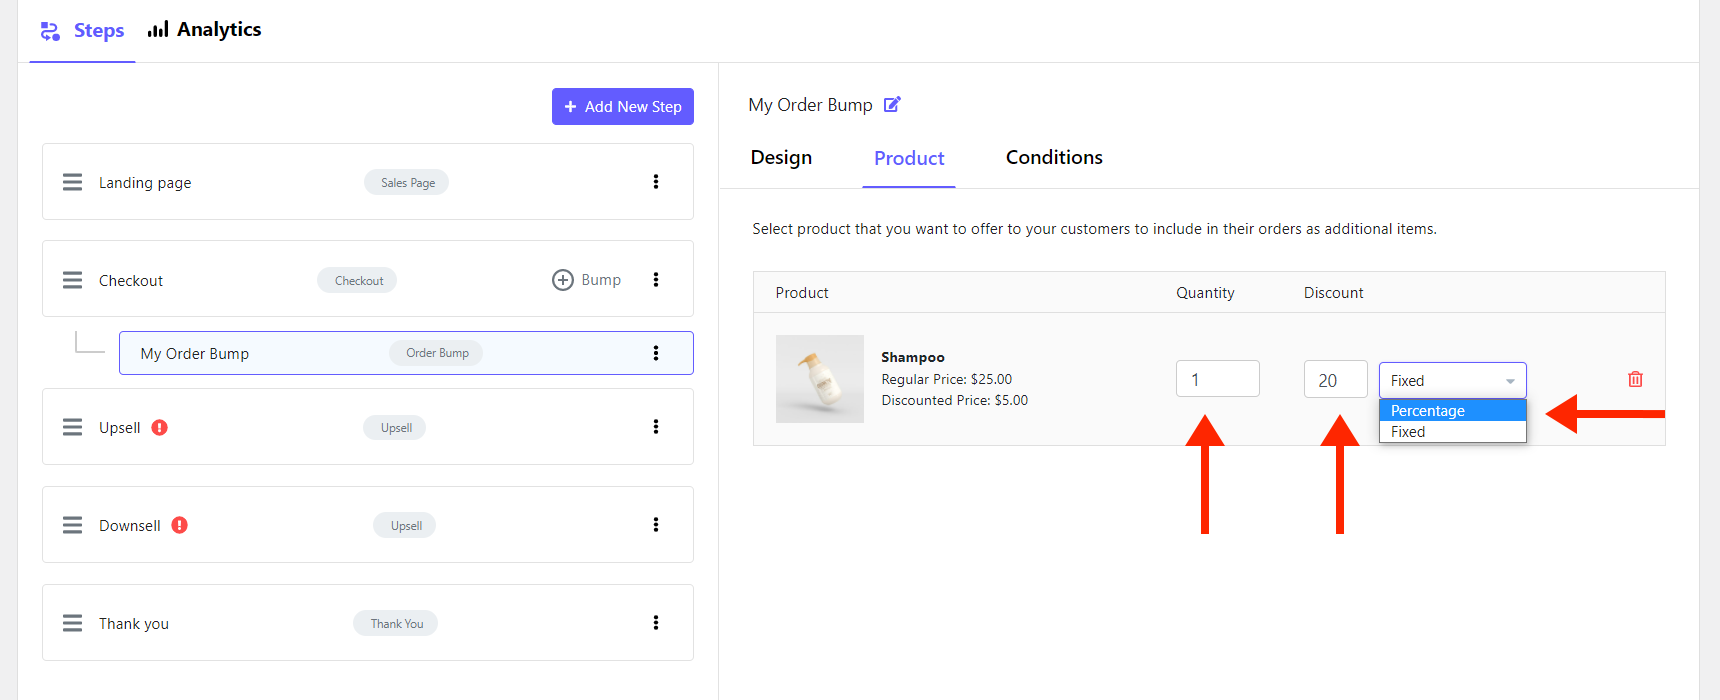
From the Product tab, choose a product to add to your order bump.
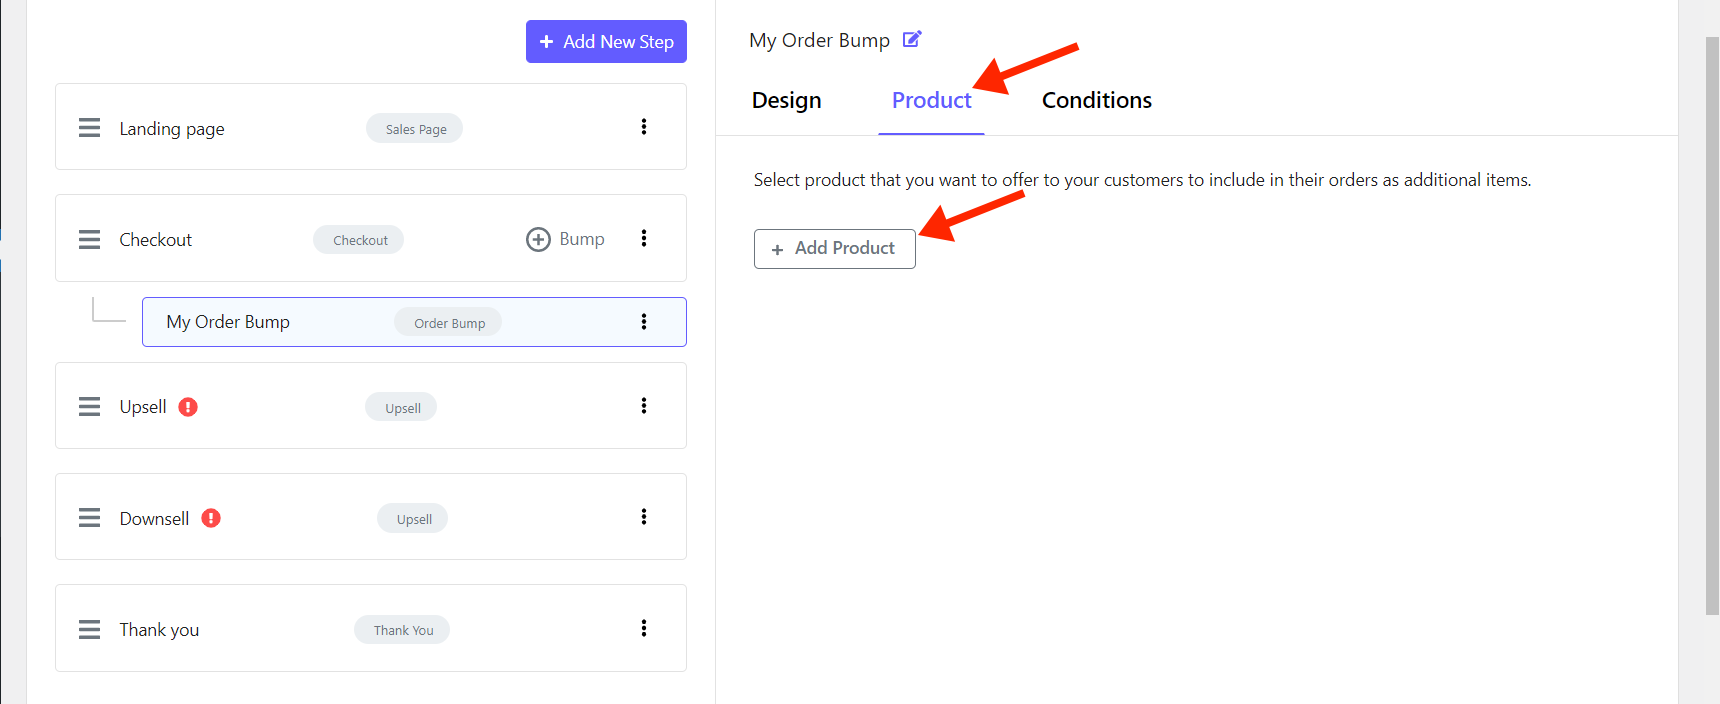
Tip: Try to choose a product that complements the existing offer and is cheaper than it, e.g. if the original product is a set of scissors for cutting hair, shampoo would be a good item for your order bump.
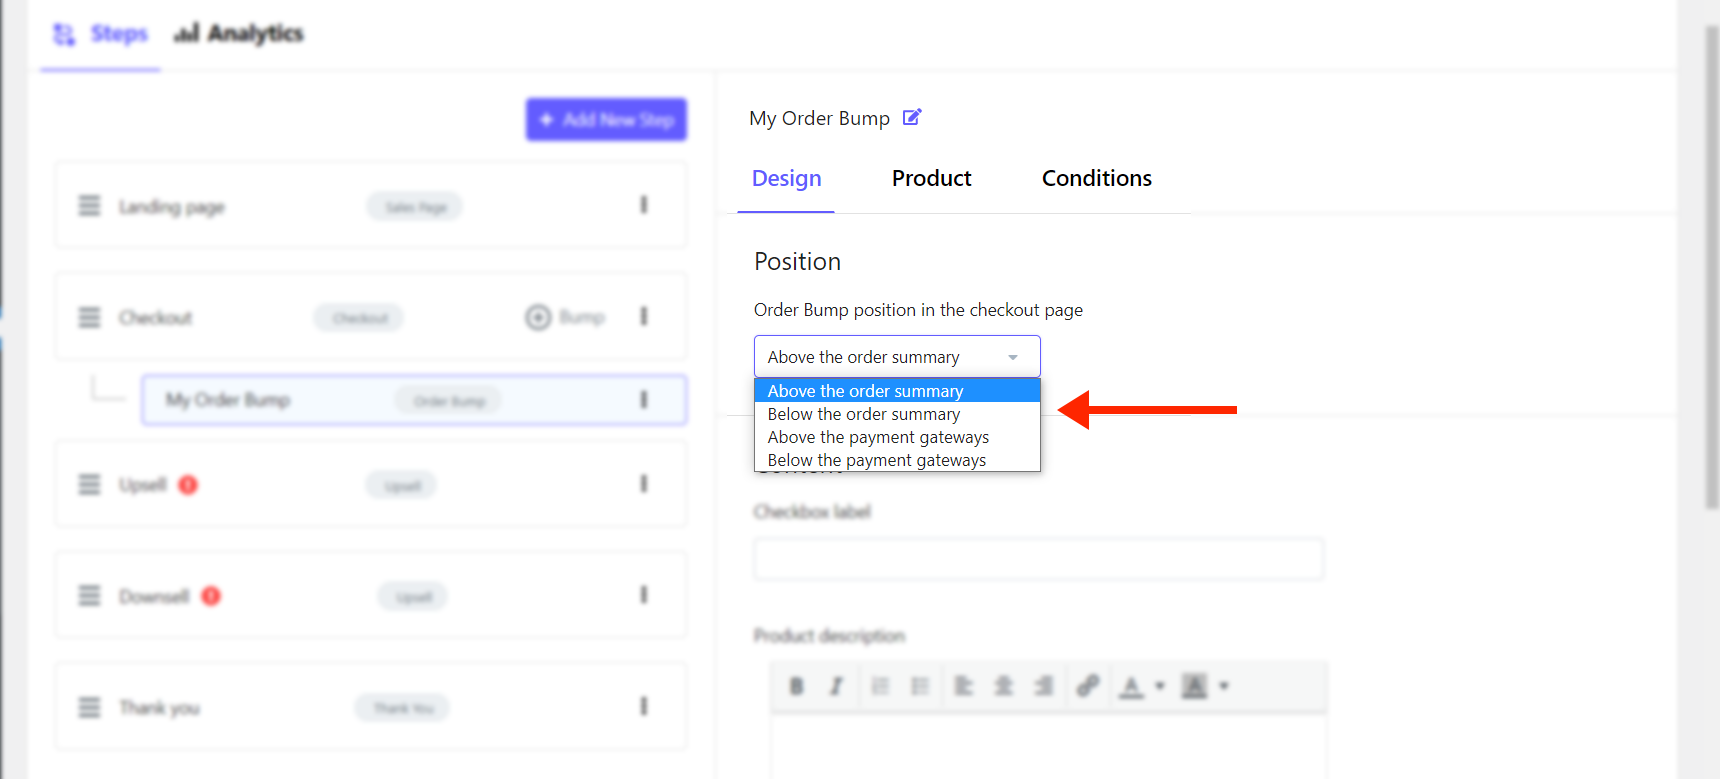
In the design tab, you have four options to set the position of the order bump:
- Above the order summary
- Below the order summary
- Above the payment gateways
- Below the payment gateways
Add the checkbox label and product description from the Content tab. If you want the image of the product displayed in the order bump box, activate the product image.
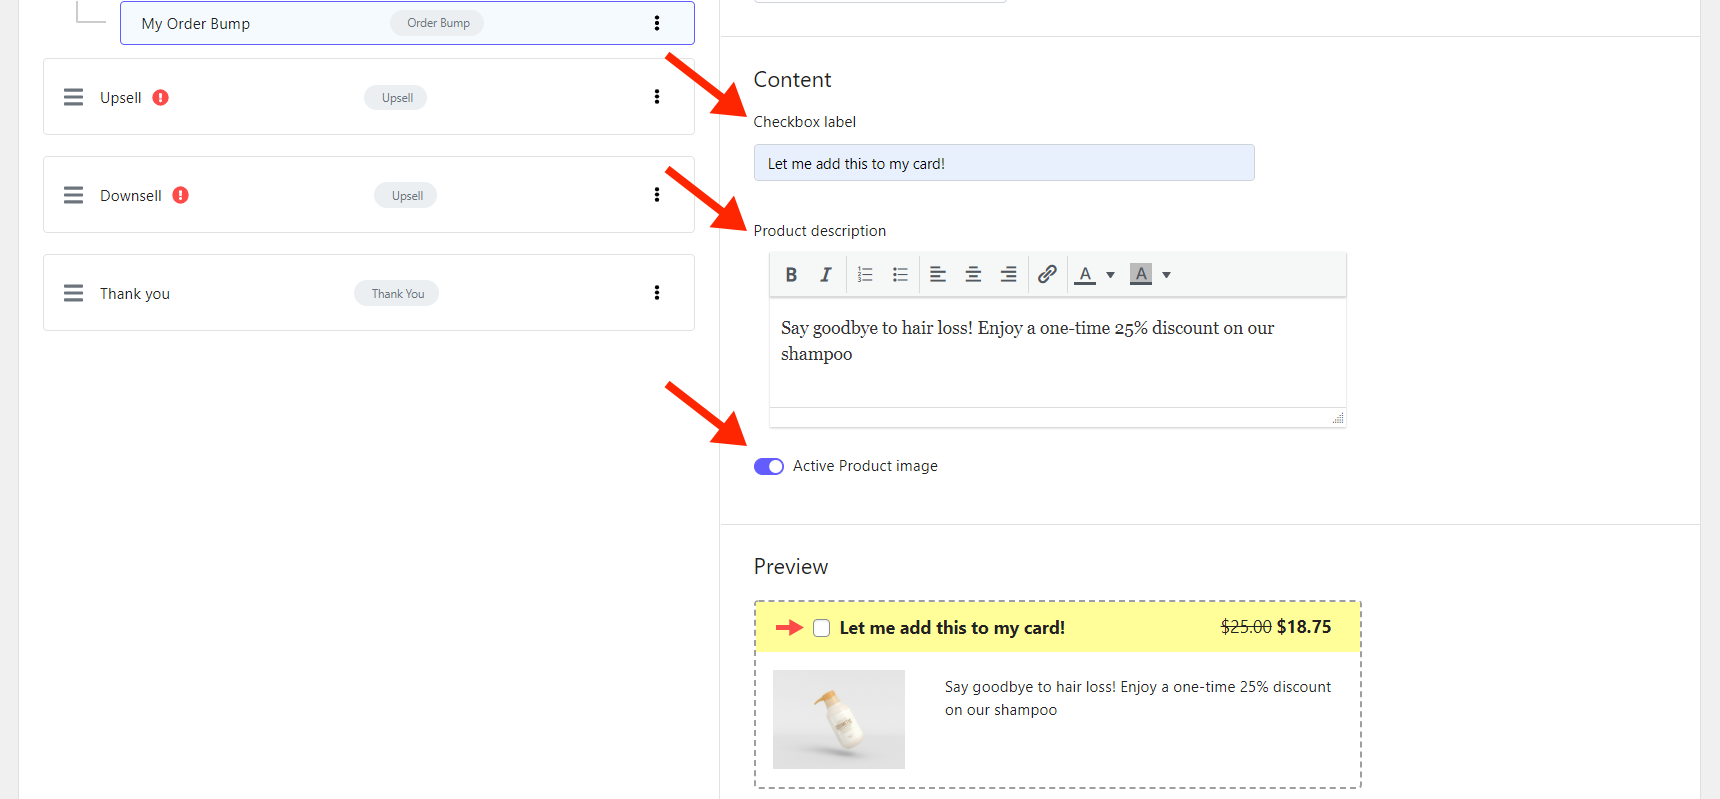
Note: While adding content, you can check the design of your order bump in the preview section.
In the Conditions tab, you can define when to display the order bump. Jupiter X2 offers +30 different conditions to choose from.
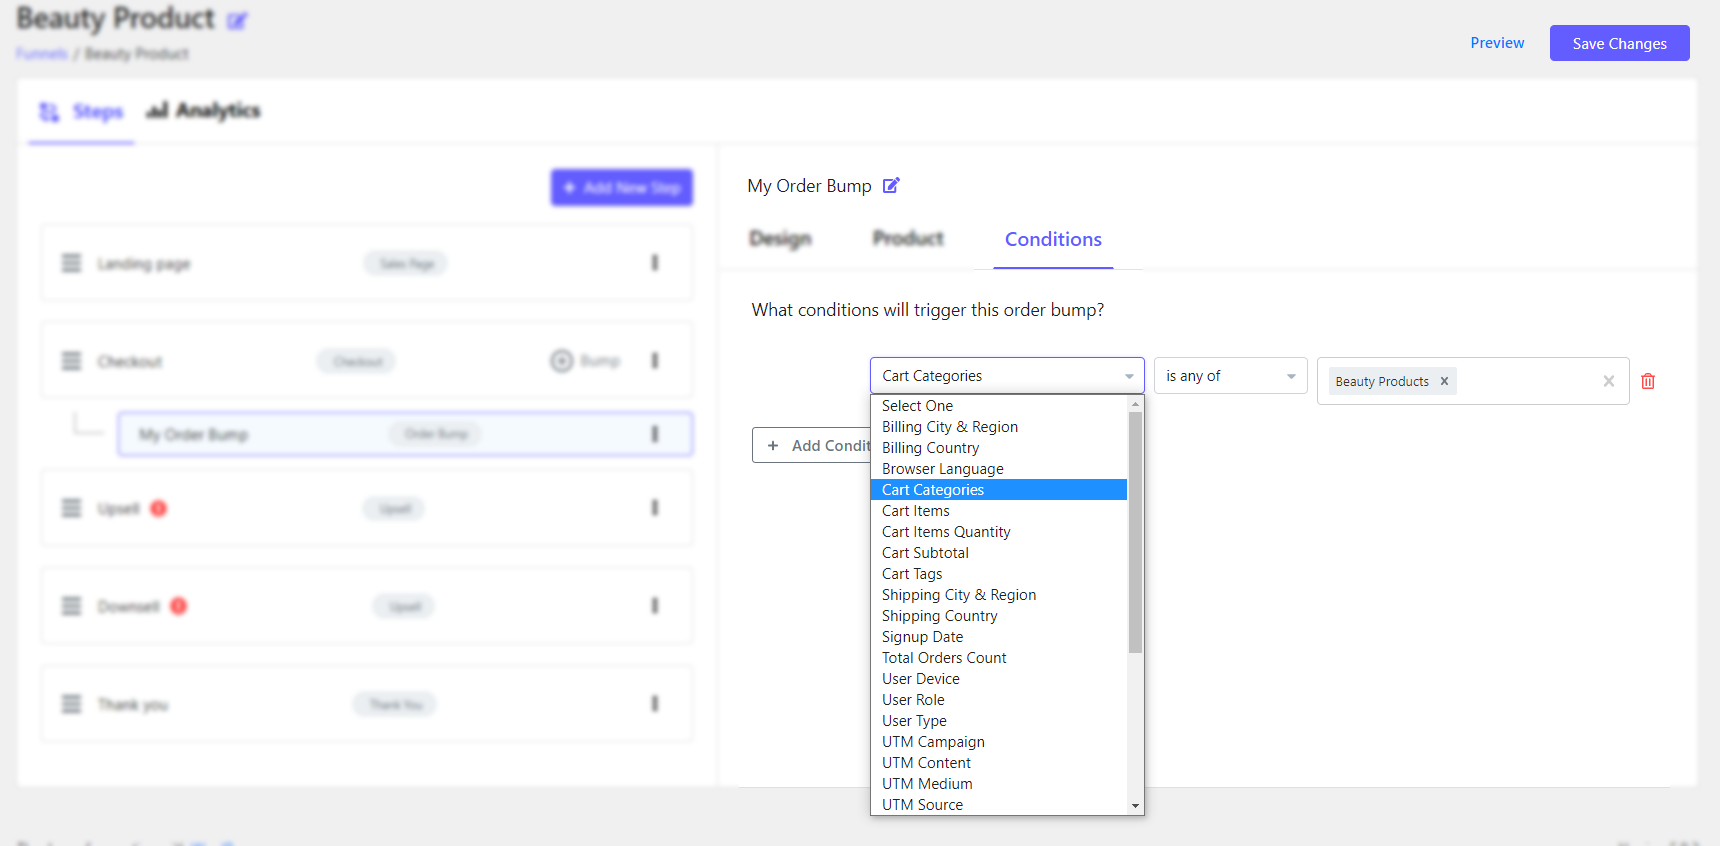
Note: you can add multiple by clicking on the + Add Condition button in the Conditions tab.
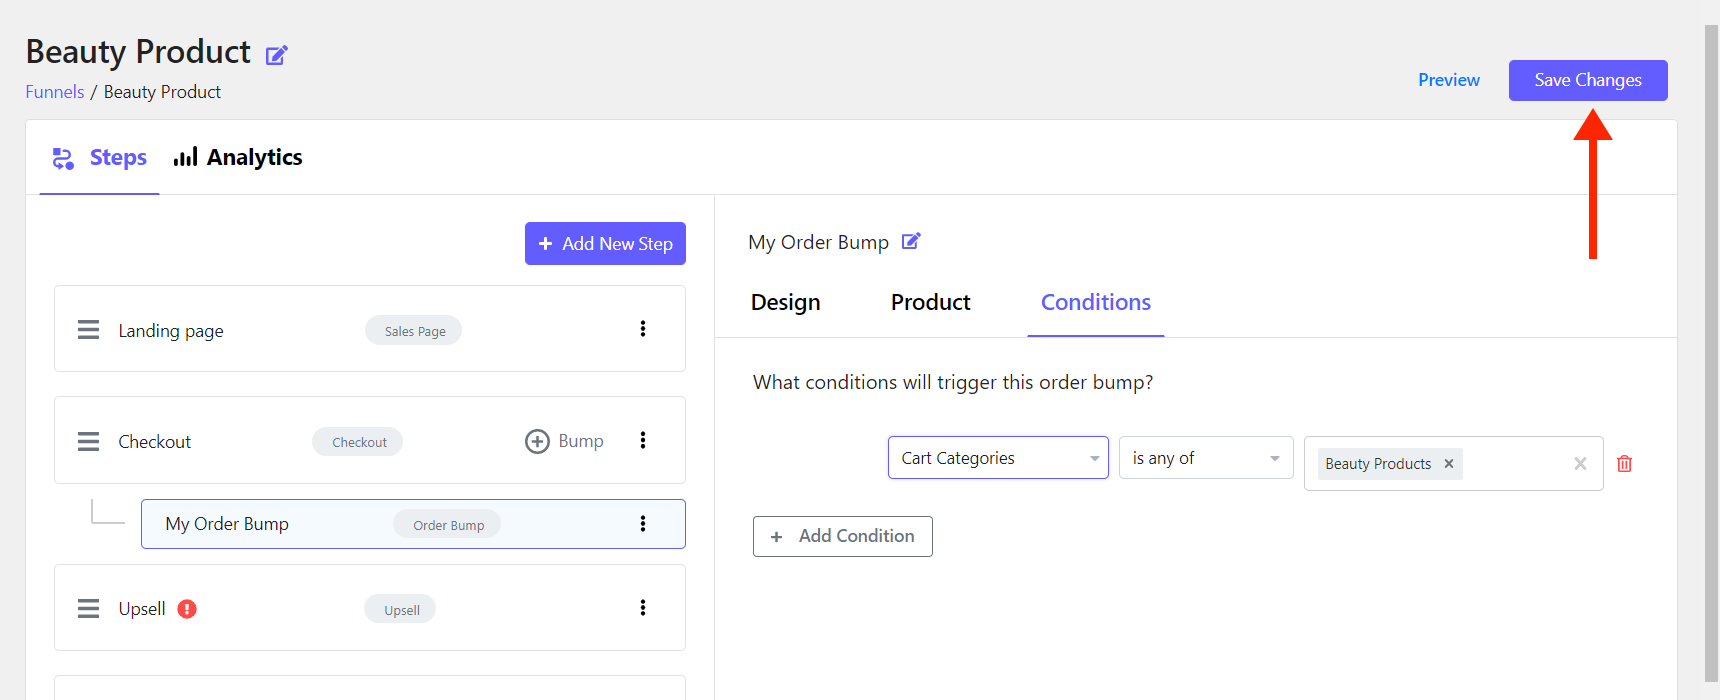
To finish, save new changes by clicking on the Save Changes button.
Jupiter X2 Order Bumps Versus Other Solutions
Most solutions charge you for their order bump, as you can see from the table below:
| Solution | Price |
|---|---|
| Jupiter X | $59 |
| WP swings | 69$/year |
| villaThemes | 30$/year |
| iconicWP | 79$/year |
| FantasticPlugins | 79$/year |
However, you can create personalized order bumps with +30 conditional segmentation to display your offer, free of extra charge, in Jupiter X2.
2. Offer Personalized Upsell Right Before Payment
Another technique to increase order value with WooCommerce checkout optimization is upselling. It’s the art of motivating your current customers to choose a more expensive product or service in a way that is not pushy. Let’s learn more about this technique.
What Is Upselling?
In order to understand upselling you should be familiar with the sales funnel. A sales funnel is a series of steps that leads potential customers to purchase. For example, a visitor finds a Google ad for a camera and clicks on the link to get more details about the product. He enters a series of connected pages, starting with a landing page and ending with a thank you page, that nurtures him to place as big of an order as possible.
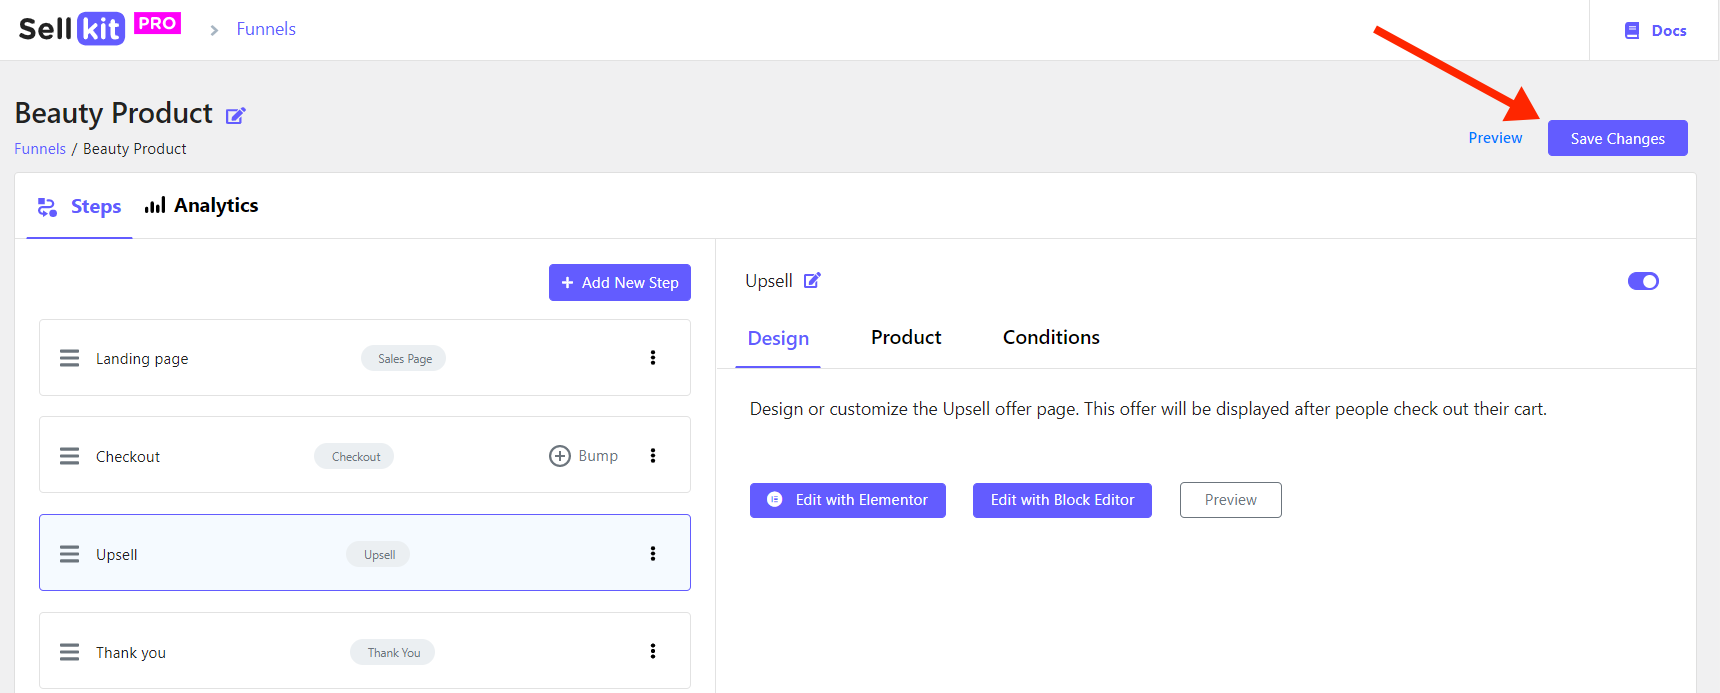
Upselling occurs when you offer an upgraded, premium or more complete version of a product or service that the customer aims to buy, which naturally should be more expensive. As you can see in the image below, upselling occurs after the Checkout page and before the Thank You page.

Tips for Effective Upselling Offers
Like any marketing and sales technique, if you fail to implement the correct upsell strategy you might get the opposite result. Here are some suggestions to get started with upselling:
- Personalize your offer: Customers differ from each other, so the upsell offer should be different as well. Offering a product relevant to customer behavior, referral details or geolocational details will not only increase the chance of purchase but also improve your relationship with customers.
- Offer one option: Offering too many options can prevent customers from acting, so create a highly targeted option and try to score.
- Add testimonials or reviews: Users will trust you more if they hear from other customers. Ask your customers for a review and add it to your upsell page.
- Limit the discount or deal: Offering something in a limited time frame or with a limited supply can create a sense of urgency and persuade users to act faster. Add a countdown or just mention the limited offer to convince customers to act now.
- Focus on value: Explain or display the benefit of your upsell product or service. Recognize the needs of each segment of customer and focus on them.
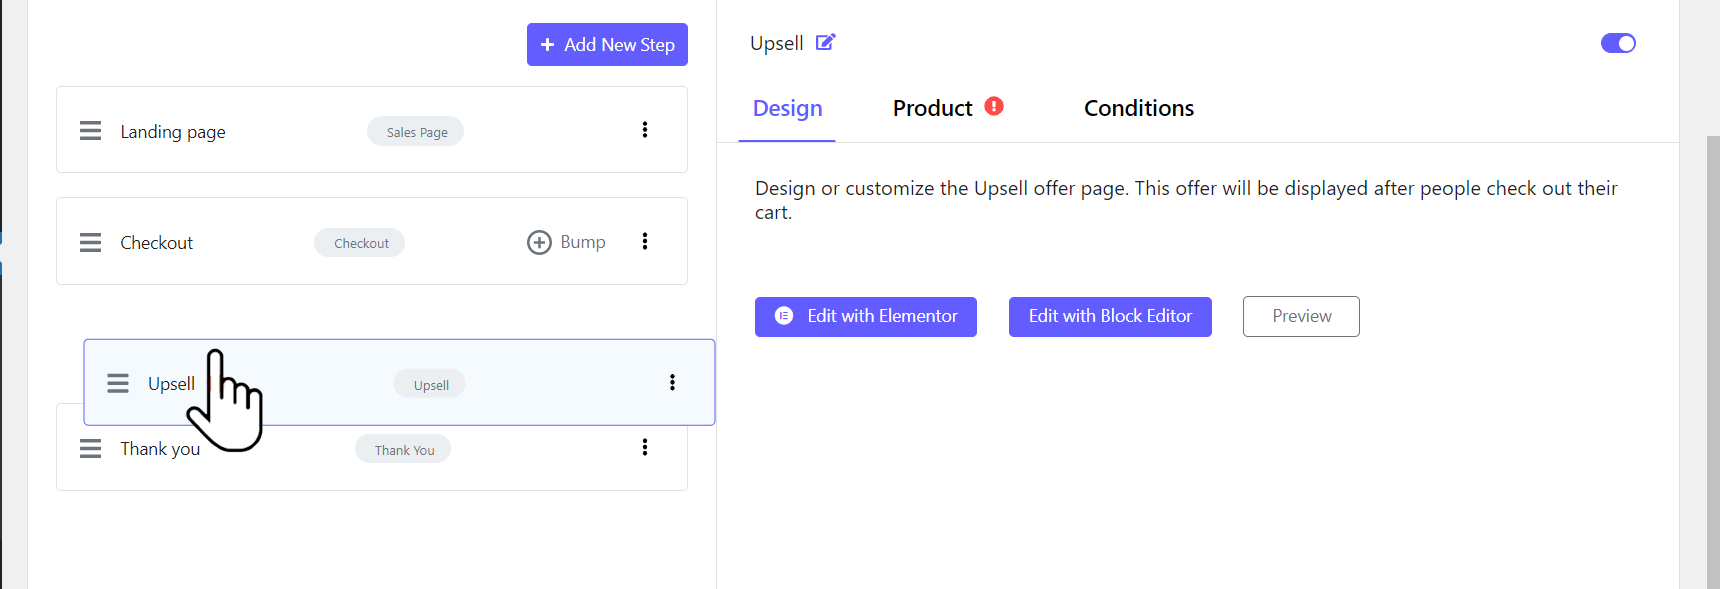
How to Create an Upsell in Jupiter X2
With the drag and drop Jupiter X2 funnel builder, adding upsells is as easy as pie.
First, make sure your Artbees SellKit plugin is installed and active via WP dashboard > Plugins.
If you can’t find it there, you can find it in WP dashboard > Jupiter X > Bundled Plugins > Optional Plugins. This plugin is included in your Jupiter X license for free.
Next, go to the WordPress dashboard > SellKit > Funnels and select the funnel you want to add a upsell to and follow these steps:
1. Click on the + Add new step button.
2. Choose Upsell.
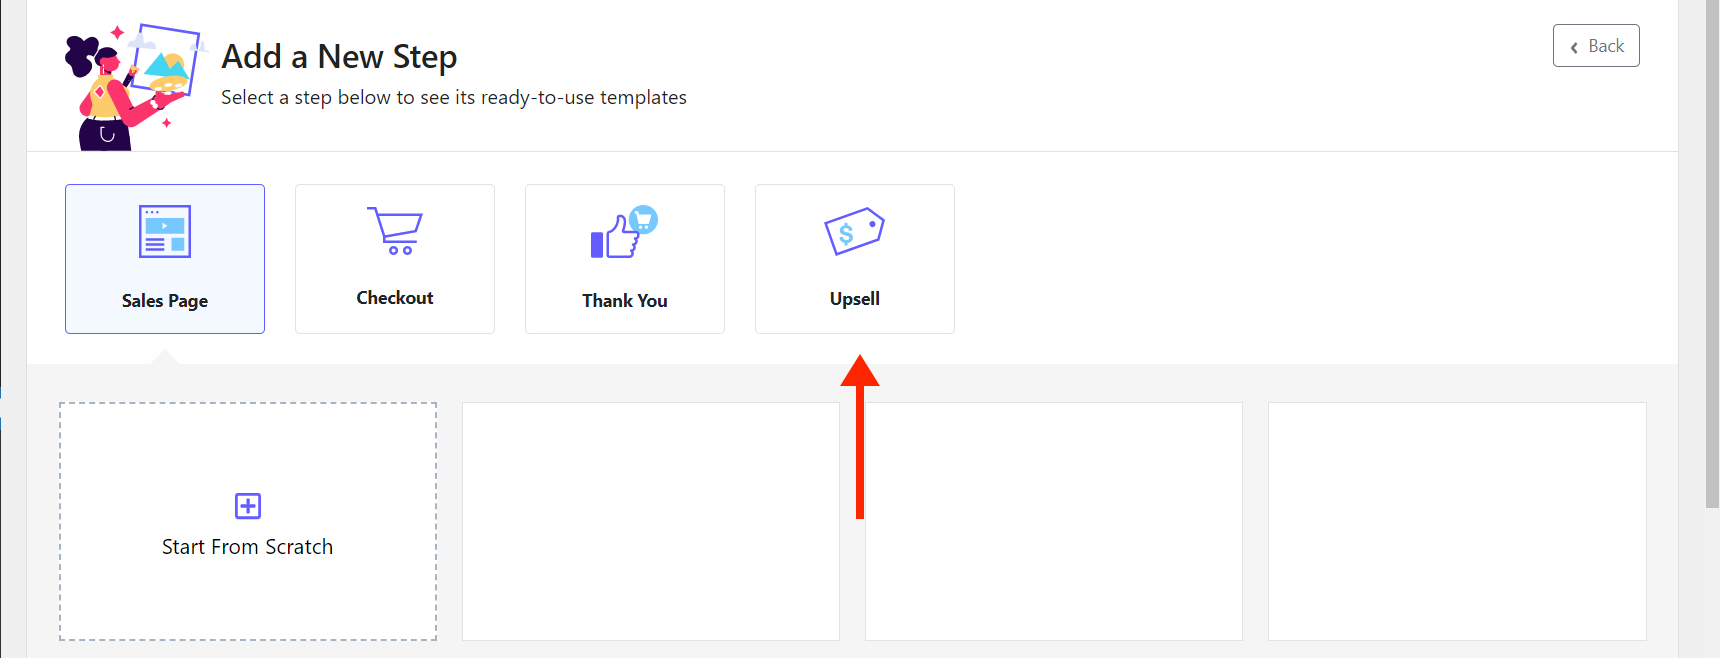
3. You can create one from scratch or choose a pre-made template and import one.
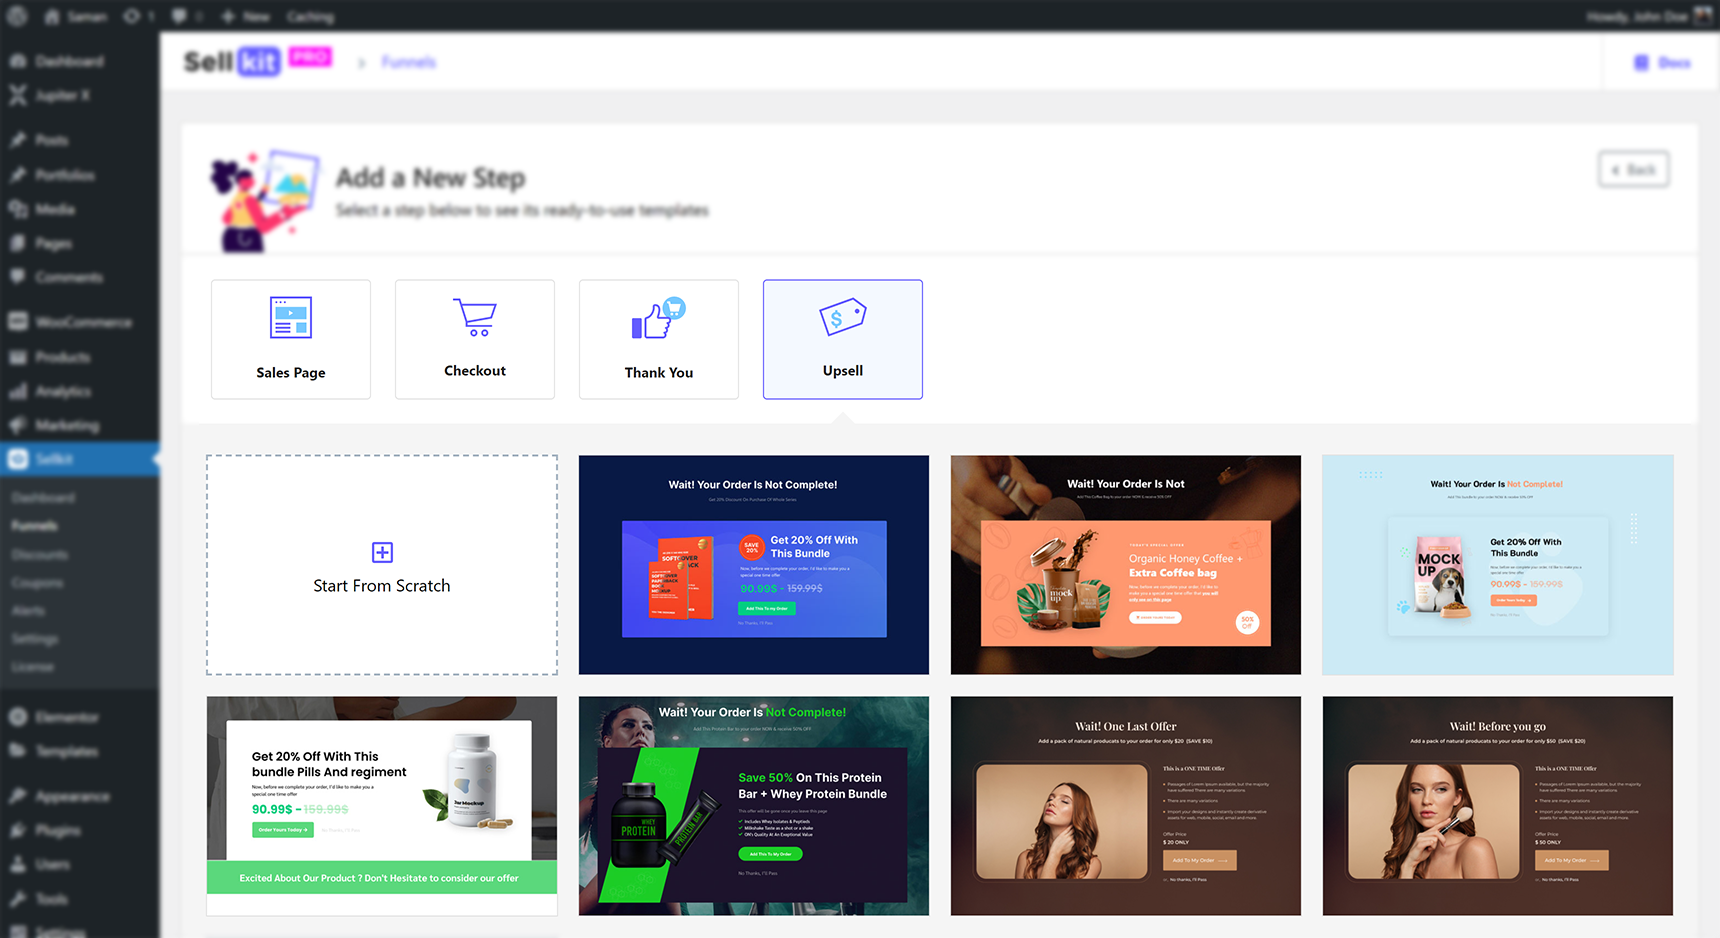
Note: The new step goes at the end of the funnel by default, but you can move the step anywhere in the funnel with SellKit’s drag and drop builder.
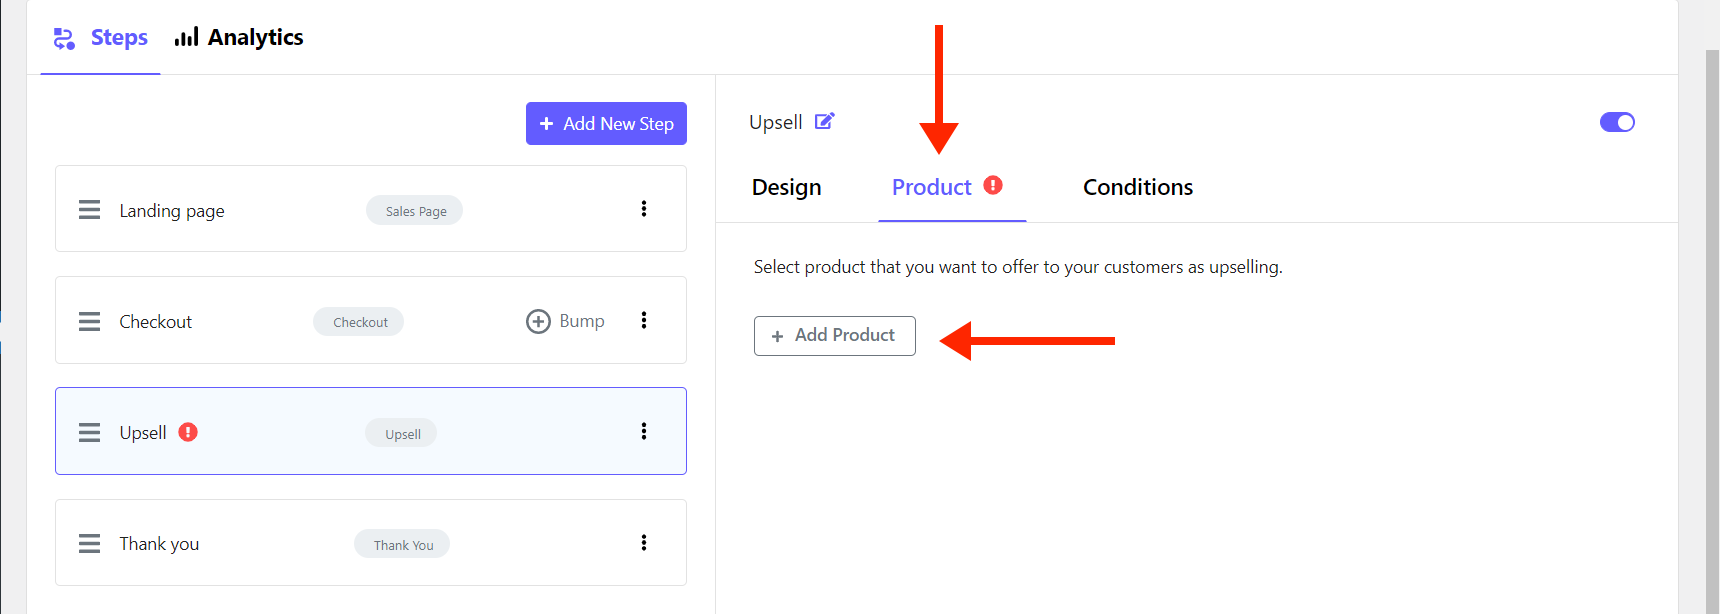
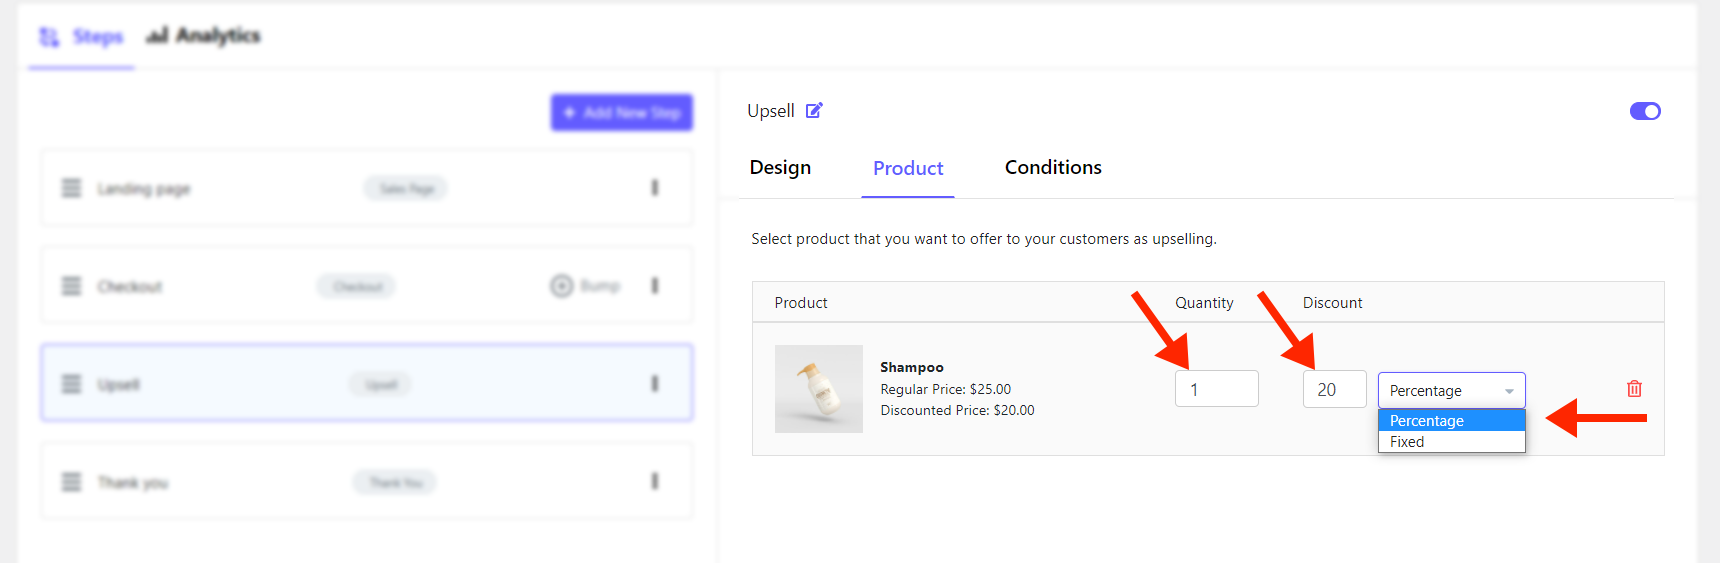
4. From the Products tab click on the + Add Products button.
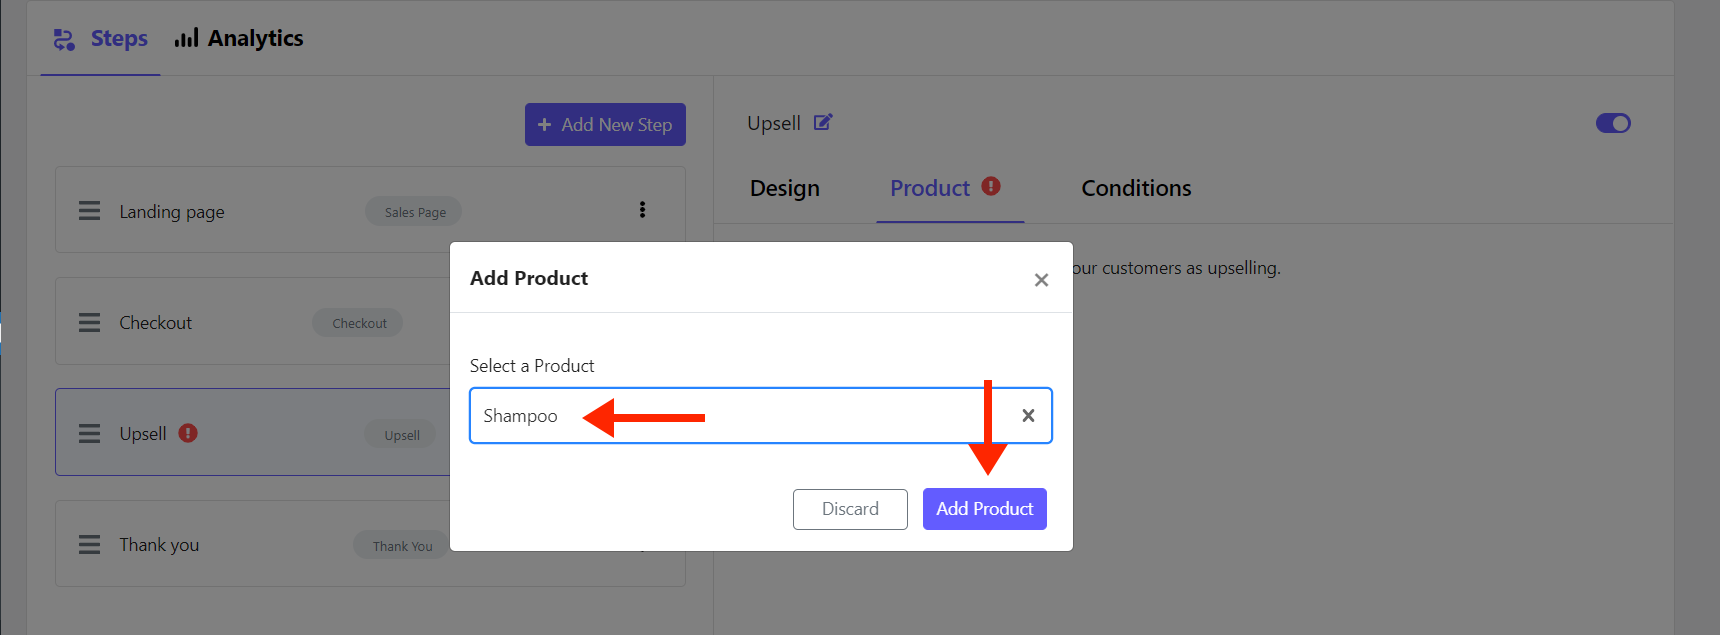
5. Select a product by typing its name and click on the Add Product button.
6. Set quantity, discount value and type of upsell.
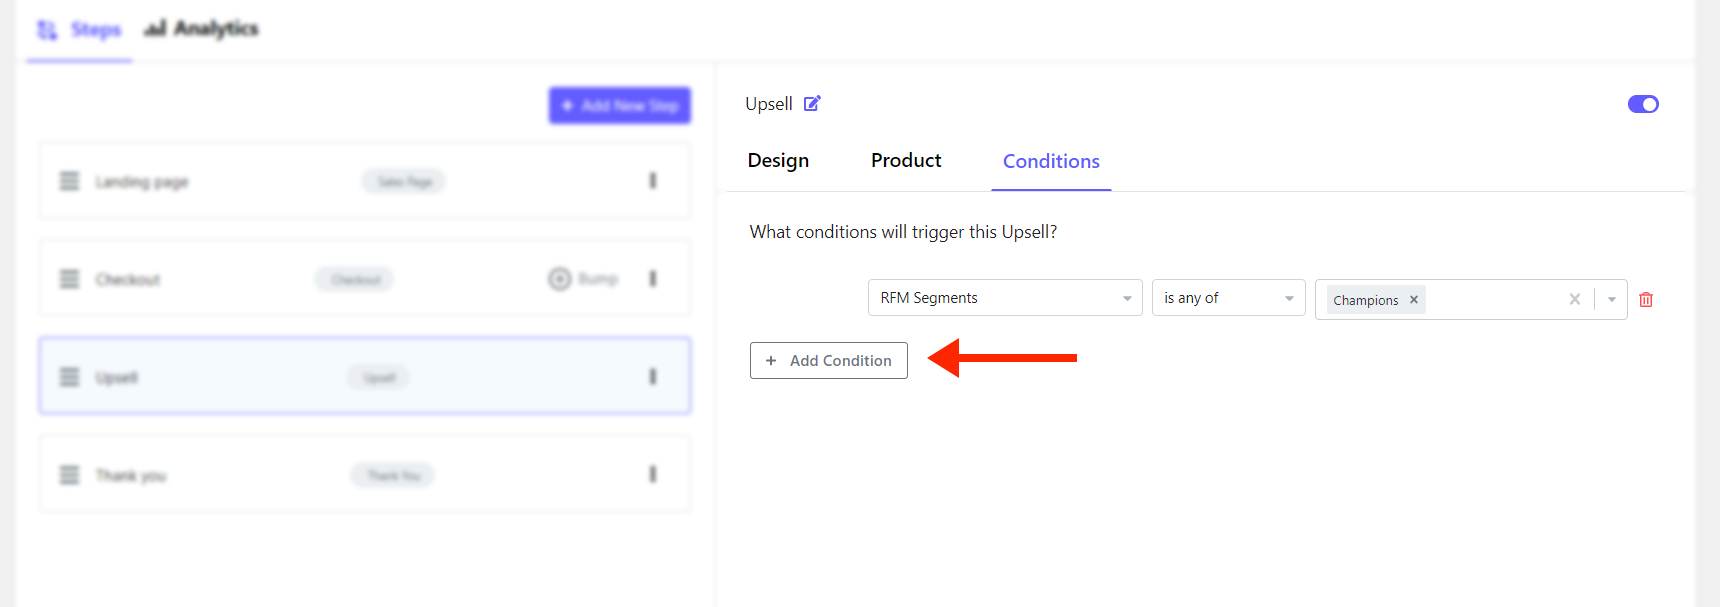
7. From the Conditions tab, set the condition for triggering this offer.
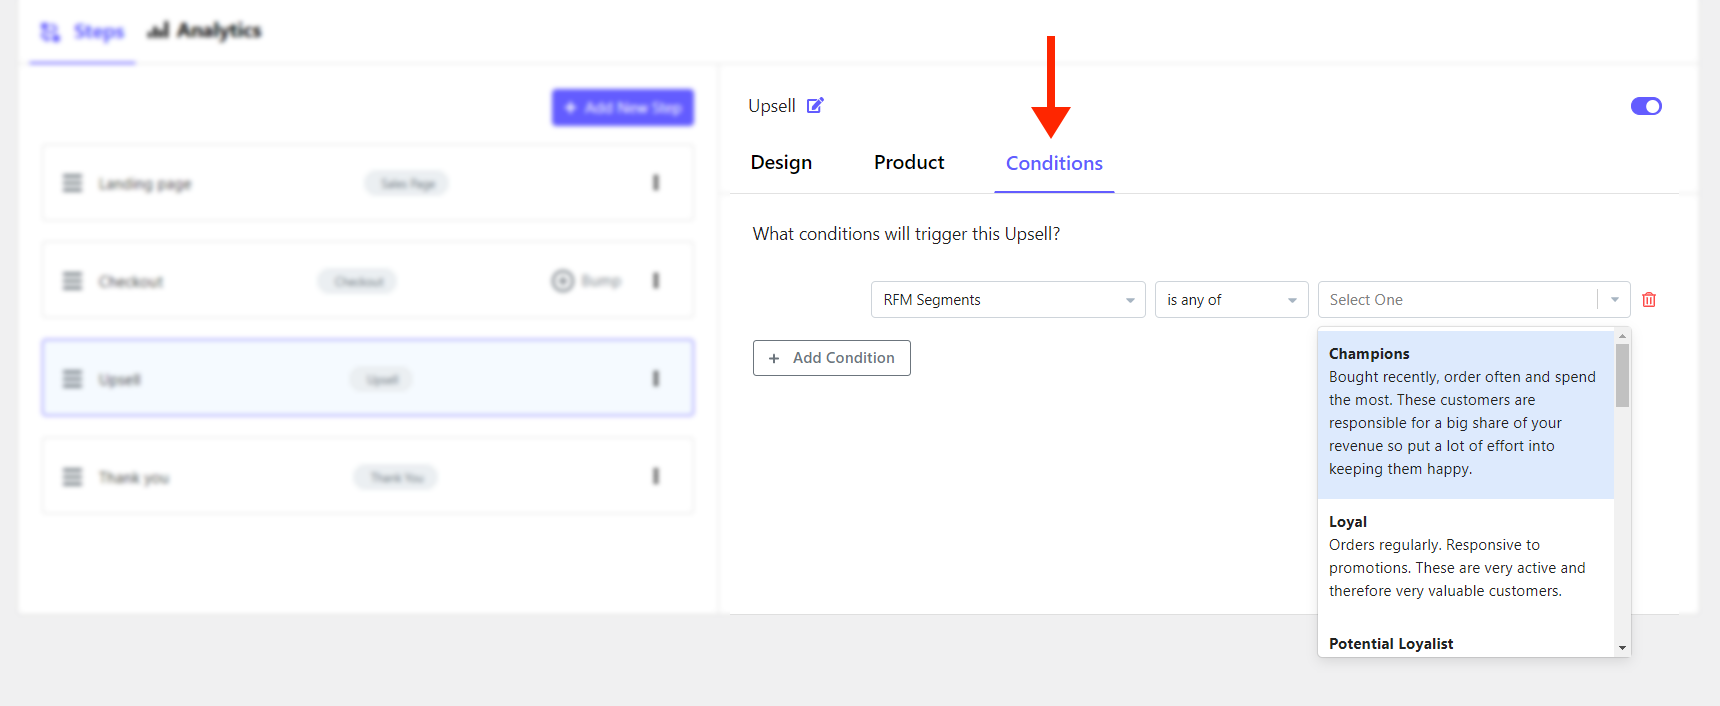
Note: if you want to add more conditions, click on the + Add Condition button.
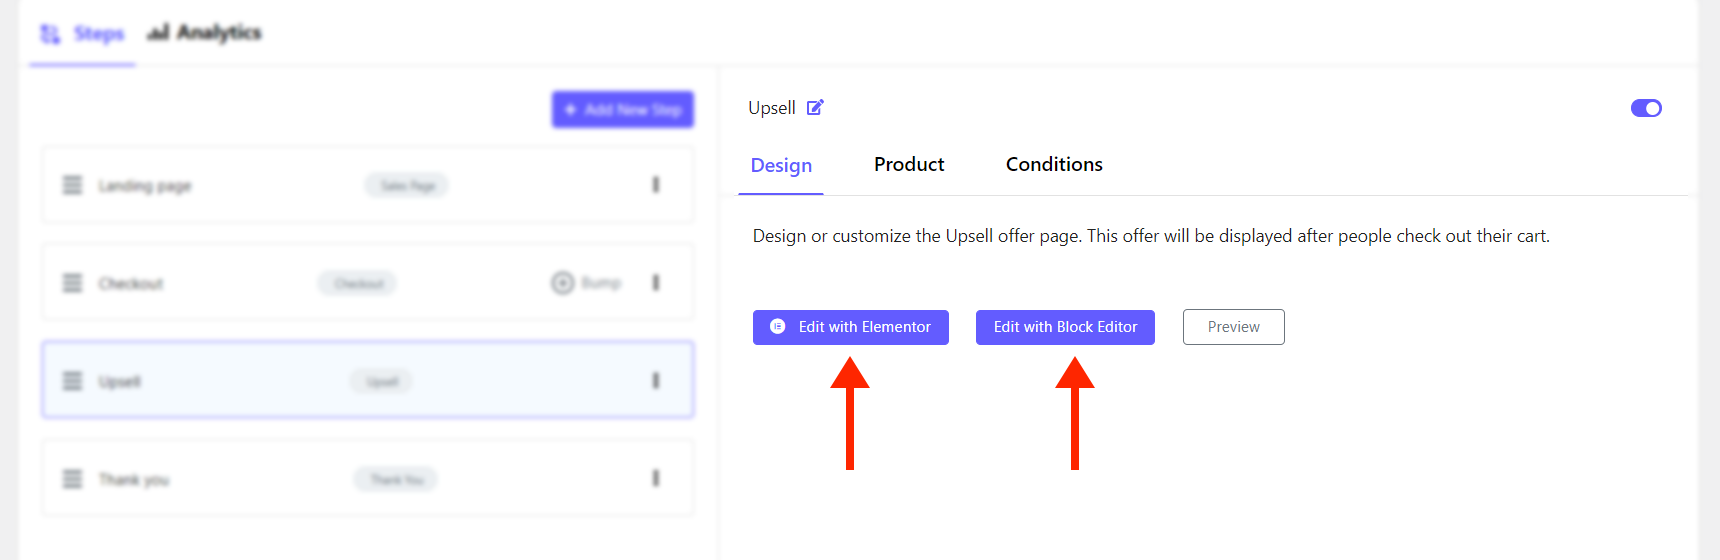
8. From the design tab you can change the design of your upsell page by clicking on Edit with Elementor or Edit with Block Editor.
9. Click on the Save Changes button.
Jupiter X2 Upsell versus Other Solutions
To be able to create sales funnels and upsell offers in your store CartFlows charges you nearly 300$ while CheckoutWC charges you $500 each year. Artbees SellKit Pro pricing is way lower, at $200 per year. However, it is included in Jupiter X for free and offers more features than Cartflows and BuildWooFunnels, such as advanced customer segmentation.
3. Display Smart Notices During Checkout to Trigger Bigger Sales
This is one more way to increase order value with WooCommerce checkout optimization. The goal here is to show notices that trigger cognitive biases such as FOMO (fear of missing out), loss aversion, hyperbolic discounting and more to improve conversion probability and order value.
What is a Smart Notice?
A smart Notice is a personalized message in a recognizable box that can be placed anywhere on your website, including the checkout page, and is displayed based on the condition(s) that you set. It can boost engagement and increase the chances of more orders.
As a simple example, let’s say customers get free shipping if a cart’s subtotal amount is $500 or more. By setting certain conditions, you can notify customers whose cart is between $200 and $499 that they will enjoy free shipping if their order value is $500 or more via a smart notice on the checkout page.
In WooCommerce you can set a free shipping threshold, so if the subtotal goes above that threshold customers can choose the free shipping option at checkout. But how do users know what this threshold is? Even if you mention it somewhere on your website isn’t it better to remind users at checkout? Jupiter X2 allows you to do just that. Plus, it calculates how much customers need to add to be eligible for free shipping, which you can display on the checkout page to maximize efficiency.
Sample Checkout Notices to Trigger Bigger Sales
Here you can see some cognitive bias techniques with examples to get you inspired on the WooCommerce checkout optimization process.
- Use FOMO technique: FOMO stands for ‘Fear Of Missing Out’ and is a psychological element that affects our decision making process. For example, if the latest time for shipping products is 3:00 pm each day, then you can place a countdown timer on your notice with a message that reads “order within [countdown timer] to get your order shipped today.”
- Trigger loss aversion: This technique motivates users to take action to avoid possible losses. For example, you can set a 10% discount for orders of more than $200, and notify users in your notice to place more orders to be eligible to use that discount with a message like “Add [$200 – current order value] worth of products to get a 10% discount at checkout.”
- Encourage with exclusivity: The sense of special attention always works. You can prepare discounts based on UTM parameters or visitor country and display them on the checkout page. For instance, your Facebook users can see something like this at checkout: “25% special discount only available for our [UTM Source is Facebook] users.”
- Offer hyperbolic discount: Simply put, users value immediate discounts or rewards more than delayed ones, even if the long-term discount is bigger than the immediate one. For example, offer a small giveaway such as a book or a T-shirt for a short period of time and see the results. Your notice can be something like “Place order within 2 hours to get The Little Prince book for free!”
- Use RFM segmentation to nurture customers: RFM segmentation groups your customer by their behavior; for example, customers that have recently made a purchase, loyal customers or about to sleep customers. You can display your marketing plans for retaining or nurturing these groups via a smart notice to see the result faster. For instance, to retain your about to sleep customers who need some nurturing to be reactivated, offer a 25% discount plan. Announce the discount with an notice on the checkout page that reads: “Enjoy a sweet 25% discount only for today that is waiting for you at checkout.”
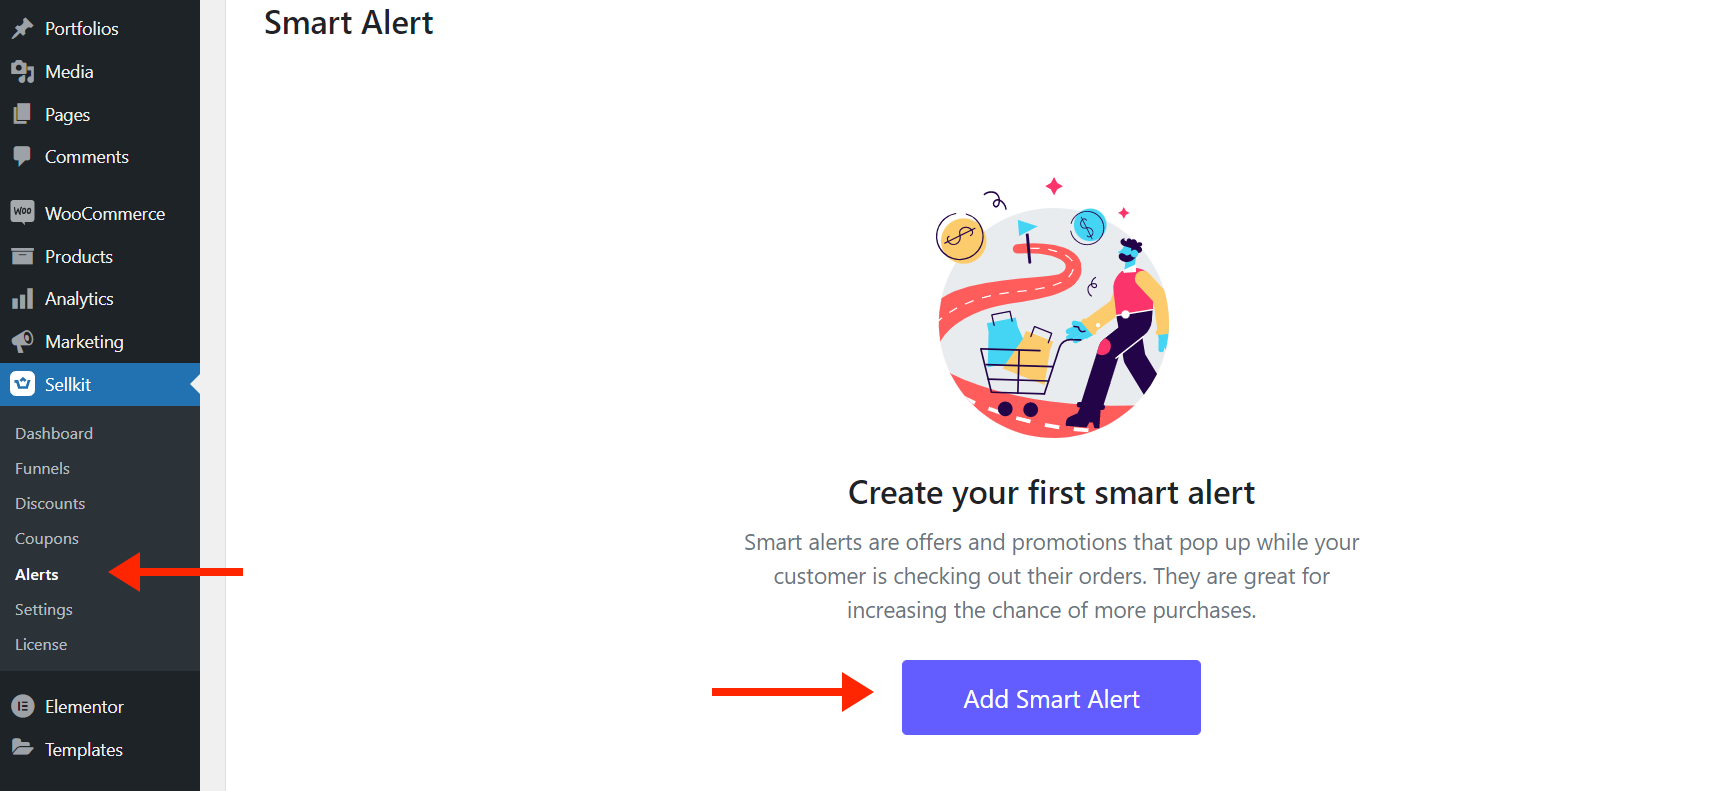
How to Create Checkout Notices in Jupiter X2
First, make sure your Artbees SellKit plugin is installed and active via WP dashboard > Plugins.
As we mentioned before, you can find it via WP dashboard > Jupiter X > Bundled Plugins > Optional Plugins if it’s not in Plugins. This plugin is included in your Jupiter X license for free. Then go to WordPress dashboard > SellKit > Notices and follow these steps:
1. Click on the Add Smart Notice button.
2. Specify a name for the notice.
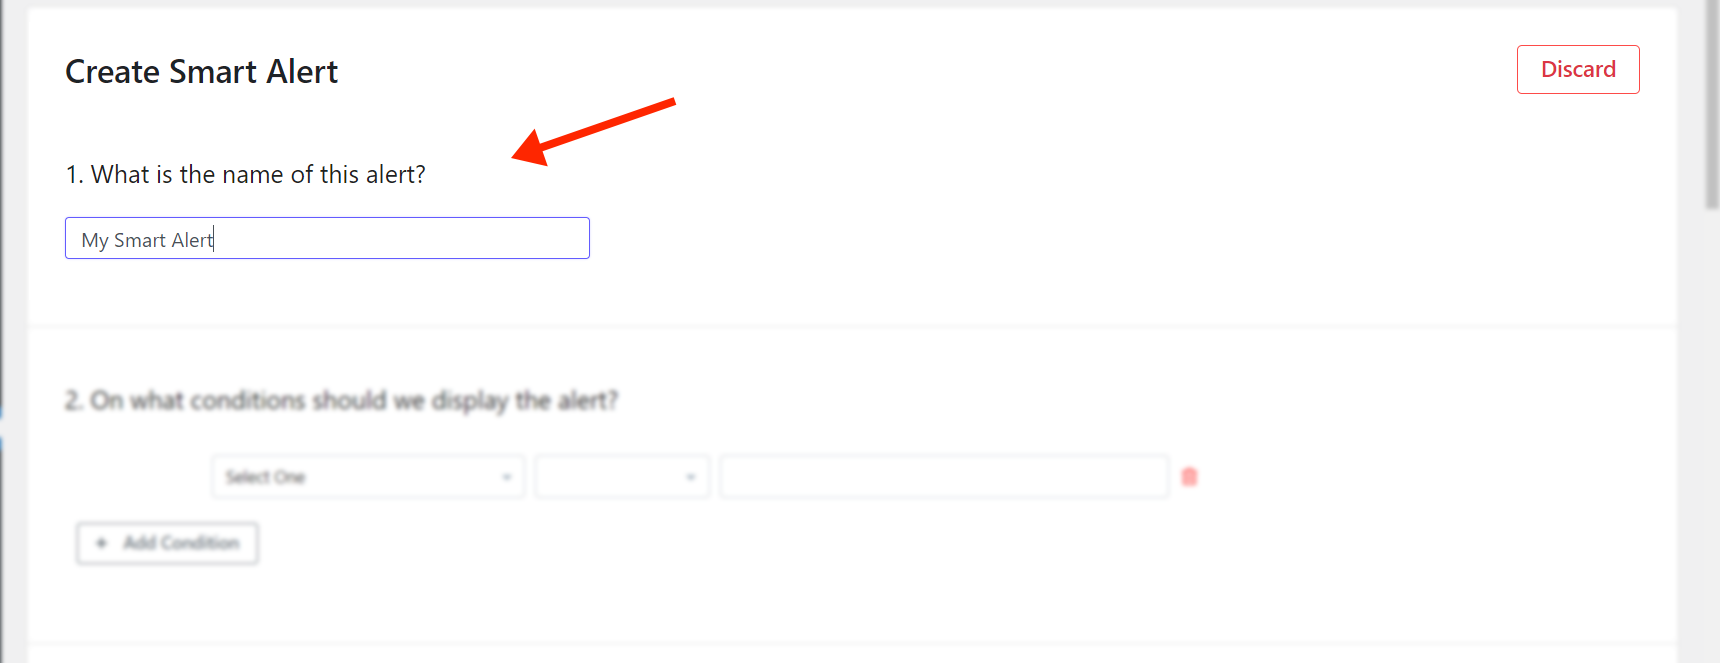
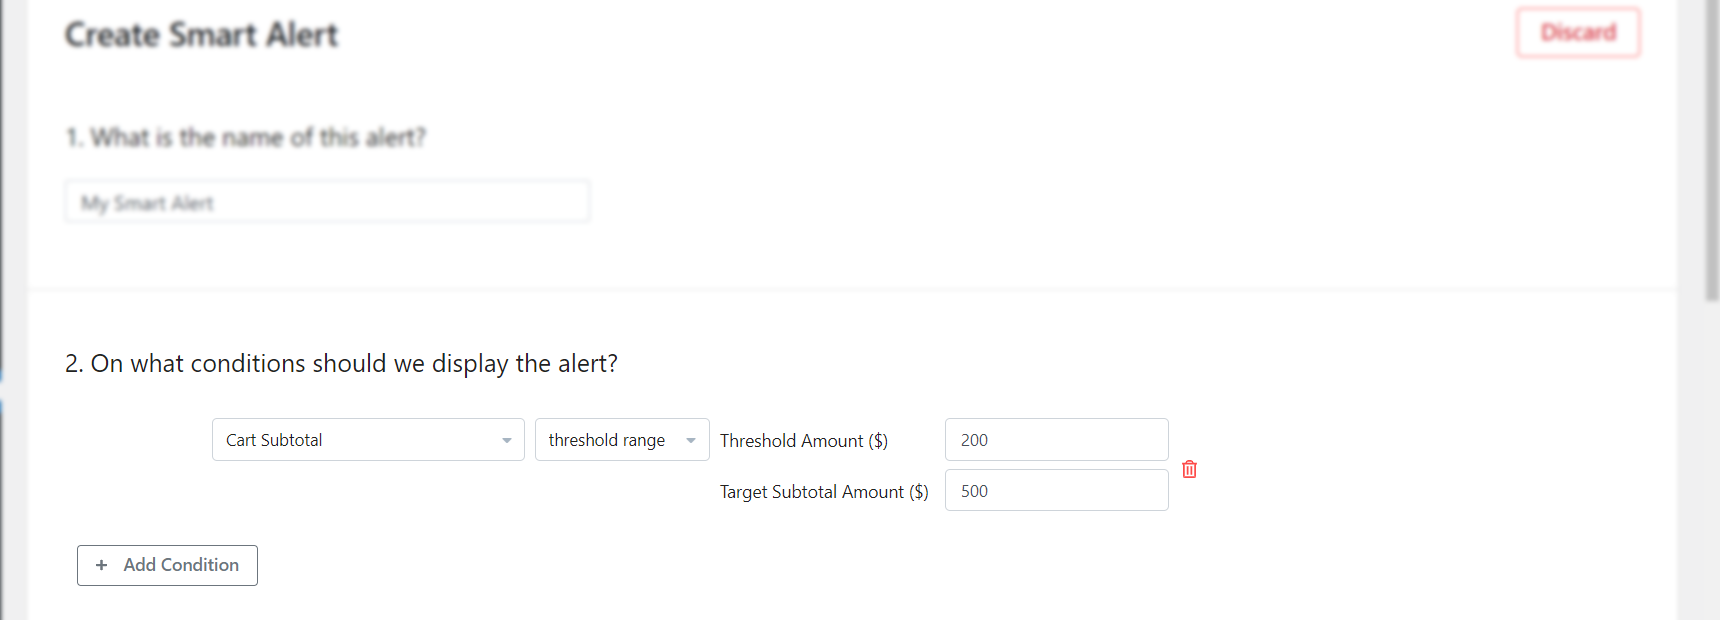
3. From the conditions drop down menu set one or more condition(s). For example, select Cart Subtotal and then select Threshold range. Set 200 for Threshold amount and 500 for Target subtotal amount.
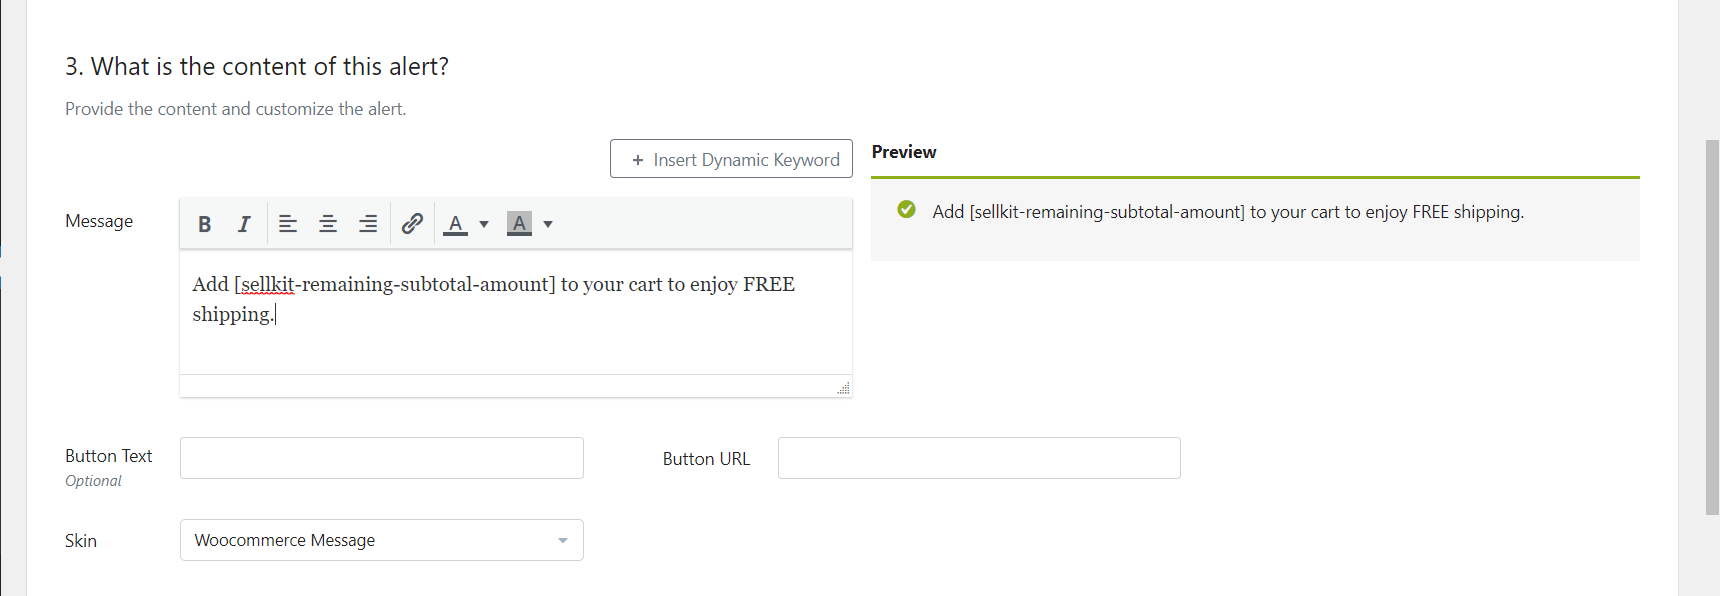
4. Write the message you want to be displayed in the smart notice from the message section. In order to continue our example, add the Remaining subtotal amount from dynamic keywords to your message to display the minimum price that users should add to their cart. An example message might read: “Add [sellkit-remaining-subtotal-amount] to your cart to enjoy FREE shipping.”
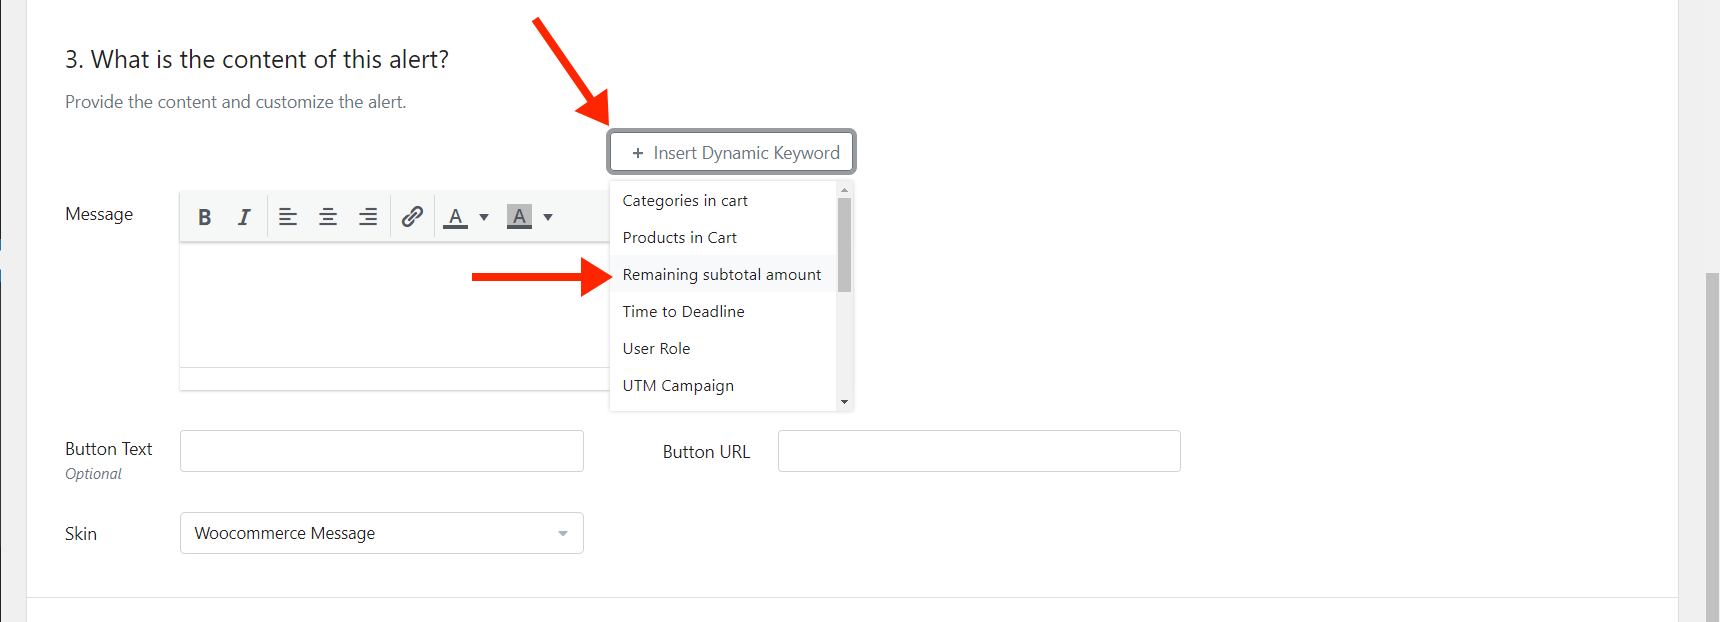
Note: The Remaining subtotal amount dynamic keyword subtracts the user’s cart amount from the Target subtotal amount and displays the result.
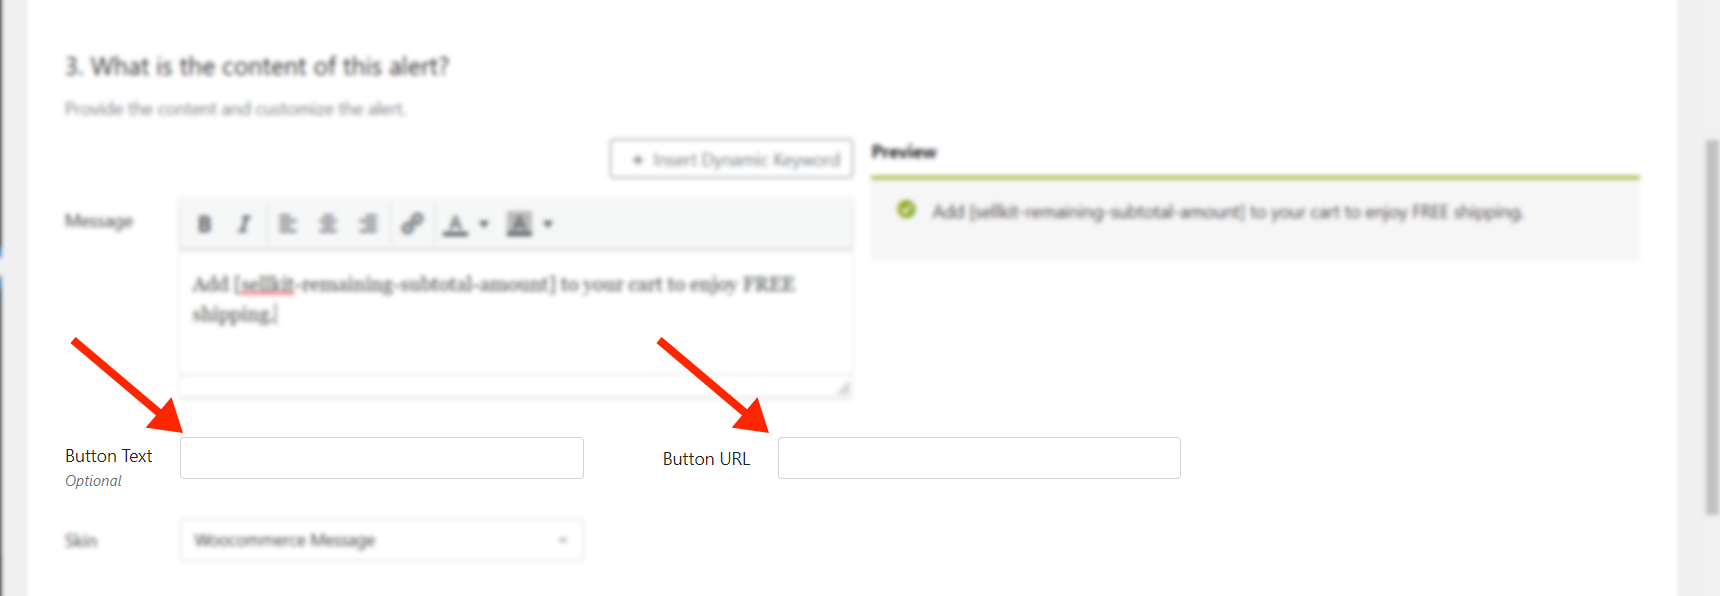
5. You can add buttons and redirect users via Smart notices. If you want to do so, add the text and the URL of the button from the content section of your smart notice.
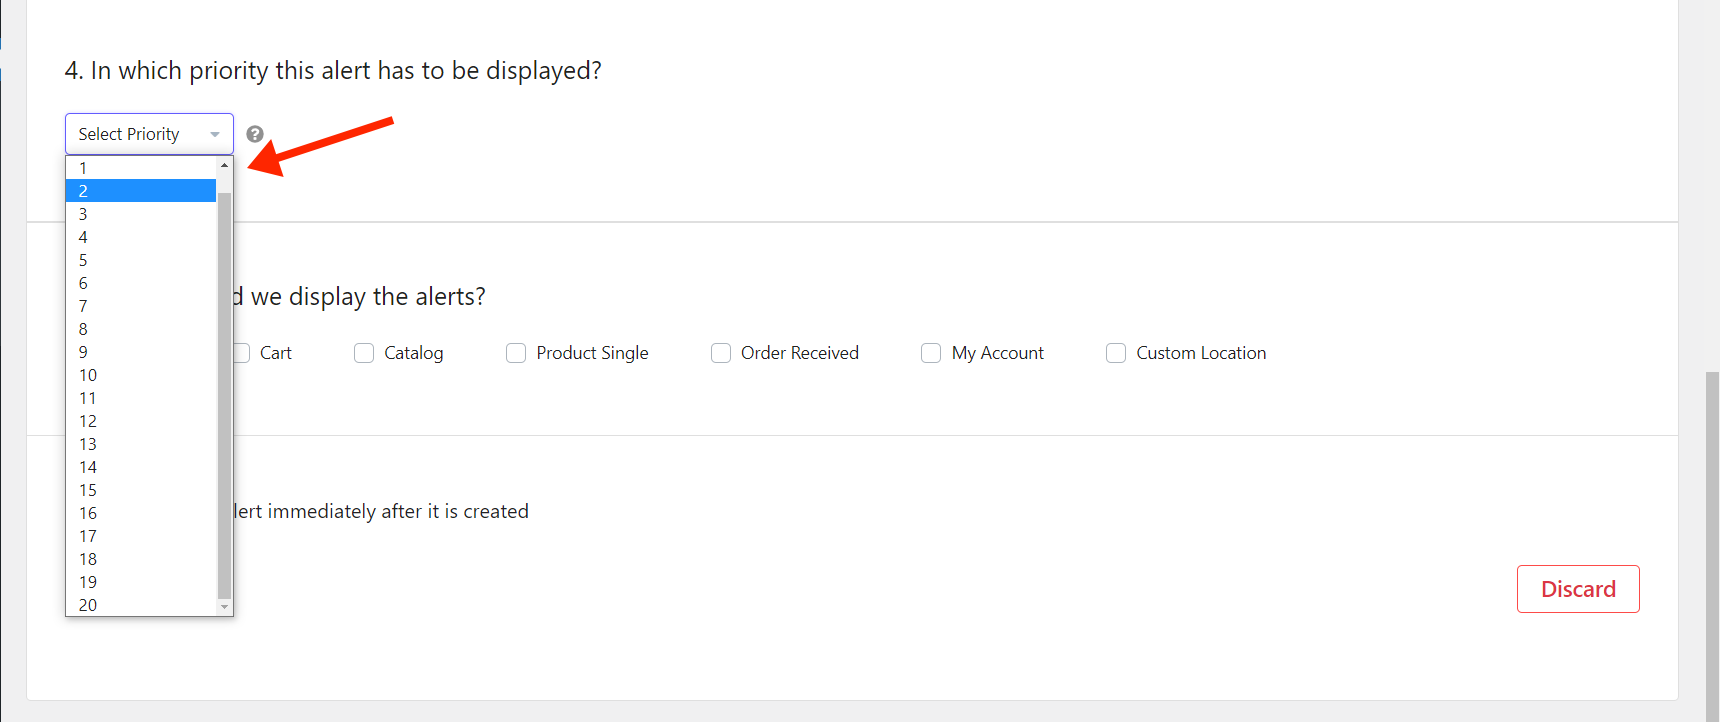
6. Select a priority for your notice. Number 1 has the highest priority.
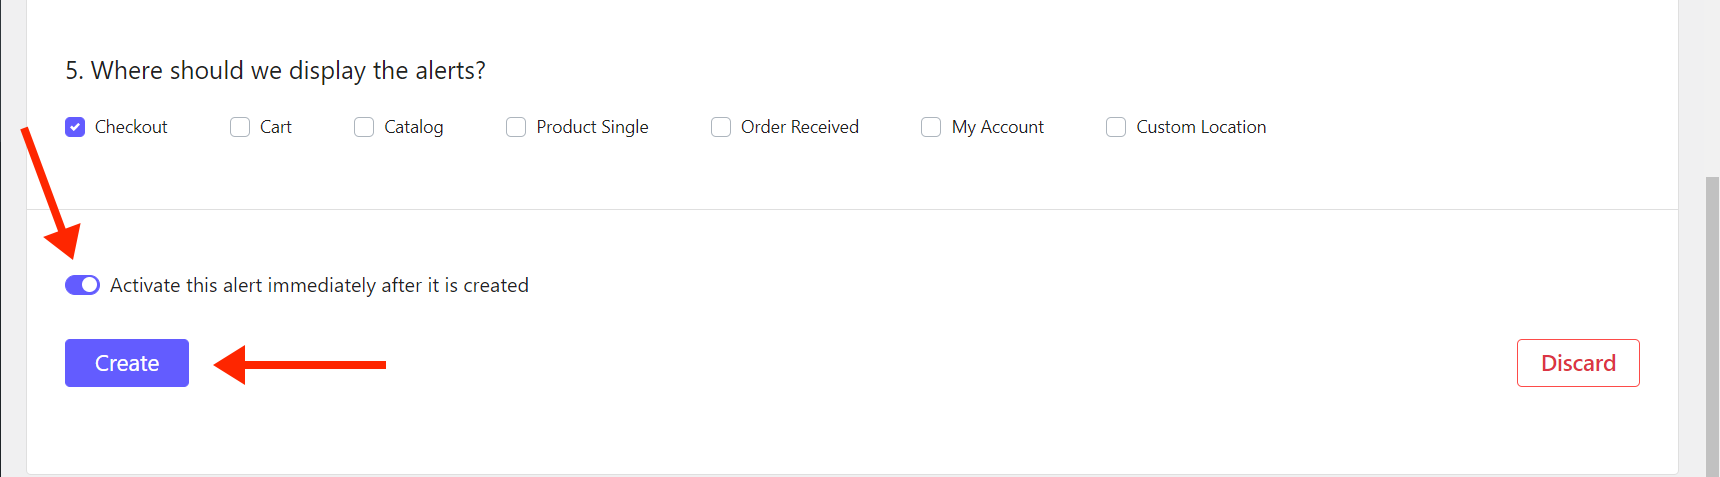
7. Choose checkout to display the notice in the checkout page.
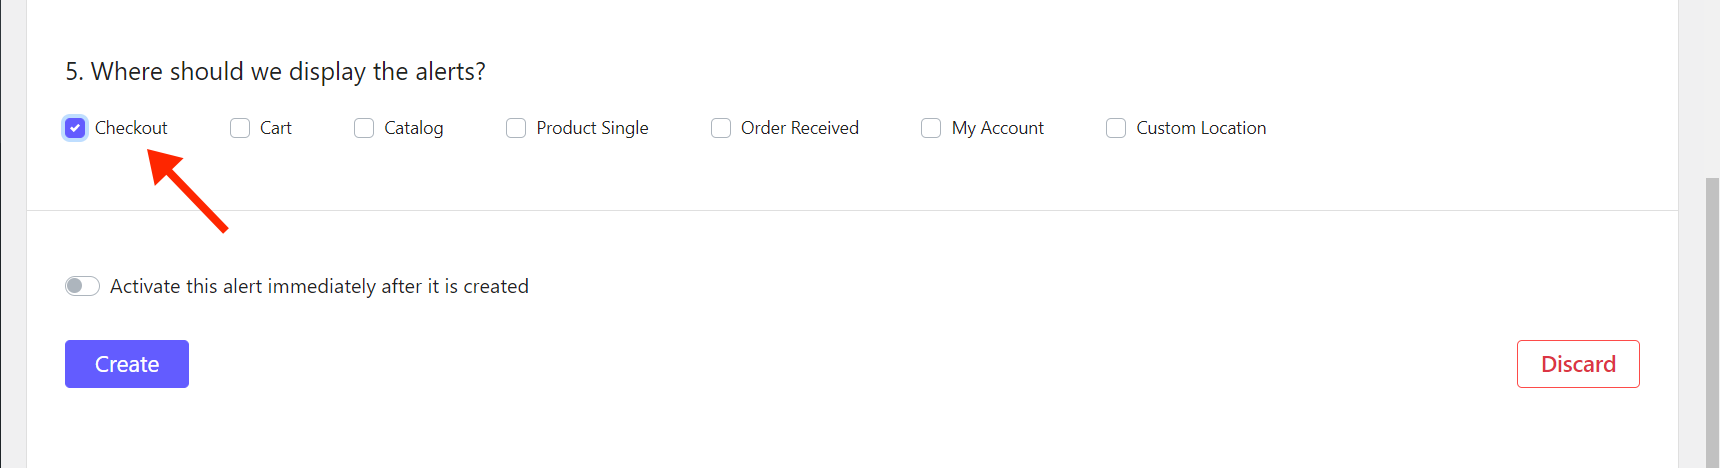
8. Create your notice and activate it.
Jupiter X2 Checkout Notices Versus Other Solutions (Yith Cart Messages, Skyverge Cart Notices)
Here is a list of the prices of some solutions that let you prepare checkout notices:
| Solution | Price |
|---|---|
| Jupiter X WP | $59 |
| Addify Dynamic Cart & Checkout Notices | 49$/year |
| WooMatrix Cart Notices | 19$/year |
| Skyverge Cart Notices | 49$/year |
| YITH WooCommerce Cart Messages | 60$/year |
However, Jupiter X2 allows you to display smart notices based on +30 conditions not only in the checkout but in the catalog, product single in your WooCommerce as a built-in feature.
Final words
We introduced a new level of opportunities for our WooCommerce users in the X2 version of Jupiter, meaning that these new features allow you not only to increase order size and amount but also optimize every detail of your WooCommerce store, including WooCommerce checkout optimization.
As you can see, these techniques are not hard to implement. Start using them today to grow your website and let us know what you think about these new features.

1 Comment
Very good article. It has perfect content. Thank you.