
It hasn’t been long since I created my website using Jupiter so the process is still fresh in my mind. At times I remember being delighted at how well WordPress and Jupiter worked together and made the process so seamless. At other times I remember wasting hours, going in circles just to fix one feature.
It was like a giant jigsaw puzzle with a million little pieces and I was determined to do as much as I could on my own, without hiring an expensive developer. In this way I was able to learn from my mistakes, know when and where to ask Artbees for help and quickly improve my web design skills. Most importantly, I became very familiar with the ins and outs; the simple and the sticky; and the obvious to the obscure concerning the workings of Jupiter for WordPress beginners.
Lucky for you, I’ve gained a lot of tips and tricks from the whole website creation experience on Jupiter – some that you may find useful and that will save you plenty of time at this point in your WordPress website’s young life. This article will give you a nice overview of how to get started with Jupiter as a WordPress beginner.
Perfect Your Plugins
Start with the plugins first. There are a few mandatory Jupiter plugins that you need to have incorporated in your WordPress website in order to get started, otherwise your design process could be disrupted before you even begin. Visual Composer is the first plugin you should activate. It is in my opinion the most valuable feature of Jupiter for WordPress beginners. It gives you control over your entire WordPress website by giving you the ability to build almost any layout imaginable without having to write any of your own shortcode.
The installation of Visual Composer is mandatory for Jupiter and The Ken so go to your WordPress Dashboard, click the “Jupiter” tab and then “Install Plugins”. Here you will find plugins, including Visual Composer, that are conveniently bundled with the theme. You can install them immediately in this section. See here more info on Visual Composer.

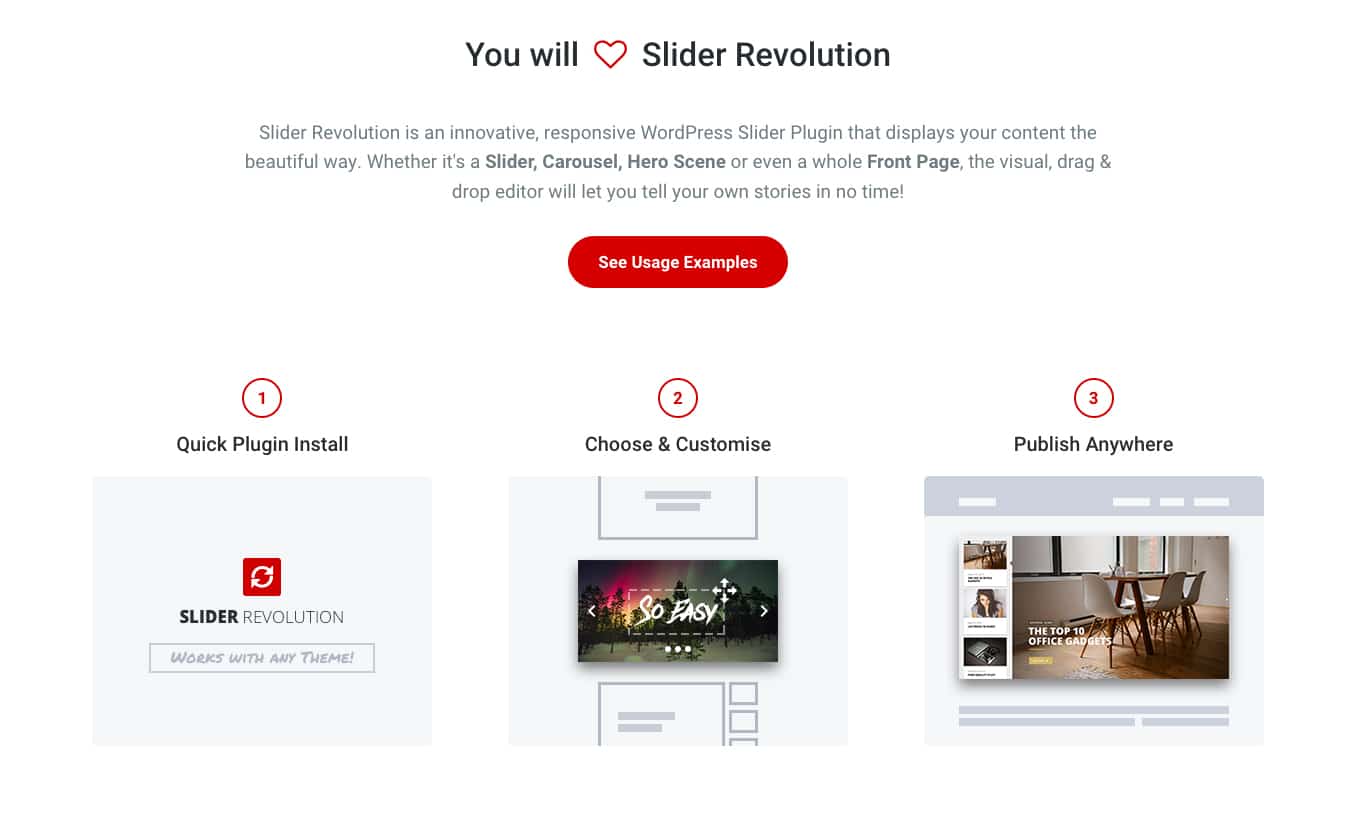
Next, for a lovely layout activate a reliable slider plugin – we recommend Revolution Slider, Edge Slider, Master Slider, or Layer Slider. All of these are available to download as plugins in Jupiter onto your WordPress website. For those of you who are new to the WordPress world, a slider is a term for Slideshow, but it encompasses everything from carousels, photo slides, film clips, background graphics, etc. It allows you to display multiple images, videos and graphics in a big, beautiful, flashy way. This will make your site compelling and attention-grabbing. See here In-Depth Tips On How To Use Revolution Slider.
Tackle Your Templates
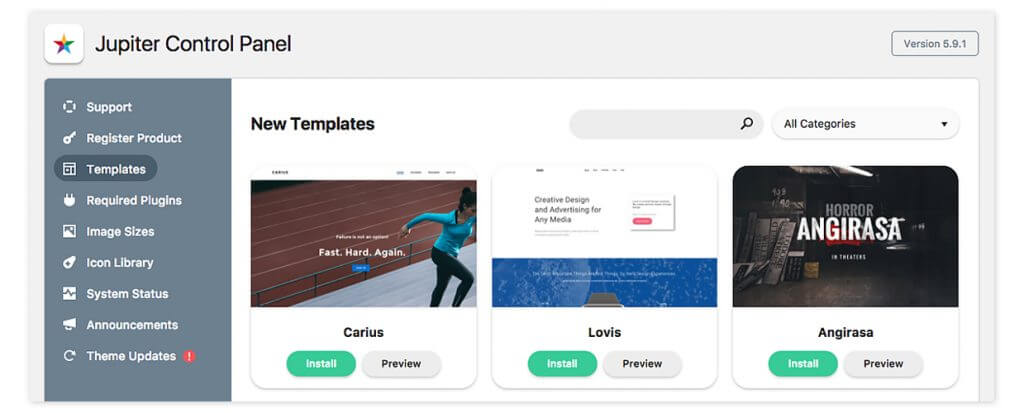
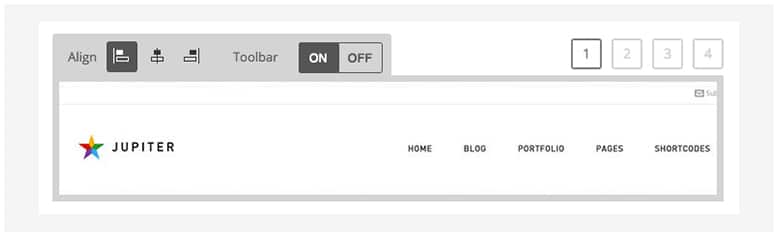
With a fresh installation of WordPress, you’re all set to choose any of the 140+ exclusive templates (pre-built demos) that Artbees has designed and developed as part of the Jupiter theme. The templates are all able to be installed, as long as WordPress is running and the latest version of Jupiter theme is registered. You can find these template options from the “Install Templates” under the “Jupiter” tab in your WordPress Dashboard. Here is an example of what Jupiter templates look like in WordPress:
For detailed directions on how to install templates head here.
Optimize Your Theme Options
While creating my WordPress website I didn’t realize how much I could change overarching features in the “Theme Options” tab until a few days into the process. It would have saved me a lot of time and manual labor if I had known that I could change certain global settings collectively, instead of changing every color of every icon, and content box, and header individually. Talk about a major headache! There are endless amounts of features and functionalities contained in the Theme Options tab of Jupiter. I encourage you to explore all the different tabs that you see listed at the top:
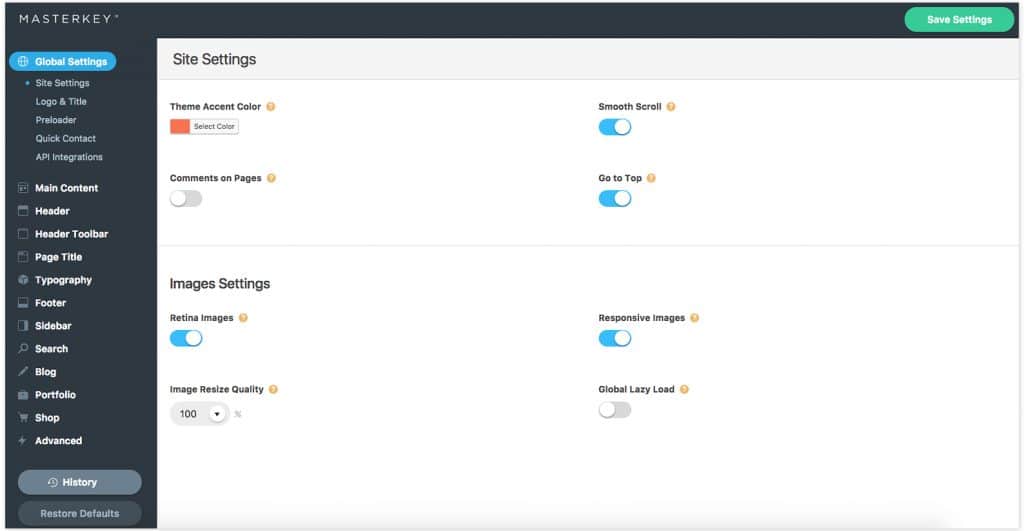
They’re pretty self-explanatory, but once you start exploring more you will see that there are loads of tabs within each category: allowing you to change a vast amount of features in your WordPress website. For example, in the General section you can upload anything from your Google Maps API, to your company’s logo and desired contact form. Styling is a section I wish that I had discovered sooner, because from there you can alter almost all of the colors of your website quickly and consistently.
Another tab I used a lot was Blog/News. Instead of spending time editing every single individual blog post, you can go to this tab to set global settings for all of your posts, such as layout options, feature photo settings and the comments section. For more specifics about blog theme options check out this post.
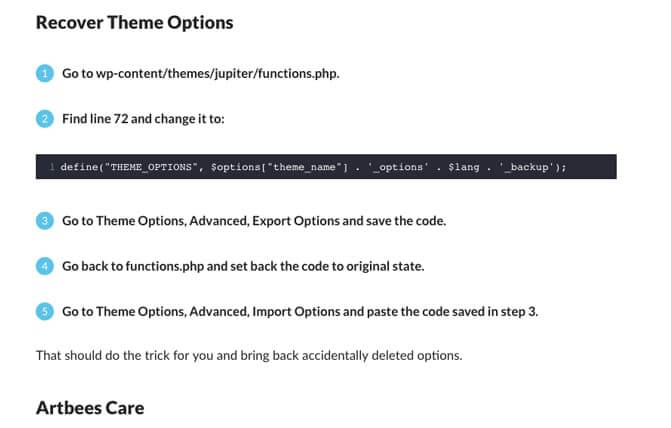
If after adjusting all these features and functions in Theme Options you decide you royally messed up your site – don’t fret! You can click “Restore Defaults” found on the bottom left of every page in Theme Options to get you back to the default status of the theme. But, if you accidentally reset your Theme Options and would like to bring back deleted information, check out this page for step-by-step instructions on how to do so.
Pick Apart Your Page Options
As you create your website, you’ll be spending most of your time in the WordPress admin tab called Pages. What’s nice is that when you just begin, you will most likely be working off of what the templates have already provided. Your job now is to replace photos and content; switch up features and move page sections when appropriate; and also, to add elements wherever necessary.
The Most Common Confusions For Jupiter WordPress Beginners
There are many tips and pieces of advice I’d love to bestow upon you, as I know how frustrating this stage of website creation can be, but for now, let me share some of the most common confusions experienced in Jupiter by WordPress beginners:
- Understanding the importance of the “Update” button on the top right of the page. When I first starting putting together my website, I thought each added element and feature would automatically refresh and save itself. Update in my mind meant updating the theme overall, not “save” so I made the mistake of losing my modifications/changes many times before finally remembering to always “Update” each change. Make sure you do the same!
- Another common issue that new Jupiter users have in WordPress is that their Visual Composer editor is disabled for “pages” even though the plugin is active. If you experience this, all you need to do is go to your WP Dashboard, choose “Visual Composer”, then “Role Manager”, and then tick the needed elements under “Post Types” (Custom). In this case, you would need to be sure “page” is ticked so that you can use the Visual Composer editor in your page sections.
- Using the most important buttons correctly: Backend/Classic Mode, Add Element, Page Section and Templates.
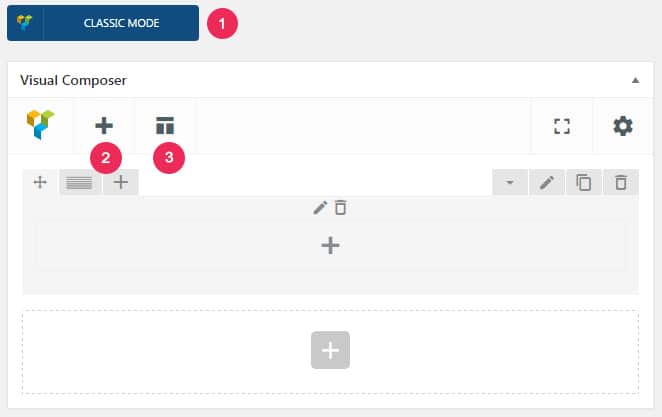
- Press button #1 if you want to switch from Visual Composer to the backend editor where you can generate shortcodes manually. Though I suggest only doing this if you are confident with what you’re doing.
- Use the Plus (+) button whenever you want to add a specific element to your page. This could be anything from a video, to a contact form, to a button, etc.
- Use this button sparingly, when you want to alter the layout of your page.
Don’t Forget About The Header and Footer
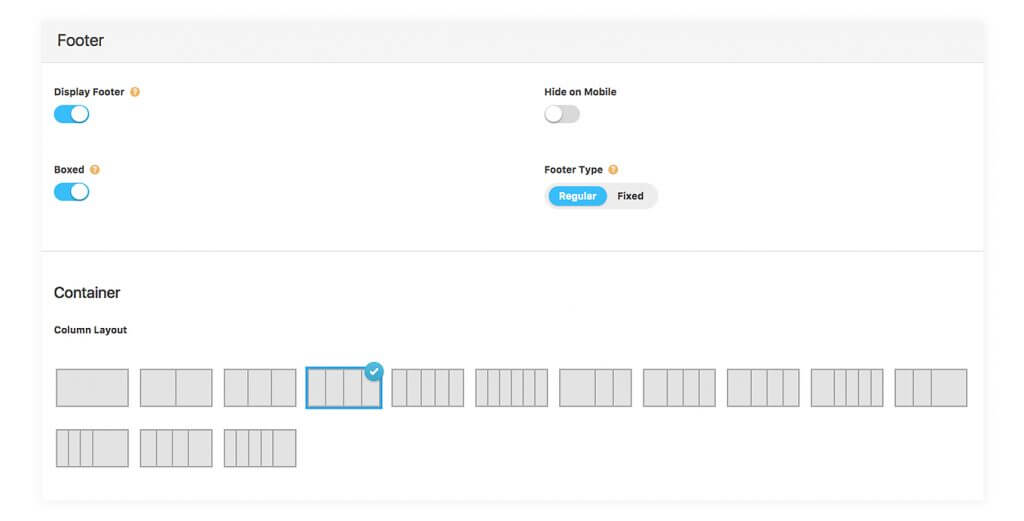
Other important elements of Jupiter that you need to sort out before launching are the Header and Footer area. The Header usually contains your main navigation buttons, the company logo and perhaps a few icons. The Footer is generally filled with copyright information, social media icons/links, Google Maps, or whatever other widgets you can think of. Both the Header and Footer remain static on each page of the WordPress website.
What I finally realized, after some confusion was that Jupiter contains two different places where you can edit your Header and Footer. One is in Theme Options under the “General” section, and the other is in the Customize button found at the top of your Dashboard. You may want to get yourself acquainted with what you can do in these two areas, because your adjustment options vary in each.
In Theme Options you can do things like upload and edit the logo that will appear at the top of the page. You can also change the general layout of the Header and Footer. For more in-depth details of what you can do, check out these links here on Headers and Footers.
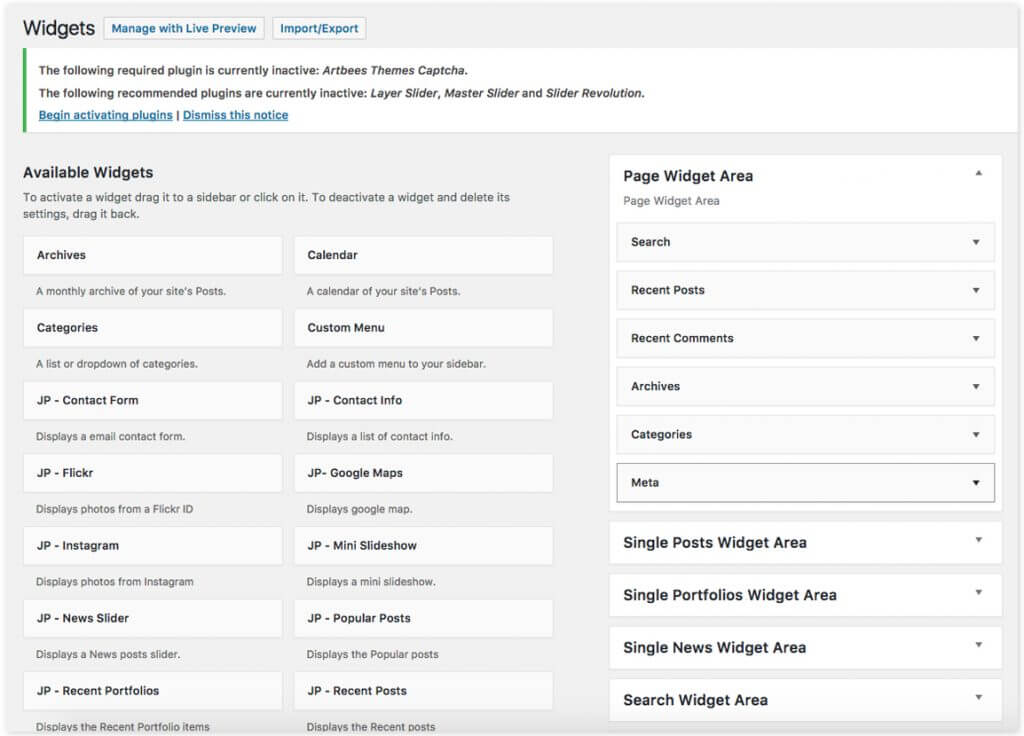
In the Customize section you can change the navigation buttons in your Header, add drop-down menus, and do a lot of work on the widgets of your Footer. Here are two helpful articles to help you learn more about working with widgets.
Breaking It All Down
Designing a website is a lot of work and even with all the amazing features offered these days, it can still be pretty darn confusing. Hopefully this article enables you to get a better sense of what to do and where to go when you’re just starting out with Jupiter. Let’s break down what we just learned about Jupiter features in WordPress:
- Once your domain and theme are registered and ready to go, activate essential plugins that are necessary from the start, including Visual Composer and a slider plugin (we suggest Revolution Slider, Edge Slider, Master Slider, or Layer Slider).
- Then choose a template from an entire database of over 140 options that Jupiter offers in WordPress.
- Explore the “Theme Options” tab and make changes here that will affect the look of your design throughout your entire website.
- Once you start creating your pages, be sure to use the most vital buttons correctly and gain an understanding of what each one does before you start.
- Before you launch your website, adjust the Footer and Header in Theme Options or in the Customize section to have some of the finer touches of your website in place.

No comment yet, add your voice below!