If it’ll give you some extra reassurance take a look at this article to become more knowledgeable about the most common kinds of malware infections in WordPress and useful security plugins to fight against them.
If you’ve already been hacked, the good news is that you can clear out the malware infections in WordPress by following the steps we cover in this article. They can be safely done on your own but if you don’t feel comfortable handling it yourself, or if you detect that the hack job is a particularly serious one, you can also hire a removal service like this one.
We’re confident that you can clean you website, get it back to normal and protect it from future attacks. We’ll explain in detail how to do all that in the eight steps below. Let’s begin.
Step 1. Scan your computer.
Your site can be infected in various ways and one of the most common ways is when your computer has a virus that is leaking your site’s FTP password. So the first thing you need to do is to check that your computer is virus-free.
Scan your computer with antivirus software on an updated virus signature database. As you’ll learn after reading this article, one of the best ways of preventing hacks is by keeping everything updated – including your antivirus software.
Step 2. Backup site database and files.
It’s always good practice to create a full-site backup before any actions are taken with site files, as it will help you to restore your site to it’s current state if something goes wrong. That’s the whole point of a backup!
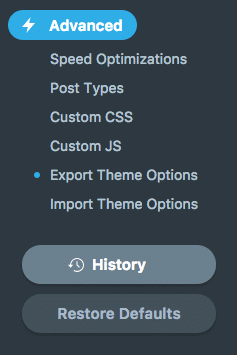
You can use hosting panel features to backup your site’s database and files. If it doesn’t seem clear to you, you can also reach out to your hosting provider support to help with that. After the backup is ready, download it to your local machine. Also, don’t forget to export theme options. For Jupiter theme it can be done via Jupiter > Theme Options > Advanced > Export Theme Options.
Step 3. Download WordPress installation package.
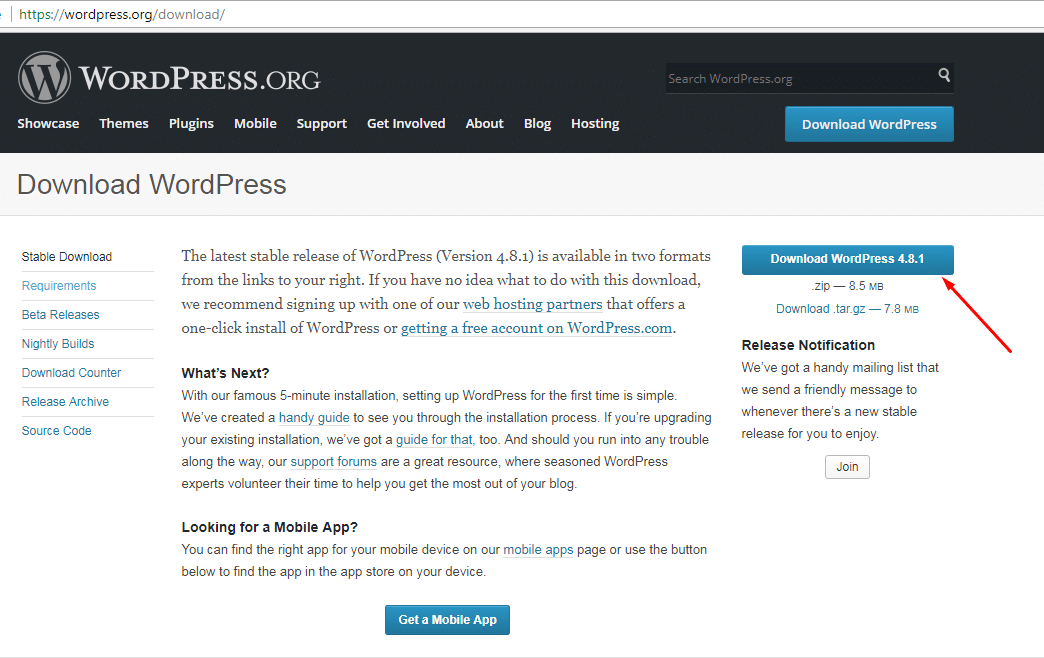
Go to https://wordpress.org/download/ and download the latest WordPress installation package.
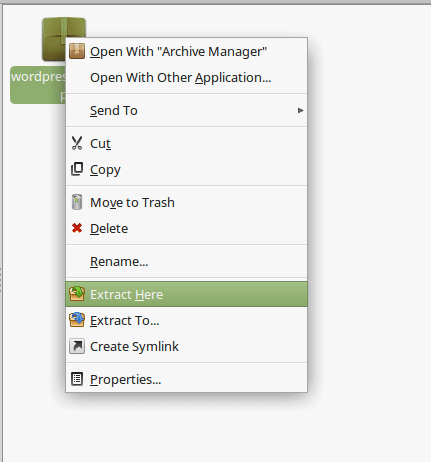
Then open the folder where you saved the archive and extract files from it on your computer.
Step 4. Delete the malware infections in WordPress.
Now you need to delete the WordPress files of your current installation. You can do it via FTP using FTP manager (e.g. FileZilla), or via the cPanel File Manager. Note, it will be substantially faster if you do it through File Manager. So, when you open up the directory where your WordPress site is installed, you should find files that look like this:
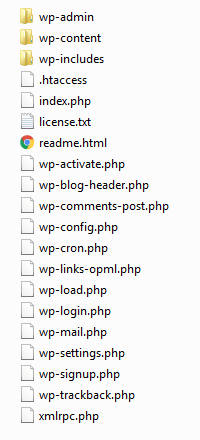
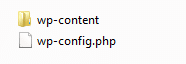
I know it sounds scary, but delete everything except for the wp-content folder and the wp-config.php file. Don’t worry. After doing that, your installation should look like this:
Open the wp-config.php file to edit and make sure that there aren’t any strange lines of codes, like a long string of random text. To be totally sure everything belongs, you can compare your config file with the default one called wp-config-sample.php.
Then go to the wp-content folder, where you can see the following directories/files:
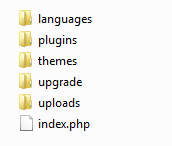
You should find only .mo and .po files in the languages folder, so if there are any .php or .js files – delete them immediately. Copy down a list of the plugins you are currently using and then delete the plugins folder.
Let’s go over what to do with the themes folder. If you made customizations in the Jupiter theme files and use a child theme for them (as we suggest) then you can delete all folders in the themes directory except for the jupiter-child folder. You’ll need to manually check all the files in your child theme to be sure there’s no malicious code. If you didn’t customize any theme files then you can simply delete everything in the themes directory.
Finally, if all customizations were made directly in the parent theme files, you need to save all of your modifications and move them to the child theme (because you can’t reupload theme files). That’s why Artbees strongly recommends making customizations in the the child theme right from the beginning of your website’s creation.
The upgrade folder should be empty by default. WordPress creates it automatically during the core update process. The uploads folder should only contain image files. Check every directory inside your uploads folder to make sure there are no php files or anything that you may not have uploaded. And lastly, the index.php file should contain the following code only:
<?php
// Silence is golden.
Step 5. Re-upload process.
Now you can upload fresh WordPress files that were extracted in Step 3 via FTP. After that re-upload the latest version of Jupiter theme on your server into wp-content/themes directory.
Step 6. Reset passwords.
Log in to your site dashboard and reset passwords for all usernames. Also, you need to change all FTP and hosting panel passwords. Note, don’t use weak password which consists of a simple phrase or just numbers. Always create strong passwords with at least one number, one special character and a mix of upper and lower case characters.
Step 7. Re-save permalinks and install plugins.
In your WordPress Dashboard go to Settings > Permalinks and click the Save Changes button. This will restore your .htaccess file so that the site URLs will work again. Then re-install your plugins according to the list you saved in Step 4. Note, you shouldn’t install old plugin versions. It’s always to keep everything updated for security and maintenance purposes.

Step 8. Re-check for malware infections in WordPress with security plugins.
Install one of the following plugins and scan your site to make sure you didn’t miss anything: Wordfence Security, Shield WordPress Security, Anti-Malware Security and Brute-Force Firewall. Note, if you decide to check the site with all the mentioned plugins then you don’t need to keep them all activated, so just leave one after you’ve verified the clean site.
In this article we’ve provided a list of steps to clean malware infections in WordPress and we’ve explained how to get your site back to its normal functioning. Now that your site is free of malware, you can ask Google to remove the warning, “This site may harm your computer”, from visitors’ screens. All you need to do is login or create an account at Google Webmaster Tools, add your website, choose “Health”, click “Malware”, and then “Request a Review”
We hope that all this new info will help you before you experience any breakdowns or panic attacks. If you remain calm, you’ll see that your website can be be restored and back to normal in no time!
Review The Steps:
Step 1. Scan your computer.
Step 2. Backup site database and files.
Step 3. Download WordPress installation package.
Step 4. Delete the malware infection.
Step 5. Re-upload process.
Step 6. Reset passwords.
Step 7. Re-save permalinks and install plugins.
Step 8. Re-check your site with security plugins.

No comment yet, add your voice below!