Website migration is the process of changing a website configuration or technology that can affect its online visibility and search engine optimization. A site migration includes changes such as changing the domain name or switching the hosting provider and server location, changing the structure of the site, site redesign, moving from HTTP to HTTPS protocol and moving the site to a new platform (CMS or Framework). In this article we will focus on changing the hosting server as the main process to migrate a WordPress site.
The reason for the migration is obvious when it comes to uploading a site on a production server after its development in the local environment, since the site needs to be made publicly available. If you are considering transferring an already working site from one server to another one, then there may be several most common reasons for that:
- Balanced pricing plan
- More hosting resources and useful features
- Good server security
- Great customer support
So if you are ready to publish your site or decide to switch to a new hosting provider, you will be faced with the question of how to migrate it. Here we will consider the technical aspects of two methods for migrating a WordPress site to a new server: a plugin-based method using the most popular migration plugins and a manual method.
The main risks involved in moving a site are data loss and downtime, which can make your site inaccessible for users and search engines, which in turn can lead to search engine rankings loss. Nevertheless, if everything is done in the right way, downtime will be minimized or won’t happen at all.
Choosing and setting up the new hosting environment
If you are looking for information on how to migrate the website, you clearly have reasons why you are leaving your current hosting provider and you don’t want to suffer any problems on a new host. There are different kinds of hostings available to choose from and it’s important to understand how they work. Here is a list of hosting types:
- Shared hosting – Usually the most common type of hosting, when one server houses many websites and shares resources between them.
- Virtual Private Server (VPS) – The virtual partitions of a dedicated physical server are used in this hosting type and an actual area of the server is dedicated to your site.
- Dedicated server – A physical server supports only your website and you have full access to the server’s resources.
- Managed and WordPress optimized hosting – A hosting service where all WordPress technical aspects are managed by the hosting provider. This type of hosting includes technologies and tools that help your site run smoothly.
Before starting to migrate your site, you need to add your site (domain name) to the new hosting panel so that the necessary records will be created for your domain on a new server.
An important thing to remember: Don’t cancel your current hosting plan before the migration and further testing are completed, as you could lose your entire site’s data.
Backing up the site before you get started
A good practice before making any crucial changes to the site is making a full backup (site files and database). It can be done manually or with the help of any backup WordPress plugin. Since creating a backup is one of the steps of site transfer, we will cover it later in this article.
The plugins-based method to migrate a WordPress site
Migrating a WordPress site using any cloning plugin is a popular solution that helps to ease the process: Just install the plugin and make a few clicks. There are dozens of WordPress plugins for migration in the repository. However, in this article we will consider the two most popular ones: All-in-One WP Migration and Duplicator.
The All-in-One WP Migration plugin
The All-in-One WP Migration plugin specializes in website migration and provides all the necessary tools for that. It’s easy to use and has drag-and-drop import functionality, which simplifies the migration process.
At first you need to install and activate the cloning plugin on your old and new hosting environment. To do that, log in to your site’s WP Dashboard, navigate to the Plugins > Add New section, type the plugin name in the Search field and then click the Install Now button for the necessary plugin.
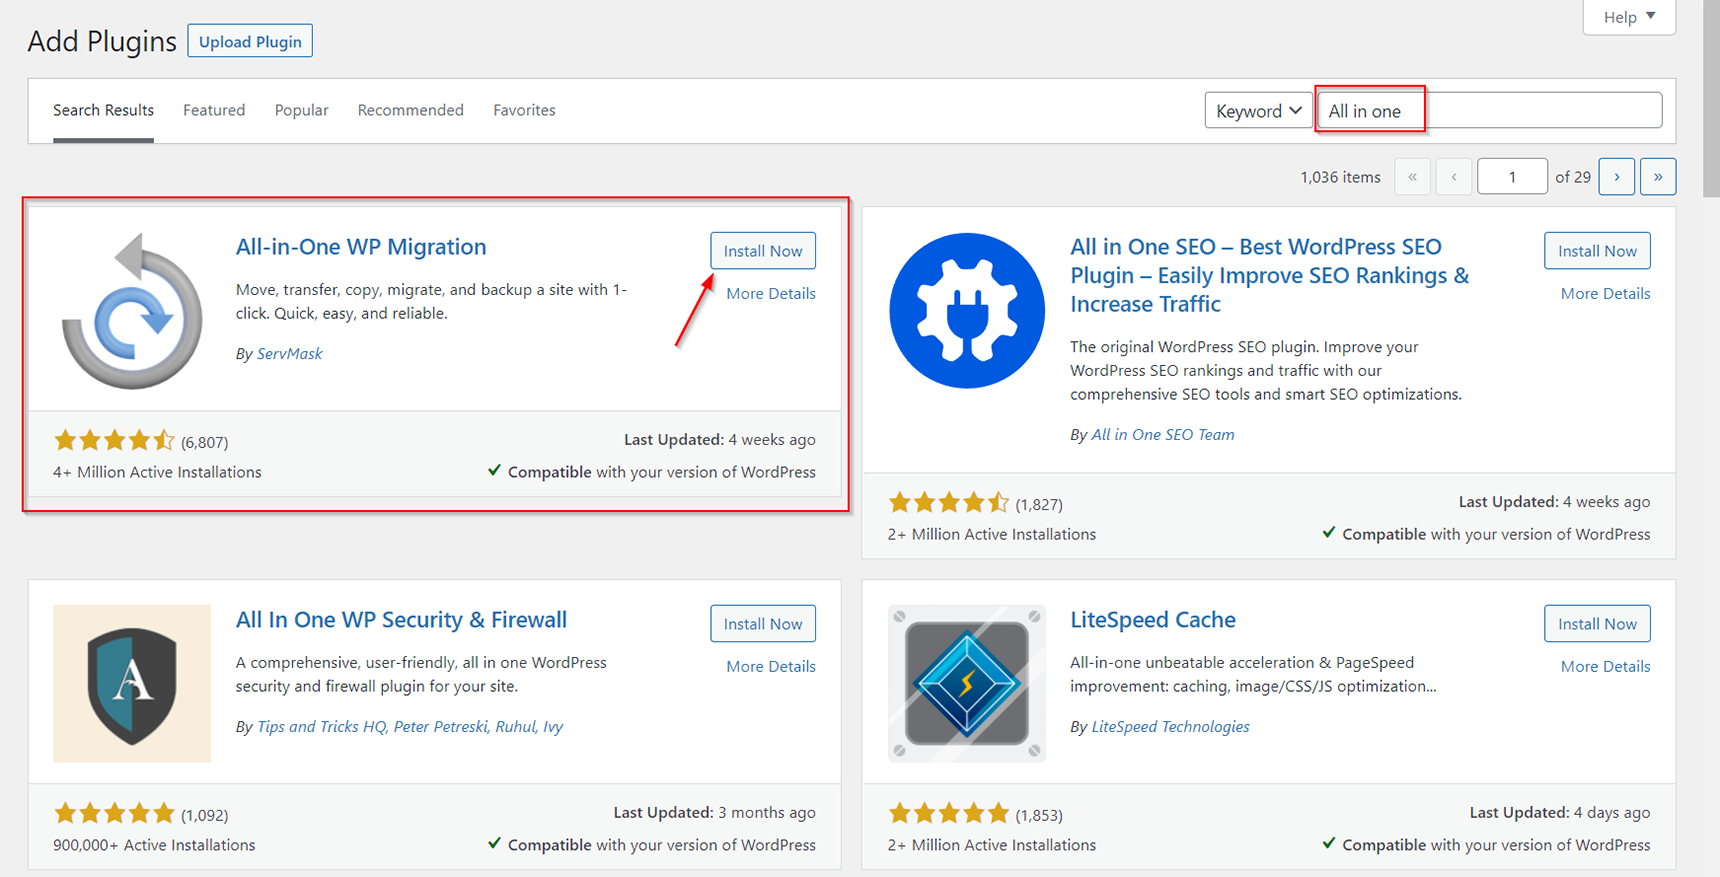
When installation is complete, just click the Activate button to turn on the plugin.
The steps below will show you how to move your WordPress site.
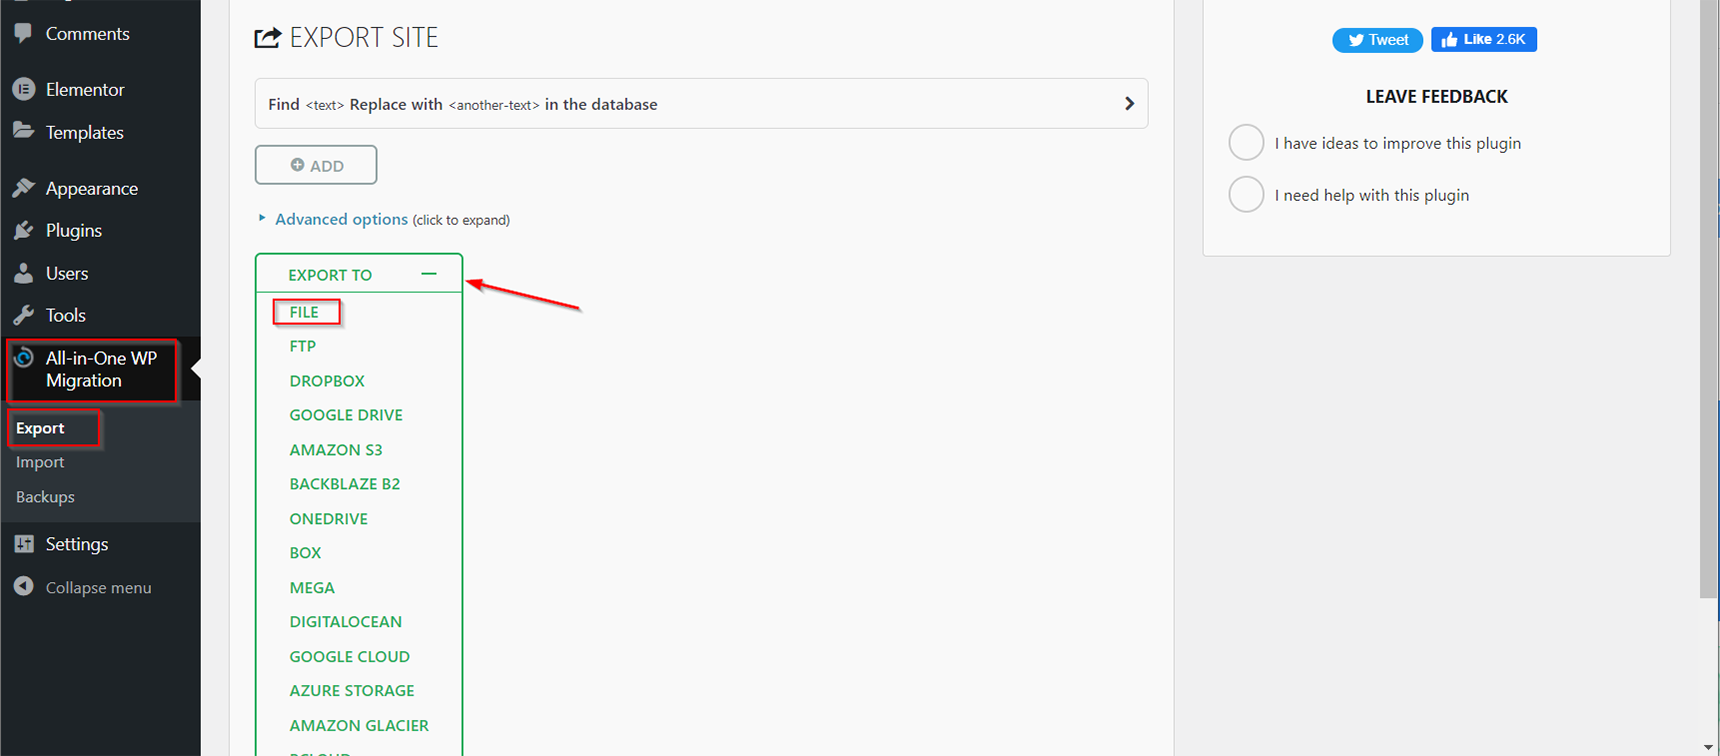
1. In the WP Dashboard of the site you want to move, go to the All-in-One WP Migration -> Export section.
2. Select the File option from the Export to dropdown menu.
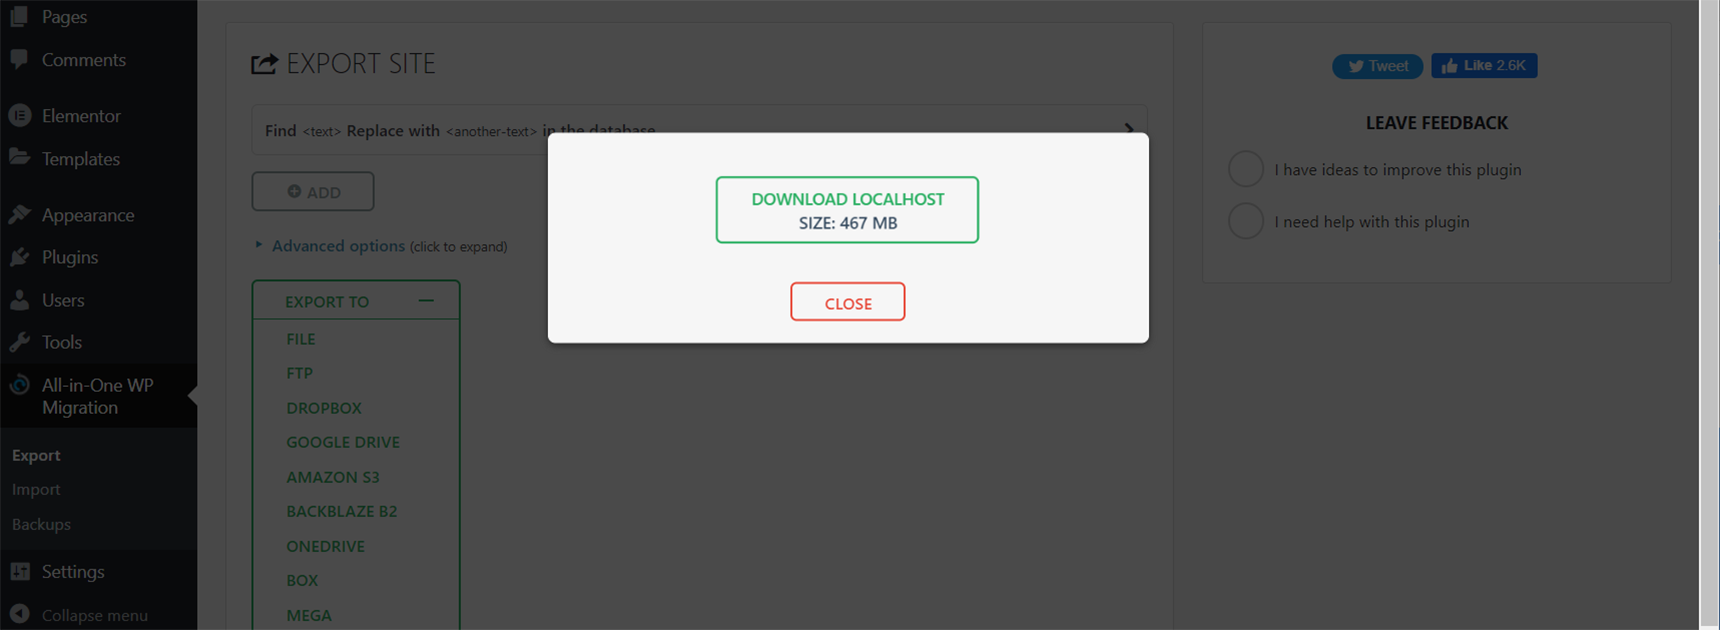
3. Wait for the plugin to finish exporting the site data and then download the generated file in the .wpress format.
4. Log in to your new site’s WP Dashboard and navigate to the All-in-One WP Migration -> Import section.
5. Click the Import from buttonand select the File option.After that, locate the .wpress file you downloaded in step 3.
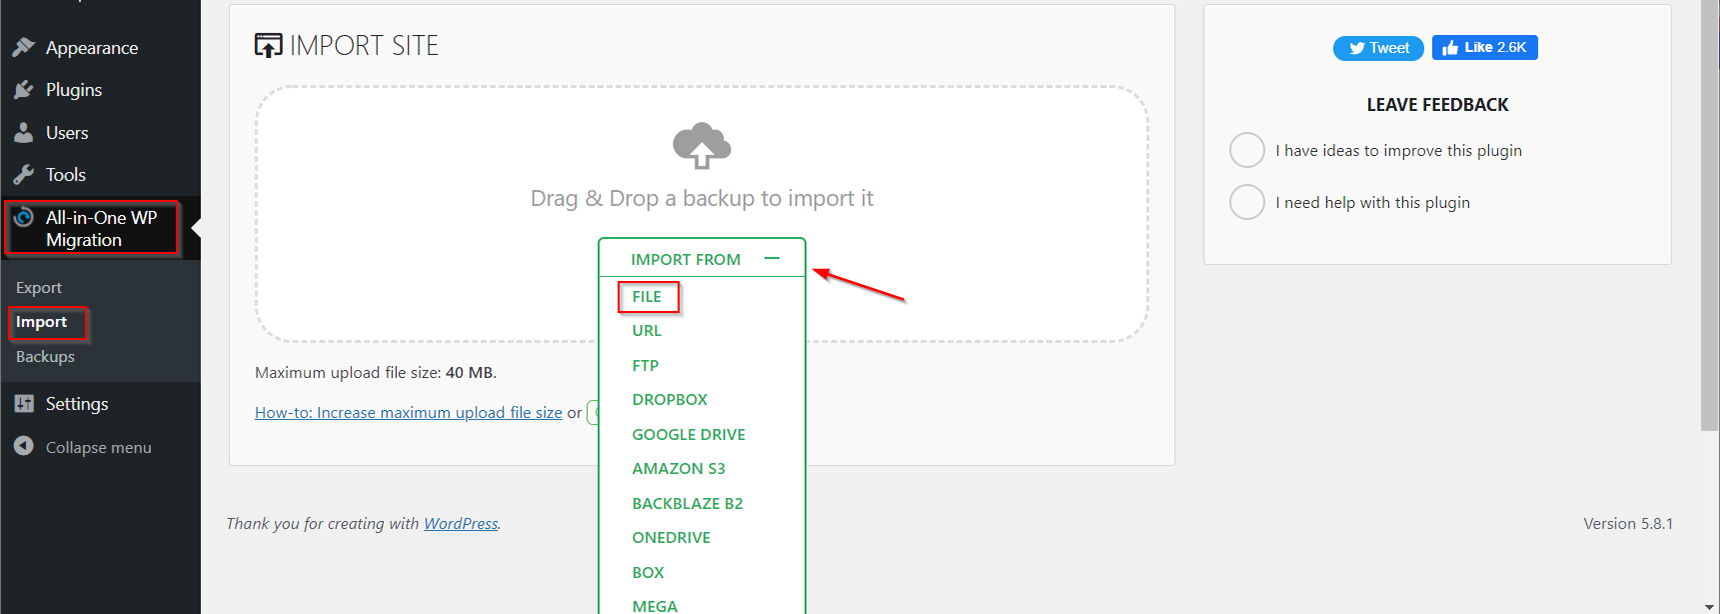
6. Click the Finish button once the import process is completed. In case the backup file can’t be uploaded via the web interface due to the max_upload_filesize limitation, you can upload it via File Manager in your hosting panel or via FTP. Upload the generated .wpress file into the wp-content/ai1wm-backups folder of your new site and then it should be displayed in WP Dashboard > All-In-One WP Migration > Backups. Click the Restore button and proceed with the restoration process. When migration is done you need to resave the permalinks structure in WP Dashboard > Settings > Permalinks, so it will regenerate the .htaccess file.
Important note, All-in-One Migration is a freemium plugin and it has free and premium features, but one of the main limitations you need to pay attention to is the size of the site’s backup file. If it’s bigger than 512M, you need to have a premium version of the plugin to proceed with the migration process.
The Duplicator plugin
Duplicator is another migration plugin that is also on the list of the best WordPress migration plugins. With the help of this plugin you can simply clone your site to a new server without downtime. When migrating, Duplicator creates a package with all the pre-configured files, so you don’t even need to install WordPress on your new host, as Duplicator does it itself.
The plugin installation is the same as the one described in the previous section. Once it is installed and activated, you will see the Duplicator menu in the WP Dashboard panel.The following steps will show the process of migrating the WordPress site using Duplicator.
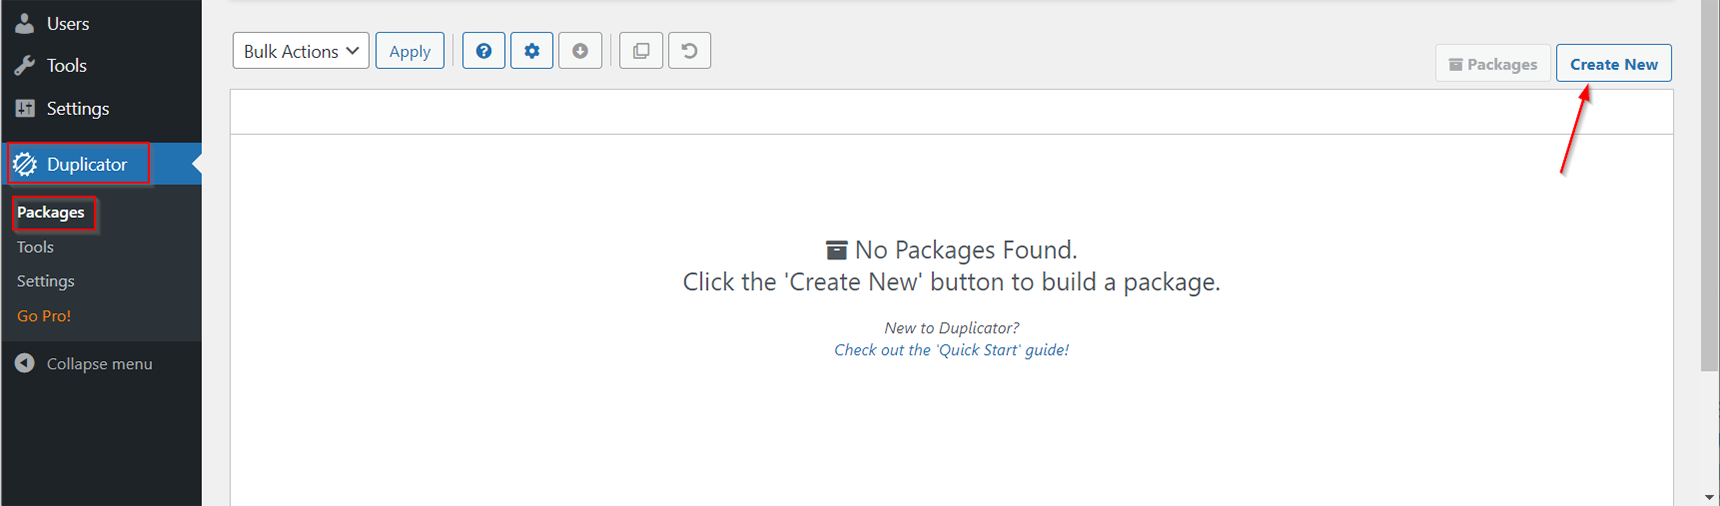
- Opent the Duplicator > Packages section and click the Create New button in the top right corner. Give a name to your package and click Next.
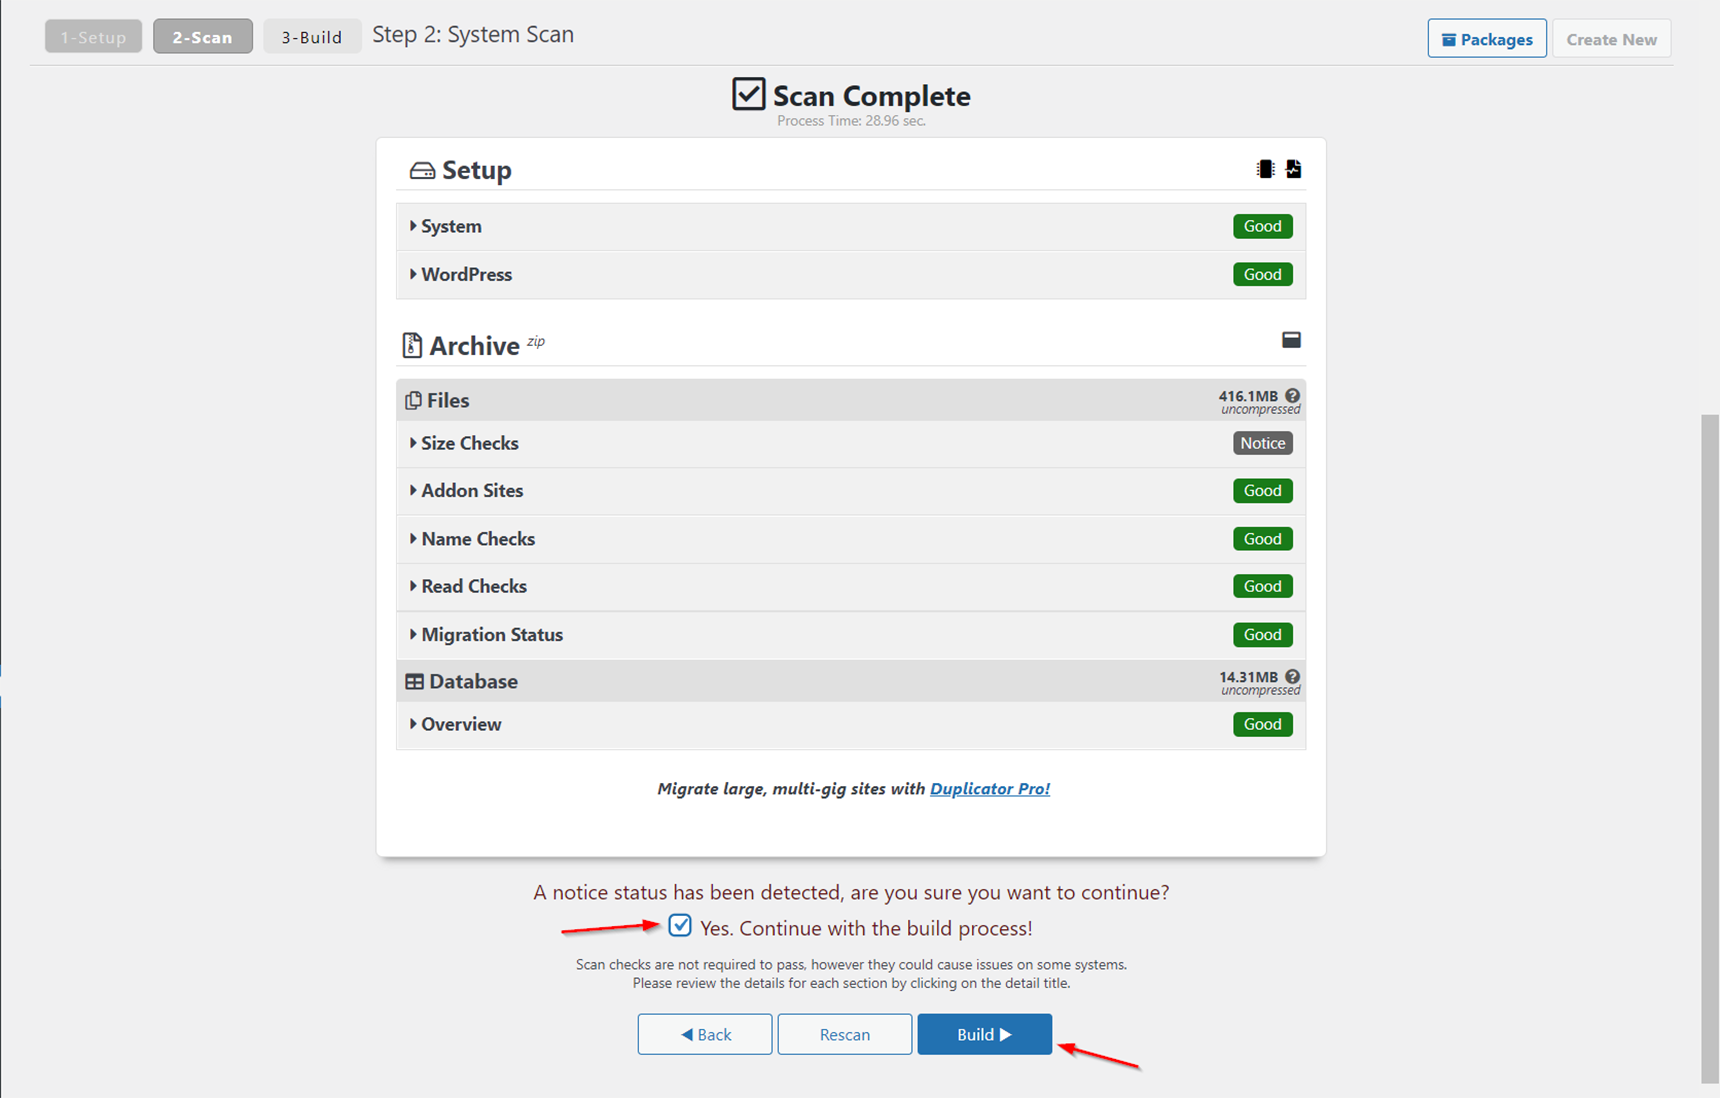
At this stage Duplicator will scan your site and let you know if there are any potential issues. If there are problems highlighted, resolve them and scan again before proceeding.
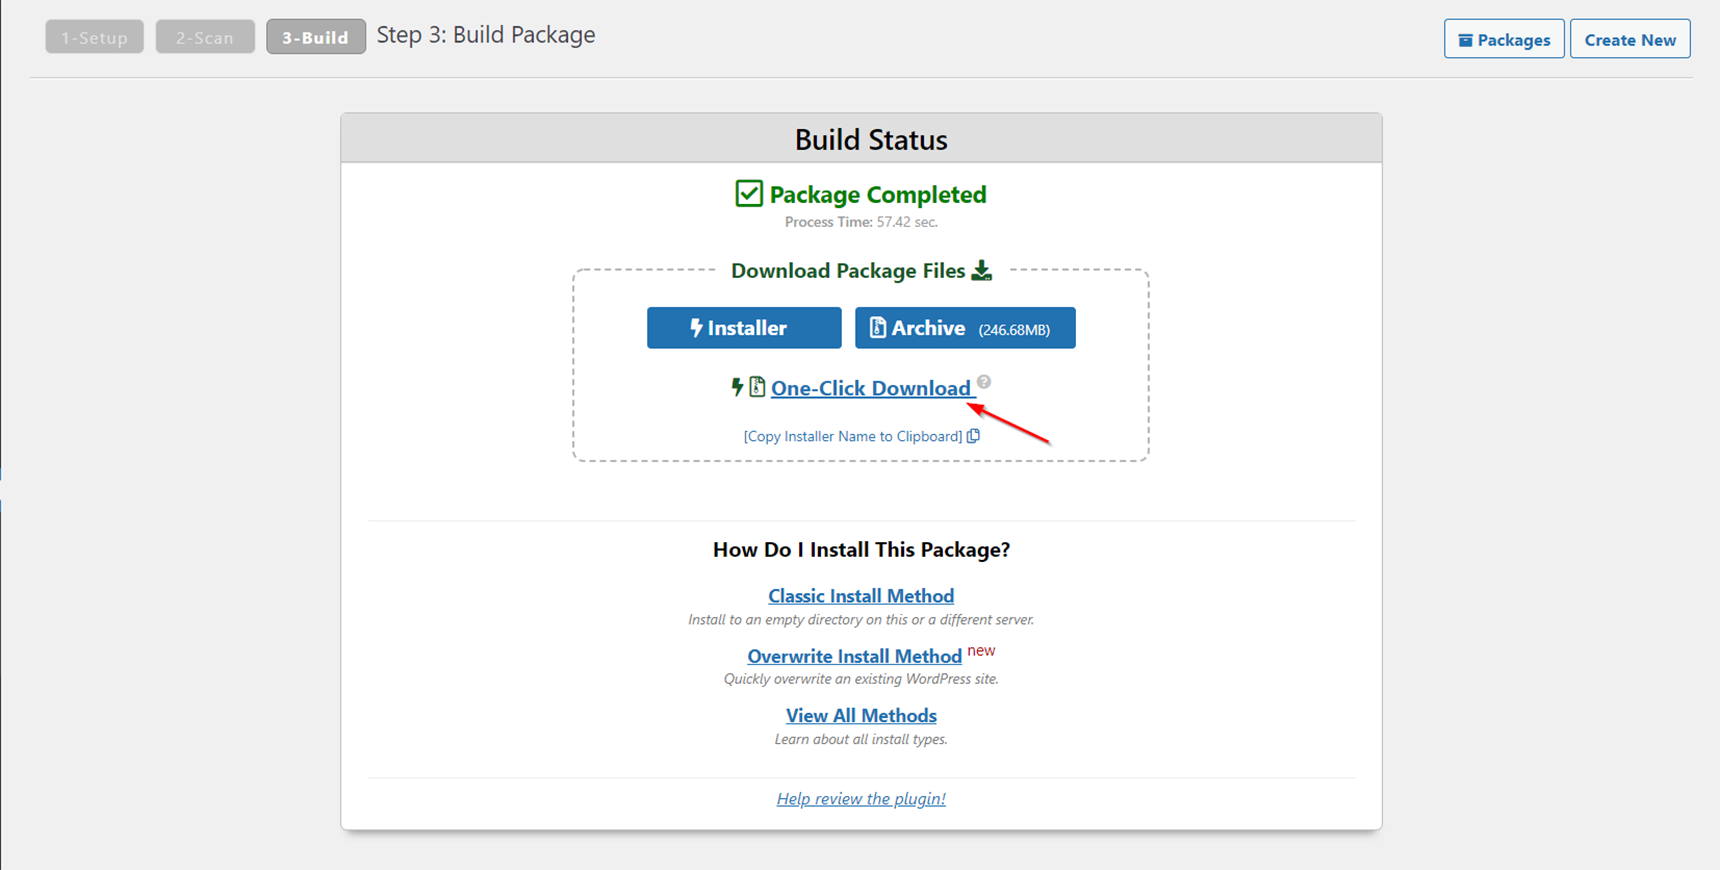
2. When the backup file is ready, download it by clicking the One-Click Download link. It will download both the backup file and the installer.php file to your computer.
3. In this step you need to create a database on your new host. This can be done in the hosting panel; for example, if it’s the cPanel, you need to log in to it and find the Databases section. In that section, select MySQL Databases and click Create a New Database. Enter a name for your database and click Create Database. Then under Add a New User, enter a username and password and click Create a User. After that, scroll down to Add a User to a Database and select the user and database you just created and click Add. On the Manage User Privileges section tick the ALL PRIVILEGES checkbox and click Make Changes.
Important: You need to remember the database name, its username and the password for later actions.
You can check more about managing databases in the cPanel documentation.
4. Upload the files you got in step 2 into the site’s root directory on your new hosting server (usually it is the public_html folder).
5. If you are migrating the site while keeping the same domain name, then you will need to modify your hosts file on a local machine. It allows you to override which server is hit when you browse a site and real domain switch (DNS change) will be done only after the migration and testing processes are completed. It’s important to prevent any downtime. To do that, you need to determine the IP address of your new server. You can find it in the new hosting panel or just ask the new hosting provider support. Now find the hosts file on your local machine (for Windows users its location is c:\windows\system32\drivers\etc\hosts, for Unix-based operating systems it is /etc/hosts) and in the bottom line of the file add the entry in the following view:
the_new_ip_address your_domain_name
For example, if the new server’s IP is 123.123.123.123 with the domain name mydomain.tld, the entry will be:
123.123.123.123 mydomain.tld
6. Navigate to the installer.php file in the browser by entering the address http://yourdomainname.tld/installer.php to start the installation process. In the duplicator installation wizard, enter the database credentials you created in step 3 (leave the Host field as “localhost”) and click the Test Connection button. If everything is fine then click Run Deployment.
7. When the migration process is completed, test the site and then you may switch the name servers for your domain to the new host and remove the entry made in the hosts file in step 5. Note that name server changes may take effect after up to 24 hours.
The manual method of migrating a WordPress site
Migrating a WordPress site manually requires some technical skills, as you need to move the site files and database, and then configure the wp-config.php file. Using this method you need to know how to access files via the File Manager in your hosting control panel or via FTP (File Transfer Protocol). Also, knowledge of managing the database is required, in most cases using the phpMyAdmin environment.
Backing up your current WordPress site files and MySQL database
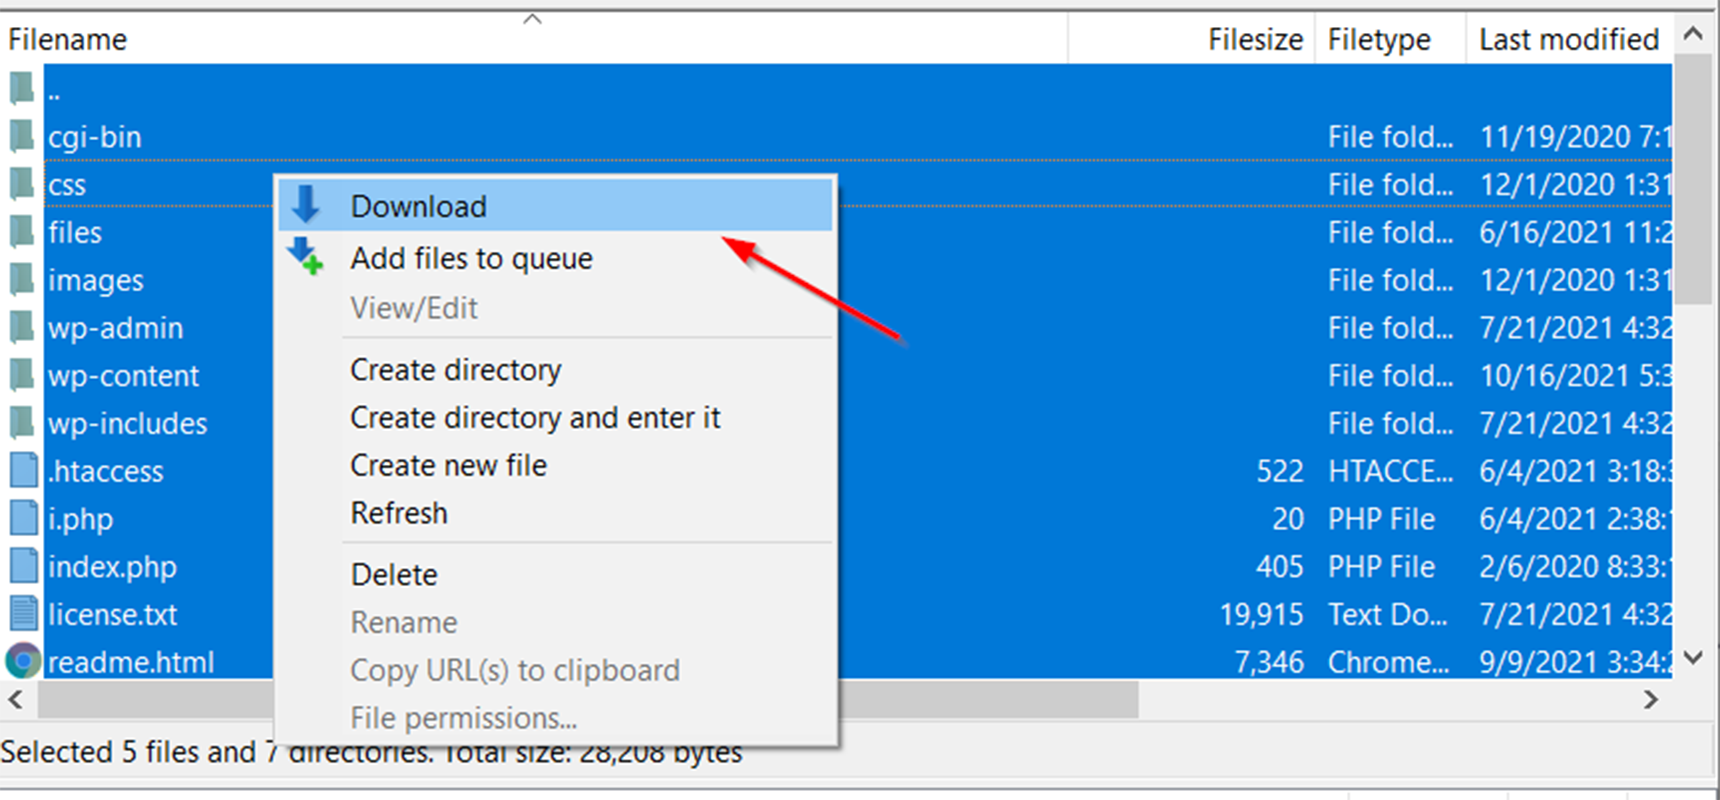
Files can be downloaded from the server via FTP using the FileZilla FTP Client. After connecting to the old server, navigate to the site’s root directory (public_html in most cases), select all WordPress files, then open the context menu by right click and select Download.
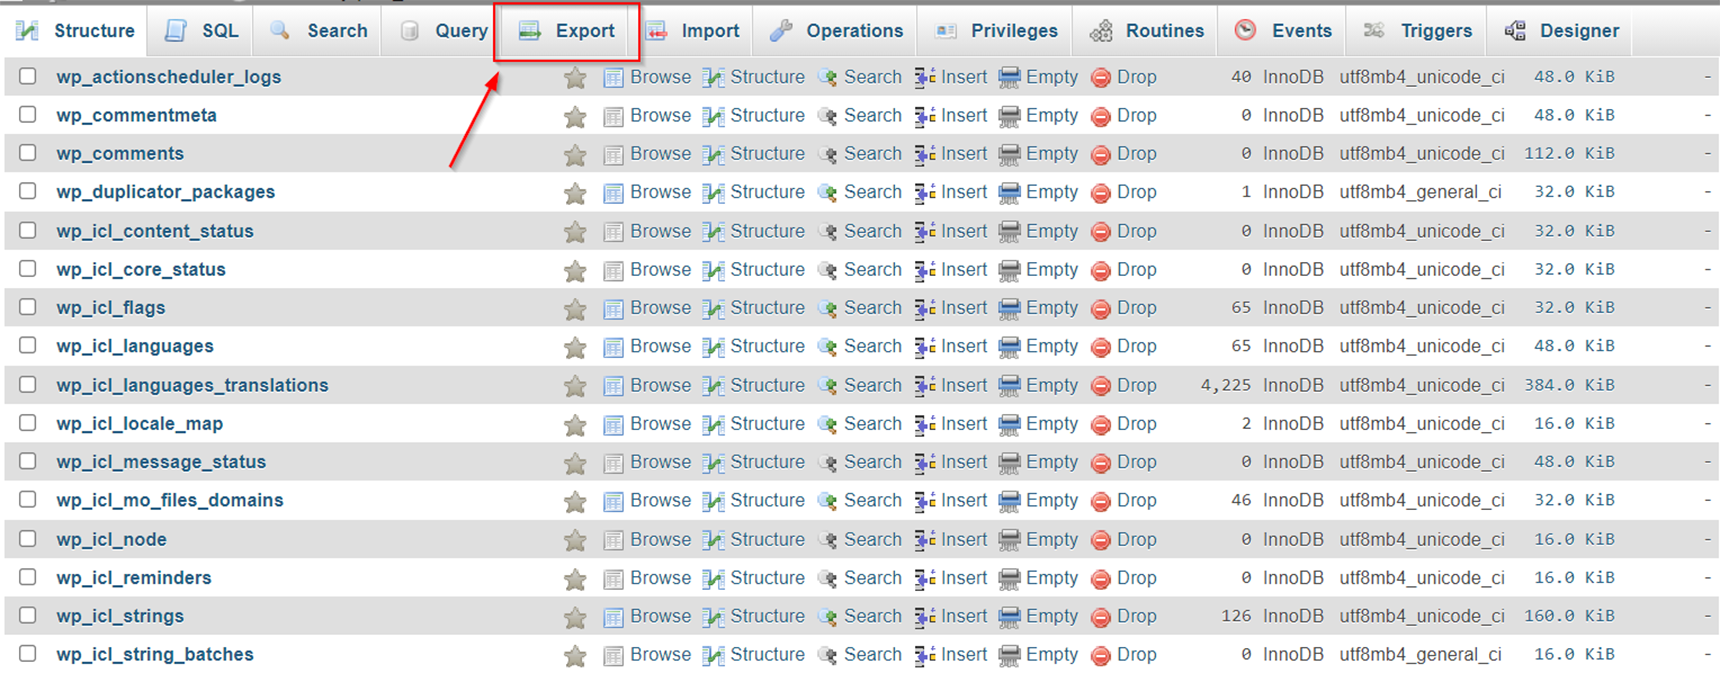
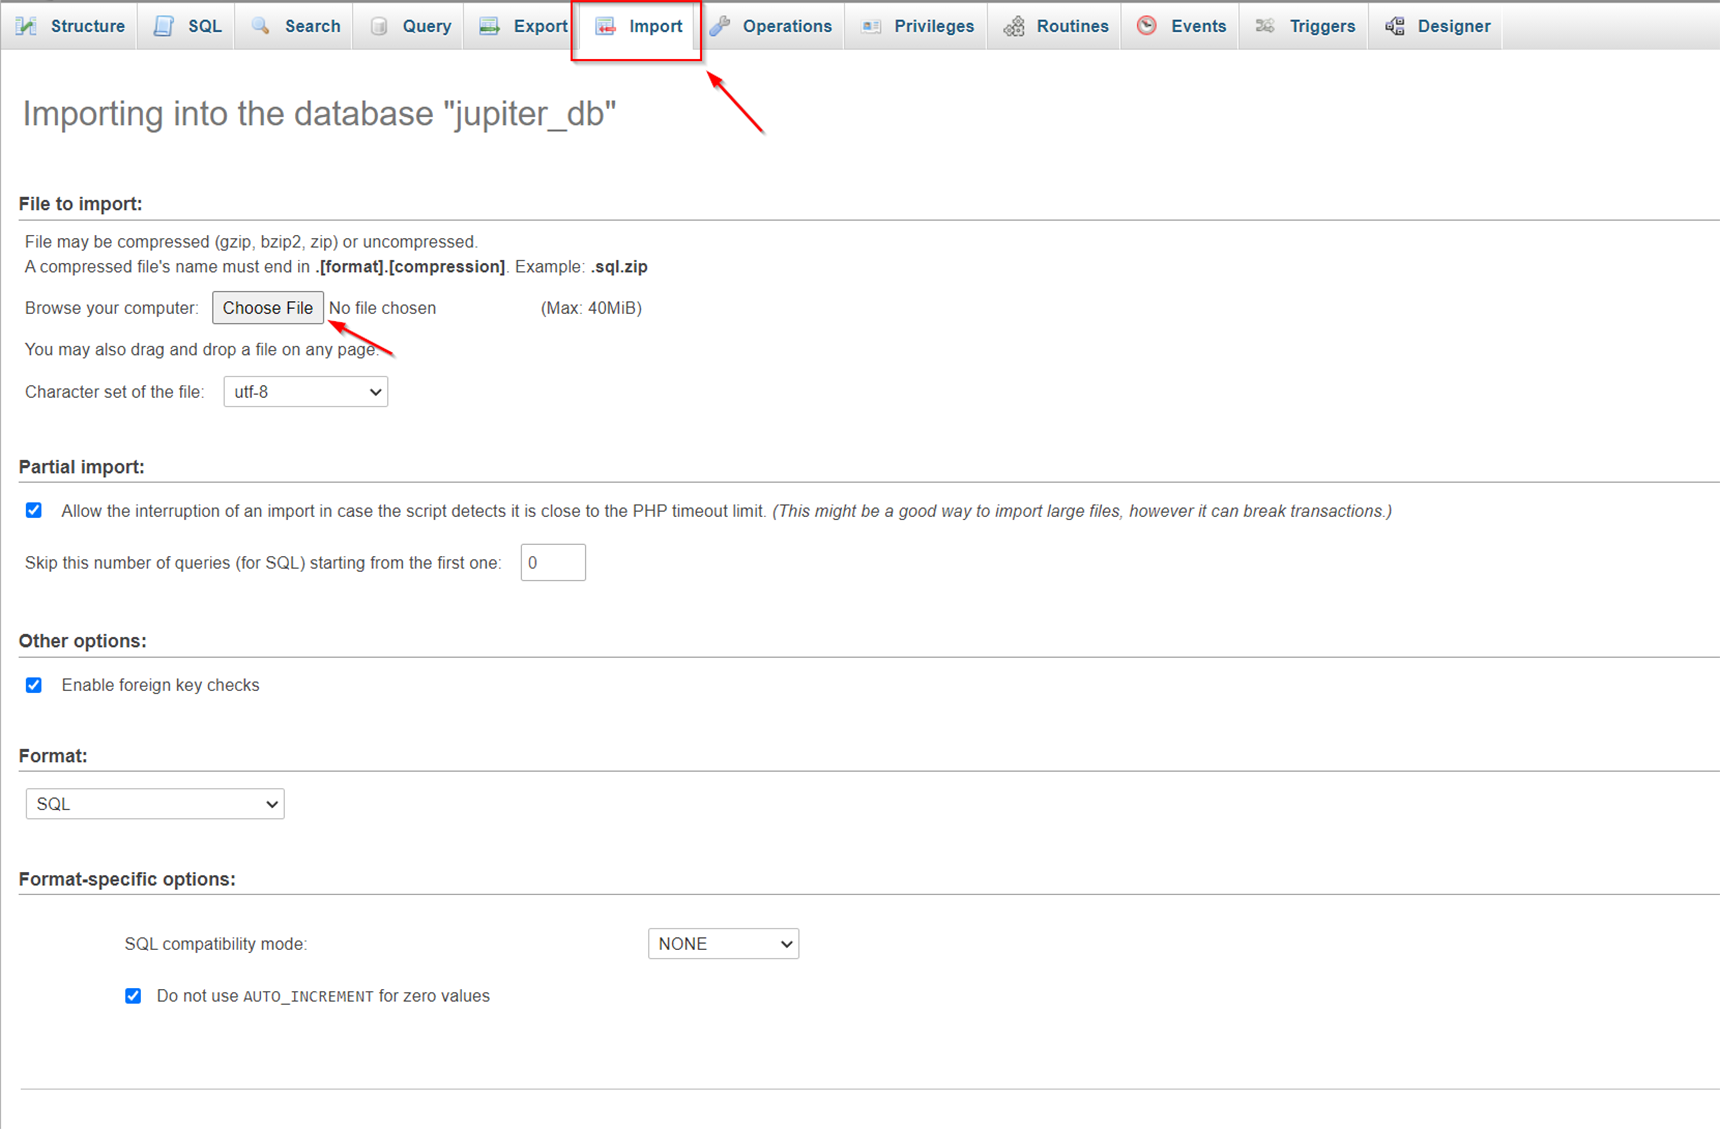
When the download is complete, open the phpMyAdmin tool in the hosting control panel to access the databases, select the database of your site and open the Export tab.
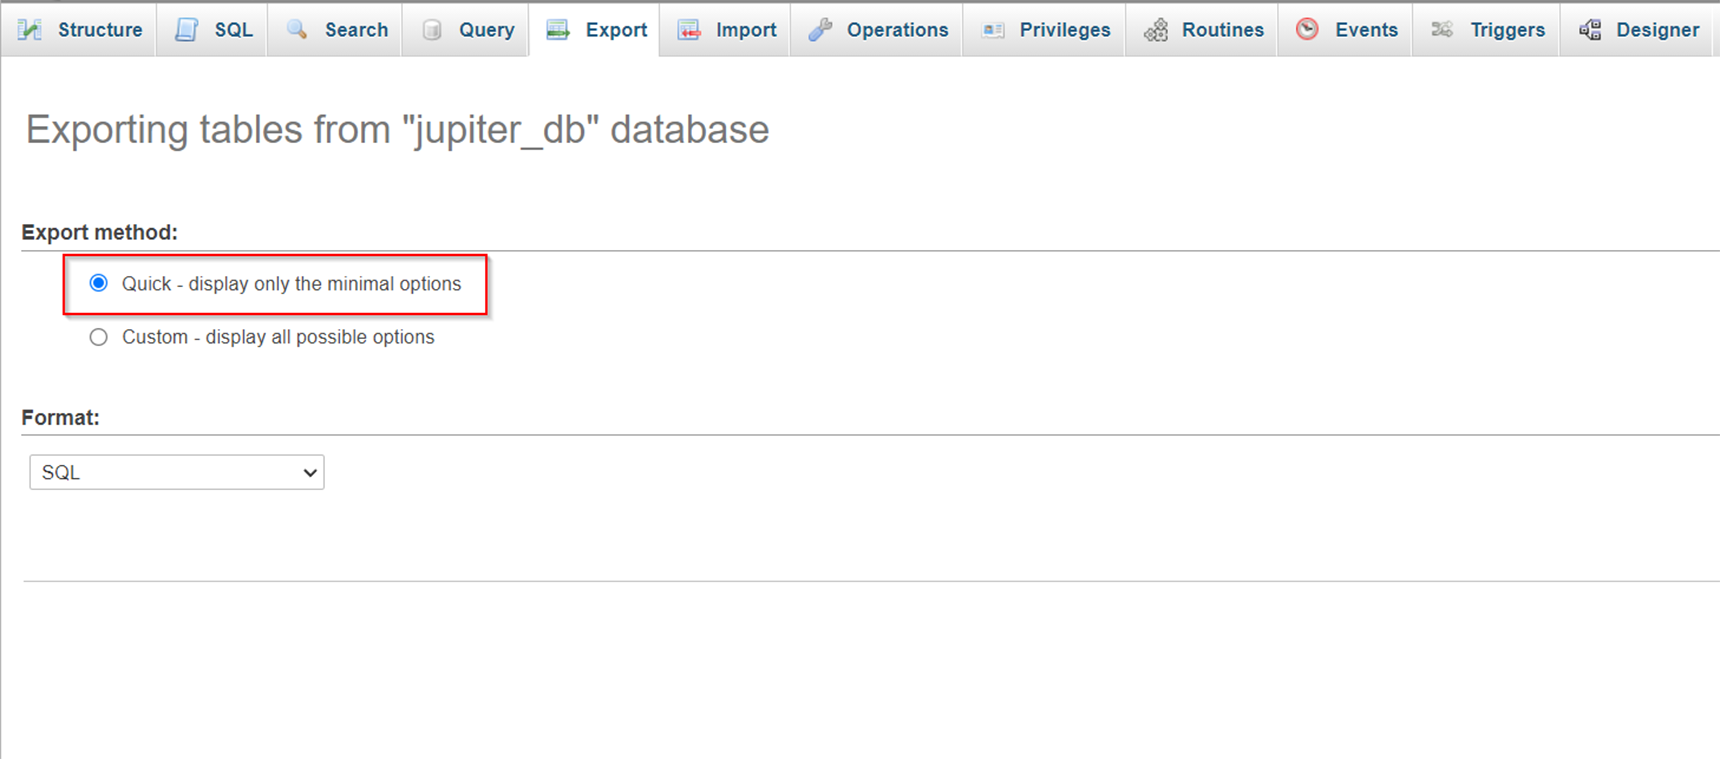
In the Export Method section select the Quick method, then choose the SQL option as the format and click the Go button.
The database dump will be downloaded to your computer.
Uploading the files and exporting the database to a new server
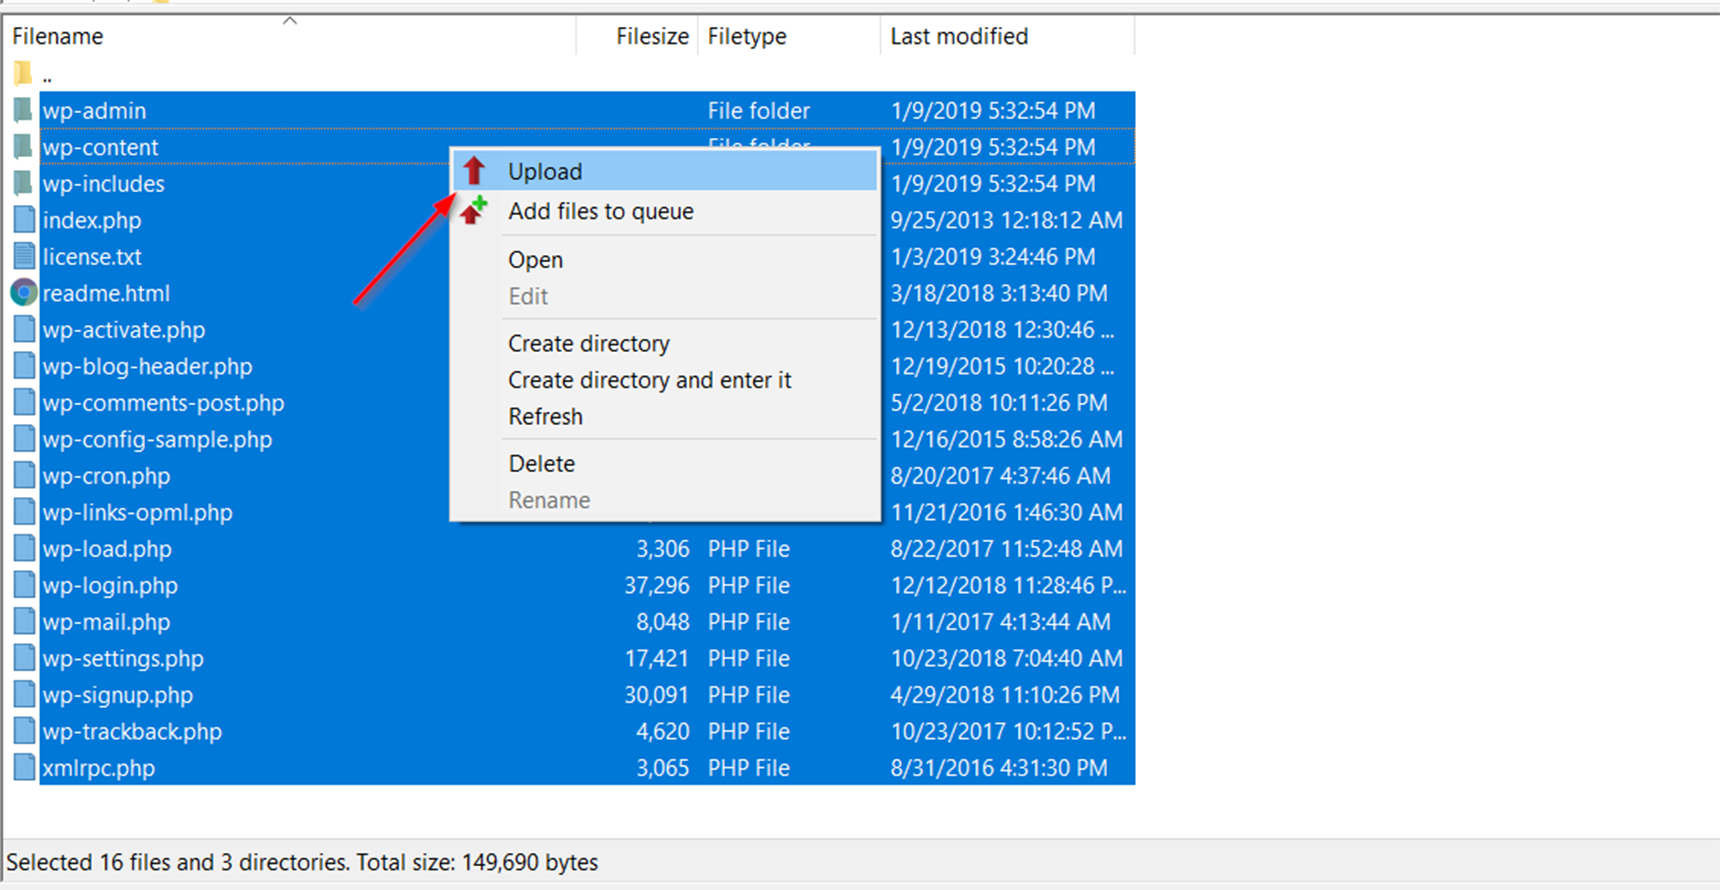
Now you can upload the site files to your new server. Connect to it via FTP with the FileZilla FTP Client and navigate to the public_html folder. From the left side of the client (Local site) locate the files you downloaded in step 1, select them all and then click Upload from the context menu.
While the files are uploading you can enter your new hosting panel and create a new database and note the database name, database username and database password. Then open the phpMyAdmin tool, select the created database and navigate to the Import section. In the Import screen, click Choose File and upload the database dump file you downloaded earlier and click Go.
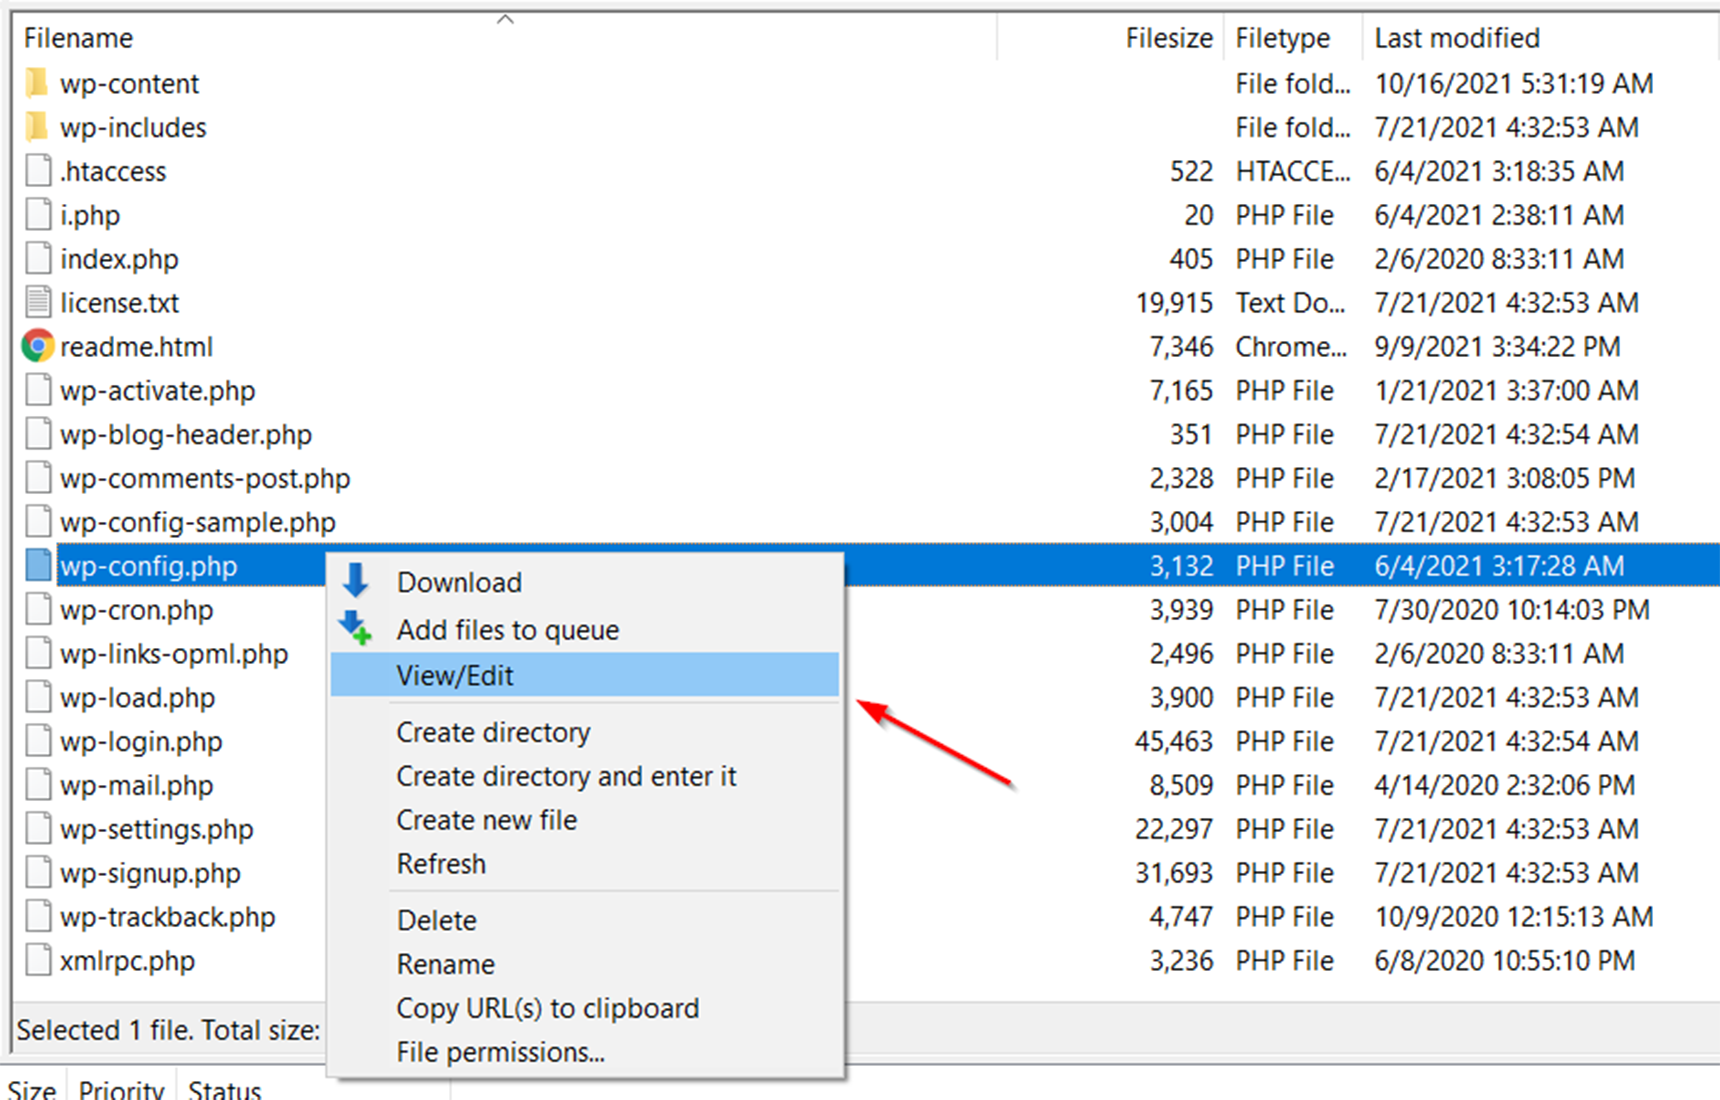
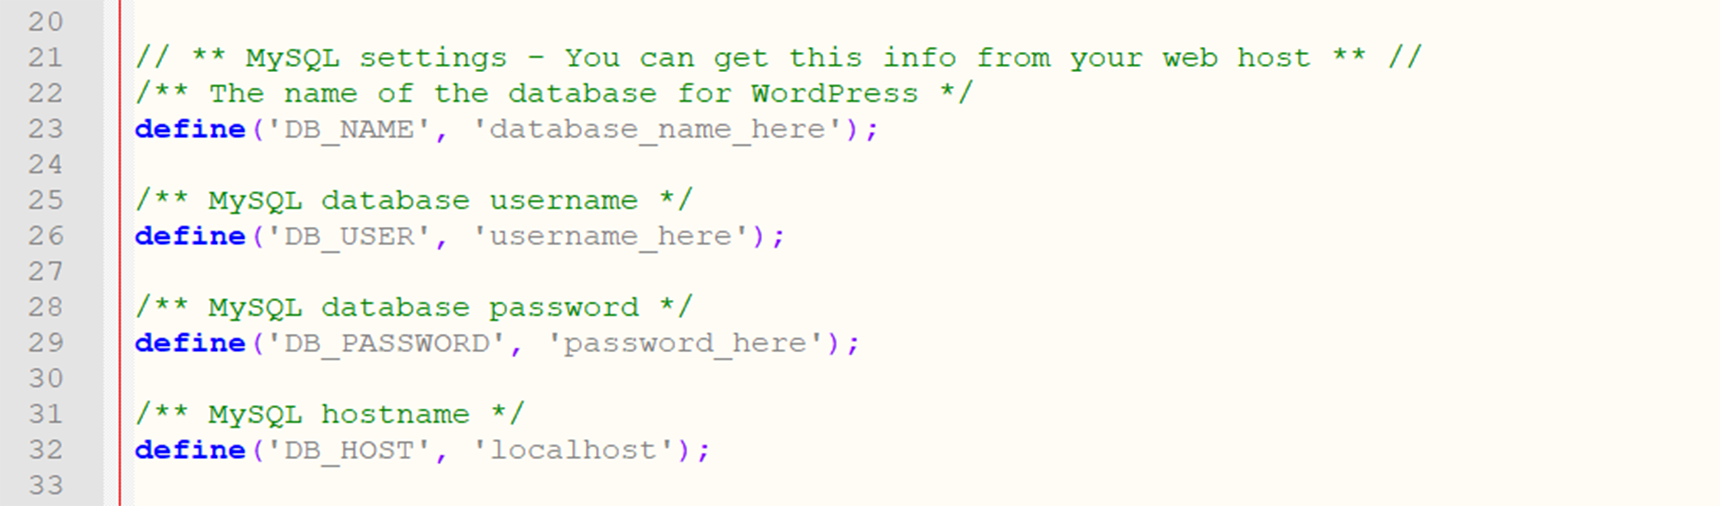
Once the upload is complete you need to edit the wp-config.php file. In FileZilla, locate wp-config.php and open it to edit.
Change the following values to match your new database credentials:
DB_NAME – database name
DB_USER – database username
DB_PASSWORD – database password
DB_HOST – database hostname (Usually it should be localhost, otherwise you can specify it from your new hosting provider).
And lastly, you can do the trick with the hosts file, which we described earlier, to be able to test the migrated site on a new server. If everything is working fine then you can switch nameservers for your domain to the new hosting.
Conclusion
In this article we described one type of migration of a WordPress site—moving to a new hosting provider (a new server). The benefits of this can vary, such as better customer support, more hosting resources and useful features as well as better server security. We showed two different approaches to achieve this: plugin based migration and manual migration methods. These methods can be applicable in different situations, so it’s important to know the steps of the process to prevent your site’s data loss and downtime.

No comment yet, add your voice below!