It might surprise you to think about your website visitors like this: they’re not paying close attention to your landing page – or any of the components that make up the page. They’re probably not even paying much attention to your brand. What they want is something that will fulfil what they need and want at that particular moment in time. When they get to your landing page, they will only be focused on what they’re looking for. It’s likely these couple seconds are the most crucial point in the customer’s journey throughout your site. If you’re able to convey the right message, then your site’s visitors are more likely to stay on your page a bit longer. The goal here is to get them to explore your site more and click on your call-to-action button.
In this blog post, we’ll take a look at how you can personalize your landing page to boost both engagement and conversion. Then we’ll go on to discuss the essential elements to personalize landing pages in WordPress and how to automate the entire process.
What’s the point of personalizing your WordPress website?
Let’s face it: your site’s visitors are sophisticated. They have at least 10 years of experience on the internet being bombarded with ads and clickbait. Most of them at 81% assume that business will understand what they want and offer up solutions and services at the appropriate place and time. Your sophisticated visitors are likely to open up several search results in one go, look over them in just a couple of seconds and pick 1 or 2 results that they like the most.
If you have a cookie cutter landing page, then your visitor will be welcomed with an overly used message automated by general WordPress templates. And the visitors will exit the site as quickly as they arrived.
Google places a lot of importance about the content of your landing page. In other words, the more relevant the content, the better the landing page ranks in search results. Providing customized products and services is the best way to convey to potential customers that you know what it is they’re looking for and their particular attributes and characteristics. Giving visitors what they want when they want it is likely to have a positive psychological effect on them, increasing the chances that they will engage and convert.
Good segmentation is the first step in personalizing your landing page
Personalization only works when it’s done right. And to do it properly, you’ll need to do the research and get your hands on the right marketing technology. If not, your personalization efforts might fall through, and you’ll end up with a landing page that’s worse than it simply being generic!
Before starting on the process of personalizing your WordPress website, you should first do your research. Part of this means finding various customer segments that are relevant for your business dependent upon what your aims are and what you expect from customers. It’s important to create a customer profile for crucial visitor types on your website. You can figure this out through market research and competition analysis, as well as your website funnels. The next step is to narrow your focus into customizing and tailoring your landing page for this segment. We’ve gone ahead and provided some samples to give you a better idea:
- User phases: Is this a user visiting for the first time? A lead who has returned? Or a regular customer?
- Location-specific visitors:
Do visitors from a specific location carry more weight?
- Source-specific visitors:
Or are visitors from a particular source (certain social media platform, website, etc) more important to you?
- Particular campaigns:
Would you like to personalize the experience for users coming to your site from a particular marketing campaign (for example, using UTM parameters)?
- Certain in-site activity:
Would you like to target users who have gone to certain pages on your website?
- Visitors who display a particular behavior on your landing page:
Does it matter if they spend a certain amount of time on your page or if they are trying to leave your page?
- Previous shopping history:
Would you like to target customers who already made a purchase of certain items on your website?
- Certain device:
Would you like to personalize the experience for users from a certain device such as a mobile phone or tablet?
Things to personalize on a landing page
Hot tip: not everything! When you’re looking to personalize your WordPress website, you should only look to customize the elements that will resonate with what your customers want. This is particularly important when considering that you have a short window of time in which to attract their attention. Here are some of the most vital elements to keep in mind:
Immediate content (images, texts, videos, among more)
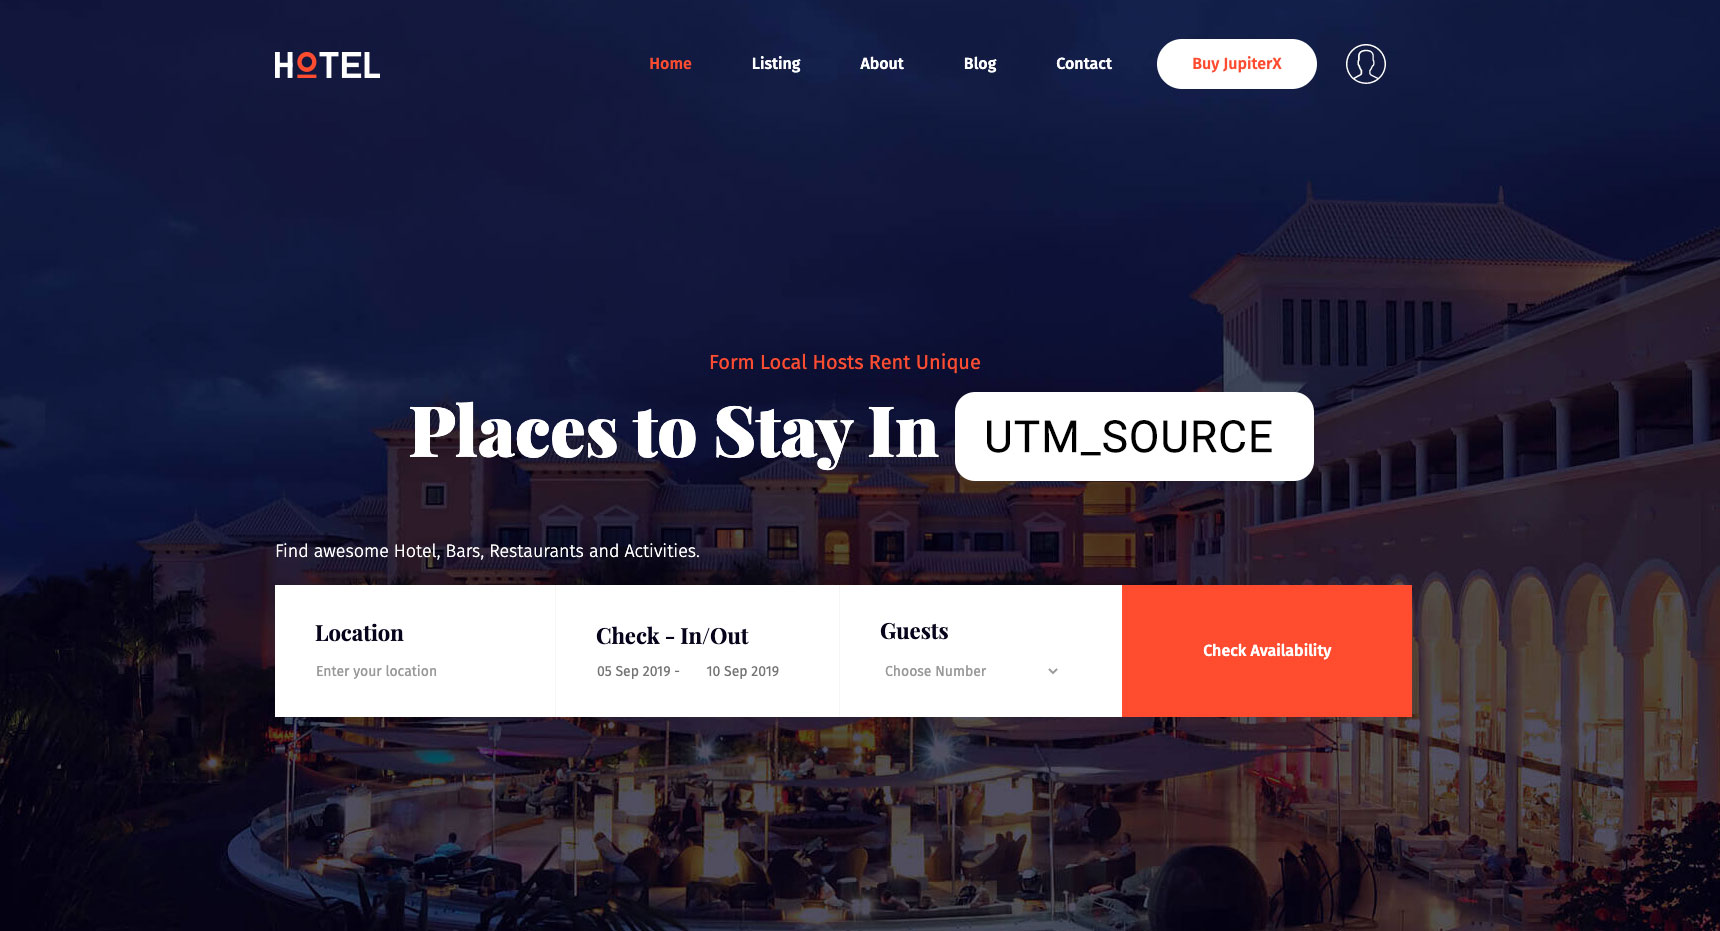
Anything that a visitor could possibly see in the first couple of seconds after landing on your page could be personalized. This might include a greeting message, an image in the hero section or even an intro video.
Products
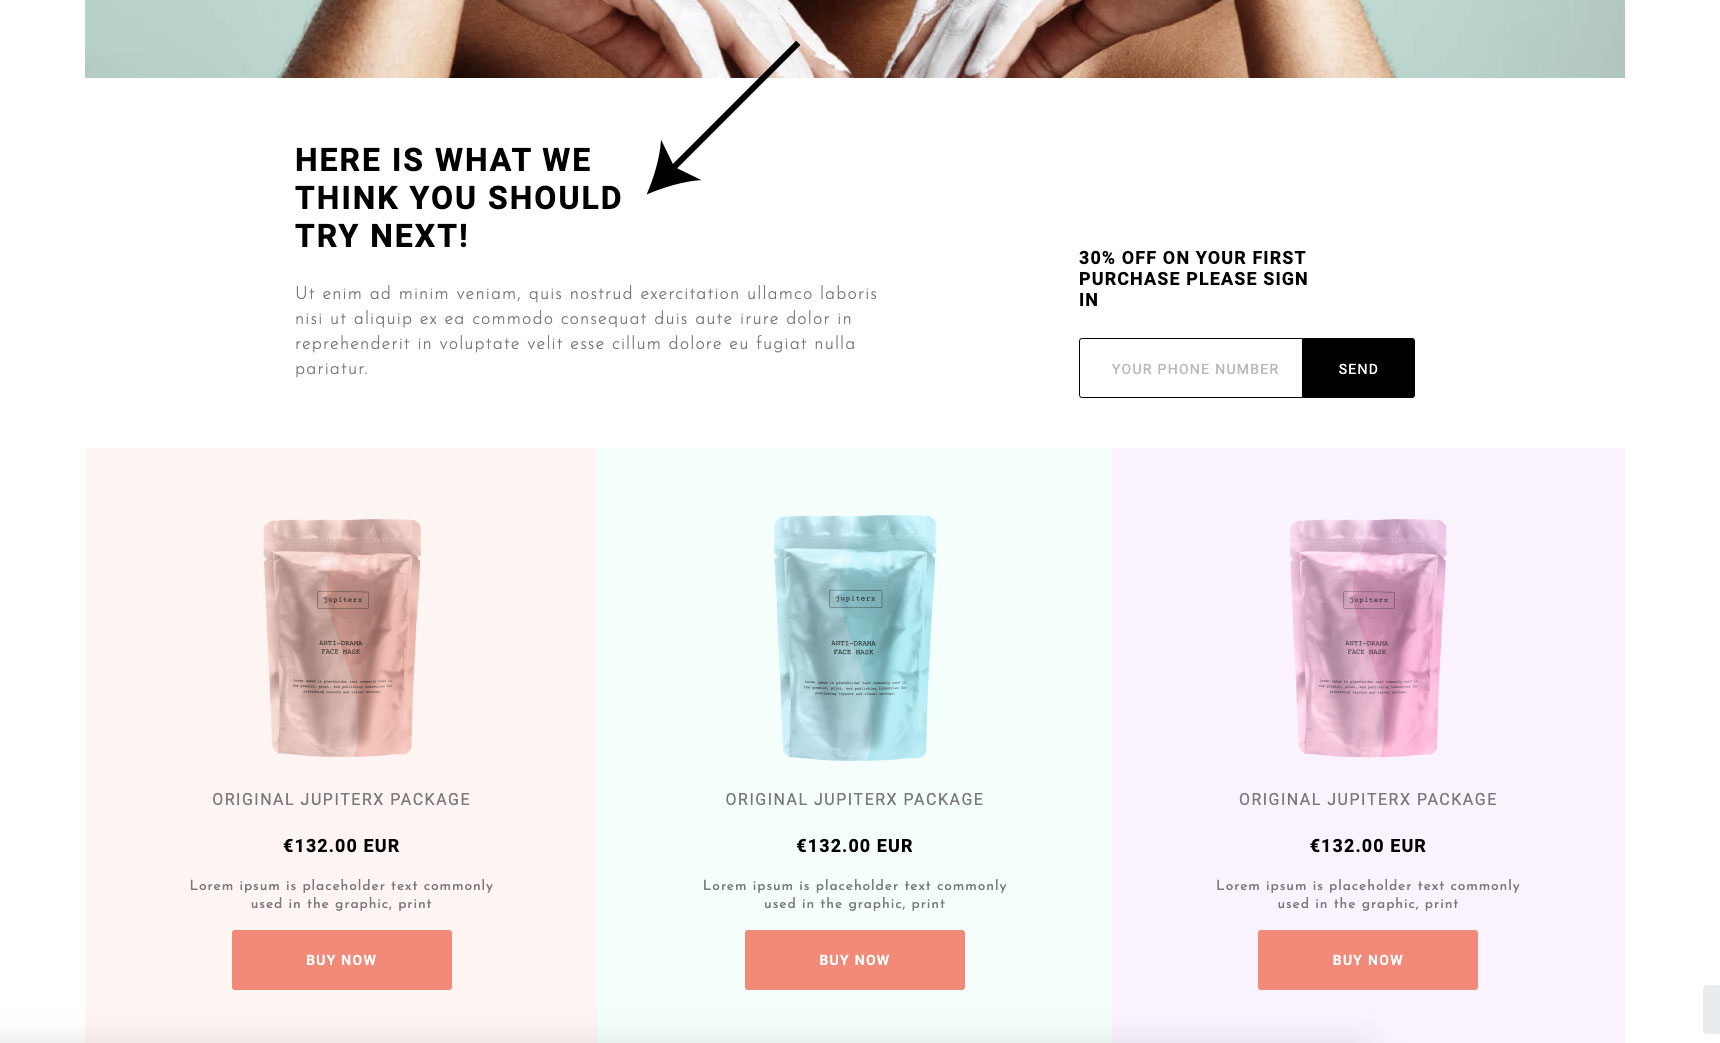
This is the most crucial! If you insert a list of products onto your landing page, then you can list the items that are most relevant to your targeted customer segment. This could be a particular product or it could be a category of products that aligns with exactly what your visitors are looking for. Let’s say that you’re aiming at getting business from existing customers, then you might want to include items they’ve abandoned in their cart.
Blog posts

There’s no doubt that blog posts are part and parcel in nurturing new visitors. Because of this, it’s vital that you display a relevant list of posts on your landing page that aligns with what your visitors want. This could be a particular post or a category of blog posts.
Any other important info
Although it might be easy to lay out the guidelines to follow for a landing page, a brand might have particular needs for its own custom content type and layout. The best thing to do is to understand which info on your landing page is important for your visitor and customize it based on that.
Actionable tips to personalize landing pages in WordPress
In order to better understand the practices that we’ve just mentioned, let’s go ahead and personalize a fictional landing page. For this, we’ll go ahead and use Growmatik for both segmentation and personalization. We can do this as Growmatik offers a wide array of criteria options for personalization. You can also make use of its visual editor – which means there’s no coding needed – to carry out these personalization rules you’ve set in the tool.
Let’s get to work!
Display tailored greetings by using personal dynamic keywords
In personalizing content through dynamic keywords, you can greet your leads or existing customers with their name. This can be done on your home/landing page or in a popup. To do this in Growmatik:
- Navigate to the automation dashboard, locate the customers column and click the + button.
- Assign All customers as the condition.
- Assign the action to Personalize Page and choose your landing page.
- After the page loads, click on existing text or add a new text element. (learn more)
- Edit the text and add the First Name dynamic keyword.
- Click on Save and then Create Rule.
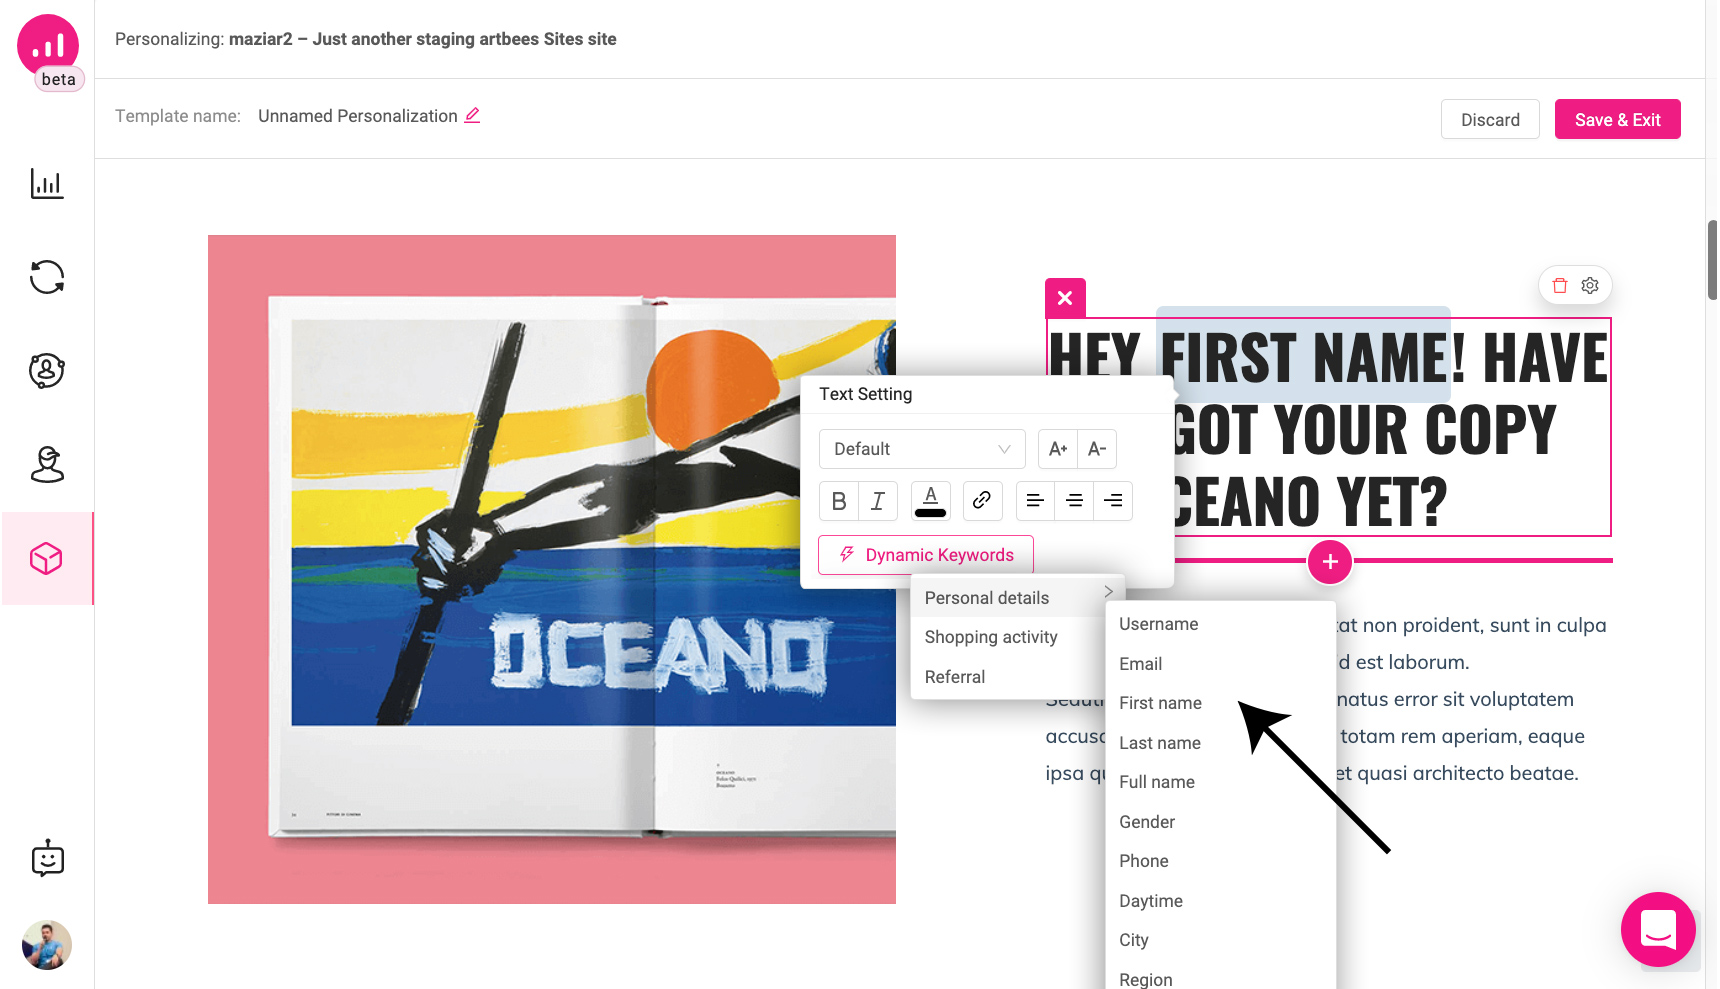
Another way to go about this is by inserting the greeting inside a popup in the corner. Follow the same steps as above and simply choose Show Popup as the action and add dynamic keywords exactly as written above.
Use UTM dynamic keywords to customize homepage and popup content
This is useful when you want to personalize the journey for visitors coming from a particular marketing campaign. For instance, let’s say they’re searching for ‘buy snickers’ and click on your ad in the results and visit your landing page. Using a UTM parameter in your ad, you can show their search intent in the hero section of your landing page as a way to convey relevancy to your visitors. To do this in Growmatik:
- Navigate to the automation dashboard, locate the Guests column and click the + button.
- Assign the condition as Source > UTM Parameter > UTM Source
- Assign the action as Personalize Page and choose your landing page.
- Insert the dynamic keyword of the UTM source in the appropriate place.
- Click on Save and then Create Rule.

Another way to go about this is by inserting the greeting inside a popup in the corner. Follow the same steps as above and simply choose Show Popup as the action and add dynamic keywords exactly as written above.
Insert a related video or image for each campaign
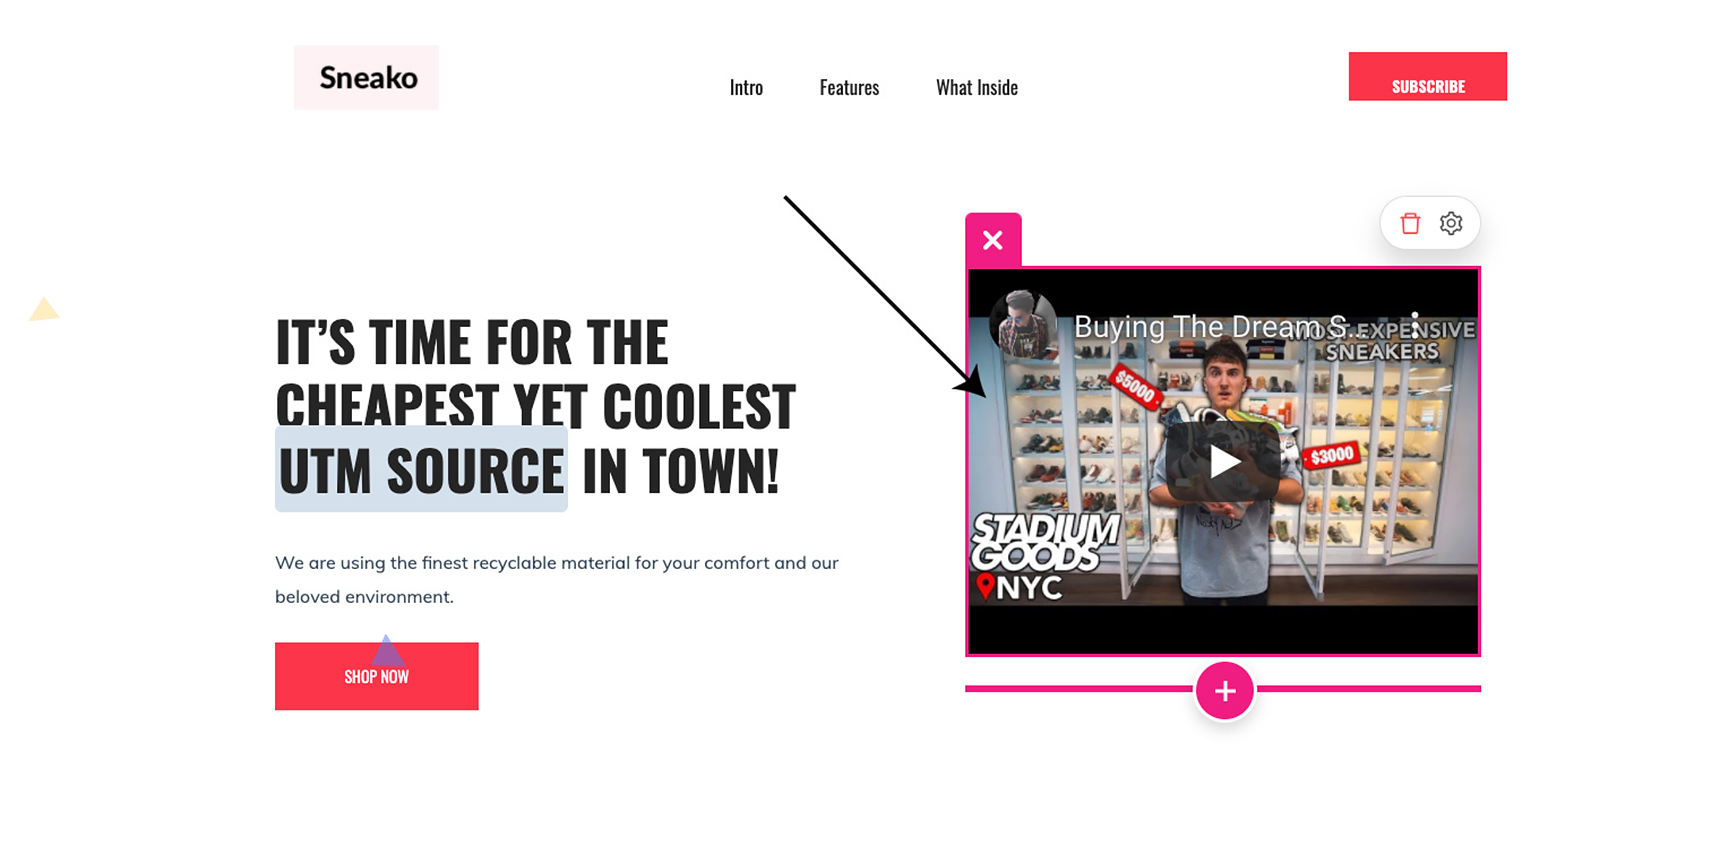
A promo video relevant to the visitor’s reason for being on your page can greatly speed up the amount of time it takes for a visitor to find out more about the product they want. And this makes the path to conversion shorter. This is in contrast to generic promo videos, which everyone tends to ignore. To do this in Growmatik:
- Navigate to the automation dashboard, locate the Guests column and click on + button.
- Assign the condition as Source > UTM.
- Assign the action as Personalize and choose your landing page from the menu.
- After getting to the Webpage Personalizer environment, insert a video element onto your hero section.
- Click on Save and then Create Rule.
Display a tailored list of products on your landing page
Display certain products or a category of products to your visitor related to their previous shopping behavior. To do this in Growmatik:
- Navigate to the automation dashboard, locate the Customers column and click on the + button.
- Assign the condition as All Customers.
- Assign the action as Personalize and choose your landing page from the menu.
- After arriving in the Webpage Personalizer environment, insert a product element to the right section of your page, and select content > related
- Click on Save and then Create Rule.
Or you can remind them about their abandoned items in their cart from their previous visit by:
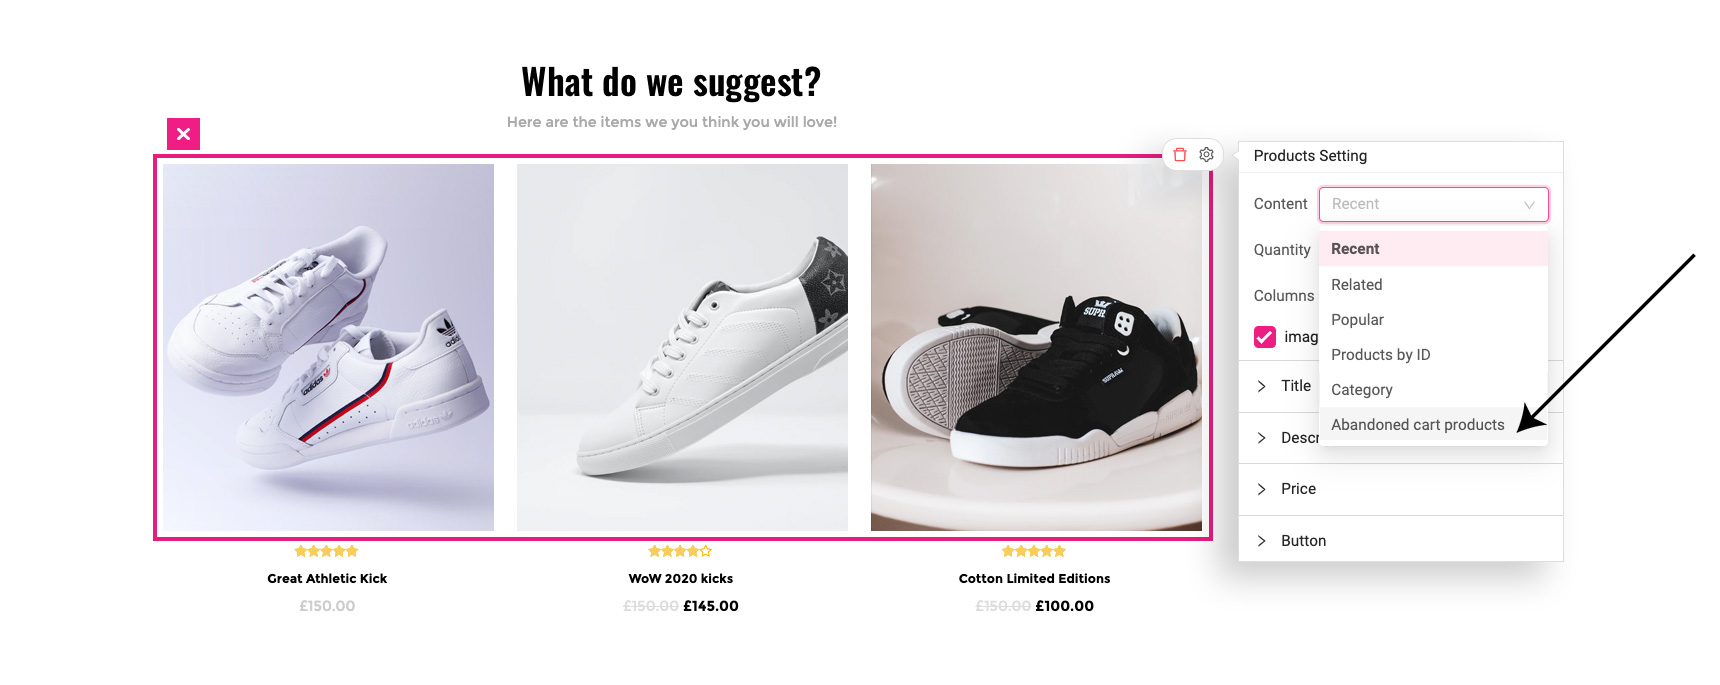
- Navigate to the automation dashboard, locate the Leads column and click on the + button.
- Assign the condition as All leads.
- Assign the action as Personalize and choose your landing page from the menu.
- After arriving in the Webpage Personalizer environment, insert a product element to the right section of your page, and select content > abandoned cart products.
- Click Save and then Create Rule.
Insert customized blog posts onto your landing pages
As we’ve made mention to before, blog posts are an integral part of the customer journey when they are being made aware of and are considering your product. If you have blog posts that offer valuable insight into your industry or niche, then it’s a good idea to share them on your landing page. It would be even better if you could display certain blog posts or a category of blog posts to potential leads and customers based on their attributes – or even on their previous reading history if they are already a customer. To do this in Growmatik:
- Navigate to the automation dashboard, locate the Leads column and click on the + button.
- Assign the condition as All Leads.
- Assign the action as Personalize and choose your landing page from the menu.
- After arriving in the Webpage Personalizer environment, insert a blog element into the right section of your page, and select content > related.
- Click on Save & Exit and then Create Rule.
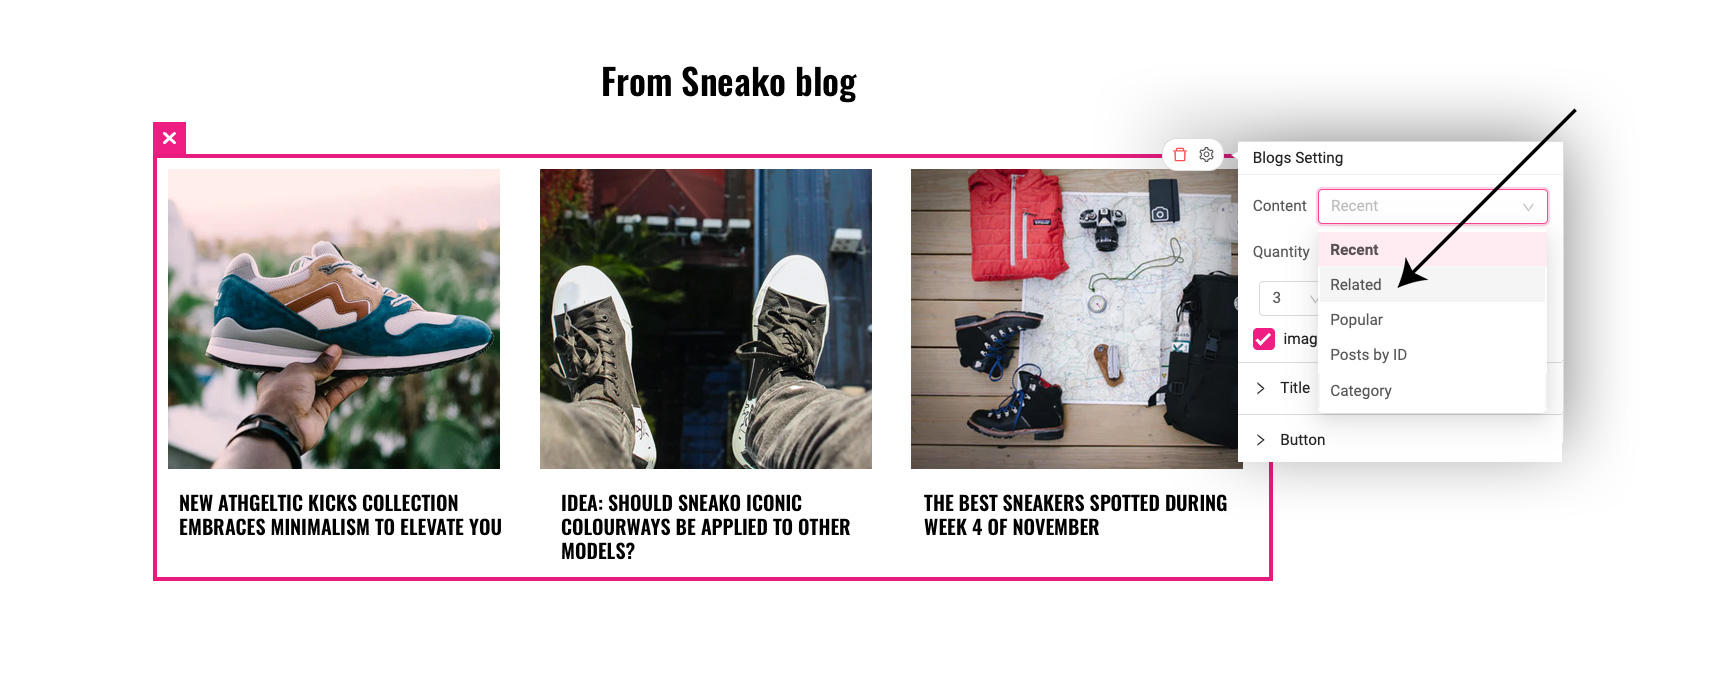
You can also set more specific sources for your visitor like the UTM_source and in Personalizer, set Content > Category or ID to place more specific blog posts based on which campaign your visitor was referred from.
Show geolocational popups for customers
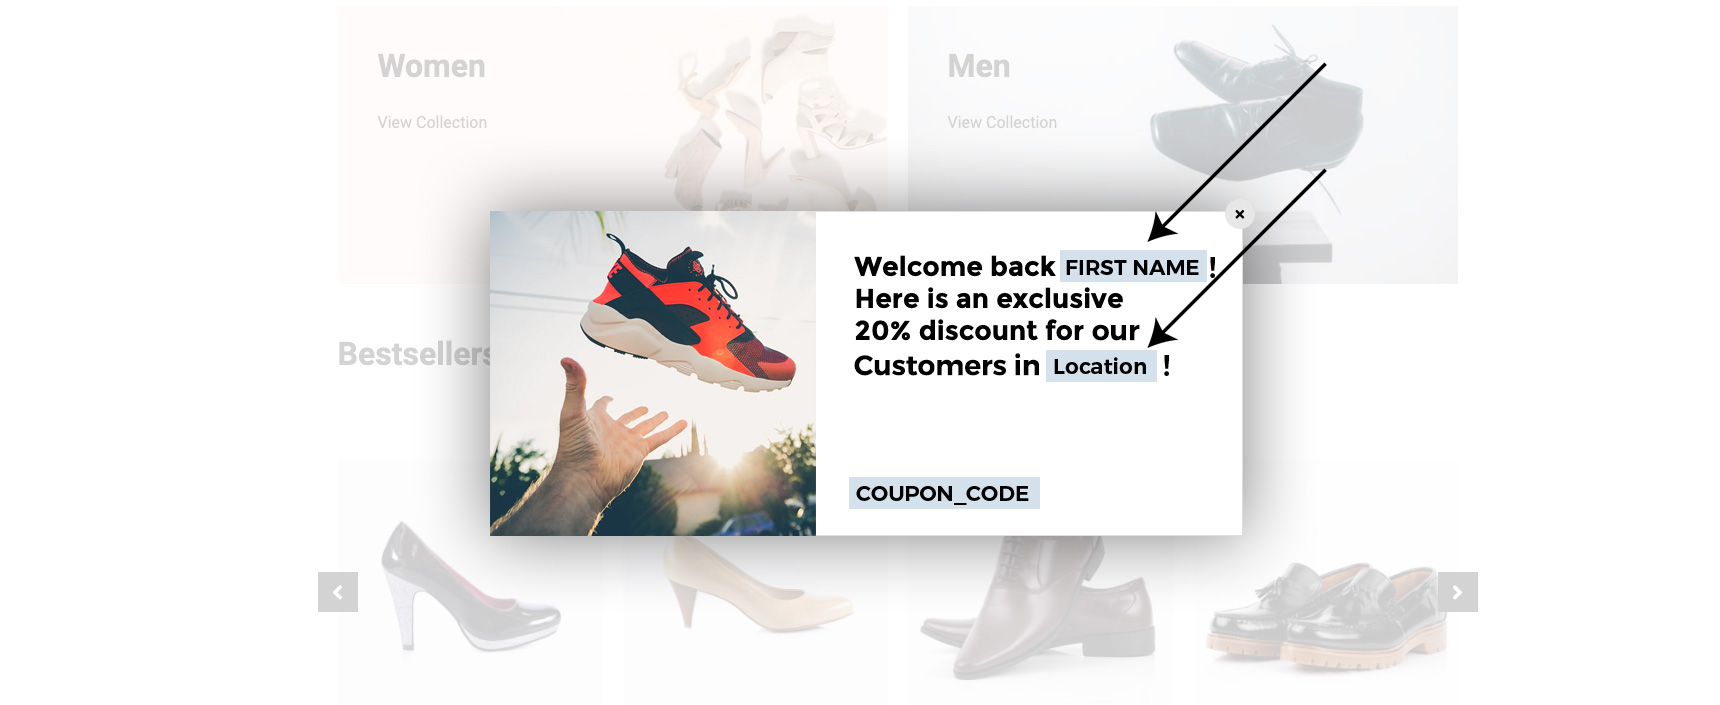
When it comes to retaining repeat customers, it’s always a good idea to offer them limited-time offers and discounts. For instance, let’s say a visitor who comes from a particular location lands on your page, they would be impressed if they had a personalized message and an exclusive discount on a product. To do this in Growmatik:
- Navigate to the automation dashboard, locate the Customers column and click on the + button.
- Assign the condition as All Customers.
- Assign the action as Show Popup.
- After arriving in the popup builder tool, choose a premade popup template or create one.
- Insert a text element and include dynamic tags > first name and location inside it.
- Click on Save & Exit and then Create Rule.
Display chronological dynamic keywords in popups
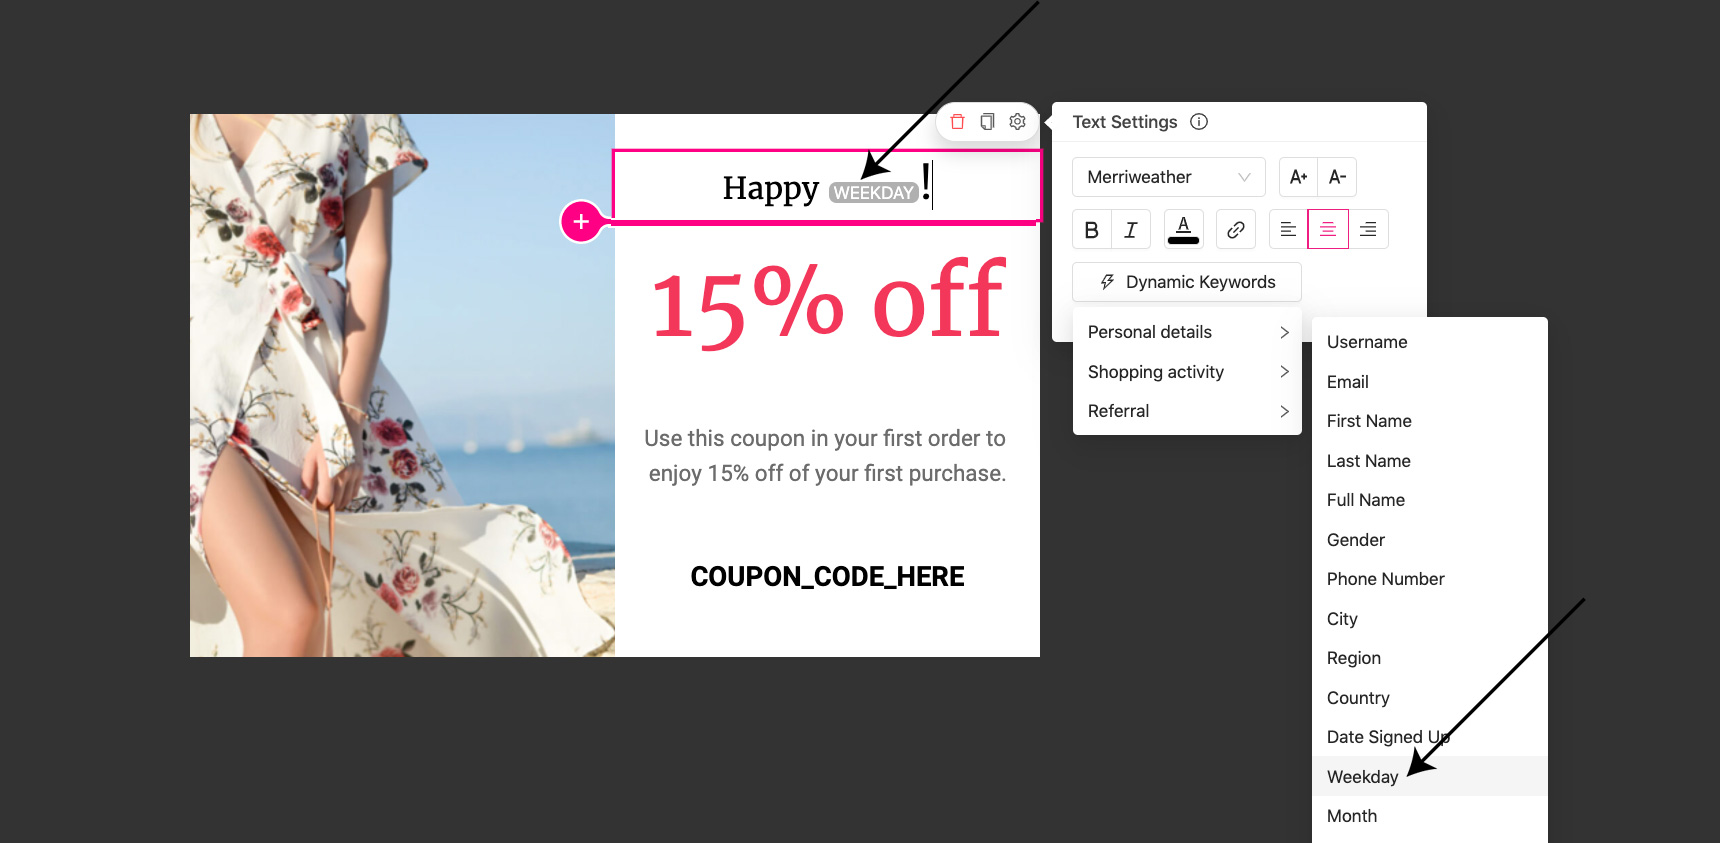
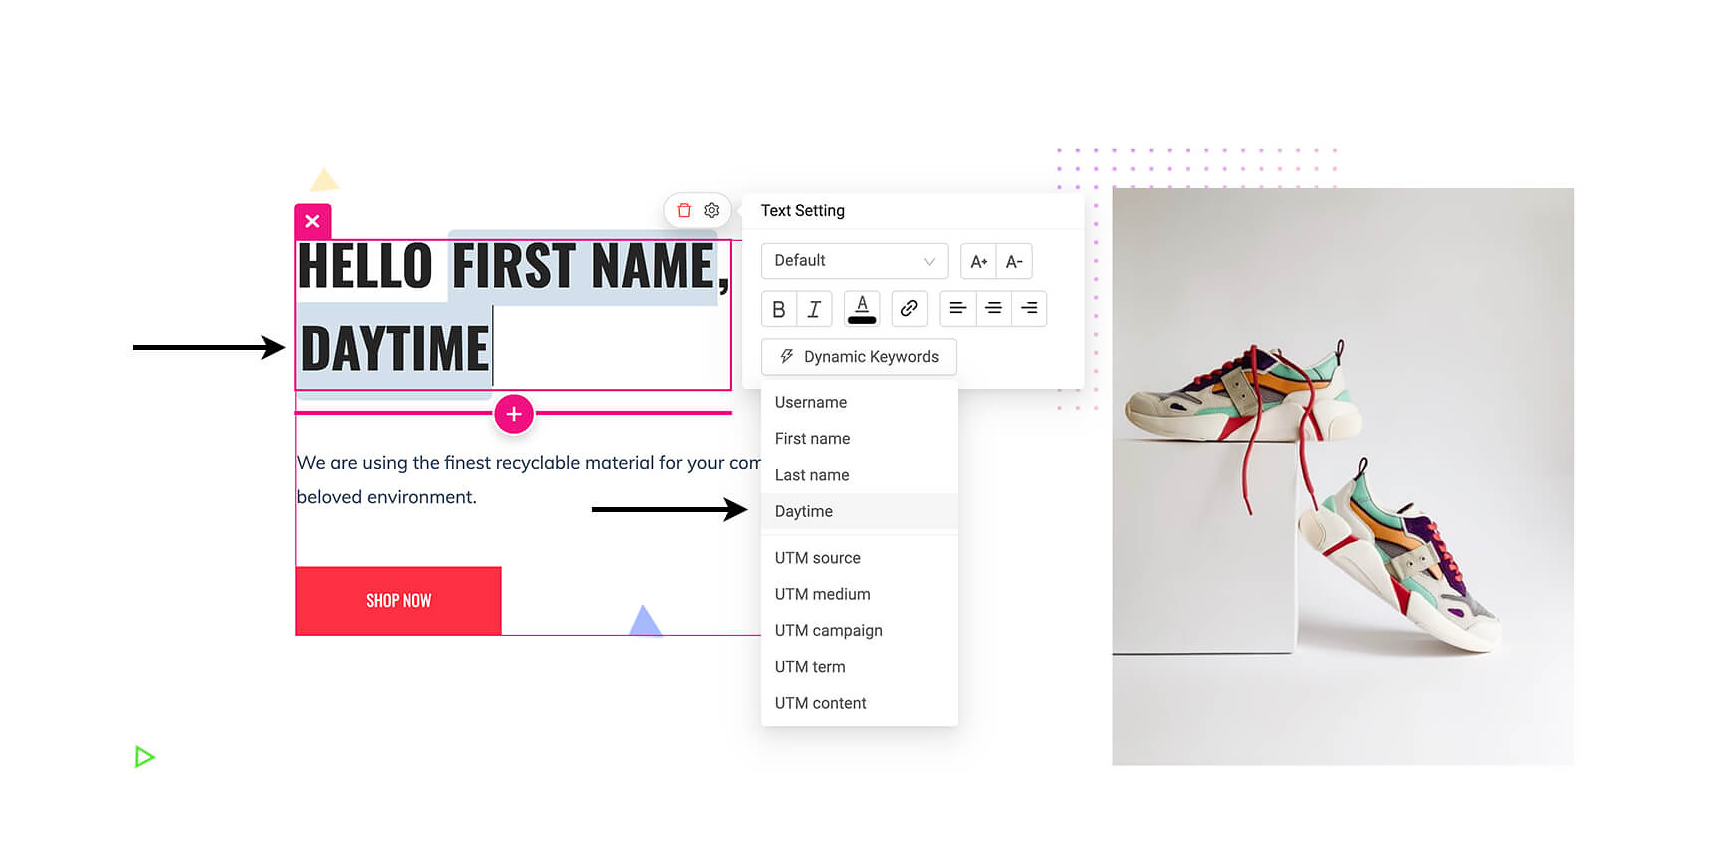
You can welcome your existing leads or customers with a weekday greeting, for example “Happy Friday!” or “Happy Monday!”. To do this in Growmatik:
- Navigate to the automation dashboard, locate the Customers column and click on + button.
- Assign the condition as All Leads.
- Assign the action as Show Popup as the action and choose your landing page from the menu.
- Edit the relevant text element and choose the Weekday dynamic keyword.
- Click on Save & Exit and then Create Rule.
Utilize daytime dynamic keywords on the landing page
One other way to make use of dynamic keys in your quest for personalization is through greeting visitors with their local time zones. This means that a site visitor from Moscow will see a “Good evening!” message while someone from Virinia will see a “Good morning” message. To do this in Growmatik:
- Navigate to the automation dashboard, locate the leads column and click on the + button.
- Assign the condition as All Leads.
- Edit text on the homepage or add a text element.
- Add a new dynamic tag for Daytime.
- Click on Save & Exit and then Create Rule.
Use geolocation to personalize your calls-to-action
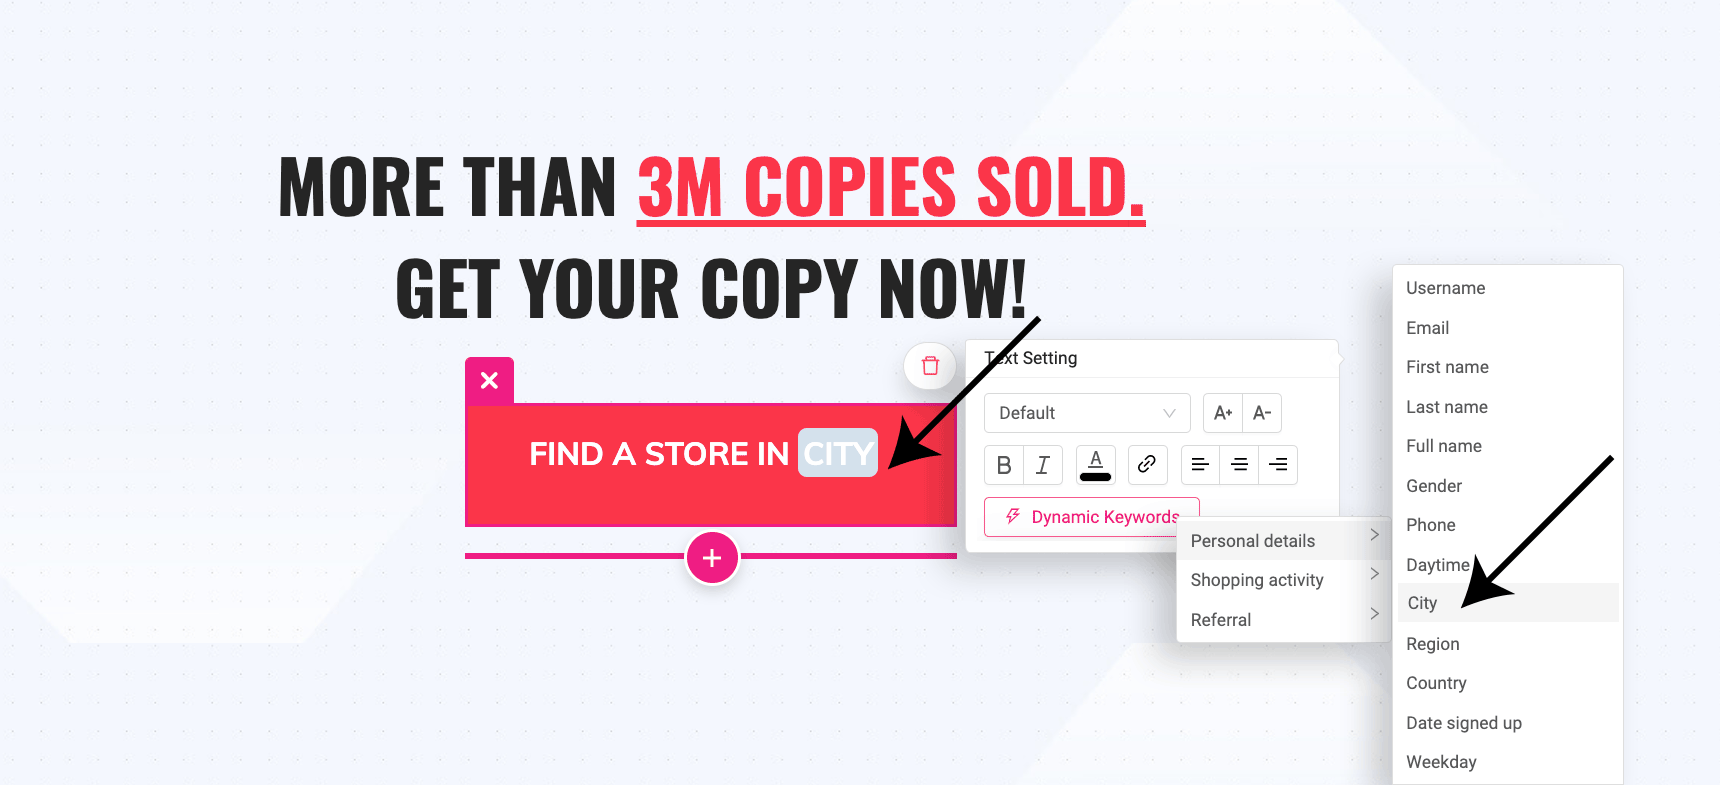
One great way to personalize landing pages in WordPress is to tweak your calls-to-actions to make them relevant to your visitors’ location. Let’s say that your main target customer segments reside in three cities or countries – then you can customize your calls-to-action based on each location:
Find a store in Beijing
Find a store in Berlin
Find a store in Delhi
To do this in Growmatik:
- Navigate to the automation dashboard, locate the Guests column and click on the + button.
- Assign the condition as All guests.
- Assign the action as Personalize and select your landing page.
- In the Webpage Personalizer tool, click on the call-to-action button and insert the location name by double-clicking on it and then selecting dynamic tags > location inside it.
- Click on Save & Exit and then Create Rule.
Insert mobile-specific calls-to-action for mobile users
Before indexing your desktop site, Google first looks at your mobile site to decide on ranking. In other words, digital mobile channels are of utmost importance. To leverage this knowledge, place mobile-exclusive products onto your landing page to increase the changes of converting your visitor into a paying customer. For instance, this could be a “call now” or “message on WhatsApp” button.
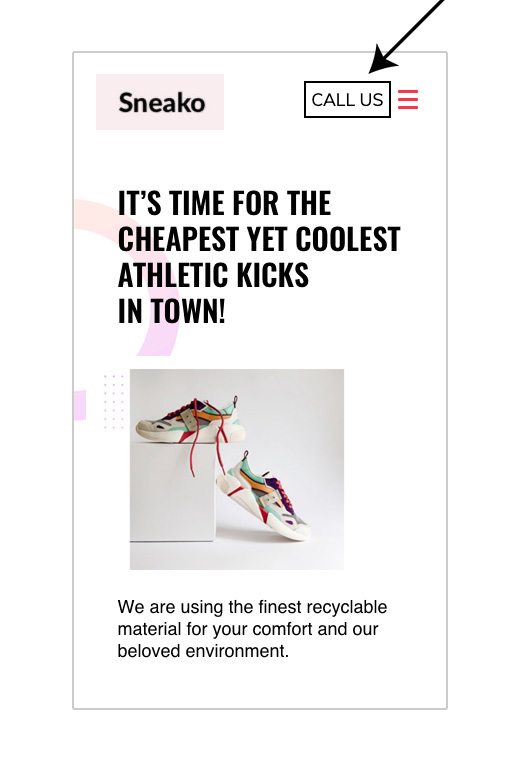
To do this in Growmatik:
- Navigate to the automation dashboard, locate the Guests column and click on the + button.
- Assign the condition as Device and select Mobile.
- Assign the action as Personalize and select your landing page.
- In the Webpage Personalizer tool, insert a related Button to your top menu.
- Click on Save & Exit and then Create Rule.
Wrapping up
Personalization is a magic wand that can be implemented on any marketing channel or campaign. Visitors will feel privileged and important if they are treated specially through seeing content that is relevant to what they are looking for. In turn, this increases the likelihood that they will be converted into paying customers – or that you can retain them as loyal customers.
To do this, it’s important to pinpoint the most crucial target segments and then to research how best to personalize the experience of visitors in this segment. Before making permanent changes to all your channels, you can first test your ideas out via A/B testing in some ads and/or landing pages and make notes of how well they do.


No comment yet, add your voice below!