URL redirection is a method to redirect visitors to a specific page or section of your website. It’s most commonly used when a website is rebranded or under maintenance – through a simple URL redirection, visitors are redirected to the new website or the “under maintenance” page. However, what a lot of people don’t realize is that URL redirection can do a lot more than that; it can also be a powerful marketing tool. In this article, I’m going to explain how to effectively use redirection to personalize your WordPress website.
What is a URL redirection?
A URL redirection sends users and search engines to a different URL from the one that they requested.
There are two different types of redirections, and each has different use cases:
HTTP level redirection
This is done by 301 (moved permanently) and 302/307 (moved temporarily) redirects.
- 301 Redirect
Facilitates permanent redirects of a page or domain to the new URL.
- 302 Moved Temporarily
Facilitates temporary redirection of a page or domain to the new URL.
HTTP-level redirection lets search engines know about the redirection. So, for example, if your website declares a 301 permanent redirect to Google, Google transfers your old page or domain ranking power to the new one. But if you use 302 temporary redirects, the old site’s ranking power won’t be transferred to the new page or domain as the redirection is temporary.
This type of redirection is useful for rebranded or migrated websites as well as to update obsolete pages within the websites but If you want to use HTTP-level redirection you have to be cautious with its SEO implications.
You can do HTTP redirects by directly editing the .htaccess file in your server or by using SEO tools such as YoastSEO and UltimateSEO.
Browser-level Redirection
There is also a second method in implementing conduct redirects right within the browser without changing anything at the HTTP level and letting search engines know about it. This is useful when you want to redirect your visitors to different pages based on specific conditions but you don’t want this to affect your website’s and individual pages ranking power. For example you want to redirect the traffic coming from a specific source to a special page optimized for that source but you don’t want this to affect the SEO ranking power of your main landing page.
Browser-level redirection can be done by coding or readymade tools. This type of redirection is most useful for personalization and marketing purposes. For example:
- Redirecting users from a specific source such as Instagram to a special landing page
- Showing different homepages to visitors based on their stage. For example guests, leads and customers seeing different versions.
- Redirecting users from Brazil to a Brazilian version of your homepage with local content
- Showing a totally different and optimized homepage to your mobile users
- Showing a temporary and exclusive landing page to a loyal customer when they hit a certain number of purchases
In this article, we’re going to further cover this kind of browser-level redirects. We’ll use our newly introduced marketing automation and personalization tool for WordPress and WooCommerce websites called Growmatik as a case study to show how to create conditional redirections to personalize your website for different segments.
Growmatik creates automation in the form of a ‘IF this THEN that’ rule. You can define different conditions (such as specific source, location, device or date) to trigger a redirection, and the redirection will automatically get executed when the condition is triggered.
Redirect traffic from a specific domain
If your website has a noticeable amount of traffic from a specific website such as a social media website or a partner blog, you can consider showing them a special landing page on their first visit. The content of this page can be optimized based on the source they are coming from and boosted with exclusive items such as discounts.
Using Growmatik, we’ll define this rule:IF [Source is X] THEN [Show Page Y].
- In the Growmatik automations page, click on the + icon in one of the columns. This defines the user type you want to target with this redirection. It can be guests, leads and customers. We’ll select customers for this example.
- Select Source from the conditions list (next to If)
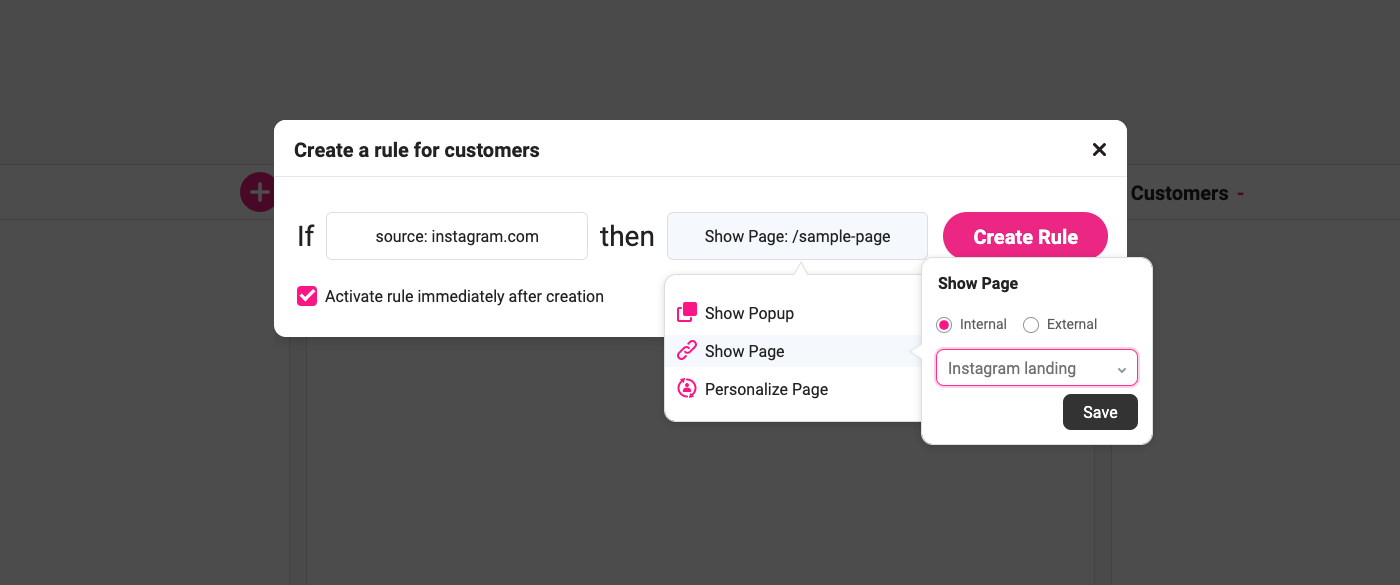
- Select domain and enter the website you want to define as the source. Let’s say it’s instagram.com and click Save.

4. Select Show Page from the actions list (next to Then). You will have two options from:
By internal, you can choose a page inside your website and
By external, you can define an external website to refer the visitor to

5. Check the ‘Activate rule immediately after creation’ if not checked and click on the Create Rule button.
Using the above simple rule all of the customers who are referred by Instagram, will be redirected to Instagram landing. Please note that this applies only to your existing customers as we defined that user type when creating the rule.
Redirect your ads traffic based on URL parameters (UTMs)
You can redirect the traffic coming from specific ad campaigns that you publish via Adwords, banners or blogs you do outside your website to personalize your content accordingly. For example, a nice special landing page exclusively built for your Adwords ads, a page built for your promotional email campaign or a special landing page for an online event or visitors of your booth who get a QR code to visit your website and join a competition, get discounts and so on.
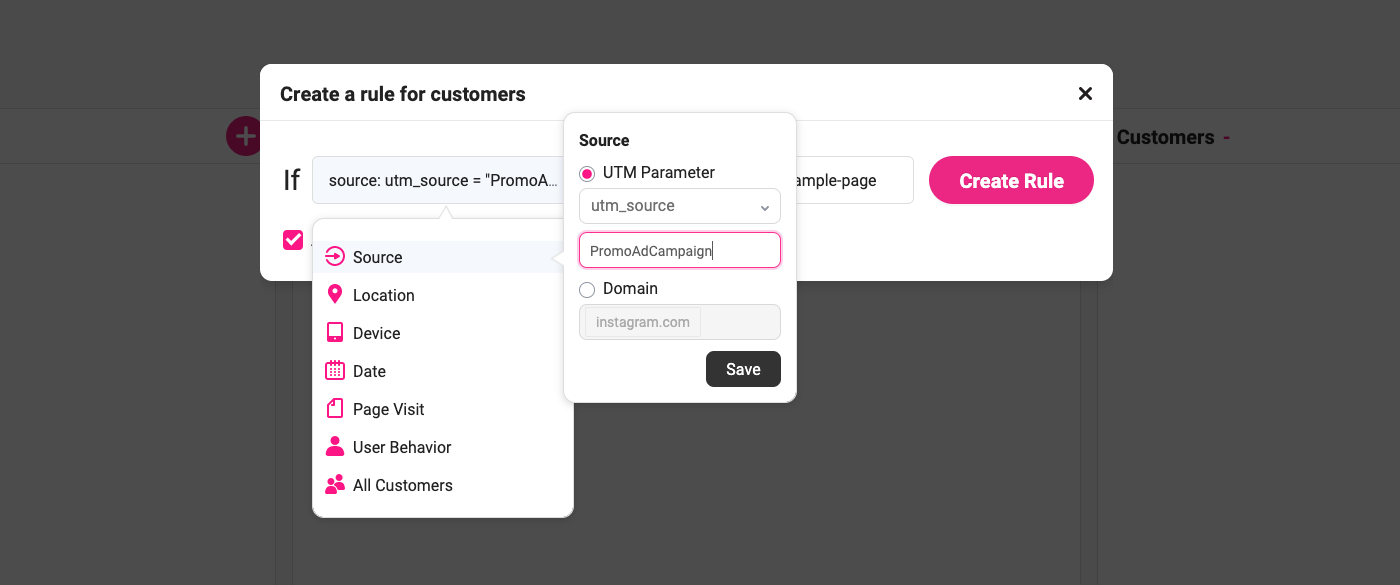
You will need to define URL parameters in the form of UTMs in links you put in your ad campaign to your website. UTM values help you identify the source of the traffic in a narrower level than domain. So for a promo email campaign, you can use the link: https://your-website.com?UTM_source=PromoEmailCampaign
We will create a redirection rule such as the previous one just this time source should be set UTM values:IF [UTM_source is X] THEN [Show Page Y]

Redirect your mobile visitors to an exclusive landing page
All of us know the importance of optimizing websites loading speed and responsiveness to improve the mobile experience, but this is actually being done by many already. So if you want to take it a step further to stand out in the competition you can create a totally different landing page for mobile users with optimized design and exclusive content.
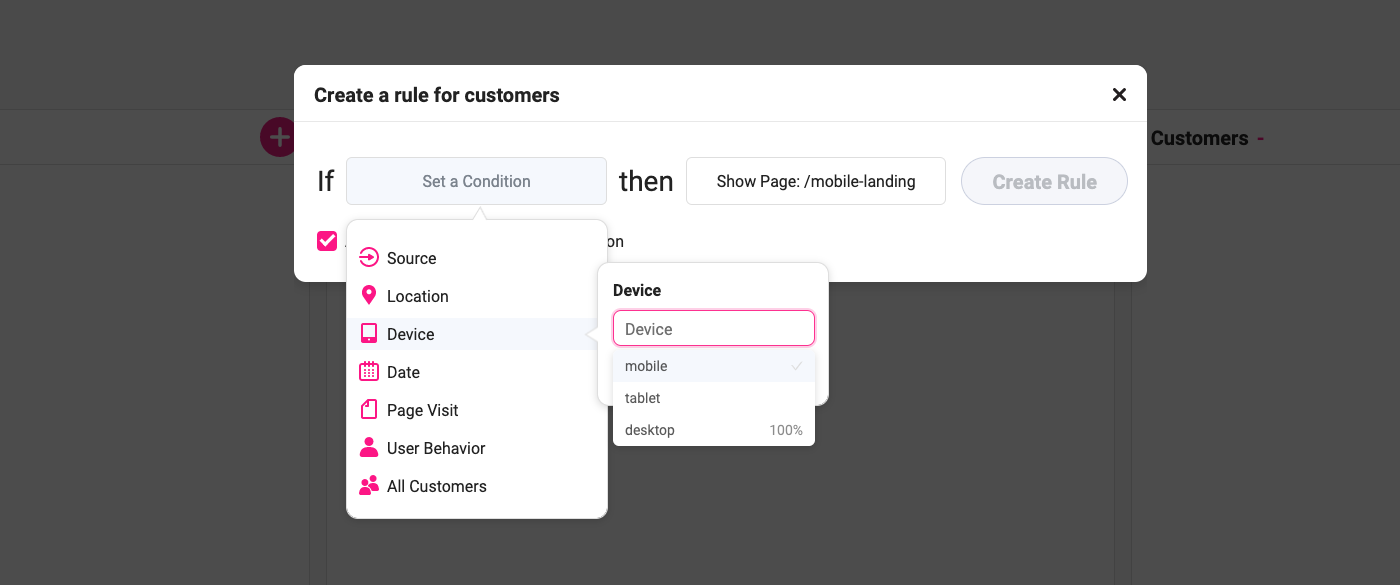
IF [device is mobile] THEN [Show Page X]:
- In the Growmatik automations page, click on the + icon in one of the columns to define the user type you want to target with this redirection. For this example, we’ll choose customers.
- Select Device from the conditions list.
- Select the device type you want to target with: mobile, tablet or desktop

4. Select Show Page from the actions list and define an internal or external URL to redirect the segment and click on the Create Rule button.
With the above automation, your new mobile visitors will be automatically redirected to the page you specified.
Redirect visitors from a specific country
Next up in your redirection list should be geographical redirection to personalize your WordPress website.
It’s good practice to show optimized or even different content on your website to people from different countries. More relevancy will increase engagement from your visitors in different stages across your website.
For geolocational personalization, you need to first find out the main countries that sent traffic to your website and create special landing pages preferably with translated and more localized content.
IF [Location is Italy] THEN [Show Page X]:
Let’s create a simple automation in Growmatik:
- In the Growmatik automations page, click on the + icon in one of the columns to define the user type you want to target with this redirection. I’ll choose leads.
- Select Location from the conditions list and choose the country you want to target with your redirection. You can select one or multiple countries to target.

3. Select Show Page from the actions list and define an internal or external URL to redirect the segment and click on the Create Rule button.
With the above redirection automation, your leads from Austria will see the German landing page when they enter your website.
Redirect only on a specific date
Running occasional promotional campaigns can be an effective way to engage your visitors. Think of a special landing page made for Black Friday or a special homepage during a period (like the COVID-19 pandemic maybe just you don’t know when this occasion is going to end!)
So the redirection rule you need to define is:
IF [date is X] THEN [Show Page Y]
- In the Growmatik automations page, click on the + icon in one of the columns to define the user type you want to target with this redirection. I’ll choose guests.
- Select Date from the conditions list.
- Choose the date or date period you’d like redirection to happen.

4. Select Show Page from the actions list and define an internal or external URL to redirect the segment.
The above redirection automation will redirect all your guest visitors during 2020 November 27 to your Black Friday landing page.
Redirect when a specific page is visited
When your service is under maintenance or a product is out of stock, and you don’t want to show a null ‘check back soon’ or ‘under maintenance’ page to your visitors, you can redirect them to a temporary page with useful links and alternative products or service they might like to check and prevent a hard bounce.
So the redirection rule you need to define is:IF [page X visited] THEN [Show Page Y]
- In the Growmatik automations page, click on the + icon in one of the columns to define the user type you want to target with this redirection. I’ll choose leads.
- Select Page Visit from the conditions list.
- Choose the page you want to trigger the redirection when visited.

4. Select Show Page from the actions list and define an internal or external URL to redirect the segment.
By using the above automation, all of your leads that visit the product X page will be redirected to your product roundup page.
Redirect when a user made a specific number of orders
If you have a retention strategy for your WooCommerce business, you should definitely consider gamification techniques in your business and website. This means you can define milestones for your customers to do specific actions on your website such as visiting a page or buying a particular amount of products. Imagine users will see a temporary ‘thank you page’ with a special design, cross-selling links and probably discount coupons everytime they hit an order count milestone.
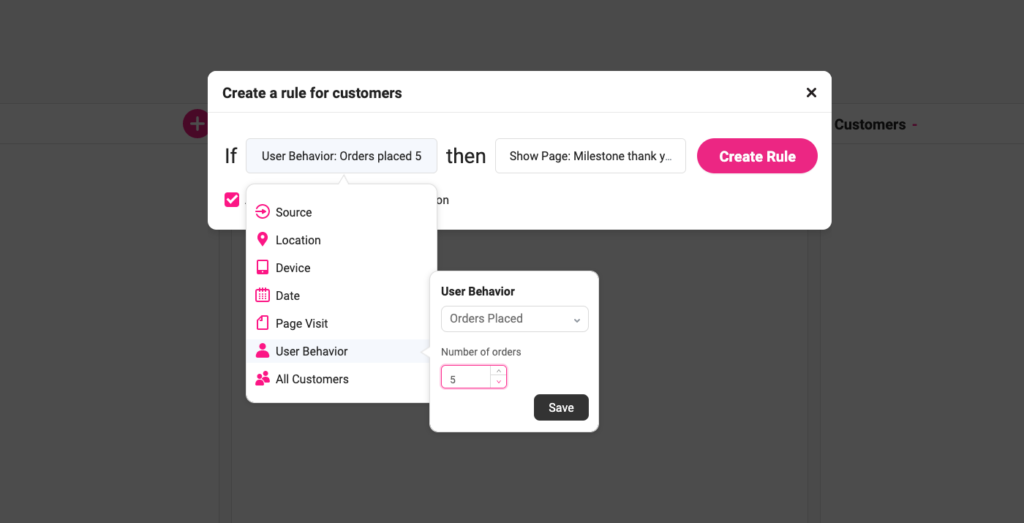
The redirection rule you will require is:IF [X orders placed] THEN [Show Page Y]
- In the Growmatik automations page, click on the + icon in one of the columns to define the user type you want to target with this redirection. We will target customers in this example.
- Select User Behavior > Orders Placed from the conditions list.
- Choose the number of orders that should trigger the redirection.

4. Select Show Page from the actions list and define an internal or external URL to redirect the segment.
The above redirection will show the ‘Milestone thank you page’ every time a customer hits a total count of 5 orders in your website.
Wrap up
If there’s one way that marketing in the 2020s will differ from the past decade, it’s deeper personalization and more automation. Using smart redirections can help you make more relevant experiences for your WordPress and WooCommerce website visitors. In this article, I tried to show how to use redirection to personalize your WordPress website without affecting the search engine ranking of pages on your website.
In a future article, I’ll share more tips on how to achieve a deeper level of personalization in WordPress and WooCommerce websites with Growmatik. If you have experiences with using redirection for marketing and personalization purposes, please do not hesitate to share in the comments below.


No comment yet, add your voice below!