During the installation process, WordPress creates a configuration file called wp-config.php. Primarily, this file contains database credentials that allow WordPress to establish a connection with the database. Additionally, there are more settings to configure other database elements, security keys and developer options in the wp-config.php file. In this article, we will explore the wp-config.php file’s functionality, find its location in your WordPress installation, and show custom settings that can be added to it. Let’s dive in to learn more about configuring WordPress in wp-config.php!
What is the wp-config.php file?
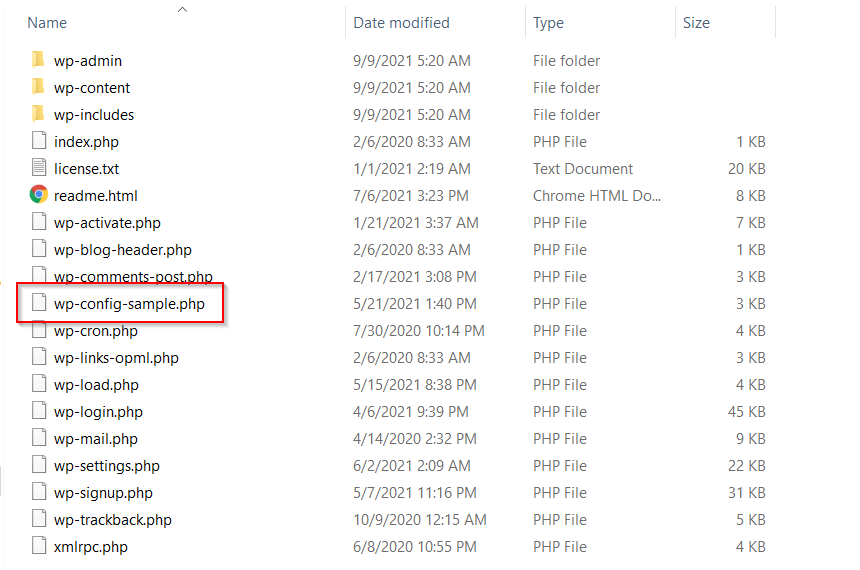
The wp-config.php file isn’t included in the default installation package of WordPress, but you can find the wp-config-sample.php file there. This file is located in the WordPress root directory and contains the database configuration details of the site.
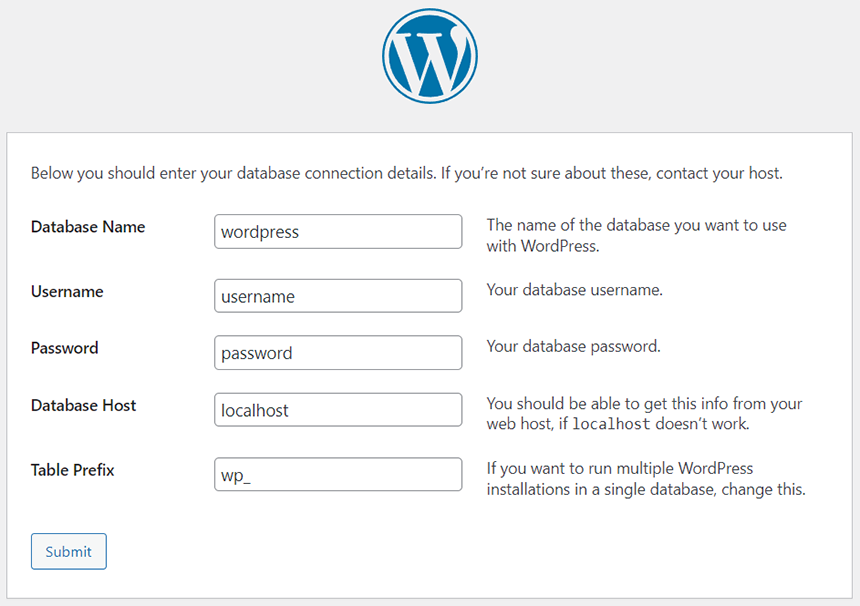
When installing WordPress you’re asked to input the following database information: database name, username, password, database host and table prefix. Then, the installer will create a wp-config.php file based on the provided information. From there you should be able to start configuring WordPress in wp-config.php.
In case you need to create the configuration file manually, you can use the sample wp-config-sample.php file. Just rename it to wp-config.php and edit its content, which is required for the installation process mentioned above. Note: Don’t change the order of the code, as rearranging it may create errors on your site. Below you can find the default content of the wp-config.php file:
<?php
/**
 * The base configuration for WordPress
 *
 * The wp-config.php creation script uses this file during the installation.
 * You don't have to use the web site, you can copy this file to "wp-config.php"
 * and fill in the values.
 *
 * This file contains the following configurations:
 *
 * * MySQL settings
 * * Secret keys
 * * Database table prefix
 * * ABSPATH
 *
 * @link https://wordpress.org/support/article/editing-wp-config-php/
 *
 * @package WordPress
 */

// ** MySQL settings - You can get this info from your web host ** //
/** The name of the database for WordPress */
define( 'DB_NAME', 'database_name_here' );

/** MySQL database username */
define( 'DB_USER', 'username_here' );

/** MySQL database password */
define( 'DB_PASSWORD', 'password_here' );

/** MySQL hostname */
define( 'DB_HOST', 'localhost' );

/** Database charset to use in creating database tables. */
define( 'DB_CHARSET', 'utf8' );

/** The database collate type. Don't change this if in doubt. */
define( 'DB_COLLATE', '' );

/**#@+
 * Authentication unique keys and salts.
 *
 * Change these to different unique phrases! You can generate these using
 * the {@link https://api.wordpress.org/secret-key/1.1/salt/ WordPress.org secret-key service}.
 *
 * You can change these at any point in time to invalidate all existing cookies.
 * This will force all users to have to log in again.
 *
 * @since 2.6.0
 */
define( 'AUTH_KEY',         'put your unique phrase here' );
define( 'SECURE_AUTH_KEY',  'put your unique phrase here' );
define( 'LOGGED_IN_KEY',    'put your unique phrase here' );
define( 'NONCE_KEY',        'put your unique phrase here' );
define( 'AUTH_SALT',        'put your unique phrase here' );
define( 'SECURE_AUTH_SALT', 'put your unique phrase here' );
define( 'LOGGED_IN_SALT',   'put your unique phrase here' );
define( 'NONCE_SALT',       'put your unique phrase here' );

/**#@-*/

/**
 * WordPress database table prefix.
 *
 * You can have multiple installations in one database if you give each
 * a unique prefix. Only numbers, letters, and underscores please!
 */
$table_prefix = 'wp_';

/**
 * For developers: WordPress debugging mode.
 *
 * Change this to true to enable the display of notices during development.
 * It is strongly recommended that plugin and theme developers use WP_DEBUG
 * in their development environments.
 *
 * For information on other constants that can be used for debugging,
 * visit the documentation.
 *
 * @link https://wordpress.org/support/article/debugging-in-wordpress/
 */
define( 'WP_DEBUG', false );

/* Add any custom values between this line and the "stop editing" line. */


/* That's all, stop editing! Happy publishing. */

/** Absolute path to the WordPress directory. */
if ( ! defined( 'ABSPATH' ) ) {
	define( 'ABSPATH', __DIR__ . '/' );
}

/** Sets up WordPress vars and included files. */
require_once ABSPATH . 'wp-settings.php';
Basic configurations of the wp-config.php file
In the sample configuration file you can see the following configuration blocks:
- MySQL settings
- Secret keys
- Database table prefix
- WordPress debugging mode
- ABSPATH
Let’s take a closer look at these blocks.
MySQL settings
The MySQL settings block consists of your WordPress database configuration, such as database name, username, password and hostname.
/** The name of the database for WordPress */
define( 'DB_NAME', 'database_name_here' );

/** MySQL database username */
define( 'DB_USER', 'username_here' );

/** MySQL database password */
define( 'DB_PASSWORD', 'password_here' );

/** MySQL hostname */
define( 'DB_HOST', 'localhost' );
You can find all the information required by this section in your hosting control panel or by asking your hosting provider support. Also, this block contains the database character set and database collate type settings.
/** Database charset to use in creating database tables. */
define( 'DB_CHARSET', 'utf8' );

/** The database collate type. Don't change this if in doubt. */
define( 'DB_COLLATE', '' );
When configuring these settings you can define database tables with the appropriate character set (charset). As the default charset WordPress assigns UTF8, which supports any language. The database collation determines how the database sorts your data. Mostly, the database collation value should be left blank, so it will be automatically assigned by MySQL based on the database character set specified by charset. Usually there is no reason to change the default value of DB_CHARSET and DB_COLLATE, however, you can change them if needed according to the character sets and collations supported by MySQL. Note: Using the wrong combination of charset and collation values may cause different errors in the WordPress database.
Secret keys
In the secret keys block of the wp-config.php file WordPress stores a set of authentication unique keys and salts, which provide an extra layer of security for your site against attacks by adding random elements to the password. This block contains eight variables that consist of random strings of data.
define( 'AUTH_KEY',         'put your unique phrase here' );
define( 'SECURE_AUTH_KEY',  'put your unique phrase here' );
define( 'LOGGED_IN_KEY',    'put your unique phrase here' );
define( 'NONCE_KEY',        'put your unique phrase here' );
define( 'AUTH_SALT',        'put your unique phrase here' );
define( 'SECURE_AUTH_SALT', 'put your unique phrase here' );
define( 'LOGGED_IN_SALT',   'put your unique phrase here' );
define( 'NONCE_SALT',       'put your unique phrase here' );
You can change the values to yours by changing the “put your unique phrase here” fields. The unique keys can be generated by visiting the WordPress secret keys service.
Database table prefix
The database table prefix is the value placed in front of the WordPress database tables. By default, WordPress sets this value as “wp_” in the wp-config file.
/**
 * WordPress database table prefix.
 *
 * You can have multiple installations in one database if you give each
 * a unique prefix. Only numbers, letters, and underscores please!
 */
$table_prefix = 'wp_';
Changing the database prefix to a unique value is one of the steps to improve your database security against SQL injection attacks. Also, using unique table prefixes in different WordPress installations allows you to store data from different sites in one database.
WordPress debugging mode
The default wp-config.php file has a useful setting for WordPress developers where the debug mode can be enabled. When debug mode is turned on and there is an error, you’ll see the error notification on your site. WordPress turns off the debug mode by default as shown in the following code line:
define( 'WP_DEBUG', false );To turn the debug mode on you need to replace the “false” value with “true”:
define( 'WP_DEBUG', true );Note: You should disable debug mode on a live site, as errors and warnings that may be shown to site visitors can provide valuable information about your site and it’s not secure. We will describe later in this article how to use debug mode safely.
ABSPATH
ABSPATH is a PHP constant defined at the bottom of the wp-config.php file, which states the absolute path to the WordPress directory.
/** Absolute path to the WordPress directory. */
if ( ! defined( 'ABSPATH' ) ) {
	define( 'ABSPATH', __DIR__ . '/' );
}

/** Sets up WordPress vars and included files. */
require_once ABSPATH . 'wp-settings.php';
This code snippet is placed after the following comment:
/* That's all, stop editing! Happy publishing. */That means WordPress does not recommend modifying the lines of code after it.
Advanced wp-config.php configurations
In the previous section we reviewed default settings of the wp-config. php file. In addition to basic configurations for WordPress in the wp-config. php file, you can add advanced ones, which we will describe below. One important thing: All code snippets should be placed above the line “/* That’s all, stop editing! Happy publishing. */”, otherwise your custom settings won’t work.
WordPress URL
When moving the site to a new domain or server it’s necessary to change the WordPress URL. You can change it in the site dashboard via the Settings > General section.
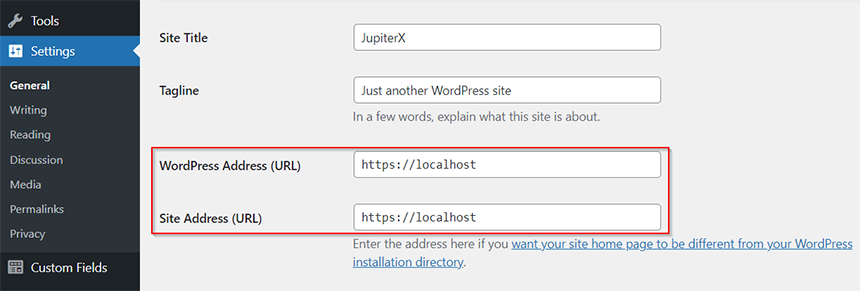
It may happen that these fields can’t be edited in the dashboard. In this case you can change the WordPress URL by adding the following code snippet in the wp-config.php file.
define( 'WP_HOME', 'http://your-new-domain' );
define( 'WP_SITEURL', 'http://your-new-domain' );
The value of the WP_SITEURL is the address where your WordPress core files are located. The WP_HOME value is the address your visitors type in their browser to reach your website. Both constant values should include ‘http://’ or ‘https://’ and shouldn’t have a slash symbol “/” at the end. Setting WP_SITEURL and WP_HOME in wp-config.php can reduce the number of database calls when loading your site, as by default these values are stored in the wp_options table.
Upload Directory
The Uploads directory stores all media you upload via WP Dashboard > Media. By default, WordPress sets the uploads path to “wp-content/uploads”. You can redefine this value to yours in wp-config.php by adding the following code snippet.
define( 'UPLOADS', 'wp-content/custom-folder' );To store media files in a directory outside the wp-content folder, use the code snippet below:
define( 'UPLOADS', ''.'media' );Note: The value doesn’t require a leading slash, as this path is relative to ABSPATH.
wp-content Directory
WordPress allows you to move the wp-content directory, which stores your themes, plugins, and uploads, outside of the WordPress app directory. It’s one of the methods to secure your site from malware injection attacks. To do that you need to redefine WP_CONTENT_DIR:
define( 'WP_CONTENT_DIR', dirname(__FILE__) . '/new-folder/wp-content' );and change the location of the wp-content URL by changing the WP_CONTENT_URL value:
define( 'WP_CONTENT_URL', 'http://yourdomain/new-folder/wp-content' );Theme Directory
The theme directory can’t be simply changed via wp-config because its path is hardcoded relative to the wp-content folder:
$theme_root = WP_CONTENT_DIR . '/themes';In this case, additional theme directories can be registered as described in the article entitled Register theme directory.
Plugins Directory
As for moving the Plugins folder, it can be easily changed by using the following code snippets in the wp-config.php file.
define( 'WP_PLUGIN_DIR', dirname(__FILE__) . '/wp-content/new-folder/plugins' );
define( 'WP_PLUGIN_URL', 'http://yourdomain/wp-content/new-folder/plugins' );
The first code line sets the WP_PLUGIN_DIR and the second one sets the WP_PLUGIN_URL value.
Custom User Table and User Meta Table
WordPress has the wp_user table in the database to store user data. If you need a custom user table, add the following code in wp-config.
define( 'CUSTOM_USER_TABLE', $table_prefix.'my_users' );If you created a custom user table, then you need to create a custom user metadata table as well.
define( 'CUSTOM_USER_META_TABLE', $table_prefix.'my_usermeta' );Language and Language Directory
WordPress version 4.0 users can change language in WP Dashboard > Settings > General.
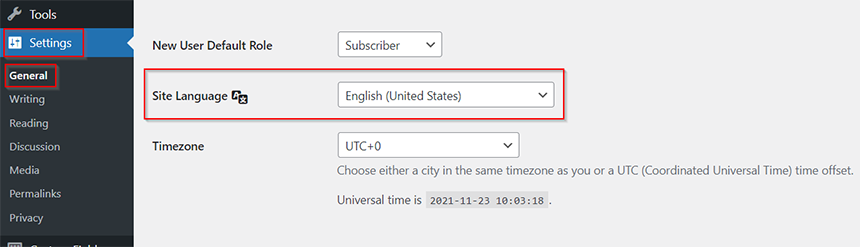
It’s also possible to change language via the wp-config.php file during the WordPress installation process. Use this code to change language and define the language directory where the language files will be stored.
define( 'WPLANG', 'it_IT' );
define( 'WP_LANG_DIR', dirname(__FILE__) . 'wordpress/languages' );
The WPLANG language code can be found here in the WP Locale column.
Memory Size Limit
In WordPress, you can set the amount of PHP memory that is required to execute scripts by using the WP_MEMORY_LIMIT option. The thing you need to consider is this option changes PHP Memory only for WordPress and not other applications. By default, WordPress allocates 40M for a single site and 64M for multisite. To increase, for example, to 256M, you need to add this code in wp-config.
define( 'WP_MEMORY_LIMIT', '256M' );Also, you can increase or decrease PHP memory from the WP_MEMORY_LIMIT for the administration area by defining WP_MAX_MEMORY_LIMIT.
define( 'WP_MAX_MEMORY_LIMIT', '256M' );File Permissions
The file permission setting determines who can view, modify and execute files and folders of the site. Each permission level is represented by a 3-digit code that consists of the following:
| no access | 0 (-) |
| execute | 1 (x) |
| write | 2 (w) |
| read | 4 (r) |
In wp-config you can override the default file permissions with help of two constants: FS_CHMOD_DIR and FS_CHMOD_FILE. In the example below we will set permissions for directories to “755” (read, write and execute for the owner; read and execute for the group; read and execute for others), and for the files to “644” (read, write and execute for the owner; read for the group; read for others).
define( 'FS_CHMOD_DIR', ( 0755 & ~ umask() ) );
define( 'FS_CHMOD_FILE', ( 0644 & ~ umask() ) );
As the permissions are octal values they are prefixed with a 0. You can find more information about file permissions in this article.
WordPress Auto Updates
WordPress allows the auto-update feature during the installation process. However, there are different situations when autoupdate can affect your site functionality, and in this case, it’s better to disable the auto-updates by adding the following code.
define( 'AUTOMATIC_UPDATER_DISABLED', true );Also, since WordPress version 3.7 you can manage core updates with the WP_AUTO_UPDATE_CORE constant. To disable all core updates use this code.
define( 'WP_AUTO_UPDATE_CORE', false );There is also the ability to enable core updates for minor releases.
define( 'WP_AUTO_UPDATE_CORE', 'minor' );Content Related Settings (autosave interval, post revisions)
These types of settings may be useful as your website grows. When you edit any posts, WordPress adds an entry to the posts table, which allows you to restore previous posts/pages revisions. Though it’s a cool functionality, it can generate a problem when your site gets big. In this case you can disable/reduce the number of post revisions and reduce the autosave interval. WordPress saves revisions each 60 seconds automatically, but it can be changed (for example, to 180 sec) using this code:
define( 'AUTOSAVE_INTERVAL', 180 );To decrease the number of posts revision (set to 5) add this code:
define( 'WP_POST_REVISIONS', 5 );or disable them at all using:
define( 'WP_POST_REVISIONS', false );Debugging Mode advanced settings
Earlier in this article we described how to enable the debug mode in the wp-config.php file. However, in this case all errors and notices will be visible to our site’s visitors, which poses a security risk. After setting WP_DEBUG constant to “true” you need to add a few lines of code below, so the full code will look like this:
define( 'WP_DEBUG', true );
define( 'WP_DEBUG_LOG', true );
define( 'WP_DEBUG_DISPLAY', false );
@ini_set( 'display_errors', 0 );
In this way, all errors, notices and warnings will log to a file called debug.log, which will be generated in the wp-content directory so that no errors are shown on the site.
Lockdown the wp-config.php file
As you can see, the wp-config.php file contains not only the database settings, but also other important configurations of your WordPress site, so there is a reasonable question as to how to protect it. One of the methods is to use the following directives in the web server settings:
For Apache web servers, add this code to the .htaccess file:
<files wp-config.php>
order allow,deny
deny from all
</files>
For Nginx web servers, add this code to the configuration file:
location ~* wp-config.php { deny all; }Note: These directives should be applied only after all configurations are completed.
Conclusion
In this article we described the WordPress configuration file called wp-config and defined its functional purpose. This file is created during the WordPress installation process and, mainly, it contains the database credentials to establish a connection between the site and the database. Along with the basic configurations (secret keys, database table prefix, etc.), it can be supplemented with other advanced settings, such as: changing location of the uploads, wp-content and plugins directories; customizing user table; allocating WP Memory size; setting file permissions and much more. Unfortunately, it’s hard to review all possible custom configurations of the wp-config.php file in one article, so in this one we provided the most popular settings that can be helpful when configuring WordPress in the wp-config.php file.

No comment yet, add your voice below!