In the previous post about WordPress custom admin pages, we defined a custom admin page and explained how to add a new admin page to WordPress.
One of the most important usages of WordPress custom admin pages is the Settings Pages. Almost every plugin has custom setting pages, which allows developers to have an option page for their plugin. Some plugins like Akismet ask for integration codes and others have the option to enable or disable their features. WooCommerce has several options to customize shop, and all of them are implemented using Settings API.
In this post, we’ll delve into how to create a custom setting page in WordPress for what we created in the previous post. We’ll also add a new setting and the required UI for it. We’ll then save and use this saved value on the site.
Adding a new setting in WordPress
In order to add new settings to WordPress, we have to use WordPress Settings API. Settings API is a core API that allows developers to add a new custom setting page in WordPress.
This includes functions to register settings, setting the section and setting fields, form rendering and error handling.
Before adding settings
For the first step, we need to make sure we have a form and that it’s set to work with options.php. In the following code that we have a call back function to generate the heading, we need to load settings for the API functions to let our custom settings work with WordPress.
The code from the previous post about how to have a custom admin page can be accessed here.
We need to change the my_admin_page_contents function to the following:
function my_admin_page_contents() {
    ?>
    <h1> <?php esc_html_e( 'Welcome to my custom admin page.', 'my-plugin-textdomain' ); ?> </h1>
    <form method="POST" action="options.php">
    <?php
    settings_fields( 'sample-page' );
    do_settings_sections( 'sample-page' );
    submit_button();
    ?>
    </form>
    <?php
}
We just loaded the setting fields and the setting sections (which we will create) and added a submit button to save them.
Settings section
A setting section is part of the WordPress settings API which allows developers to have a group of settings under a heading. It’s possible to add a setting section to an existing WordPress admin page or to a new custom admin page.
Here, we are going to add a new setting section to our custom admin page.
Adding a new setting section
Now, we’ll go ahead and use the add_settings_section function to have a new setting section in our custom admin page which have sample-page as the slug.
add_settings_section(
	'sample_page_setting_section',
	__( 'Custom settings', 'my-textdomain' ),
	'my_setting_section_callback_function',
	'sample-page'
);
In the above code, we have added a new setting section and the arguments are:
<?php add_settings_section( $id, $title, $callback, $page ); ?>$id A custom slug for the setting section.
$title Setting section title. Make sure it is translatable.
$callback A function that adds markups to the settings section.
$page The page slug that we want to add our settings section.
As we have used a callback function (my_setting_section_callback_function), let’s define it.
my_setting_section_callback_function( $args ) {
	echo '<p>Intro text for our settings section</p>';
}
And let’s wrap our codes to a new function to call it on admin_init.
add_action( 'admin_init', 'my_settings_init' );

function my_settings_init() {

    add_settings_section(
        'sample_page_setting_section',
        __( 'Custom settings', 'my-textdomain' ),
        'my_setting_section_callback_function',
        'sample-page'
    );
}

function my_setting_section_callback_function() {
    echo '<p>Intro text for our settings section</p>';
}
The result will be like the following:
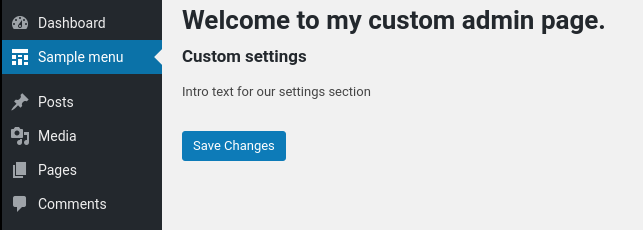
Note that WordPress automatically adds a Save Changes button.
Settings fields
After having a section for our settings, which includes a title, custom markup and save button, it’s time to have some real settings that will allow us to get some inputs. In order to do that, we’ll use the settings_fields function.
settings_fields function is not only for having settings and input markups, but it also adds nonce and takes care of security as well as adds the required actions and functionality to make sure our settings will work.
Adding a new setting field
The usage of the settings_fields function is like
add_settings_field(
   'my_setting_field',
   __( 'My custom setting field', 'my-textdomain' ),
   'my_setting_markup',
   'sample-page',
   'sample_page_setting_section'
);
which is actually
<?php add_settings_field( $id, $title, $callback, $page, $section, $args ); ?>and the arguments are:
$id A custom slug for the setting field.
$title Setting the field title.
$page The page slug of which we want to show setting field on it.
$section The section that we want to show setting field under it.
$args Extra arguments. See more here.
Like adding a setting section, we have a callback function that generates the markup.
function my_setting_markup() {
    ?>
    <label for="my_setting_field"><?php _e( 'My Input', 'my-textdomain' ); ?></label>
    <input type="text" id="my_setting_field" name="my_setting_field">
    <?php
}
We should wrap the settings_fields function to our my_settings_init function. So our code will be:
add_action( 'admin_init', 'my_settings_init' );

function my_settings_init() {

    add_settings_section(
        'sample_page_setting_section',
        __( 'Custom settings', 'my-textdomain' ),
        'my_setting_section_callback_function',
        'sample-page'
    );

		add_settings_field(
		   'my_setting_field',
		   __( 'My custom setting field', 'my-textdomain' ),
		   'my_setting_markup',
		   'sample-page',
		   'sample_page_setting_section'
		);

		register_setting( 'sample-page', 'my_custom_settings_options' );
}


function my_setting_section_callback_function() {
    echo '<p>Intro text for our settings section</p>';
}


function my_setting_markup() {
    ?>
    <label for="my_setting_field"><?php _e( 'My Input', 'my-textdomain' ); ?></label>
    <input type="text" id="my_setting_field" name="my_setting_field">
    <?php
}
And the output will be
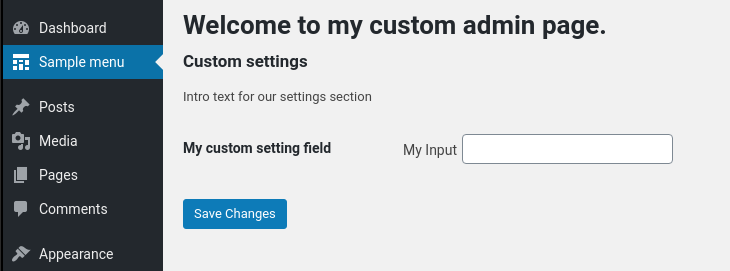
If you try to save the settings, you may see some errors like option page not found. The reason is that we just added markups, but our settings are not registered to WordPress yet, and we’re not ready to save values to the WordPress database.
Registering custom settings in WordPress and saving values
The WordPress settings API has the needed functionality for getting and saving values from a setting. So we should use the register_setting function. Using the following code, we’ll register our settings in WordPress.
register_setting( 'sample-page', 'my_setting_field' );Again, we need to use that in the init. So our code will be:
add_action( 'admin_init', 'my_settings_init' );

function my_settings_init() {

    add_settings_section(
        'sample_page_setting_section',
        __( 'Custom settings', 'my-textdomain' ),
        'my_setting_section_callback_function',
        'sample-page'
    );

		add_settings_field(
		   'my_setting_field',
		   __( 'My custom setting field', 'my-textdomain' ),
		   'my_setting_markup',
		   'sample-page',
		   'sample_page_setting_section'
		);

		register_setting( 'sample-page', 'my_setting_field' );
}


function my_setting_section_callback_function() {
    echo '<p>Intro text for our settings section</p>';
}


function my_setting_markup() {
    ?>
    <label for="my_setting_field"><?php _e( 'My Input', 'my-textdomain' ); ?></label>
    <input type="text" id="my_setting_field" name="my_setting_field">
    <?php
}
As a final step, we need to make sure we are showing the saved value in the form after getting back to our custom setting page in WordPress.
Let’s add the following code to the my_setting_markup function
value="<?php echo get_option( 'my_setting_field' ); ?>"And it will be
function my_setting_markup() {
    ?>
    <label for="my_setting_field"><?php _e( 'My Input', 'my-textdomain' ); ?></label>
    <input type="text" id="my_setting_field" name="my_setting_field" value="<?php echo get_option( 'my_setting_field' ); ?>">
    <?php
}
Wrapping it up, we’ll have our plugin:
<?php

/*
 * Plugin Name: My custom admin page
 * Description: Adds a custom admin pages with sample styles and scripts.
 * Version: 1.0.0
 * Author: Artbees
 * Author URI: http://artbees.net
 * Text Domain: my-custom-admin-page
*/

function my_admin_menu() {
    add_menu_page(
        __( 'Sample page', 'my-textdomain' ),
        __( 'Sample menu', 'my-textdomain' ),
        'manage_options',
        'sample-page',
        'my_admin_page_contents',
        'dashicons-schedule',
        3
    );
}
add_action( 'admin_menu', 'my_admin_menu' );

function my_admin_page_contents() {
    ?>
    <h1> <?php esc_html_e( 'Welcome to my custom admin page.', 'my-plugin-textdomain' ); ?> </h1>
    <form method="POST" action="options.php">
    <?php
    settings_fields( 'sample-page' );
    do_settings_sections( 'sample-page' );
    submit_button();
    ?>
    </form>
    <?php
}


add_action( 'admin_init', 'my_settings_init' );

function my_settings_init() {

    add_settings_section(
        'sample_page_setting_section',
        __( 'Custom settings', 'my-textdomain' ),
        'my_setting_section_callback_function',
        'sample-page'
    );

		add_settings_field(
		   'my_setting_field',
		   __( 'My custom setting field', 'my-textdomain' ),
		   'my_setting_markup',
		   'sample-page',
		   'sample_page_setting_section'
		);

		register_setting( 'sample-page', 'my_setting_field' );
}


function my_setting_section_callback_function() {
    echo '<p>Intro text for our settings section</p>';
}


function my_setting_markup() {
    ?>
    <label for="my-input"><?php _e( 'My Input' ); ?></label>
    <input type="text" id="my_setting_field" name="my_setting_field" value="<?php echo get_option( 'my_setting_field' ); ?>">
    <?php
}
Here is the result of our custom WordPress development. Now we have a custom admin page that includes a custom settings page in WordPress. We can save options in the database and retrieve and use it to implement complex functionalities in our plugins.
In order to get the saved value of the added setting, we can use the get_option function. The following code will return the saved value for setting that we have added in this post:
get_option( 'my_setting_field' );
6 Comments
Nice article, good explanations… thanks for sharing this.
So cool tutorial!
How to access ‘my_setting_field’ via REST API?
Example not displaying “setting saved” after successful setting. Why?
Missing:
settings_errors(); // in php brackets
in page contents, below tag
Can you explain how to change the shape of the design and get rid of the old table and design
nice tutorial!!
And how do i add several input fields? and labels for the different ones? I cant add an extra input to my_setting_markup function… because that adds a second input field.
the input field in the my settings markup function has the id, name and value, they have the name of the settings field, but if you add extra fields you cant add them because you can only use one input. So i think it shoud be a foreach loop but just cant figure out how to do this.