
As a web developer, you prefer to make your codes ready, make sure they return what is expected and then style the result. It would be a hassle if you have to keep thinking about how to style this and that while trying to render the result that is a complex context coming out of code. If you, like many other developers, are using WordPress and Elementor as a handy tool to develop your website projects, you need to know how you can extend their functionality and do so quickly.
In the previous article, we discussed how we can use dynamic shortcodes to create a gaming website. We were using a shortcode inside a dynamic template exclusively. However, shortcodes can also be used in other places. One of the places where we can use the dynamic shortcodes is inside the heading elements. Imagine that you want to build a complex script, show it on your page and also have the ability to style the text using Elementor’s powerful editing options. If this sounds like you want to make use of dynamic headings in Elementor, then this article is for you.
How does it work?
It’s simple: you define your own shortcode using any method you wish, then select the source of your heading element as Dynamic and write down your shortcode. I’ll provide examples in the next steps.
Why is that necessary?
You can of course use the Shortcode element instead of the heading, but then in order to style the outcome, you need to use custom CSS. If you use the Heading elements, you’ll need to use Elementor’s styling options, and you can change the style whenever you want.
What are the use cases?
It has the most uses in complex scripts and dynamic text. Imagine that you have to manipulate a word with a sentence. This might be the simplest example.
Another example could be showing the phonetics of a word in front of the text automatically. Let’s say that you want to build a dictionary website: you define your text and want to use a library to automatically translate the text to phonetics. For example, you have the word “Artbees Themes” but you want to automatically turn it into “Artbees Themes (artbees θimz)” and show it on your page. This could be a more complex example. You even may need to use a Javascript snippet to show a heading text.
Another example might be an SEO tip! While you have one WordPress page and you need to make that page have different content by changing a URL parameter. If you don’t do this, Google will consider your page as one single page and you won’t be able to achieve your SEO goals. This is what Artbees actually did to perform different category indexes on its templates page (compare this page to this and check the heading).
Dozens of other creative use cases exist for this feature. If you know how you can use this feature, certainly there is a place for this in your next web design projects.
Let’s do it with an example.
Convert the digits into words
To get started on making dynamic headings in Elementor, I’ll need to convert all the digits in my text to words. I know that using this function in PHP I can turn any digits into words:
$f = new NumberFormatter("en", NumberFormatter::SPELLOUT);
echo $f->format(123456);
It will look something like this:
one hundred twenty-three thousand four hundred fifty-six
But anyway, I’ll use a custom-made function because the above depends on a PHP extension.
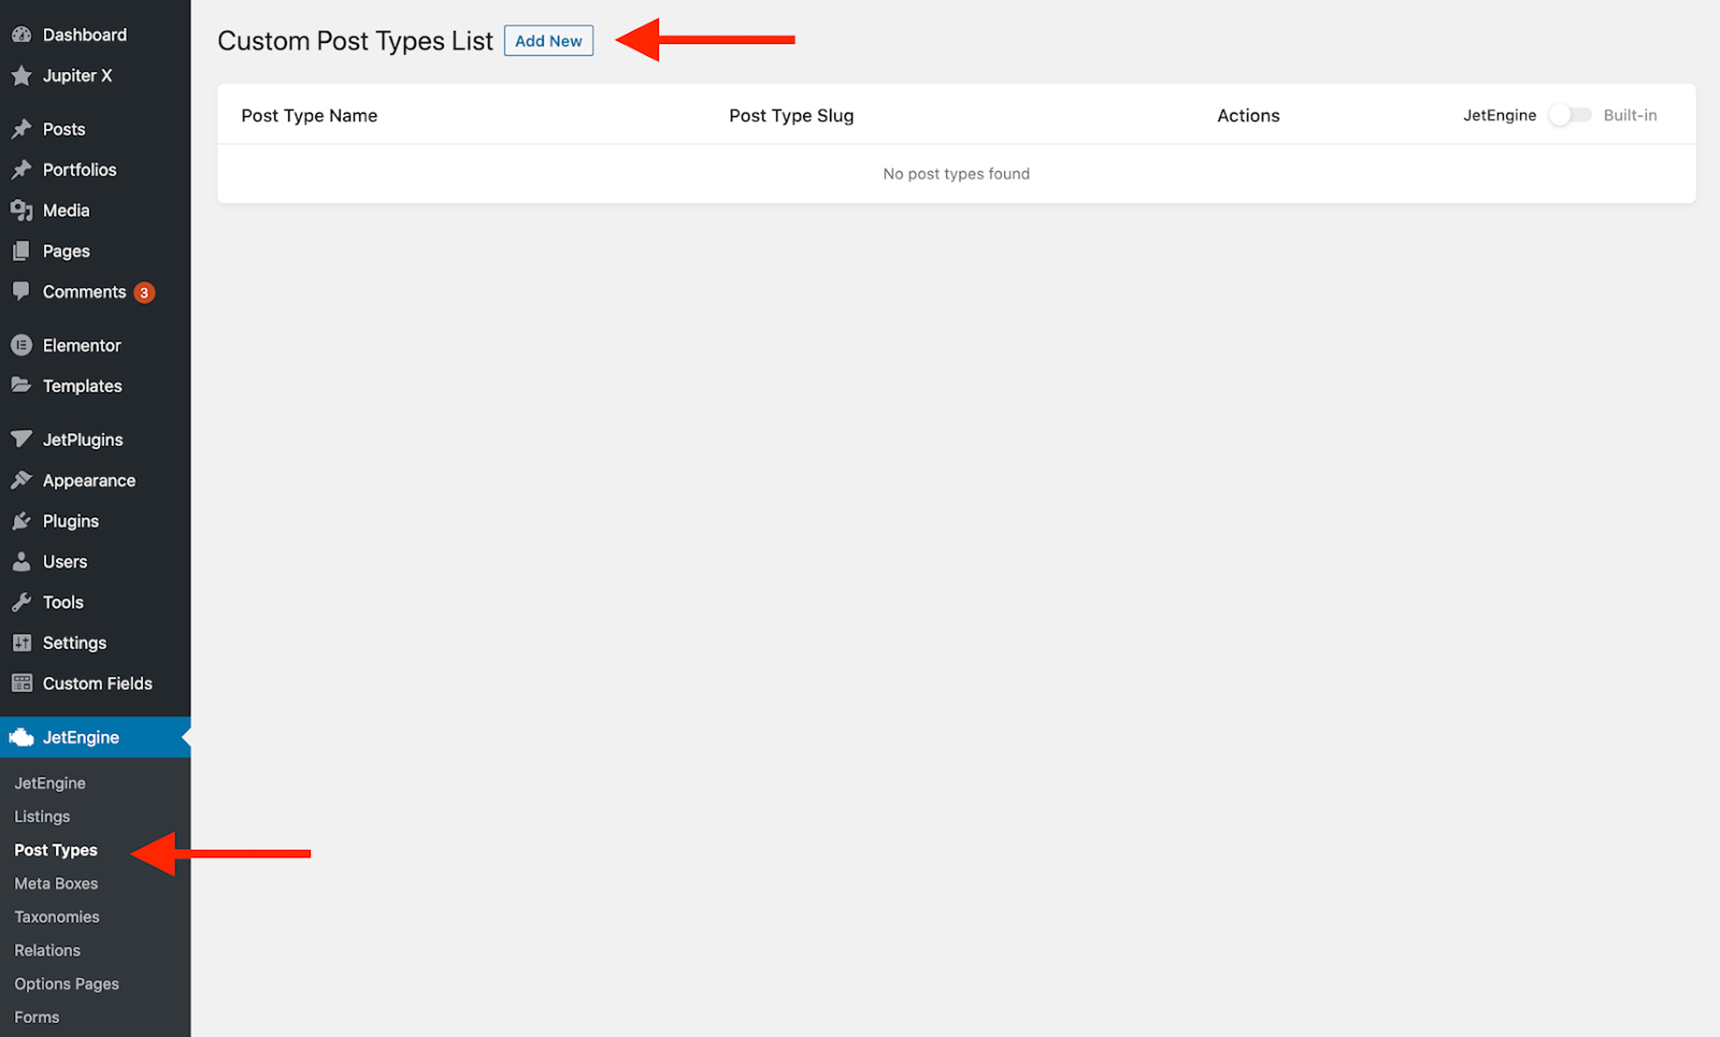
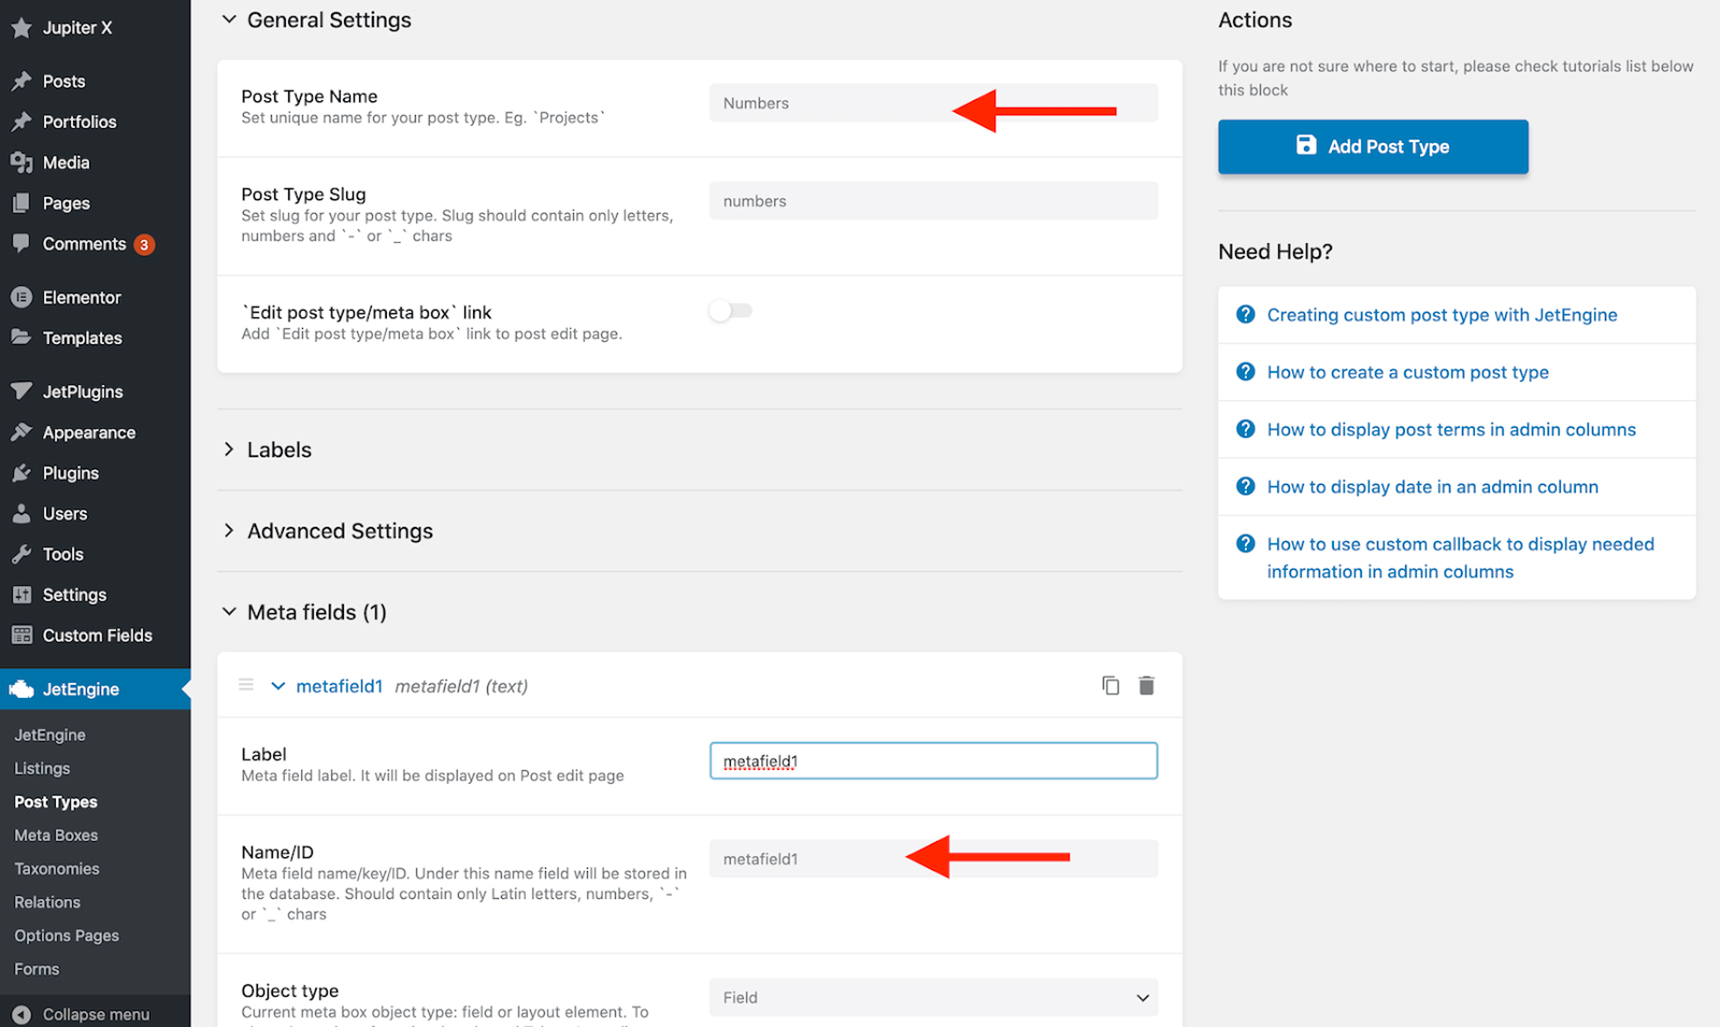
To do that, I’ll use a custom post type (with the Jet Engine plugin) and add a meta field named as metafield1 to store my number. For the first step, I’ll go to Jet Engine -> Post Types and click on Add New.
Then, I’ll name my custom post type and add the meta fields as mentioned above.
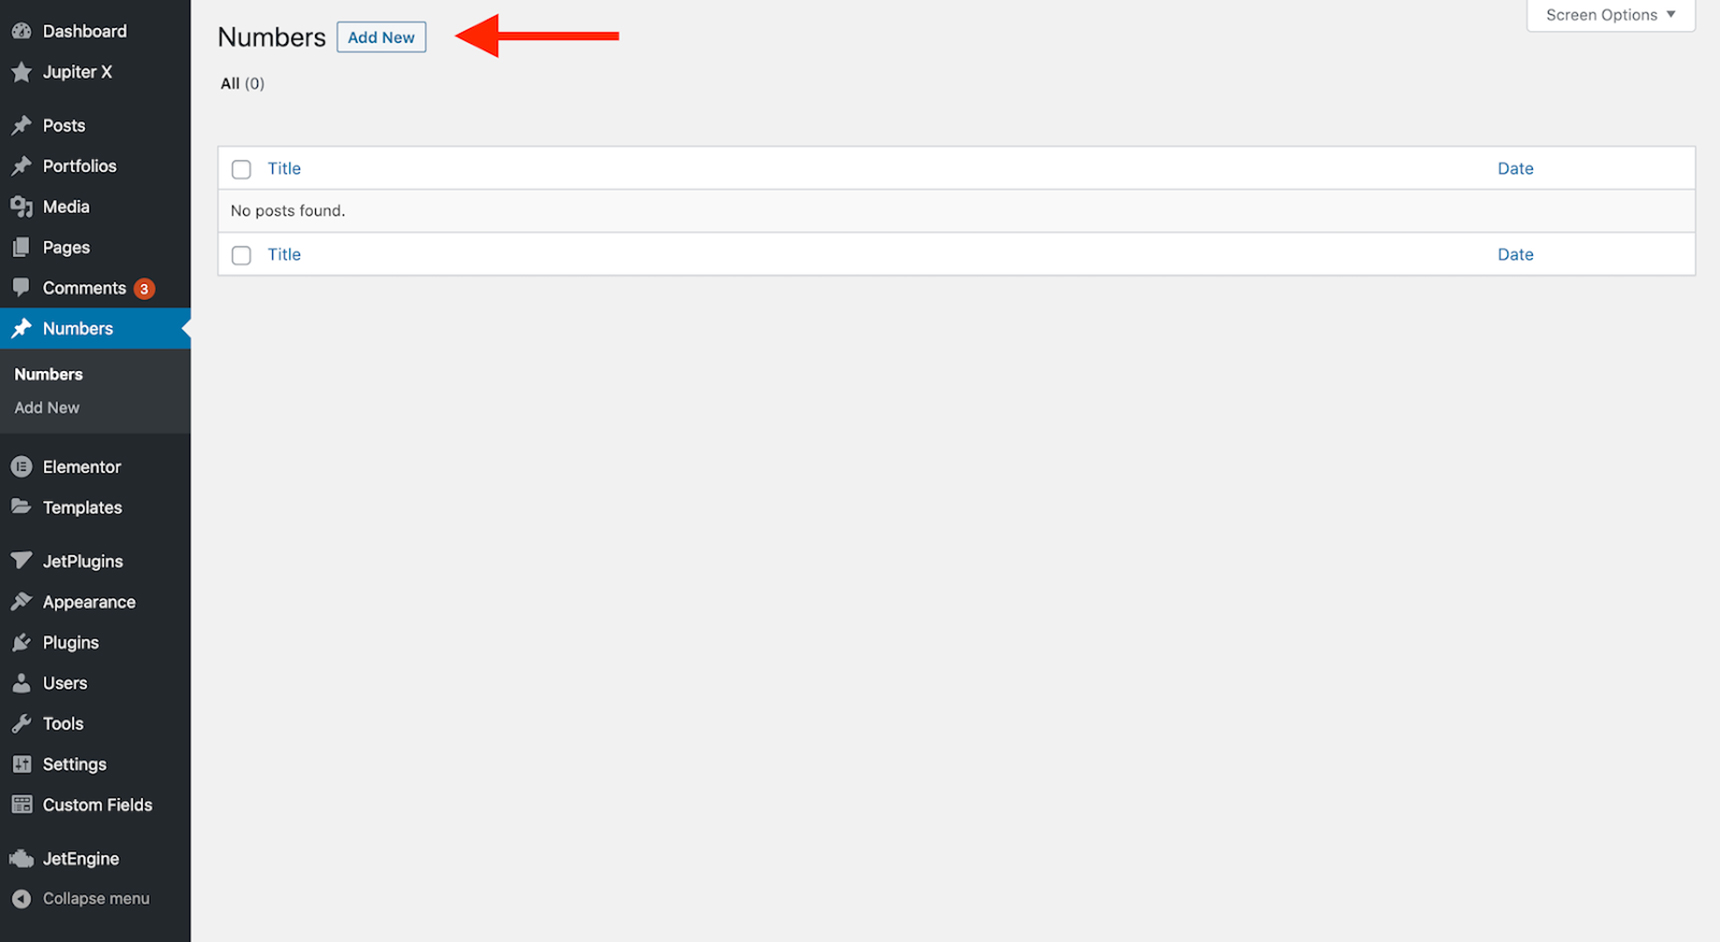
After my post type is created, I’ll click on the Numbers menu in the WordPress sidebar and add a new entry.
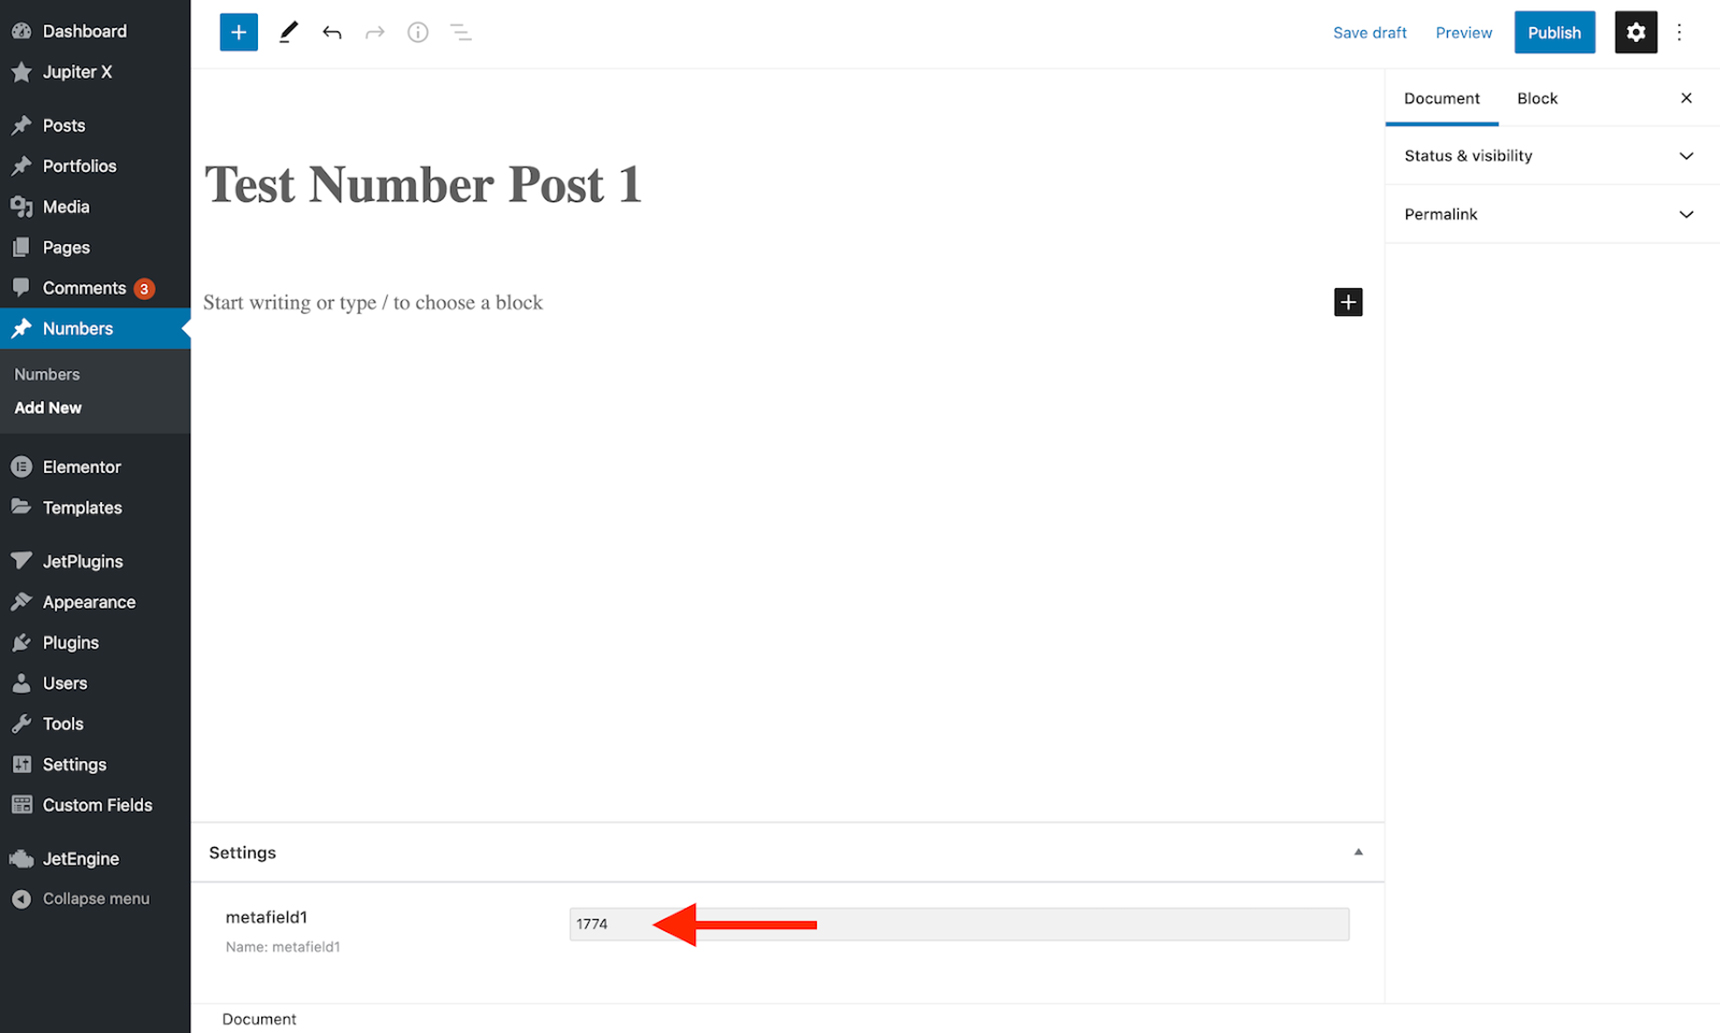
Now, I’ll add the number in the metafield1 text box and publish my post.
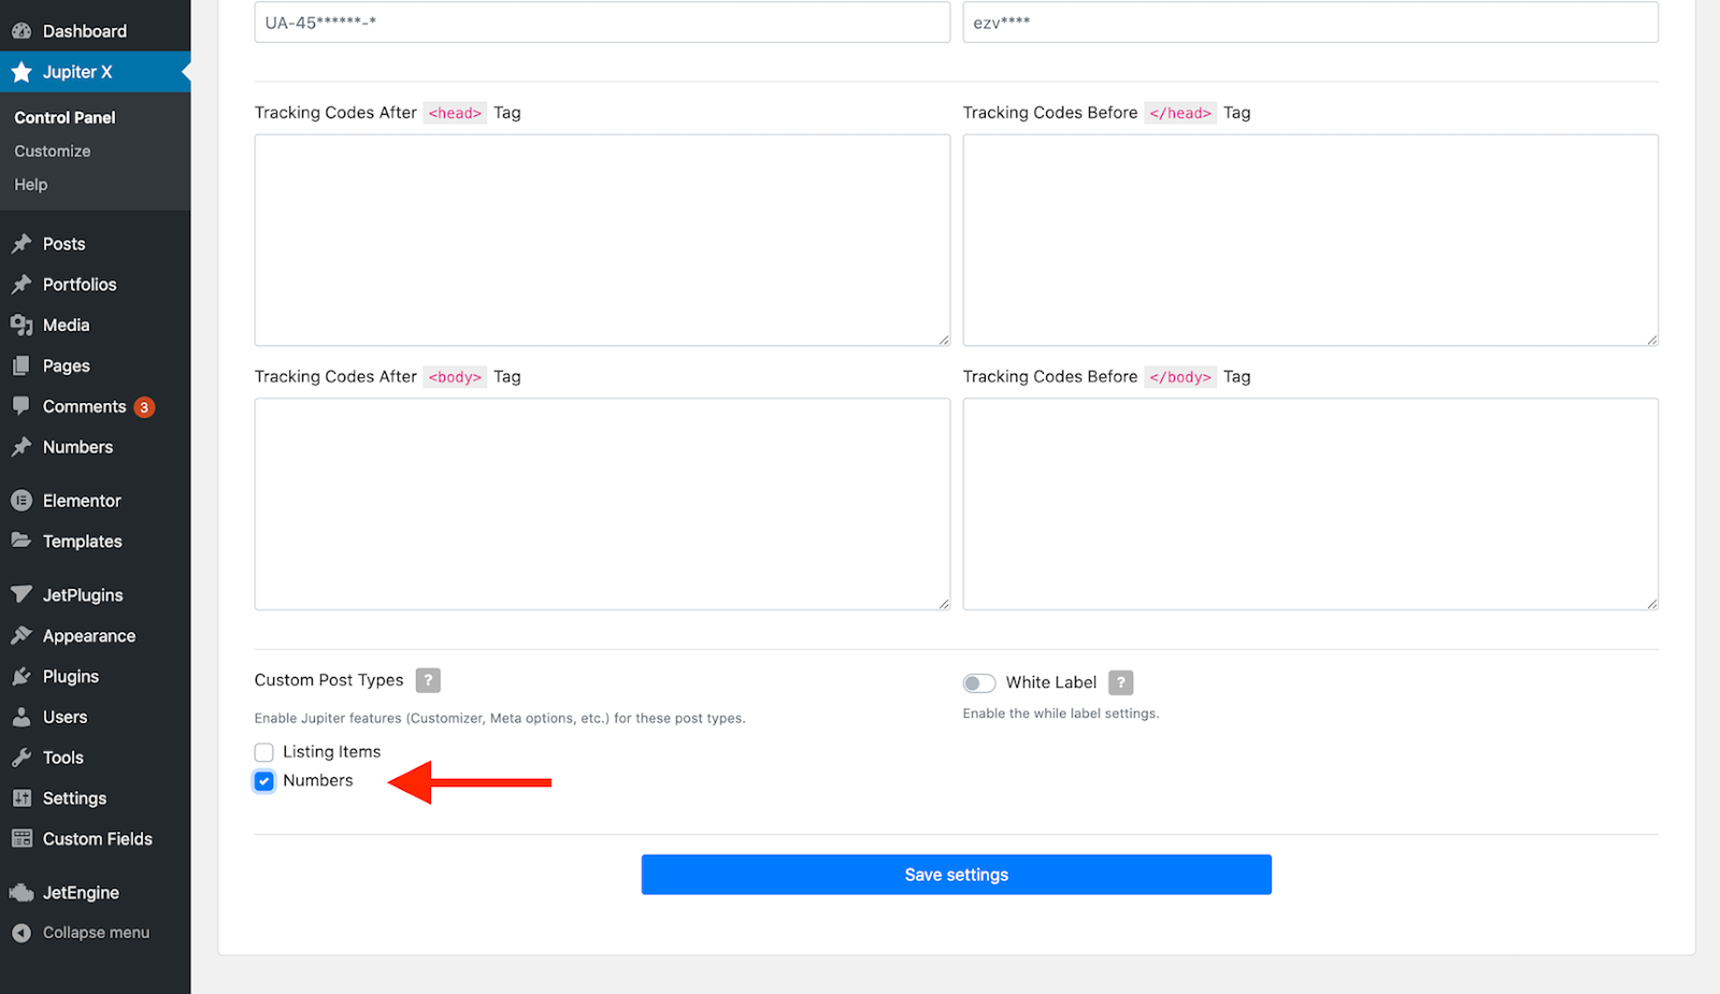
Now from the Jupiter X -> Control Panel -> Settings, I’ll need to enable my Numbers post type to be able to add a custom template to it.
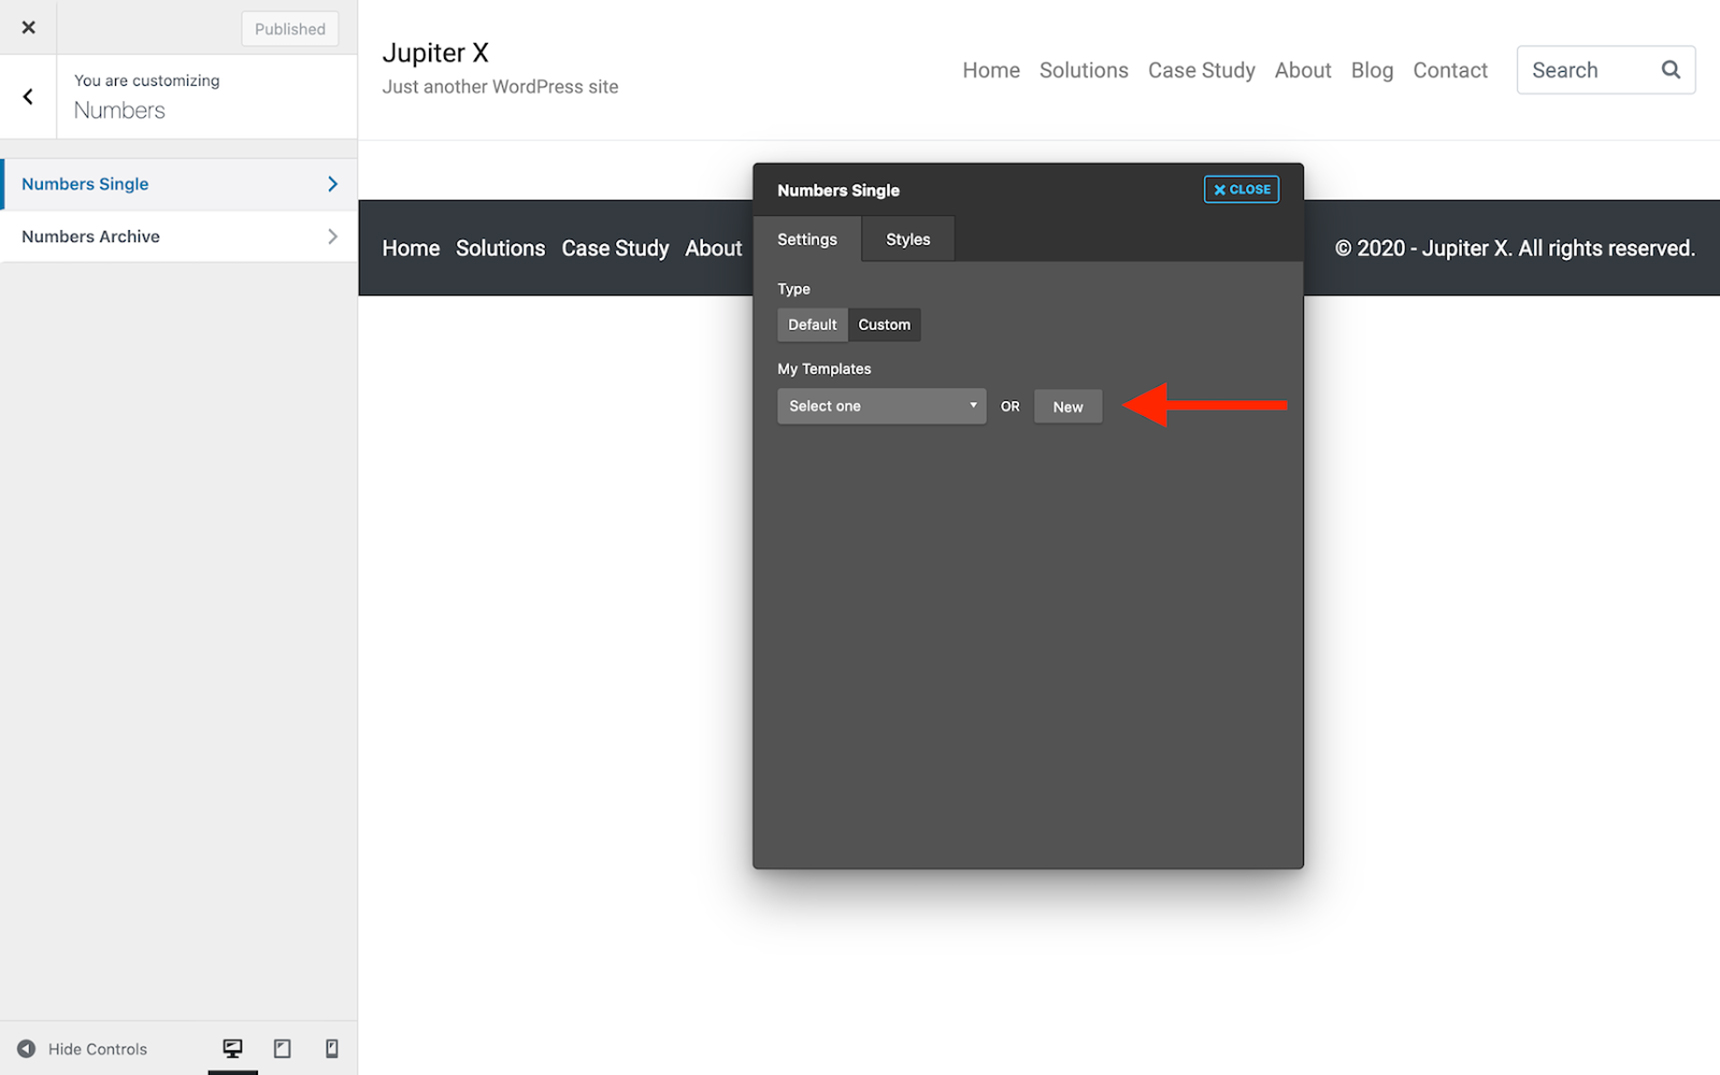
It’s possible to add a template to my post type now and show the shortcode results inside it. Al I’ll need to do is simply navigate to Customize -> Post Types -> Numbers -> Single and set the template to Custom. Then, I’ll add a new template to it.
In the Elementor editor, drag a Heading element into the page and place it as you wish. Then select the source of the text to be dynamic. Please note that you don’t need Elementor Pro to do this. It’s a feature available in the Jupiter X theme.
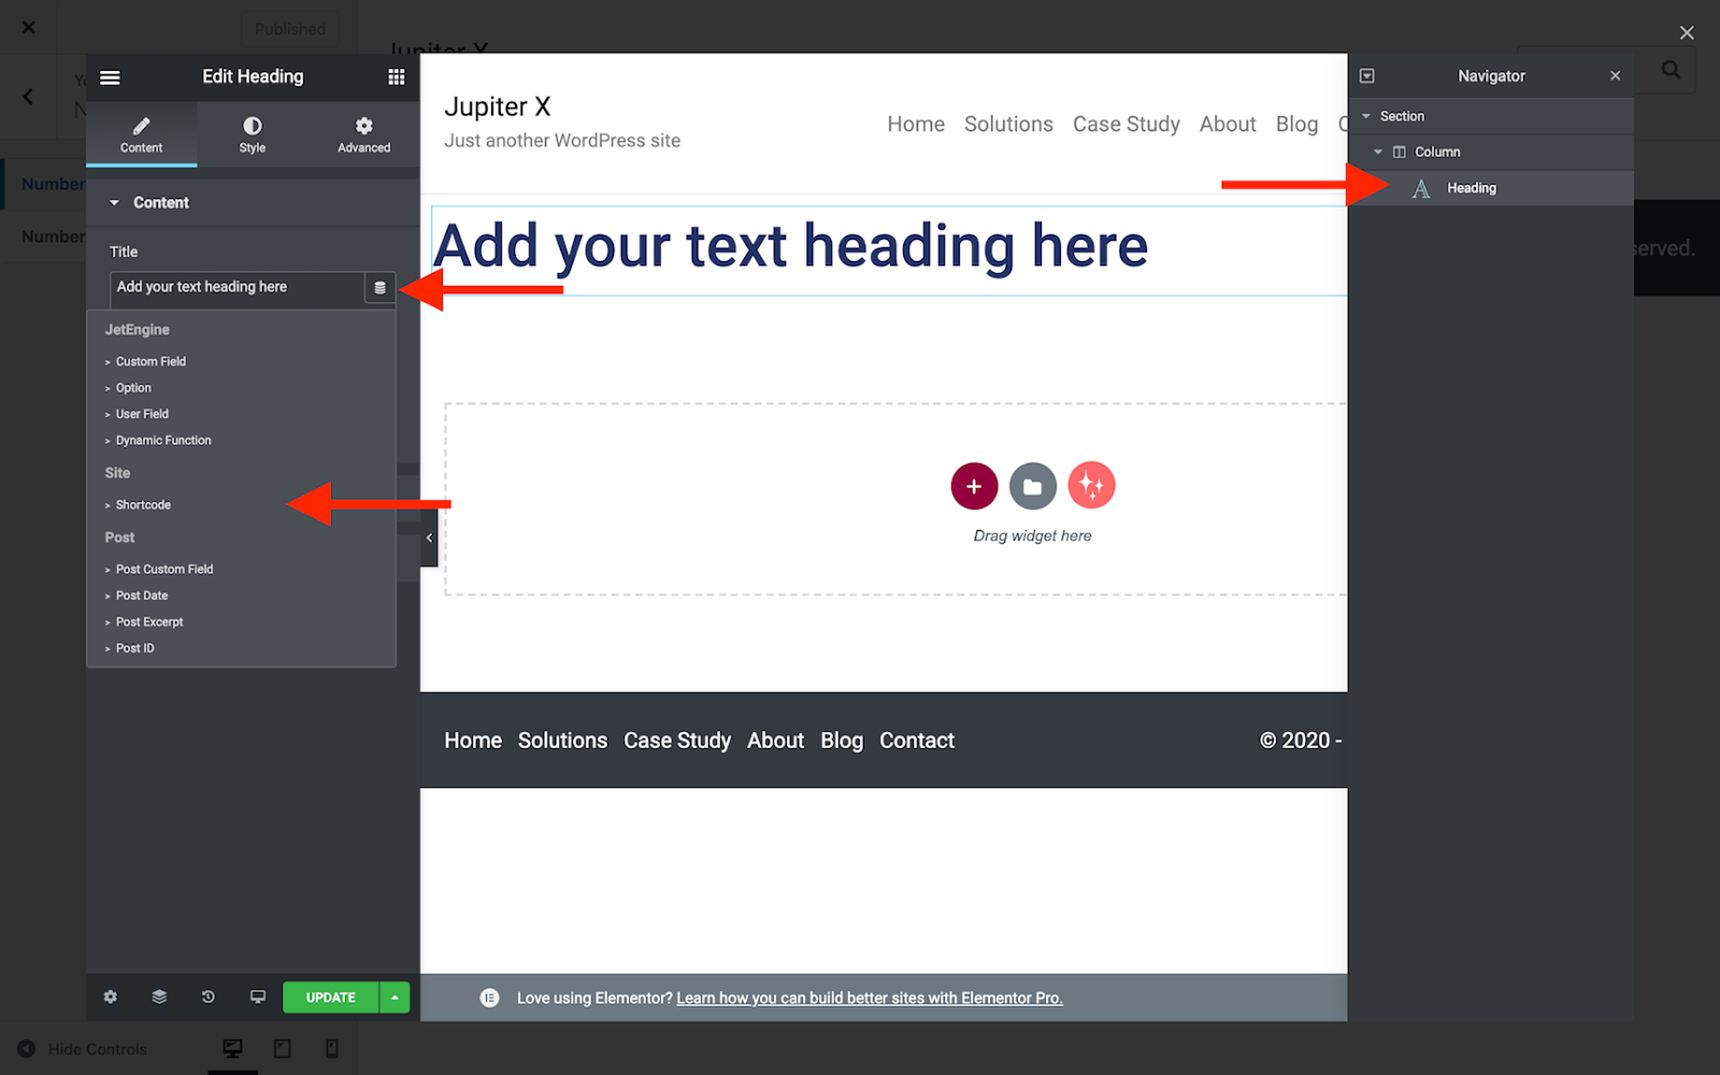
Now click on the Shortcode and write down the shortcode name like below.
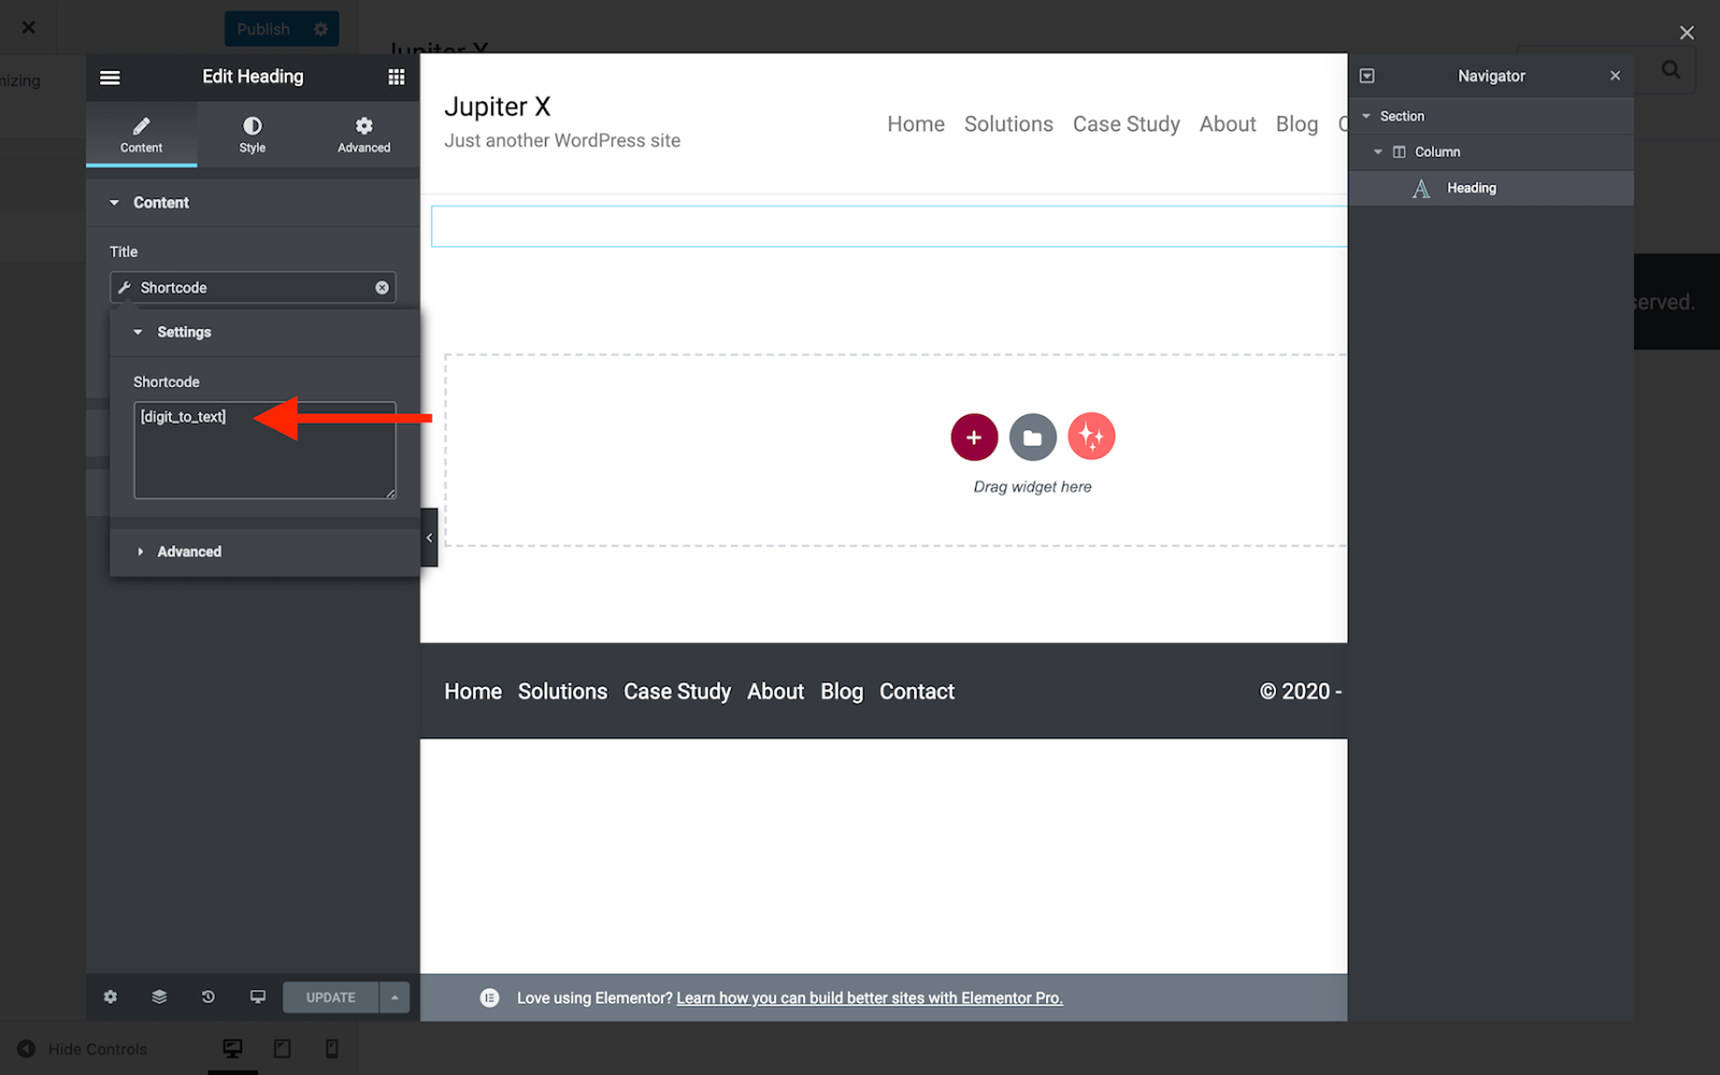
You can add attributes to your shortcode as you wish and do it like every other shortcode. However, in the codes, you need to catch the attributes and decide what to do with them. Since we don’t use attributes in this example, we don’t need to catch any attribute in the codes.
Here are the codes that I have in my child theme’s functions.php file:
add_shortcode( 'digit_to_text', 'digits_to_text_function' );
function digits_to_text_function( $atts ) {
$key_1_value = get_post_meta( get_the_ID(), 'metafield1', true );
return convertDigitsToWord($key_1_value) ;
}
//https://stackoverflow.com/a/30299572
function convertDigitsToWord($num = false)
{
$num = str_replace(array(',', ' '), '' , trim($num));
if(! $num) {
return false;
}
$num = (int) $num;
$words = array();
$list1 = array('', 'one', 'two', 'three', 'four', 'five', 'six', 'seven', 'eight', 'nine', 'ten', 'eleven',
'twelve', 'thirteen', 'fourteen', 'fifteen', 'sixteen', 'seventeen', 'eighteen', 'nineteen'
);
$list2 = array('', 'ten', 'twenty', 'thirty', 'forty', 'fifty', 'sixty', 'seventy', 'eighty', 'ninety', 'hundred');
$list3 = array('', 'thousand', 'million', 'billion', 'trillion', 'quadrillion', 'quintillion', 'sextillion', 'septillion',
'octillion', 'nonillion', 'decillion', 'undecillion', 'duodecillion', 'tredecillion', 'quattuordecillion',
'quindecillion', 'sexdecillion', 'septendecillion', 'octodecillion', 'novemdecillion', 'vigintillion'
);
$num_length = strlen($num);
$levels = (int) (($num_length + 2) / 3);
$max_length = $levels * 3;
$num = substr('00' . $num, -$max_length);
$num_levels = str_split($num, 3);
for ($i = 0; $i < count($num_levels); $i++) {
$levels--;
$hundreds = (int) ($num_levels[$i] / 100);
$hundreds = ($hundreds ? ' ' . $list1[$hundreds] . ' hundred' . ' ' : '');
$tens = (int) ($num_levels[$i] % 100);
$singles = '';
if ( $tens < 20 ) {
$tens = ($tens ? ' ' . $list1[$tens] . ' ' : '' );
} else {
$tens = (int)($tens / 10);
$tens = ' ' . $list2[$tens] . ' ';
$singles = (int) ($num_levels[$i] % 10);
$singles = ' ' . $list1[$singles] . ' ';
}
$words[] = $hundreds . $tens . $singles . ( ( $levels && ( int ) ( $num_levels[$i] ) ) ? ' ' . $list3[$levels] . ' ' : '' );
} //end for loop
$commas = count($words);
if ($commas > 1) {
$commas = $commas - 1;
}
return implode(' ', $words);
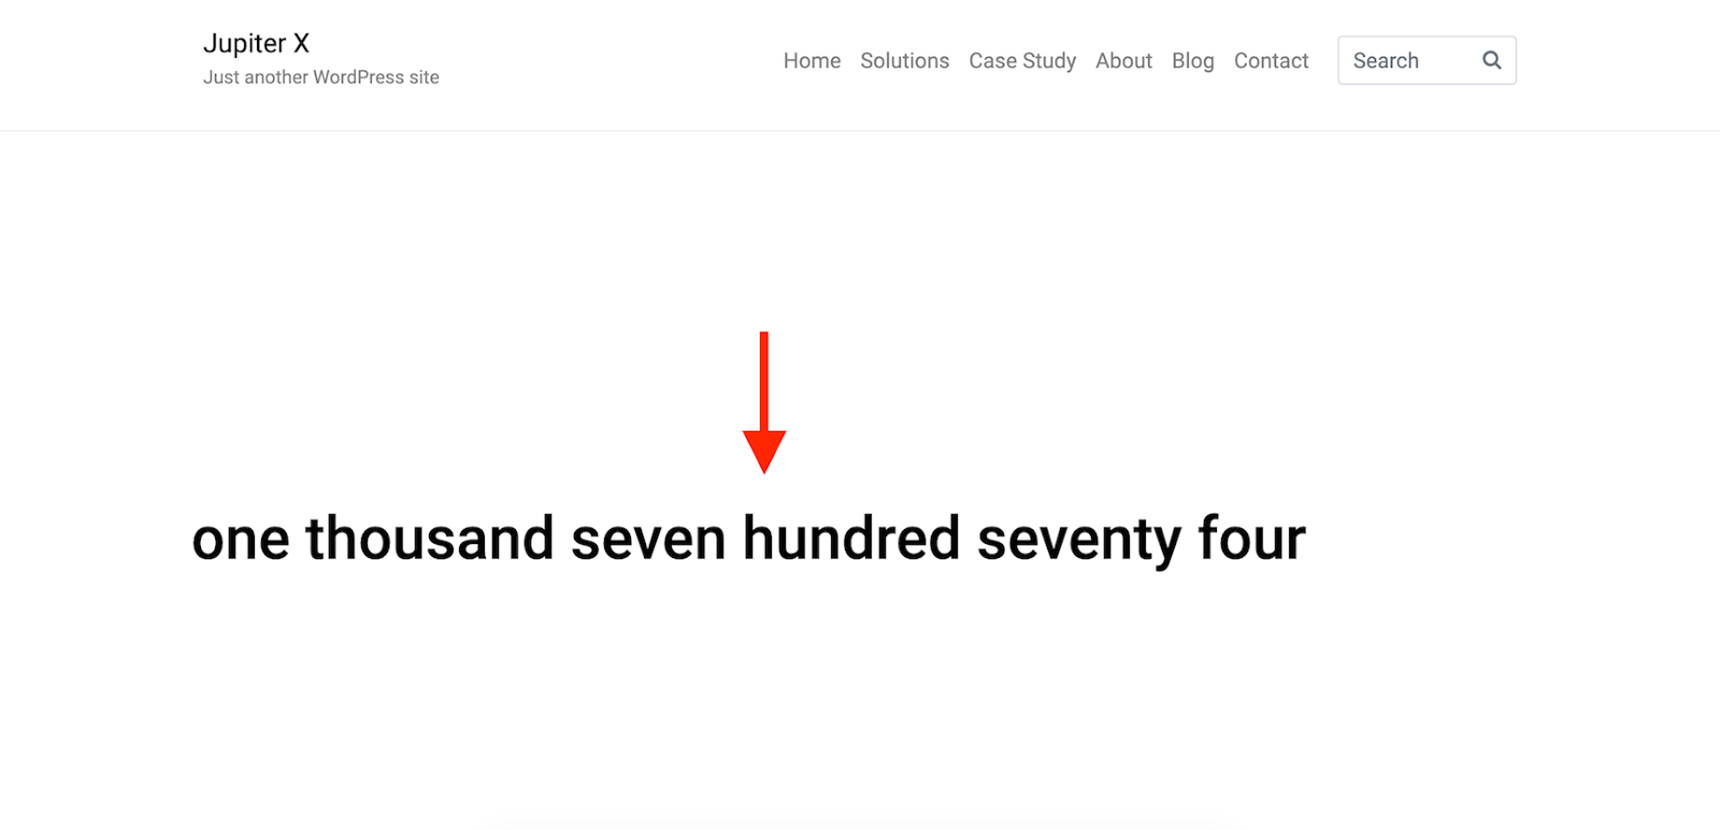
}And now, when I open the numbers post in my frontend, I’ll see this:
When it comes to making use of dynamic headings in Elementor, you can freely set any type of stylings on the heading element including font change, size modifications, paddings, margins and everything that is available in the element. It will help you focus on your functionality instead of concentrating on design and styling.
As another example, you can catch the URL parameters and show something to your viewer based on that. The basic example is: a form that asks for a name and after the user submits that, it will add the name as a URL parameter on the page and refresh the page. Now you’ll be able to get that value and show the name inside your Elementor page.
Don’t stop here. Please share your ideas below in the comments section so we cover the implementation process in the following articles.
Wrapping up
Sometimes as a web developer, you need to extend the functionality of the tools you are using. If you are one of the Elementor users, you need to be familiar with the ways you can add functionality to it. Using dynamic headings in Elementor is one of the easiest ways to do so. It requires a small amount of code, so you can concentrate on the logic and style the raw data using a great design tool like Elementor. In this post, we covered how we can simply extend the usage of the heading element and make it dynamic instead of showing a constant text.

No comment yet, add your voice below!