In the previous article, we stopped right after we created a community poll website, which enables users to submit their own polls. . In this post, we’ll walk you through the rest of the process. The next step is setting up a homepage where users will be able to see the latest votes, filter them based on their tags and also be able to search between them. After that, we’ll need to design the single poll page.
Step Four: Implement the single polls page and the homepage
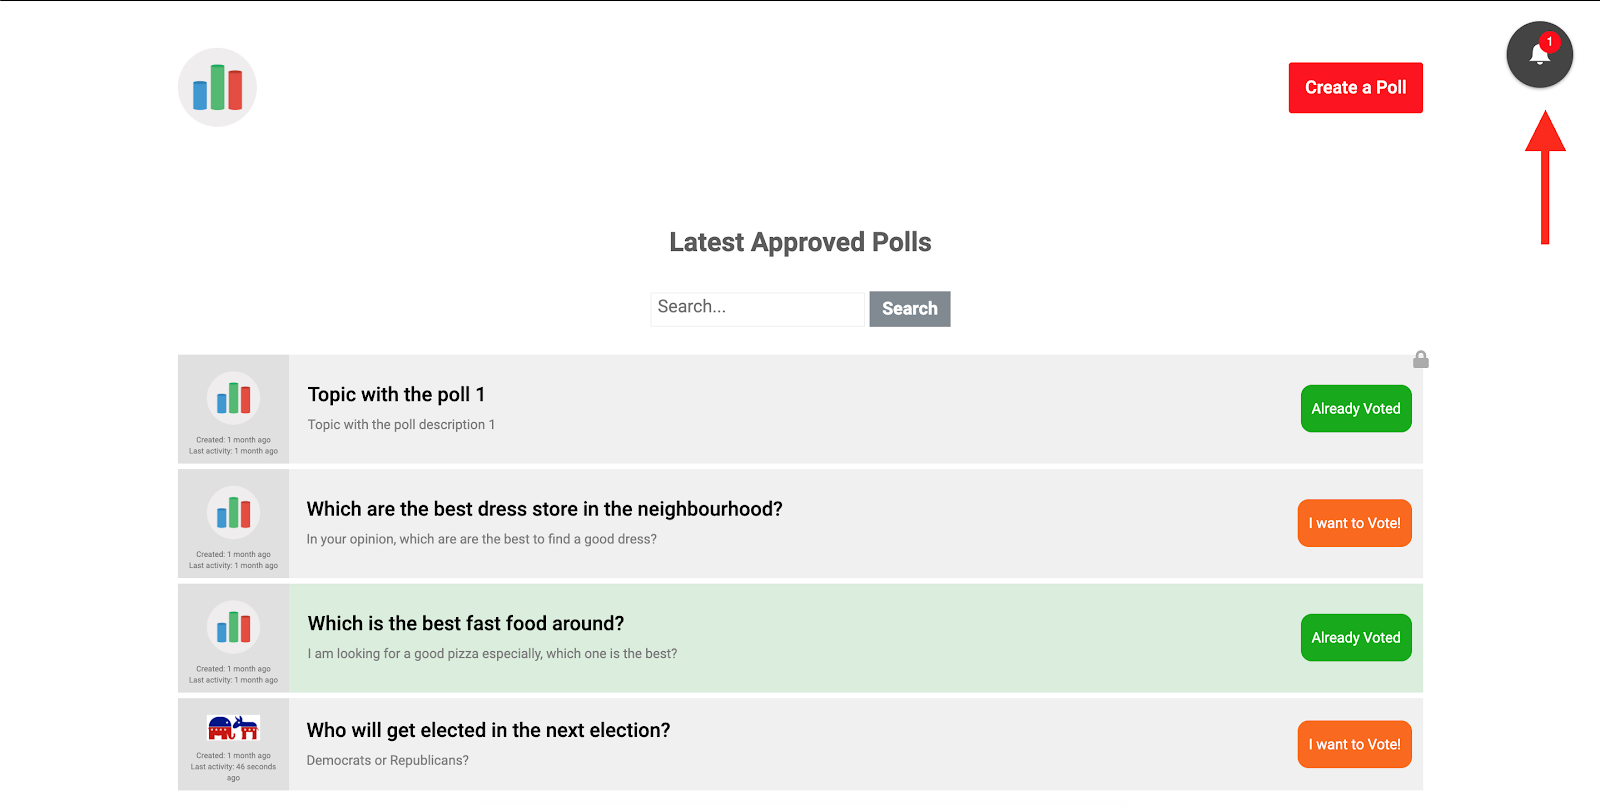
This is what I want from the homepage: a list of the latest approved polls, which includes the title, subtitle, latest vote date and created date. In case the poll was closed, it should also show a lock icon in the top right corner.
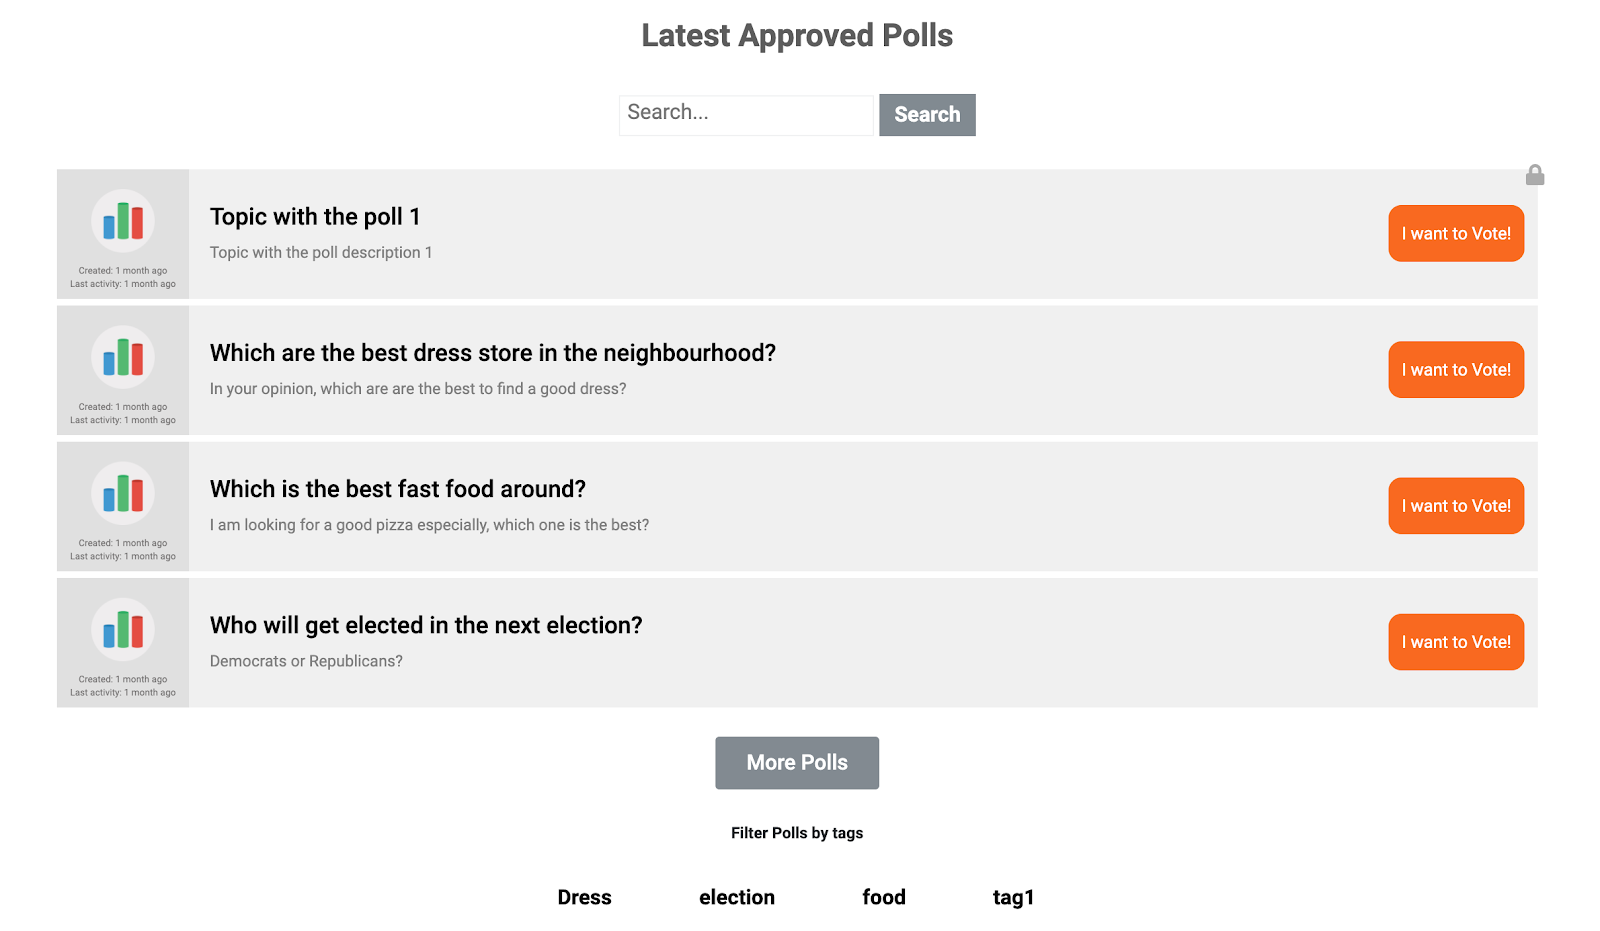
Also, if the user is logged in, the polls that I’ve already voted on should turn green, so it becomes possible to distinguish between the polls that I’ve participated in and the ones that I haven’t.
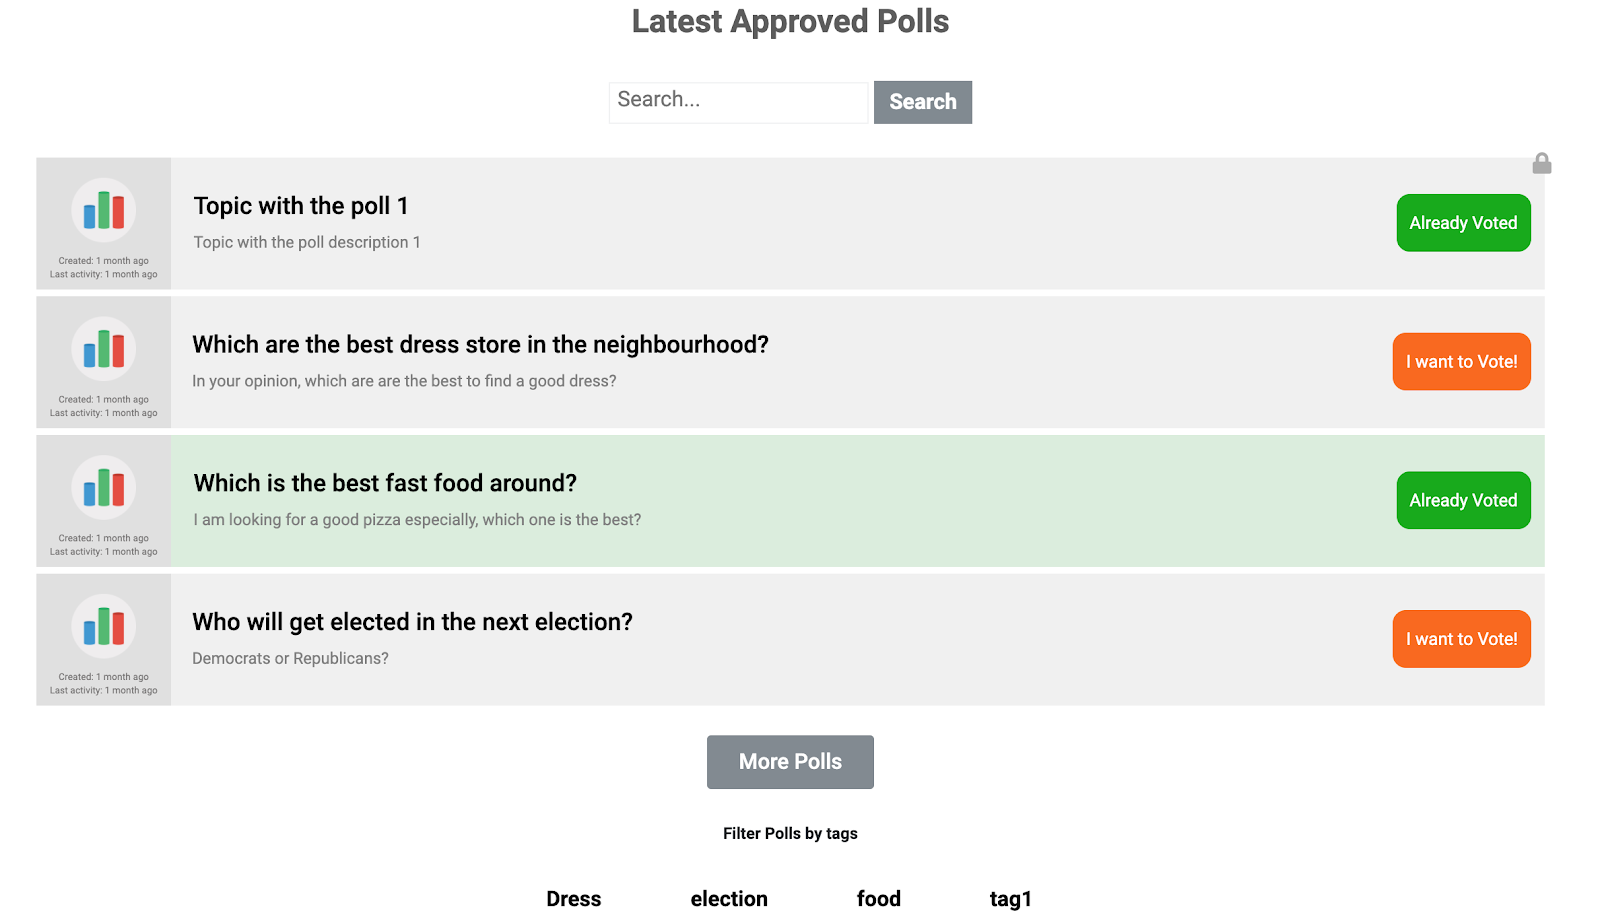
At first look, it seems possible to implement this by using a simple listing with the help of Jet Engine and Jet Smart Filter plugin. Well, this is true for sure. However, one thing that is missing is the conditional logic of colors. Jet Engine doesn’t give me the ability to distinguish between the polls I’ve voted in and the ones I haven’t.
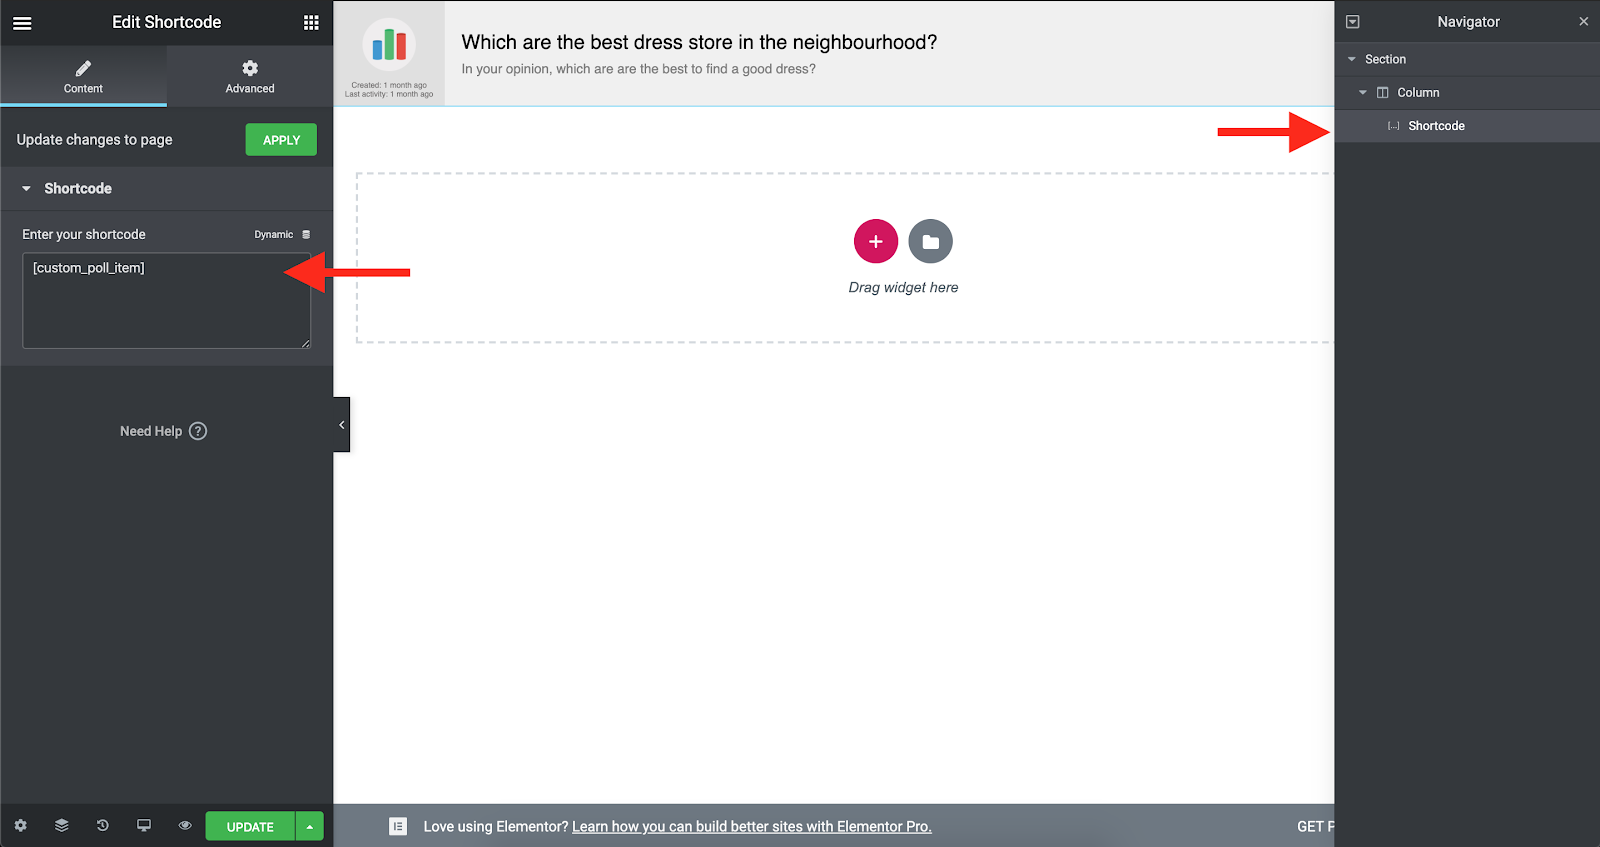
So, the trick here would be to define a custom shortcode, place it inside a listing and then use it to have smart filters. The following code will give me a shortcode that I can use inside a Listing template on Jet Engine. It represents a single topic with the desired conditions that let me style it as I wish:
add_shortcode( 'custom_poll_item', 'custom_poll_item_function' );


function custom_poll_item_function( $atts ) {
   global $_gdpol_poll;
   $topic_id =  get_the_id();
   $poll_id = gdpol_get_topic_poll_id($topic_id);
   $custom_clasees = " " . get_post_status($topic_id) . " " . " poll_list_item";
   $topic_title = get_the_title($topic_id);
   $topuc_desc = get_the_content($topic_id);
   $uploads = wp_upload_dir();
   $upload_path = $uploads['baseurl'];
   $topic_thumbnail = get_the_post_thumbnail($topic_id) ? get_the_post_thumbnail_url($topic_id) : $upload_path . 'https://d3pa45a5f8vwb1.cloudfront.net/2020/01/chart.png' ;
   $topic_post_date = get_the_date('U', $topic_id);
   $topic_url = get_post_permalink($topic_id);
   $last_active = strtotime( get_post_meta( $topic_id, '_bbp_last_active_time', true ) );
   $topic_button_text = "I want to Vote!";


  if(is_user_logged_in())
  {
  	$user_id = get_current_user_id();
  	$has_voted_or_not = gdpol_db()->user_voted_in_poll($poll_id, $user_id);
  	if($has_voted_or_not)
  	{
        $custom_clasees .= " voted ";
        $topic_button_text = "Already Voted";
  	}
  	else {
  		 $custom_clasees .= " not_voted ";
  	}
  }
  else {
  	$custom_clasees .= " not_voted ";
  }


  $output = "
			    <a href=\"" . $topic_url .  "\"  class=\"poll_link_list_big\" >
	  				<div class='" . $custom_clasees . "' >
		  				<div class='thumbnail_poll' >
		  					<img src='".$topic_thumbnail."' />
		  					<div class='topic_date' >Created: " .  esc_html( human_time_diff($topic_post_date, current_time('timestamp') ) ) . ' ago' . "</div>
		  					<div class='topic_date_last_activity' >Last activity: " .  esc_html( human_time_diff(date('U', $last_active), current_time('timestamp') ) ) . ' ago' . "</div>
		  				</div>
		  				<div class='poll_body' >
		  					<h3>". $topic_title."</h3>
		  					<div>". $topuc_desc."</div>
		  				</div>
		  				<div class='poll_list_last_column'>
		  					<div class='poll_permalink_button'   >".$topic_button_text. "</div>
		  				</div>
	  				</div>
  			    </a>
  			 " ;

	return $output;

}
Just put this in your child theme’s functions.php, and the shortcode will be available. I also need to style it a little bit, so I’ll go ahead and add this CSS fix into the jupiterx-child/assets/less/style.css:
.poll_link_list_big .poll_list_item {
    display: flex;
    justify-content: space-between;
    width: 100%;
    align-items: center;
}

.thumbnail_poll {
    max-width: 100px;
    padding: 6px;
    background: #E0E0E0;
}

.topic_date {
    /* font-size: 7px; */
    /* margin-top: 7px; */
}

.thumbnail_poll {
    min-width: 100px;
    font-size: 7px;
    color: #777575;
    text-align: center;
}

.thumbnail_poll img {
    max-width: 48px !important;
    margin: 9px;
}

.poll_body {
    justify-content: flex-start !important;
    text-align: left;
    width: 80%;
    padding: 5px 15px;
}

.poll_link_list_big {
    display: flex;
    background: rgba(224, 224, 224, 0.48);
    position: relative;
}

.poll_body >h3 {
    color: black;
    font-size: 18px;
}

.poll_body > div {
    color: grey;
    font-size: 12px;
}

.poll_list_last_column {
    padding: 10px;
}

.poll_permalink_button {
    background: #fb6800;
    color: white;
    padding: 12px 10px;
    border-radius: 10px;
    font-size: 13px;
    text-align: center;
}


.publish.poll_list_item.voted {
    background: rgba(84, 218, 100, 0.14);
}

.voted .poll_permalink_button {
    background: #00ab00;
}


body .poll_link_list_big .closed:before {
    font-family: "Font Awesome\ 5 Free" !important;
    display: block;
    width: 16px;
    hright: 16px;
    color: #ababab;
    font-size: 16px;
    font-weight: 900;
    -moz-osx-font-smoothing: grayscale;
    -webkit-font-smoothing: antialiased;
    font-style: normal;
    font-variant: normal;
    text-rendering: auto;
    line-height: 1;
     content: "\f023";
     position: absolute;
     right: -7px; top: -4px;
}
Now, go to Jet Engine -> Listings and add a new Listing Item. I named it as “polls.”
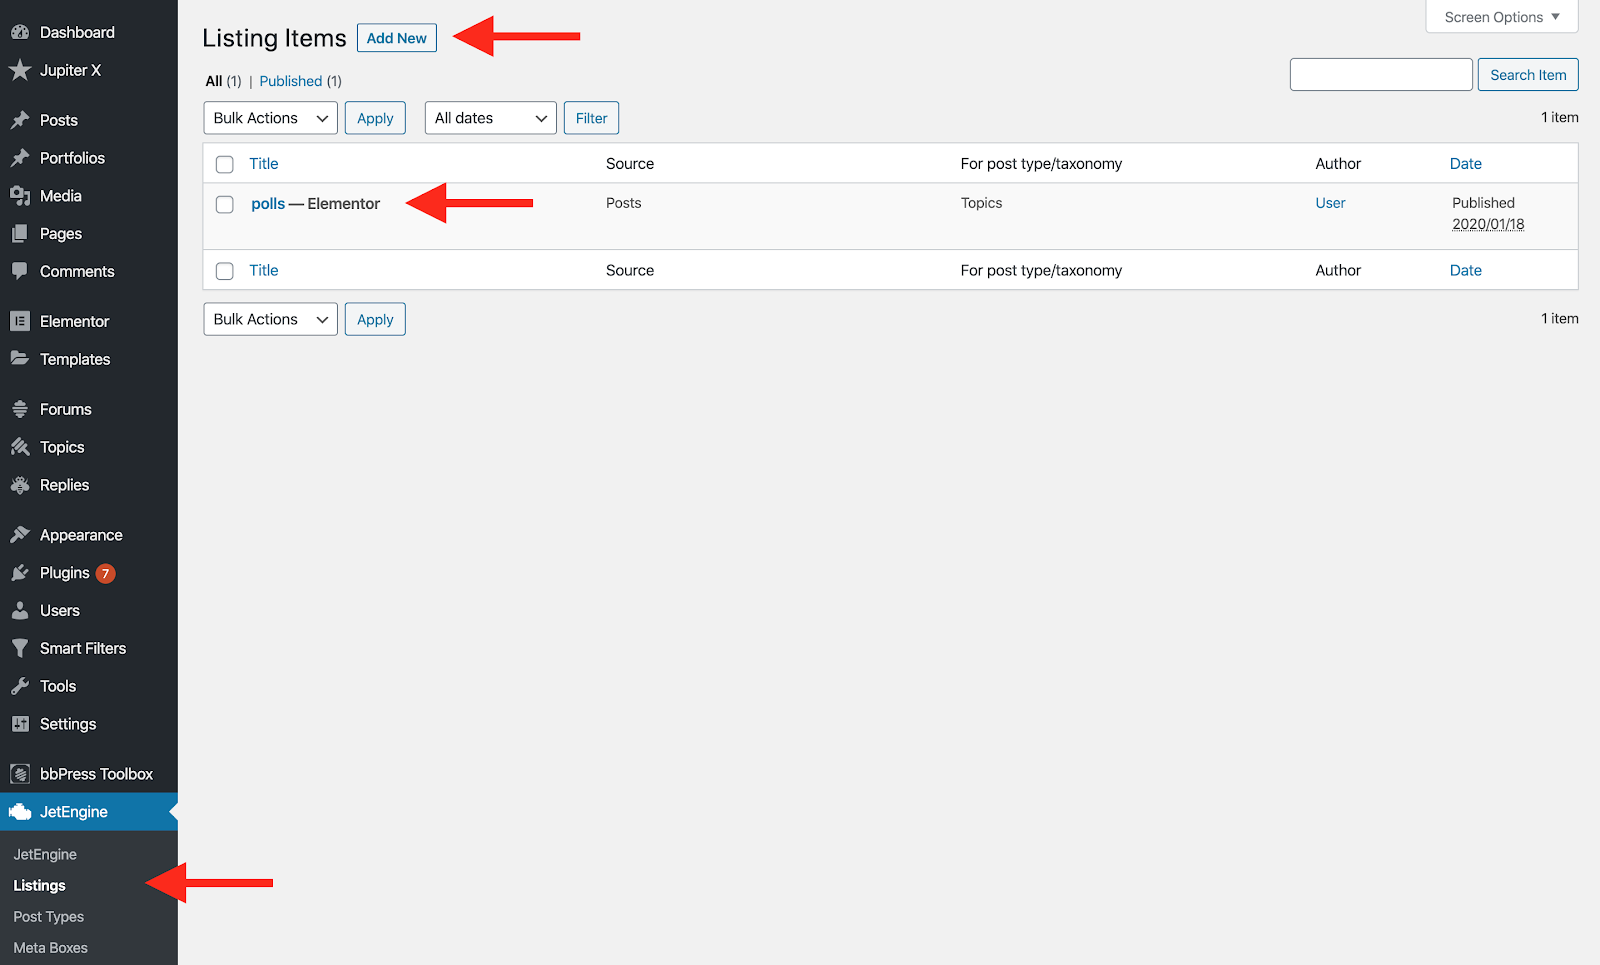
While editing the listing, set the Listing Source as “Posts” and assign the “Topics” post type to it. You can set the whole item to be clickable as well.

Now drop the Shortcode element into the page, and add this shortcode to it:
[custom_poll_item]
This is the name of the shortcode that we previously built in the functions.php file.
As soon as the shortcode is added, you should be able to see the result in the preview. It’s better to set the margin and column gap of the sections here to 0. Now that you added the listing template, you need to use it on a Listing Grid and put it on your page.
Go to your homepage and drop a Listing Grid element into the content. Then configure it as follows:

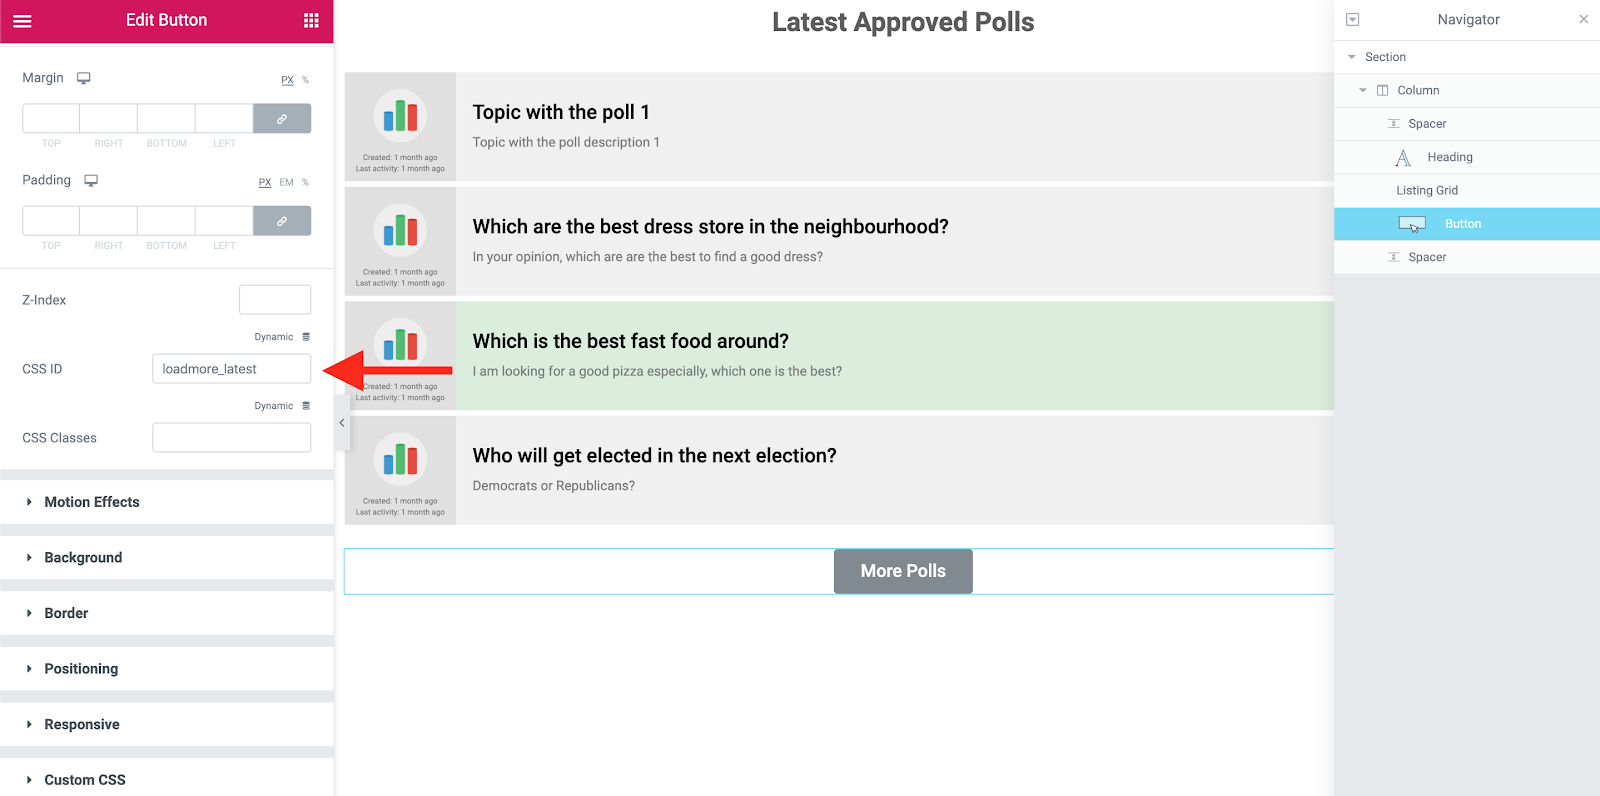
In order to load more polls, you need to add a button and set it’s ID as “loadmore_latest,” which is the ID you set in the Load More Element ID section of the listing grid.
Now it’s time to add the search box on top of the polls list and then add the tags filter at the bottom. I’ll use a Smart Filter plugin to do that.
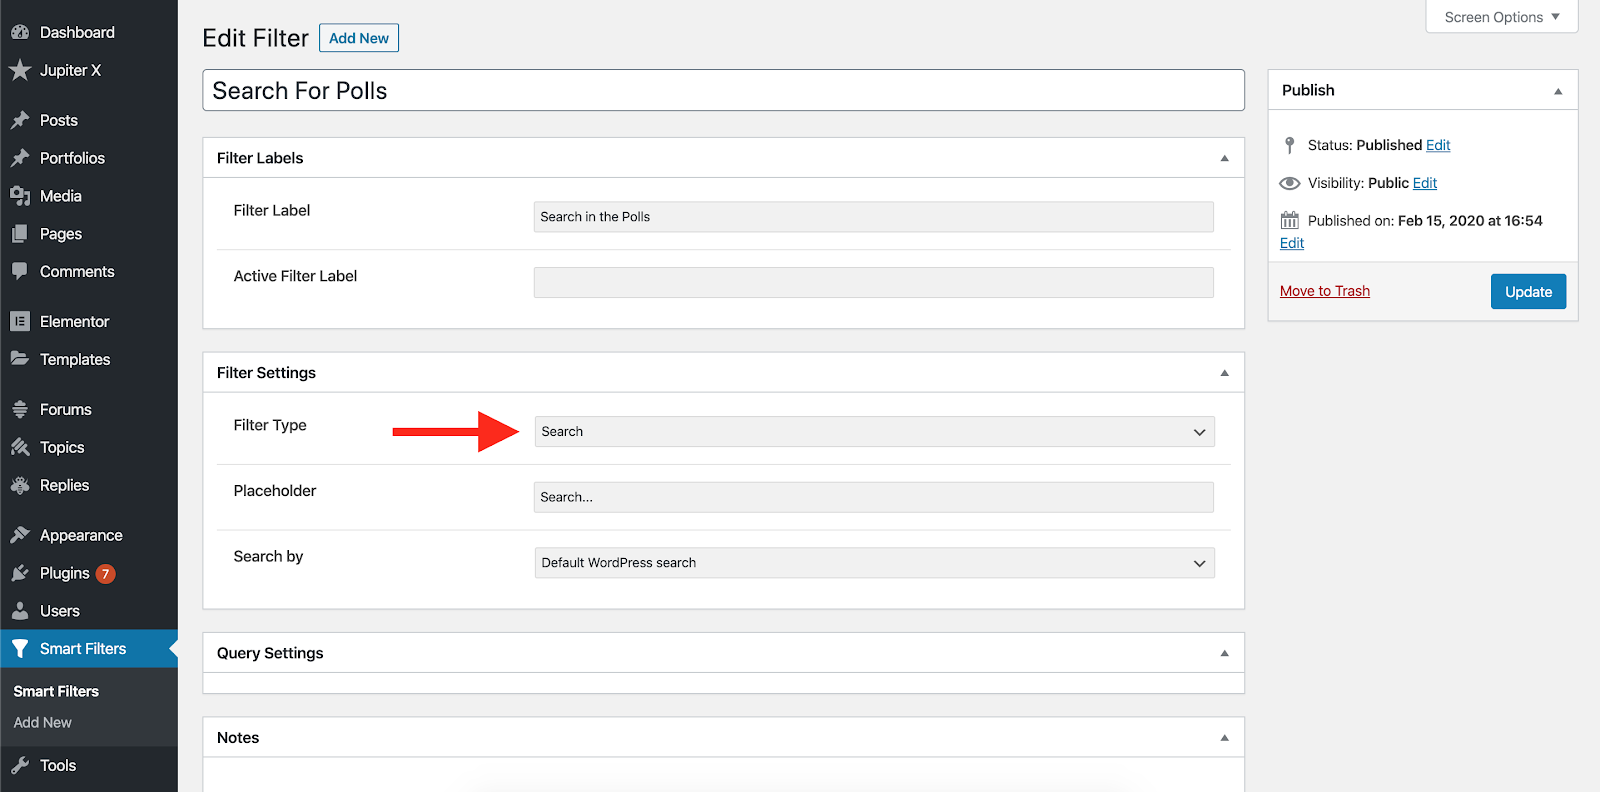
Go to Smart Filters and add two filters:
- Tags Selection filter
- Search for polls

For the search box, use the Search filter type:
And for the tags, use a Radio type as follows:

Update the filters and go back to the homepage. Now drag and drop the search filter and radio filter into the page.
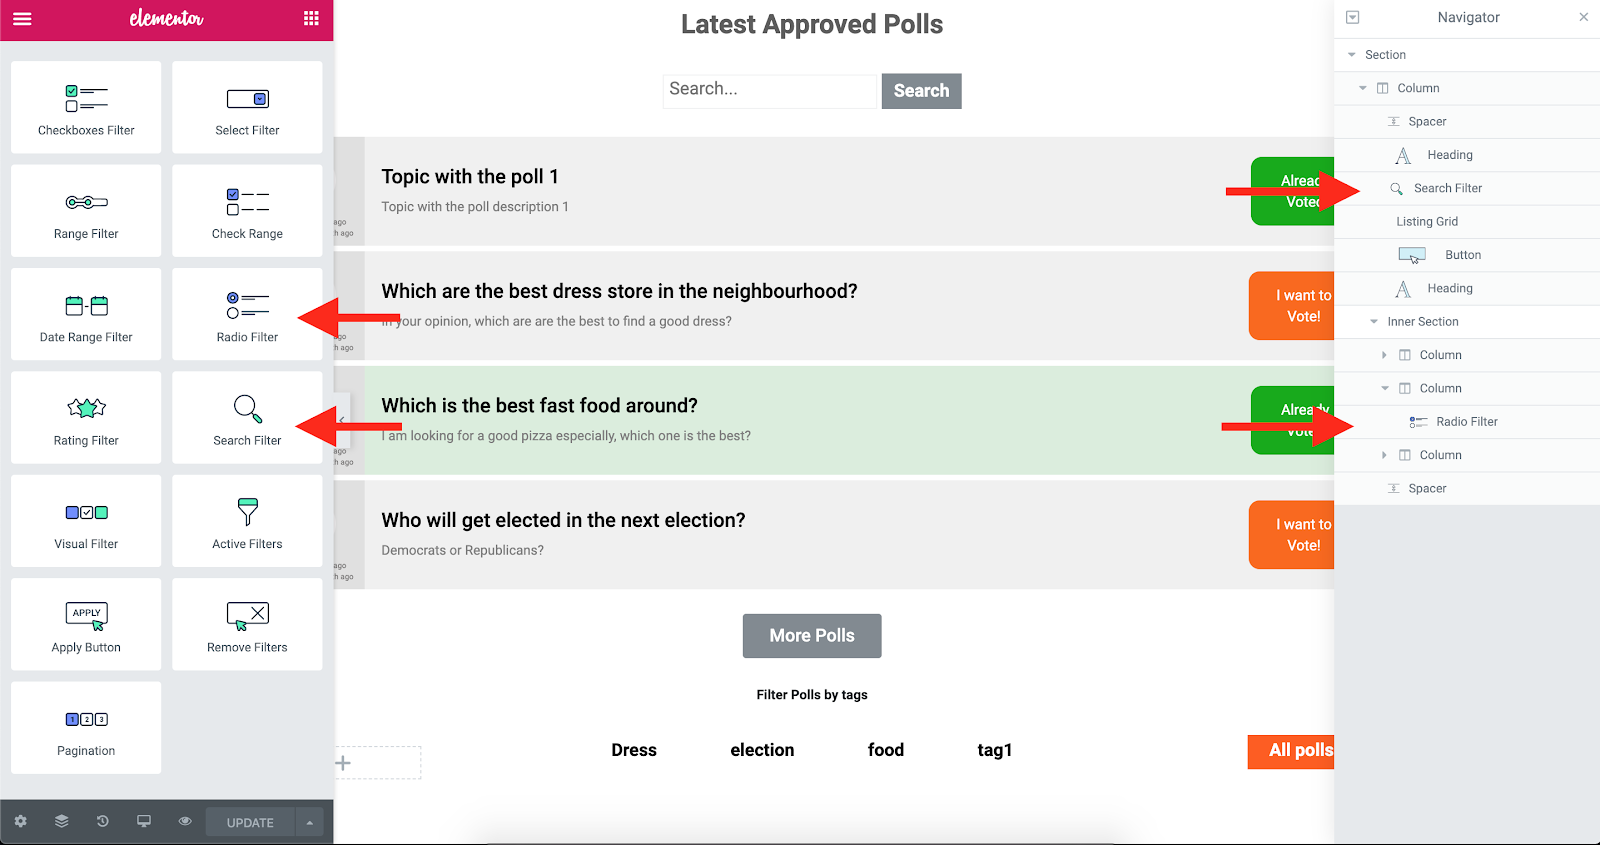
And assign the filters as you wish. Then style them using their styling options.

Also, this CSS snippet is needed to remove the radio circles and to also show a different color on the selected tag:
.elementor-element .jet-radio-list__input:checked ~.jet-radio-list__label {
    background: #ff5c08;
    color: white !important;
}

.elementor-element .jet-radio-list__input ~.jet-radio-list__label {
    background: white;
    padding: 2px 20px 8px;
    color: #0a0a0a !important;
}
The homepage is ready now! Publish the changes, assign this page as your homepage in WordPress Settings -> Readings and check your website.
By clicking on every vote item, you’ll be directed to the polls page where you can participate in the polls. Styling this page requires some modifications in the child theme.
In the previous article, we showed how to override the bbPress template files in a child theme. Just like before, I would need to override gdpol-poll-content.php from wp-content/plugins/gd-bbpress-toolbox/templates/default/bbpress/ in wp-content/themes/jupiterx-child/bbpress/gdpol-poll-content.php.
Also I need to override content-single-topic.php from wp-content/plugins/bbpress/templates/default/bbpress/ in the same directory of my Jupiter X child theme (bbPress).
You can edit the rest of the template files in order to get the look you’re going for. You can find more information here.

Instead of the poll title and description, we used the topic title and description in the previous article. So, we need to show the topic title and description in the poll single page template.
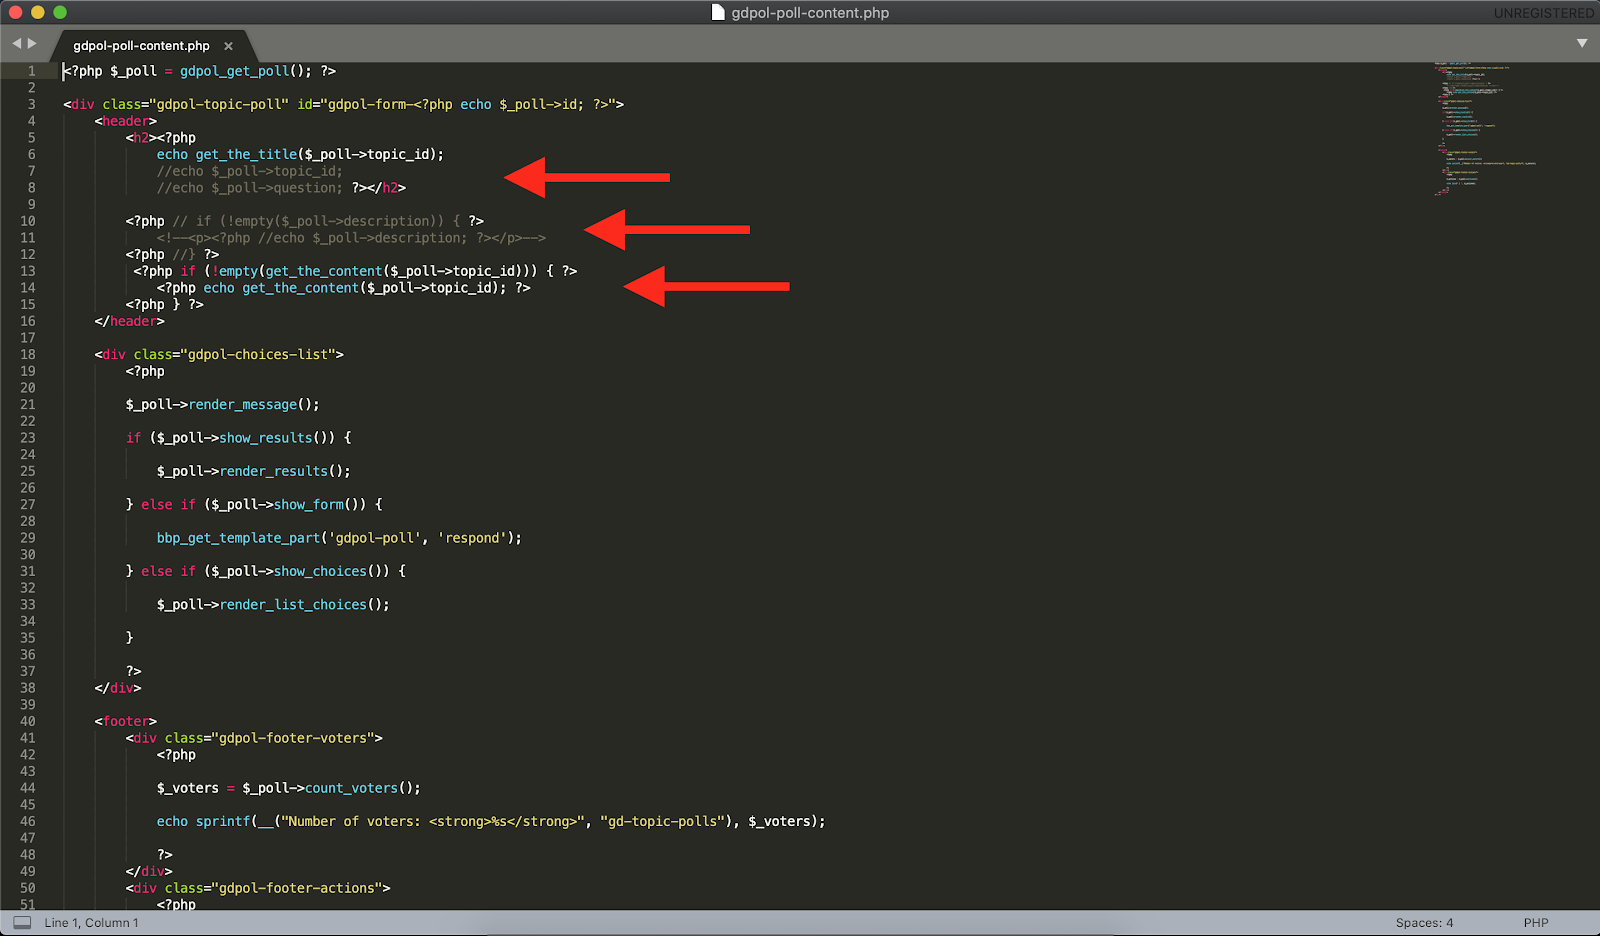
In the end, adding this CSS snippet to jupiterx-child/assets/less/style.less will give you a better look in the single topics page:
.gdpol-choices-list legend {
font-size: 12px;
}
.gdpol-topic-poll header h2 {
font-size: 2em;
}
.gdpol-topic-poll header p {
margin-top: 20px;
/* background: #fffdfd; */
padding: 20px 0;
}
.gdpol-topic-poll footer, .gdpol-topic-poll header {background: none; }
.gdpol-topic-poll {
border: none;
background: #fff;table.wp-list-table.widefat.fixed.striped.posts {
width: 100% !important;
}
}
.um-dropdown-b li:nth-child(2) {
display: none !important;
}
a.gdpol-action-show {
margin-left: 8px;
}
.gdpol-poll-choices label span {float: right;}
.gdpol-poll-choices label input {float: left !important;margin: 4px 6px 0 0px !important;}
.gdpol-fields-wrapper {
display: block !important;
border: none !important;
}
#gdpol-poll-status, #wc-comment-header, .wc_stick_btn.wc-cta-button, .wc_close_btn.wc-cta-button, .bbp-form.gdpol-topic-poll-form legend, .d4p-attachment-addfile
,a.gdbbx-attachment-add-file, .gdbbx-attachment-control >div:nth-child(3), .gdbbx-attachment-control >div:nth-child(4),
.wc-field-submit .wpd_label{
display: none !important;
}
table.wp-list-table.widefat.fixed.striped.posts {
width: 100% !important;
}
.bbp-form .gdbbx-attachments-form .gdbbx-validation-active .gdbbx-attachment-preview {
float: left !important;
margin-left: 0 !important;
}
.bbp-form .gdbbx-attachments-form .gdbbx-validation-active .gdbbx-attachment-control {float: left; margin-left: 15px;}
.gdbbx-attachments-form {
text-align: left !important;
}
.jupiterx-post-image picture{
display: flex;
text-align: center;
margin-bottom: 50px
}
.jupiterx-post-image img {
width: auto;
height: 100%;
max-height: 400px;
margin: auto;
}
.single-topic #bbpress-forums ul.gdpol-poll-choices, .single-topic #bbpress-forums.bbpress-wrapper ul.gdpol-poll-choices li {
padding: 12px;
font-size: 1.2em;
color: white;
list-style-type: none !important;
margin: 0 !important;
vertical-align: middle;
padding-top: 24px;
position: relative; min-height: 75px;
display: flex; align-items: center; width: 100%; columns: 1; flex-direction: column;
flex-wrap: wrap;
}
.single-topic #bbpress-forums.bbpress-wrapper ul.gdpol-poll-choices li label {position: absolute; top: 0; bottom: 0; right: 0; left: 0; text-align: right; width: 100%; display: flex; align-items: center; padding: 10px; cursor: pointer;}
/* different colors on the poll choices */
.single-topic #bbpress-forums.bbpress-wrapper ul.gdpol-poll-choices li:nth-child(odd) { background-color: #292ab1; }
.single-topic #bbpress-forums.bbpress-wrapper ul.gdpol-poll-choices li:nth-child(even) { background-color: #1e7b48; }
.single-topic #bbpress-forums.bbpress-wrapper ul.gdpol-poll-choices li:nth-child(3n) { background-color: darkcyan; }
.single-topic #bbpress-forums.bbpress-wrapper ul.gdpol-poll-choices li:nth-child(4n) { background-color: mediumorchid; }
.single-topic #bbpress-forums.bbpress-wrapper ul.gdpol-poll-choices li:nth-child(5n) { background-color: dodgerblue; }
.single-topic #bbpress-forums.bbpress-wrapper ul.gdpol-poll-choices li:nth-child(6n) { background-color: darkorange; }
.single-topic #bbpress-forums.bbpress-wrapper ul.gdpol-poll-choices li:nth-child(7n) { background-color: firebrick; }
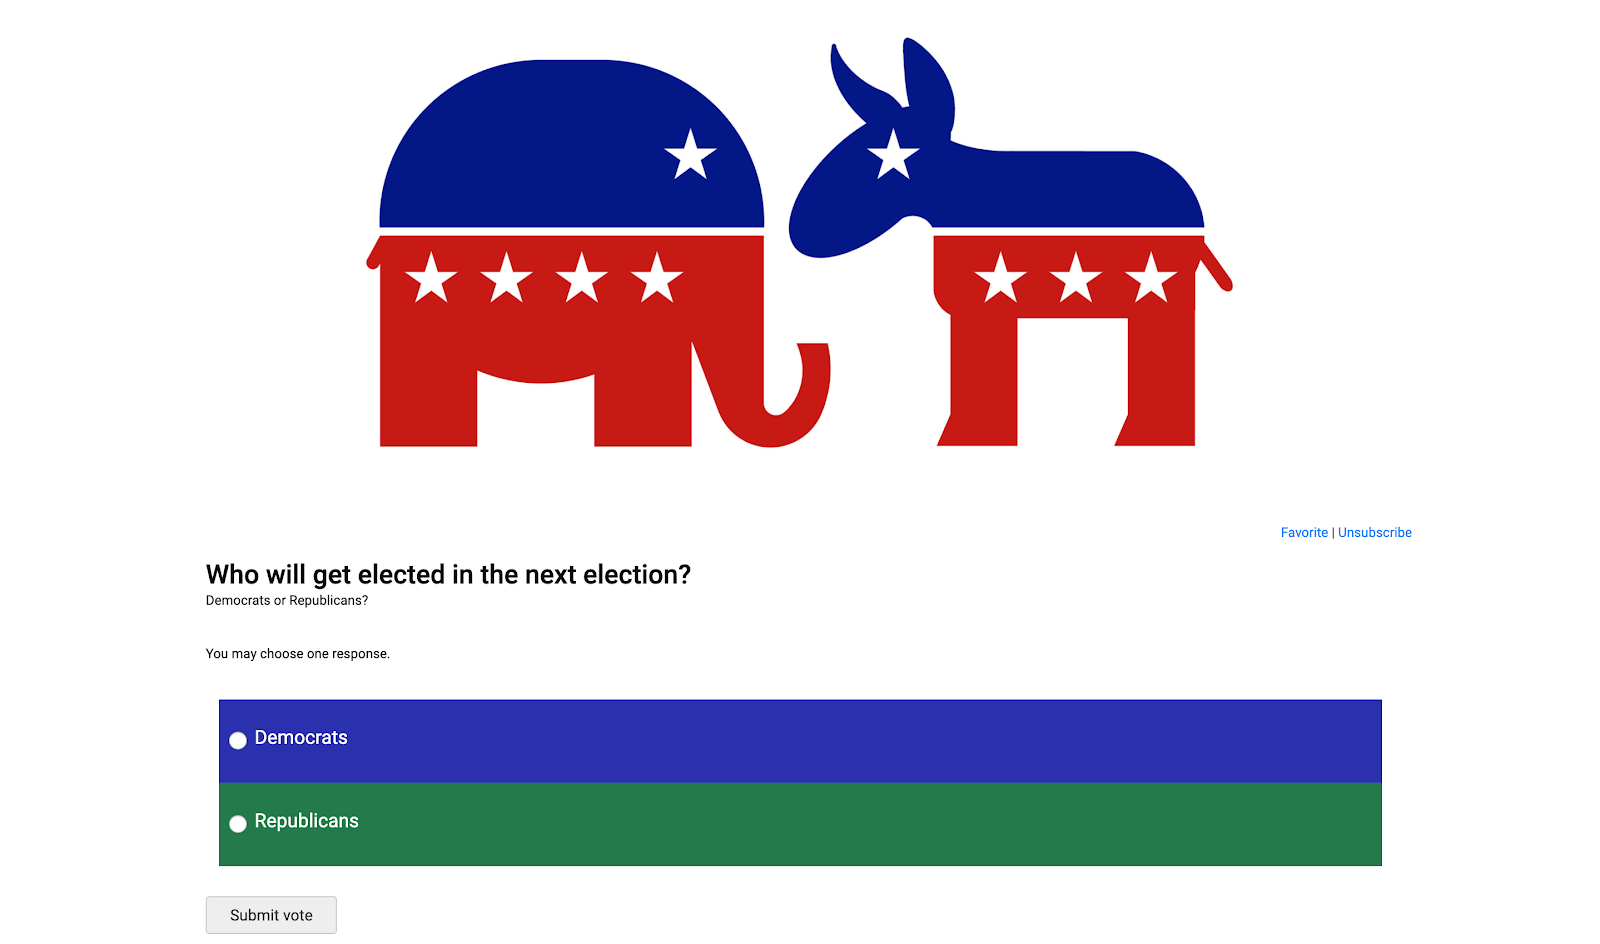
.single-topic #bbpress-forums.bbpress-wrapper ul.gdpol-poll-choices li:nth-child(8n) { background-color: lightseagreen; }This is the final look on the single polls page:
Step Five: Design the header and footer with Jupiter X and Raven
The next part when you create a community poll website involves designing the headers and footers of the website. There’s nothing special in this section since everything is possible with the Jupiter X’s Custom Header and Custom Footer capability. You may want to put menus and call to actions in the header and ensure they are looking as they should. More information about this section can be found here.

Step Six: Install Ultimate Member and its add-ons and configure
Using a membership plugin can help you create a membership directory and add social networking features to your app. This will also help you monetize your project. For this particular website, we used the Ultimate Member plugin.

Dozens of add-ons offered by this plugin can help you build a social network. Imagine that the users of your community create polls, share them on social media, and others vote in the polls and join your community. They interact with each other, see their profiles and receive notifications with each interaction. This is all possible with this plugin. Remember that in order to have an integration on the user profiles and the bbPress forums, you would need to use this add-on on Ultimate Member which is premium:
https://ultimatemember.com/extensions/bbpress/

Later on, you can use localization and change the “Topics” word to “Polls.” After installing the Ultimate Member plugin, you need to define some pages as the membership directory page, single profile page and etc. Here you can find more information on how to configure that.
Step Seven: Add custom notification on the poll votes
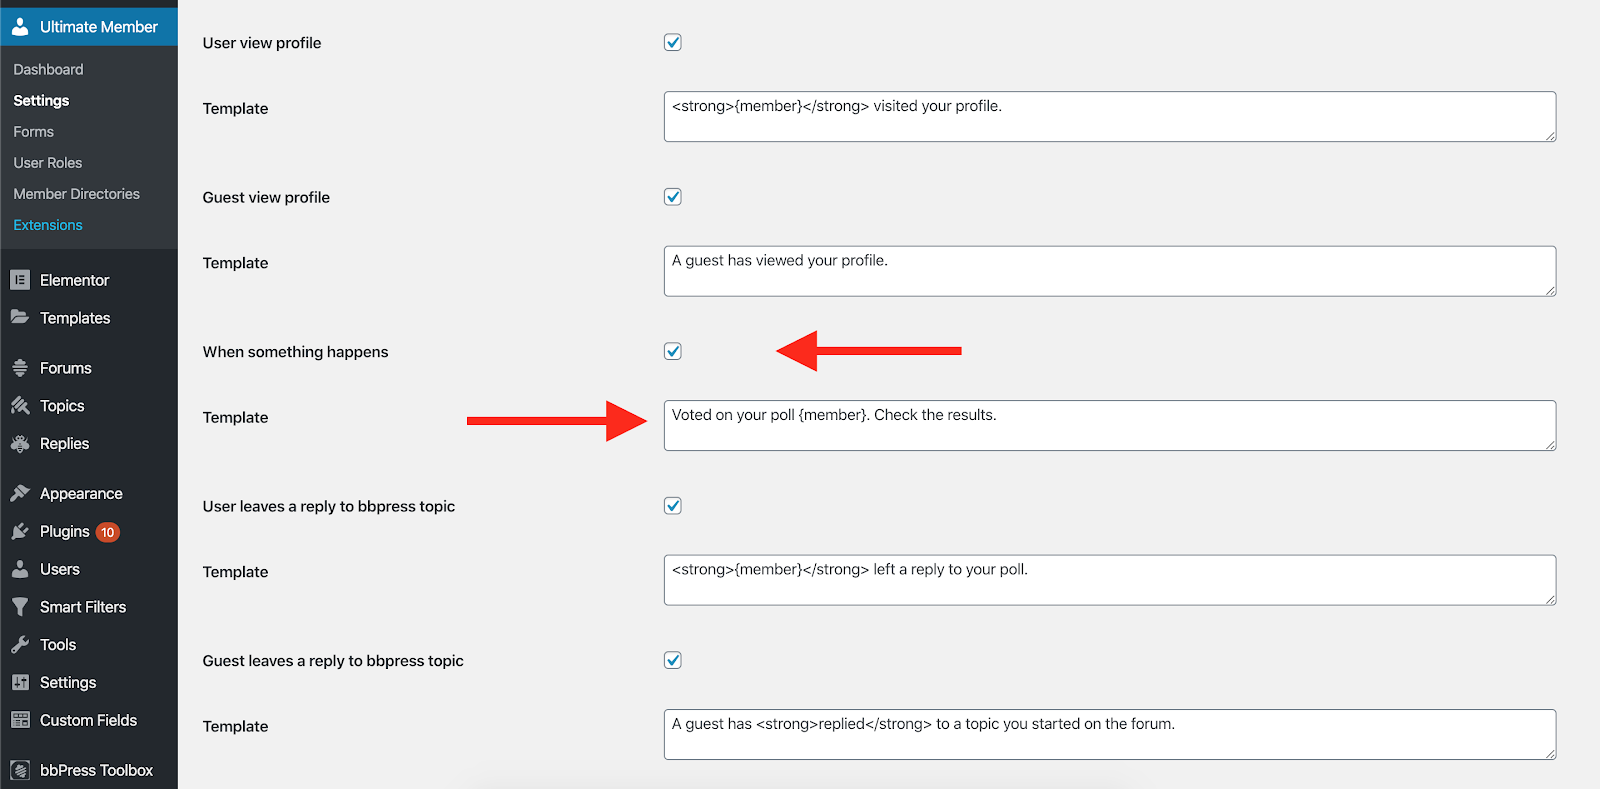
Notifications are a must-have for any social poll website. As soon as any sort of interaction occurs, users should be notified. In order to have a notification system, we used the Real Time Notification add-on for the Ultimate Member plugin and configured it as we wanted. By default, it gives you these notifications, and you have full control of the options to enable/disable them and show the texts as you like.
- Notify users when the user role has changed.
- Notify users when someone comments on their post.
- Notify users when someone replies to one of their comments.
- Notify users when another member views their profile.
- Notify users when guests view their profile.
- bbPress – Notify users when someone replies to them on topics they created.
- bbPress – Notify users when someone replies to them on a specific topic.
You can find information on how to configure it here:
I want to also notify the owner of the poll whenever his/her poll receives a vote. In order to do that, I’ll write a code with the help of the notification API included in the Ultimate Member add-on called Real-Time Notification.
/*

This code sample shows you how to use the API to create
and add custom notifications (for real-time notifications) in the plugin.

STEP 1: You need to extend the filter: um_notifications_core_log_types with your
new notification type as follows. For example:

*/

add_filter('um_notifications_core_log_types', 'add_custom_notification_type', 200 );
function add_custom_notification_type( $array ) {

	$array['new_action'] = array(
		'title' => 'When something happens', // title for reference in backend settings
		'template' => '<strong>{member}</strong> has just did some action.', // the template, {member} is a tag, this is how the notification will appear in your notifications
		'account_desc' => 'When member does some action on my profile', // title for account page (notification settings)
	);

	return $array;
}

/*

STEP 2: Add an icon and color to this new notification type.

*/

add_filter('um_notifications_get_icon', 'add_custom_notification_icon', 10, 2 );
function add_custom_notification_icon( $output, $type ) {

	if ( $type == 'new_action' ) { // note that our new action id is "new_action" from previous filter
		$output = '<i class="um-icon-android-person-add" style="color: #336699"></i>';
	}

	return $output;
}

/*

STEP 3: Now you just need to add the notification trigger when a user does some action on
another user’s profile. I assume you can trigger that in some action hooks.
For instance, when a user views another user’s profile, you can hook like this.


$who_will_get_notification : is user ID who will get notification
'new_action' is our new notification type
$vars is array containing the required template tags, user photo and url when that notification is clicked

UM()->Notifications_API()->api()->store_notification( $who_will_get_notification, 'new_action', $vars );

*/

add_action('gdpol_vote_saved', 'trigger_new_notification', 100);
function trigger_new_notification( $args ) {
	 global  $_gdpol_poll, $um_notifications, $post, $topic;
	 $_poll = gdpol_get_topic_poll_id();
			$poll_author_id =  bbp_get_topic_author_id($args->topic_id); // die();
				update_post_meta( $args->topic_id, '_bbp_last_active_time', date( 'Y-m-d H:i:s', current_time( 'timestamp', 0 )));

	if ( is_user_logged_in() ) {

		$vars['member'] = $args->topic_id;
		$vars['notification_uri'] = get_the_permalink($args->topic_id);

		UM()->Notifications_API()->api()->store_notification( $poll_author_id, 'new_action', $vars );

	}

	else {
				UM()->Notifications_API()->api()->store_notification( $poll_author_id, 'new_action', get_the_permalink($args->topic_id) );


	}


}
After adding the above code, a new notification will be added to the Ultimate Member -> Settings -> Extensions. Remember to activate it and save the settings.
In the meantime, I want to update the topic’s last activity meta field with the latest vote time. So, in the last function, you’ll see this line of code:
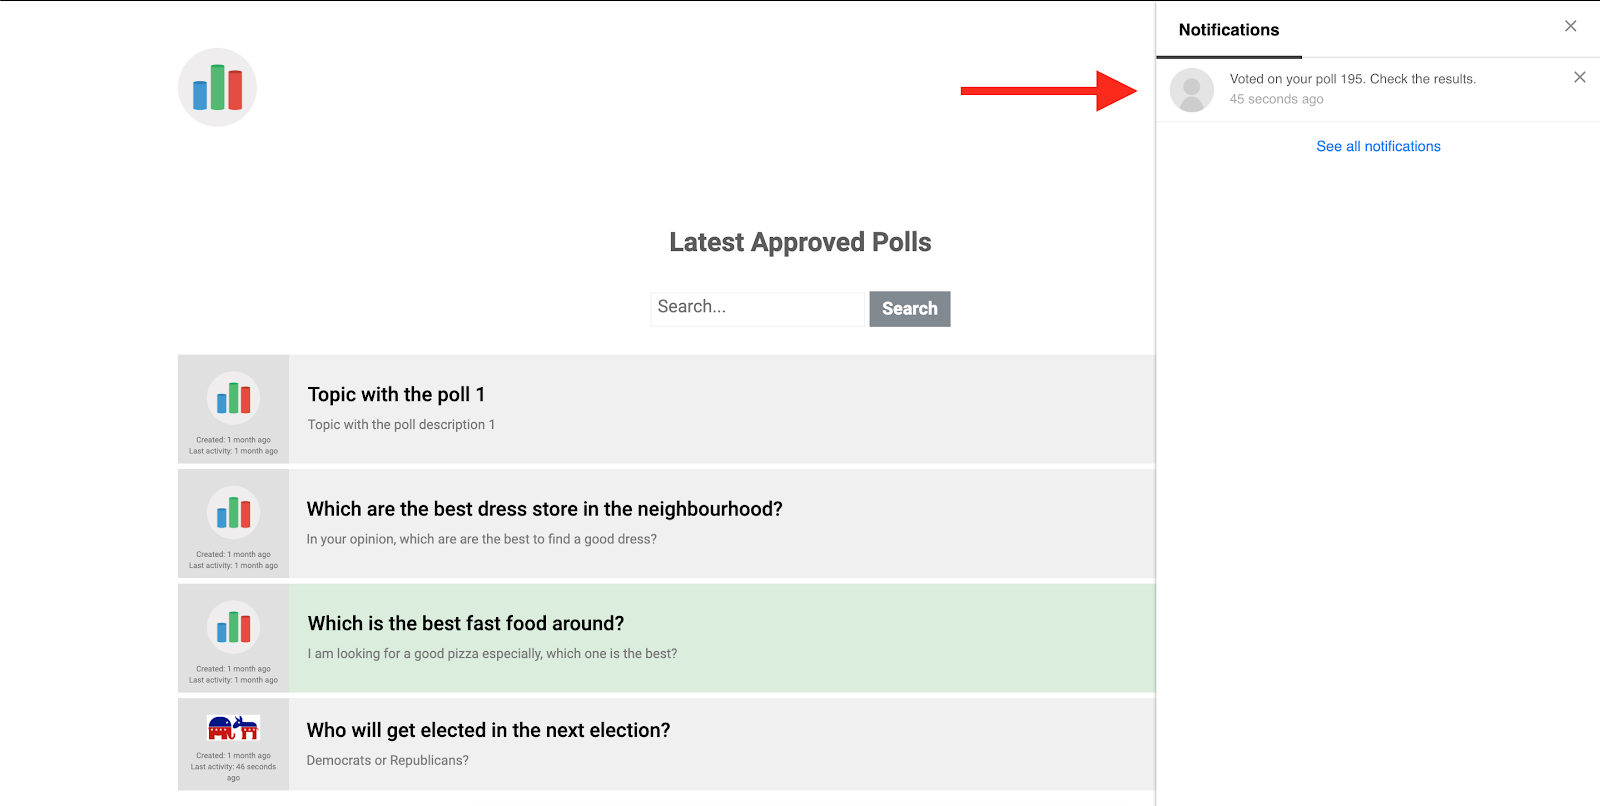
update_post_meta( $args->topic_id, '_bbp_last_active_time', date( 'Y-m-d H:i:s', current_time( 'timestamp', 0 )));This will help you update the latest activity on each poll which is showing on the homepage within the listing you created before. Just add the above code to your child theme’s functions.php file. It’ll give you a look like below. As soon as someone votes on the poll:
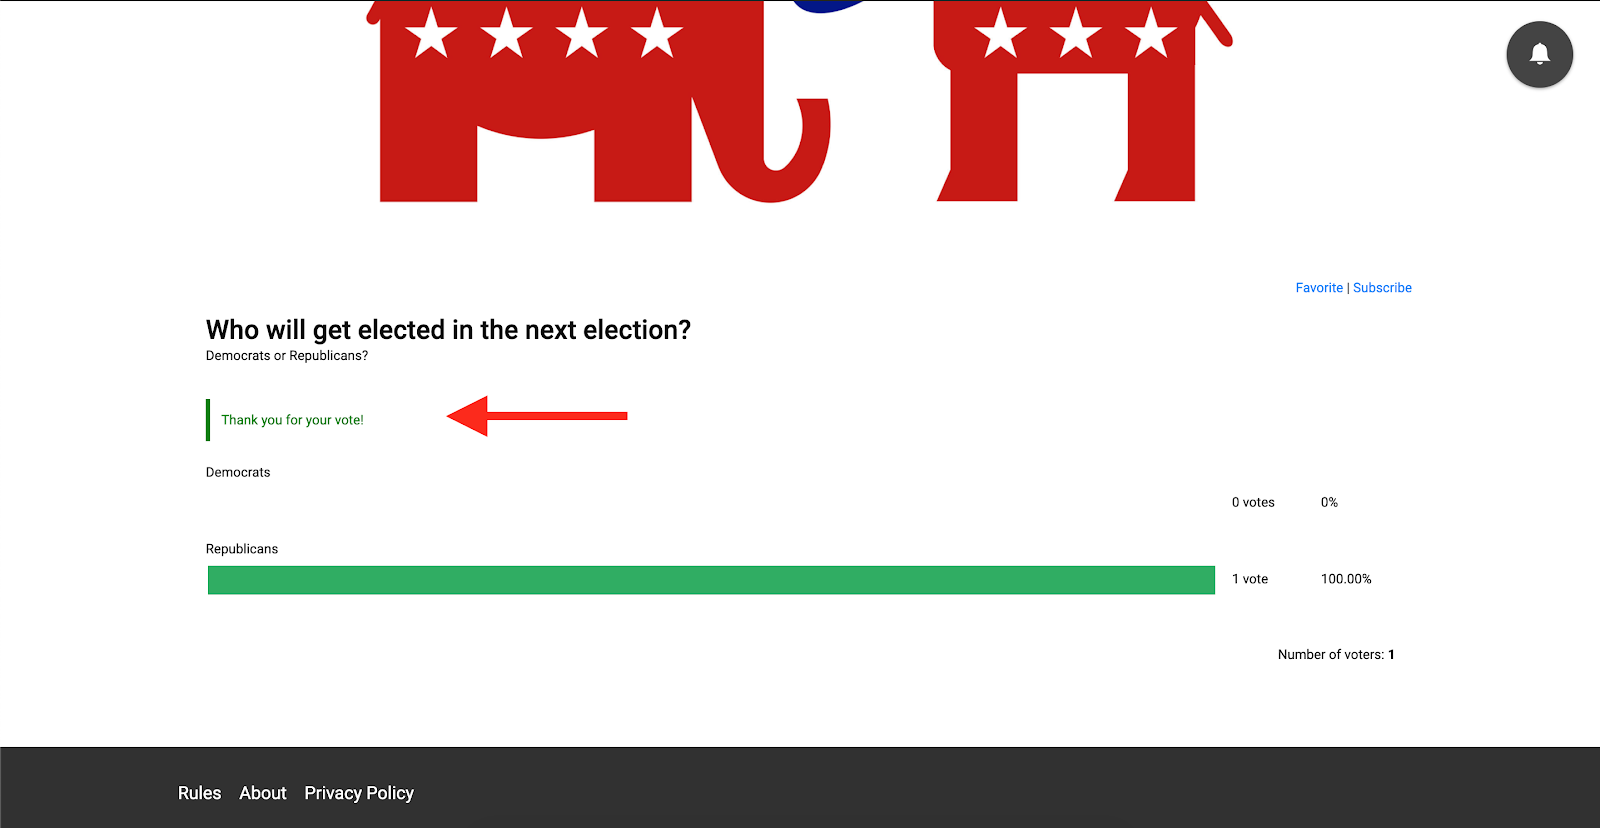
It’ll send a notification to the user who created the poll.
And by clicking on the notification icon, it’ll show you the text that you have provided in your custom function and the configuration of the plugin.
More configurations and stylings are possible using custom CSS.
Step Eight: Localize and translate to your own language
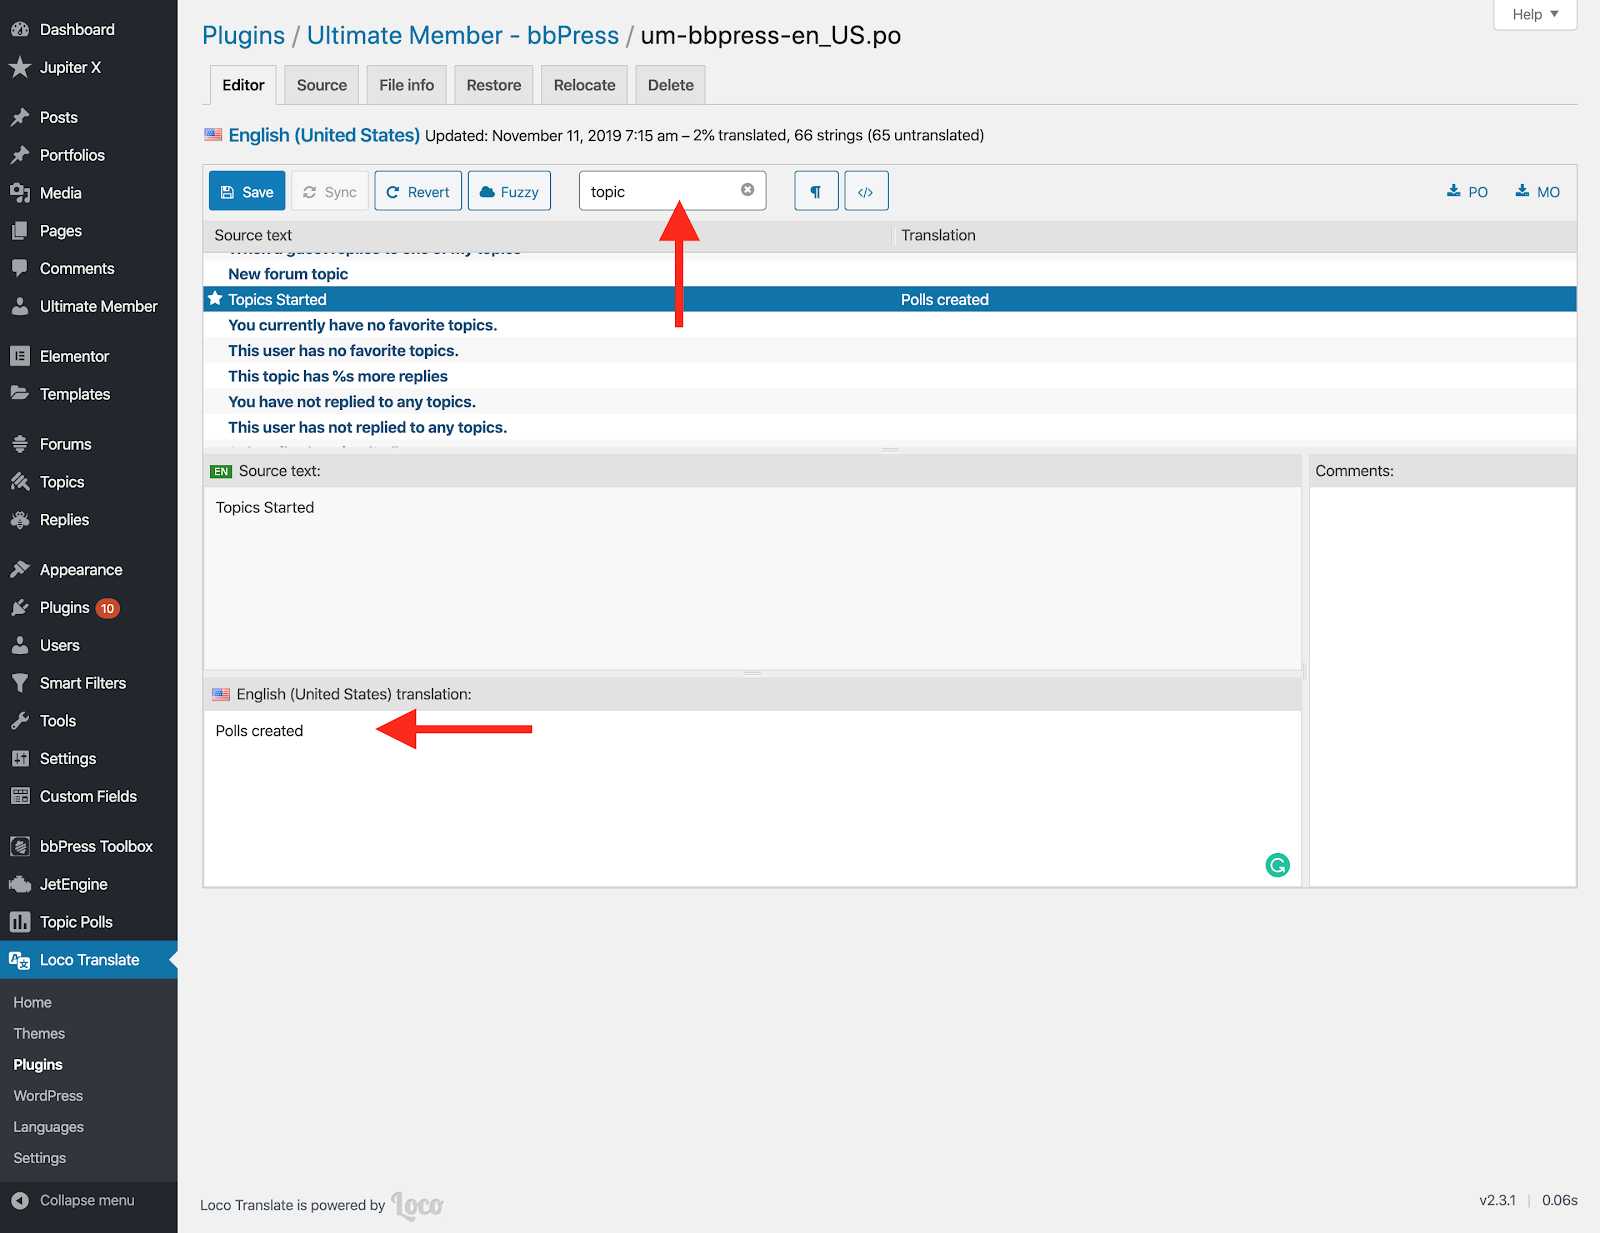
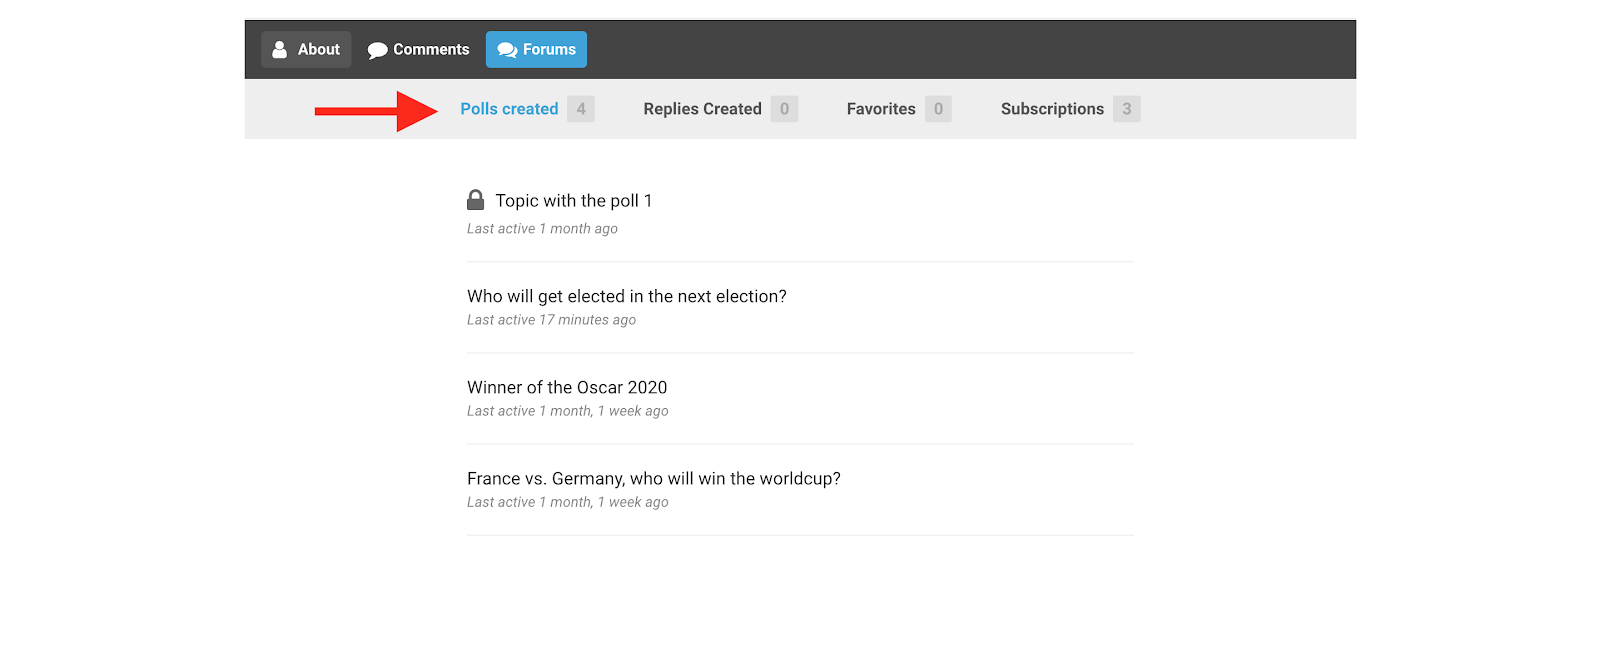
The last section in creating a community poll website is translating and localizing the words into your own language. Using the Loco Translate plugin, you can change every single piece of text within this app just as you like. Remember that the texts are located on different plugins, and you need to dig into the plugins to find the source of the text. Mostly, you need to change the word “Topic” to “Poll” wherever it is showing up because of the logic behind this app.
Results, further development and roadmap
We created a social network application based on social polling features. Certainly, there are tons of further considerations to make it like a production app. But the thing is that the base is prepared, meaning that you can add as many features as you want simply by using different plugins and configurations.
This method will save a lot of money if you aim to build such a community – and compared to the social polling platforms out there, it can be considered almost a free platform. The good thing about this method is that you can keep everything updated and secured with one single click.
Additional features such as Login by Phone (using two-factor authentication) or the discussion below the threads can be applied to the app using the following plugins:
Adding more plugins may require configurations and, in some parts, or even writing some codes to integrate it with your base. For example, bbPress uses three post types such as “forum,” “topic” and “reply.” You would need to enable the comments for the “topic” post type using custom development because by default, the topics don’t receive any comments. Or you may need to configure the Digits plugin to work with your own SMS platform.
Also, you may want to push your notification to the users who subscribed to your app or website. This can be done by using FireBase or any other push notification service. However, it may require custom development in some parts to make sure it triggers correctly whenever an interaction happens on your website.
The last thing you want to do is to wrap the website on a webview and publish it on app stores such as Google Play or iTunes. There are dozens of tutorials out there that can help you with that.
Wrapping Up
Creating a community poll website has never been easier than now. It can be done using bbPress and WordPress and using handy tools such as the Jupiter X theme. Its bundled plugins will ease the process and reduce the cost of development.
In this series, we provided an overview of how to create a social polling website using their tools we had. Check out the first article of this series here if you’ve come across this post using a search engine.c

No comment yet, add your voice below!