If your website has been hacked or you made some changes that left your site broken, then you need to immediately restore your WordPress website to a previous version. But you can only do that if you have a backup to restore it to. Without a backup, then there’s nothing to restore.
See how important it is to backup your WordPress website regularly?
If you haven’t created a website backup yet, there are many ways to do so. You can use a WordPress backup plugin like BackupBuddy or UpdraftPlus (easy method) or you can go the manual route and download site backups using an FTP client.
If you already have a backup, then read on to learn how to restore your WordPress website and get it up and running again in no time.
To restore a WordPress site, you NEED to have access to the following:
- A stable copy of the backup files themselves, namely: WordPress files, database, theme and plugins. It’s better to always have a fresh backup of the database—you don’t want to restore your site and realize that the most recent content was posted last 2014. As a rule of thumb, we recommend backing up your WordPress website at least once every three months. If you regularly post new content on your website, then you should do this at least once a month
- Your Server. Server access is usually provided through an FTP account, which allows you to copy files to and from the server. You can get the access credentials from your hosting provider.
- The Database. You will most likely use a program called phpMyAdmin, which provides access to your databases. Again, login information should be provided by your hosting provider.
Restoring WordPress Files using FTP
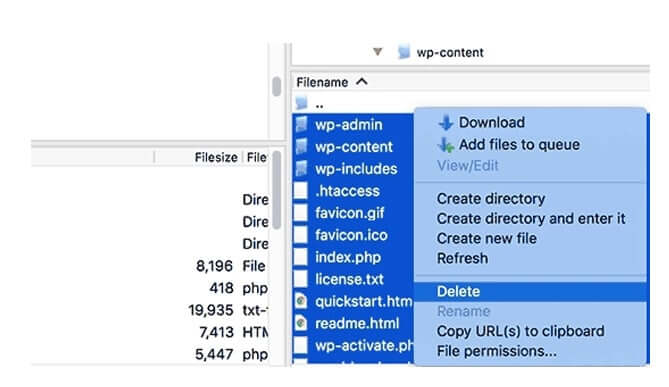
Before restoring the site, you first need to delete all existing WordPress files and directories.
You should only do this if your backup is up-to-date. Once you’re sure that everything is correct, then you can delete all files on your website using the cPanel (control panel of your web hosting provider) or through a File Transfer Protocol (FTP) client like FileZilla.
If you’re doing this with an FTP client, you need connect to your website server, select all files in your WordPress root directory, and then delete them.
Once everything is deleted, you need to download the latest version of WordPress:
- Download the latest version of WordPress here.
- Locate the zip file you just downloaded, and unzip the files.
- Connect to your server using an FTP client.
- Transfer all files from the downloaded and unzipped WordPress version.
- Once you have uploaded the WordPress files, you can then upload the wp-config.php file from your backup.
Alternatively, you can rename the wp-config-sample.php file in your freshly uploaded WordPress files to wp-config.php. After that, you need to edit the wp-config.php file and enter your database information.
Once that’s done, transfer all files from the location where you saved them to your server. If you have a backup of your site in a zip file, unzip all files first. Usually you should upload only the “wp-content” folder to restore your themes and plugins. Or, since you have a new installation of WordPress, you can opt to install the theme from scratch and install the plugins you used to make things neater.
When you’re done with this, proceed to restore your database.
Restoring the database via PHPMyAdmin
To restore the database of your WordPress site, you need to have a backup of the sql database. Let’s assume that you have exported the existing database using phpMyAdmin, a tool available from your hosting cPanel.
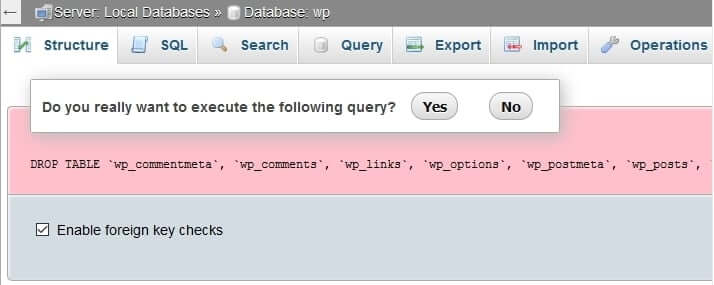
- Open phpMyAdmin in your hosting control panel. You will see a list of all databases you have. We recommend deleting all tables first for the needed database. Tables are the files where WordPress saves all the information for your site, including posts, pages, comments, (theme and plugin) settings, etc.
- Open the database you want to replace. Double check to make sure you select the right one.
- Tick the “Check All” box.
- From the “With selected”, select “Drop.”

- Click “Yes” when you see the popup “Do you really want to execute the following query?”
- Once all tables are deleted, then you can start importing your backup database.
- Make sure that you have the proper database selected, and then click the “Import” tab.
- Select your database backup from your computer.
- Leave all options set to default settings and click the “Go” button.
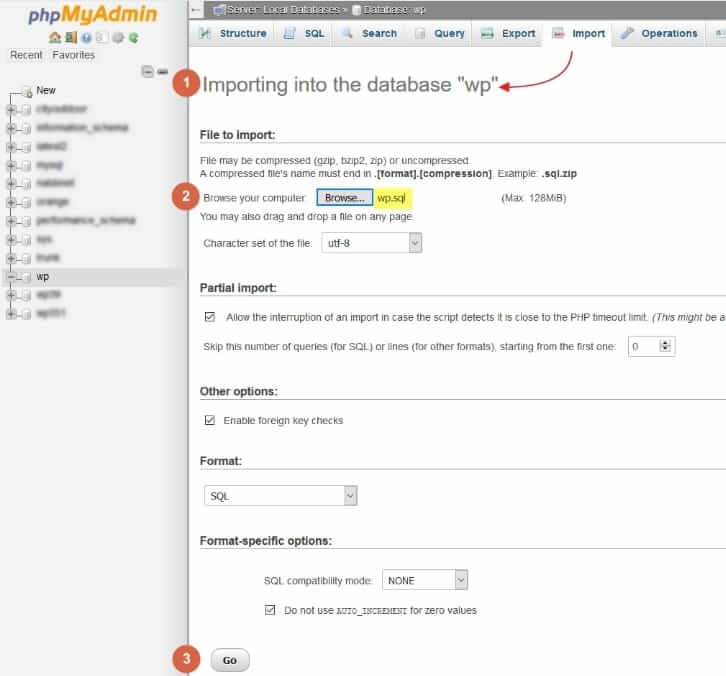
- Wait for confirmation.
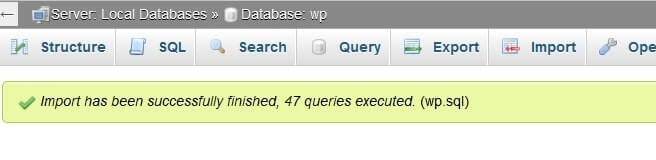
And, you’re done! You’ve successfully restored the database for your WordPress website. Check your live website to see the version you restored and ensure everything is working fine.
Final Words
Creating regular backups can save you both time and money (not to mention the headache) when trying to figure out how to restore your WordPress website. Just remember to backup both your WordPress files, themes and plugins, as well as your database.
One final tip: Store your backup files in two secure locations (e.g. one in your computer and another on a cloud storage provider such as Google Drive, Dropbox, iCloud etc.) so that even if something bad happens to either one, you always have a spare to use.

No comment yet, add your voice below!