This is a guest post contributed to Artbees Themes Blog by Vishnu Goyal.
If you are here looking for ways to improve customer communication on your WordPress website, chances are you already own a website for your business or you are working on another’s website to make it communication friendly. In any case, you have landed on the right page. Welcome!
As of 2020, we have 4.5 billion internet users worldwide who stay online to live, work, play, shop and do everything in between. For a business to succeed in the internet-dominated world, a thoughtful online presence is not optional but a necessity, Today, if you want to connect with your prospects and customers, you can’t miss the opportunity to get your business online, start conversations with your target audience and build customer relationships on the internet.
Your business website is the centerpiece of your online presence and overall digital marketing and thankfully you already have one. Now, having a website up and running is just one aspect. Setting it up for success and growth requires a lot of effort in regular optimization and keeping the conversation going. The primary purpose of your business website is to generate leads who you can turn into your customers and keep the show going.
With a communication friendly website, you can make sure that you are not letting your visitors leave without talking to you. And once they are in contact, you are the best person to let them explore more about you and convert into customers.
So, once you’re done with the hard work of getting visitors on your website, the next focus should be to make it easy for them to start a conversation with you. And that’s the agenda of this article: to help make your WordPress powered website customer communication friendly and let you spark as many conversations as you possibly can on your online space. Without further ado, let’s get started.
5 ways to make your website “customer communication friendly”
5 tips to improve customer communication on your WordPress website. [Illustration by Agnesh Jha/MyOperator]
Here are 5 ways (plus a bonus one) to improve customer communication on your website and step up your lead generation game, as well as improve your overall sales cycle process:
Have a dedicated Contact Us page
No website is complete without a dedicated Contact Us page. If your visitors want to contact you, it’s likely that they are going to visit your contact page. So, make sure to have one. See, when it comes to communication, different people have different preferences. Some like to pick up the phone and call, some like to chat online, while others may find it comfortable to fill a contact form, email you or visit you at your location.
In any case, it is best practice to include all available contact options. For best user experience, besides building a custom Contact Form, consider including the following communication options on your contact page:
Your business email address
Your business phone number
Your office or business address
A Google map of your location
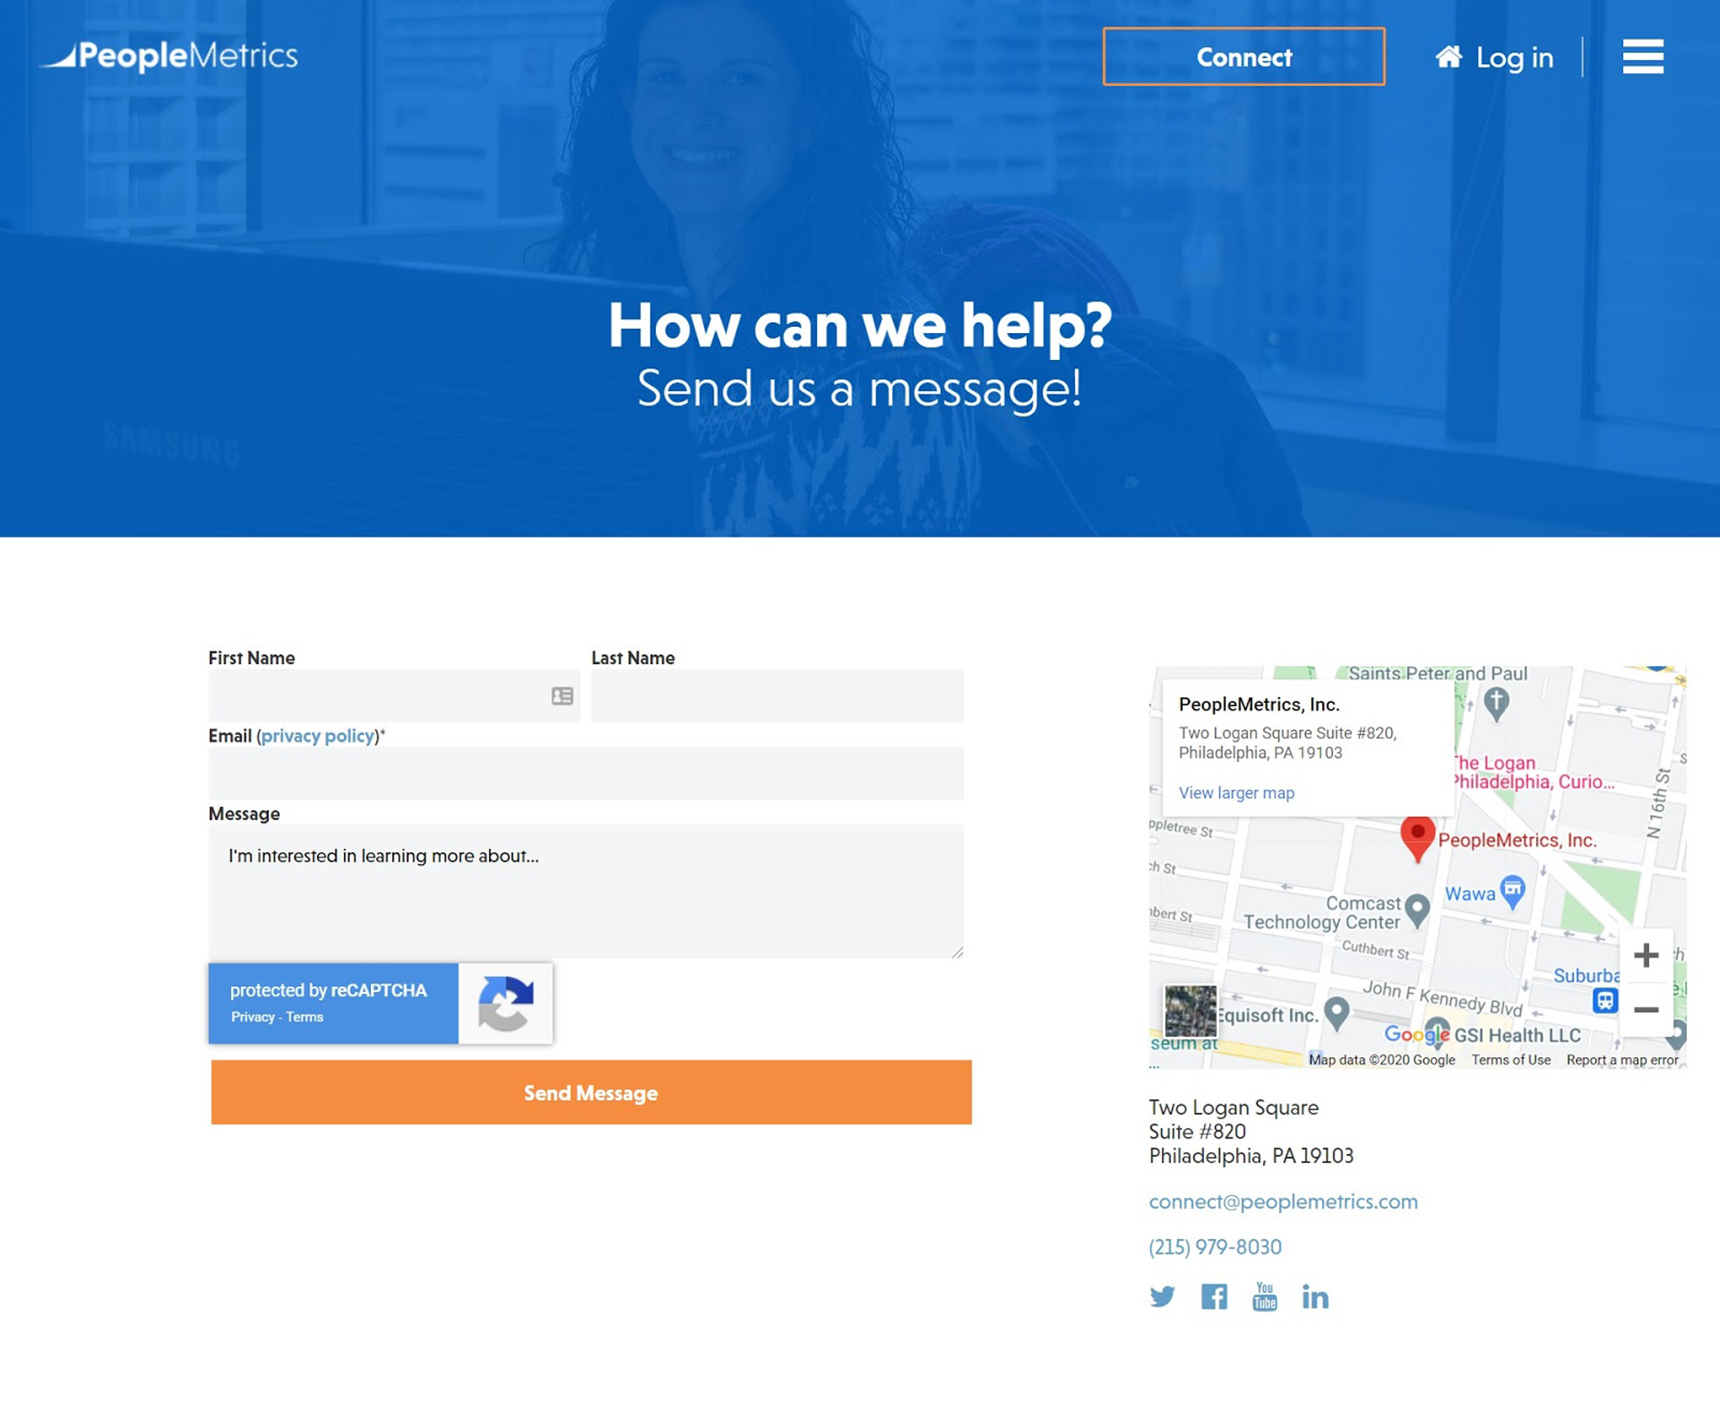
Contact us page on PeopleMetrics website with contact form, business address, Google map, business email ID, and phone number.
In case you have multiple locations, you can add all those onto your page. Also, don’t forget to mention your preferable business hours.
Install a chat widget on every page
We are living in the age of instant gratification. It’s an age where people don’t have time to wait, and they want everything in real-time. Your customers are no different. As per recent trends, 41% of customers expect live chat on your website.
Can you let them down and lose business? Nope! That’s why live chat has moved from “nice-to-have” channel to a “must-have” communication channel.
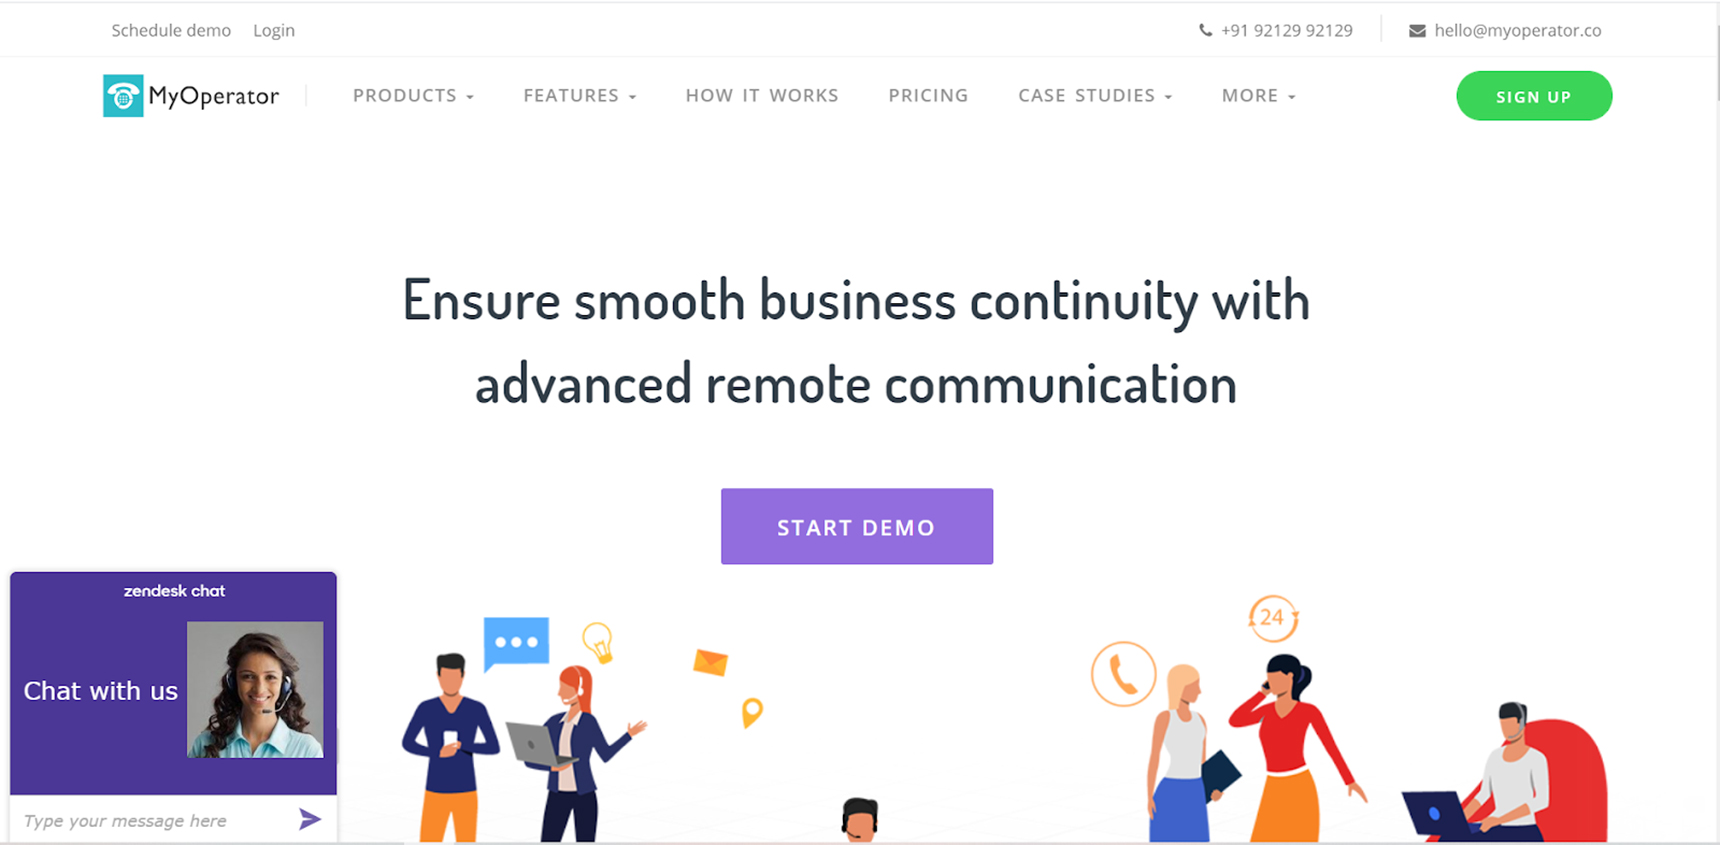
MyOperator uses a live chat widget on every page of their website to provide 24/7 connectivity for their customers. It also displays a 24/7 helpline number in its header section making it easy for customers to connect on call with the MyOperator support team.
To help you get started with live chat on your Jupiter WordPress website, we have curated a list of Best Live Chat WP Plugins. Feel free to check that out.
Don’t bury your business phone number
While phone calls are one of the oldest modes of business communication, they are still one of the customer-preferred ways to connect with brands. This holds even more true for small businesses.
According to a recent study study, 60% of customers prefer to call small businesses on the phone. That number alone is sufficient to realize the importance of having a business phone number. If you already don’t have a dedicated business phone number, consider getting one. Thanks to their advanced calling features like toll-free calling and Interactive Voice Responses integration, those connect your customers with you in the most personalized way.
And once you have your business number, display it proudly to enhance customer communication on your WordPress website. A few website sections where you should display your business contact number include:
Website menu bar
Website footer section
Your contact page
By mentioning your phone number there, you are making it easy for customers to call you in a click and talk business.
Ask visitors to contact you
You might be thinking about how can you ask each visitor on your website to call you, initiate a chat or fill out that contact form. Worry not. It’s quite easy. I’m sure you are aware of that thing called call-to-actionor CTA, right? While we all have heard of CTAs and how good ones can skyrocket online conversions, still they are often not used to their full potential.
See, you must be working hard on building your brand, putting lots of effort into content marketing and SEO, or might be spending huge money on online ads to get visitors to your website. So, to do justice to your work, you must take measures to make the most of every page and every visit.
On every page, you need to have a clear one call-to-action that you want users to click on. Every article on your blog is also an opportunity to include a relevant CTA and invite users to take action as they consume meaningful content on your website. For example, the team at gaming site Solitaired used a CTA to solicit feedback on their solitaire games. Through the user insights they received as a result, they ended up adding features like hints and redos, which drove their user engagement by over 10%.
Thanks to the simplicity of Jupiter WordPress, you can create attention-grabbing CTAs in one click, without writing a single line of code.
Be eager to adopt modern means of communication
The ways businesses connect with their customers are always evolving. While channels like email and SMS marketing, phone calls, 1:1 personal chat have been helping businesses for years to stay in touch with their customers, there are new yet very helpful channels adding to this list. For example, Facebook messenger for business and WhatsApp Business chat widgets are two of the most popular customer communication options used by modern websites. Those can be integrated on your website with few lines of code and provide your visitors with the ability to contact you in one tap.
A website using Facebook Messenger Chat Plugin. [Source: Facebook]
Another trend is AI for websites and chatbots. With an AI chatbot, you can automate a big chunk of your customer communication by automatically replying to the frequently asked questions while connecting visitors to your support agents for complex questions.
The point is to stay ahead in the communication game. You always need to make the best use of available channels plus also keep an eye on new channels along the way. After all, first-mover advantages do help a lot, and it also brings a distinct identity for your brand.
Last but not least: Pay attention to your website design and content
If you want visitors on your website to take action, you need to make your website design user friendly and appealing. As a perk of running your website on WordPress, you have a nice collection of WordPress themes and page builders at your disposal to instantly upgrade your website design.
To entice visitors into action, make your website copy actionable. Here are a few quick tips to make your website content action-worthy:
Use lingo that your audience understands: Avoid jargon or fancy words. The simpler, the better.
Speak to your leads: Shift the focus from you to them! Let them know how you can solve their problems.
Include CTAs: A copy without a clear call-to-action will not benefit you much. Make it clear what action you want visitors to take.
Give opportunity to engage: Ask questions from your visitors and give them a way to respond. Meaningful engagement often ends up in long-term relationships.
What’s next?
By using all the above techniques or a combination of them, you can spark new conversations and engagements, which will help you enhance overall customer communication on your WordPress website. This will also enable your prospects and customers to speak to you and literally convert your website into a lead generation engine. What follows next is a growing customer base, thriving business and more success to you that you are working so hard for and so deserve.
Most theme developers simply don’t pay that much attention to the design of the author page. If you have a blog or magazine website and want to display author information on a specific author page, you are often limited to your theme’s default author page design – and it might not be enough.
Fortunately, there are tons of methods to overcome this issue. Possible ways to customize an author’s page in WordPress range from developing the author’s page template on your theme directory, to using different types of archive templates or using third party plugins, all are. Let’s discuss three of these methods and explore the pros and cons of each.
1 – Using the Ultimate Member plugin
The Ultimate Member plugin has wonderful user management features. One of its features is the User Profile pages. By using the profile pages, you can easily get additional author info when you click on any author link in your blog. Let’s see how it looks.
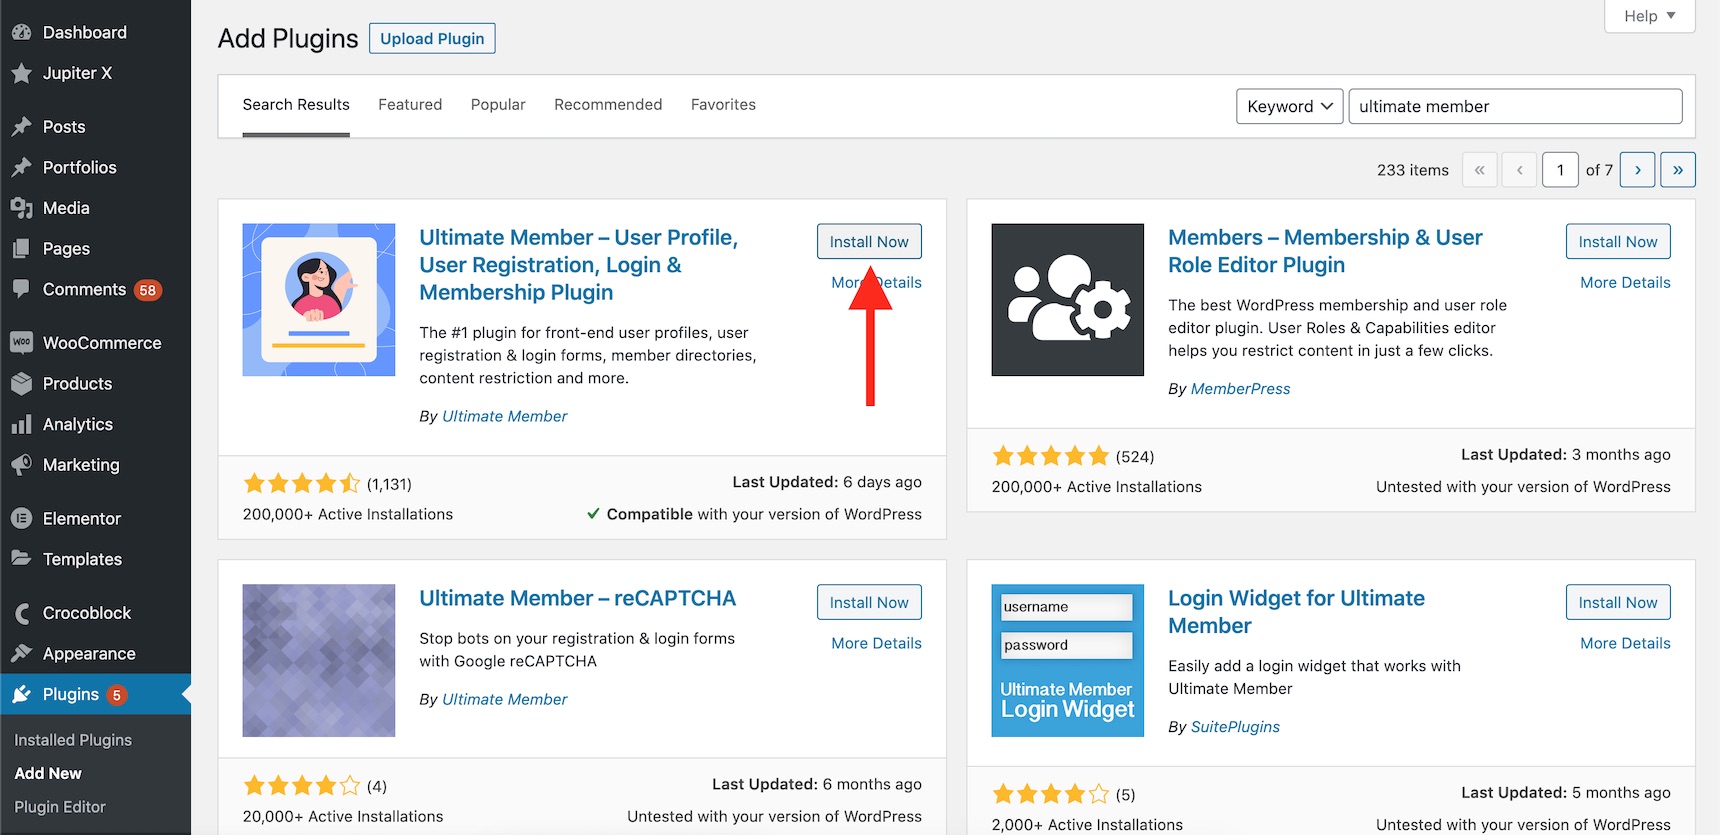
Install and activate the Ultimate Member plugin through the WordPress -> Plugins pan.
Installing the Ultimate Member plugin
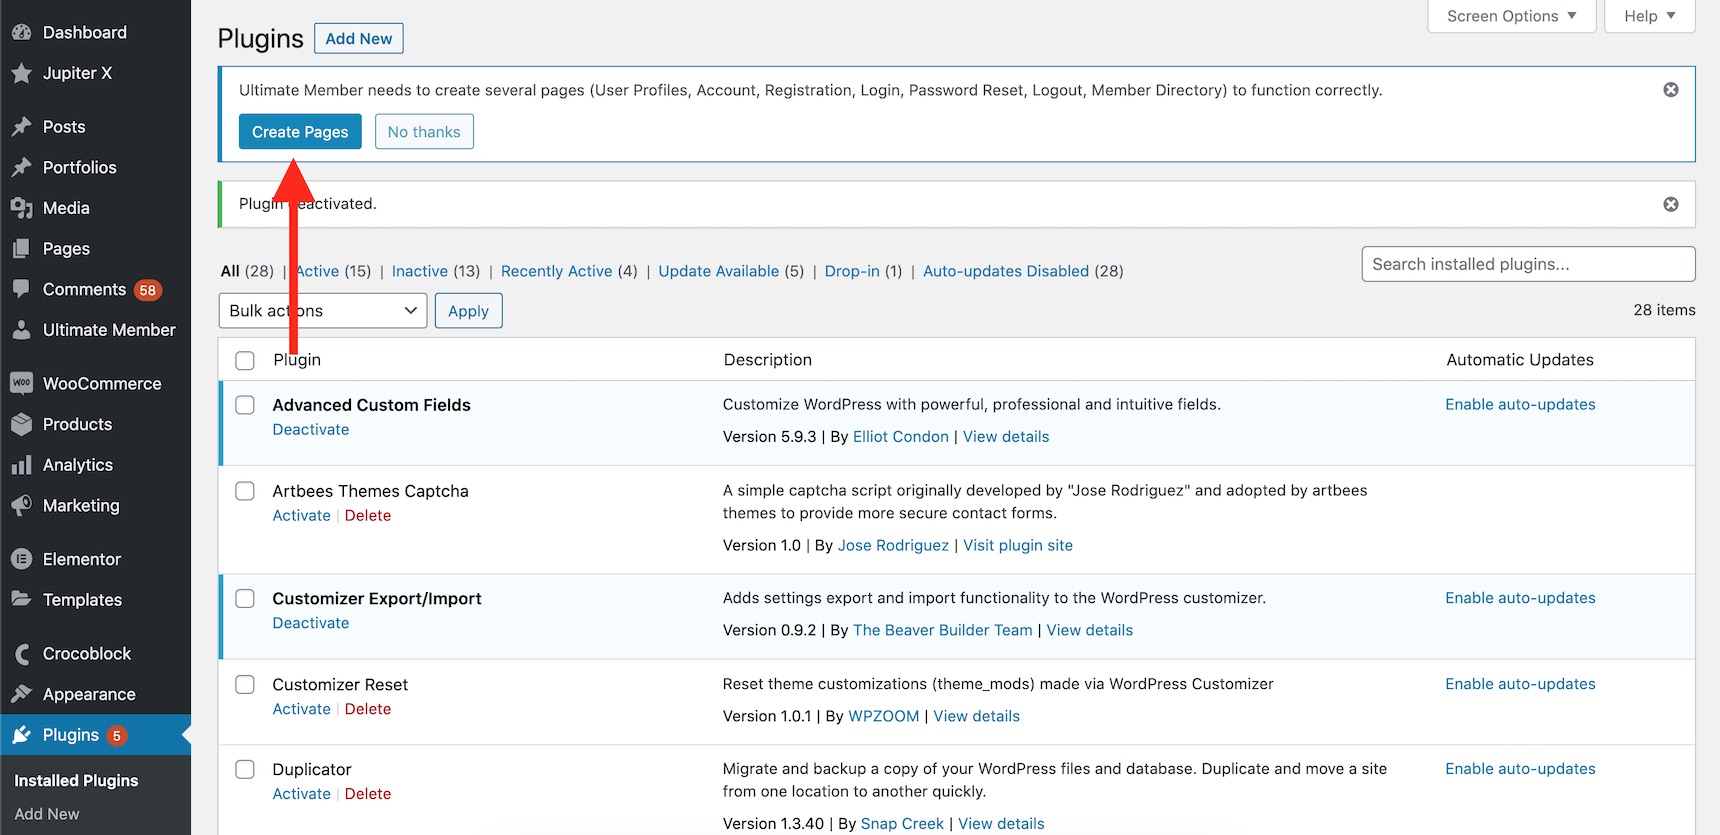
After installing, click on the Create Pages button on the top notice bar to make sure you have all the required pages for the Ultimate Member plugin available.
Create Ultimate Member pages
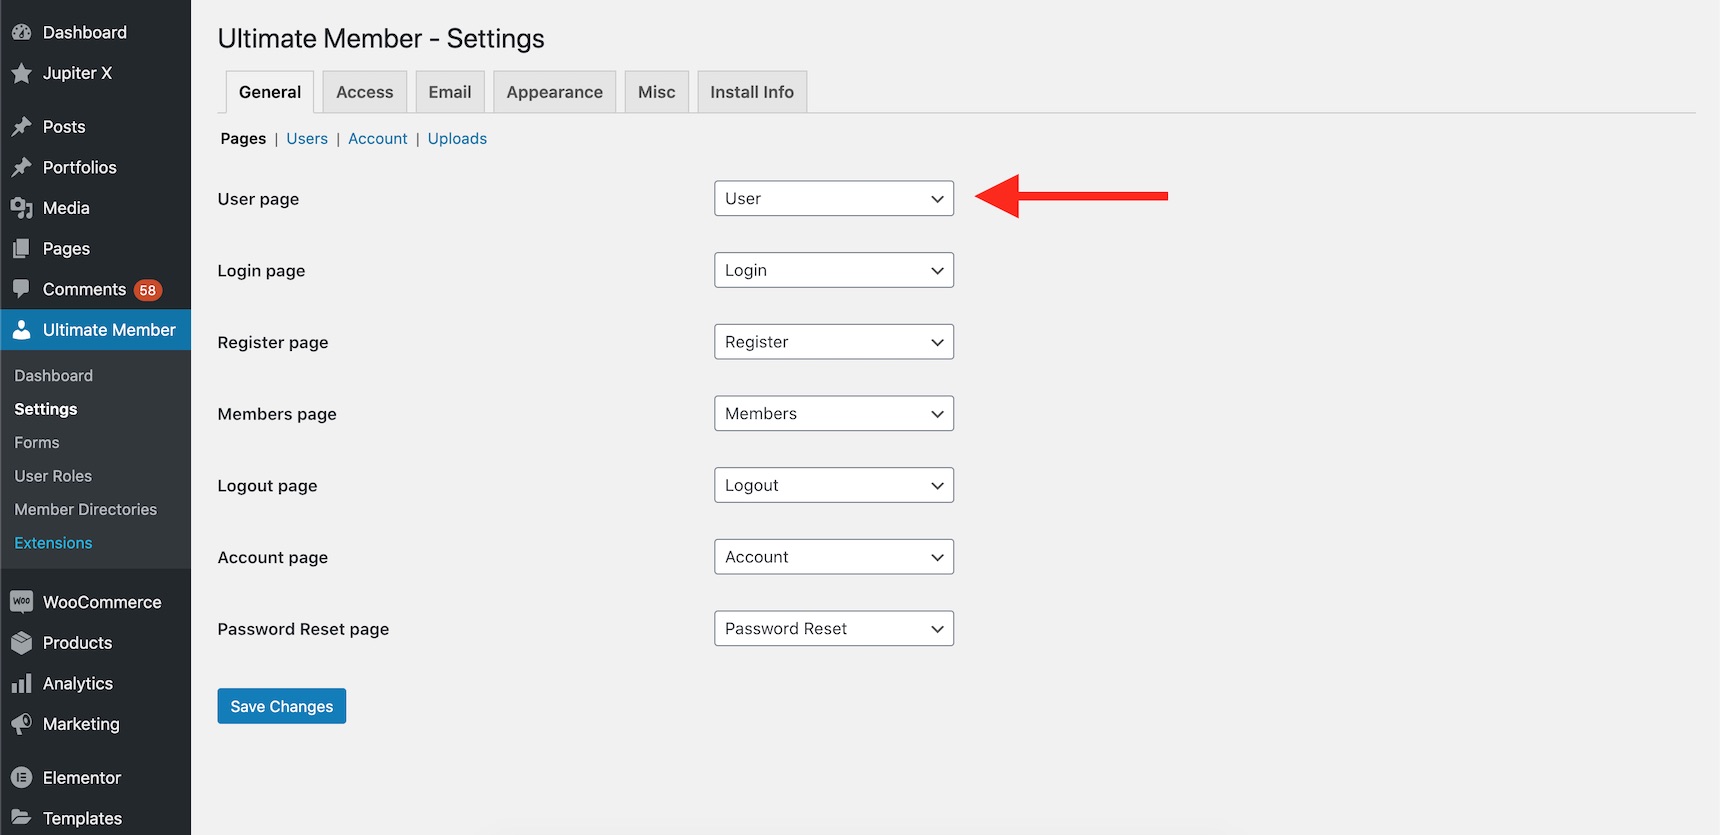
If you don’t do that, you need to create the pages manually and set them through the Ultimate Member configuration.
Setting the Ultimate Member profile page
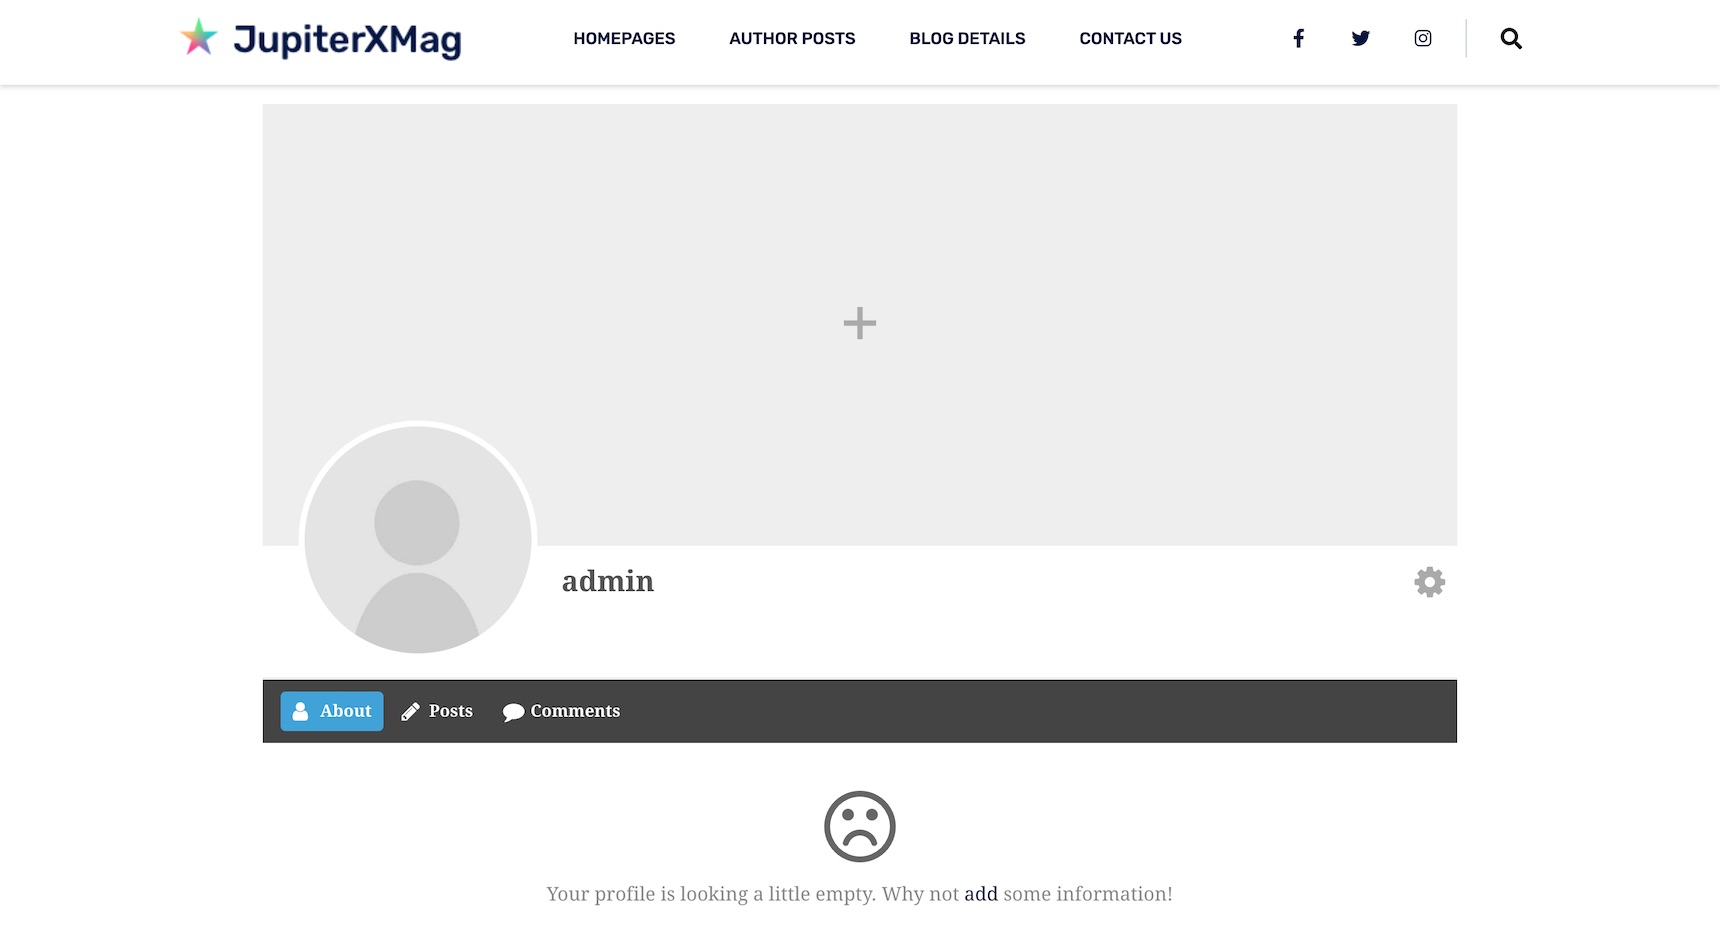
The user page will be considered as your author profile page. So, if you just refresh your author page, you will see that it will be redirected to the profile page and will look different.
Ultimate Member default profile page
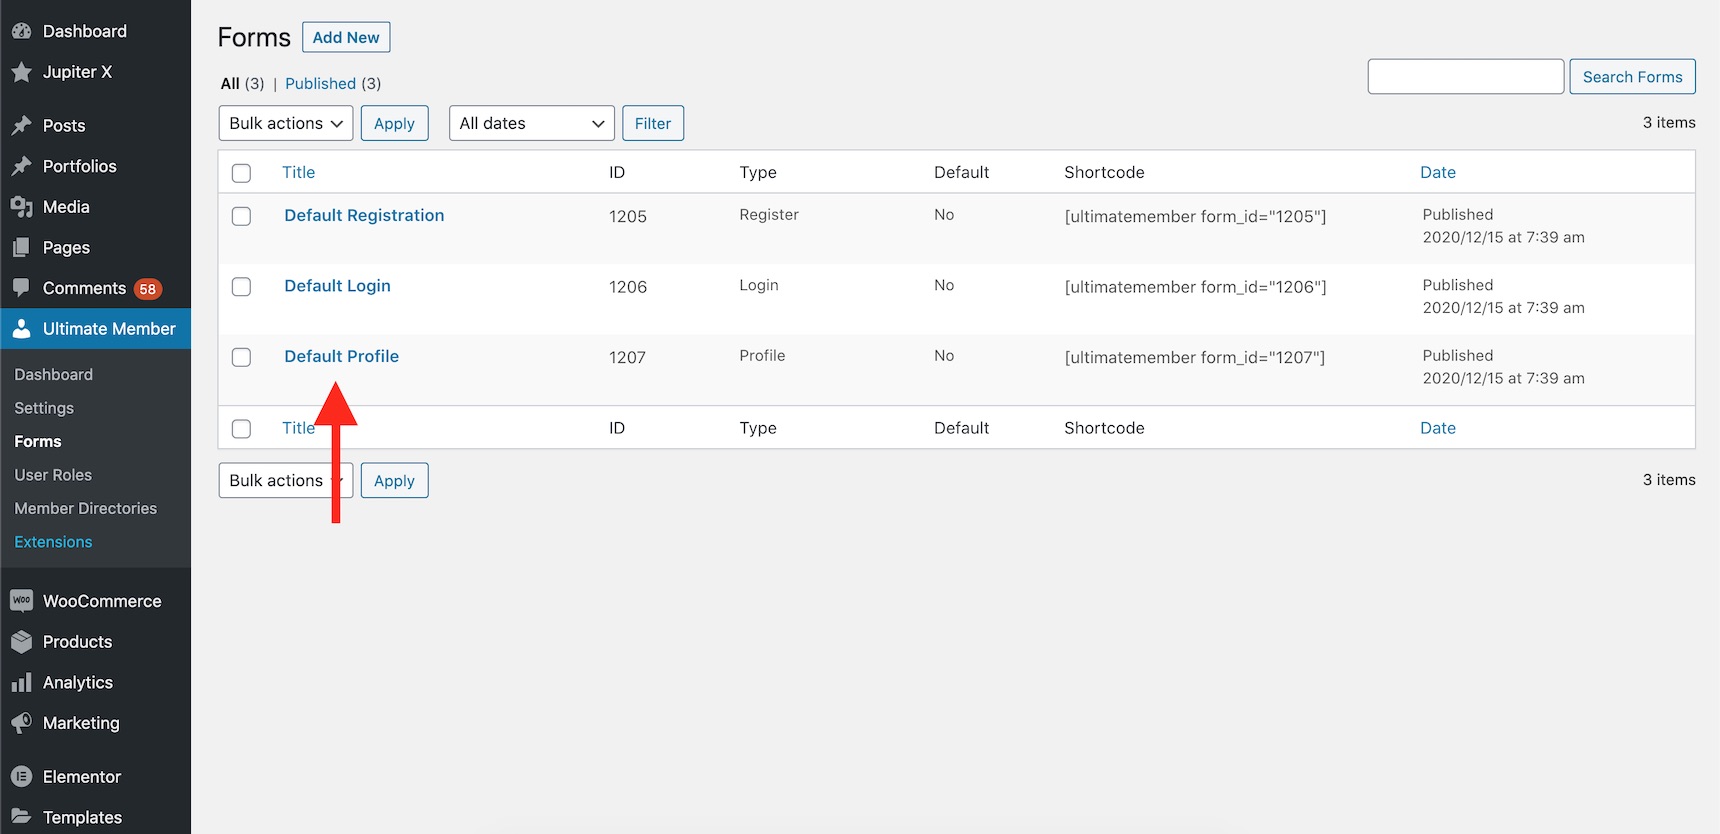
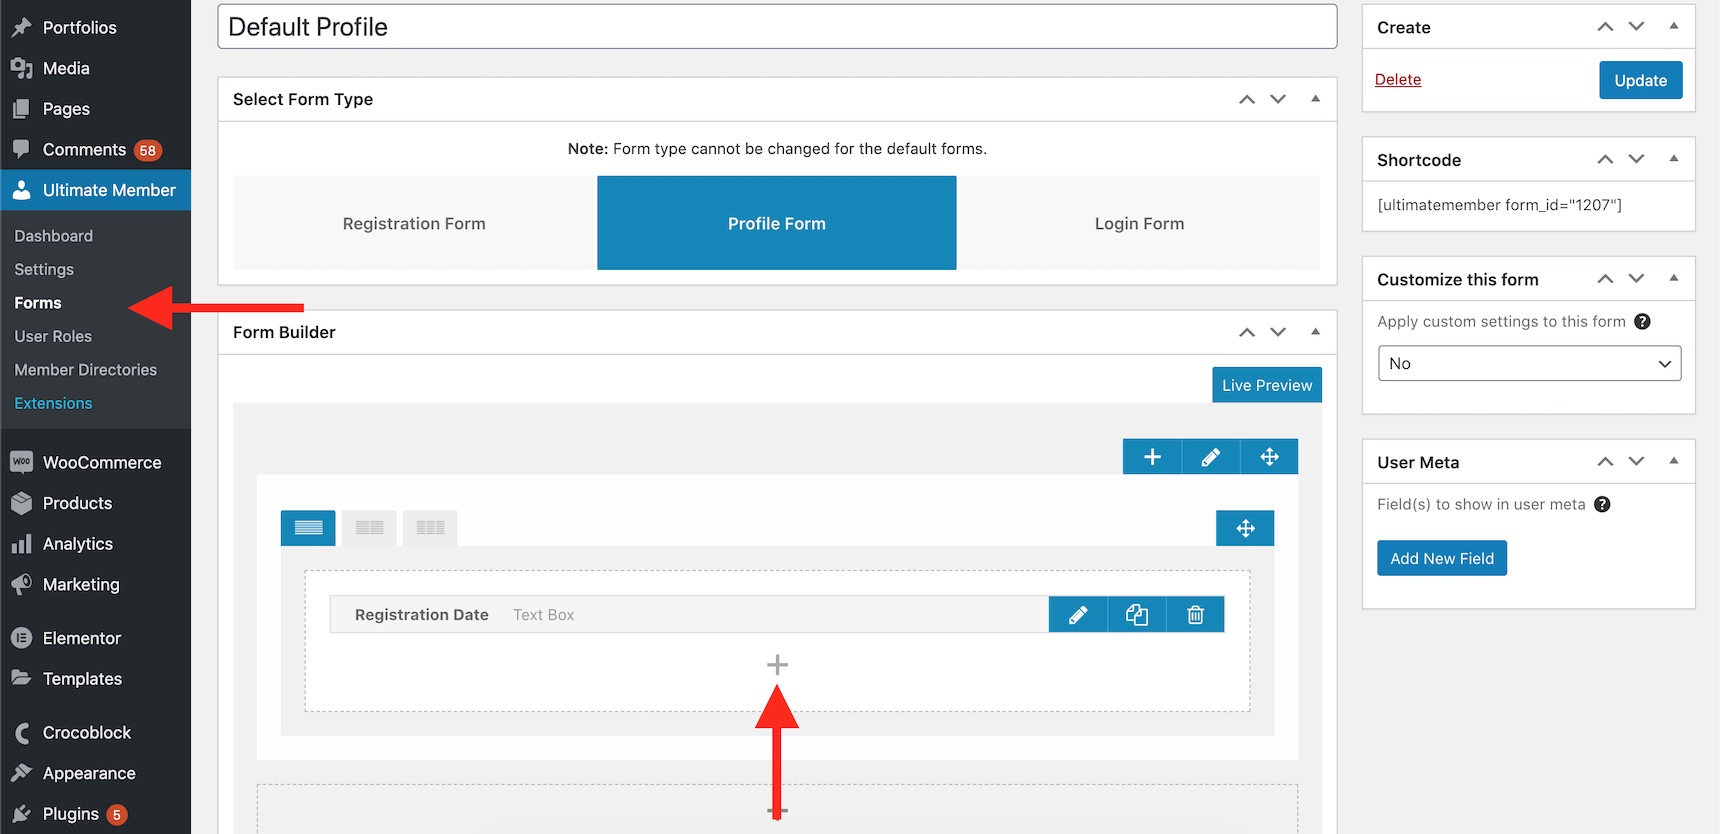
If you wish to add more info and custom metas to your profile, you can do it via the Ultimate Member form editor. Just navigate to Ultimate Member -> Forms and click on the default profile. Please note that you can create custom login and registration forms with custom meta fields and you can then show those fields on the profile pages.
Ultimate Member default profile form
You can edit the layout and add as many meta fields as you want into your profile page. I added a registration date field to show you how it works.
Adding custom fields to the profile page
And here are the final results:
Registration date added to the profile page
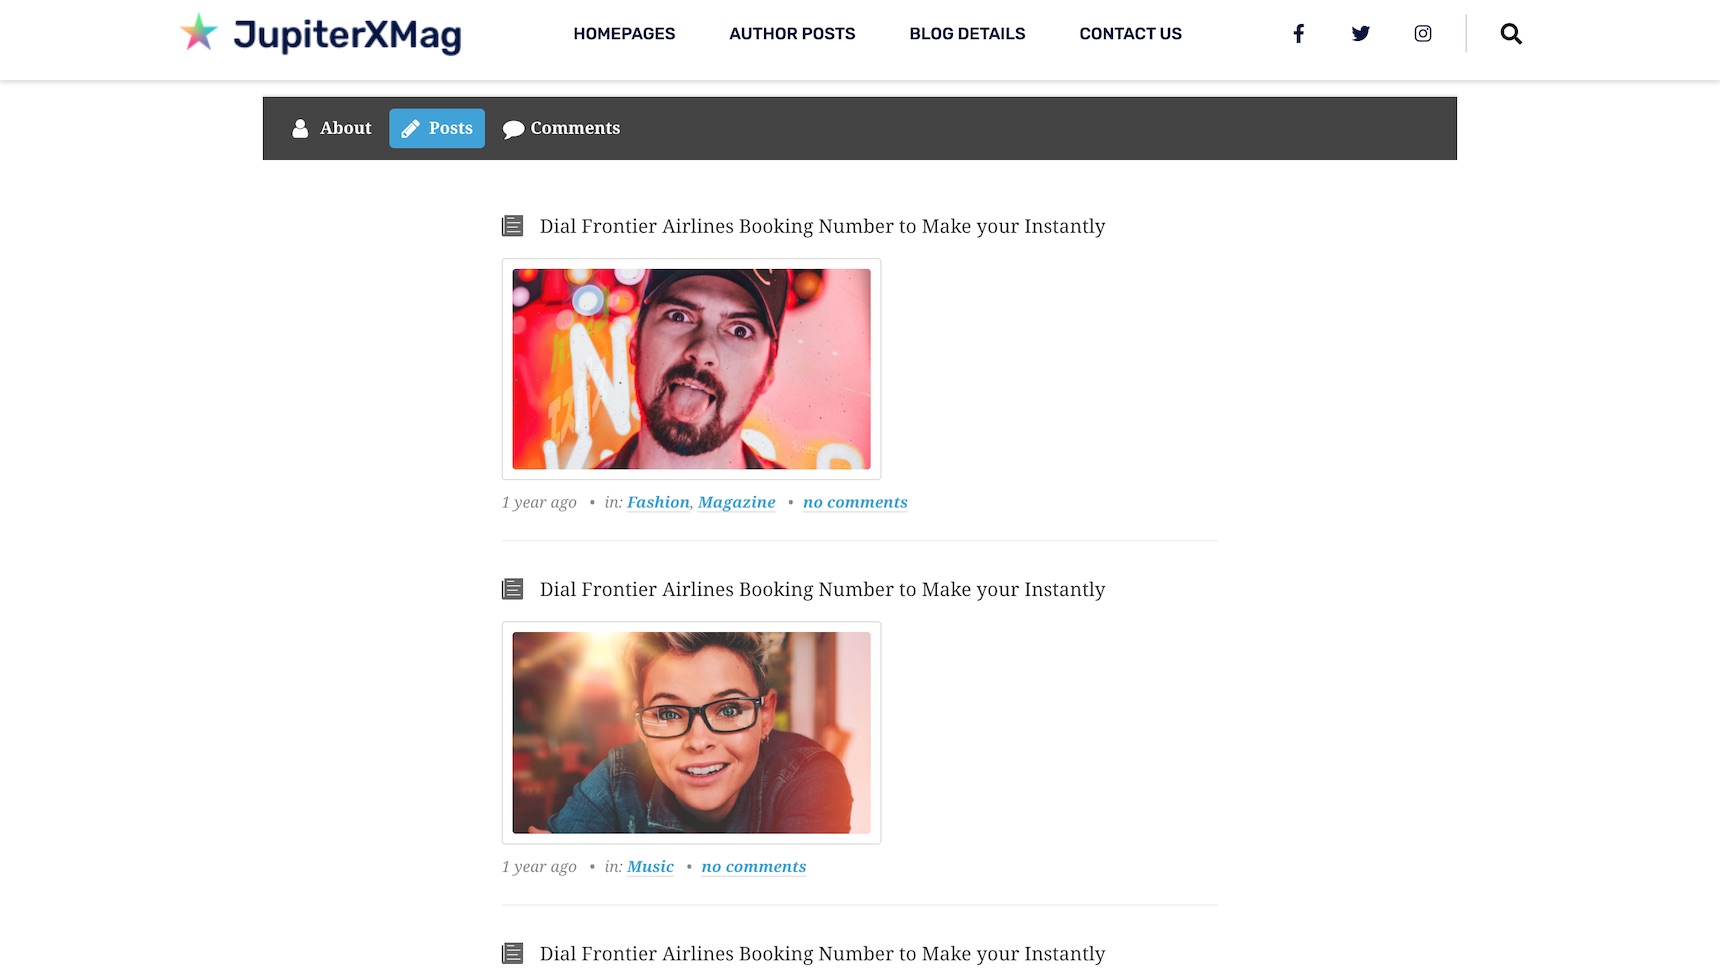
You can see the author posts in the posts tab and the comments in the comments tab. You can add as many tabs as you want using this extension. The user can also have a cover image on the profile page. You can disable this cover image through the Ultimate Member configuration.
Ultimate Member posts on the profile page
There are several other options you can use to customize the profile pages, and you can also override the Ultimate Member template files in your child theme. If you found this useful, don’t hesitate to rate them on WordPress plugins repository.
This approach might be useful when you have lots of guest authors and you want to run a member’s directory and make it possible to show each user profile.
2 – Using custom archive templates
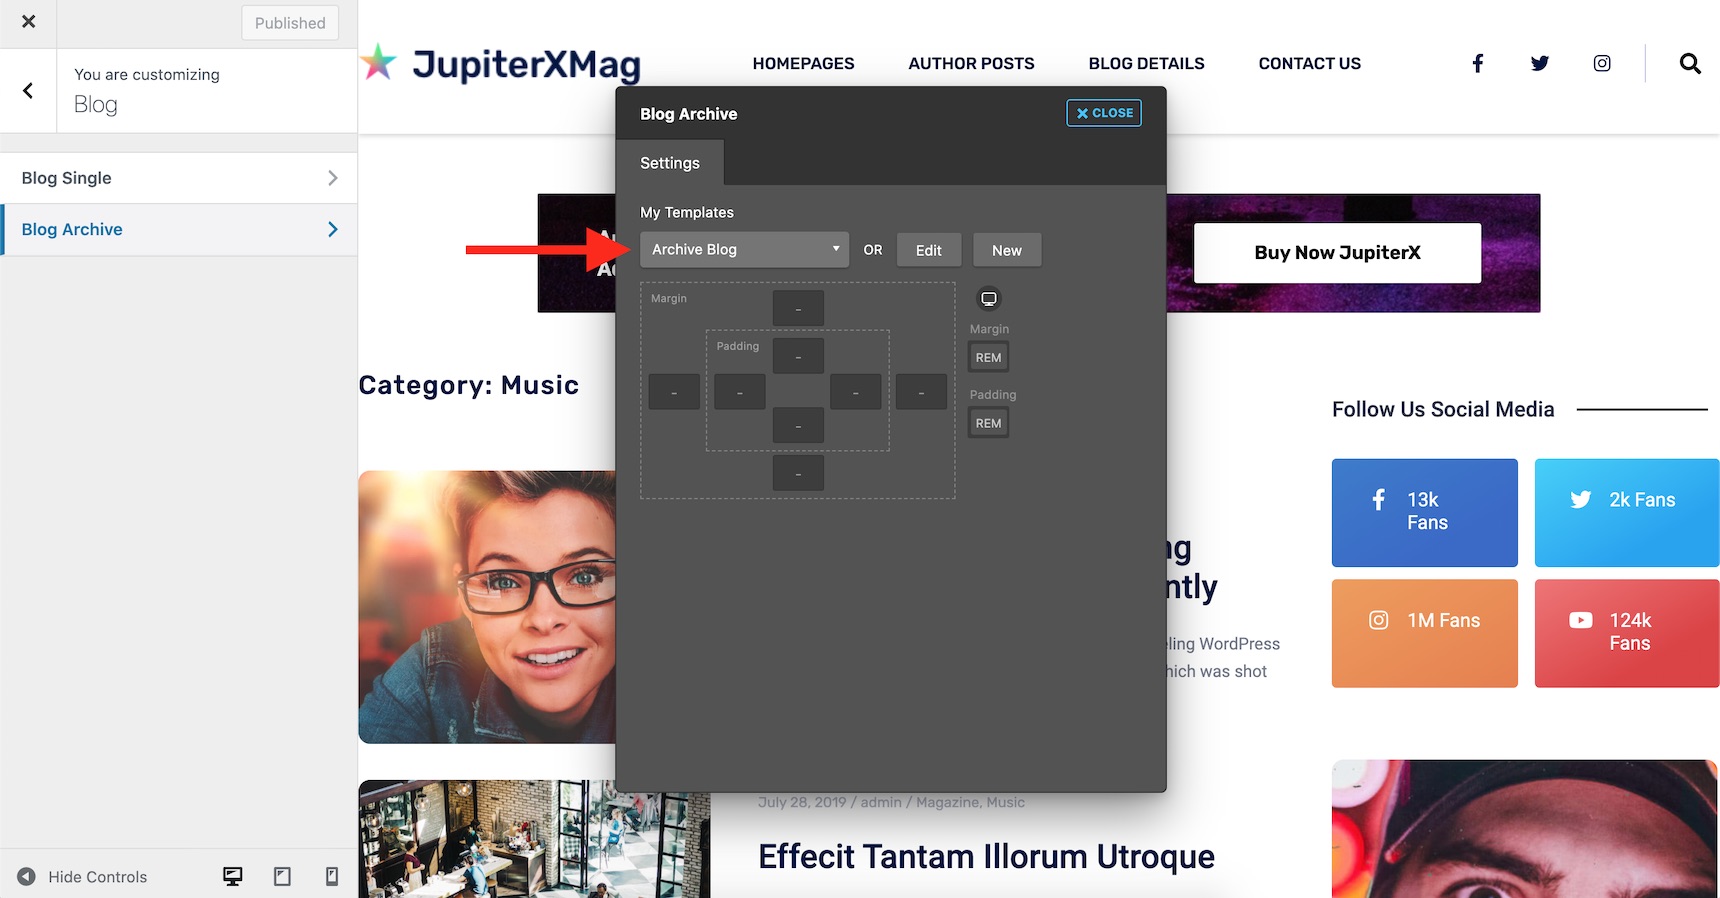
Jupiter X has a built-in custom archive templating feature, which allows for you to easily make an author’s page in WordPress. Since the author’s page will be considered as archive pages, you can create a custom author’s page using the archive template feature. The upside is that you won’t need an extra plugin. However, the downside is that you won’t be able to distinguish between the author’s page and the calendar archive pages.
So, in order to create a custom archive page, you can use the Customizer and navigate to Blog -> Blog Archive and create or assign an archive template.
Assigning an archive template in Customizer -> Blog
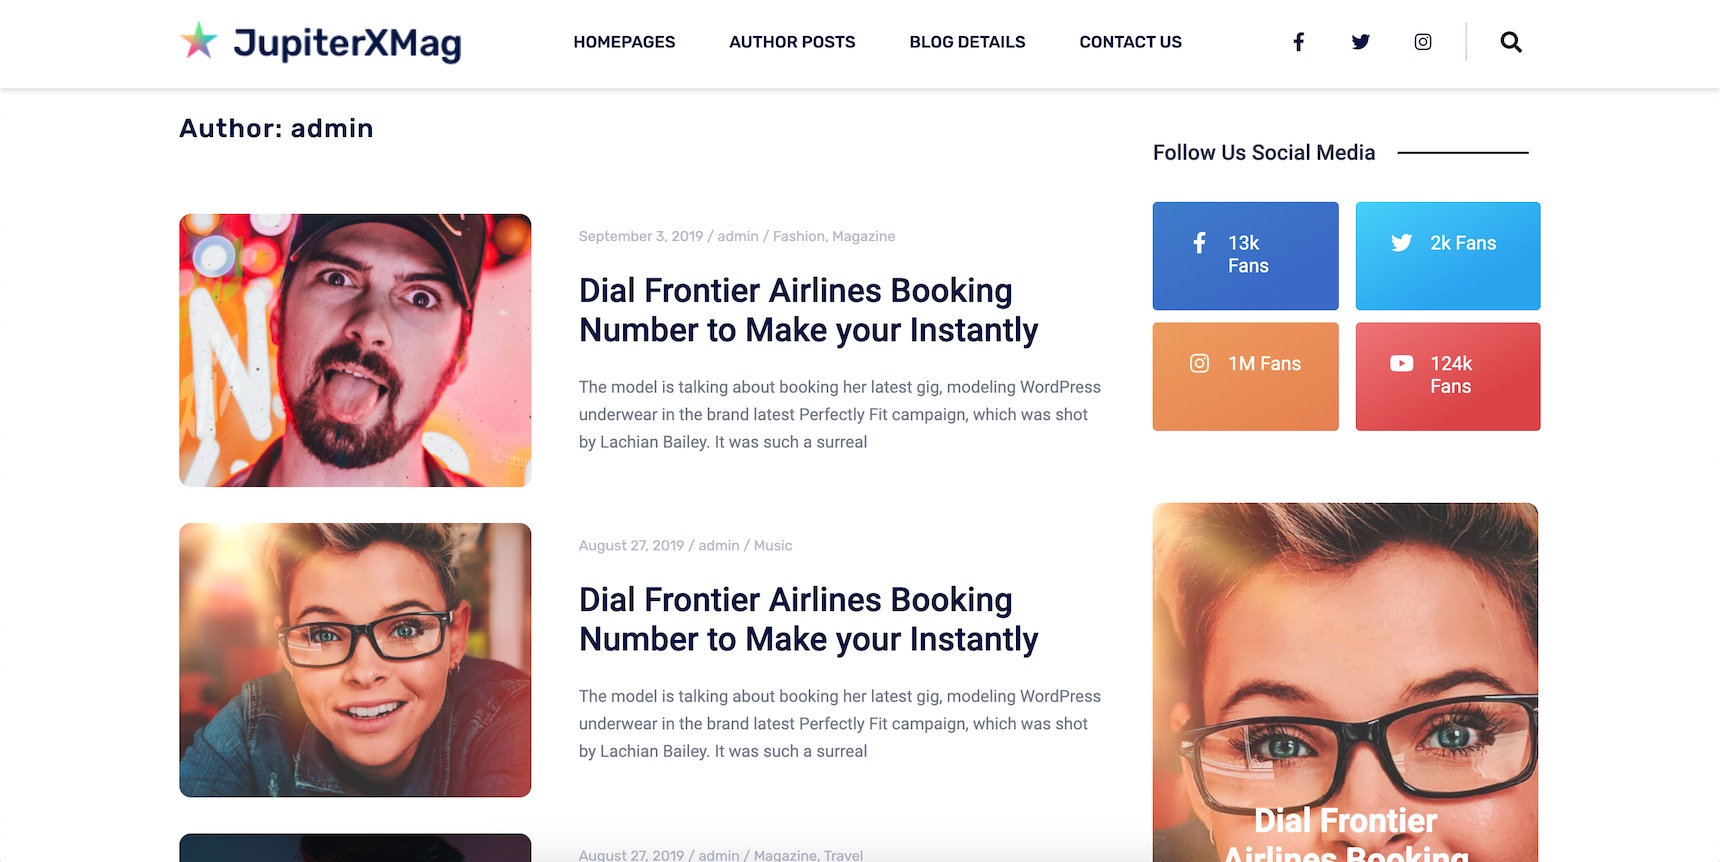
This feature was introduced in Jupiter X 1.10, and you can use it only if you are using Jupiter X theme. For more information, please check out this article. The results would be like your archive page (depending on your designed template) with the title of the author’s name.
Authors page using the archive page template in Jupiter X
3 – Using custom made pages with 301 redirection
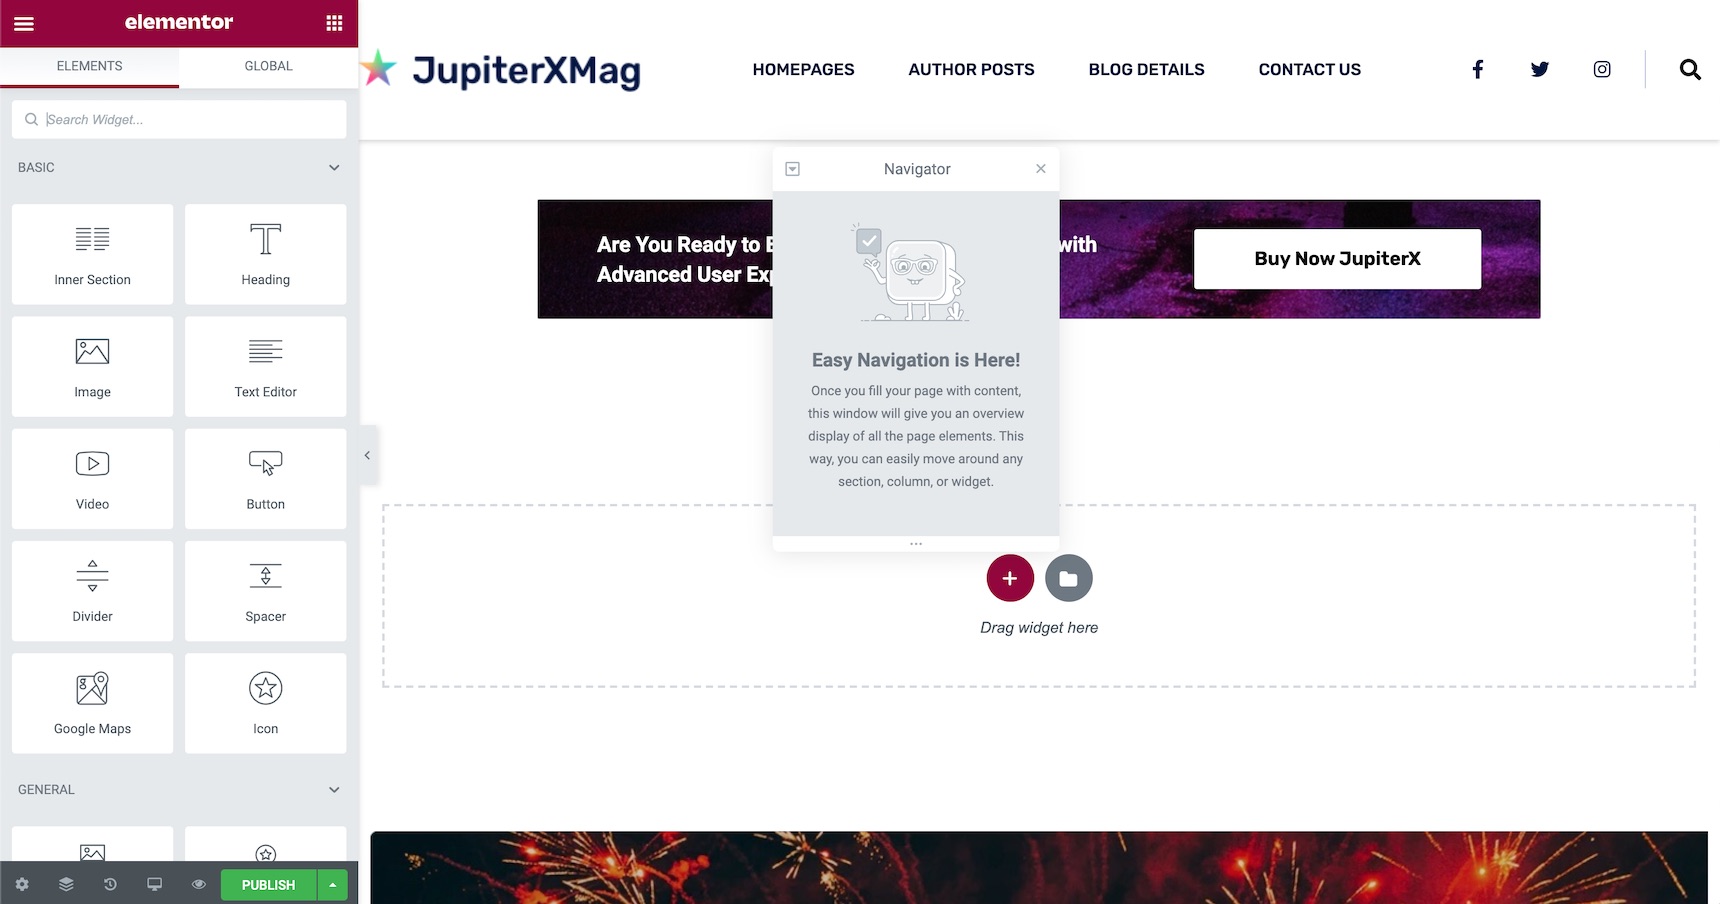
There is another excellent approach to customizing an author’s page in WordPress if you have a few authors. This approach allows you to have a fully customized authors page and it uses a simple mechanism: create your custom pages then redirect the author’s page to the custom pages one-by-one using a 301 redirect plugin. This way, you won’t have any limitations at all. You’ll be able to add whatever design, layout and type of content you want to your author page, and you’ll benefit from all the features available on your page builder. To do that, simply create a page and add your content to it.
Adding a new page and editing via Elementor
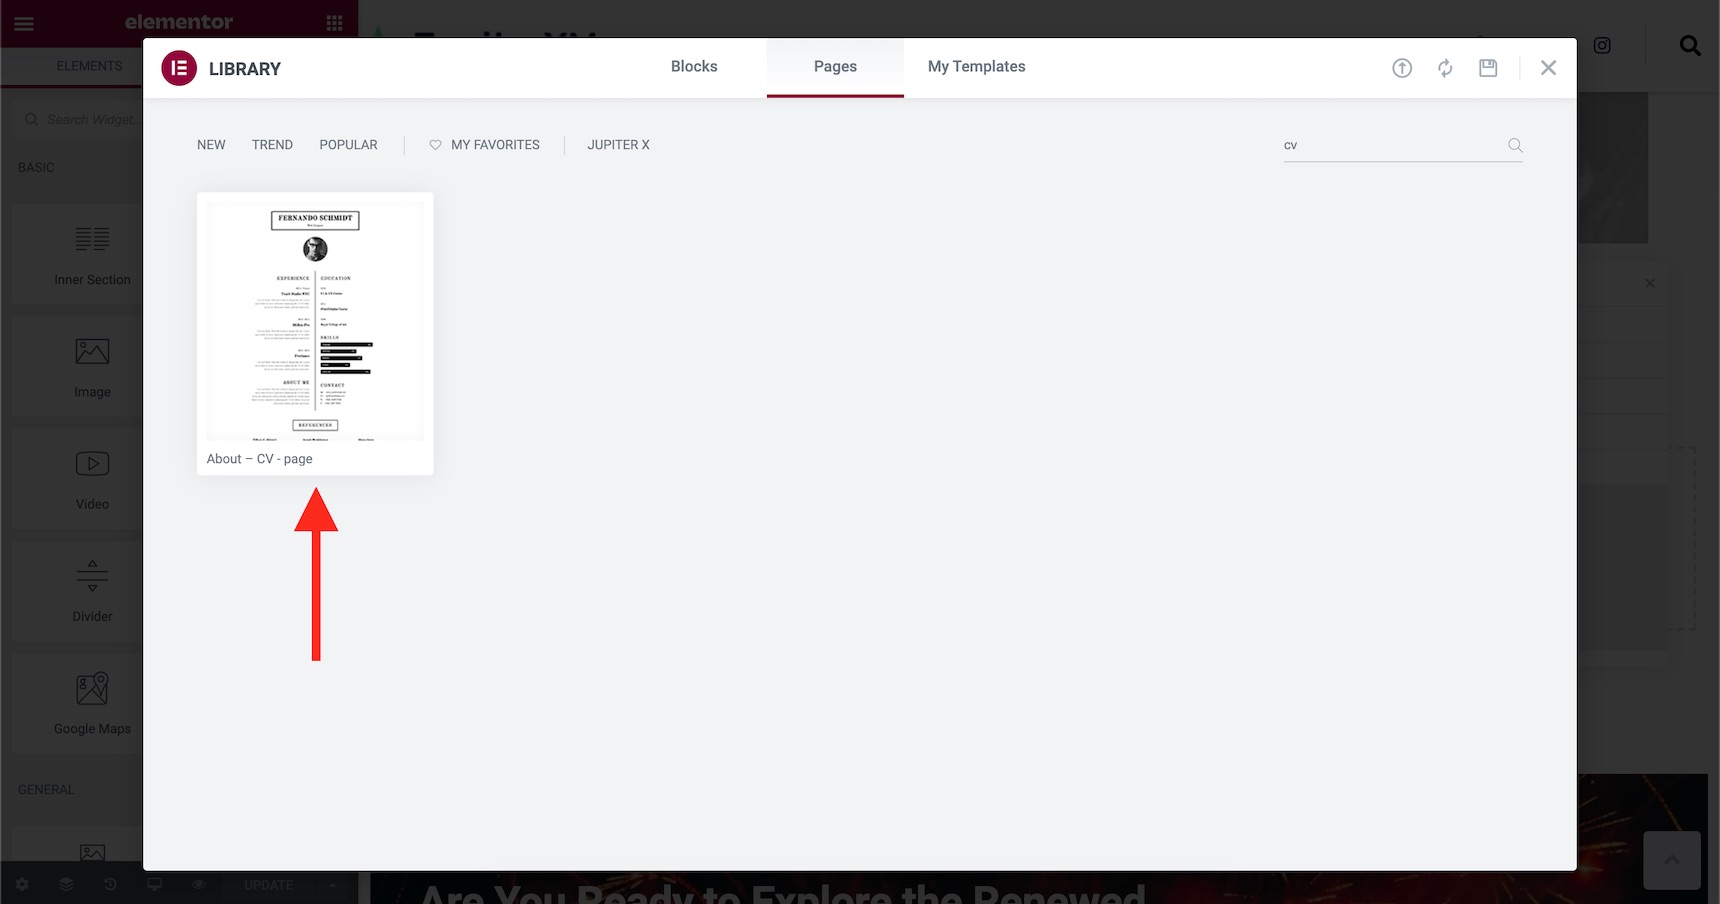
I will add a CV template from the Elementor templates repository to make the process easier.
CV template in Elementor template respiratory
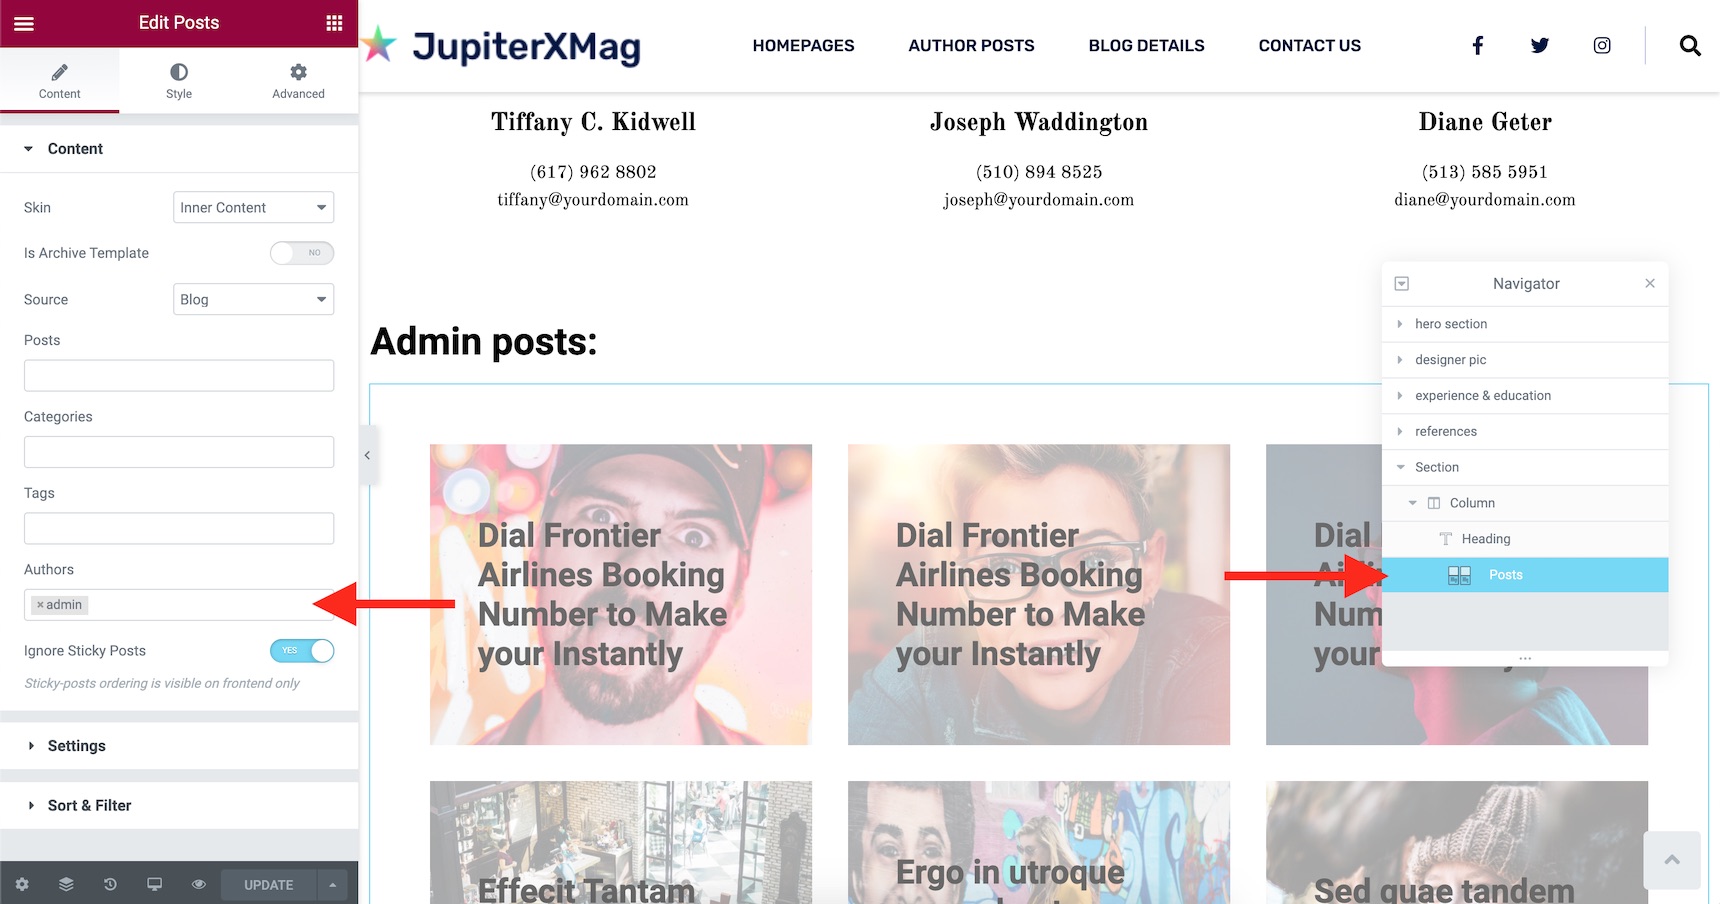
After adding the template, I’ll go ahead and add a Posts element into the page and set it to only show the posts from my desired author.
Adding the posts and filter to show the desired author posts into the page.
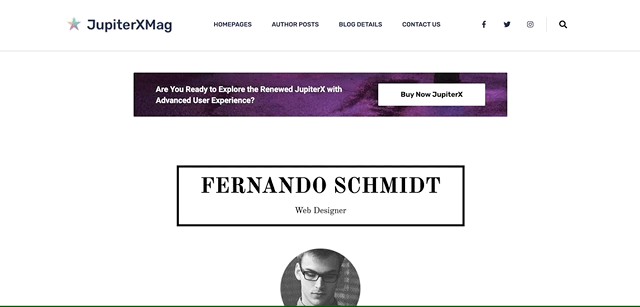
This will be my final author page:
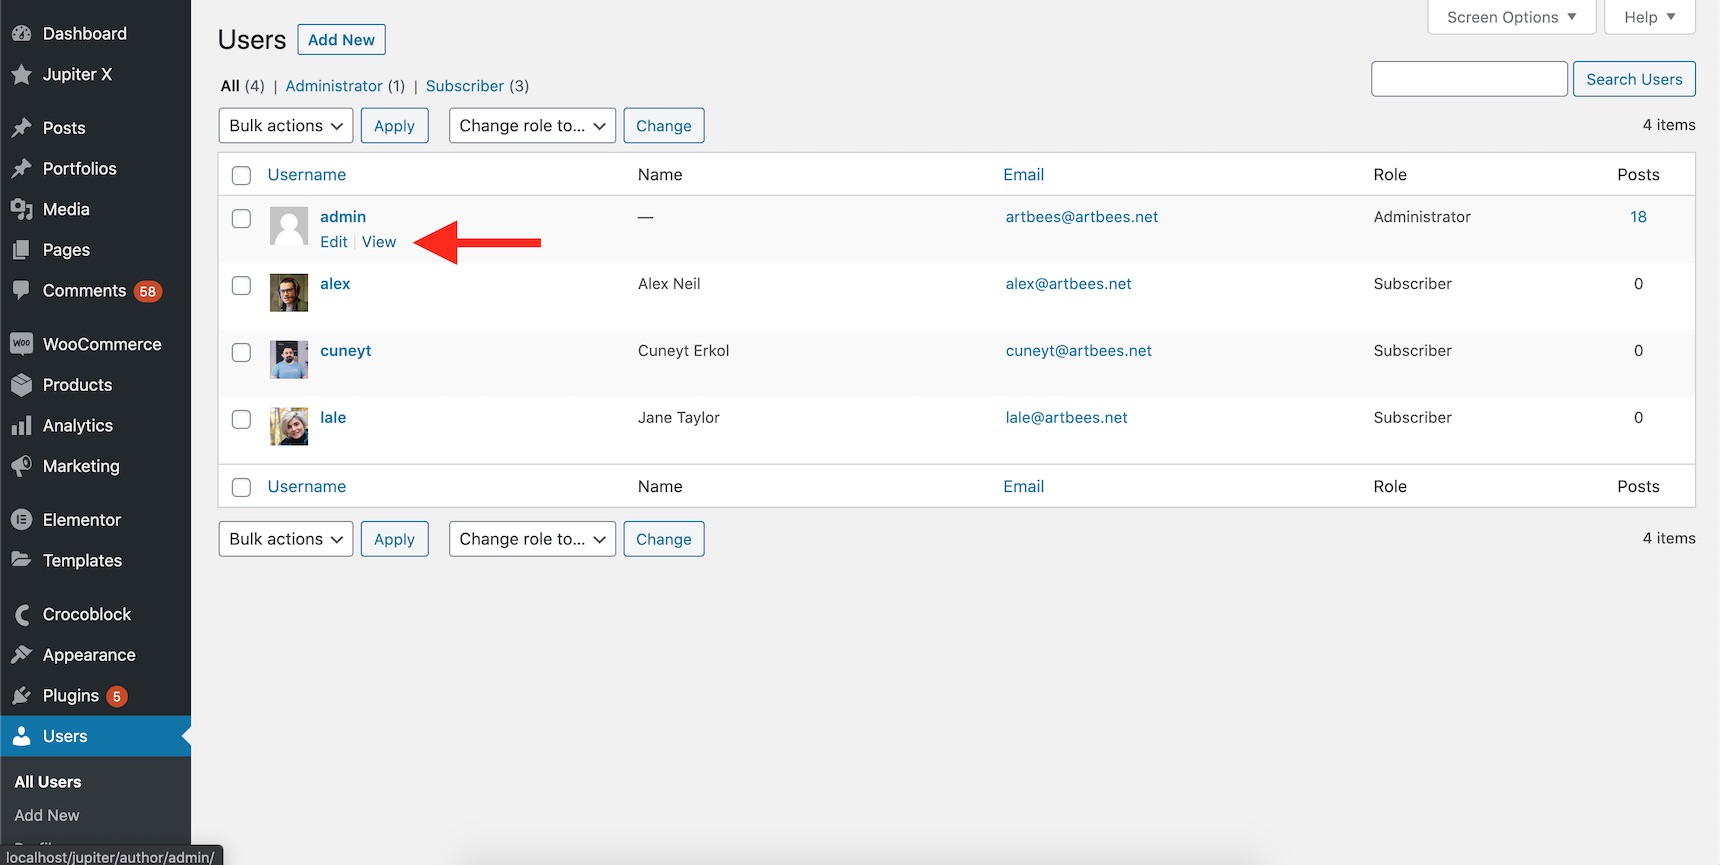
The only thing left is to redirect the authors page to the custom-made author page. To find the author page, navigate to WordPress Users and hover on the author’s name. The “view” button has the correct author page. Copy that link.
Finding the author page links
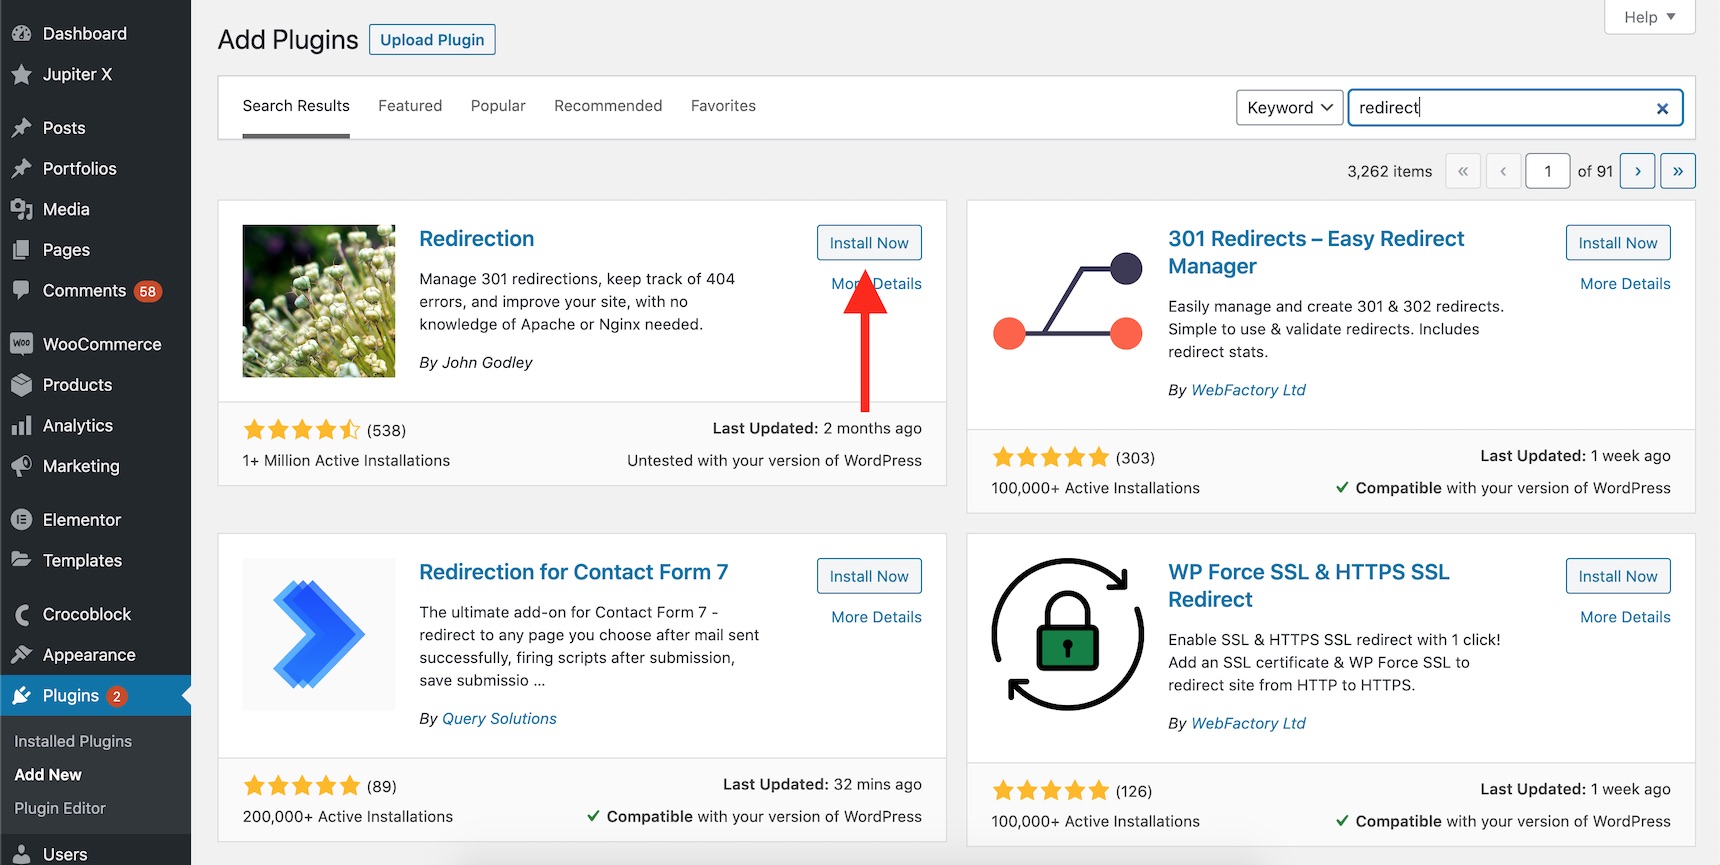
Now, you’ll need to either install a 301 redirect plugin or use your .htaccess file to redirect your old author page to the new custom author page.
Using the 301 redirect plugin, you’ll need to install it through WordPress -> Plugins -> Add New.
Search for the “redirect” keyword and install one of the plugins.
Installing a redirection plugin
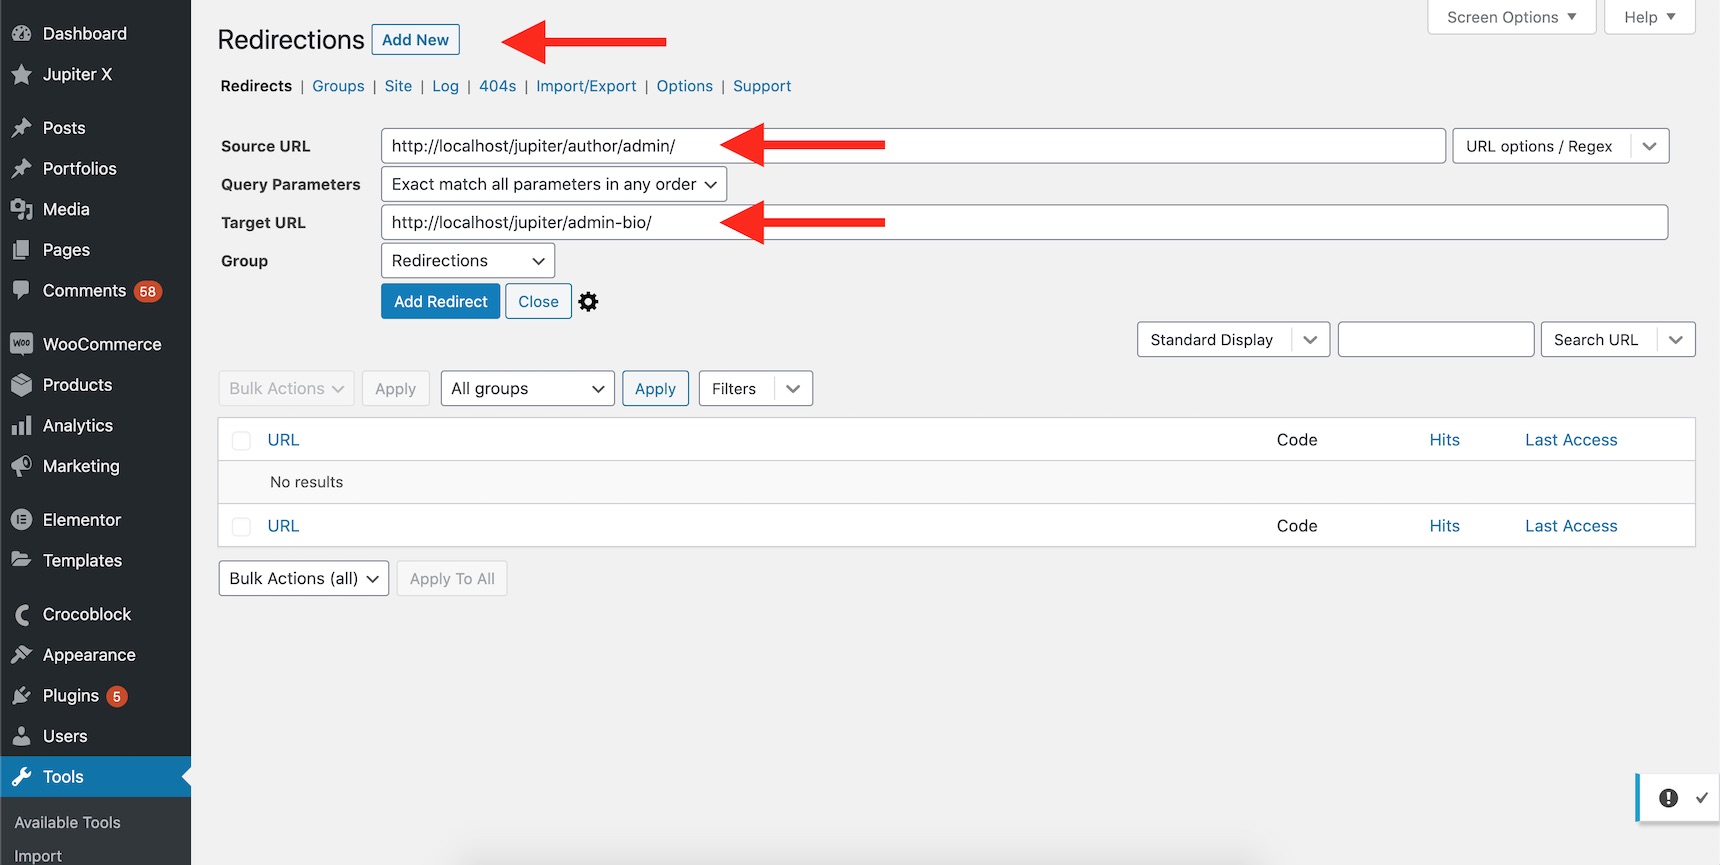
Now, add the Source URL (your current author page), the Target URL (new custom author page) and add the redirection.
Adding a redirection to the author’s page
Now if someone clicks on the author’s name anywhere on your website, they will be redirected to your customized author’s page. It’s also a good idea to include author boxes at the end of your posts containing your name so readers always catch a glimpse of it.
Redirecting the default author page to custom authors page
Wrapping up
There are other methods out there to create a custom author’s page in WordPress. Sometimes it’s worth developing the author template files on your theme or child theme. But not everyone wants to go through the hassle of coding. In this article, we discussed three methods to override the default author’s page. There certainly are more methods and plugins available to do this. If you believe there are easier steps to create an author page, please do not hesitate and share it below in the comments section.
This is a guest post contributed to Artbees Themes blog by Rosie Greaves.
Suppose you’ve been dreaming of creating a beautiful website for yourself or your business. In that case, you’ve probably started to do your research and found there are loads of website builders on the market.
If you don’t have a wealth of technical know-how, a SaaS website editor complete with customizable templates could be the right solution for you. It’s the easiest option for realizing your website ambitions without diving into complicated code.
That said, when it comes to website creation, you want to make your exact vision come true. So, there’s a good chance you’re pondering these kinds of questions as you consider whether the website builder you’re looking at is the right fit for your business:
If I use a website editor with pre-set templates, will my customization be limited?
How are web domains and hosting handled with this SaaS platform?
Are their website themes professional-looking, mobile-friendly, and SEO optimized?
What kind of performance do websites with this platform boast?
Is this platform secure?
In response to these questions, this article breaks down how to create a beautiful website with a custom WordPress.com design. We believe WordPress.com boasts the perfect compromise between functionality and attractive design, and with a little instruction, the customizability options are nearly endless.
Before we dive into how you create a stunning website with WordPress.com and the Jupiter X theme, let’s quickly cover a question that confuses many.
What’s the difference between WordPress.org and WordPress.com? Which one should you use to create your custom WordPress design?
WordPress.org is an open-source software you download as an operating system for your blog and websites. With some technical skills, you can create high-quality websites where your only limit is your imagination. With WordPress.org, you are responsible for finding your own hosting and web domain. You’ll also have to maintain the performance and security of the site yourself.
On the other hand, WordPress.com is great for beginners as you don’t need any technical know-how to setup, and it takes care of your web hosting for you. No downloads or installations are required. You simply create an account and choose one of WordPress.com’s plans. As quickly as that, WordPress.com handles your website security, manages your web server and provides an array of gorgeous website templates to use.
We think WordPress.com is the most customizable and intuitive way of developing a beautiful website. With that in mind, we’re going to delve deeper into how to achieve exactly that…
Introducing our Champion for custom WordPress design: WordPress.com
First things first, let’s acquaint ourselves with the platform. Did you know that WordPress powers over 38% of the internet? Many website creators flock to the WordPress editor for its reliability, customizability and top-notch blogging tools. It’s a giant in the website building industry, and for a good reason. WordPress.com also offers a seemingly endless array of plugins to help you expand the platform’s functionality.
Host a Website, Without the Hassle
WordPress.com takes care of webserver management and hosting for you, which saves you lots of time researching and laying the foundations for your website. In fact, with WordPress.com, you can get on the web in less than half an hour. Just choose your WordPress.com subdomain or upgrade to one of WordPress.com’s paid-for packages to connect your own domain.
WordPress.com also provides an SSL certificate with each site you create with them so that you can rely on high security.
Install Plugins for More Functionality
When you first sign up to WordPress.com, the most vital features are available to you from the start. However, as soon as you’re ready to expand, you can upgrade to WordPress.com’s Business plan (or higher) and start installing plugins.
A lot of essential functionality is built into WordPress.com. That said, there are thousands of plugins available, some of which enable you to:
Support multiple languages on your website
Add an online store to your site with WooCommerce
Dig deeper into your SEO strategy
Integrate with popular email providers
Utilize event calendars and scheduling tools
Integrate with social media
Install a helpdesk to boost your customer service strategy
…and much more!
Grow Your Audience with Industry-Leading Blogging Features
WordPress.com is famous for its blogging functionality. But, it doesn’t just provide an excellent blogging platform; it also comes with a ‘Reader’ app. This lets online readers browse through WordPress blogs, making it much easier for your target audience to find you.
WordPress.com provides users with all the blogging basics.
Use one of WordPress.com’s many sleek layouts to structure your blog content
On top of these foundational features, you can also:
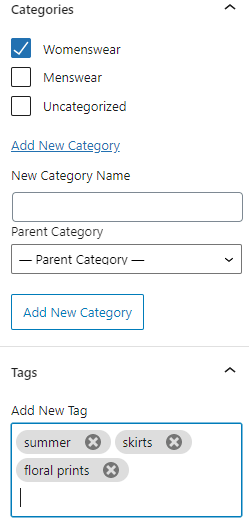
Add tags to each post for improved SEO
Organize posts into categories
Add a short excerpt description to your blogs
Schedule your posts to go live for whenever your audience is most receptive
When you combine all of WordPress.com’s native blogging features with the sheer array of blogging-related plugins available, WordPress.com undoubtedly makes content marketing accessible to even the greenest of marketers.
Optimize Your SEO
WordPress.com prides itself on being an SEO-friendly platform, providing users with a robust infrastructure for climbing search engine rankings.
For instance, you can edit meta descriptions, add title tags, edit image alt-text, and write the most appropriate URL for all your subpages. WordPress.com also makes it easy to create and submit a sitemap, which, again, is fabulous for your SEO.
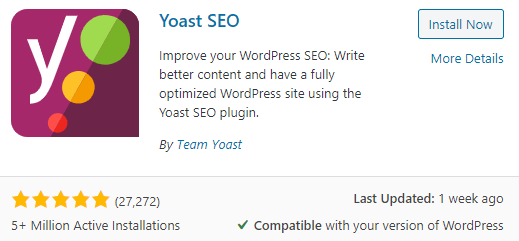
On top of that, with the Business plan and above you can integrate with Google Analytics for more SEO insights and add plugins like Yoast SEO to access more advanced SEO tools.
Endless Customizability, at Your Fingertips
WordPress.com comes with a powerful editor for customizing your website. The Block Editor allows you to keep things simple with its default settings. Or, you can drag and drop blocks and edit each page element as you see fit, and customize font sizes and color schemes to bring your vision to life.
Alternatively, if you boast the coding smarts, consider upgrading to one of WordPress.com’s paid plans to dive into the style sheets and make whatever changes you desire.
Jupiter X
In the past, WordPress’s segmental editing style made it more cumbersome to use in comparison to its competitors. However, with the Jupiter X theme, WordPress.com users can easily achieve endless customizability.
Jupiter X, brought to you by Artbees, uses the Elementor page builder to ensure access to a robust editing tool suite. With this theme, you can customize absolutely every element, from adjusting sizing, placement, and color to effortlessly dragging and dropping widgets. Elementor gives you full control over the layout.
You can resize columns, set the width and height of sections, and position your content exactly where you want it. You can even set padding, margins and edit the gaps between elements.
Even more impressive: with the Jupiter X theme, you gain access to blending modes, shadows and borders, so you can take the advanced design experience provided by tools like Photoshop and translate it onto the web!
How to Create a Personalized Website on WordPress.com
To start creating your own personalized website with WordPress.com and Jupiter X, there are only three steps you need to take:
Step 1: Create a WordPress.com Account
Head over to WordPress.com to create an account. Signing up is completely free, and you can start building your site and creating content without paying a dime. All of WordPress.com’s essential features are included with its free plan, making it great for personal websites or first ganders.
However, if you’re serious about creating a professional-looking website that’s a hit with a broader audience, upgrading to a paid plan unlocks plenty of benefits:
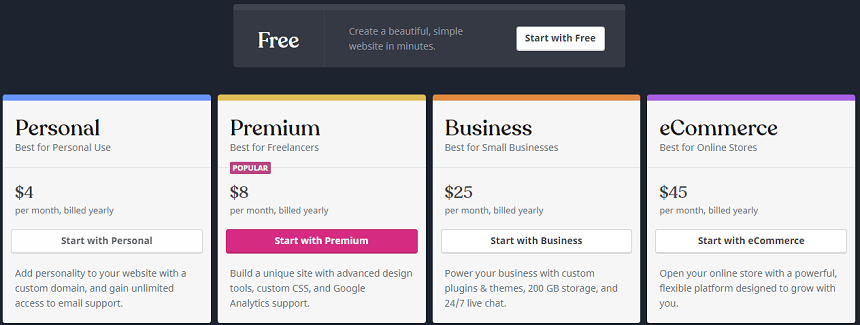
Personal: This isintended for startup blogs and personal websites. You get 6GB of storage; you can link your own custom domain, and WordPress’s advertising is removed.
Premium: The Premium plan grants you access to unlimited premium website templates, more advanced design, and social media tools. If you’re serious about creating a beautiful custom WordPress design, this plan provides a great starting point. You also get a Google Analytics integration, and you can accept PayPal payments.
Business: This plan, as its name suggests, is best suited to anyone looking to monetize their website. You can most notably start installing third-party plugins and themes, which opens a whole new world of functionality for your custom WordPress design. You also get access to priority support and a backup feature to save previous versions of your site.
eCommerce ($45 per month): Finally, if you’re building an online store and hoping to grow your audience with a beautiful WordPress.com site, the eCommerce plan is essential. You can accept payments from over 60 different countries, integrate with top shipment carriers, and gain access to premium customizable starter themes. The additional design options will prove invaluable as you go about creating the store of your dreams.
Step 2: Choose Your Site Name and Web Domain
Once you’ve decided on a plan, you can choose your site name and domain. At this point, if you’ve purchased a premium package, you can link up your own domain. Otherwise, you can use a WordPress.com subdomain to start with.
Your domain name is like the home address to your website, with WordPress.com being the house and your content making up the interior.
So, when you choose your domain, pick something professional and memorable. Also, don’t forget to check if other creators are already using similar terms. The more unique and noteworthy your domain, the easier it is for readers to distinguish you from the rest.
Step 3: Choose a Template for Your Custom WordPress Design
WordPress templates lay the perfect foundations for your web design. If you opted for the Business plan, there are tons of premium themes available, so you’re bound to find one that suits you.
If you want to change your website theme after creating your site, navigate to the left-hand bar of your WordPress.com Dashboard, and click “Appearance.” From there, you can select “Themes” and quickly switch to a new design.
Unlock Endless Customizability with The Jupiter X Theme
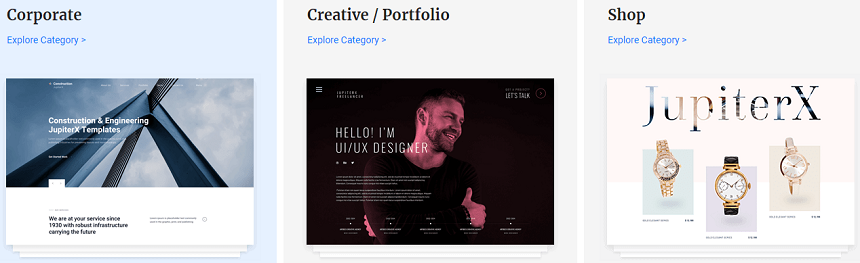
The theme is loved by over 143,000 designers and developers and offers over 420 pre-built website templates for you to choose from. All of which are designed with lead generation and conversions in mind. You can filter through these themes, depending on the purpose of your site. For instance, online shopping, events, education, blogging, corporate sales, creative portfolios, amongst many more.
In short, if you are looking for a different design option, the Jupiter X theme presents a solution with its powerful, 100% visual editor.
Start Customizing and Adding Content to Your Custom WordPress Design
With so many powerful web design tools at your fingertips, developing a custom WordPress.com site is a breeze. Especially if you’ve opted for a professional, highly customizable theme like Jupiter X. Here are some of the first things you’ll want to do to your website with WordPress.com and Jupiter X:
Add Posts and Pages
First off, you’ll want to add posts and pages to your website. To clarify, ‘posts’ are dynamic web pages typically used for blogs and portfolios, where your newest ‘post’ is automatically placed on top.
In contrast, ‘pages’ are static areas of your website that remain in the same place.
To add either a new post or page, click on the ‘+ Write’ button located to the top-right of your WordPress.com admin. From there, you can add content to your post or page – i.e., write text, embed media, edit your headlines, etc.
As you construct your content, use a sensible headline structure. Not only does this make your content more readable, but it’s also essential for SEO. This means breaking your content into H1, H2, and H3 tags in order of importance. For example, the overarching title should be marked with an H1 tag. Then, subheadings with an H2, and headings under that with an H3, and so on.
Customize Your Website
Now that you’re all set up, there are a few other things you can do to customize your WordPress.com design.
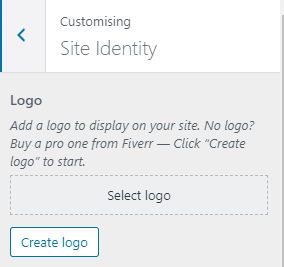
One of the first things you’ll edit is your logo. You can do so via the “Design” tab, then click “Customise,” followed by ‘Site Identity.’
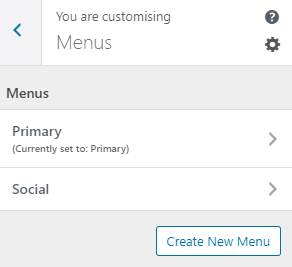
You can also modify your navigation bar to enable visitors to find the information they’re after quicker. Again, head to the “Design” tab, then click “Customise,” followed by ‘Menus.’ Here, you can design your menu bar’s look, the pages you want to include, and the order the pages are listed in.
You can also add widgets for the app store and decide where they’re displayed on your site. For instance, subscription forms, social media feeds, and post navigations.
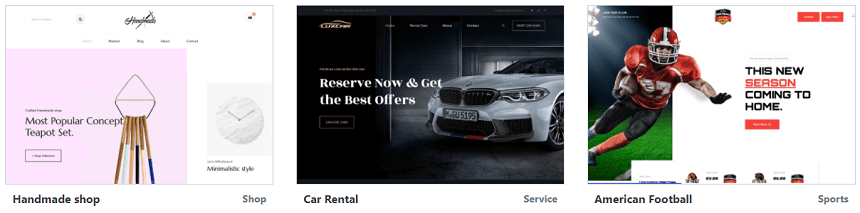
Don’t forget: you can change your site’s theme at any time, and with a template that supports Elementor Editor (like Jupiter X), your customization options vastly increase. At this point, it’s worth noting, there are tons of Jupiter X templates you can install with just a click – Handmade shop, Car rental, American football, just to name a few!
Optimize Your SEO and Improve Conversions
Finally, we wanted to cover a few best practices for ensuring your custom WordPress.com design works for you. When you’ve put in time and effort, creating a beautiful website, you want to see the fruits of your labor.
In light of that, be sure to heed the advice below:
Do keyword and topic research to ensure you create relevant, high-value, and SEO-optimized content
Post a mixture of long-form and short content
Include images and media to engage your visitors
Use internal and external links to improve your SEO
Always have a clear CTA (Call to Action) at the end of your posts
As well as all the above, you’ll also want to have a sign-up form where readers can subscribe to hear more from your brand. You can install one of WordPress.com’s many plugins to create useful opt-in forms and email funnels.
You can further optimize your SEO by:
Updating your meta descriptions
Using Yoast SEO
Adding alt-text to your images
Using post names as URLs
Are You Ready to Create Your Own Custom WordPress.com Design?
As hinted at throughout this blog post, getting started with WordPress.com is a breeze. You can create a professional-looking site no matter your design or coding skills. WordPress.com boasts powerful customization features, advanced blogging tools and excellent site performance.
When you use one of WordPress.com’s many sleek themes, you’re so much closer to launching a professional-looking website. But if you want to really encapsulate your vision using a fully custom WordPress design, look to the Jupiter X theme by Artbees.
Sign up to WordPress.com today and try its core features with its free plan. You have nothing to lose and everything to gain. Then upgrade whenever you’re ready to kickstart your professional web creation journey.
Let’s be honest – no one likes seeing a popup when they are browsing a webpage. But what if a popup is extremely relevant to what you wanted at that time? It could offer just the thing that you were waiting for. Imagine that you’re tired of focusing on your screen while working on a project and suddenly someone brings you a glass of your favorite beverage and then asks for something. This scenario is completely different from when someone turns off your WiFi and forces you to work on something else. This is why many users use ad blockers to avoid being interrupted whenever surfing the web. The point is, in both cases, you may lose your focus but the result is definitely not the same.
The example above goes to show you that there are popups that you cannot ignore, while others will cause you to be distracted. Inconvenient popups can ruin user experience, but relevant ones can be unbelievably helpful in growing online businesses – that’s if you understand how to design your popup campaigns.
In this article, we’ll learn what should be considered when choosing a popup tool, how to create effective popups in WordPress and then explore different real-world examples. Let’s dig in! Before starting, let’s go over how popups can help with a website.
Are popups still relevant?
Yes, in general, popups can not only expand online businesses but also attract drastically more followers. Indeed, there are different campaigns that you can design and run to provide more user retention. You can design popup campaigns for newsletter subscriptions or visitors signing up to grow your email lists. You could also display a popup once a user visits a post or product category and offer related or recent items for more engagement.
Furthermore, popups can be used to remind customers to complete their abandoned shopping carts or encourage them to buy products with a discount coupon. They can even be used to send a greeting message or ask users to agree to your terms. Stick with us to the end of the article to see some of the best popup examples in action.
What to consider when choosing a popup tool
Effective popup campaigns are not designed by chance. Here, all our goal is to create a popup with the highest expected feedback rate. Choosing the appropriate tool is as important as how we are using popups and what our strategies are. So, you should take the following factors into consideration when selecting a popup tool:
Ease of use
Everybody enjoys creating and designing popups without any hassle. The tool you select should provide a visual interface while offering the needed elements right at your fingertips. An ideal tool would offer a 100% drag-and-drop builder with essential tools such as text, image, button and form elements. Additionally, advanced elements such as dynamic keywords and coupons could help you to further personalize your popups.
Targeting and automation
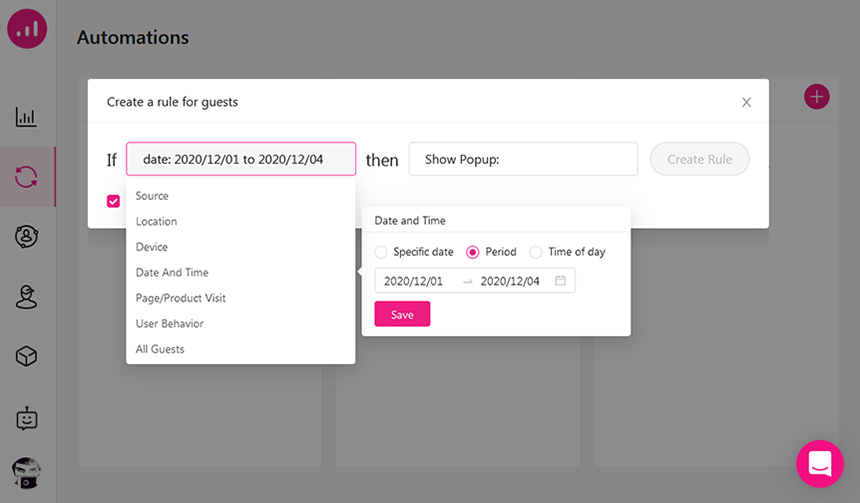
There’s an unspoken rule that goes like this: the less your popup interrupts with user experience, the better the result you’ll get. Hence, it’s important not to display the same thing to every user – and it would be even worse if you don’t consider the right time to show the popups. This is where the targeting feature becomes important. This feature makes it possible to show popups based on specific regions, periods, user behavior and much more. Also, automation provides you with the power to define and display any popup when the conditions are met without wasting time.
Segmentation
Segmentation capability is another feature that divides users into certain groups and will let you choose which segments will see which popup. These groups can be like VIP customers, newbies, registered users, etc.
Performance and analytic reports
The tool that we want to use wouldn’t be comprehensive if it didn’t support analytics reports, which allow you to see if your popup campaigns are effective enough or not. On the other hand, to avoid performance issues, the selected tool should use its own resources instead of your WordPress server when running popup campaigns.
How Growmatik can help
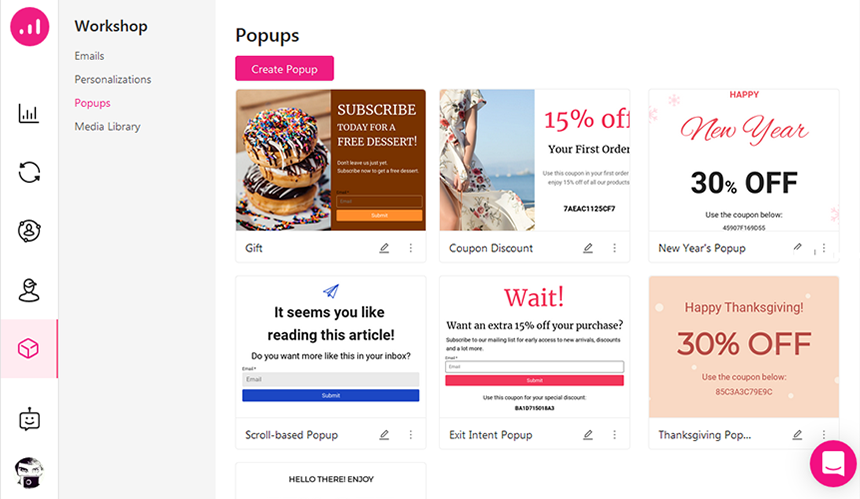
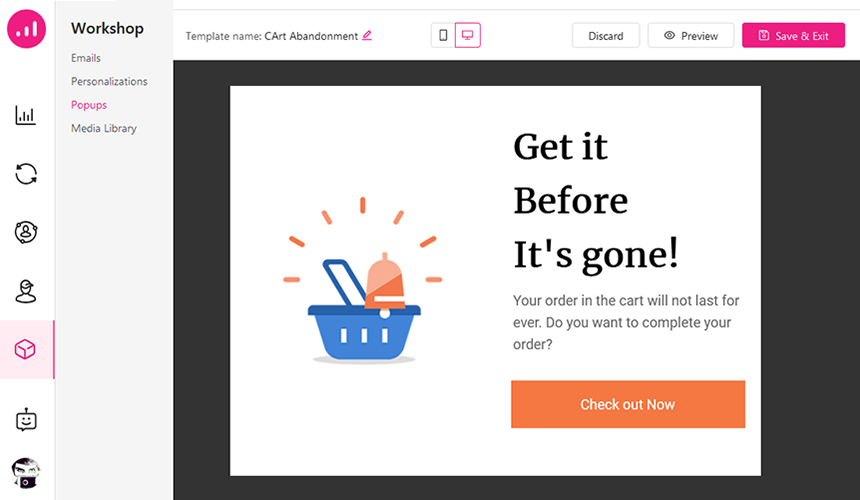
Growmatik is a marketing automation tool that can help you create effective popups in WordPress and then display them on your site. It provides a visual popup builder with more than 15 ready-made templates. To access the popup builder, just navigate to the Workshop within the dashboard, select Popups and then click on the Create Popup button. It opens a window where you’ll find pre-designed popups. You may select to edit or create a new one. That’s when the builder appears as the following image.
You can add not only dynamic text keywords – such as the audience’s first name, username, region, sign-up date, total spent time, number of viewed pages, number of orders, last purchased item, etc – but also individual elements like images, socials, buttons, videos, coupon codes, and forms to create a tailored popup. Besides, it’s possible to customize the size, position and shape of the popup using the Popup settings button.
To automate popups, users can define rules for every three main segments of guests, leads and customers. Growmatik presents deeper targeting conditions as well as UTM tags, domains, regions, devices (mobile, tablet, desktop), date and time, page/product visits, and behavioral actions (shopping activity, scroll percentages, exit intent, time spent, among more). Setting the condition is done via a few simple clicks. Unlike other tools, there’s no need for shortcodes to define the conditions.
Finally, you can track popup campaigns and see the results to refine and improve over time. Moreover, Growmatik is working independently from your servers, so it won’t ever slow down your WordPress website performance.
Best practices and sample popups for different common purposes
Now, let’s find out the best popups we can create to impress the audience.
Display a popup with dynamic keywords
Dynamic keywords are the elements that you can apply for your popups to nurture your guests, leads or customers and take them right to the next level. There are different types of dynamic keywords available in Growmatik. In this example, you’ll get familiar with how to use personal details like first names, daytimes and UTM parameters as dynamic tags within your popups.
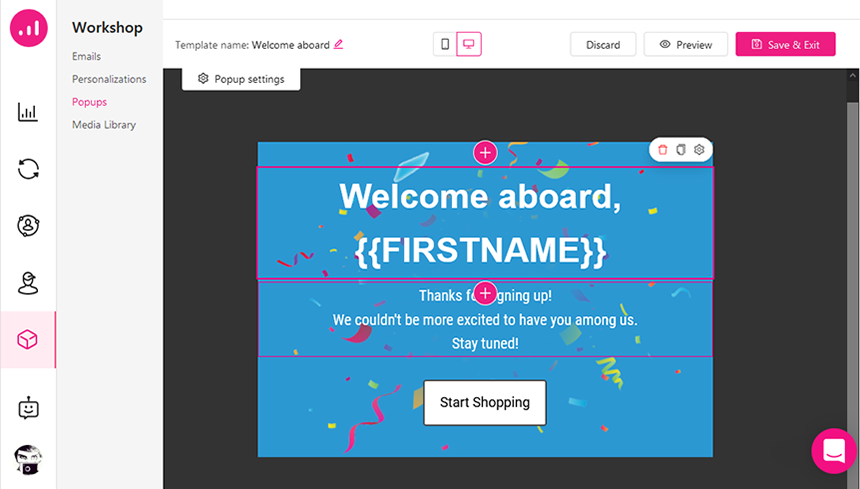
Signed up users are the probable customers who have the potential to buy products from your online store. We call them leads. To nurture these users, you should serve them relevant and personalized content. One simple way is to directly appreciate them right after their sign up forms are completed. Use their first name to say thanks and give them the feel of cordiality.
In Growmatik, select the Text element in the popup builder, click on Dynamic Keywords, then Personal details and choose First Name to put in your design as in the above image. Save your design and move to the Automations section. Click the Plus button for the leads. After that, you can set the condition to User behavior > Sign up and set the action to Show popup. Now, pick the popup you designed before.
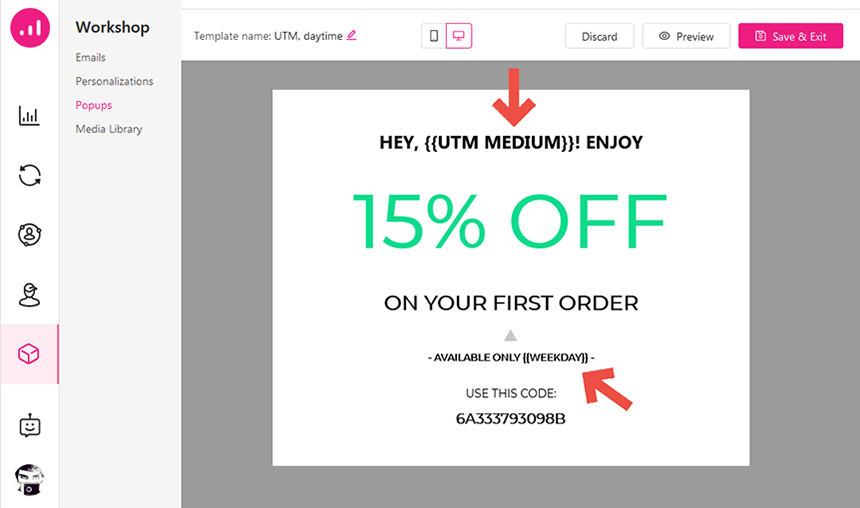
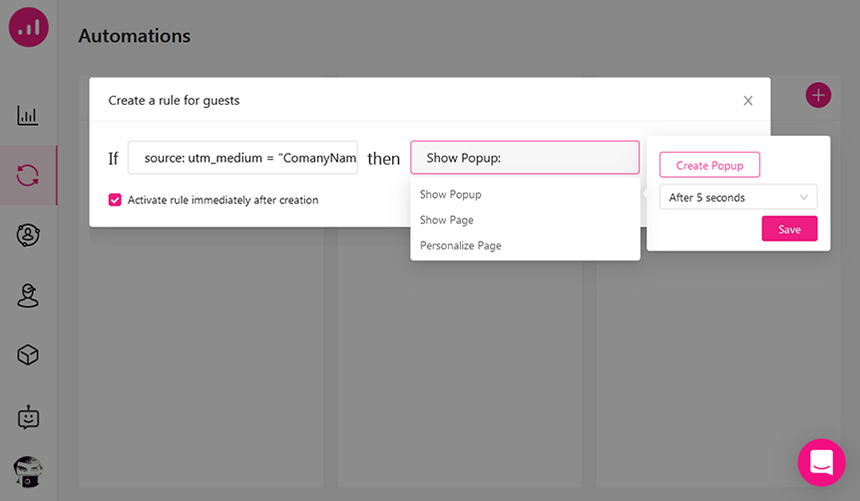
When you want to personalize the experience for the visitors referred by a specific URL, referral UTMs are helpful to your marketing campaign. For example, setting the utm_medium to CompanyNames allows you to customize the popup for every company entering your site with the following URL:
You can also offer a discount coupon for a limited time using daytime dynamic tags for an occasion like a special sale off instantly after they visit your website. The below popup design contains two different dynamic tags, the {{UTM MEDIUM}} where it’s supposed to show company names and {{WEEKDAY}} that will display that day as a time limitation.
To automate this popup, you may add a rule with a Source condition (UTM_medium) for guests as below:
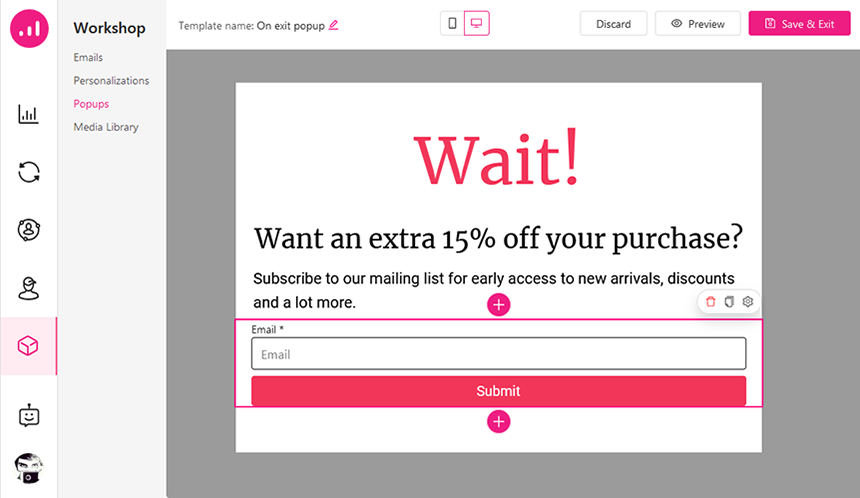
Display a subscribe popup on exit intent
Marketers use an exit intent popup to retain guests and turn them into leads. These popups should be convincing enough that visitors cannot help but engage with the site further. Add the audiences to your mailing list by asking them to subscribe just before they leave your website, and in return, send them discount coupons through emails. This can be a decent win-win situation.
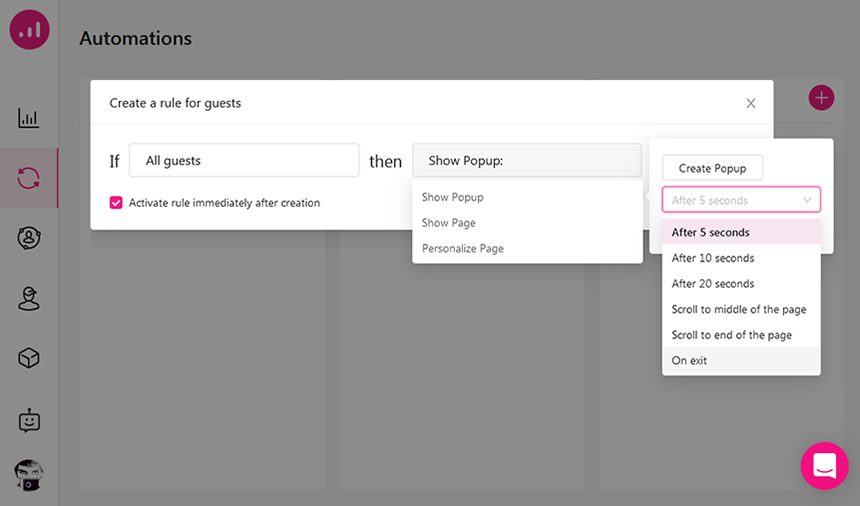
To automate an exit intent popup for guests, select All guests as the condition and set the popup to show as the action On exit:
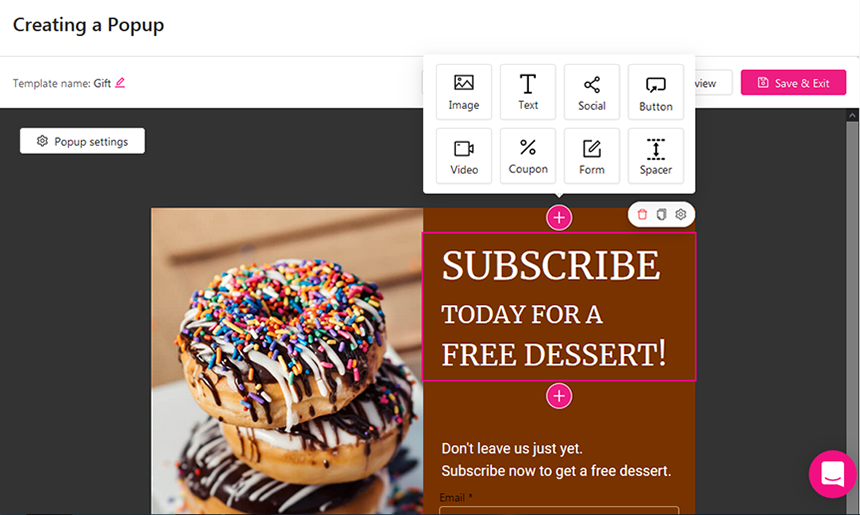
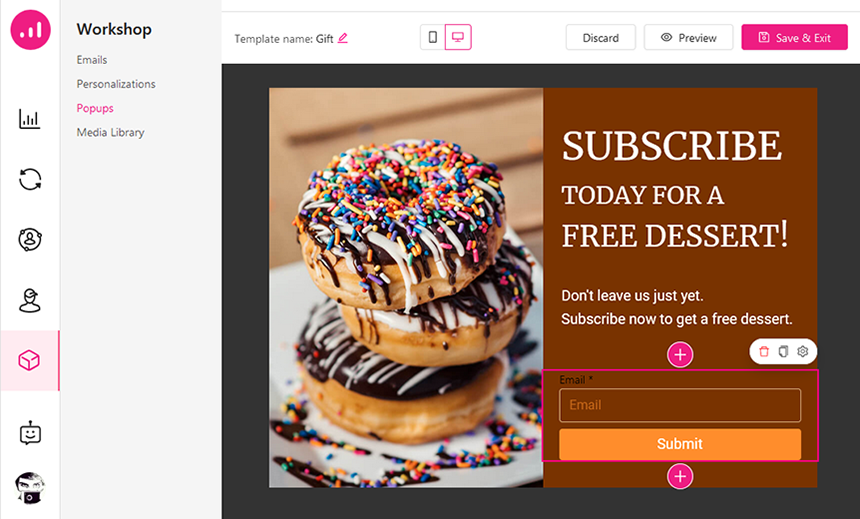
Display a giveaway popup
Giveaways can be anything tempting, but the question many may ask is what would it be? Of course, it depends on your business type and what you are presenting to your audience. For example, if you have a website for your cafe, it’s a good idea to offer a free dessert for a subscription and make them your regular customers. Usually, giveaways include the following: free e-books, coupon codes and premium learning materials. Just make sure to be creative in designing eye-catching popups like this:
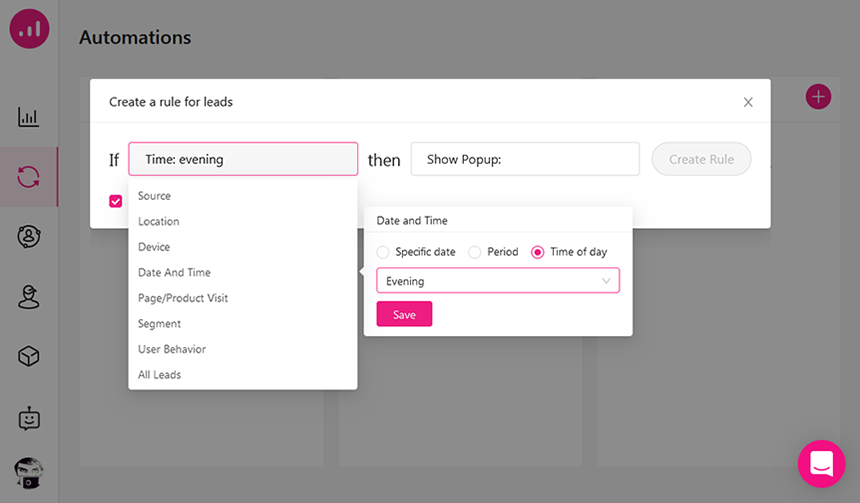
You can automate this popup for your leads who are visiting your site in the evening and bring more customers to your business. Open the Automation Section > Leads > Custom rule and then select evening as the condition and Show Popup as the action:
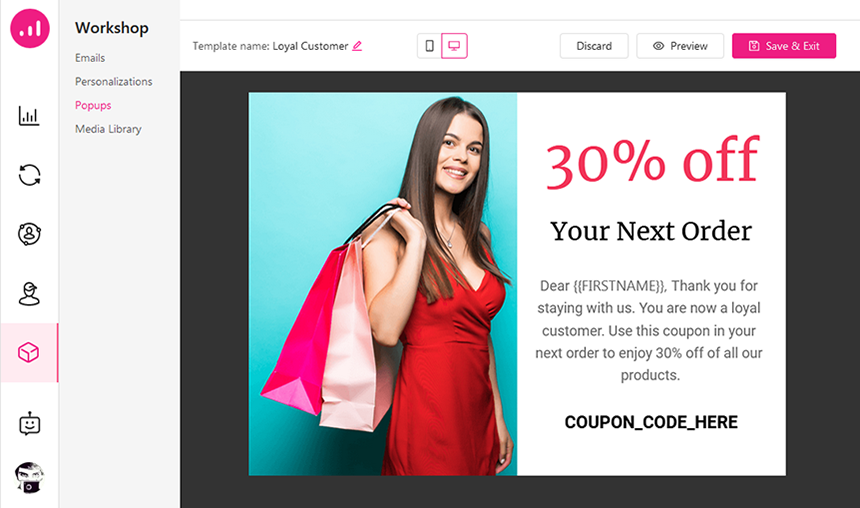
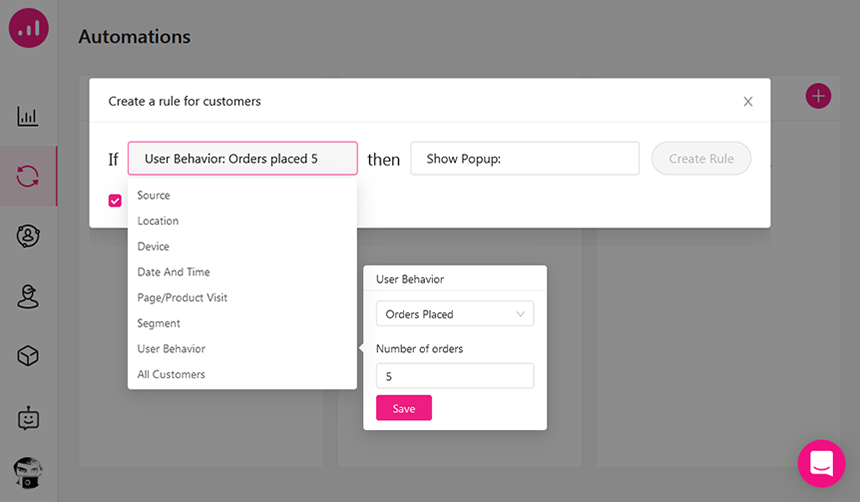
Display a discount popup for loyal customers
As you know, popups are not just a tool to bring more customers but also a great instrument to retain them for longer. In this case, nothing ignites the sense of commitment for your loyal customers more than special appreciation, and this would be by offering a discount code for your products. You can say thanks and let your customers know why they’re getting a discount coupon like this:
In Growmatik, it’s easy to define your loyal customers by setting the numbers of orders placed by a customer. Just follow Automations > Customers > Custom rule and select User Behavior and click on Orders Placed and set the value to 5. This action means that any customer with 5 successful purchases is a loyal one, and if you choose Show Popup as the action then your popup campaign will be ready after considering the popup you designed before.
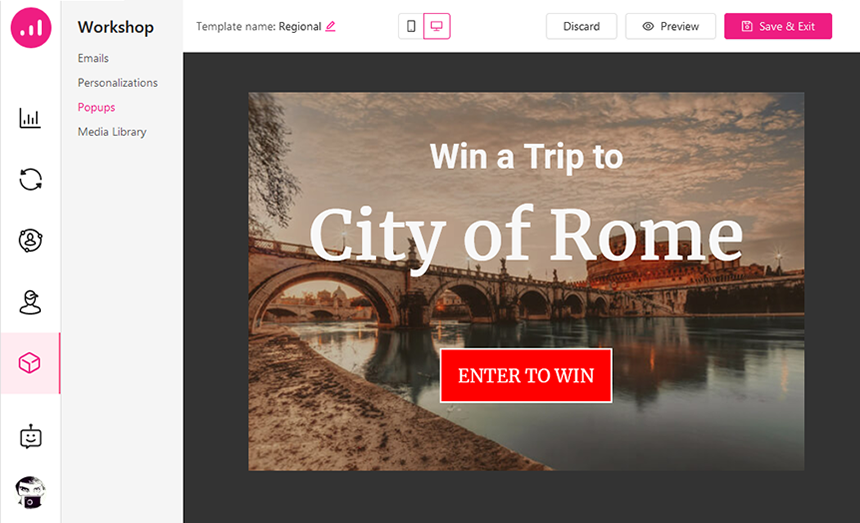
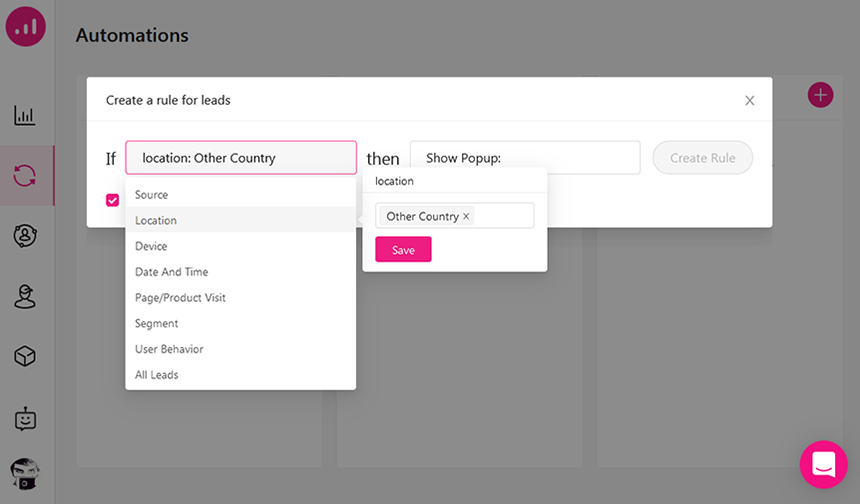
Display a regional popup
Have you ever thought about just delivering your popups to a specific region and offering what is relevant to them? This is another way to create effective popups in WordPress. With Growmatik, it’s available to promote visitors and target a group of audiences that are located in a country. Suppose that you’re living in Italy and have a plan to invite just outsiders to win a trip to the city of Rome.
Choose Automation > Leads > Custom rule, and select Location as the condition, set it to Other Countries or the particular area you like to target. Then pick Popup to Show as the action.
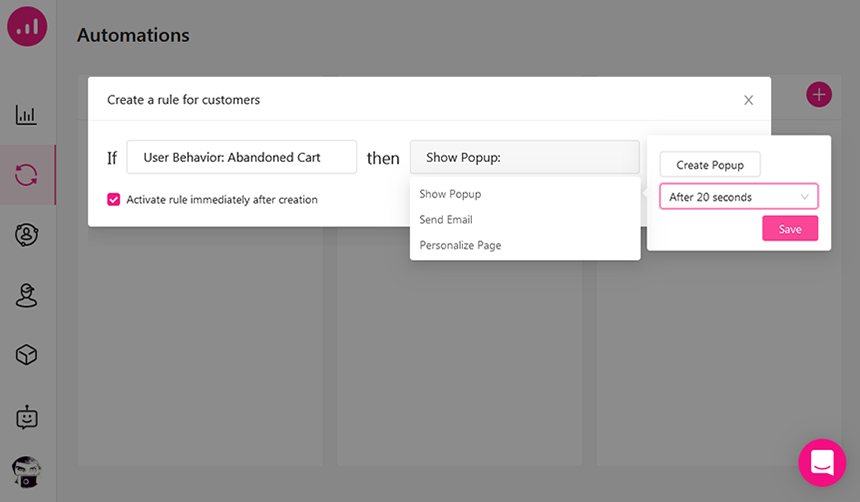
Display an abandoned cart popup
Every year, online businesses lose a huge percentage of their revenue because of abandoned shopping carts. It’s proven that abandoned cart popups will increase the engagement and conversion rates of the customers. Be creative about designing a popup to convince customers to buy the products they wanted to and complete their order.
You can automate this process by setting the user behavior to Abandoned Cart as the condition and Show Popup as the action for customers.
Display FOMO popups to drive sales
This is a natural psychological reaction when we feel like we’re being left out of something. FOMO is a common marketing technique that is defined as the Fear Of Missing Out to drive sales. You can use deadlines as FOMO elements in popups. This means that you can suggest a tempting offer only for a limited time. Find out this type of element we used above in the “Popups with dynamic keywords” section. You can automate these popups for every segment by using the Period element as the condition.
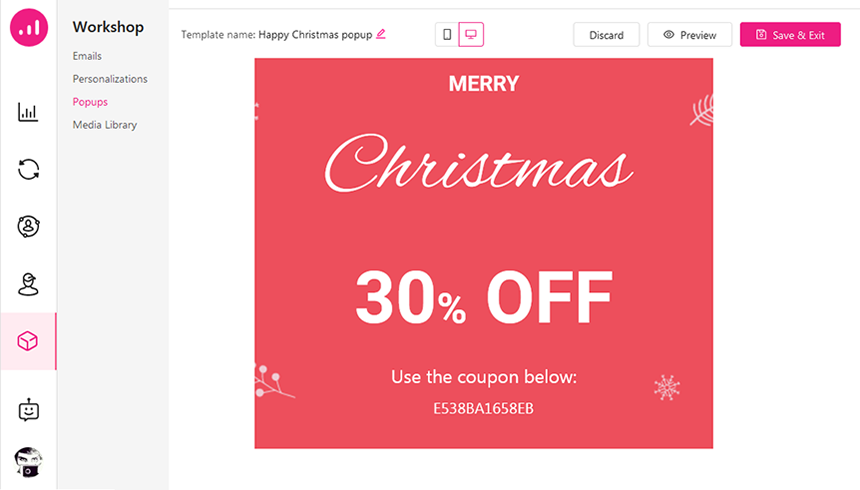
Display occasion-based discount popups
It seems that discount coupons are always exciting for customers but it’s nothing you can always present. Offering occasion-based discounts is one of the most popular methods of discount pricing such as seasonal or promotional ones to rebate product prices without hurting your sales. Consider a discount rate based on your business, product and also the occasion you choose to design your popup and automate it using Growmatik for your segmented users whenever you want.
Wrapping up
Combine the methods mentioned above to create an effective popup in WordPress for your campaign. Try to personalize the popups using dynamic keywords, and show what audiences really need. Imagine yourself as the visitors or customers of your online website, and ensure that you design your popups with minimum interruption. Besides, never forget to trigger the popups for a targeted group and not for every single visitor.
Lottie animations are becoming increasingly popular by the day. They – which are high-quality lightweight animations that allow the browser to handle rendering – are a genius idea. The great thing about a Lottie animation is its small size. While a high quality GIF animation or an MP4 video might take up megabytes of storage, an animation of the same length but with much higher quality could easily be less than a megabyte. Quality matters, and the demand for Lottie animations is growing. In this article, I’m going to show you how you can use them on your WordPress website with the Jupiter X theme.
To find out more about Lottie Animations, please visit this page.
What we need:
Simply, a WordPress website, Elementor and a Lottie Elementor extension. But since I have the Jupiter X theme installed on my website, I will simply use the bundled plugin Jet Elements, which has a Lottie animation widget.
So, it’s not a big deal to display a Lottie animation if you already have one. Let’s go ahead and go through the motions right now.
Finding the right Lottie animation
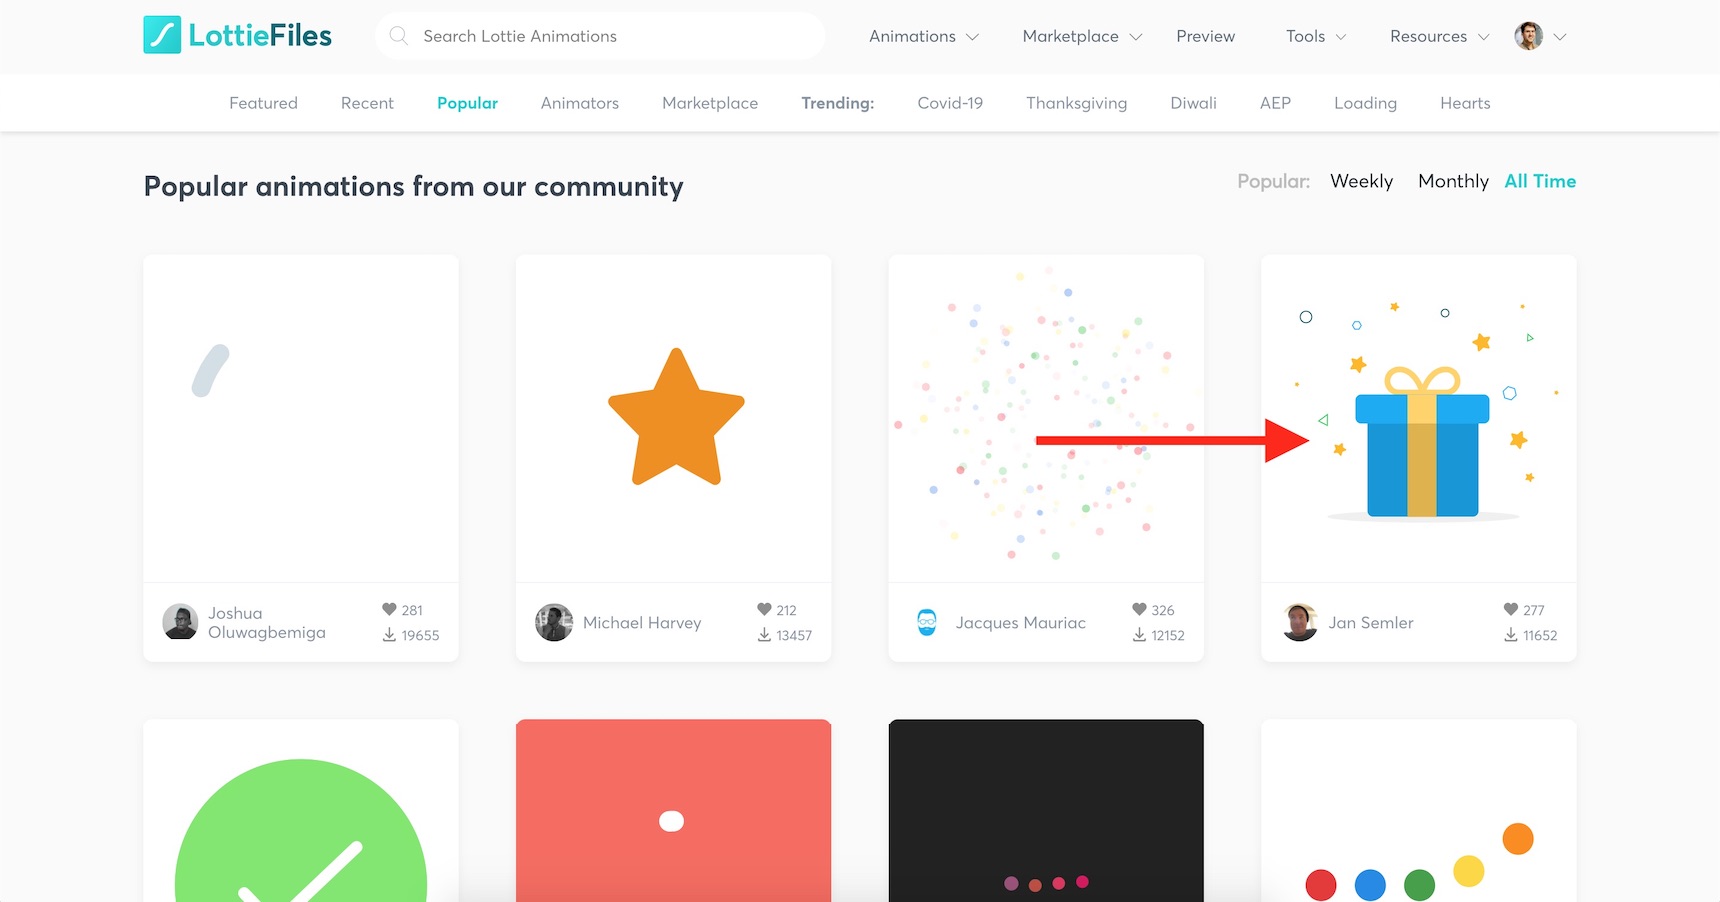
Before doing anything, I need to first find the animation that I need. So, I’ll open this website and browse the gallery.
This animation will get the job done for my advertisement box, so I’ll click on it.
Lottie animation gallery
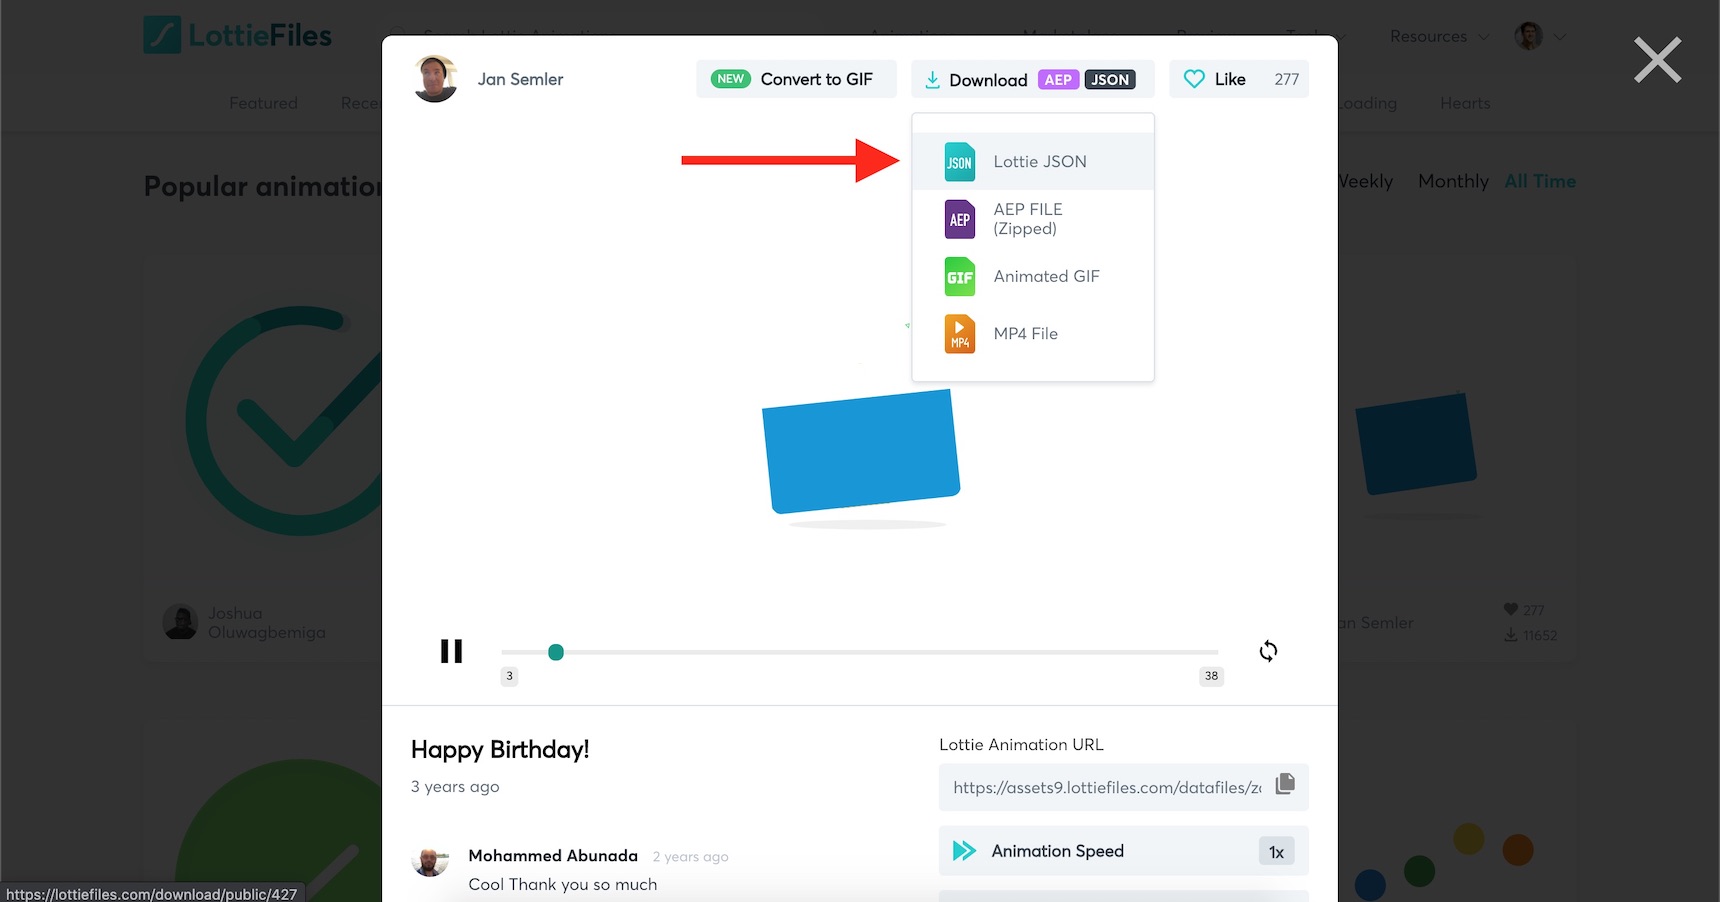
Then, I’ll go ahead and download the JSON file.
Downloading the Lottie Animation JSON file
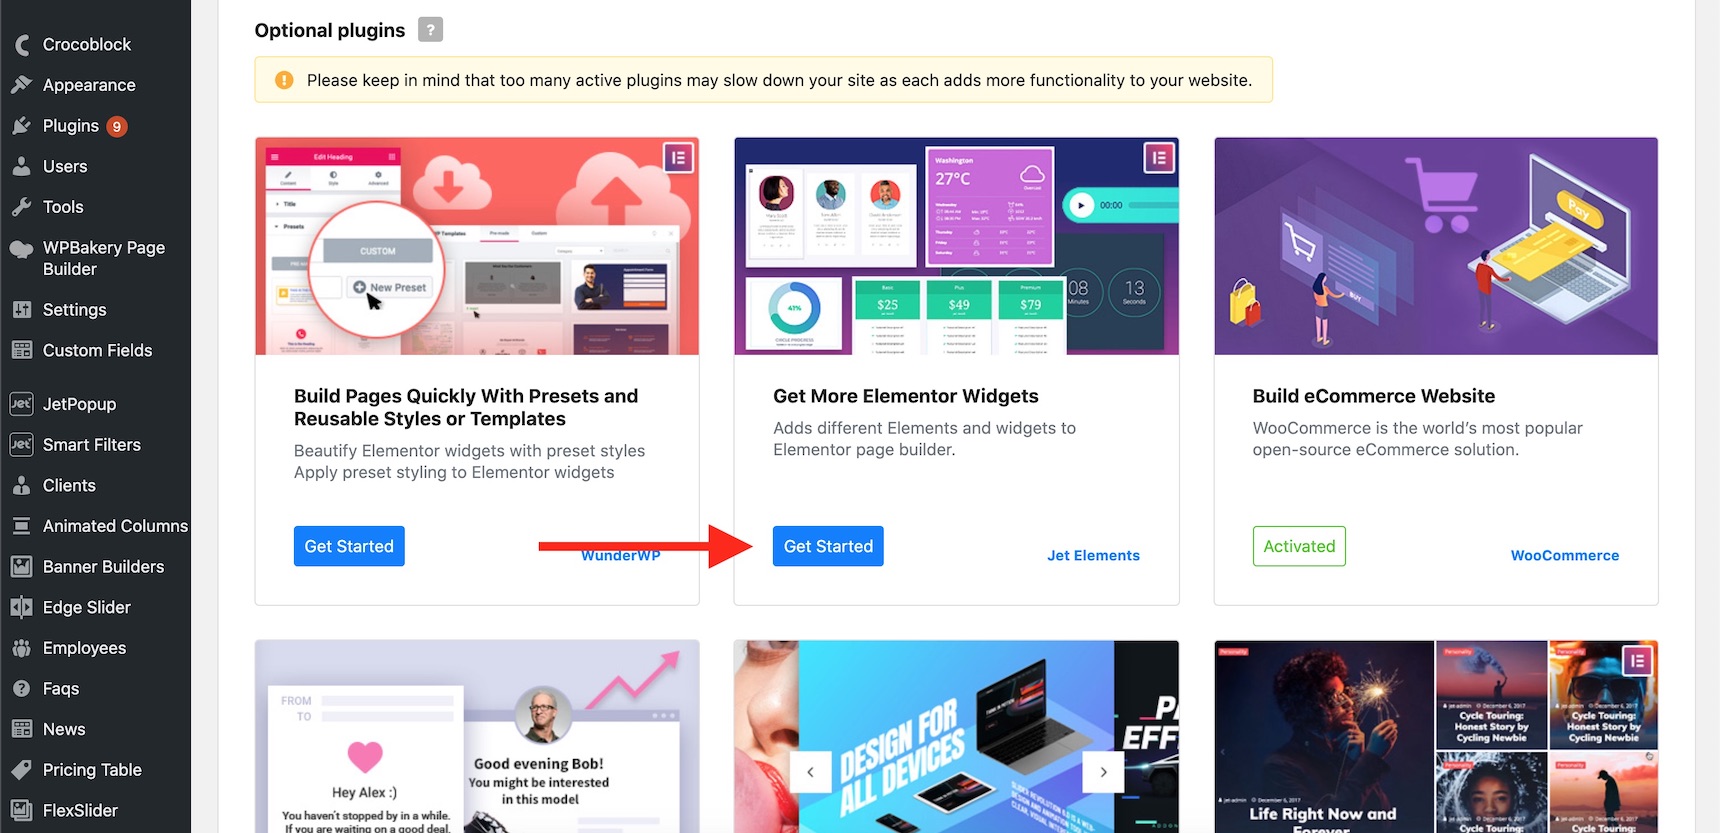
Now that I have the JSON animation (named as ‘427-happy-birthday.json’), I just need a place to display it on my website. So, I’ll install and activate the Jet Elements plugin on my WordPress website like the following.
Installing Jet Elements
In order to install Jet Elements plugin, navigate to your Jupiter X website control panel, then click on the Plugins tab.
Installing Jet Elements plugin
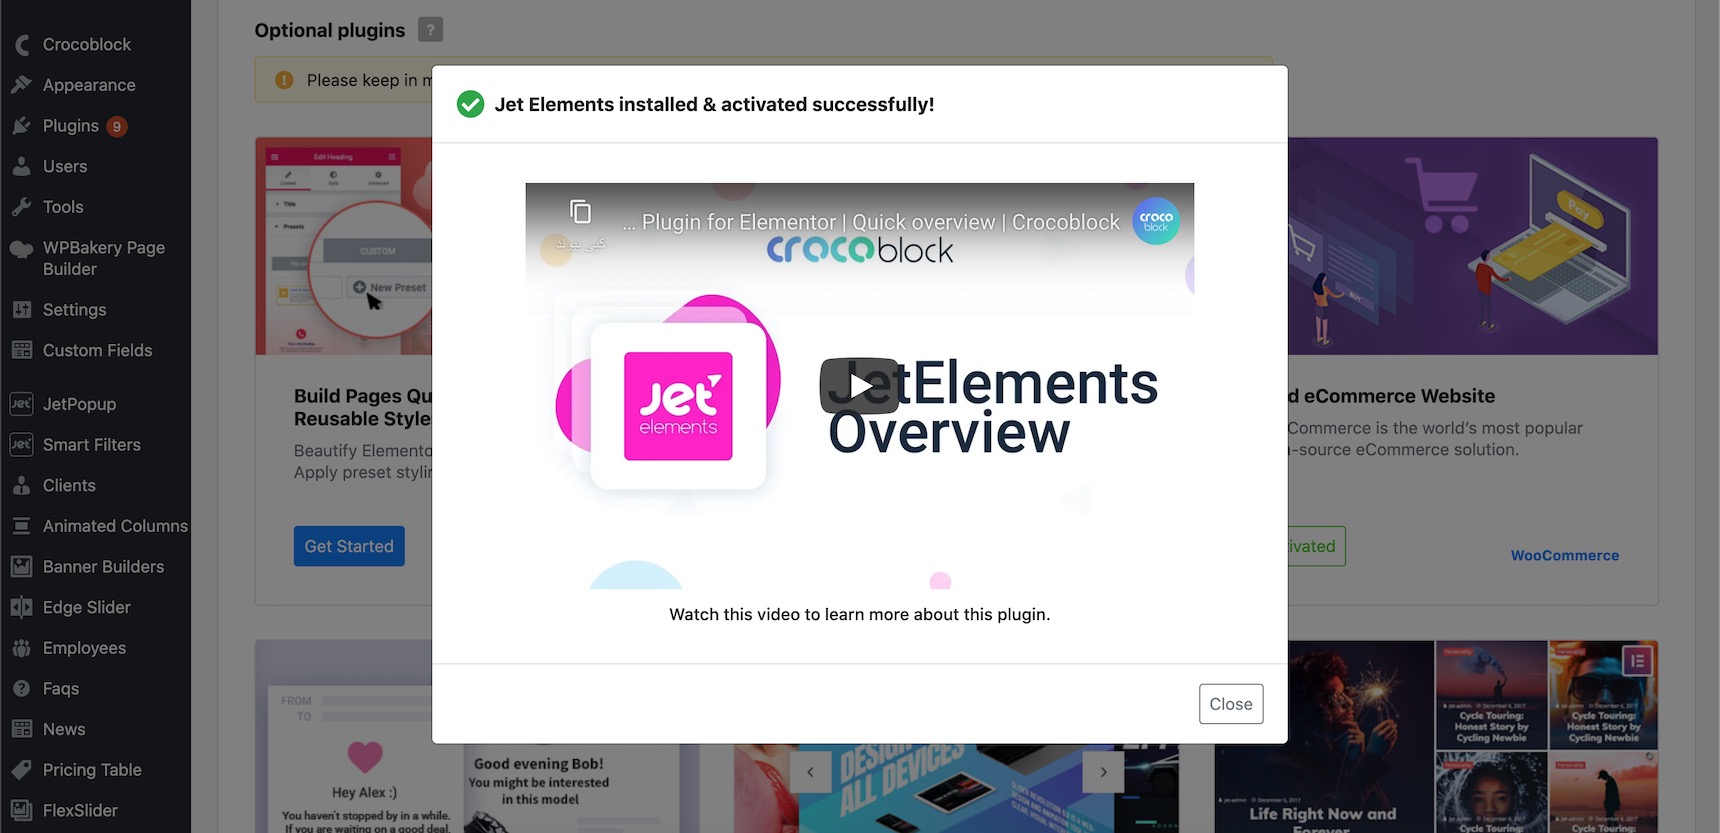
Now click on the Install and Activate plugin button and wait for it to be finished. After successfully installing, you should see this message:
Jet Elements installed and activated
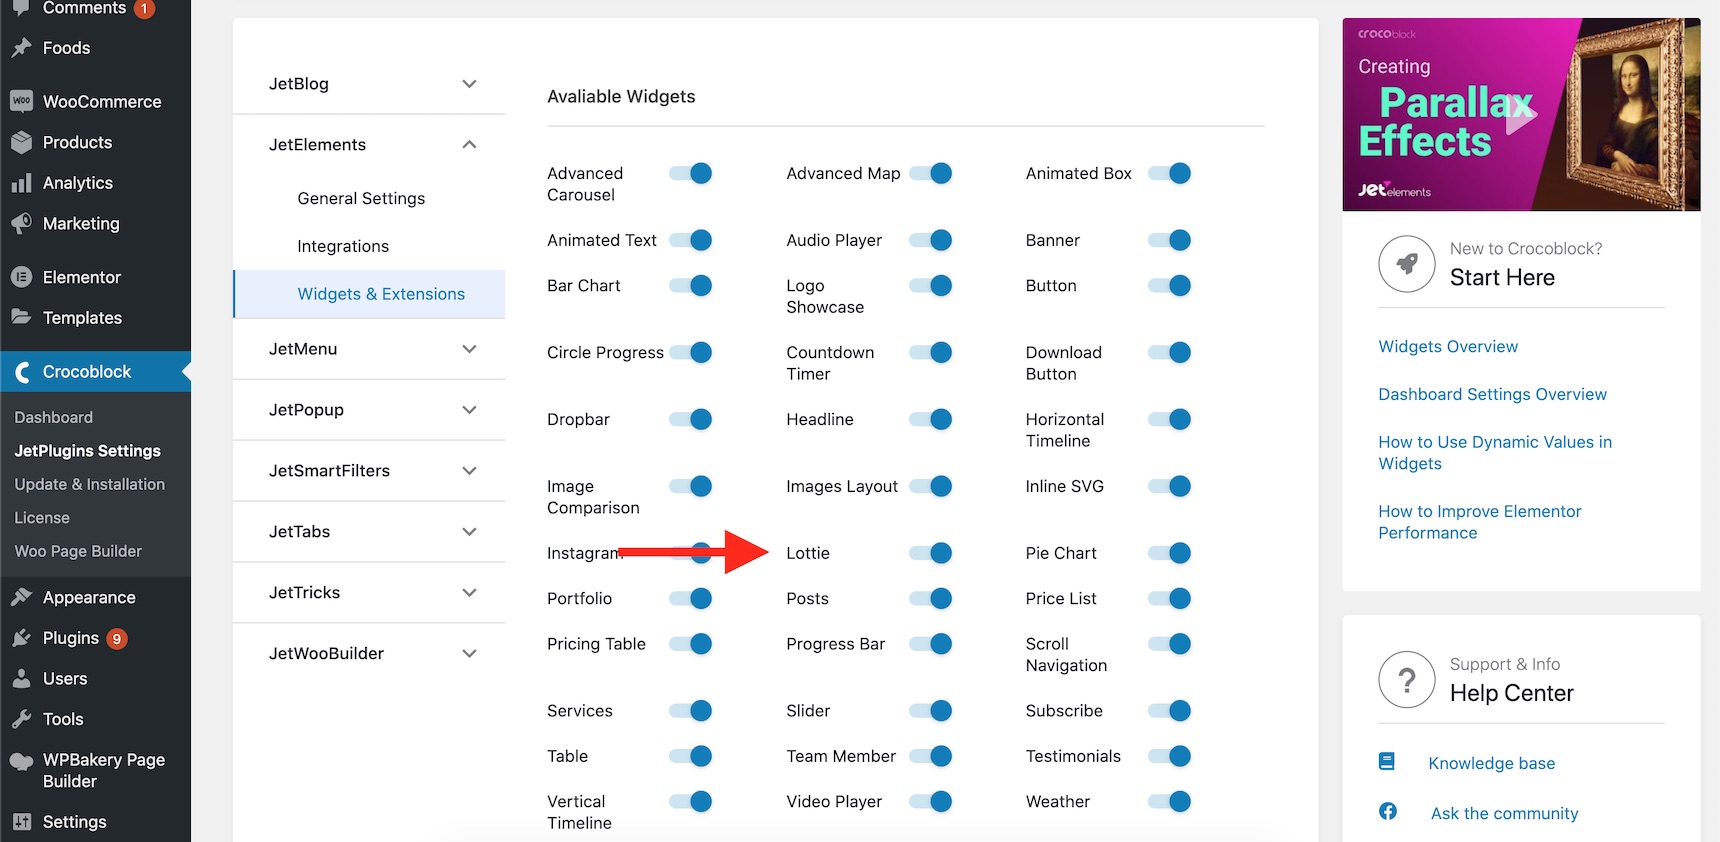
Now navigate to WordPress Dashboard -> Crocoblock -> JetPlugins Settings -> Jet Elements -> Widgets & Extensions, and make sure the Lottie widget is enabled.
Enabling Lottie widget
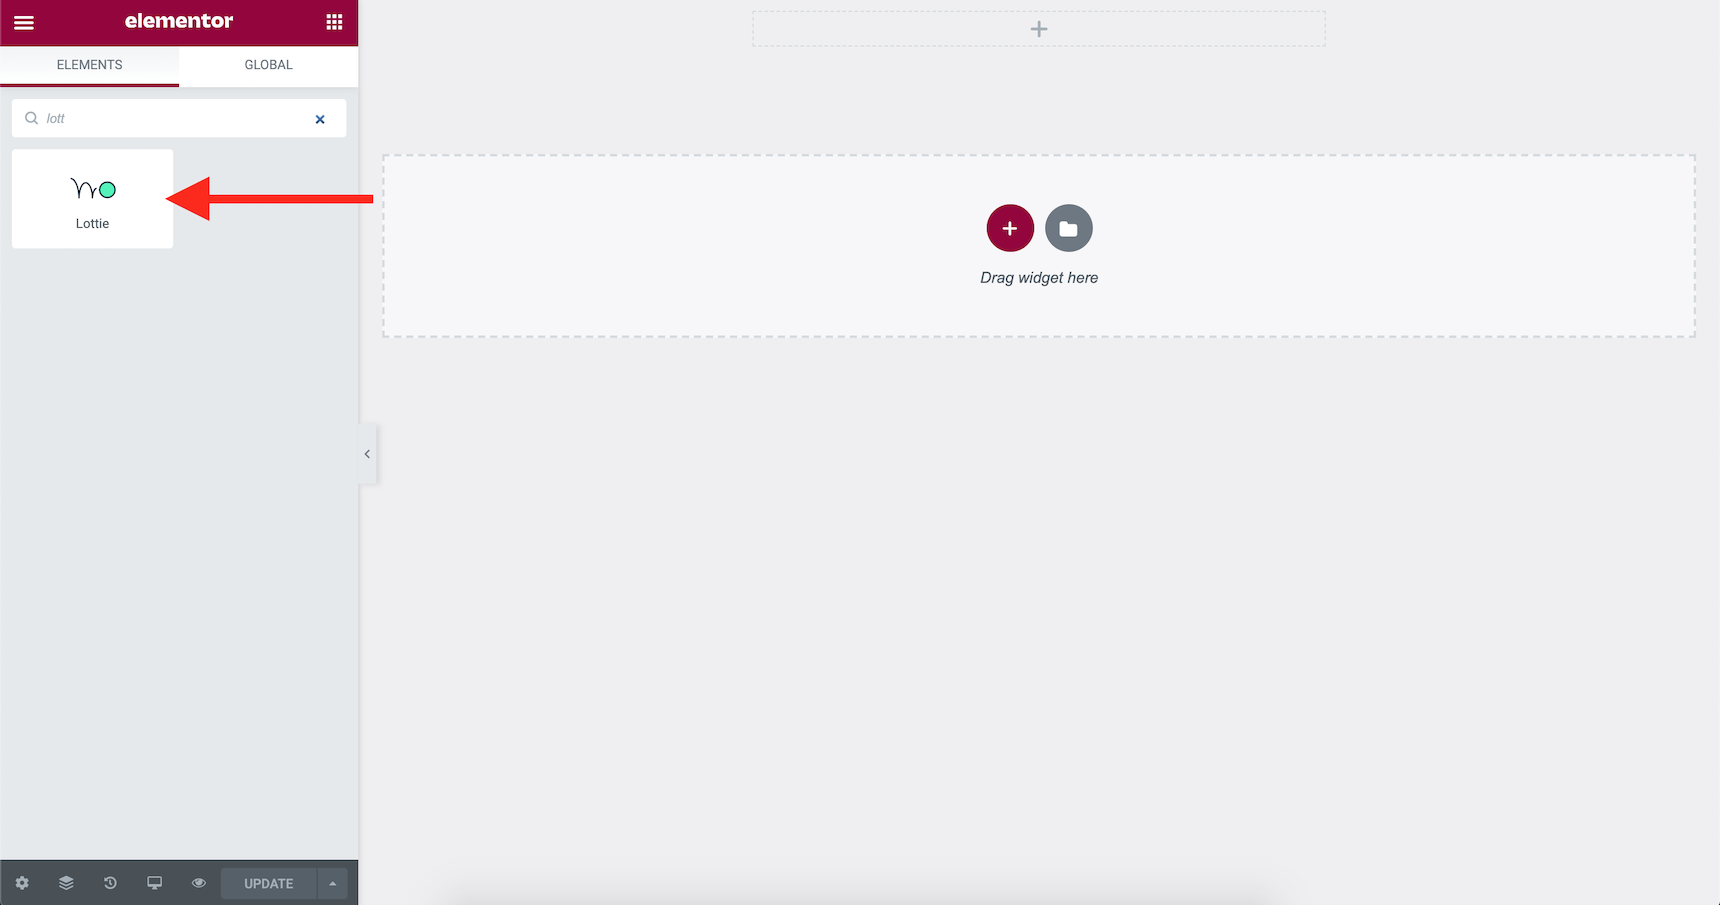
Inserting a Lottie animation onto the page
Now create a page on your website and edit it using Elementor. What we need to do is to drop a Lottie widget into your page. To do that, after loading Elementor, type “Lottie” in the widget search bar or scroll down to see the Jet Elements widgets.
Drag and drop the Lottie widget onto the page
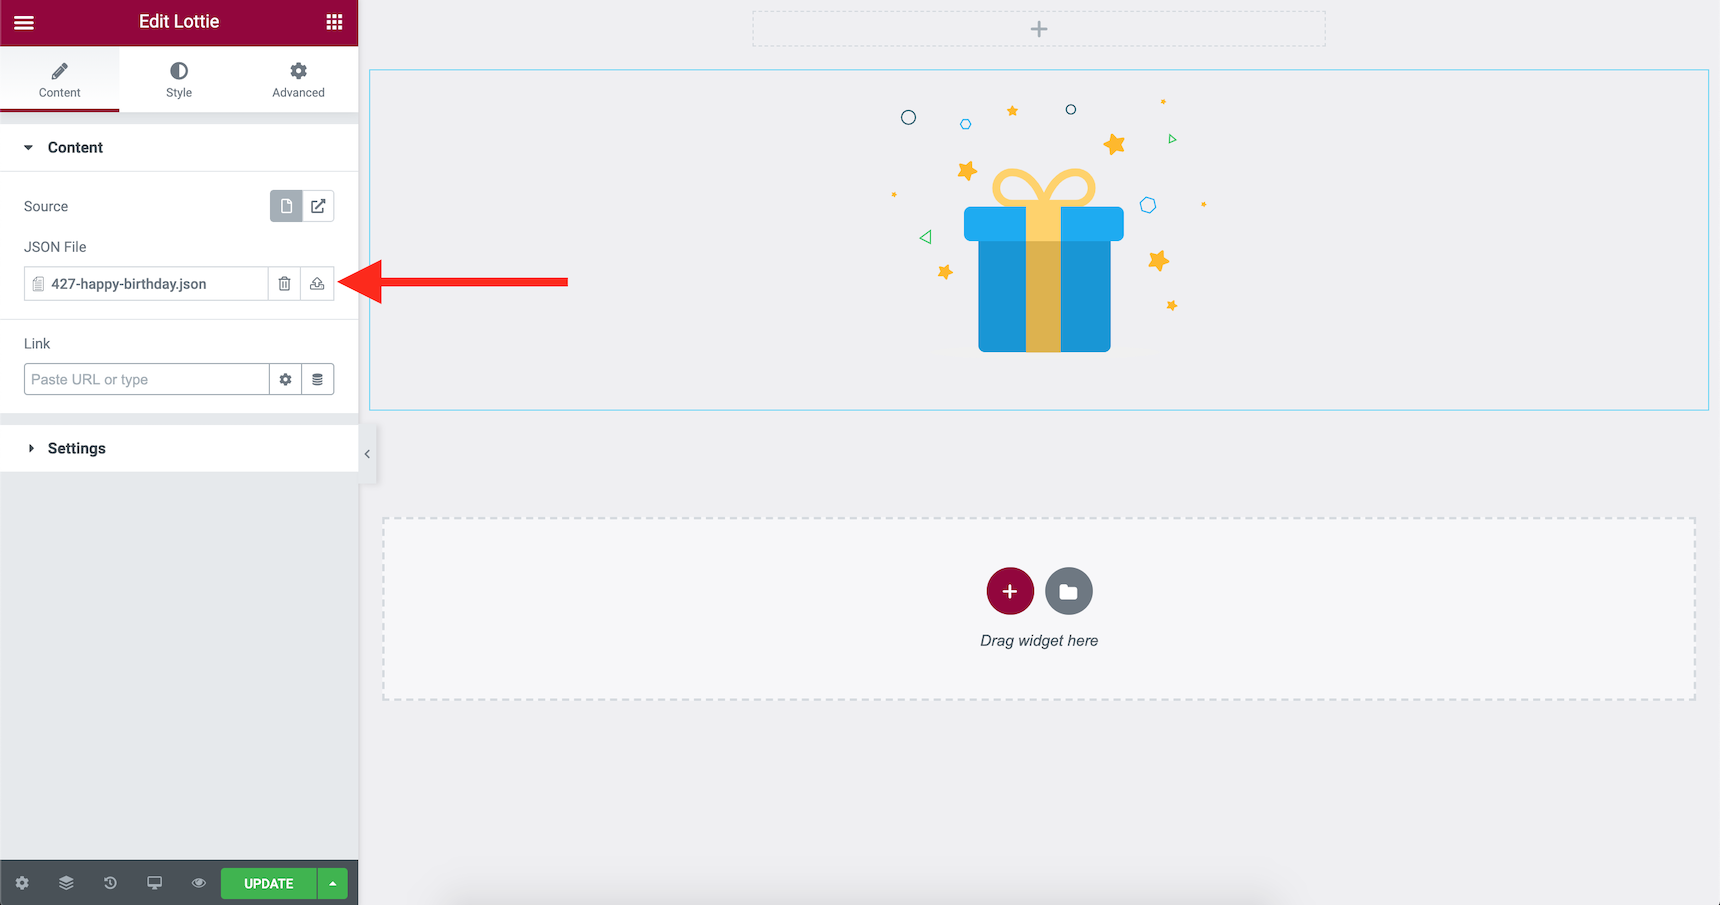
Now, upload and assign the “427-happy-birthday.json” file that we downloaded during the first step.
Uploading the Lottie JSON file
And that’s it! It was as simple as uploading an image. You can assign a link to your animation, change the speed, loop, alignment, opacity and many more via the options available with this widget. To find more about what you can do with it, check out this article.
How can I create my own Lottie animation?
That’s an excellent question. What if you couldn’t find the animation you wanted or what if you needed to use your own branding materials in the animations? The answer to this question is, currently, the only tool available that allows you to customize and create your own animations is Adobe After Effects. Most of the infographic animations you see everyday have been made by this software.
You can also export your Sketch files using plugins and bring them to Adobe After Effects and then export them as Lottie animations. Actually, it’s possible to turn any kind of vector arts into Lottie animations, but you should do multiple conversions, and in the end, you’ll need to animate them using the Adobe After Effects software. That’s why Adobe After Effects, with the help of an extension, is currently the only producer of Lottie animations. To find out more about it, please check out this AirBnB article to learn more about how to create Lottie animations.
Also, there are some tools you can use to edit Lottie animations online. Currently, they can’t be used to edit the shapes and animations and only the text and colors can be changed. Lottie animations are JSON files after all, and it’s possible to edit this kind of stuff easily. Certainly if this technology becomes more popular, more and more online tools and editors will be available on the market. Lottie has become quite popular in its brief lifespan and yet has a lot to go in its future. Check out these online tools and editors that are available right now:
In this article, we reviewed how easy it is to add Lottie animations onto a website. Due to its capability to support high-quality videos that are small in size, it’s become popular, and with each passing day, more and more apps are using Lottie animations. Because the size of a web page matters, this technique can be very useful in reducing the overall size of your pages. Try Lottie animations once for your ads campaign, and you’ll notice how attractive they are. If you have any questions about it, don’t hesitate to reach out in the comment section below.
This is a guest post contributed to Artbees Themes Blog by Hailey Lucas.
Google is the most visited site in the world and, for most other sites, their most powerful distribution channel. Creating valuable content that ranks should be a priority for all marketers. To do this, you need to do keyword research for a WordPress website, which can inform your content strategy and reveal what target customers want to know about a topic.
Keyword research identifies head, body, long-tail, and semantic keywords:
Body. Descriptive keywords that make the search query more granular (e.g., sales team management software, free team management software).
Long-tail. The near-infinite variations on a topic for users with refined interests (e.g., project team management software slack integration).
Semantic. Related keywords that may not share the exact same terms as your other keywords (e.g., best task management app).
Keep in mind that keyword research should guide your content strategy, not dictate it.
How to do keyword research for a WordPress website
When it comes to performing keyword research, there are a number of steps you will need to take in order to have a chance at successfully ranking.
The first (and hopefully obvious) step involves understanding your target audience and what they are searching for online. It’s important to draw the line between what you want to rank for and what your target audience is actually searching for, as they can be two entirely different things.
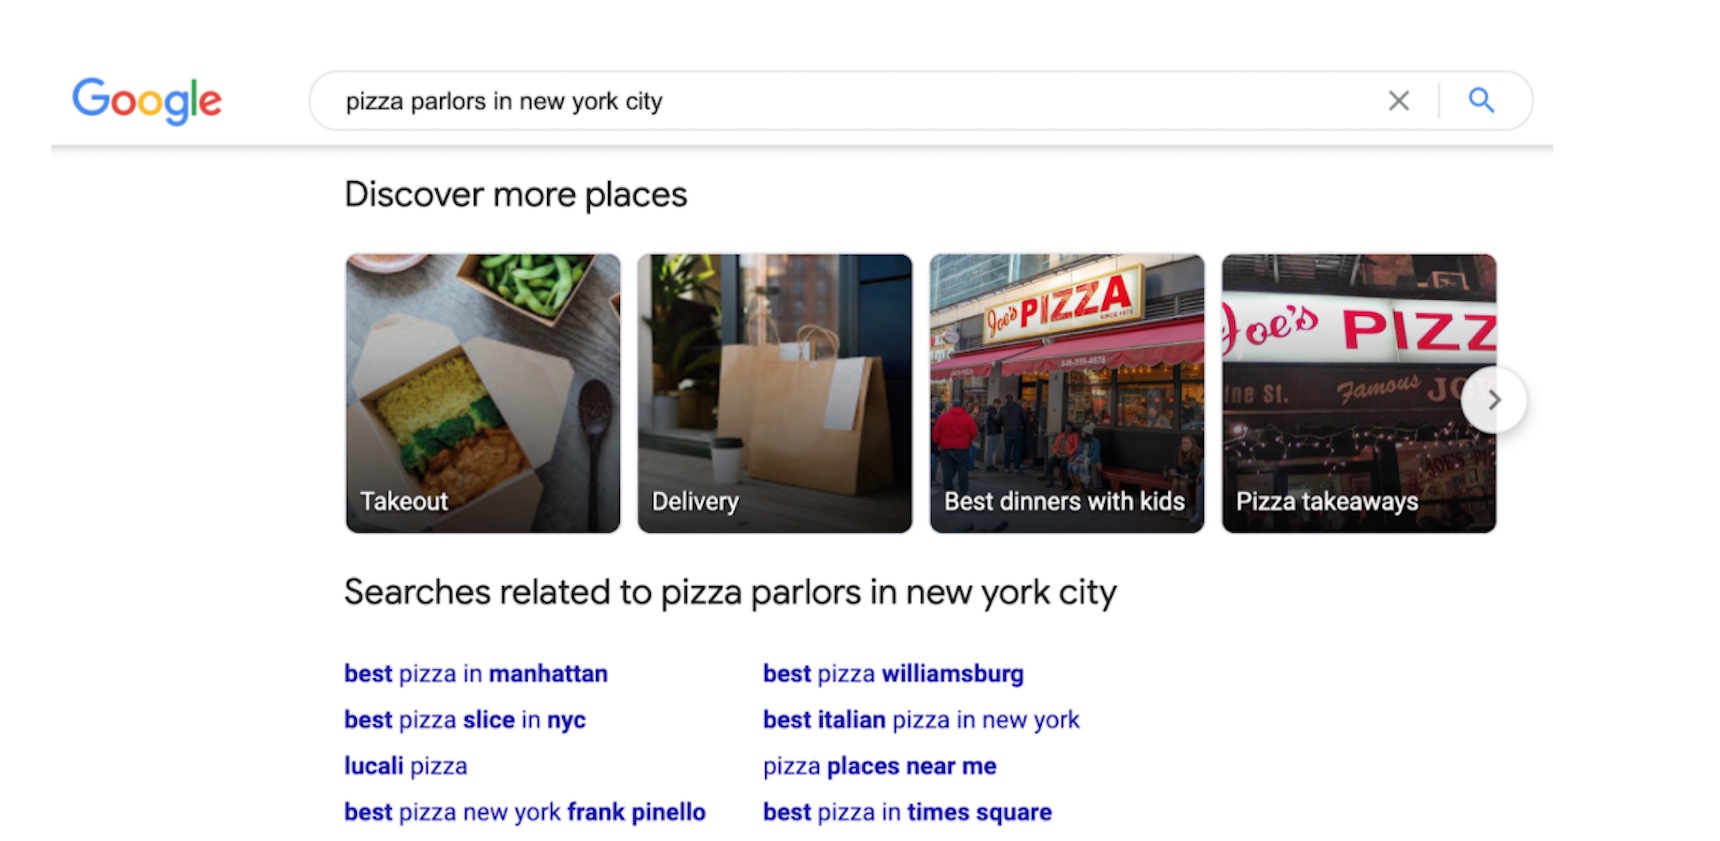
For example, if you are a pizza parlor in New York City, you may want to rank #1 for “pizza parlors in new york city” or “best pizza parlor in new york”, but that is only the tip of the iceberg of what you should try to rank for. In reality, there are a variety of things pizza eaters may be searching for, and here’s an example from Google on related search queries for this example:
If you focus only on the primary keywords, or the ones you want to rank for, you will miss out on a lot of opportunity to rank for other relevant keywords. Remember, you don’t want to put all of your eggs in one basket (or keyword).
The next step is to use a keyword research tool to identify other keyword opportunities, find out what your competitors are ranking for, and also see the monthly search volume of each. Keyword research tools often rely on third-party estimates of search volume and competitiveness. The data is directional, not absolute.
Your strategy should also focus on content that’s representative of your expertise and aligned with relevant, high-volume keywords—what you should rank for, not just what you could rank for.
Now, let’s take a look at the top free and paid tools that you can use to develop and execute an effective, search-driven content strategy.
What are the best free keyword research tools?
There are plenty of keyword research tools available for you, and thankfully, most are free. In order to find the best one, you need to evaluate your business goals and understand the different features each tool offers.
Whether you’ve started a new blog or are just maintaining an existing one, keyword research is an essential part of your SEO strategy. For some keywords in certain industries, it’s extremely competitive.
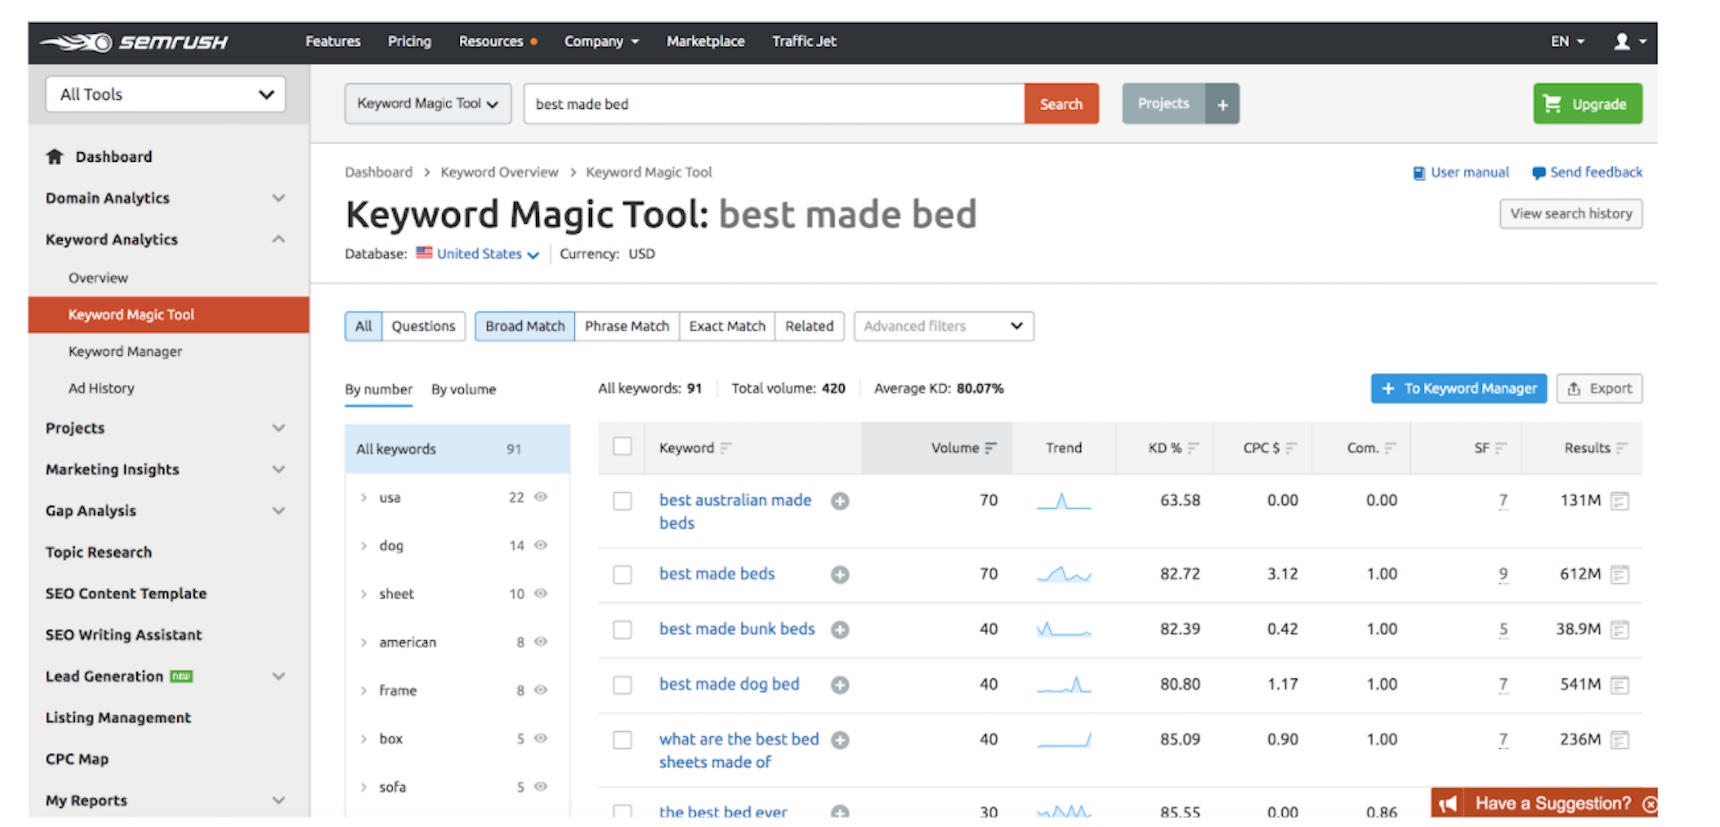
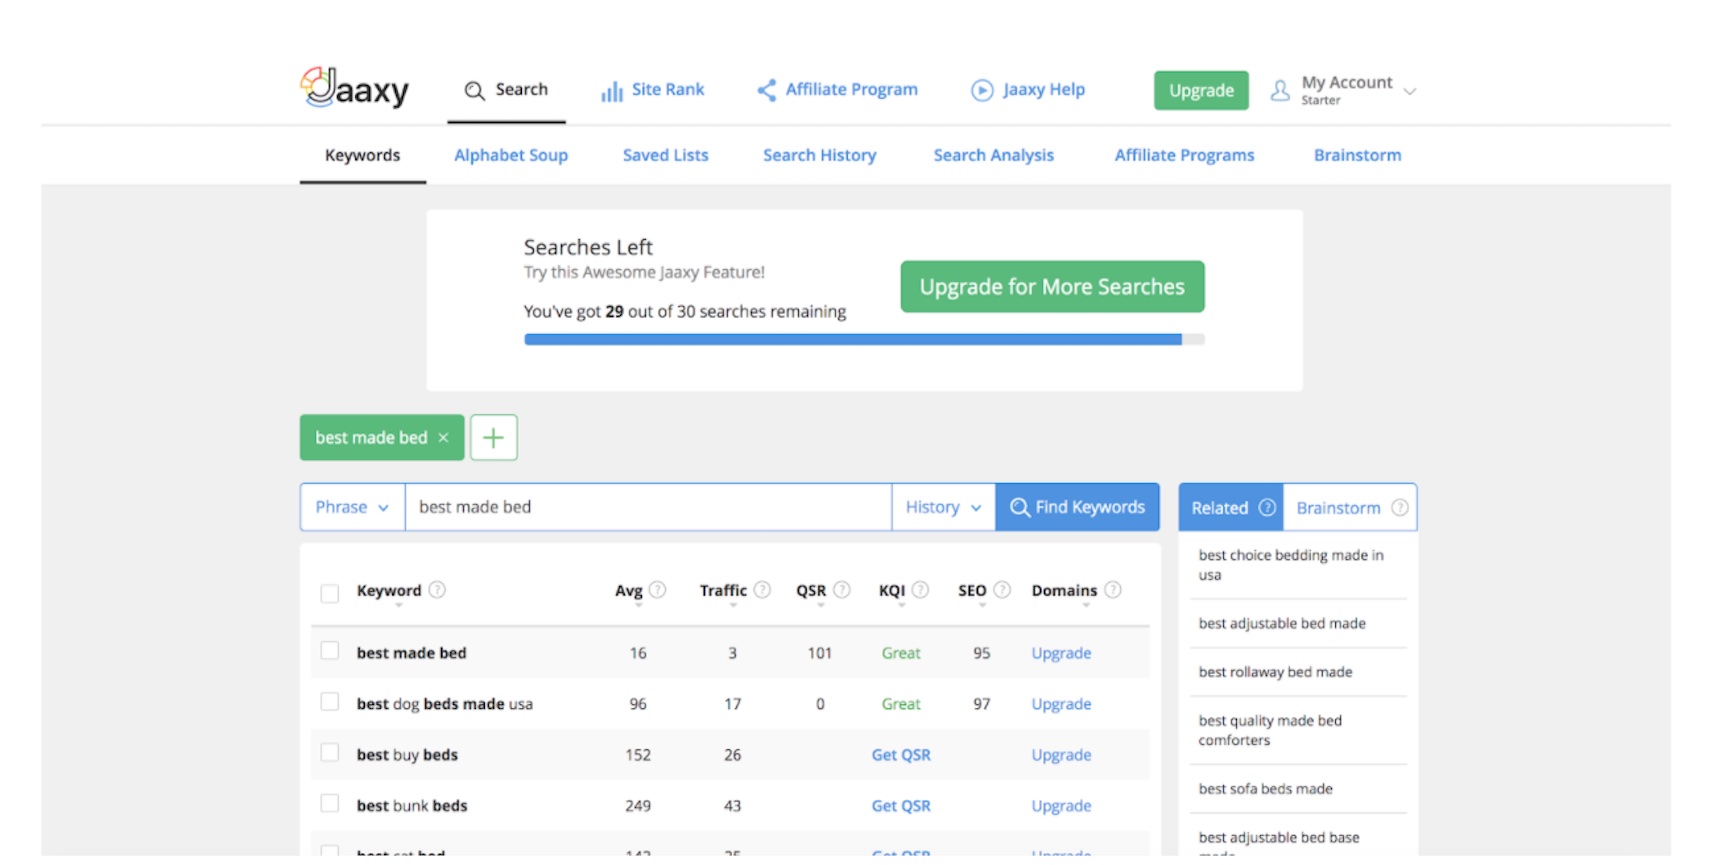
For example, a blog post about an Amazon repricer can rank for 27 keywords and show up third for “best Amazon repricer,” while a blog post for a mattress company can rank for 3,800 terms and show up first for “best made bed.” Both are competitive industries and need an airtight strategy to beat their competitors.
When you move across industries like CBD or insurance, keywords are few and far between, making them even more competitive. Let’s take a look at the different free keyword research tools available that you can use to drive traffic to your site.
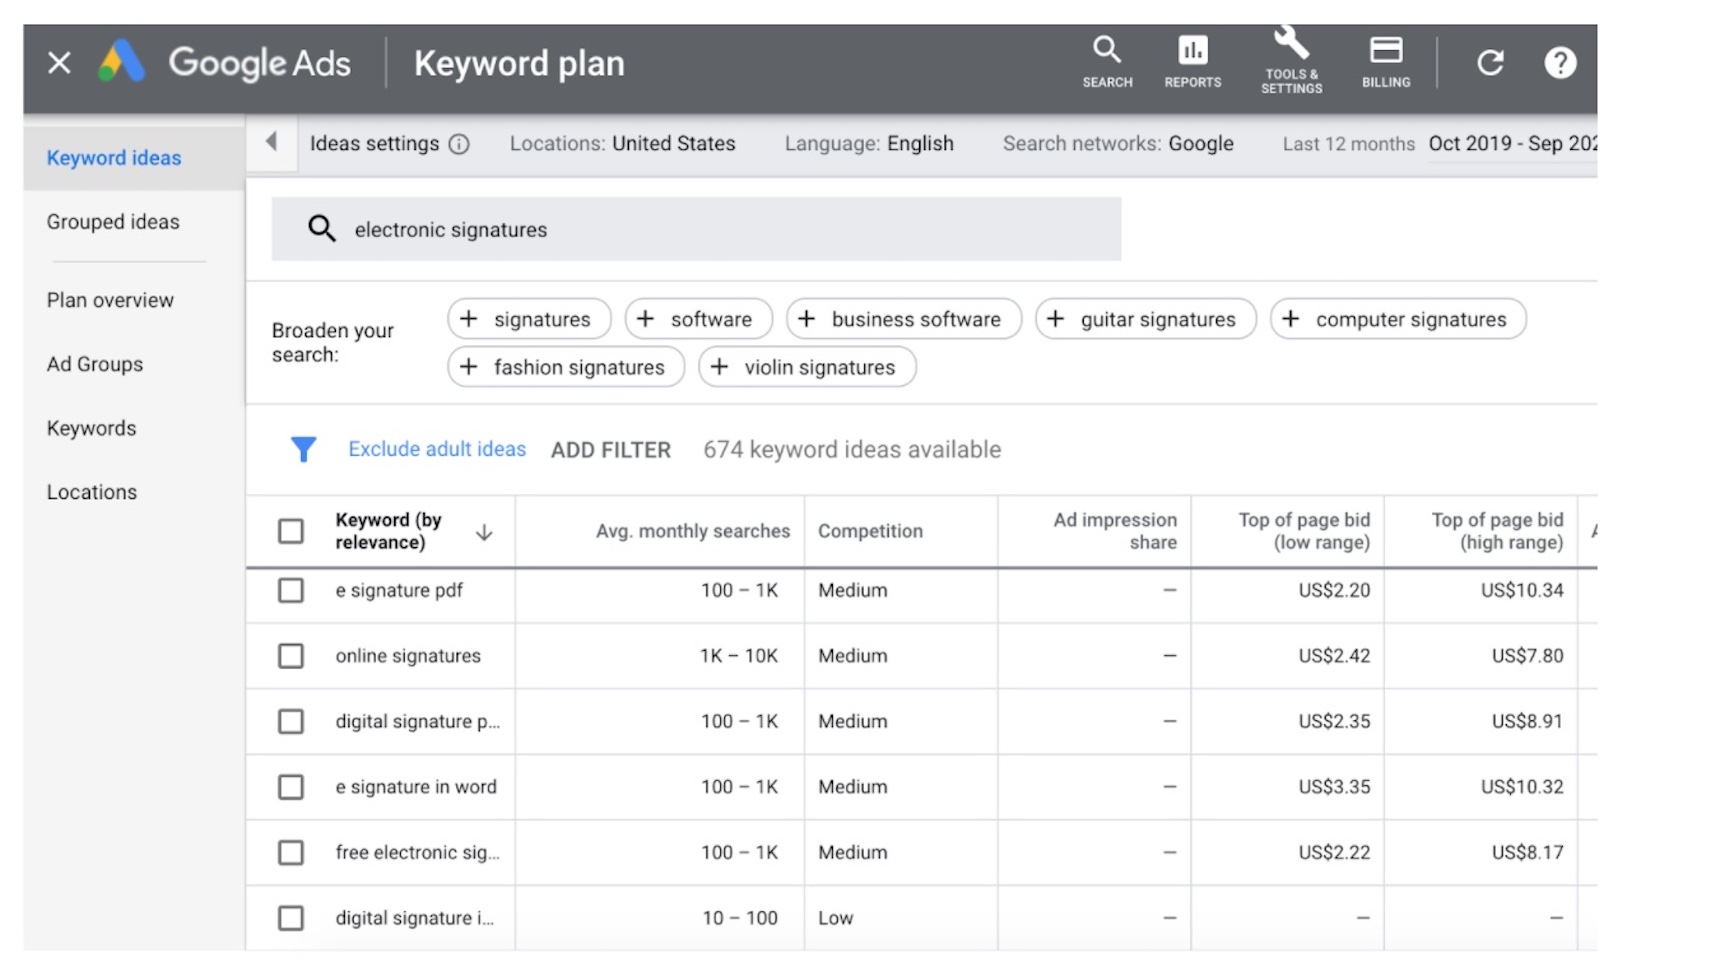
1. Google Keyword Planner
Google Keyword Planner is the standard for keyword research, because the data comes straight from the source: Google. Also, the keyword planner is a tool within the ad manager, making it super easy to set up ad campaigns that capitalize on this data.
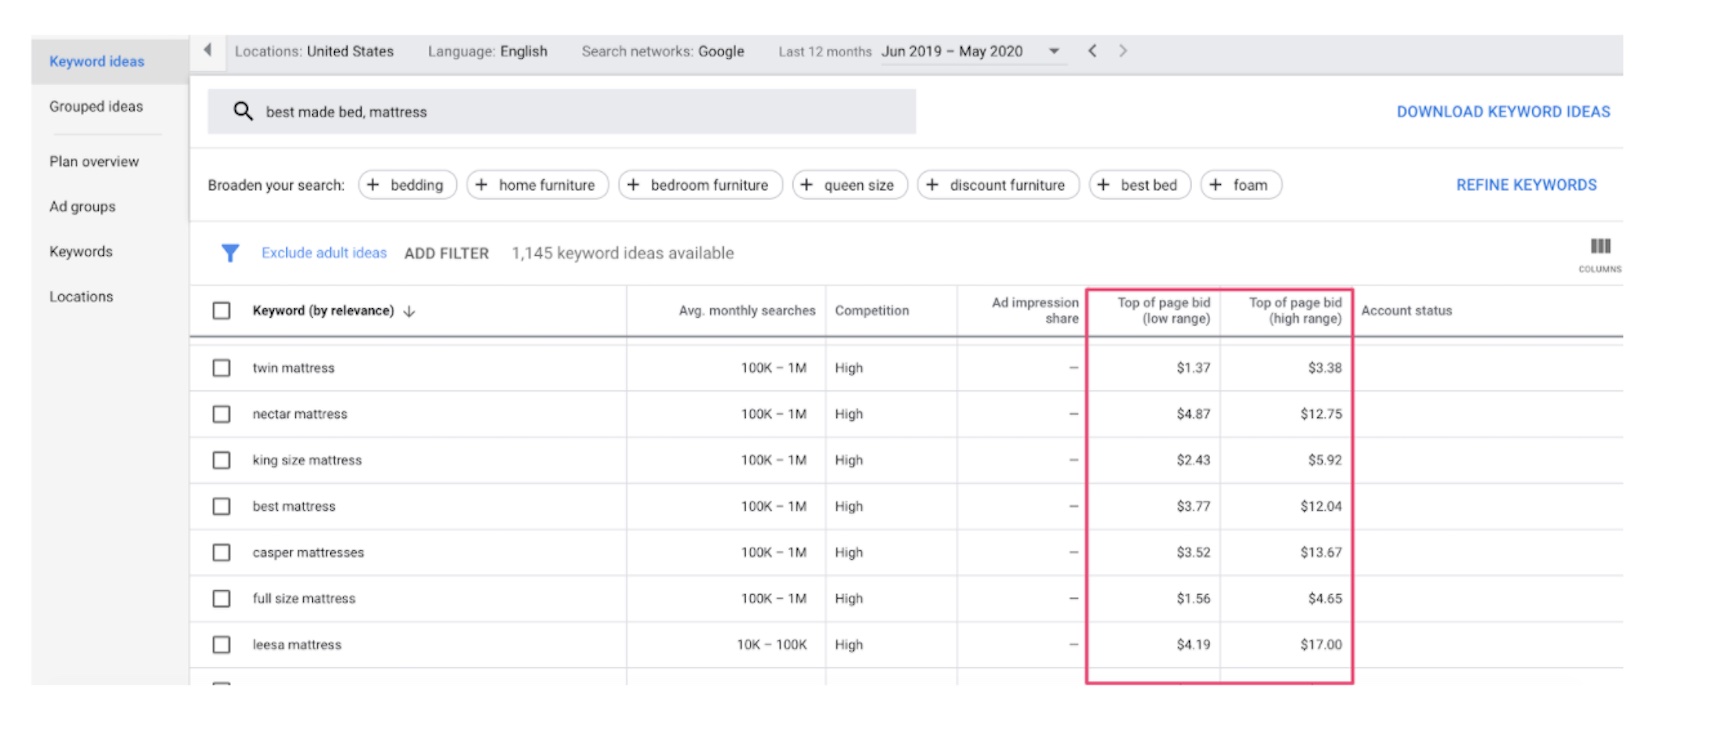
By running a simple search for the keyword ‘electronic signatures’, you can see the average monthly searches, competition, ad impression share, and range for the top bids. On the left side, you can see where you can start setting up your campaign with ad groups, keywords, and location-based targeting.
2. Ubersuggest
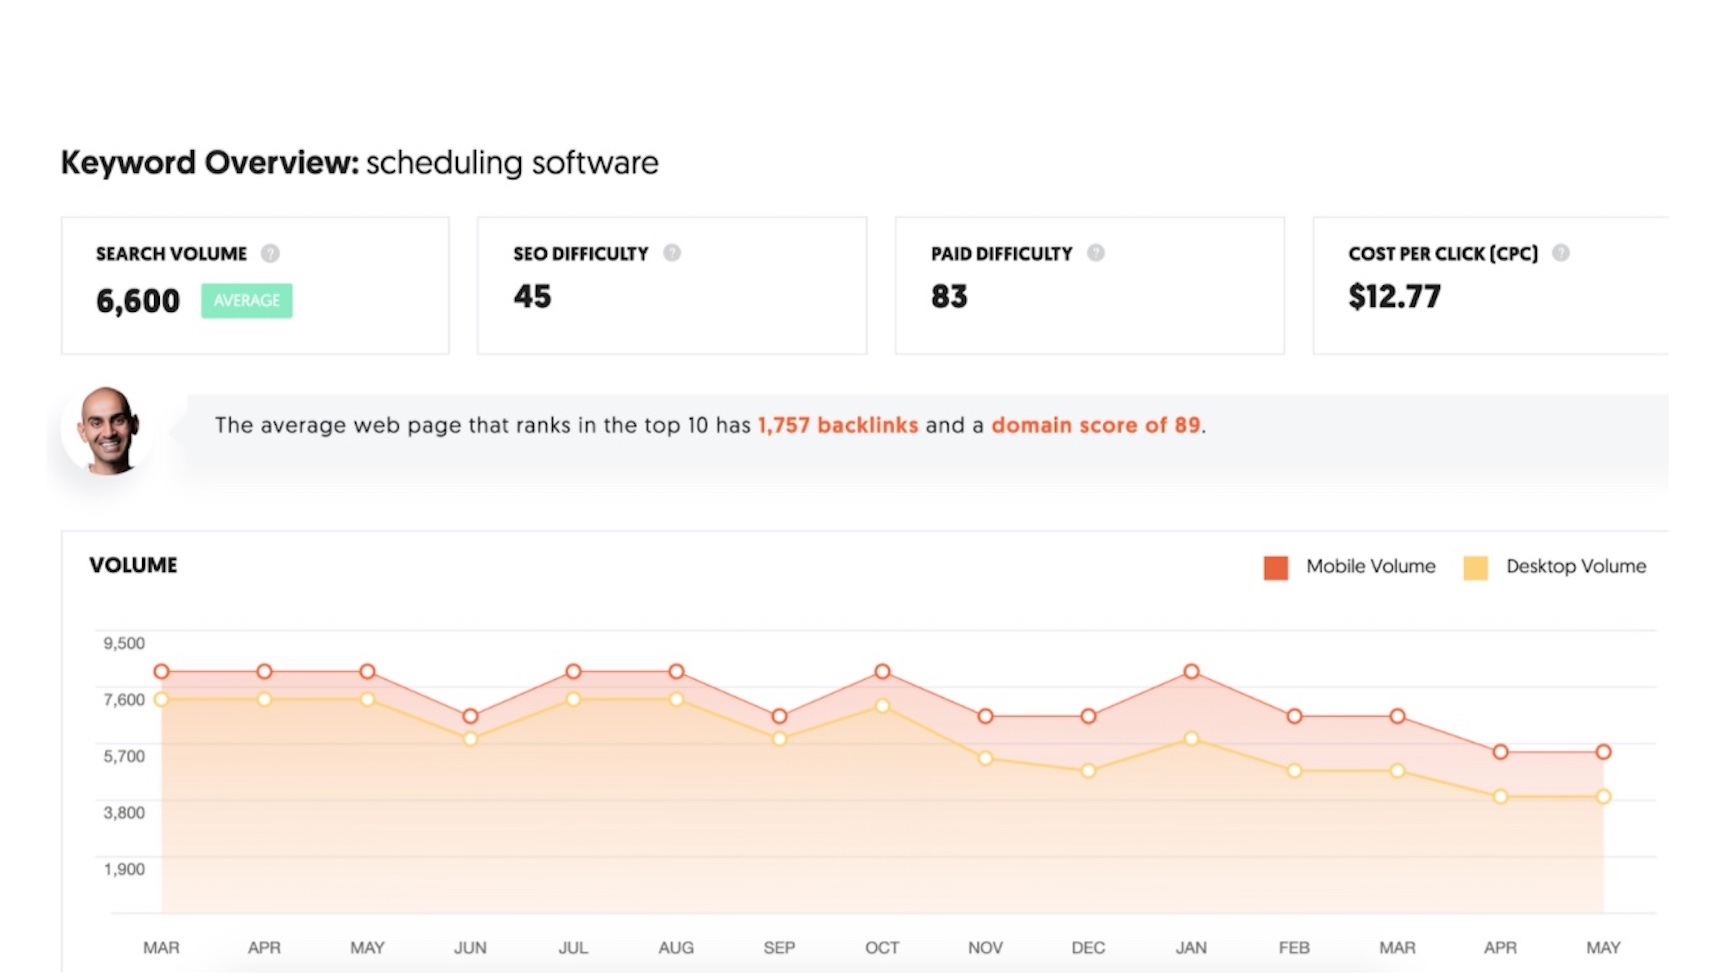
Ubersuggest, founded by Neil Patel, builds on most of the insights that Google Keyword Planner uses and adds context to them. It provides search volume, SEO difficulty, paid difficulty, and cost per click.
The distinction between SEO and paid difficulty is helpful, because as you can see, there is a significant difference between the two in the example below (45 vs. 83). The app also shows search volumes over time, relevant content that is currently ranking, the domain score, and the number of backlinks that competitive content has for that specific query.
Ubersuggest provides more applicable insights, compared to Google Keyword Planner’s data-centric approach. Let’s take a look below using the keyword ‘scheduling software’:
3. Moz
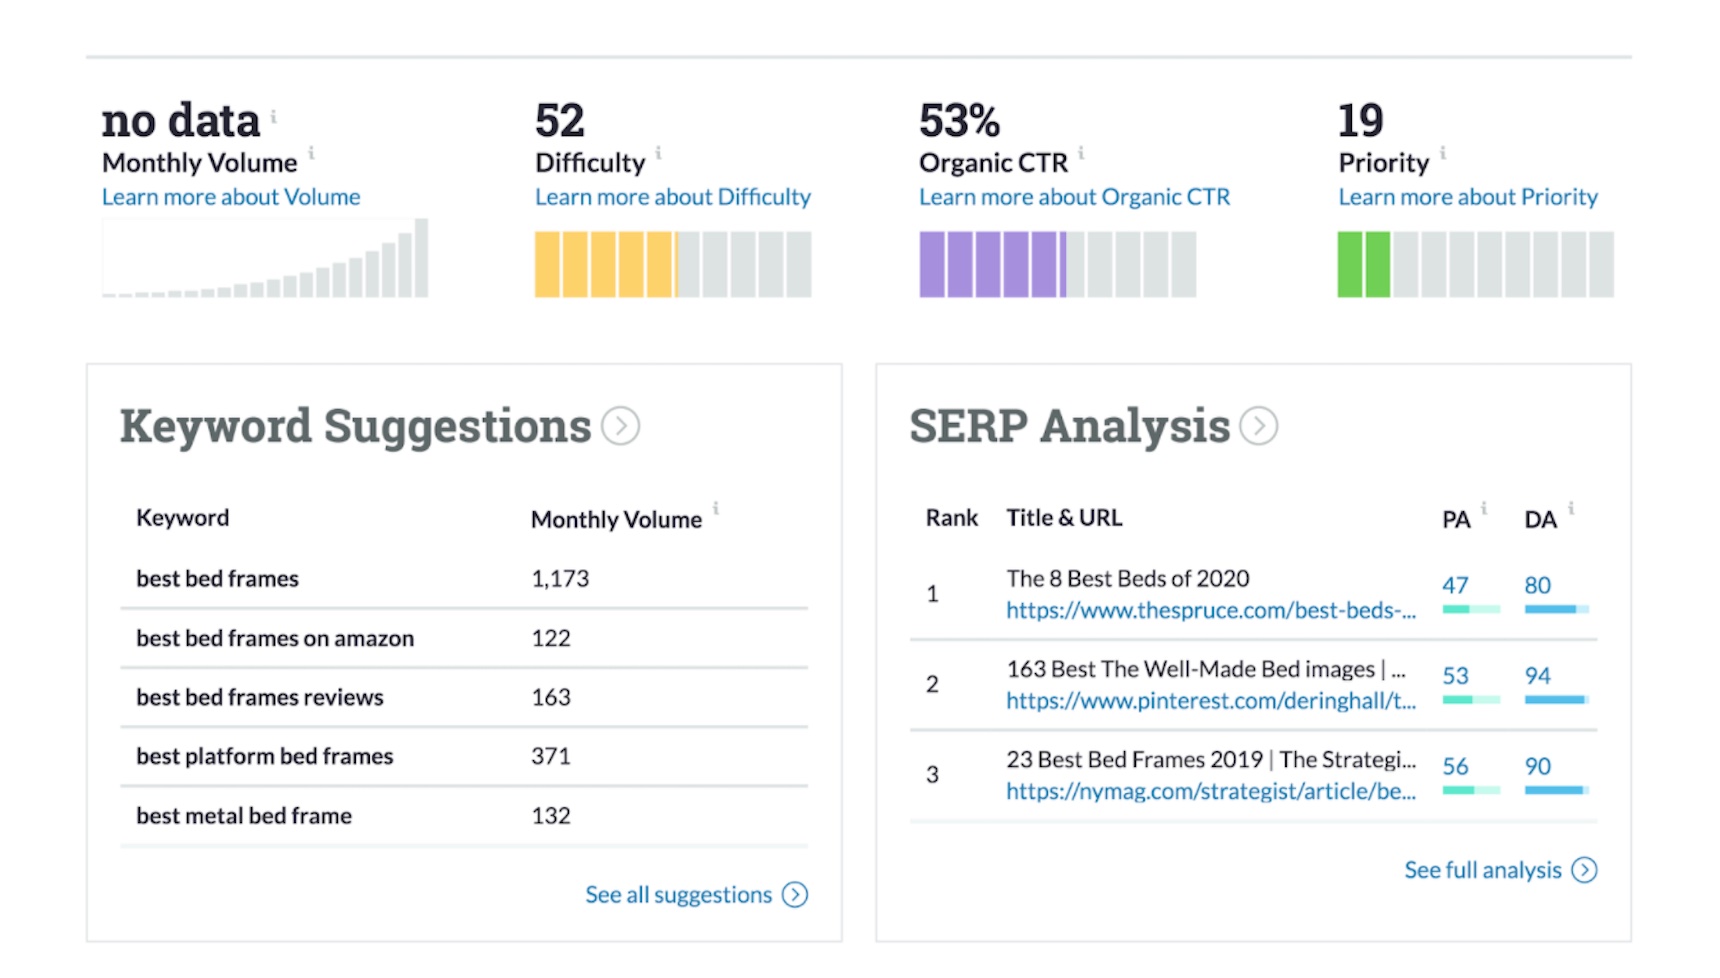
Moz Keyword Explorer is a free tool under the Moz brand that can help direct your SEO and content marketing strategy. With the free version, users can get up to ten keyword search queries per month. This tool is unique because it shows organic click-through rate, a metric that shows how much potential search volume there is that isn’t obstructed by paid ads, verticals, and other listings that compete for attention.
In addition, the priority score averages together the volume, difficulty, and organic CTR. You want to optimize for keywords with a high priority score.
4. WordStream Free Keyword Tool
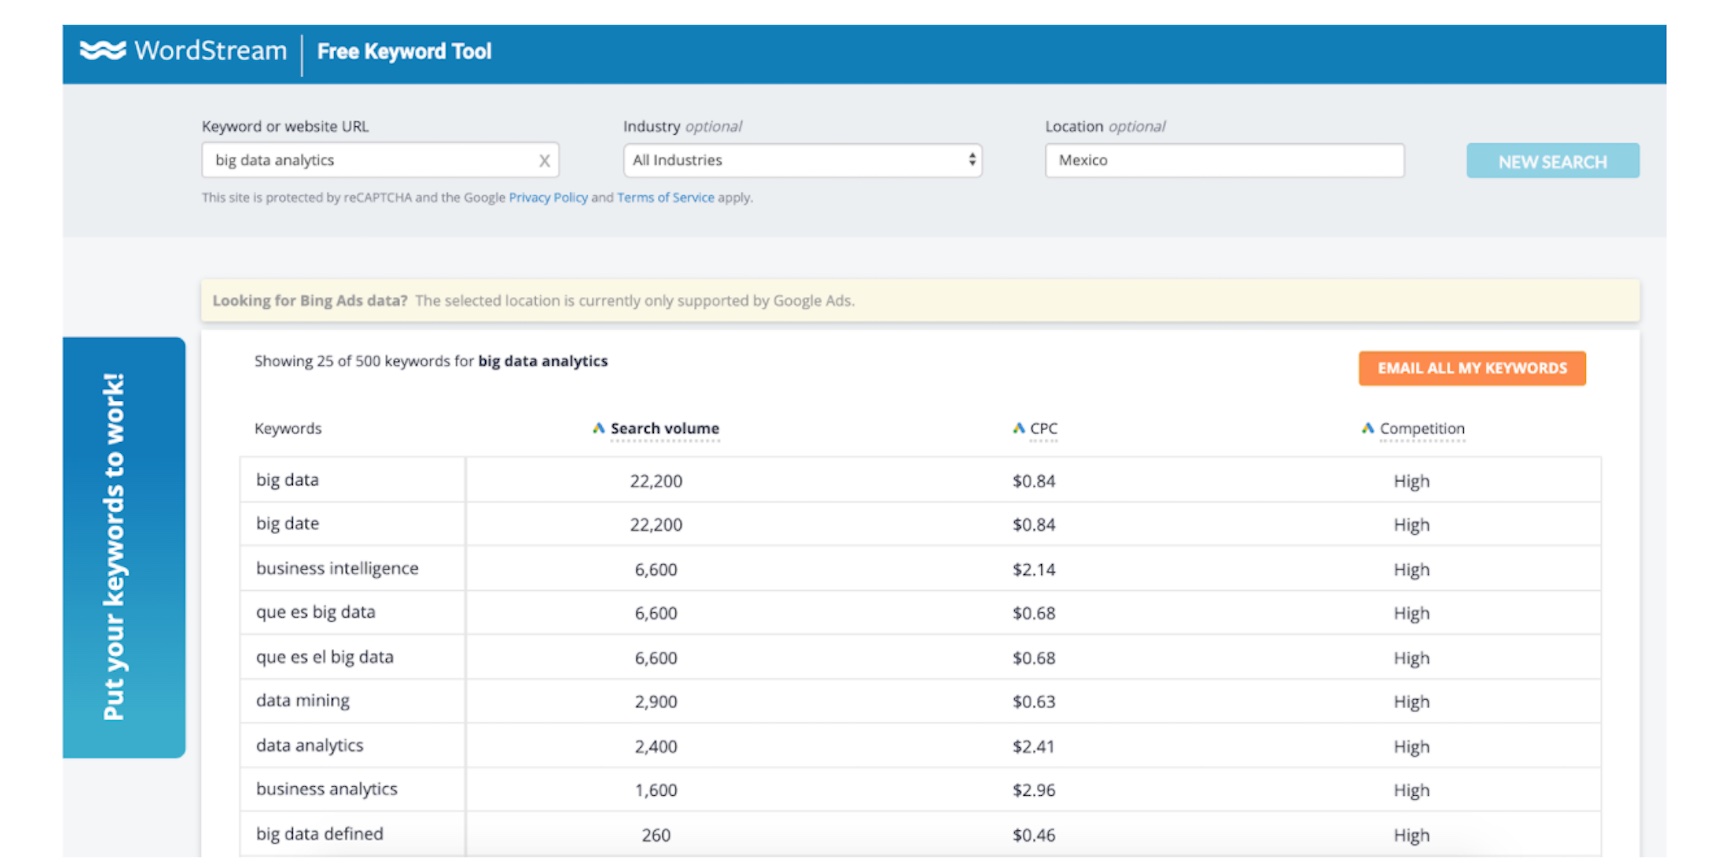
WordStream’s Free Keyword Tool takes a straightforward approach to presenting the data similar to Google Keyword Planner. The software presents search volume, cost-per-click, and competition data. It doesn’t show competitive content or provide any unique insights.
It does, however, show you search results for both Google and Bing. In addition, it even lets you choose the industry or geolocation to narrow your scope. The “Email All My Keywords” button is an easy way to export and send the data in only a few clicks.
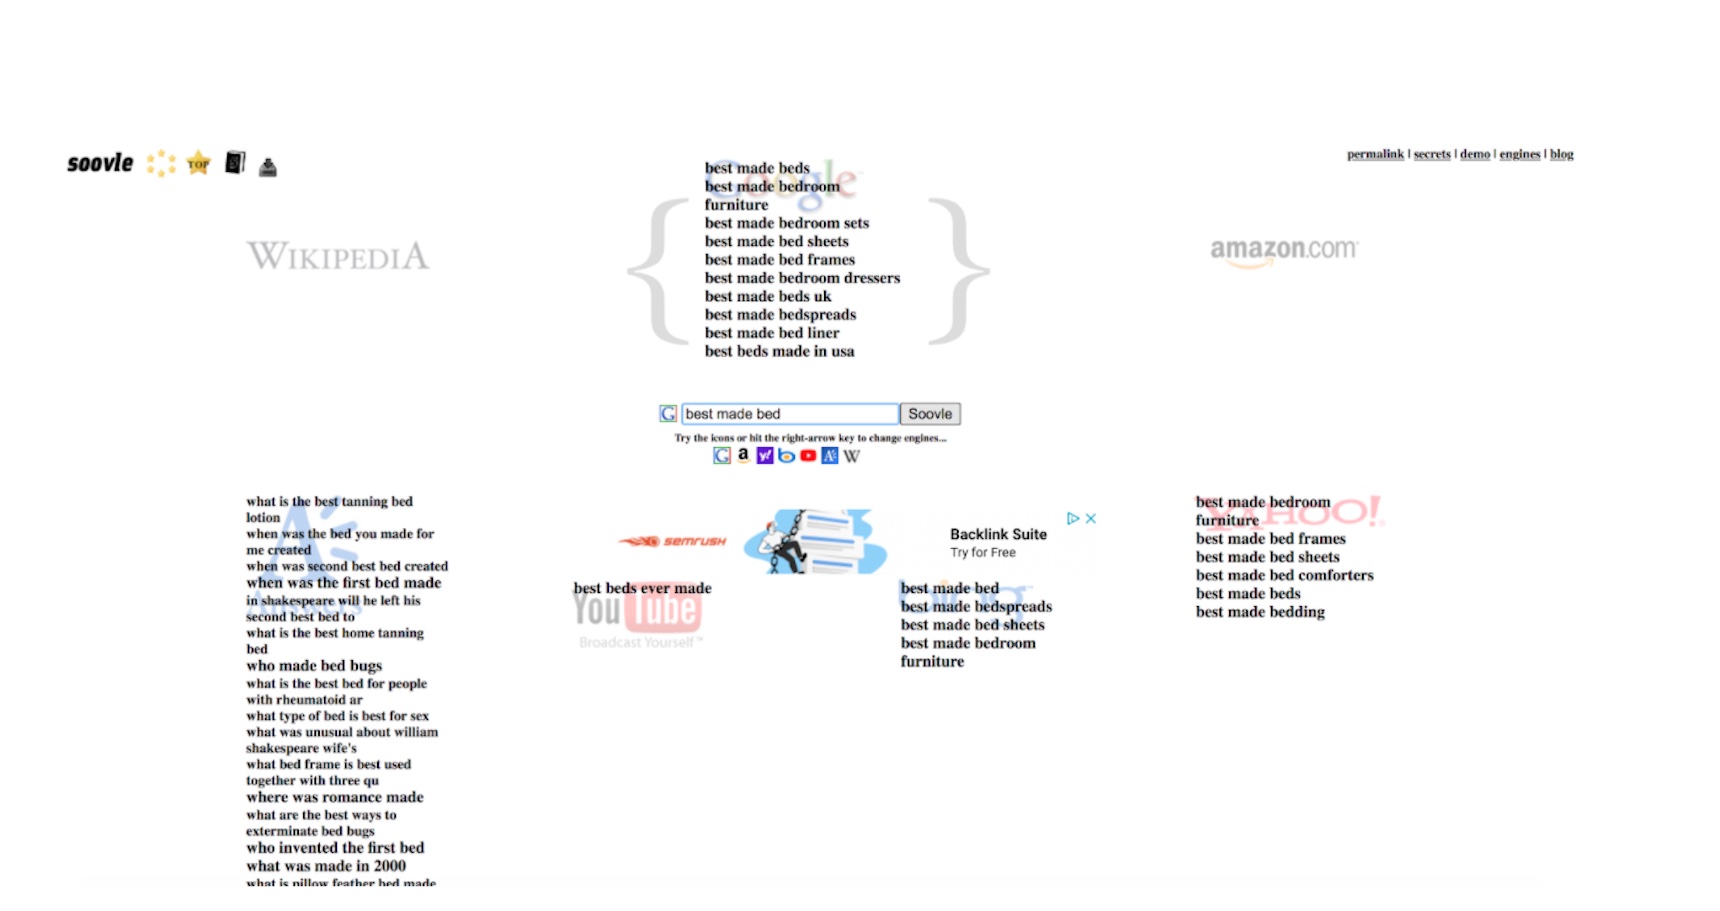
Soovle provides a high-level overview for related keywords and what content is ranking on each search engine. It does not offer search volumes, click-through rates, or difficulty rankings like the other platforms.
The tool is more basic and manual than some of the other options available. Users can type in their search query and watch as related terms appear all around the page. They can select the search engine, click “Soovle,” and see the results. Because of the manual nature of the tool, you’ll probably want to hire a freelancer to assemble it in an easy-to-digest way.
6. Answer the Public
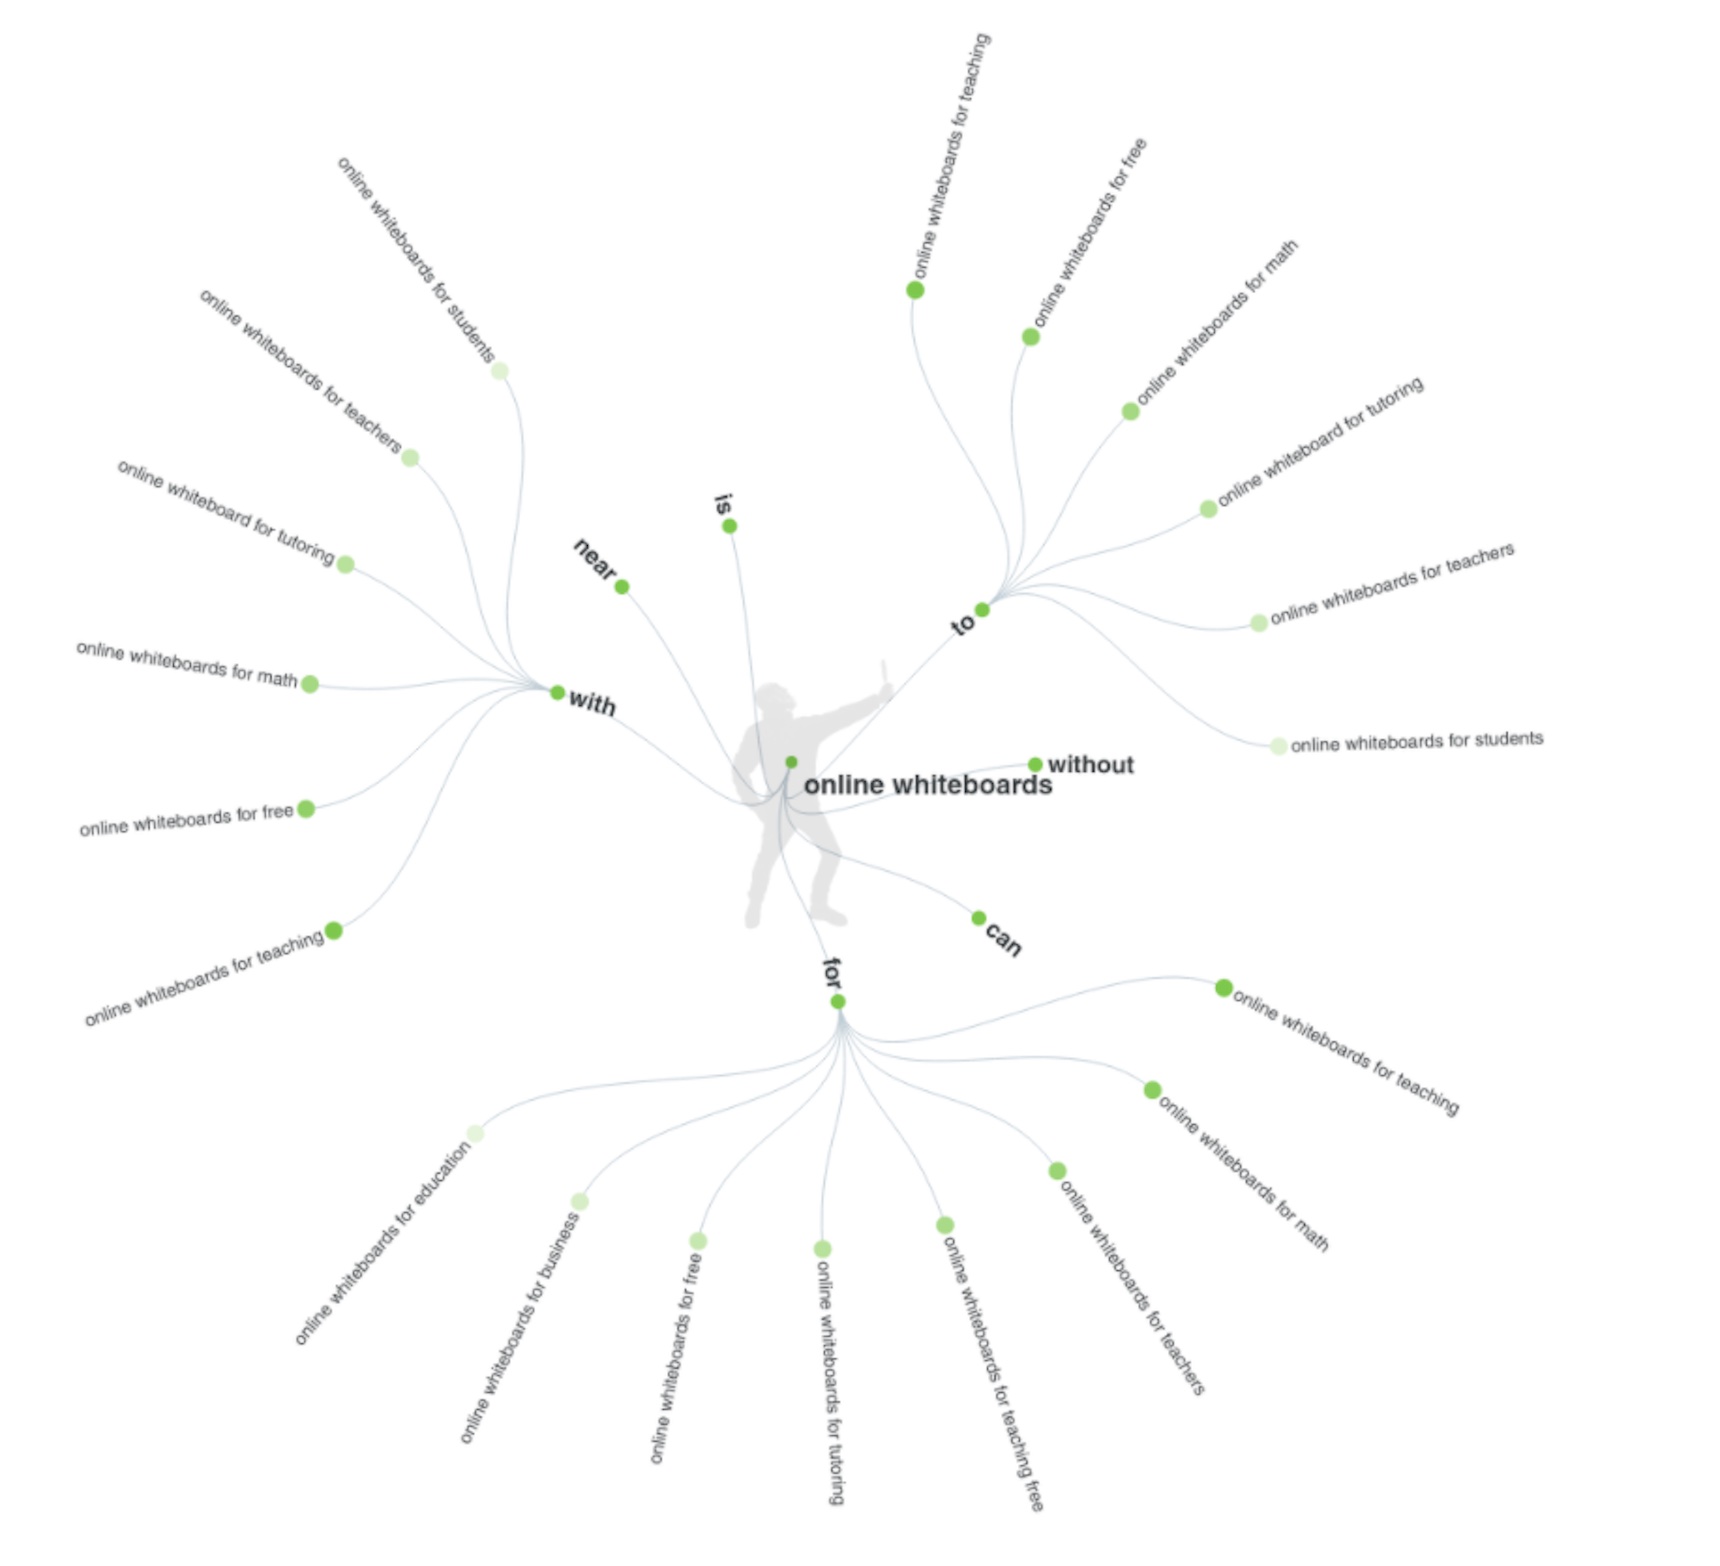
Answer the Public positions itself as a search listening tool that you can use to discover what people are asking. The value that Answer the Public brings is through its data visualization features. After typing in a keyword, you’ll generate word maps that include related queries.
For example, if you were searching for ‘online whiteboards’, you will discover other suggestions relevant to queries such as ‘best online whiteboard tools’, ‘online whiteboards for free’, ‘online whiteboards for teaching’, ‘online whiteboards for virtual teams’ ’and more:
The tool ranks keywords alphabetically, rather than by search volume. This is effective as an idea generator, but not ultimately as a guiding SEO tool. Valuable dating including click-through rates and difficulty levels are absent in the free version.
7. Google Trends
Google Trends shows the progression of interest in specific topics and search terms. This tool doesn’t get as specific as Google’s Keyword Planner, but can be useful to help track topics over a period of time.
It’s especially useful for local searches. In addition, you can segment the interest by subregion to see if those searching for the topic live in your state.
It would be a good idea to use this in tandem with Google Keyword Planner. You can see topics that are building momentum and cross-reference them with search volumes to ensure that you’re optimizing for the right focus keyword.
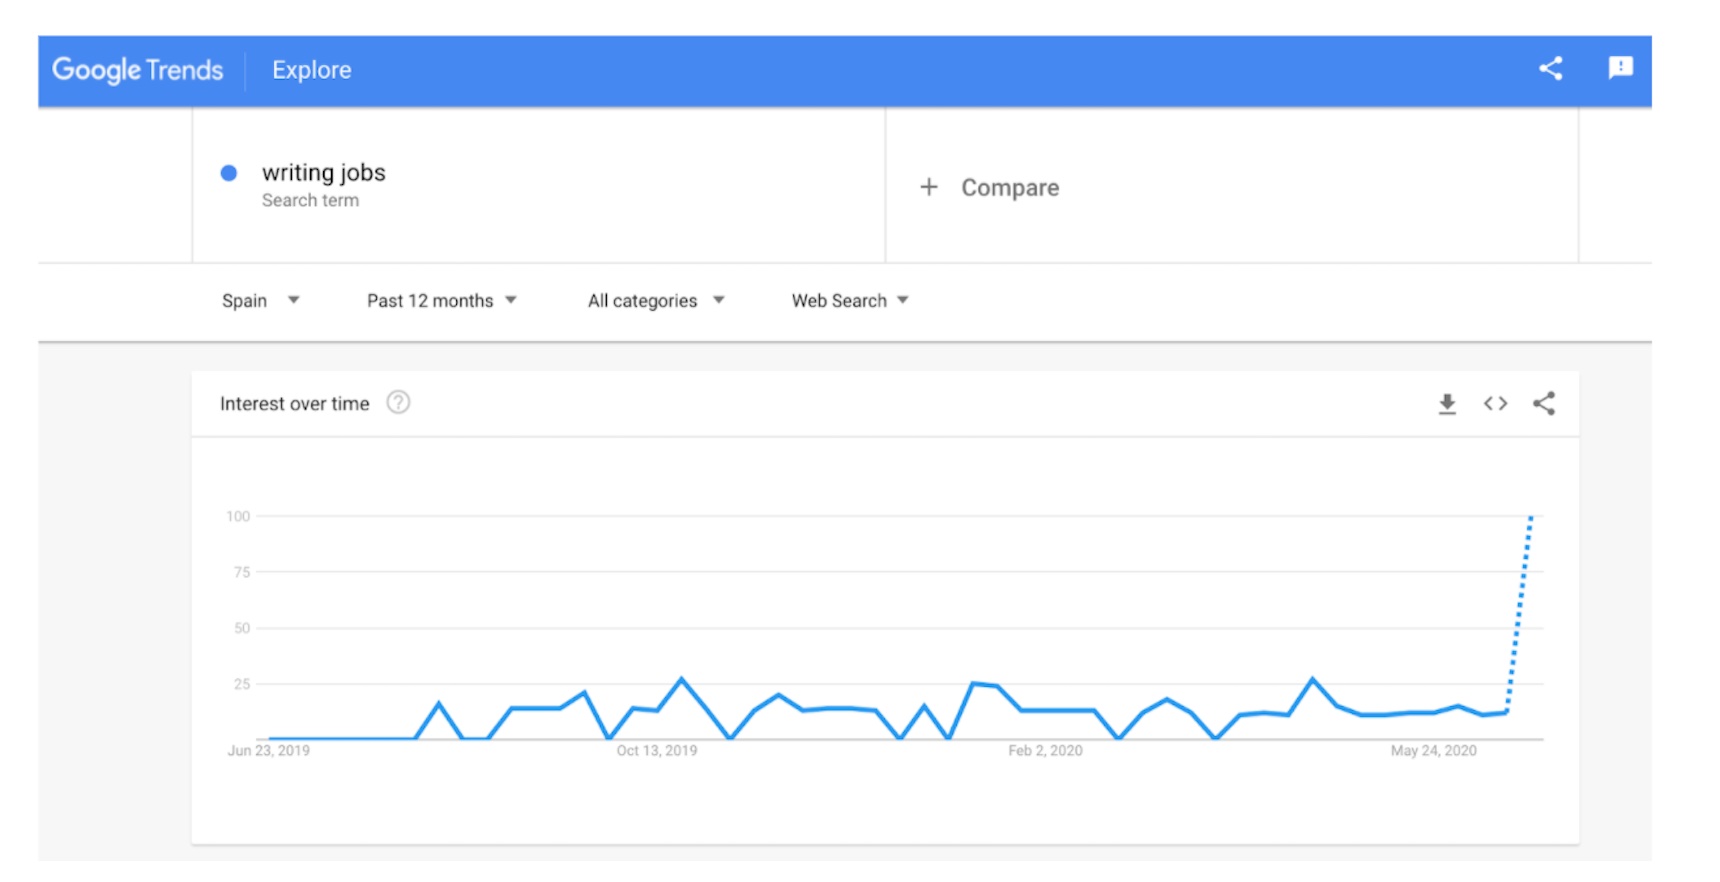
For instance, if we type the keyword ‘writing jobs’ into Google Trends, below you will see that the topic query has exploded as of recent:
8. Bonus: Google Ads
Google Ads is the last of the Google tools that can help you with your keyword research. With Google’s Keyword Planner hosted inside the Google Ads platform, these two tools complement each other for both your organic SEO and paid ad campaigns.
With Google Ads, you can leverage the cost-per-click and competition ratings to build an understanding of how many competitors are going after the same keywords.
In addition, your ad campaign click-through data will provide insights for what your customers are interested in and clicking on.
What are the best paid keyword research tools?
Paid keyword research tools improve upon the paid versions by providing all the basic features as well as backlinking metrics, long-tail keyword identification, ongoing reporting, and more. When selecting a paid keyword research tool, you should evaluate each individually to ensure your needs are met.
9. SEMrush
SEMrush is one of the best-known paid SEO tools on the market. The paid version provides a comprehensive overview of keyword analytics to aid in the execution of a successful content strategy.
In addition, to all the standard data available in the free tools, it also highlights related keywords, a keyword gap analysis, common questions, and popular keyword variations. SEMrush’s Keyword Magic Tool is what sets it apart. The dashboard may feel similar to Google’s Keyword Planner, but it allows the user to get even more granular in the data.
You can toggle between broad match, phrase match, exact match, and related keywords. You can also track volumes, trends, keyword difficulty, density, serp features, and overall results.
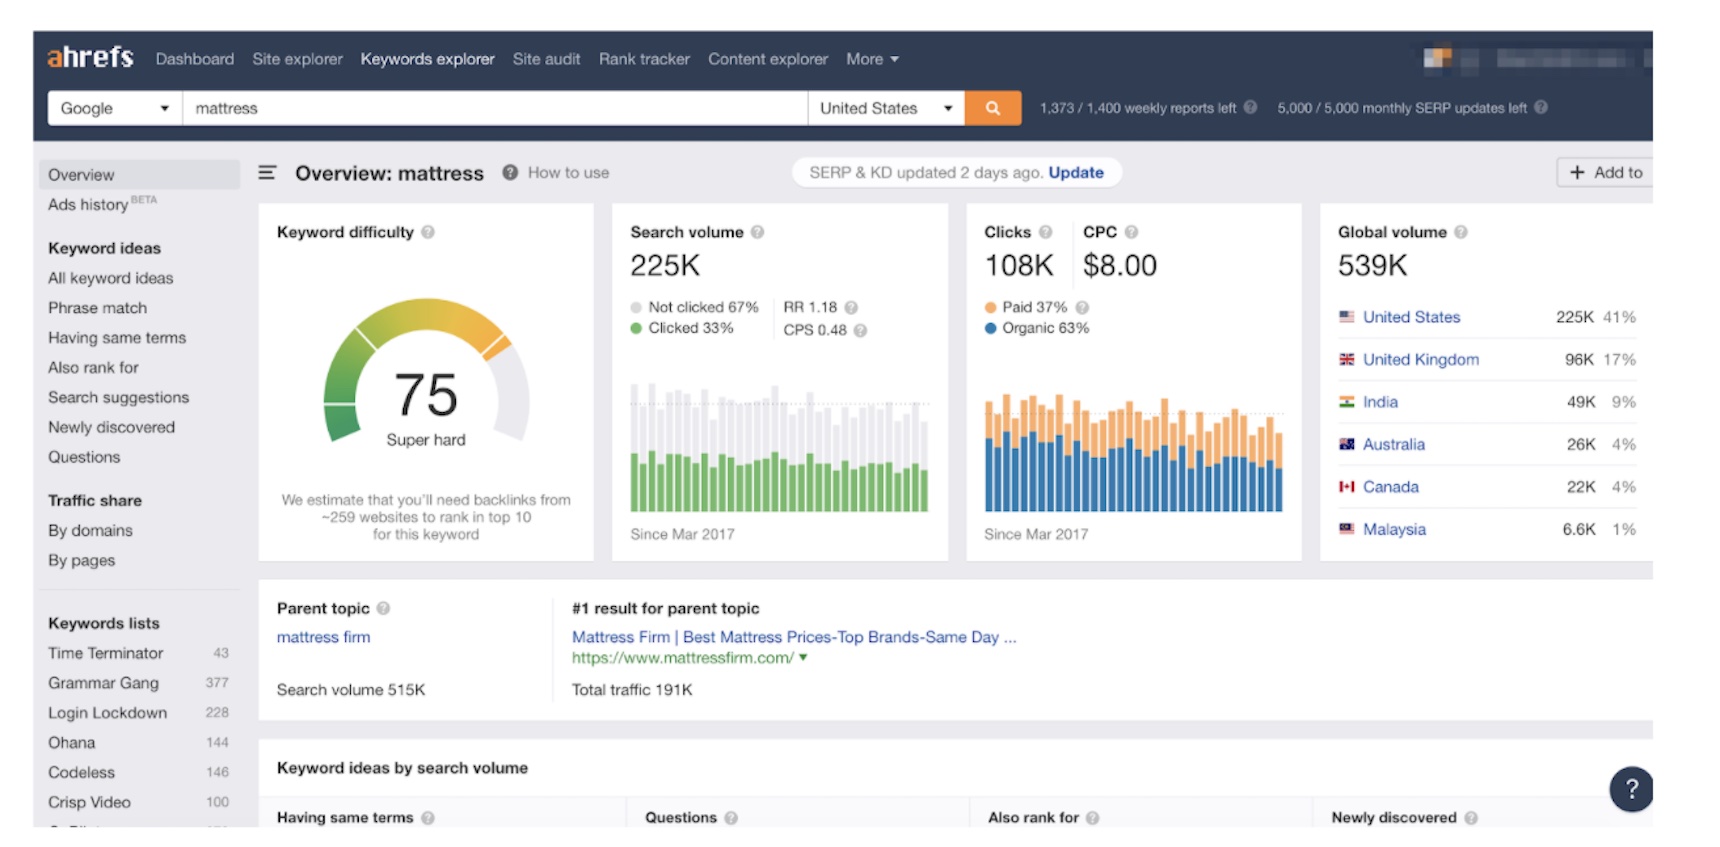
10. Ahrefs
Ahrefs is another premium tool that provides a comprehensive look at your keyword research. There are numerous visualizations for keyword difficulty, search volumes, cost-per-click data over time, and even detailed anchor text reporting, allowing you to create a comprehensive plan.
Ahrefs has more ways to segment the data and add individual queries to various lists. Lastly, Ahrefs offers a way to research keywords on YouTube, Amazon, Bing, Yahoo, Yandex, and more. For me, the YouTube keyword data is crucial as that’s not easy to find and it’s the world’s second largest search engine.
This is very valuable for brands as there are many different ways to make money on YouTube. The main advantage of Ahrefs is the serp overview section provided for each keyword query. This section outlines the currently ranked listings and compares their domain authority, backlinks, URL ranking, traffic, keywords, and top keyword.
This provides a competitive analysis and can outline the steps you need to take to improve the ranking of your piece of content.
11. Moz Pro
Moz Pro no longer limits you to ten keyword searches per month. In addition, it unlocks other features that support other aspects of your SEO efforts including a campaigns tab, web explorer, on-page grader, on-demand crawl, and a rank checker feature.
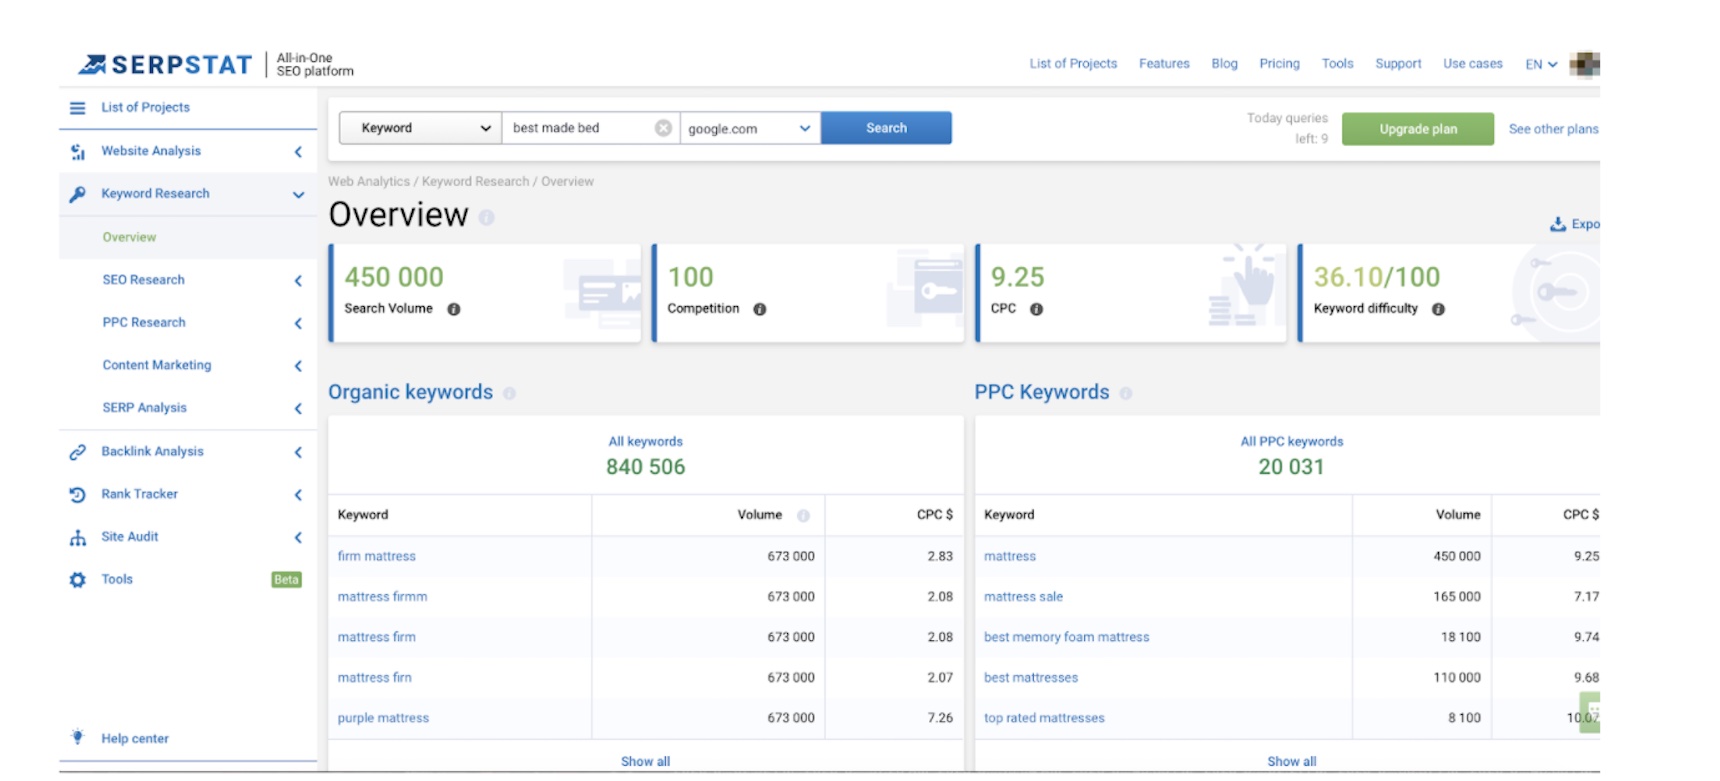
12. Serpstat
Serpstat is the “all-in-one SEO platform.” Right away, you’ll notice that it separates organic keywords and PPC keywords in the Keyword Research dashboard. In addition to the standard data provided, Serpstat also provides total results, social media domains in the top results for the specific keyword, and a way to segment all the data by country.
The keyword dashboard also has a “Competitor” option that will allow you to add and customize your list of competitors to track. This will provide you with up-to-date monitoring of their SEO efforts, so you can stay one step ahead.
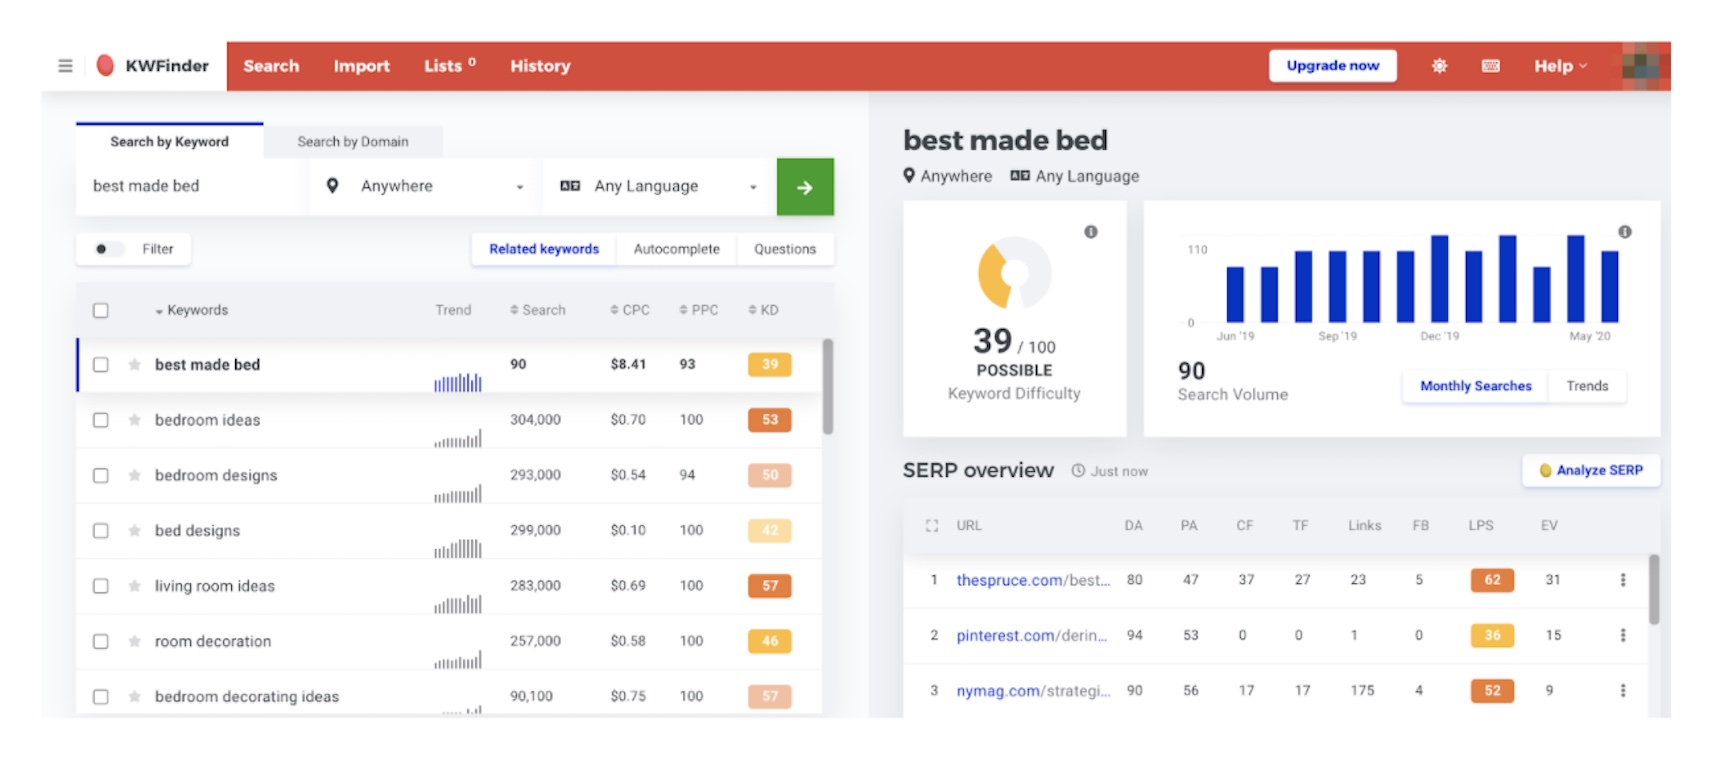
13. KWFinder
KWFinder is a keyword research tool under the Mangools brand. Under the “Search by Keyword” tab, you can filter by autocomplete to see how many searches your keyword will show up as an option to select before the user finishes typing.
In addition, there are graphs to show both monthly searches and overall trends. The SERP overview is rather simple, depicting only domain/page authority, citation/trust flow, backlinks, Facebook shares, link profile strength, and estimated visits.
This section relies on the user to crunch the data and extract their own insights from it.
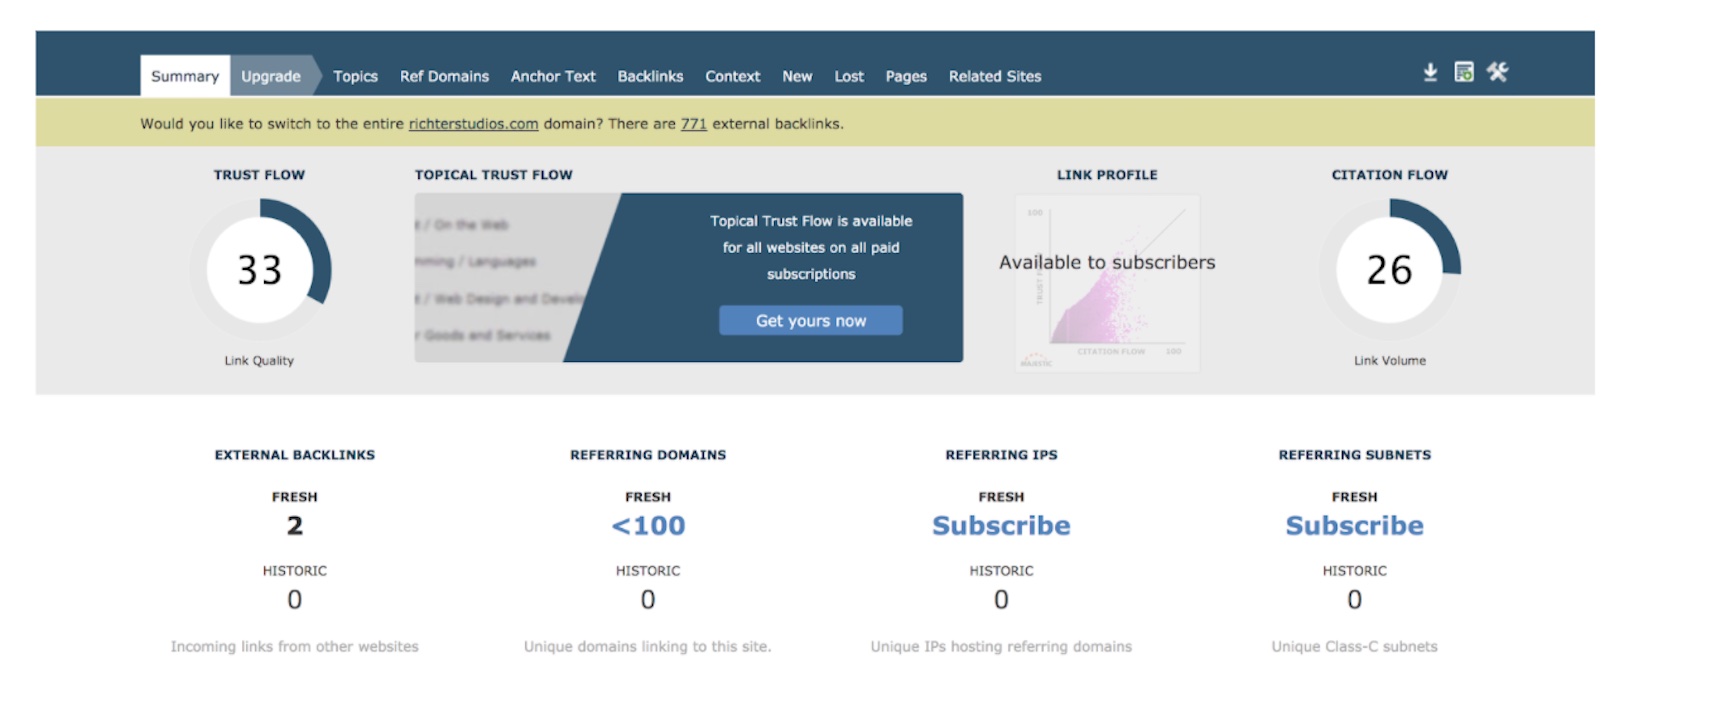
14. Majestic
Majestic helps users find out who is linking to their site. The tool places an emphasis on backlinks and delivers essential data including external backlinks, referring domains, referring IPs, and referring subnets.
As you can see, running a search for a blog post on a given site shows only two external backlinks. However, the entire site had 771 backlinks. Meanwhile, GILI Sports has a closer ratio with 80 backlinks on the homepage and 352 on the entire site.
With this data, you can dive in to see which backlinks are driving the most traffic and keep track of all the ones you have secured so far.
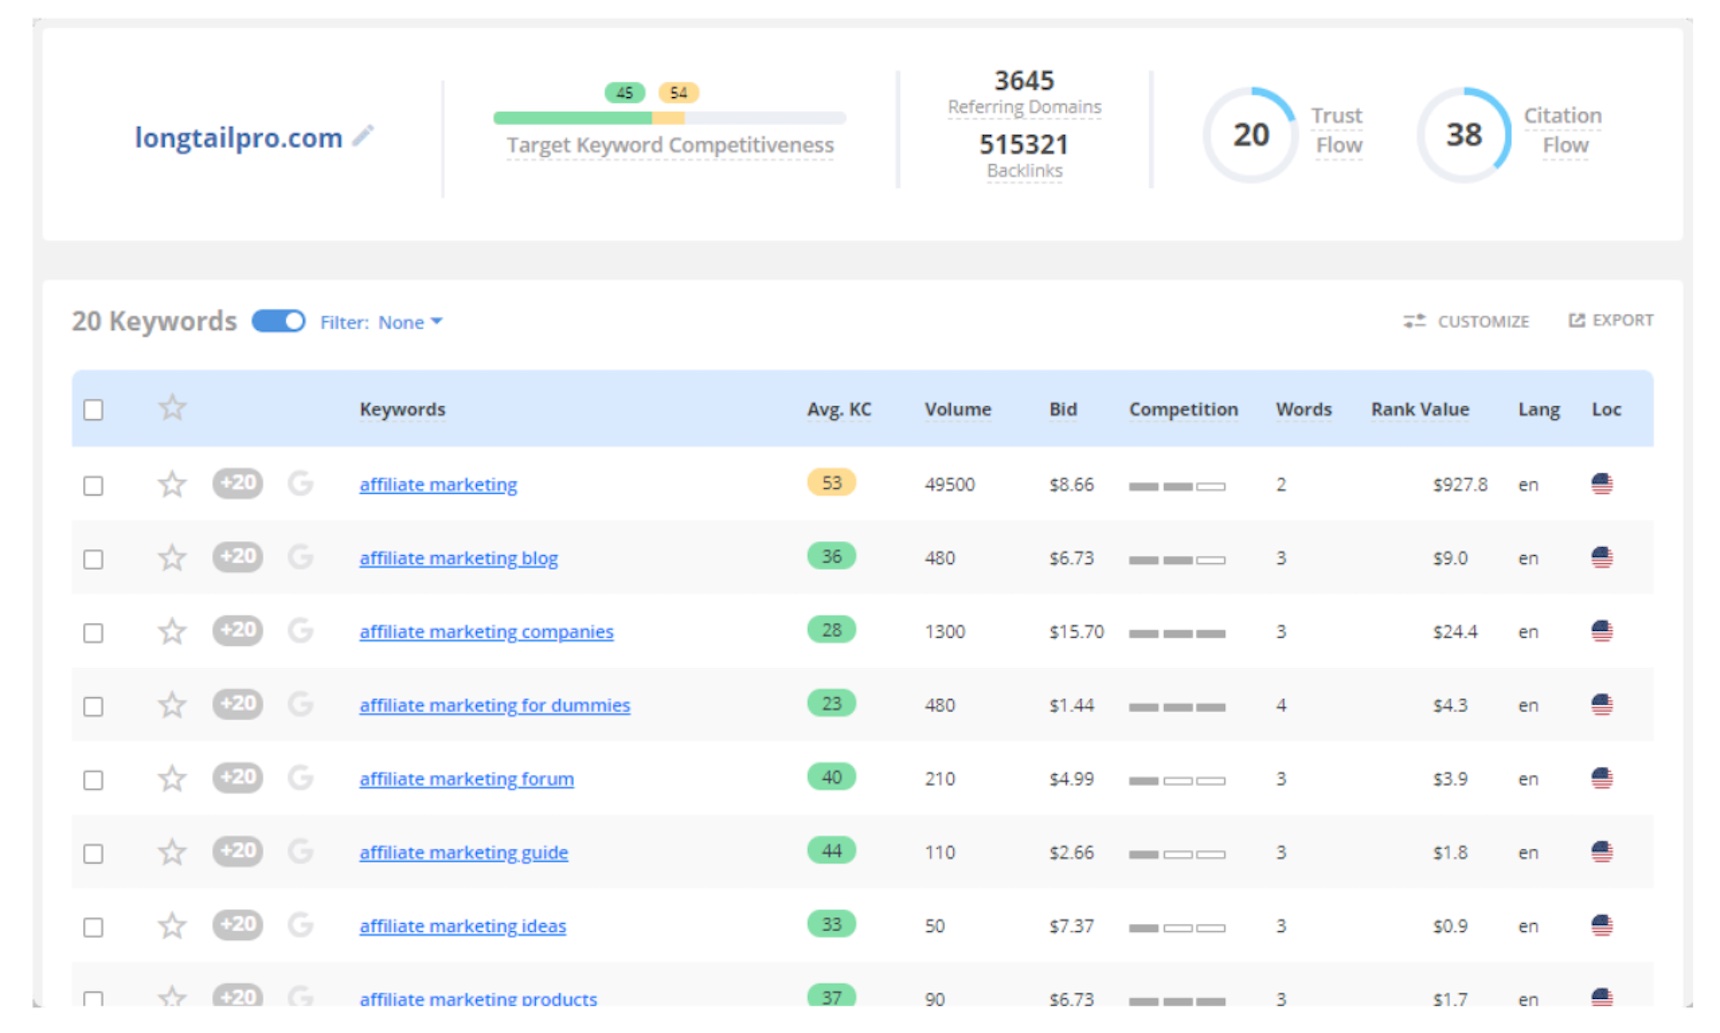
15. Long Tail Pro
Long Tail Pro’s unique features include the average keyword competitiveness rating, a number 1-100 that rates the “viability of the keyword’s competitiveness specific for your brand.” This helps indicate which keywords you should focus on.
In addition, the tool provides a view of the competitive landscape with trust flow, citation flow ratings, site age, and referring domains. Trust flow analyzes the site’s influencer, while citation flow tracks how many times the site is linked.
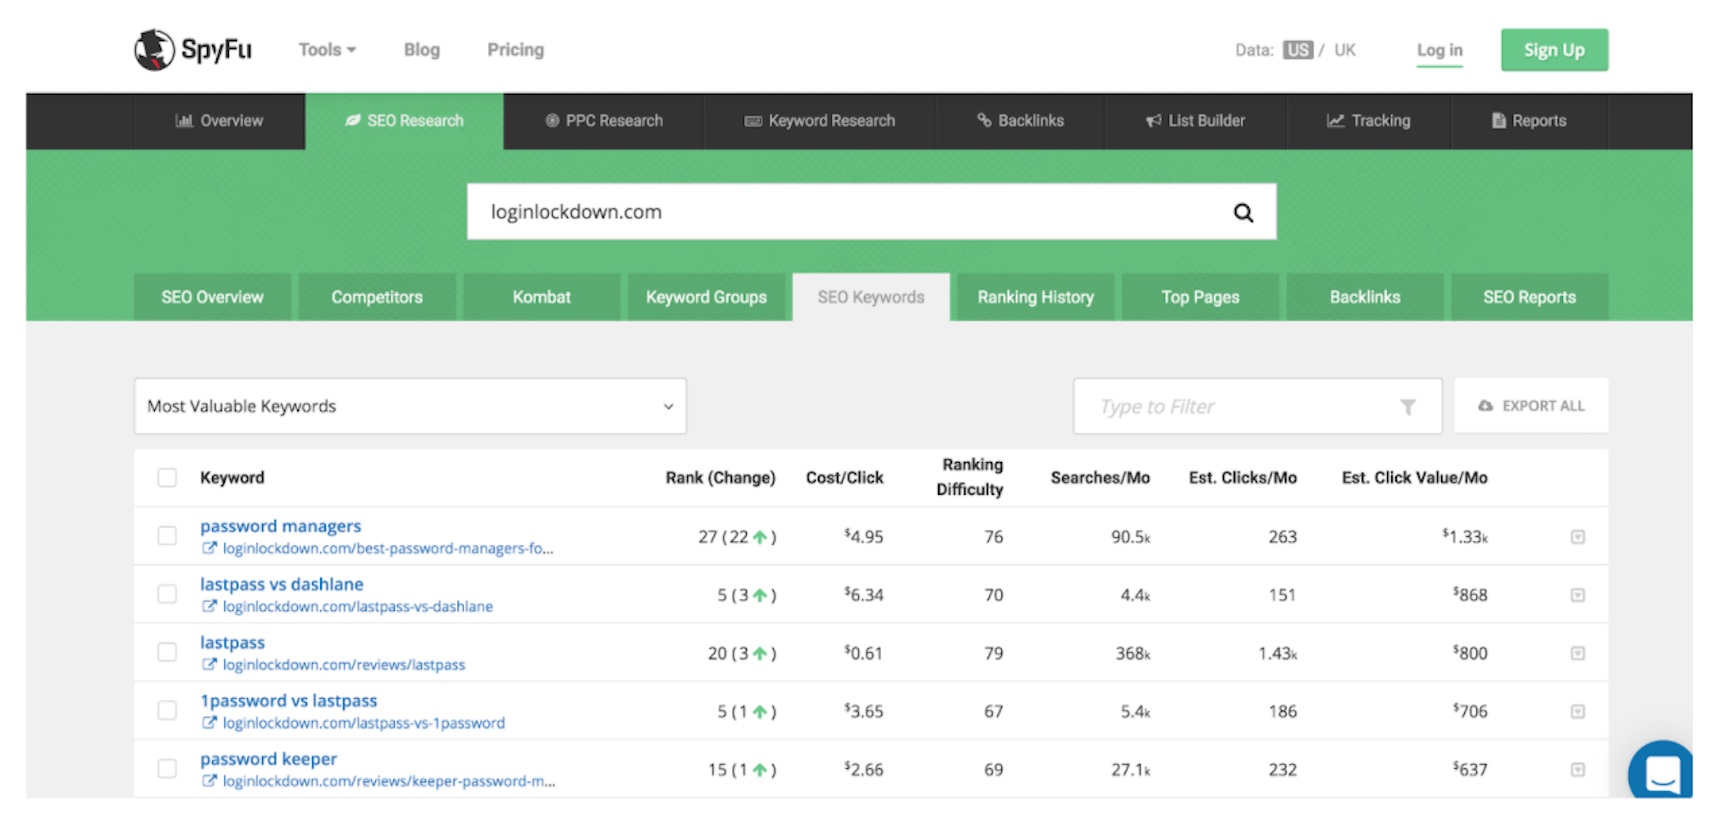
16. SpyFu
SpyFu is a comprehensive SEO tool with a breadth of keyword research and planning features. Without even logging in, you can enter a site to see its SEO overview, competitors, keyword groups, ranked keywords, ranking history, top pages, and backlinks.
In this example, we used Login Lockdown. As you can see, the query pulled the most valuable keywords that the site is currently ranking for and included their change in rank. The keyword overview also provides top ad buy recommendations, a roster of backlinks to pages on the site, and a serp analysis that provides keyword recommendations.
17. Jaaxy
Jaaxy dubs itself as “the world’s most advanced keyword research tool.” The two unique metrics this platform tracks are quoted search results (QSR) and keyword quality indicator (KQI). QSR is the total number of sites that rank for this specific keyword. KQI takes into account the traffic and the competitive analysis to formulate a rating ranging from great to poor.
This helps users evaluate whether or not optimizing content for that keyword is a good idea.
Currently, you can sign up for a free trial of Jaaxy and get 30 free searches that show all the data for the first 15 related search terms. The paid version unlocks the domains feature which will show you available domains related to your search query.
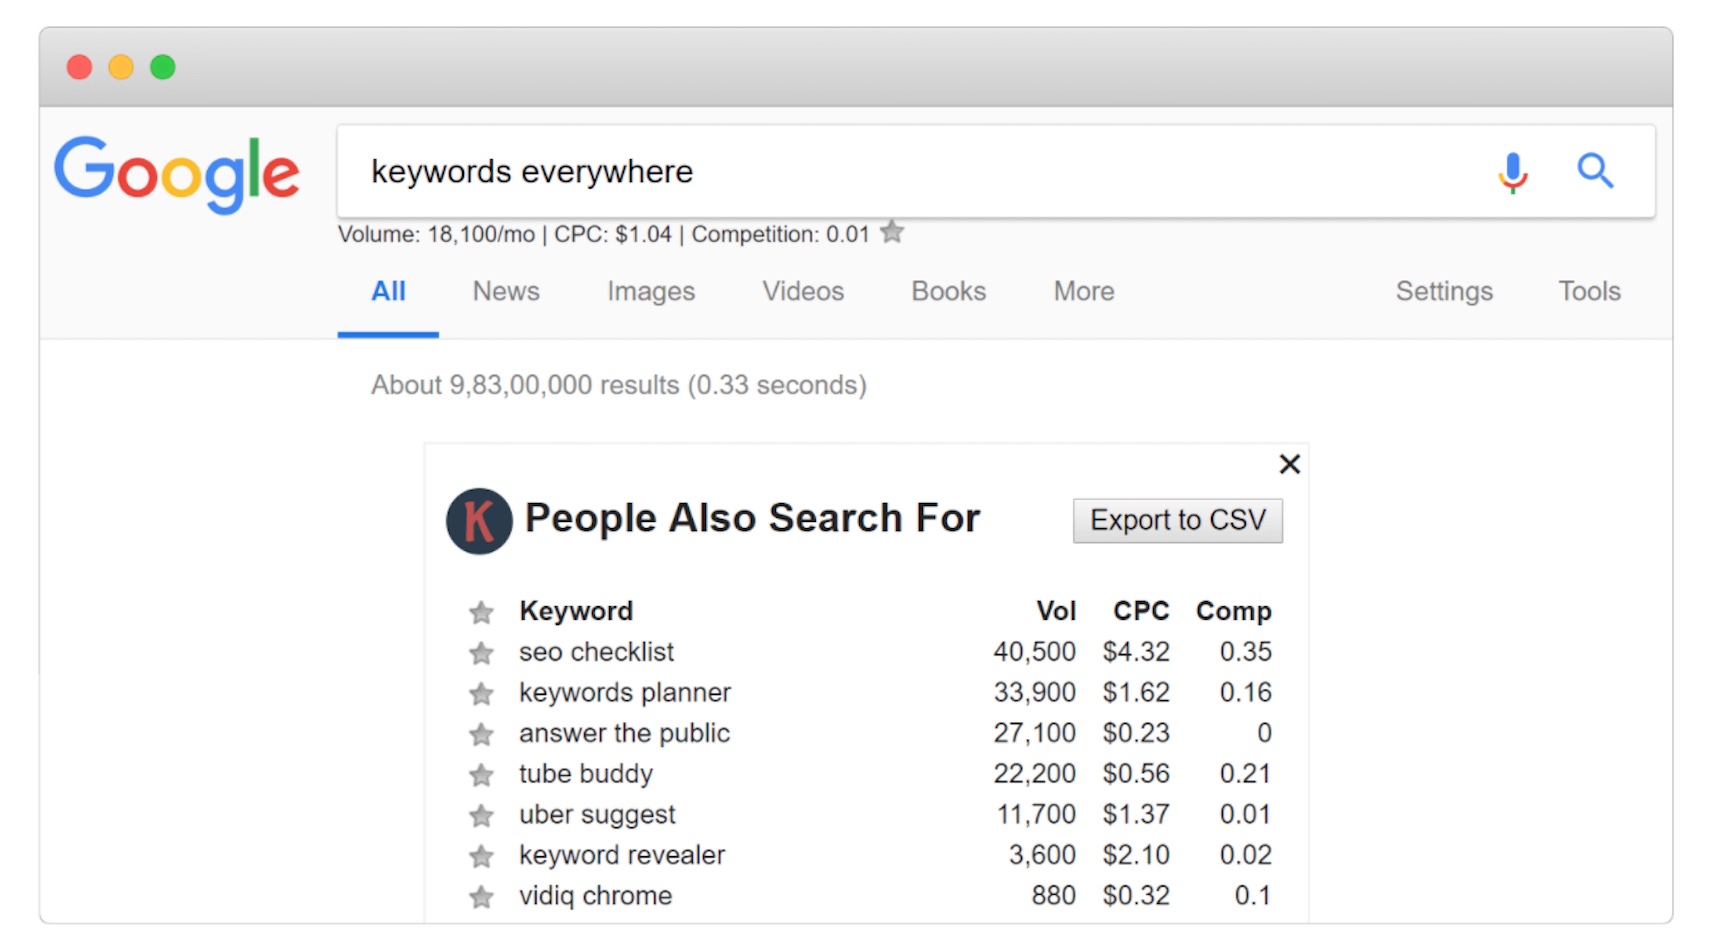
18. Keywords Everywhere
Keywords Everywhere is a Chrome extension that natively integrates with your browser and shows the search volumes, cost-per-click, and competitive rankings for terms you are actively searching.
All you need to do is search your desired keywords and the Keywords Everywhere snippet will show up at the top of the page. This is a useful tool for quick insights, but for long-term SEO planning, one of the other platforms will work better. However, the export to CSV function and ease to delete the box provides a simple and engaging addition to your keyword research efforts.
How to choose the best keyword research tool
Well, there you have it. Over 18 keyword research tools are available at your fingertips. But how should you choose? You need to evaluate which one is right for you.
Aaron Haynes, CEO of Loganix, says, “Keyword research lays the foundation for an effective, impactful SEO strategy. Without it, you’re attempting to build a house with no blueprint.” That’s why selecting the right keyword research tool is so important. Most of the tools listed above offer a free trial. Pick a few and sign up to take them for a test drive.
Then, you’ll be able to pit the programs against each other to decide which feels more intuitive and which gets the results you need. Perhaps budget is driving your decision making process. If so, consider KWFinder, Majestic, Long Tail Pro, Spyfu, Jaaxy, or the Keywords Everywhere extension.
Spyfu’s breadth of capabilities compared to its low price of $33/month is one of the best values I’ve seen.
Keyword Tool
Price
SEMrush
$99-$399/mo.
Ahrefs
$99-$999/mo.
Moz
$99-$599/mo.
Serpstat
$69-$499/mo.
KWFinder
$26.91-$71.91/mo.
Majestic
$49-$399/mo.
Long Tail Pro
$25-$98/mo.
Spyfu
$33-$39/mo.
Jaaxy
$49-$99/mo.
Keywords Everywhere
$10 for 100,000 credits
If price isn’t an issue, consider what aspect of the keyword is most important to you. After compiling this research, the following tools would be the ones I would select for each primary use case:
Competitive Research: SpyFu has everything you could need to benchmark against your competitors. Add their sites to begin tracking. Sign up for email alerts to be delivered to your inbox. With a name like SpyFu, would you expect anything less?
Link Monitoring: Majestic is almost solely focused on backlinks. The platform not only shows how many backlinks your page has, but also separates them into different classifications depending on the type, IP address, referring domain, and more.
On-Page Suggestions: SEMrush has a complete On Page SEO Checker that is built to improve your optimization, identify relevant unused keywords, and compare your pages to your competitors. For example, when it comes to optimizing for on-page SEO, you not only need to use the right keywords – but also the correct form of grammar. I typically recommend using a grammar checker tool to ensure everything is best optimized.
Technical SEO: Ahrefs, one of the golden standards in SEO, offers site audits. It will crawl your site and identify internal links that need fixing, site speed issues, and more.
As with any tool, each can provide value, but it’s up to you to extract the insights and use them to execute traffic-generating campaigns.
Conclusion
Keyword research is an essential part of your SEO process. It can quickly direct marketers to the topics and content that customers are seeking. However, marketers should only use the data as a guide. The numbers reflected in keyword research tools are estimates that should inform their marketing strategy, but not define their every move.
Depending on your budget and SEO needs, there is a tool that can help you and your business’ content strategy. Without the right keyword research tool, you’ll miss out on valuable data that can help you drive more traffic and convert more sales.
While you might be running a decent website, you could be limiting users from becoming customers if your site is only in one language. Creating a multilingual website is simply better than having a single language site for a number of reasons.
A multilingual site will add extra value to your website. By having one, you’ll not only gain the upper hand over your competitors but you’ll also win the hearts of your customers in their native language. This is particularly true if you’re operating a local website and you never know which language that your customers are most comfortable with.
In this article, we’ll discuss why you need to have a multi language website and how Polylang can be used for free in Jupiter X to achieve this goal.
What is Polylang?
There are many translation plugins out there in the world of WordPress plugins. You have a plethora of options – from paid to free plans or for a particular reason or general use. For the purposes of this article, we’ll use use the popular plugin Polylang, which we highly recommend because it’s easy to use and free.
With Polylang, you can add as many languages as you want to your WordPress site, as well as create pages, posts, custom post types, or taxonomies and define different languages for them. It also supports the right to left languages (RTL).
Let’s identify the key features of this plugin:
Manual translation of the content
Unlimited amount of the supported languages
Easy-to-use interface and easy-to-configure settings
translation services, and your content will be translated by language professionals.
How to setup Polylang
Now let’s try to create a multilingual site that is fully functional using Polylang and Jupiter X. I’d like to also mention that, in this case, the Jupiter X theme is not a special theme. All the plugin’s settings that work in Jupiter X will work in another theme as well. In other words, this tutorial isn’t only for Jupiter X.
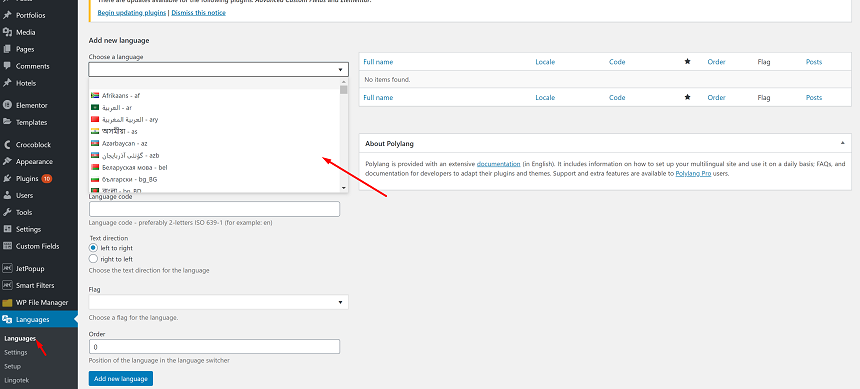
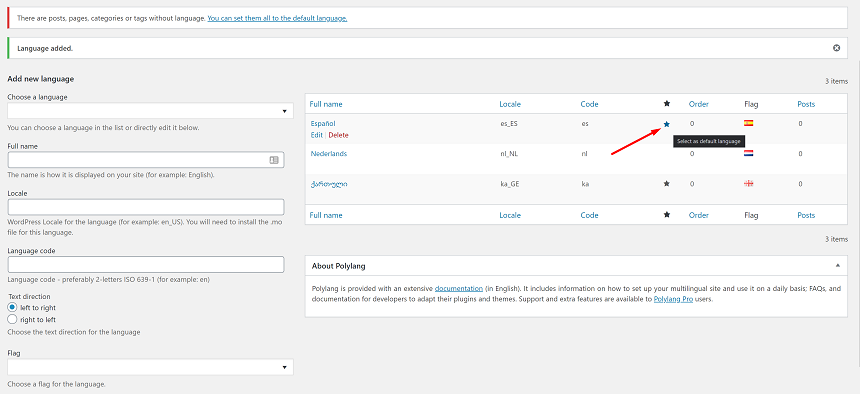
First of all, we need to install the plugin. This can be done from WordPress dashboard > Plugins > Add new. Then search for Polylang, install it, and activate. Right after activation go to settings and choose your language:
Once you add Languages, you may choose the default language of your site by clicking on the star icon here:
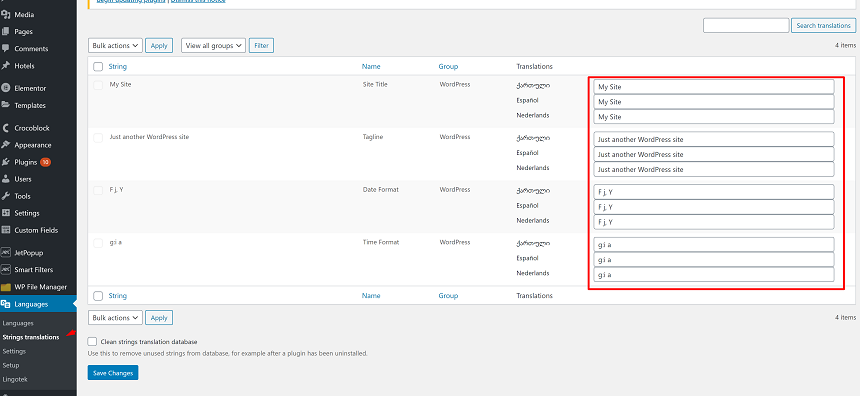
The next step in creating a multilingual site is to visit the Strings translation page, where you’ll be able to translate some of your sites important texts like the website’s name, site’s title and format of the date for different languages:
Basically, we are done with setting up the plugin and are now ready to work with the multilingual posts, pages, menus and other content types on the site:
Multilingual post types
Posts, pages, portfolios, and other post types are the main content of your website, the reason you are making a multilanguage website is your content, Polylang simplifies working with multi language content
To add a multi language page (post or any other post type), go ahead to your post type. In this case, we’ll use pages, open all pages, and on the right side of the page names you will see + sign at the page where you need to add another language, once you click on the button, you’ll be redirected to the page with the selected language for editing:
By opening this page, you’ll see a native screen where you’ll need to add the name of the page and the content.
Multilingual Menus
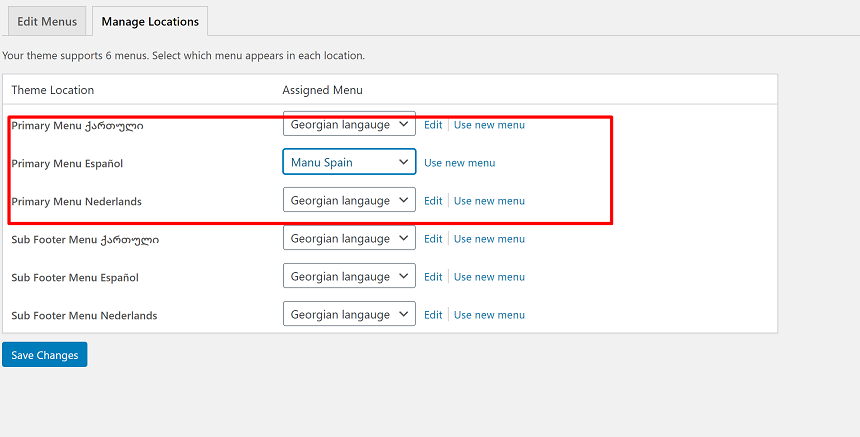
Needless to say, your site also needs multi language menus. When the user switches from one to another language, you might show them different content, but language in the menus must change as well.
In order to add multi language menus to our site, open Appearance > Menu and create different menus for different languages. For instance, if you have 3 different languages on the site, you need to create 3 different menus and once you are done creating them, you can set them from the menu location. Here’s how it’s done:
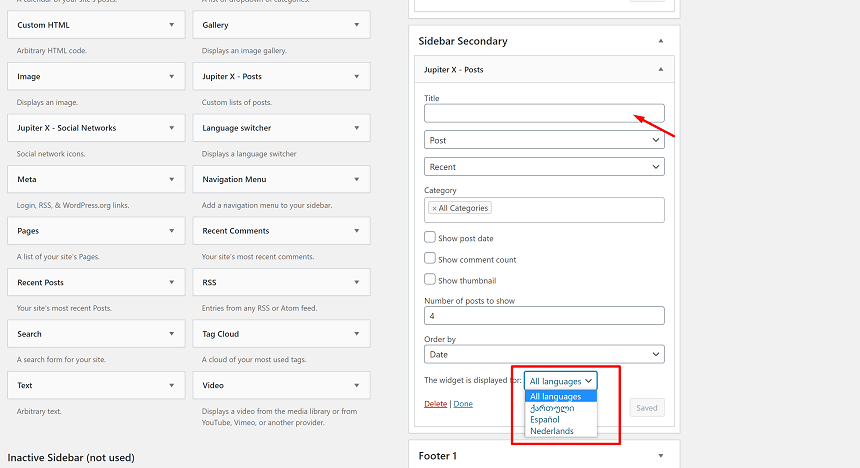
Multilingual Widgets
Now, let’s take a look at the widgets. They can be accessed in Appearance > Widgets. Once you add any widget in the sidebar or in the footer, you’ll notice that it has a dropdown language switcher. This feature allows you to set different parameters for different languages:
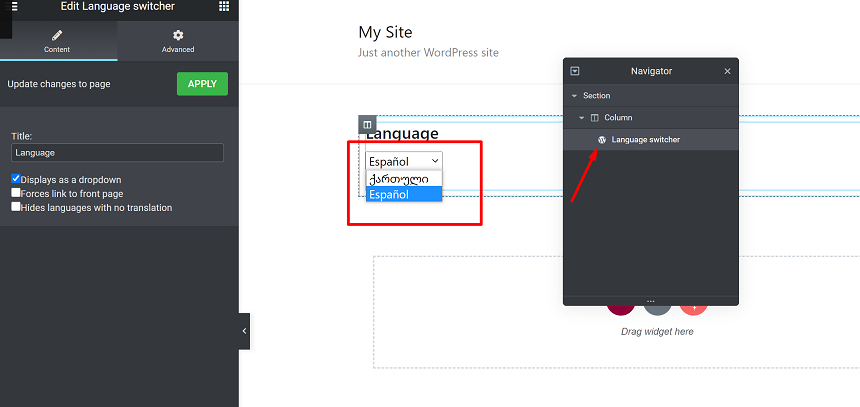
Language switcher
The Language switcher is probably the most important front page element on your multi language site. It’s an indicator that shows you the multilanguage site. Without this element, no one would be able to notice that your site is multi language, and switching from one to another language would be impossible.
The Language switcher can be accessed in the same location as a widget, in addition, it can be also accessed in the Elementor page builder. This feature in Jupiter X allows you to place the Language switcher anywhere you’d like to have a language selector on the site. It can be placed in the header or the footer.
Conclusion
What we’ve covered in this blog post were the general configuration steps and setup procedure for the Polylang plugin to create multilingual content that can be used on any kind of site. If you have a specific question that is related to the uncovered theme in this plugin, you may use official documentation of Polylang. We’d love to hear about your experiences with Polylang in the comments section below!
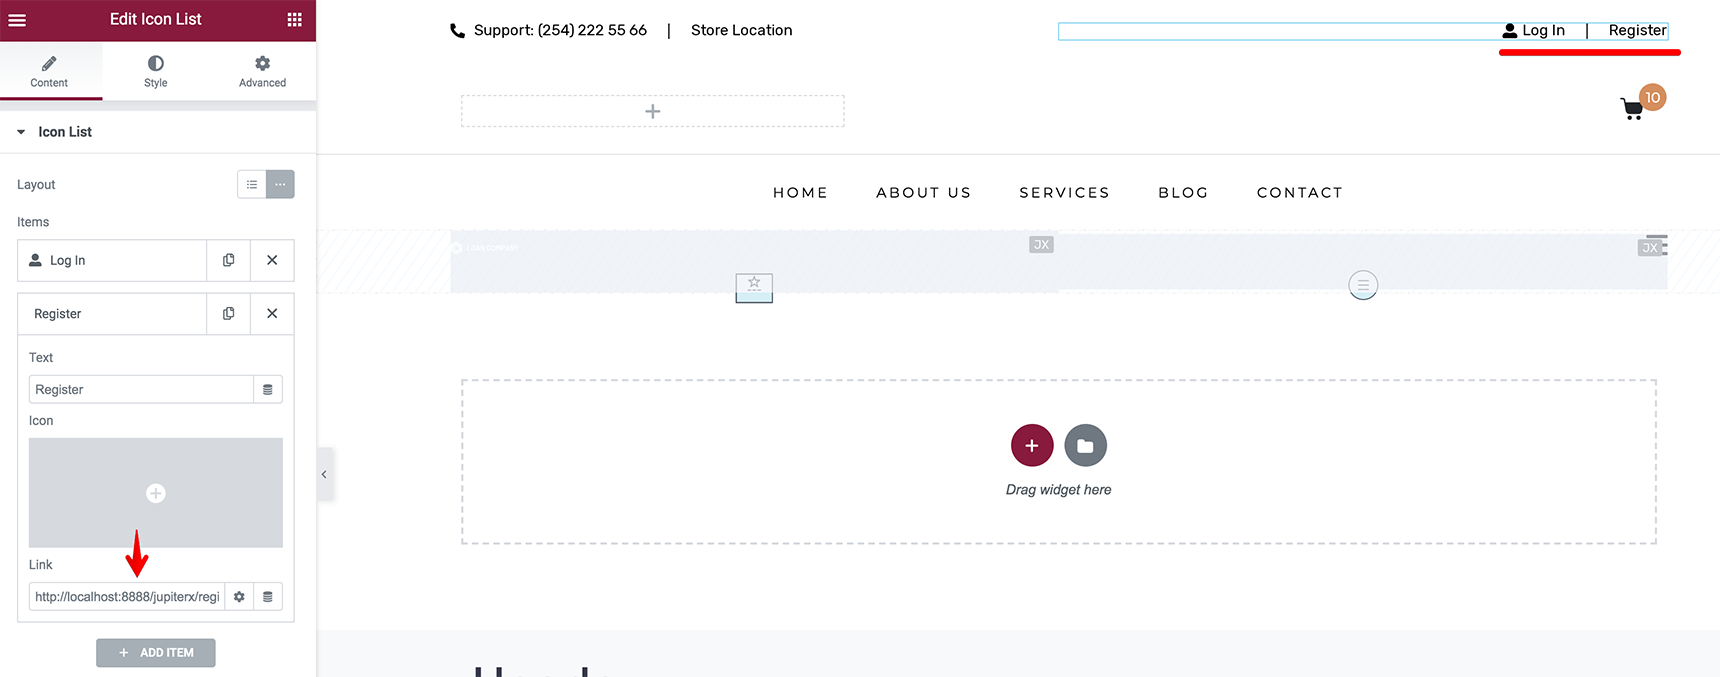
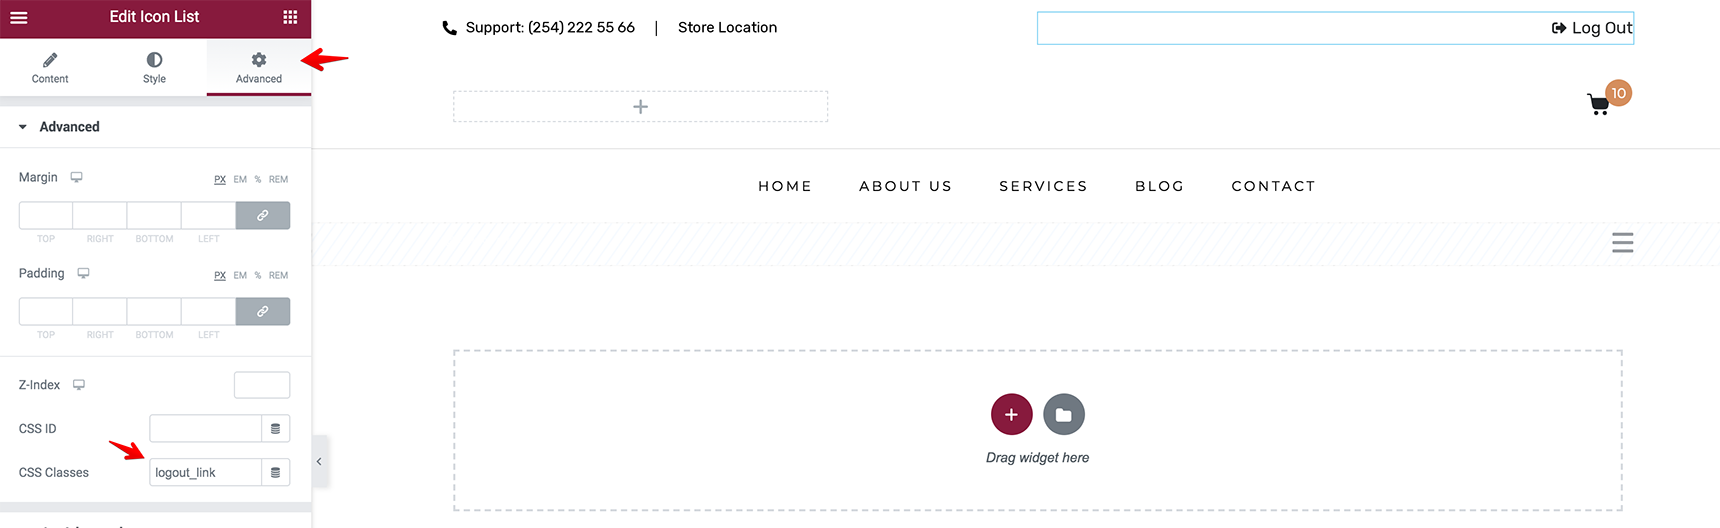
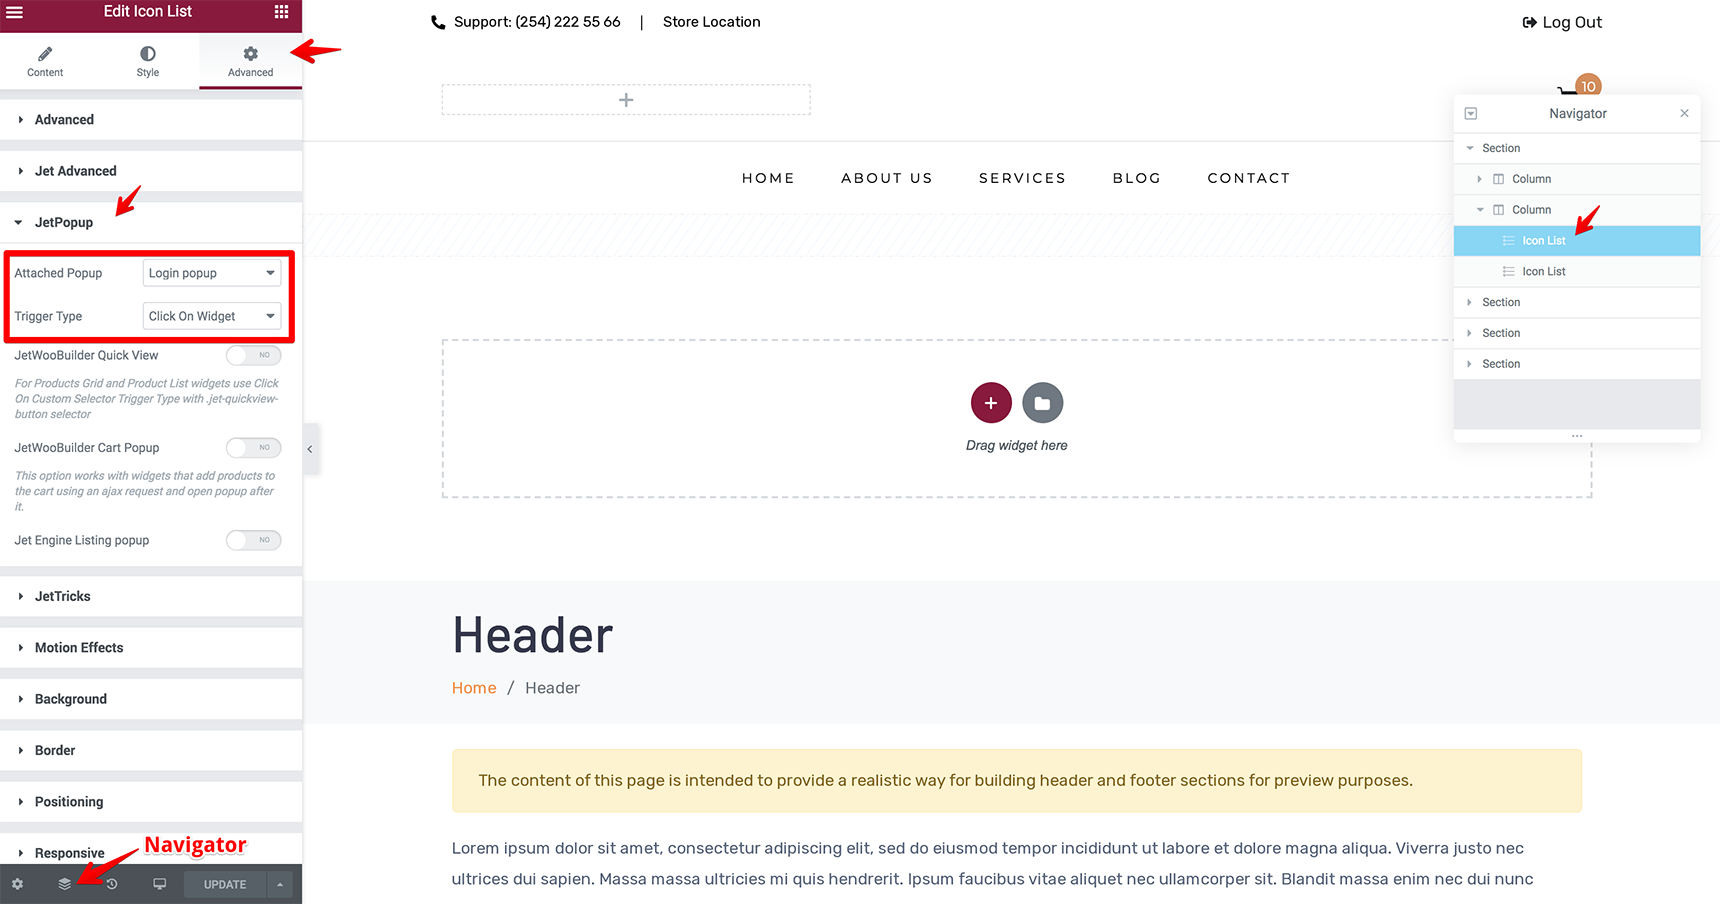
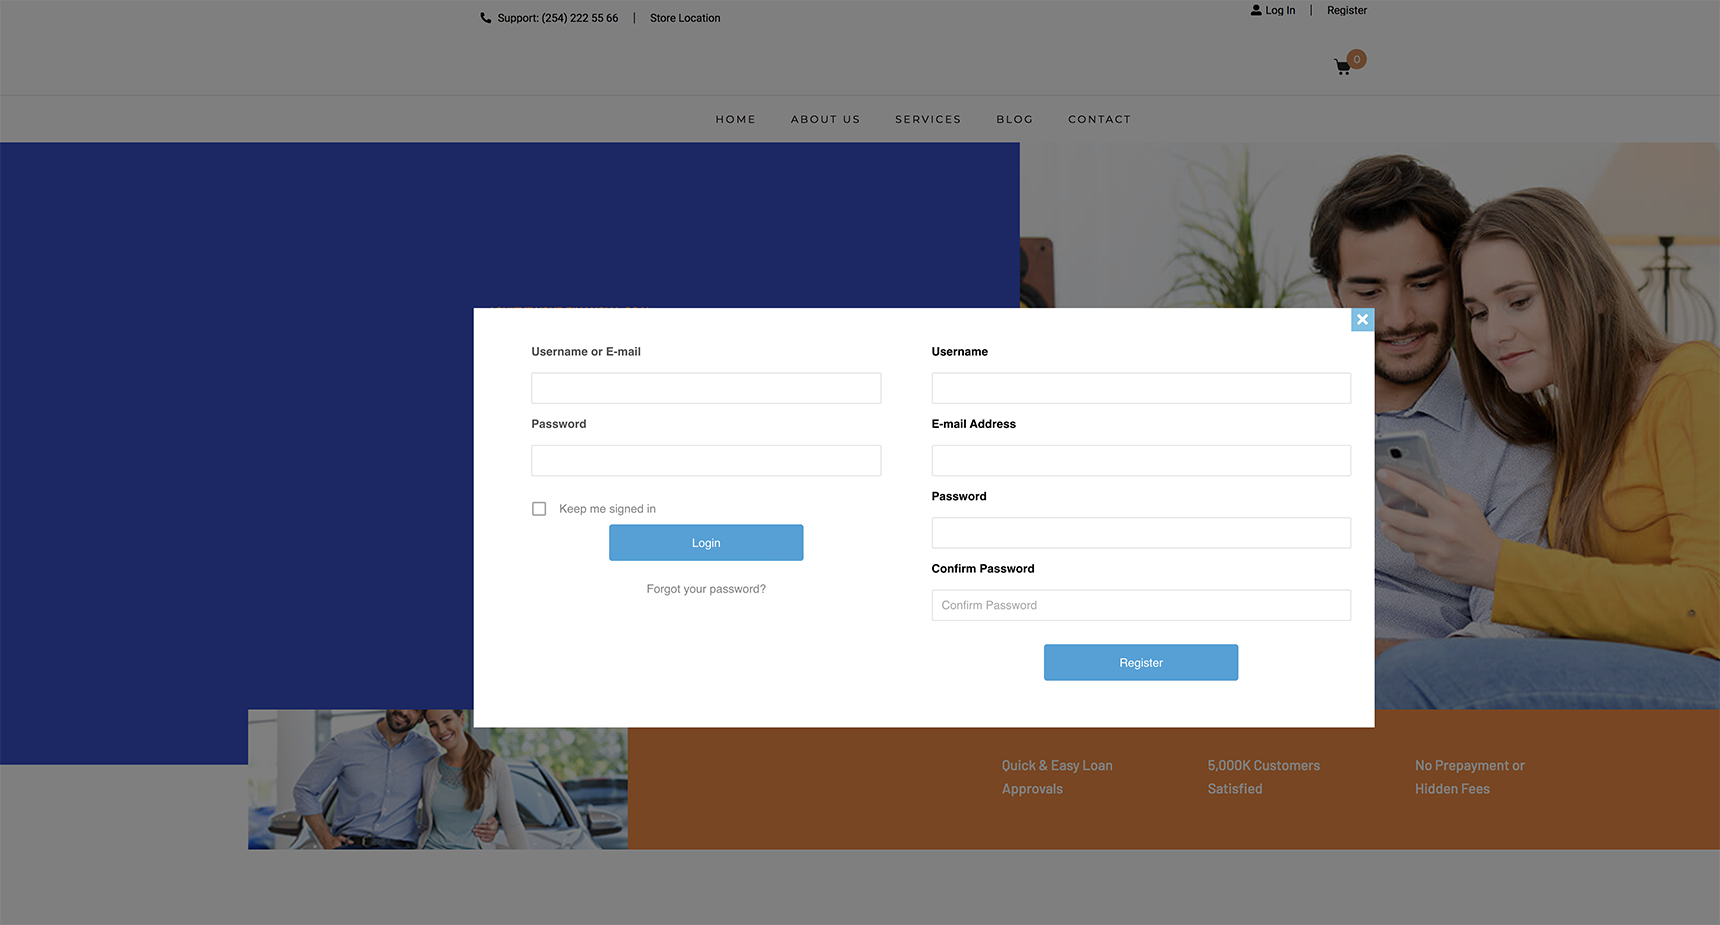
In WordPress, to access the login page of your website, you can use the default WordPress URL yourdomain.com/wp-login.php. But what if you have a large website with different authors? Then, you might need to create a custom login/register page – this is necessary for shop sites that require users to log in before making a purchase. You can build these pages with the help of Elementor and Ultimate Member plugins, both of which are already bunded with the Jupiter X theme.
In this article, I’ll show you how to build and customize login/register pages with Jupiter X by adding login/register buttons in the header and link them to custom pages with the appropriate forms or to enable the forms as a popup window.
Steps before creating a form
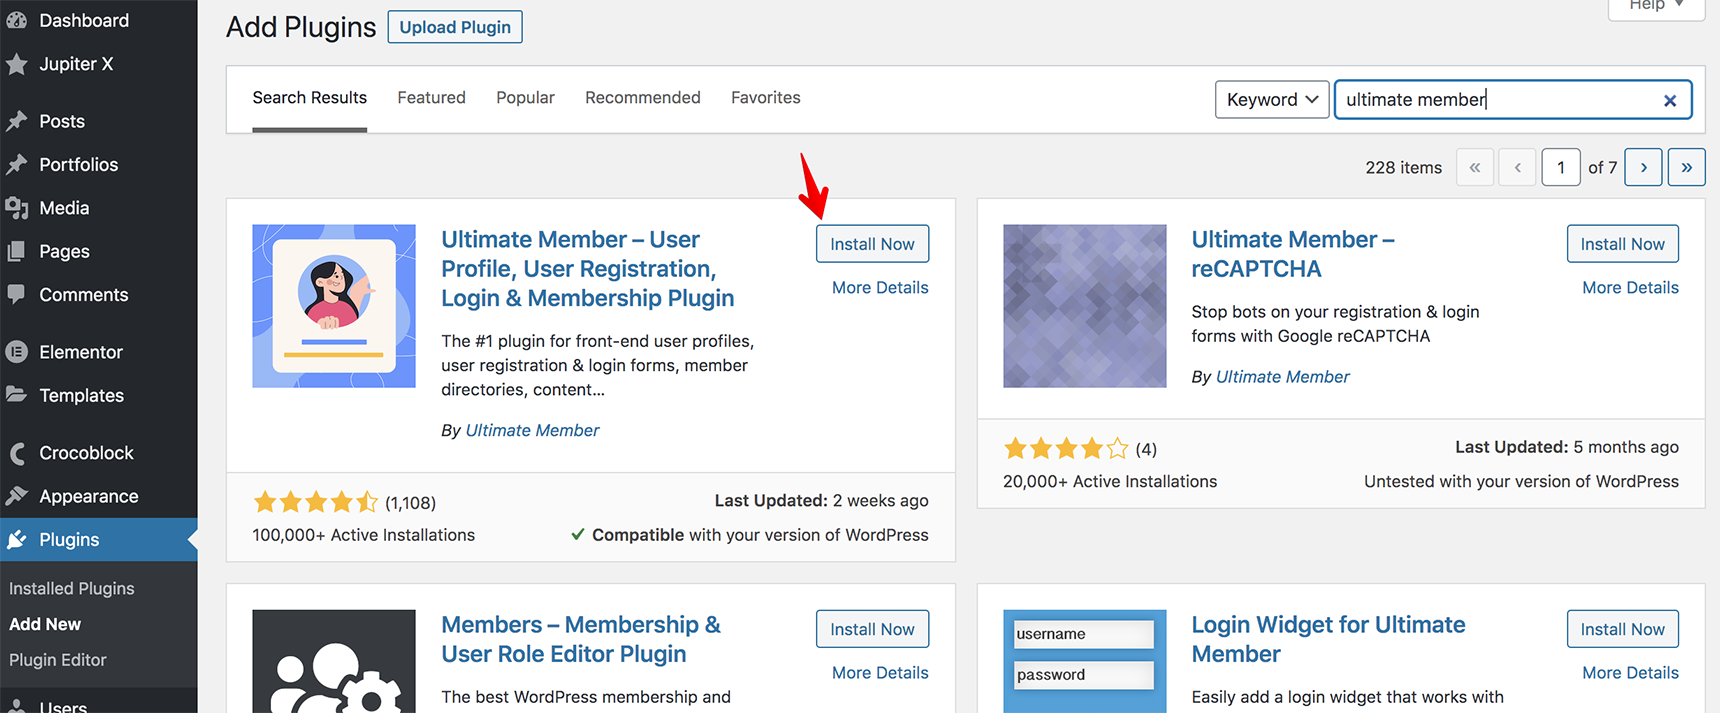
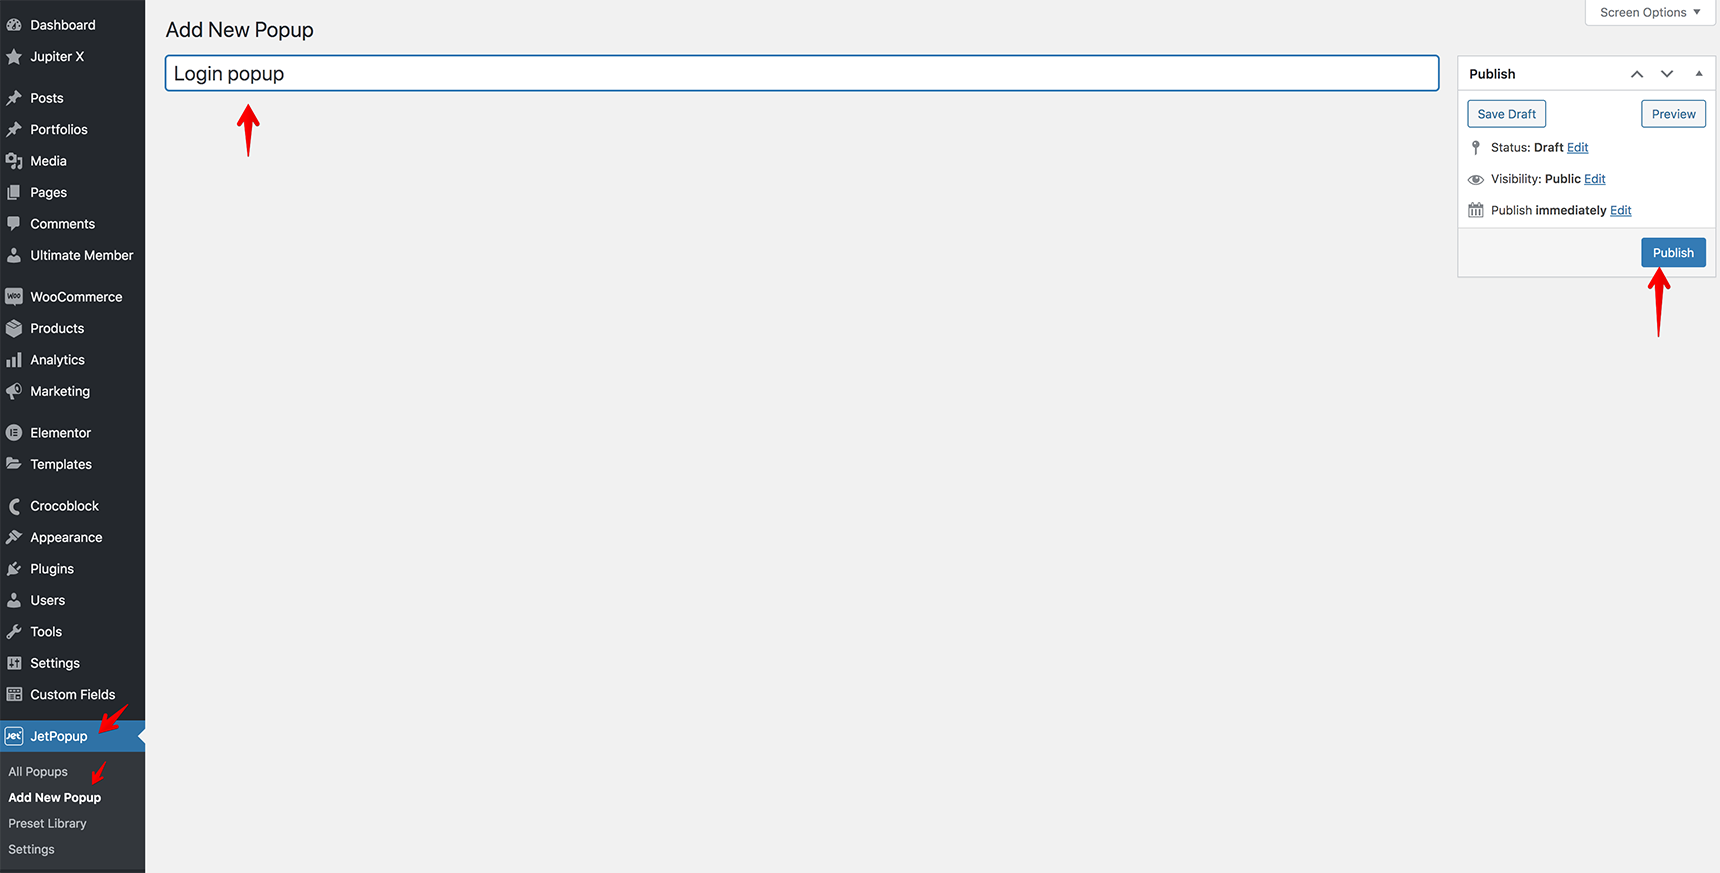
Before getting started on creating a login/register page with Jupiter X, you need to first install the Ultimate Member plugin on your WordPress site. Add this plugin as any 3rd-party plugin of WordPress: go to Plugins > Add New in the dashboard as described in this article.
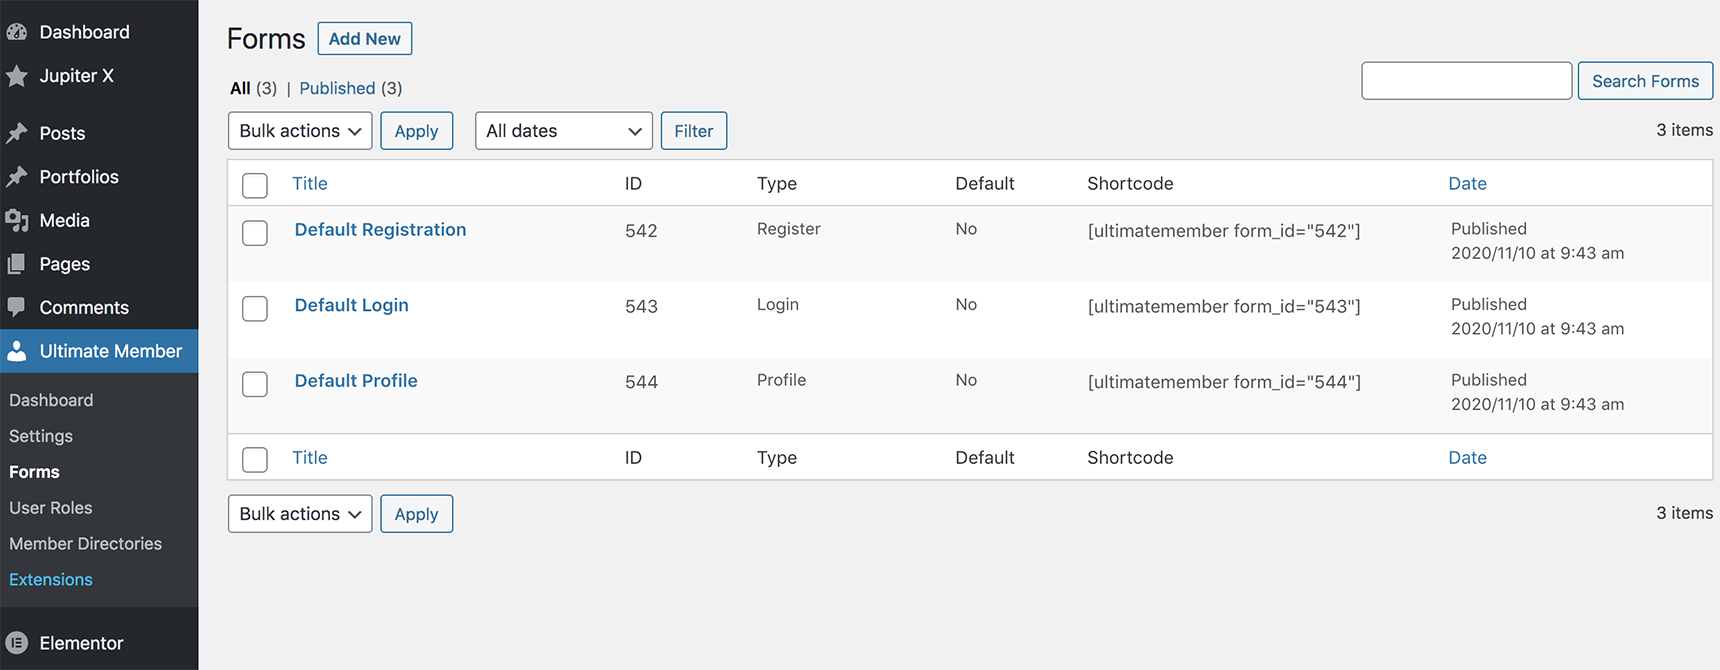
Once the plugin is installed and activated, you need to create the Login and Registration forms. You can also create a default Profile page if you want to redirect a user to it after they’ve successfully logged in.
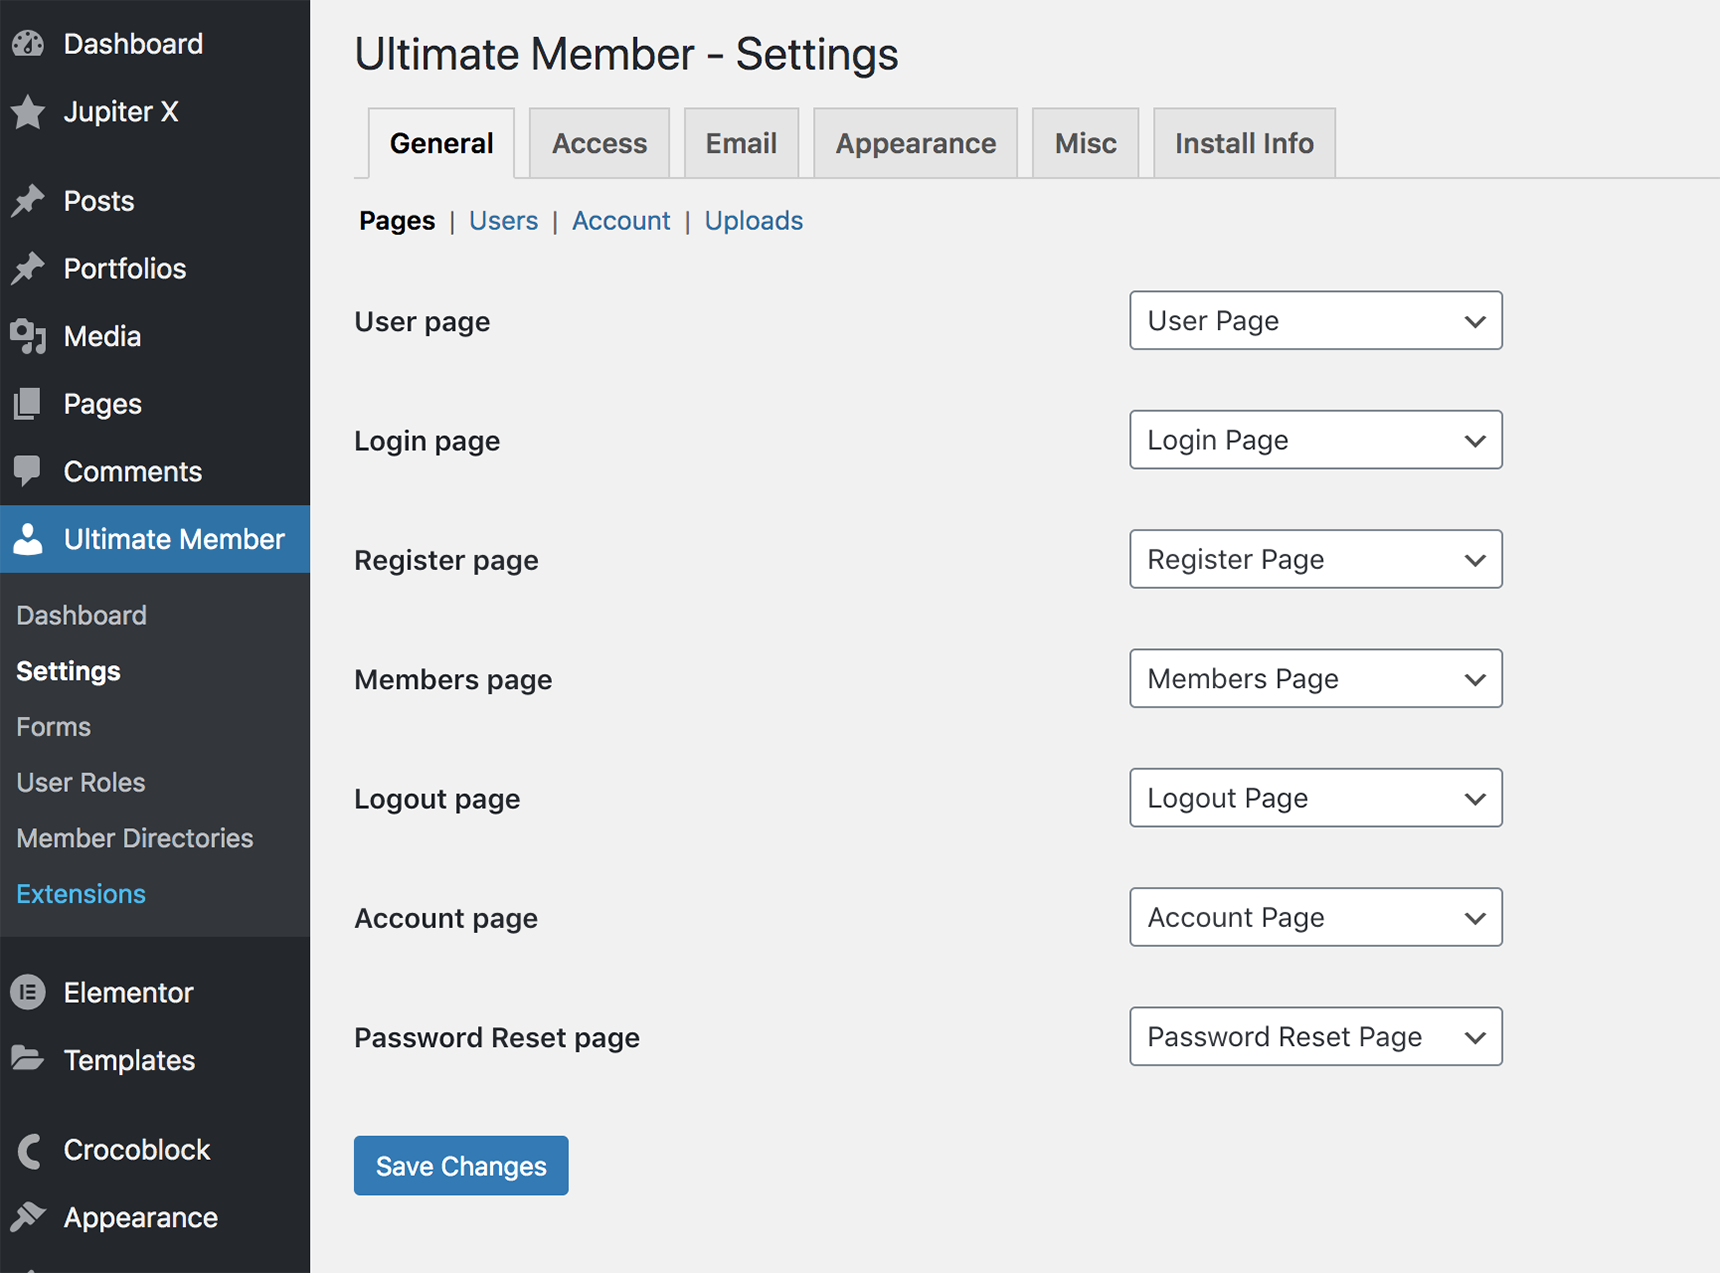
After the installation, you’ll see Pages in the Ultimate Member Settings:
They are required for the plugin to work properly. Find more information about the pages in the Ultimate Member documentation. If the pages have been deleted for some reason, you’ll need to create them, add the form shortcode and assign the appropriate page in the settings.
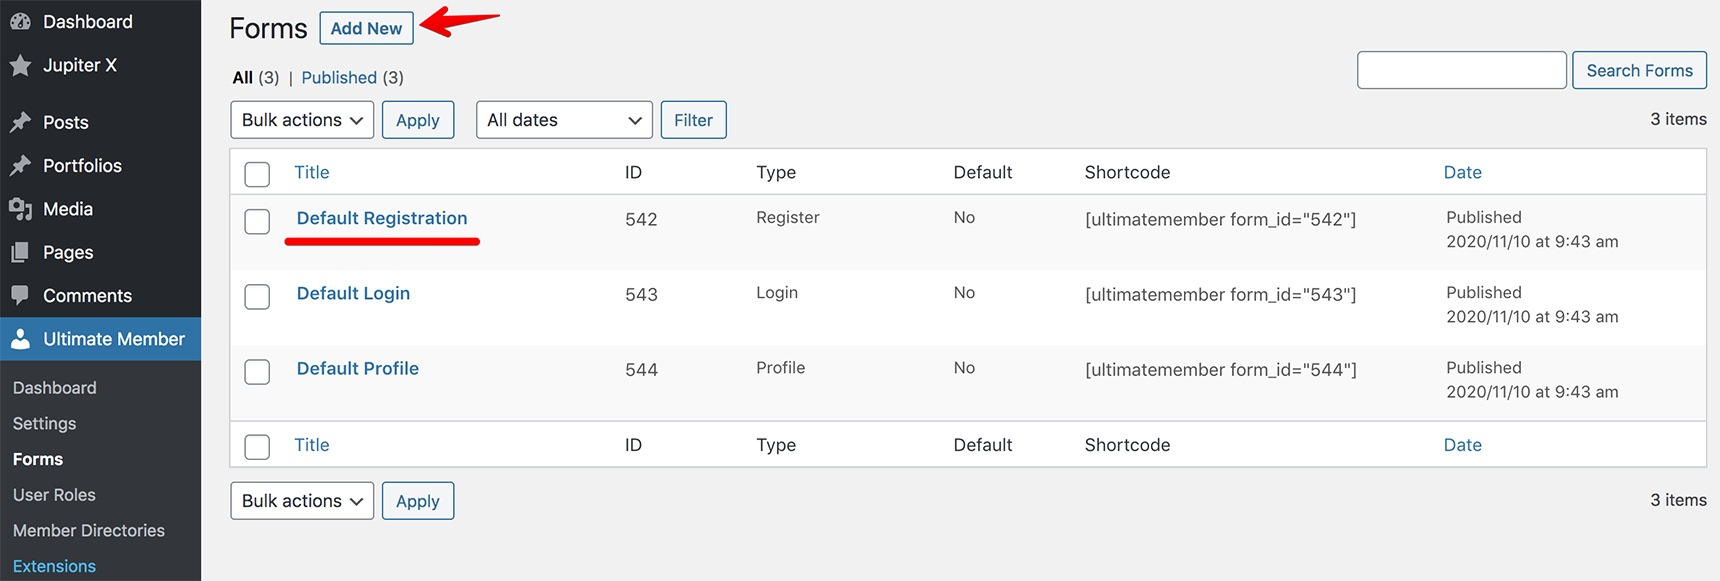
Creating the registration form
To start creating the registration form, go to Ultimate Membermenu > Forms. There you’ll be able to edit a default form or create a new one.
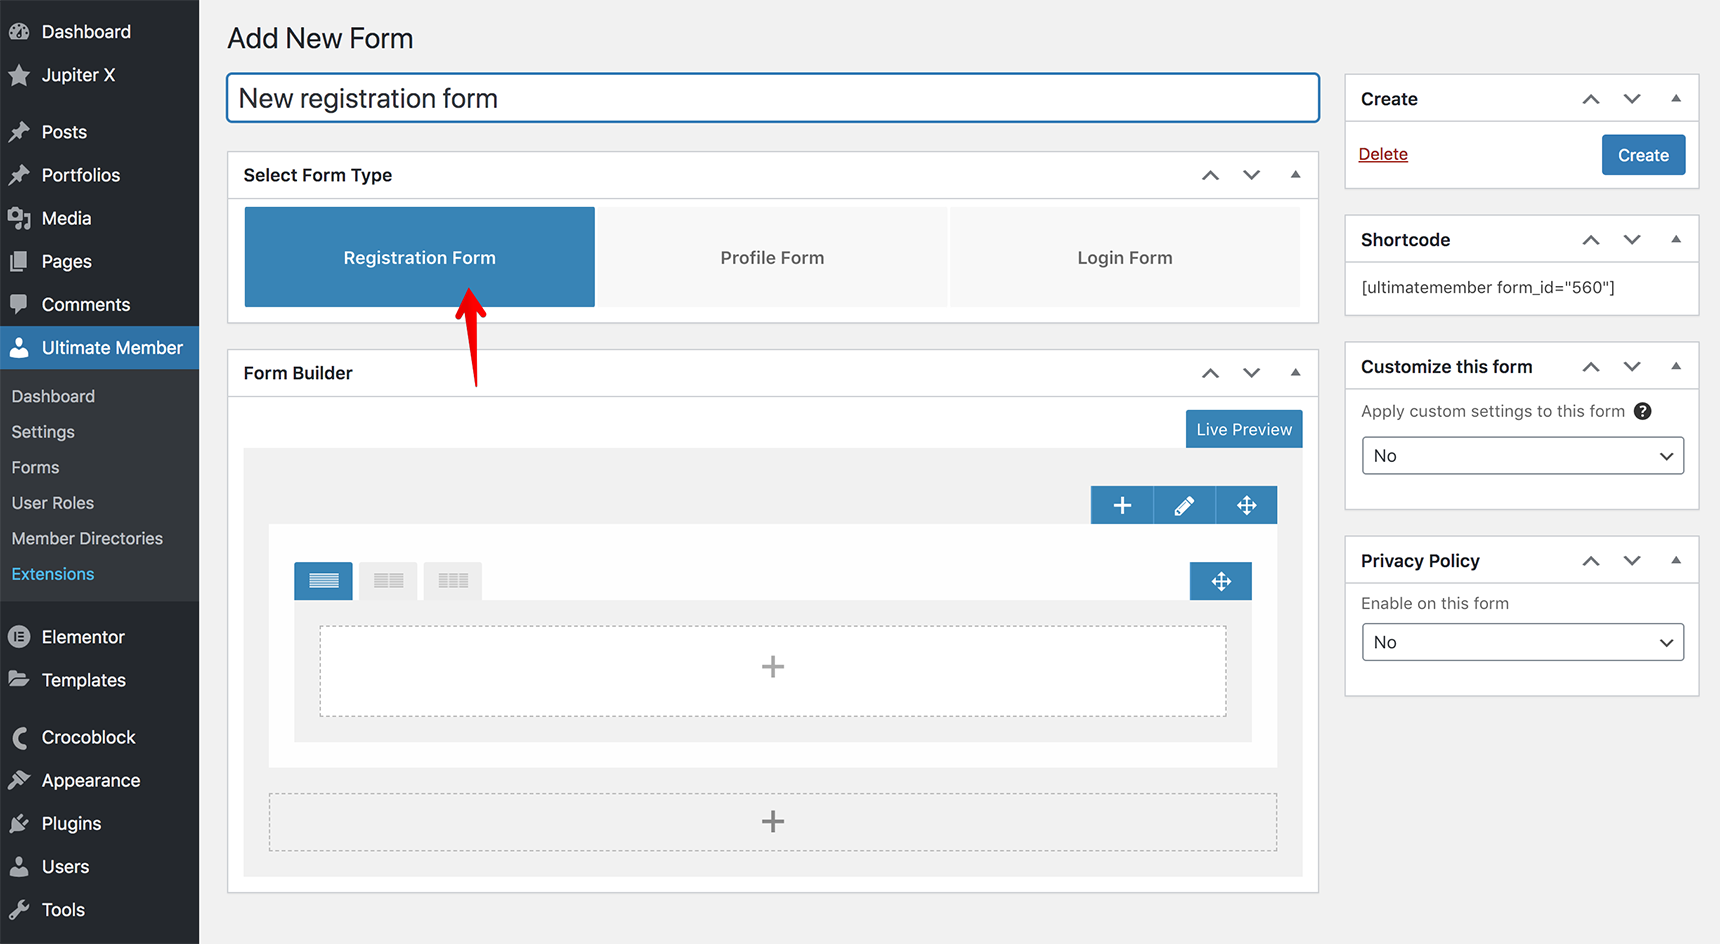
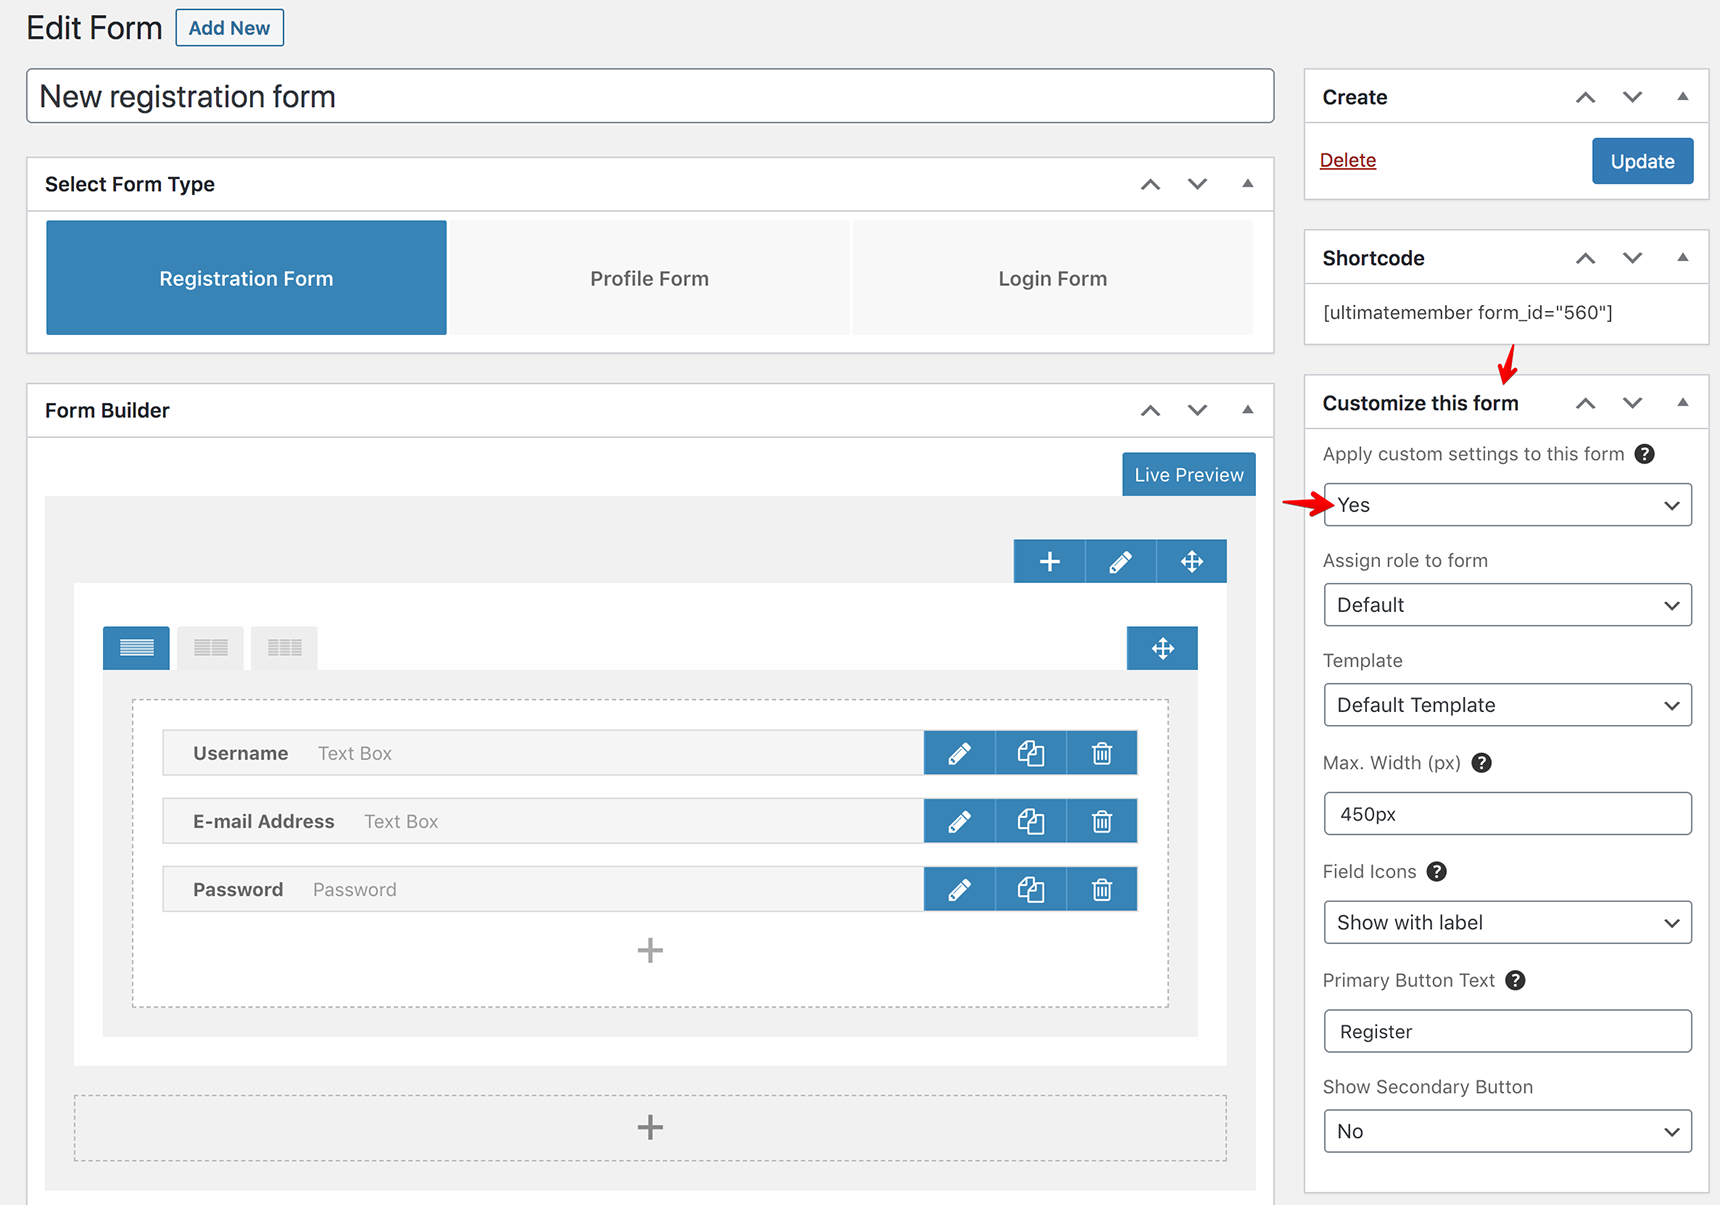
Let’s add a new form: click on the Add New button, you’ll be shown a New Form page where you’ll need to write the title of the form and select the type – Registration Form.
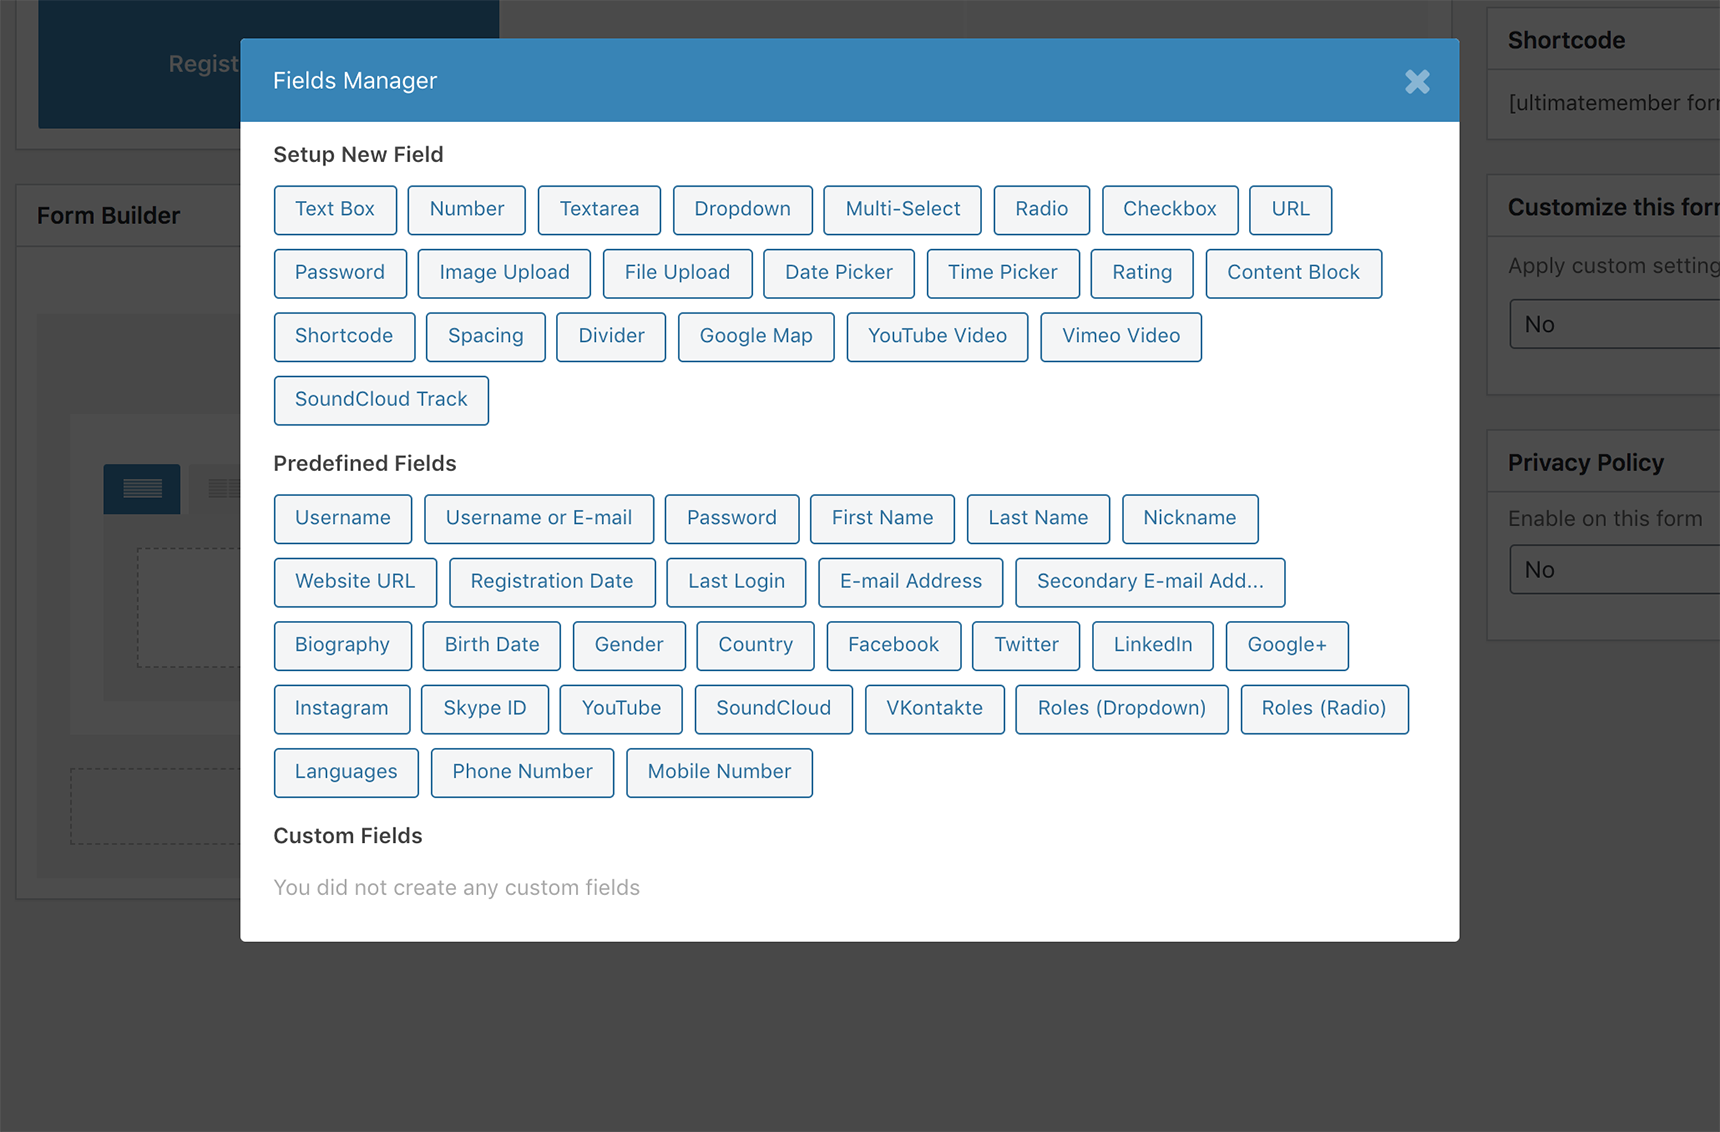
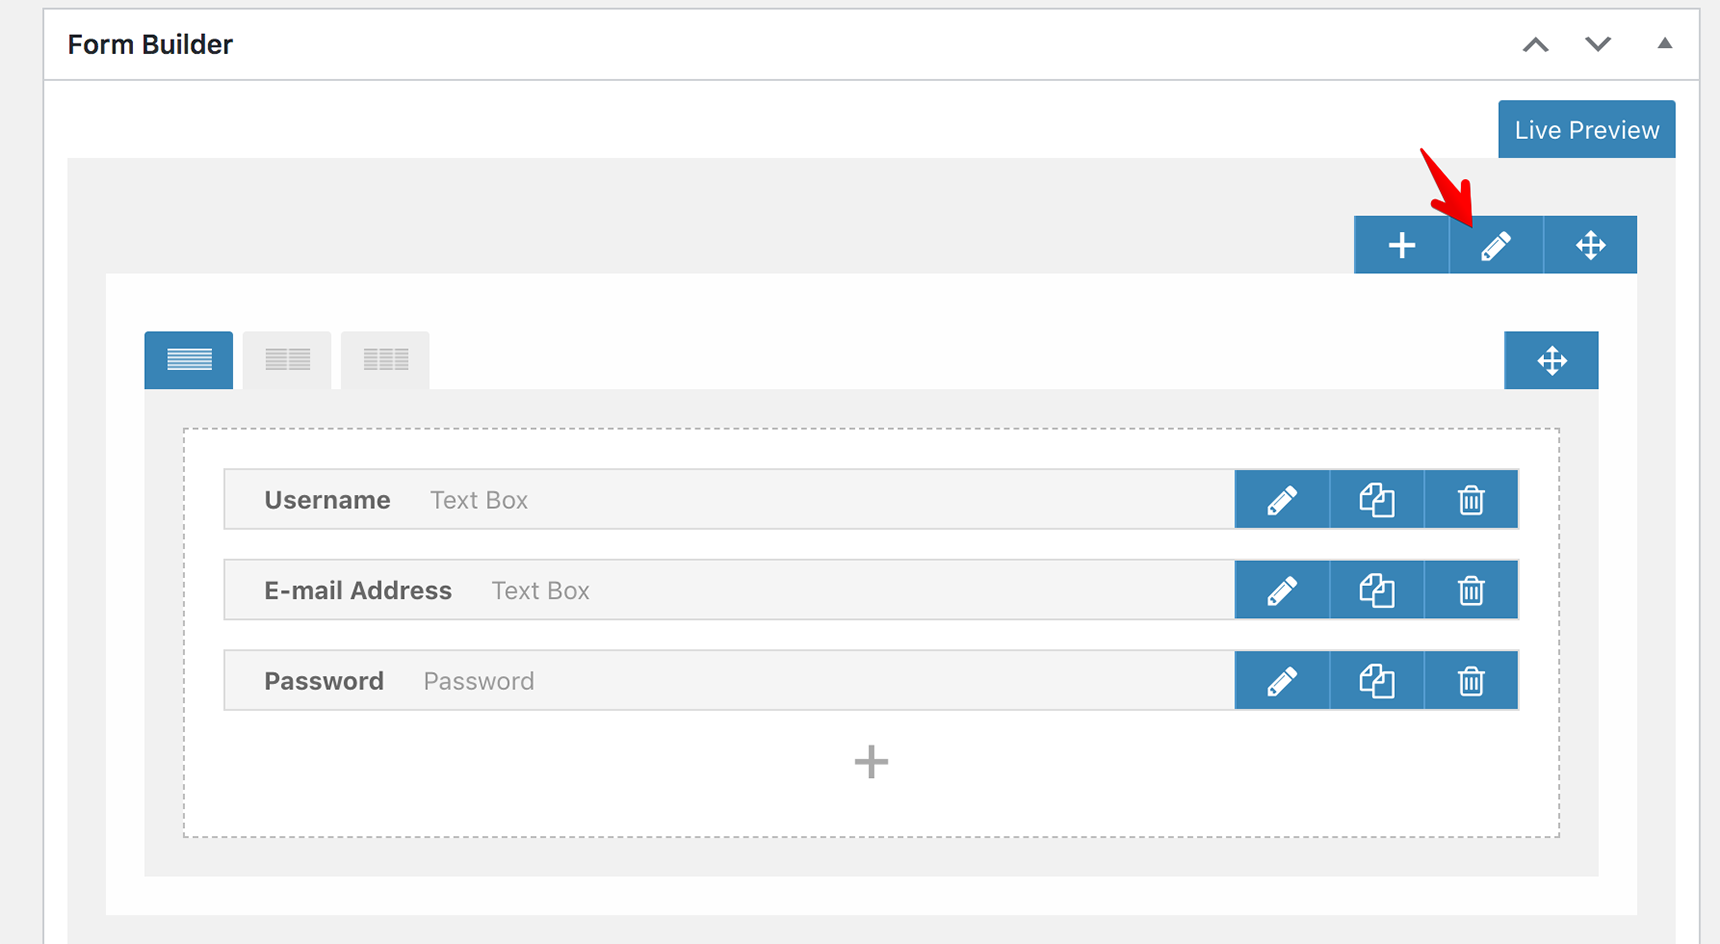
Below, there is a Form Builder where you can add the fields to the form. Let’s add the fields Username, Email Address and Password. Click on the plus icon to add the new fields.
From the Predefined Fields section, select Username. This field will be added to the form, and you’ll just need to click the plus icon again to add another field. Once all fields are imported, click on the Create button on the top right side.
There is a possibility to style the fields – you can set the background and text colors, edit padding values, borders, etc. To do this, click on the pencil icon, and a modal window will pop up with the styling settings.
Other customization options can be found on the right side of the form editor under Customize This Form section, select Yes for the Apply custom settings to this form setting. Here you’ll be able to assign a user role to the form, change the form width and rename the button from Register to whatever you’d like to name it.
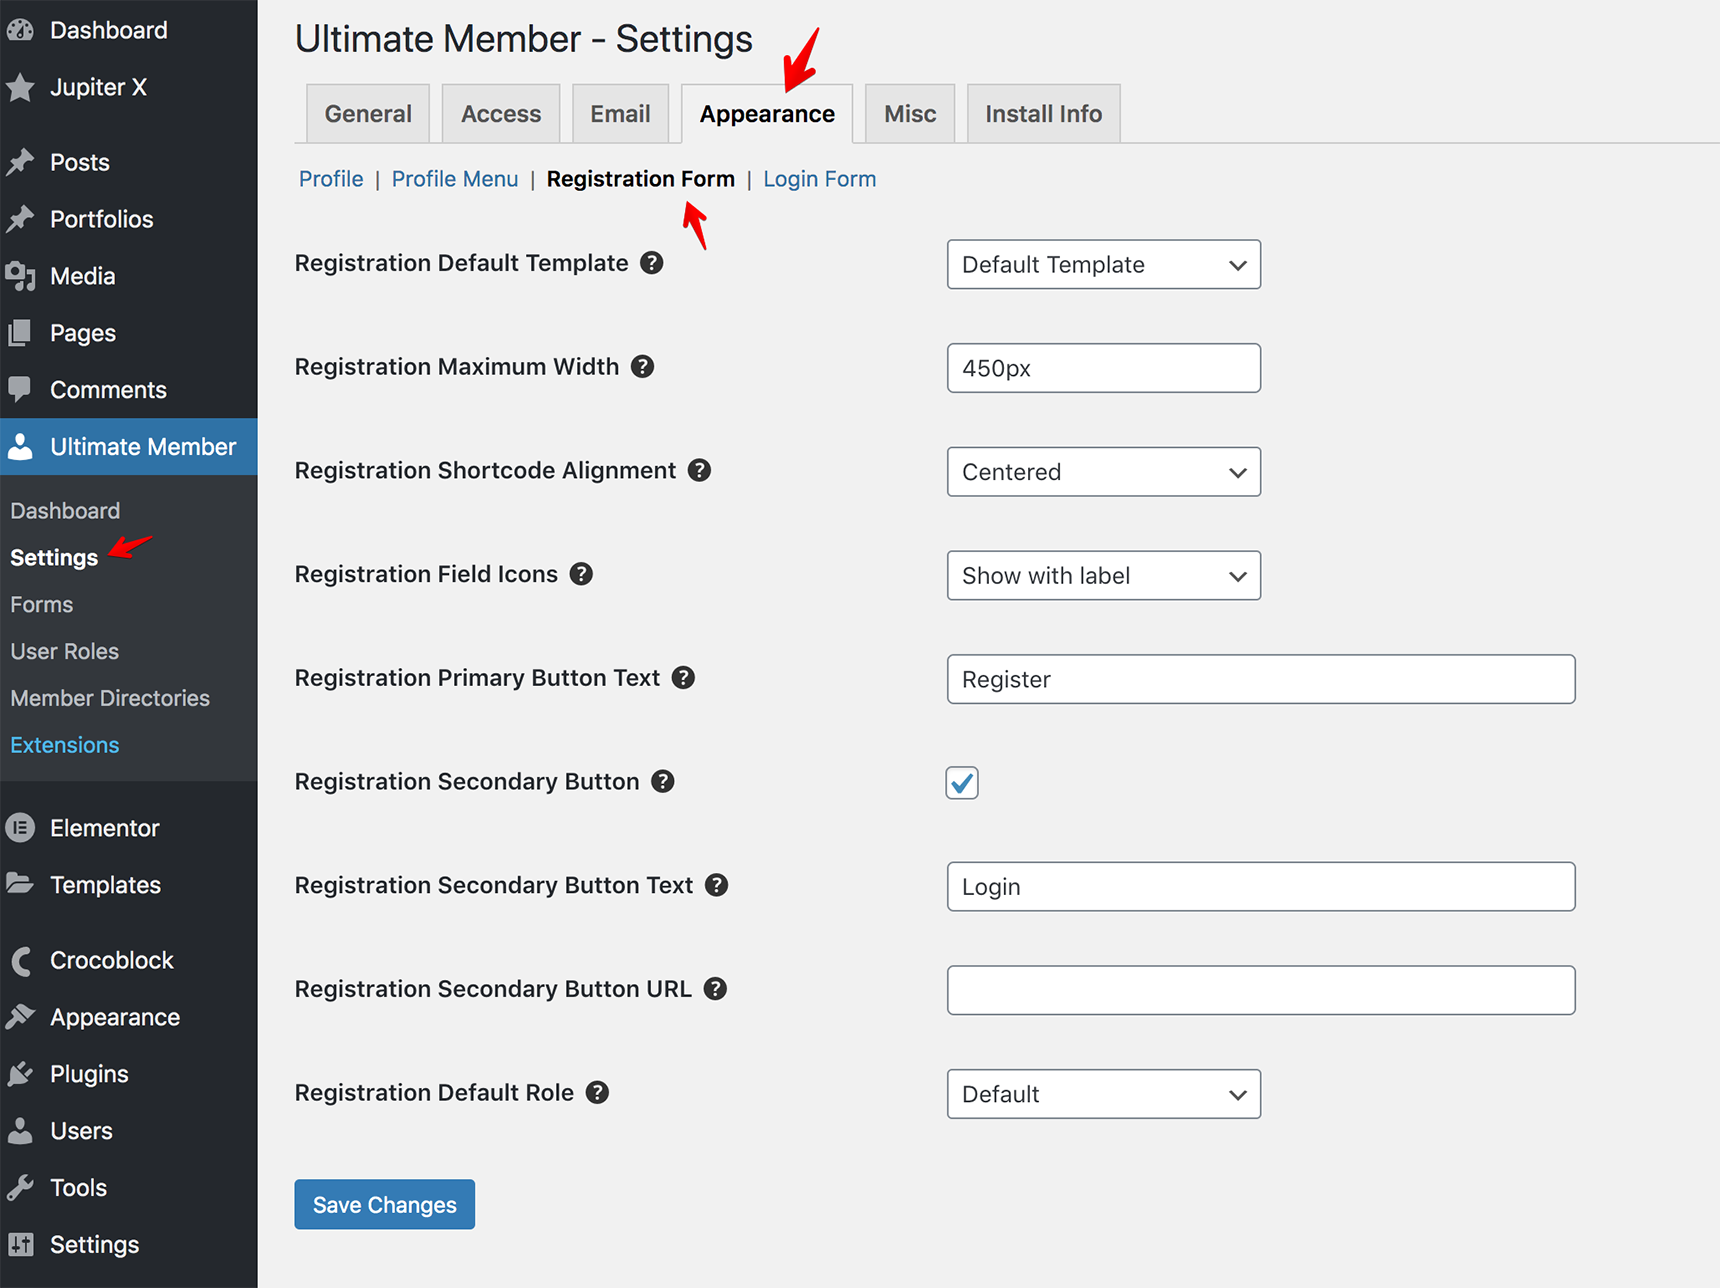
Or you can edit the global settings in Ultimate Member > Settings > Appearance > Registration Form.
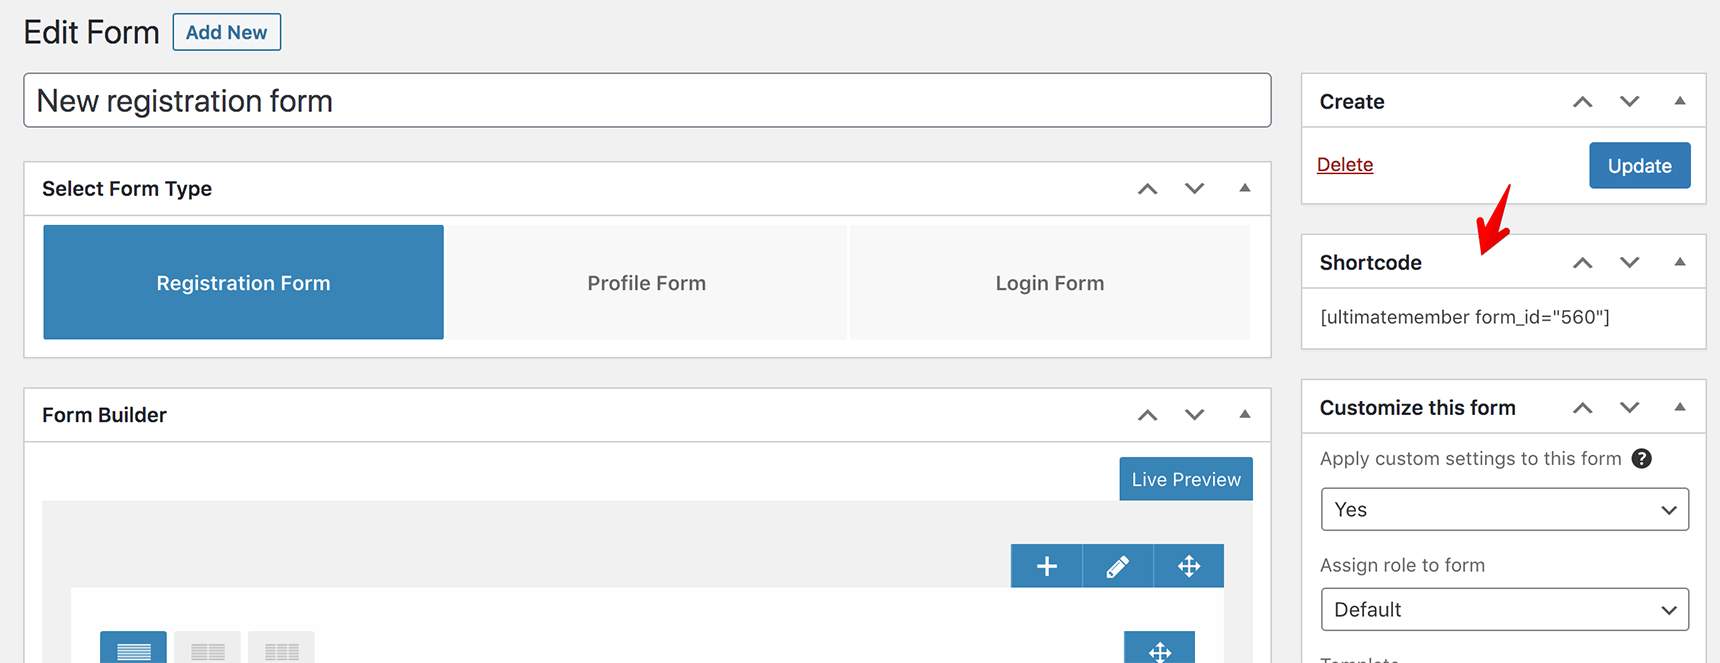
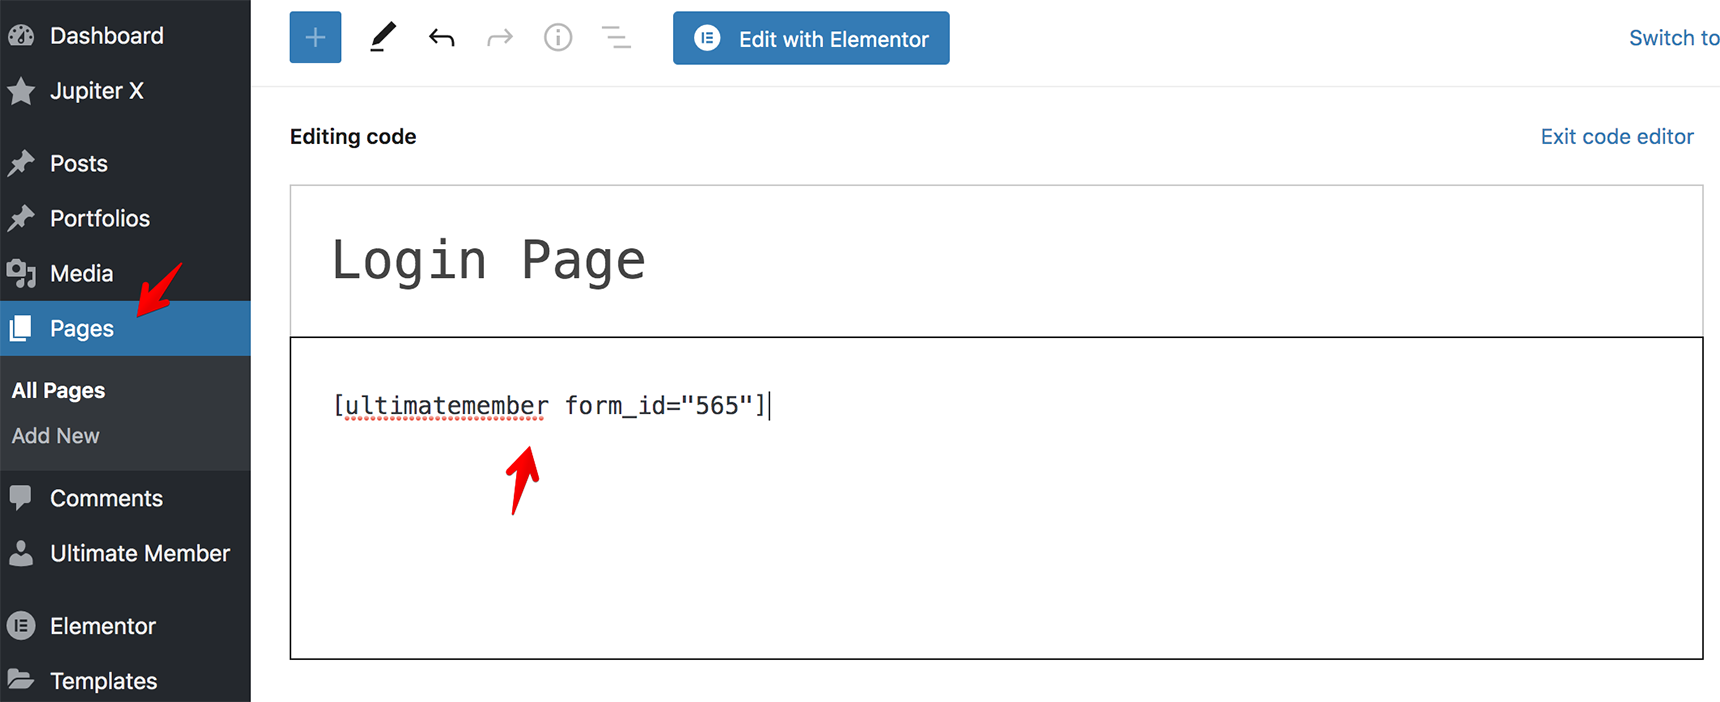
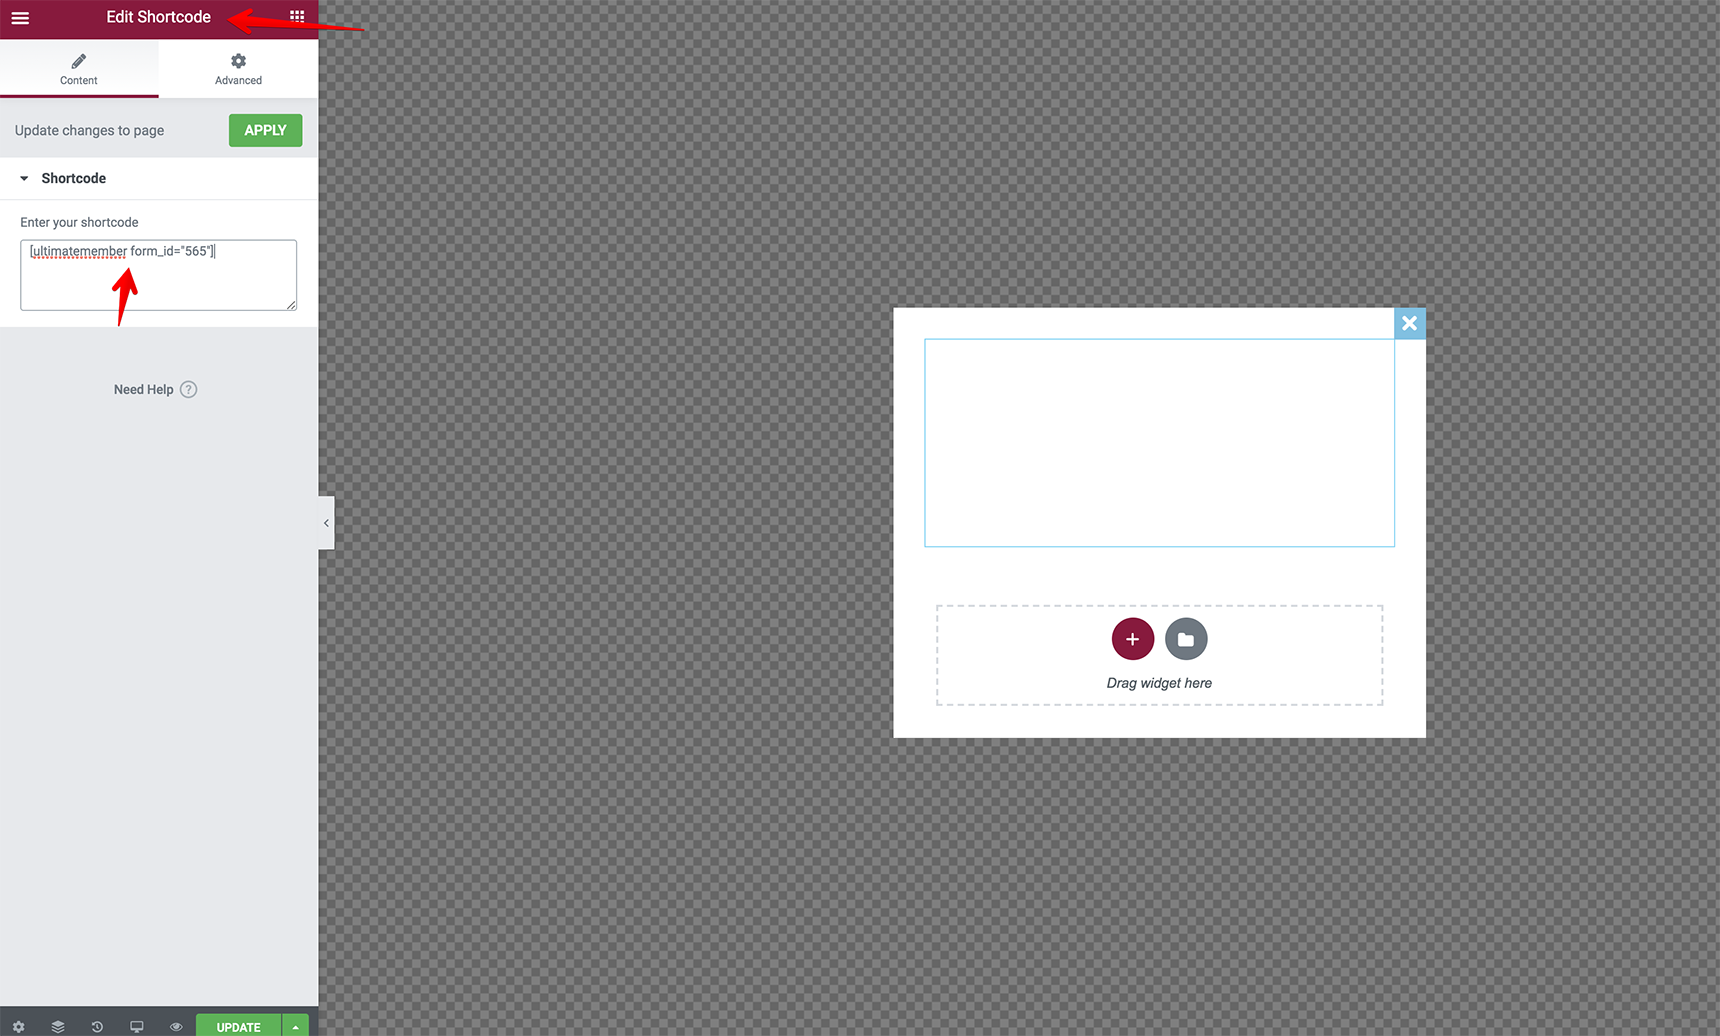
When you’re ready with the form, you need to copy its shortcode from the Shortcode section and paste it into the text editor of the Register page in the Pages menu.
More detailed information regarding the registration form can be found in the plugin documentation.
Creating the login form
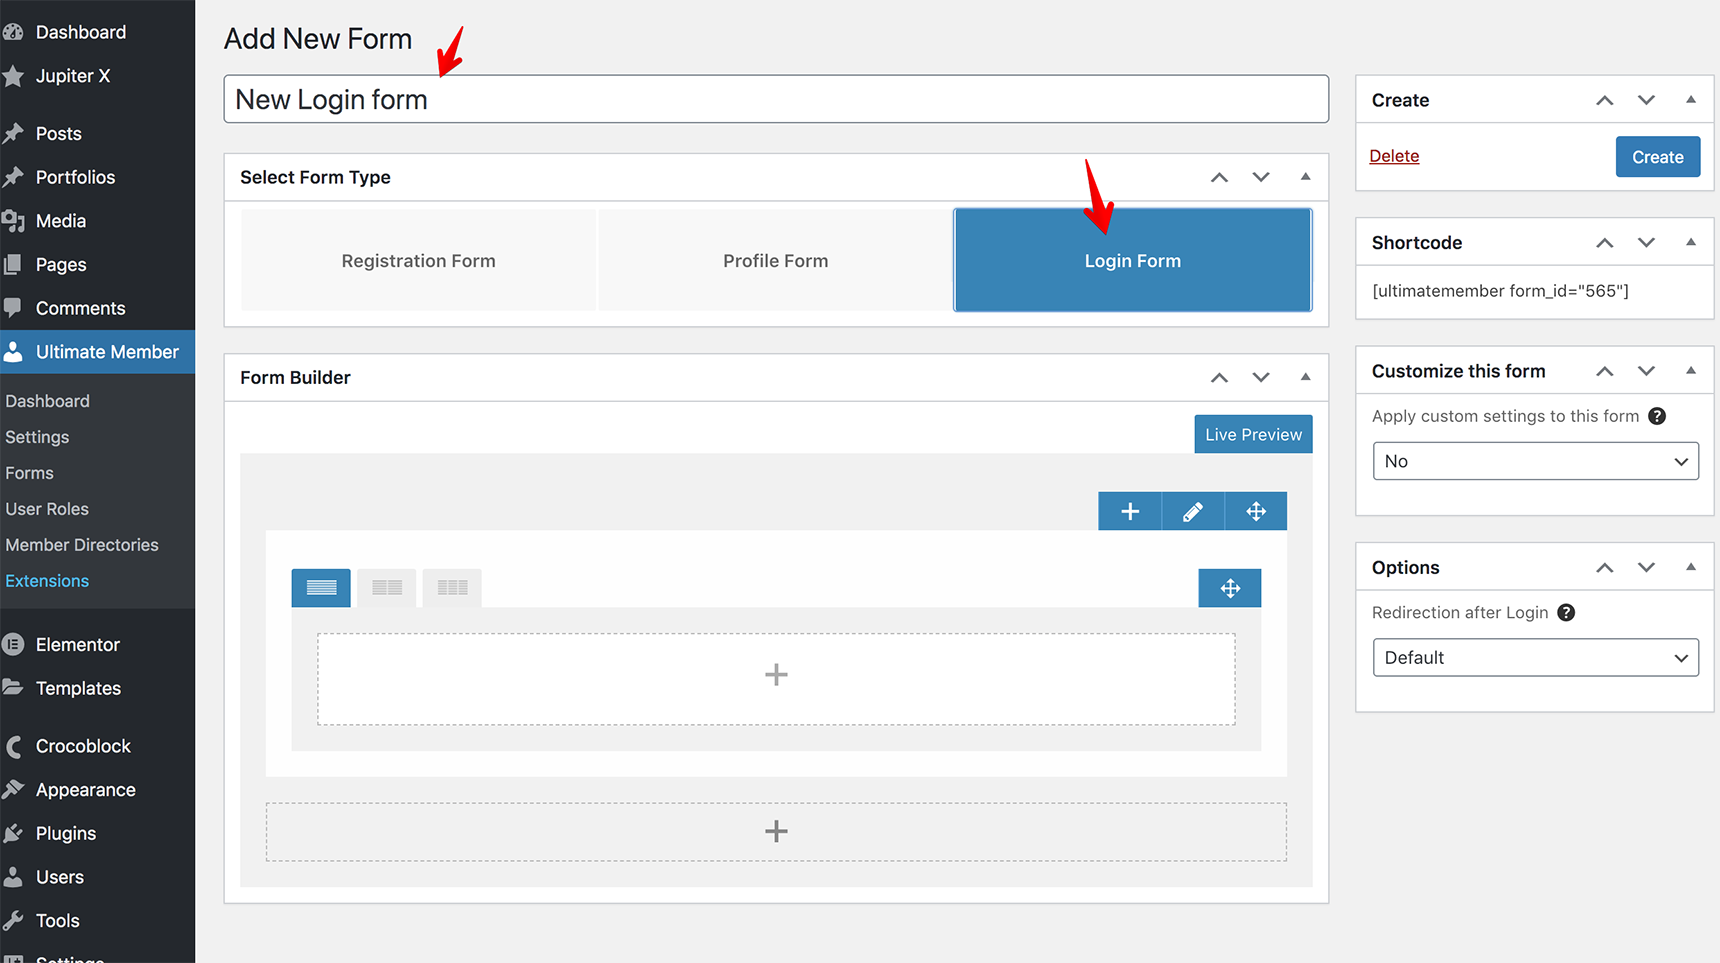
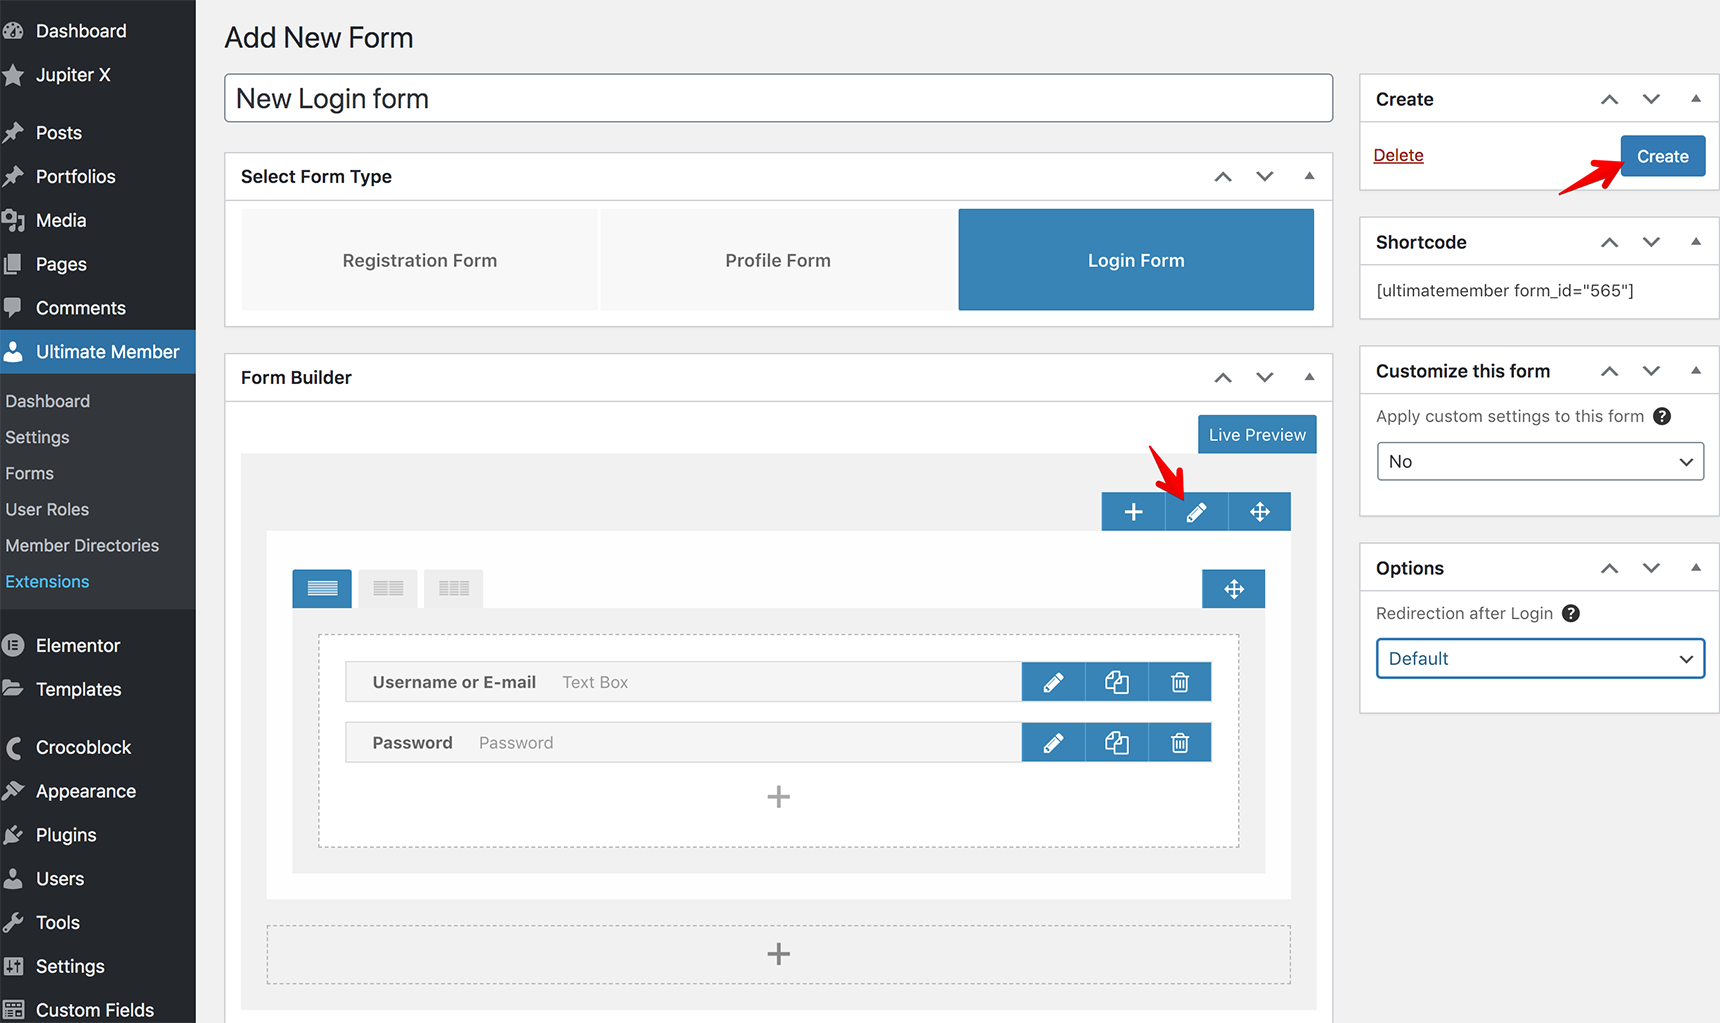
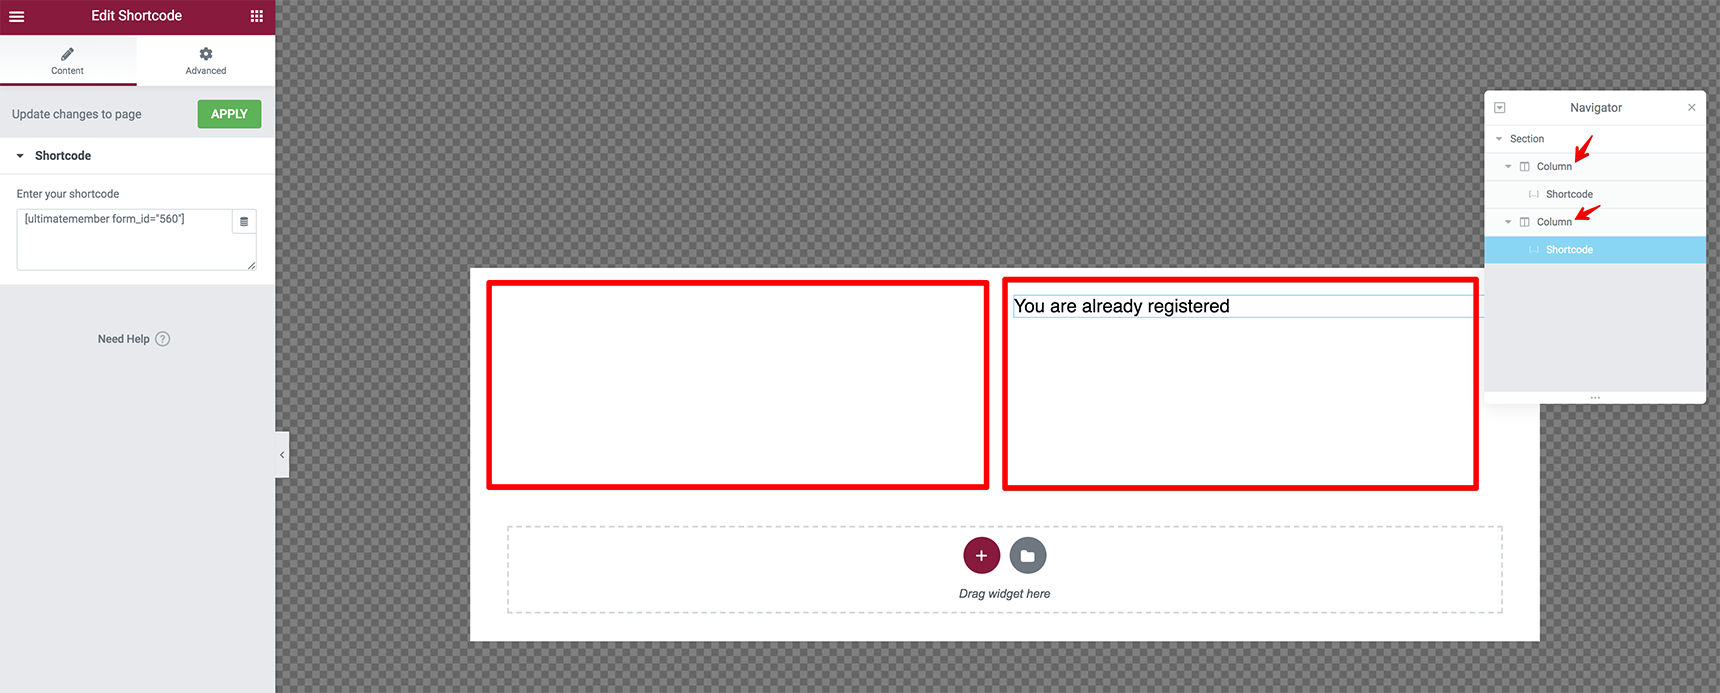
When new users are registered, they should be able to log in to make purchases or manage the site according to the user role assigned. Creating the login form is similar to the registration form creation. Click Add New under Ultimate Member > Forms, write a title of the form and choose the type Login Form.
As we did for the registration form, click on the plus icon to add some fields to the form. For example, we’ll choose Username or Email Address and Password. Style the fields by modifying the colors, borders, etc. Simply click on the pencil icon to do this, and once you’re done with this form, click on the Create button.
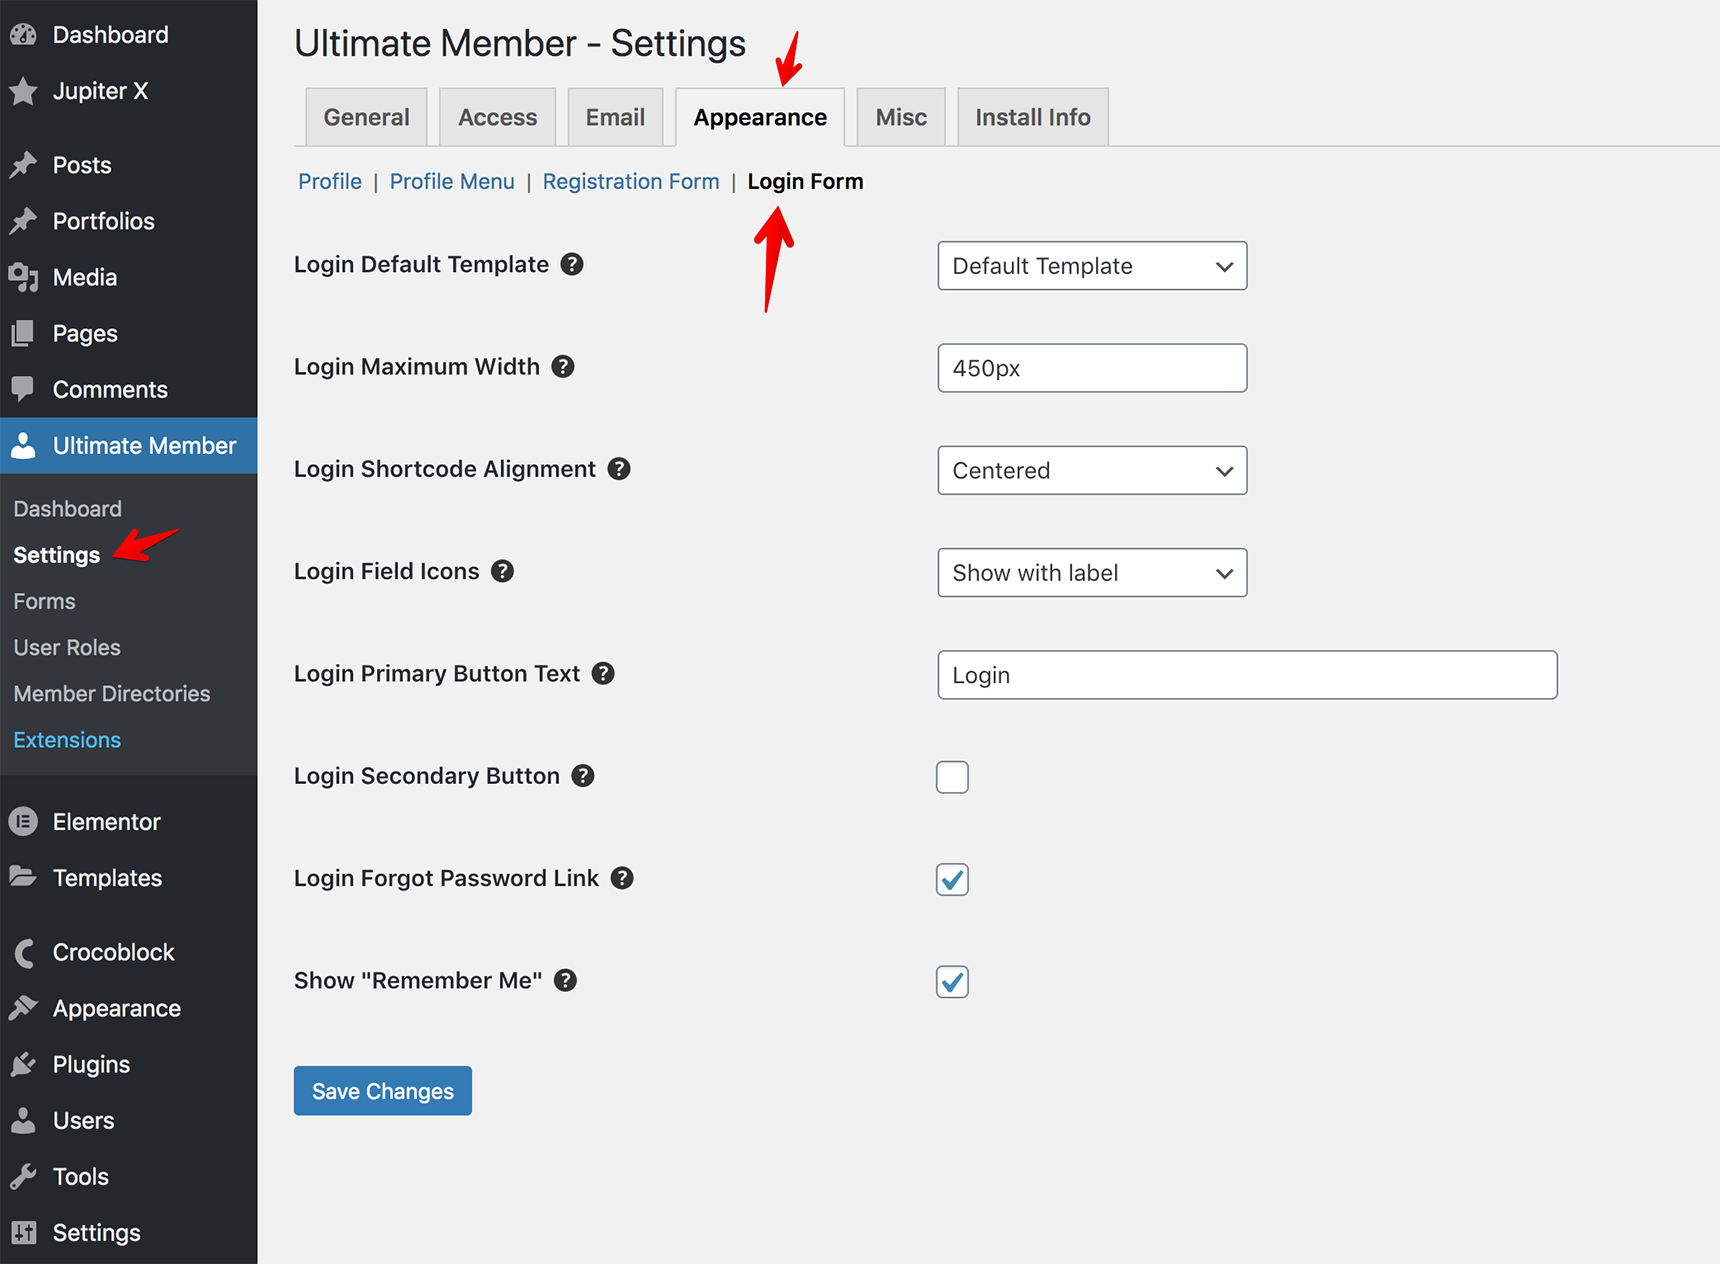
The customization options are the same as for the registration form: you can modify the settings in the form editor directly in the Customize this form section on the right side of the editor (it’s convenient if you have multiple login forms and want to customize them differently) or modify the global settings under Ultimate Member > Settings > Appearance > Login Form.
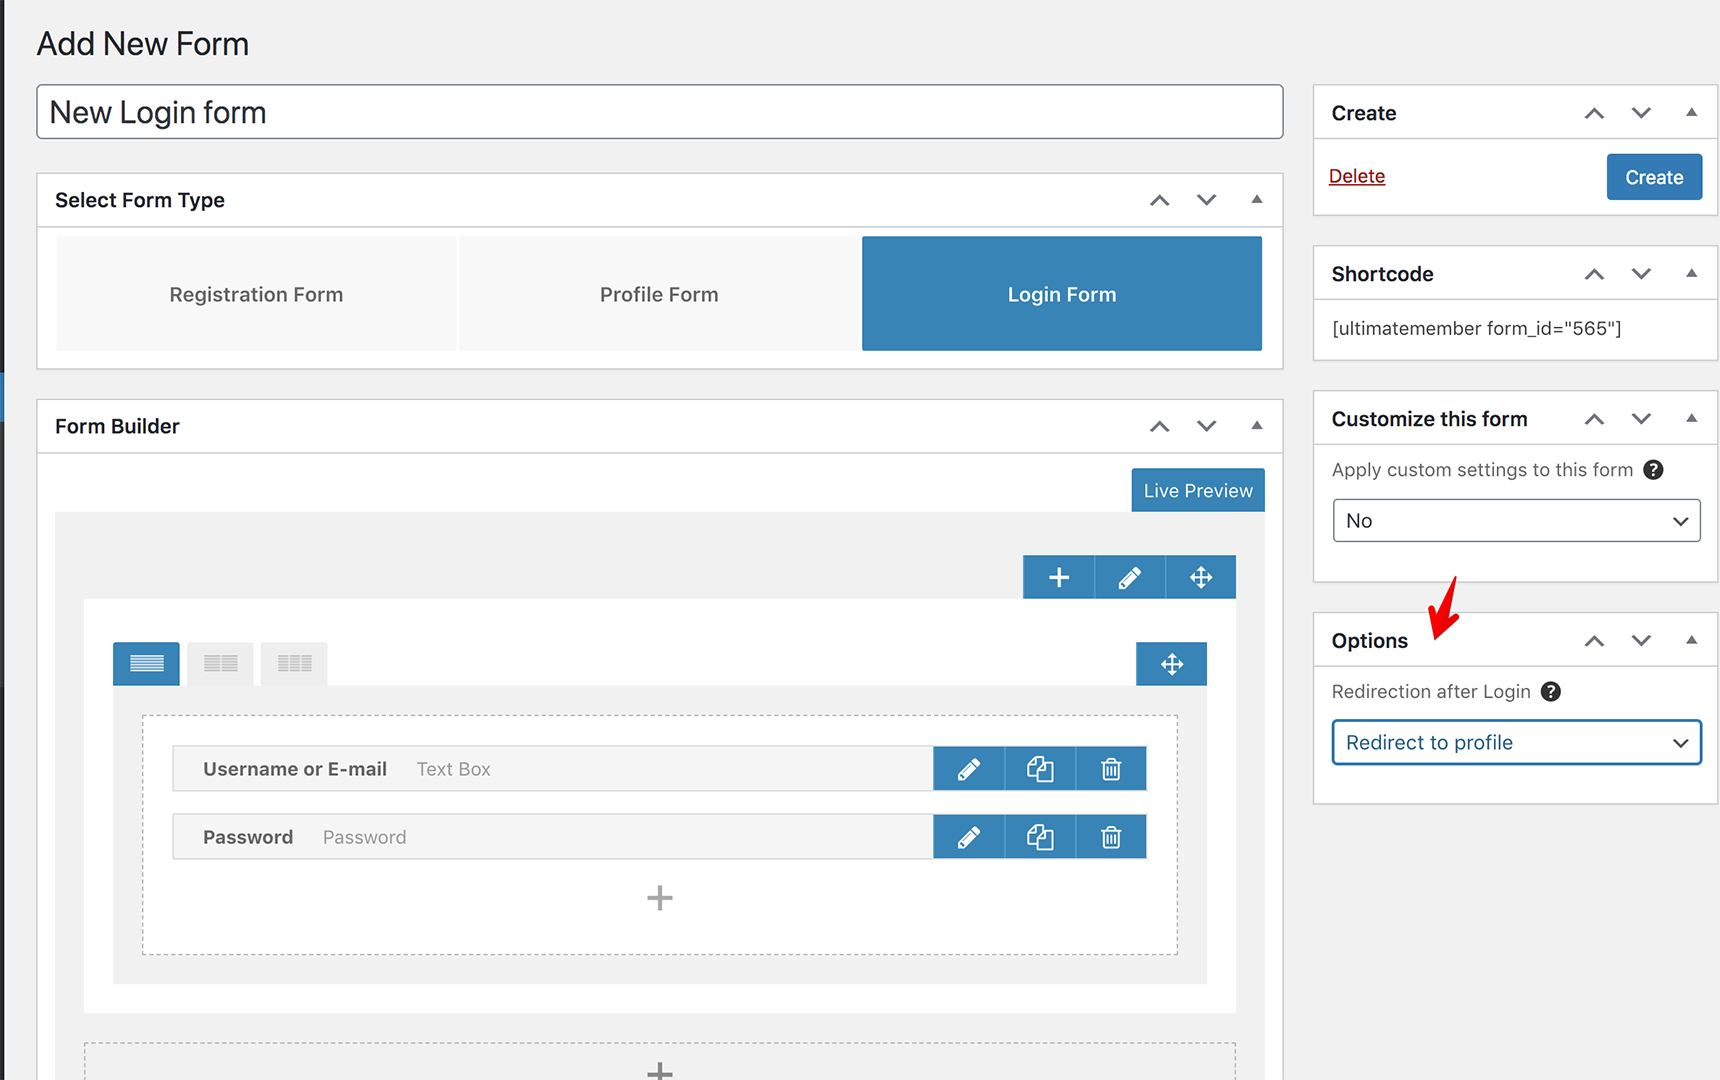
Another useful setting here is Redirection after Login, which can be found in the form editor on the right side under the Options section.
There are four options you can choose from to redirect a user after a successful login:
Redirect to Profile
Redirect to URL
Refresh Active Page
Redirect to WordPress Admin
When the form is ready, copy the shortcode from the Shortcode section on the right side and paste it to your Login page in the Pages menu.
Once you’ve customized the forms, let’s then assign them to the buttons in the header.
Assigning login/register pages to the buttons in the header
To add login/register links to the header, you need to create a custom header with Elementor at first. If you don’t have it yet, read this article on how to create a custom header. To show the login/register links, you can use the Icon List element and add the links of your pages in the settings.
It’s supposed to change the login link to log out once the user is logged in. To achieve this, we’ll use custom code.
First, add the Icon List element with the log out link and assign custom classes in Advanced > CSS Classes of the Icon List settings. For example, let’s assign the login_link class for Login/Register Icon List and the logout_link class for the Log Out Icon List.
Then add custom css code to Jupiter X > Customize > Additional CSS:
If you want to add Login/Register links inside the menu, it can also be done. The instructions are described in the Ultimate Member article.
How to open login/register forms in the popup window
If you prefer to show login/register forms in a modal popup instead of redirecting visitors to a new page, read the instructions below. I’ll use the JetPopUp plugin to create popup windows. The plugin is bundled with the Jupiter X theme and can be installed via Jupiter X > Control Panel > Plugins. Once you’ve installed the plugin, let’s create a popup for the login link. Go to the JetPopup menu in your dashboard and click on Add New Popup, write the title for it and publish.
The page will be updated, and you’ll see the button Edit with Elementor. Click on it to open the Elementor editor. The process of adding the form is very simple: look for the Shortcode element, drag and drop it into the editor, insert the shortcode of the login form that you created in Ultimate Member > Forms.
Don’t worry if you can’t see the form in the editor, that’s normal when using shortcodes as it will be visible fine in frontend. I’ll add two forms – login and register – in one popup window dividing a section into two columns.
To style the popup container, just open the JetPopup Settings as described in the plugin documentation.
Now it’s time to assign the popup to login/register links in the header template. Go to the Templates menu and open the Header template in the Elementor editor. Find the Icon List element that was added for the login/register links (you may not see it when logged in as we hid it with custom CSS code, so it’s better to use Navigator), open Advanced tab > JetPopup > select the popup in the Attached Popup field and Click on Widget from the Trigger Type field. Update the template with the new modifications.
Check the popup on the frontend, open your site as a guest and click on Login/Register in the header. The popup will then appear.
Wrapping Up
As you might have been able to tell, the process of creating and adding login/register pages with Jupiter X can be a bit tricky. Hopefully, this article helps you to make this process smoother. If you’ve followed all the steps laid out in this post, then you’ll have registered users on your site with the Ultimate Member registration form. This plugin will allow you to create beautiful user profiles, and your users will be able to join and become members with absolute ease. If you can recommend other plugins to create login/register forms, feel free to share them in the comments.
When was the last time you bought a magazine? The chances are that you don’t even remember unless you’re an avid reader who still carefully keeps up the tradition of going to the newsstand and picking your favorite magazine right after it comes out! Just like in every sector, the internet and digital age has dramatically changed the world of magazine publishing. Every day more and more magazines are moving online in order to keep up with the pace. Publishers have come to an understanding that online magazines are becoming more popular because they are easily accessible, and in most cases, free.
That being said, the trend of online blogs and magazine websites with WordPress on the rise. Undoubtedly, content is king, but if you want to put up a magazine website that is aesthetic, professional, visually appealing and user friendly, you need to pay double attention to website design. Even the best content seems banal sitting on a bad design.
Magazine-style websites should be dynamic, stylish, rich in content yet uncluttered and consistent in design. Maintaining these criteria is not easily achievable, so in this article, we put together some key tips along with some live examples from Jupiter X magazine and blog templates that can help you get inspired and create a professional-looking magazine website to reach a wider audience.
Layout matters!
Grid and masonry layout
Using vertical and horizontal lines of the grid system to organize content has always been a common practice in traditional paper magazines. Grid layouts are now modernized following the trends and are still a popular layout for blog, news and magazine websites as they make the website visually appealing, neat and easy-to-read. The grid layout – which looks like the cells of a table spaced perfectly right next to each other – creates the best architecture to organize your posts. Most of the Jupiter X magazine templates are designed under the grid layout in most sections. Here is an example of how it looks in action in the Joi template:
Another popular layout when designing magazine websites with WordPress is the masonry layout. A slight difference between masonry and grid layout is that images can be displayed in a larger size and that they are more fluid in their placement on the page. The Masonry layout comes in two inner and outer formats with their own aesthetic features. The trending News section in the Magazine 2 template enjoys this layout:
Lists
One of the unavoidable widgets in blog or magazine websites that feature heavy content is the Smart Post List, which will help you to organize posts in an interactive manner. You can customize the lists in many ways such as image size, featured post style, alignment, meta and more. Check out an example of the listing posts in the Magazine 2 template:
Tiles
Another cool way to display posts in stylish tiles is by using the Smart Posts Tiles widget. Just like lists, you can customize nearly everything in tiles, from image size and title length to box overlays and height and width. A perfect example of this style is live in the Photography Blog template’s homepage.
Posts carousel
One common and eye-catching way to display the recent posts on the website is by using a carousel style. Showcase your featured or most recent posts in moving slides, and readers will much easier be able to locate the important posts or even the archived posts from the past. Magazine 2 template uses the carousel in a neat way.
Visually appealing is a must!
The next time you buy a paper magazine, pay attention to the number of images, colors and other visual elements used on various pages. With a lot of content to read, rich media can make the design of your website compelling and more entertaining.
Images
Don’t underestimate the power of images in drawing the reader’s attention to stories. Think of your homepage as the cover of your magazine and try to make it as much attention-grabbing as possible. Use big, bold and high-quality images that are of course in line with your design style. Jupiter X’s Joi, Meditrinalia and Photography Blog templates include this image rich layout.
It would be even better you can invest in taking your own images. If that’s not possible, then you can look for stock photos on quality websites such as Shutterstock and Unsplash.
Using image-specific elements such as Image Accordion and Slider to showcase your posts makes your website even richer. You can find examples of these elements in the Magazine 2 and Simple Magazine templates.
Videos & animations
One fundamental difference between paper and online magazines is the use of videos and animations. Using them adds to the dynamism of the website. People tend to pay more attention to the posts that include a video compared to the text-only ones, so try to incorporate engaging videos that match the general feel of the website and the post they represent when you create a magazine website with WordPress, just as we did perfectly in Blog 2 and Magazine 2 templates.
Fonts
Another important factor that will make your website pleasing to the eye is the right use of fonts and typography. Don’t be afraid to use different fonts, font sizes and font colors that are consistent with the website design. Use larger fonts for headlines or the top news you want to highlight and smaller fonts in the footer or for older posts etc. Check out the various fonts, sizes and colors in Joi, Meditrinalia and Health Blog templates.
Headline
Regardless of how many types of content your magazine is covering, they all need attractive headlines – in design and content – to be read. It doesn’t matter if it’s on the stand or on a computer monitor – the first thing that a reader’s eye is going to notice is the headline. That’s why it’s worth spending time on it. According to some tests regarding headlines, the traffic to content can vary to as much as 500%. Thankfully, Jupiter X has solved the design part of headlines for you, and all you need to think about is content.
Avoid clutter
The most distinctive feature of magazine-style websites as stated above is being dynamic with too much content grouped together in a space as small as a screen. This creates a fine line between being stylish and being cluttered. While paying attention to the visual aspects of the website, you should also be careful not to drive your audience into an unwanted mess. Embrace white space and let your readers take small breaks in between their navigation throughout the website and focus more on the content that’s appealing to them.
The Blog 2, Isonoe and Simple Magazine templates struck the perfect balance between the white space and the posts and this created a seamless and uncluttered layout despite being heavy on content.
Allow users to navigate easily
Sidebars
There is a debate about using sidebars nowadays. For certain types of websites, sidebars have become obsolete. However, in situations where users need some guidance and/or you have a content-heavy website (such as a magazine website), sidebars can be useful. Sidebars play an essential role in designing magazine websites with WordPress as they are an excellent way to show other articles or pages of your website. They also allow users to navigate easily through the website or to display call-to-action buttons for something like a subscription or even a place for your social media accounts, just like we did it stylishly in Magazine 2 and in Magazine without any clutter to get the benefit of sidebars.
Mega menu
If your magazine website has a lot of categories and subcategories, then a mega menu is a good option to let users navigate easily through different parts of your website. This type of menu is useful to show all of – or most of – submenus of the main menu, and you can have a short description for each item on it. You have infinite customizability with Jupiter X’s Mega Menu, with a horizontal or vertical menu and add text, video, list items, image, icon, form and many more elements on your menu.
News Ticker
Have you ever noticed that narrow band of tape at the bottom of television channels for displaying news, information, advertisement, etc? It’s called a news ticker and is being increasingly used on the homepage of websites to show related information just like television channels. It can draw attention not only to the information that is shared but to the whole website. On a magazine website, you can use it to share your new articles so users can easily click and access that article. Or if you have a market or finance magazine, you may use it to show the price or rate of things that change frequently, but like most elements in a magazine website, it shouldn’t make the website appear too busy. Take a look at how we go about implementing this in the Blog 2 template.
Divide into categories
Another excellent way to appeal to site visitors while creating a magazine website with WordPress is by archiving your content into meaningful categories. To do that, you should have a clear understanding of why your audience visits your website. Avoid making too many categories as it can cause clutter on your website. For example, if you’re thinking of having a general fashion magazine, it would be wise to divide categories into Men, Women, and Kids for the main page. Jupiter X provides both outer style and inner style for categories, for instance, we designed Magazine 2 with inner style to categorize contents and Fashion Blog with outer style.
Include a subscribe button or sign-in form
Online magazines are becoming popular for a reason: they are easily accessible. In order to keep readers engaged and faithful to your magazine or blog, you should let them subscribe to it with ease and just like they could get paper magazines in their mailbox, let them gain access to the latest news in their inbox. Failing to do so can make you lose them forever to competitors.
Most magazine templates from Jupiter X include a subscription section and a contact form for possible questions and queries. The best practice is that you include the subscription button down every page of the website. Check out the Magazine 2 and Blog 2 templates as examples for both.
Embed social media
With so much content available for free on the internet and social media, promoting your content seems pretty difficult in such a competitive field. Thus, the effect of social media is undeniable for your brand and content to go viral. Make sure you allow for a discussion on social media about your content, which will operate like “word of mouth” in the digital world. Embed your social media accounts wherever possible on your website that of course does not make the overall design look ugly! The header, footer and contact pages are the best places to consider.
Wrapping up
There’s no doubt that you should focus and spend a lot of time on an eye-catching design to create a magazine website with WordPress, and Jupiter X would be a huge help and easy way to achieve it. We provide various templates with a lot of features for different tastes that, like all the templates of Jupiter X, you can add, edit, or delete every element of your website. Now it’s your turn, are we going to see a new online magazine soon?
Throughout its existence, email marketing has experienced some major changes. This is particularly true for the past 10 years with the appearance of several new tools and standards that have fundamentally altered email marketing. An email campaign from the early 2000s would look completely different from one today. An email that would have a high likelihood of being opened might not even make it to a user’s inbox today. This is because email providers and services have rolled out several quality measures in an effort to ensure recipients get emails that are most relevant to them.
In this post, we’ll take you through these standards so that you can take the necessary steps to ensure that your email campaigns avoid the spam filter and land in a recipient’s inbox.
1- Send emails with your own domain
When sending out marketing emails, it’s always a good idea to use your own domain. ISPs (which refer to the major email providers: AOL, Outlook, Gmail, Yahoo and others) tend to take a negative view of free email campaign providers such as Mailchimp. For instance, someone who uses Mailchimp might take advantage of the service and send out low-quality, irrelevant emails, which would lower Mailchimp’s general score for Gmail. As a result, if you use Mailchimp, you could be negatively affected as well. If recipients have engaged with emails you’ve sent out before (such as transactional emails), then there will be a better chance that the ISP will direct your email to the recipient’s primary inbox.
Certain email marketing tools have white labeling features. You can check out this documentation to find out more. For instance, Growmatik allows you to add custom outbound emails in site settings and utilize them in various email campaigns.
2- Correctly utilize your authentication records
The first thing that a recipient’s ISP looks at when deciding whether an email goes to their inbox or spam folder is authentication records. Authentication records are parts of code embedded in the header section of your email and serve as a digital signature that verifies your identity and will work toward increasing the delivery rate. Your email server must support the two main protocols of DKIM and SPF.
SPF (Sender ID)
SPF – which stands for Sender Policy Framework – enables the ISP to authenticate the identity of the party sending the email. By making it clear that YOU are the sender instead of anyone else, SBF lowers the chance that someone else pretending to be you would send out emails. This increases your email delivery rate.
DKIM
DKIM – which stands for DomainKeys Identified Mail – sender’s coded authentication message that connects the email with the server’s DNS of origin and validates the domain is in fact real. In other words, this provides a type of identification for the emails that you are sending your targeted recipients, which will also go a long way to help you avoid the spam filter and boost those email delivery rates.
Authentication records are vital if you send out emails from an email automation platform as it allows that platform’s servers to send out emails on your behalf using your own domain. This means that you need to ensure the platform you select offers email white-labeling services and provides support for these protocols. For instance, in Growmatik, after the tenant adds and verifies custom outbound addresses, then SPF and DKIM are automatically inserted into the header of your email.
3- Look up the reputation of your sending domain
If your sending domain has tons of spam reports from their users, then their email service provider will rank them poorly. In turn, this will greatly impact your email’s quality score, and your email might be rejected or directed into the spam folder. It’s always a good idea to regularly stay up-to-date on your sending domain’s reputation and to make changes if their reputation is either low or starts to fall. Several tools on the market that provide a sender score and information on how to boost it include Sender Score, Barracuda Central, Thalos database, MXToolbox and Google Post Master and Mail Tester
Marketing emails can be categorized as either transactional or promotional (also known as broadcast). Transactional emails are sent out to a recipient after they have made a particular action when engaging with your business. On the other end of the spectrum, promotional emails are set out en masse to all your leads or subscribers. As you’d expect, these types of emails are less customized and relevant, thus more likely to get tagged as spam or land in the promotional emails tab.
One of the best ways to avoid the spam filter or the promotional tab is by sending email campaigns that combine both transactional and broadcast emails.
The best way of going about this is by adding a personalized touch to promotional emails. The personalization needed here extends beyond simply inserting the user’s name to the subject time and at the beginning of an email. A tool like Growmatik offers up several dynamic keywords that help in personalizing an email’s content with personal attributes that have to do with in-site behavior and purchase activity.
In addition to the text of the email itself, the products you’re promoting should also vary for each recipient and depend on their purchase history. An excellent way to customize promotional emails is by sending out cross-selling emails or cart abandoner follow ups. You can easily do this in Growmatik by using the Product Element in the tool’s email builder to add personalized product lists in the email based on the recipient’s shopping behavior.
5- Include address and unsubscribe options for broadcast emails
A tool that is compatible with CAN-SPAM and GDPR will make you add your legal physical address in the footer section of each broadcast email. For instance, in Growmatik, its email builder will automatically insert the address section in the footer of an email.
6- Utilize sign-up forms that are double opt-in
It’s no secret that doubt opt-in is one of the best ways to build and sustain a robust mailing list. This holds particularly true when making a list for broadcast emails as double opt-in hinders additional expenses and goes a long way in sustaining a decent domain sender score. You can also use tools such as Email Verifier to verify authenticity of recipient email addresses individually or in bulk.
7- Send emails that align with the consent
Let’s say that your targeted recipient is a customer, and you’d like to keep them in the loop about particular events or things. The best thing to do to avoid the spam filter is to send them transactional emails that you know are relevant to them and that they want to receive. Keep in mind that you should only send broadcast emails if the recipient has allowed for marketing emails from your business.
8- Add quality content following CAN-SPAM guidelines
The content in your emails should completely comply with CAN-SPAM content guidelines, as well as the guidelines (e.g., pornography, phishing, cyberbullying, etc…) set out by your email marketing platform. Furthermore, if you don’t want your email to be tagged as promotional, you should not overuse certain marketing terms in your email subject and body. These terms include discount, sales, action, apply now, call now, unbelievable (and of course viagra!)
Best price
❌
Dear friend
❌
#1
❌
Winner
❌
100% free
❌
Weight loss
❌
Billion
❌
Deal
❌
Free gift
❌
Debt
❌
Giveaway
❌
Lifetime
❌
Guaranteed
❌
Score
❌
Risk-free
❌
Unlimited
❌
Apply now
❌
Urgent
❌
Get it now
❌
Become a member
❌
9- Stay away from HTML content and use a good image/text ratio
Simply put, you won’t have a shot of making it to the primary inbox tab if you send out an HTML email. Most ISP have algorithms that flag HTML content as promotional emails, therefore funneling them to the promotional tab. Emails that are most likely to land in the main inbox are ones with plain text and not that many links and images.
Following from this, the content of your emails needs to have a good image/text ratio. Content that doesn’t contain an image has a higher chance of going to the primary inbox (that is, if the email meets the other criteria), and content with a lot of images or text is more likely to be directed to the promotional tab. Furthermore, content that doesn’t have any text will probably land in the spam folder.
10- Use links that match your From address
If your email contains a call-to-action button, you should link it up to the same domain of the From address found in your email’s header in order to avoid the spam filter. If not, the recipient’s ISP may assume that you’re sending the email as an affiliate marketer attempting to make sales for affiliate earnings for another business or brand.
Bonus tip! Closely track the performance of your campaign
This is the final step, and it is probably the only step that should be taken consistently. After implementing the above tips into your email campaigns and sending them out, you should closely follow how each is doing by referring to its performance analytics as well as the sending reputation of your domain. For the former, you can look at the analytics provided by our email marketing campaign.
For instance, in Growmatik, you can see how well each email campaign is performing by going to the Report section in the automation dashboard. To check the sender reputation over time, you can utilize tools such as Mail Tester.
Closely following your email campaigns will enable you to notice any potential issues, such as low engagement or delivery rates, so that you can make the necessary changes at the appropriate time. This is crucial so you can minimize any potential damage to your email campaign and your sender reputation.