As a WordPress support engineer, I face many challenges every day. Rather than skills that a technical support staff should have, there are tools people like me can use to be able to help their clients faster and better. In this article, I’m going to give an overview of the top 10 free browser extensions that have become part of my daily workflow over the years. I can divide these extensions into the following categories: emulation tools, scanners, recording tools, measurement tools, and operating tools.
The tools may vary depending on the product you support but some tools, such as those that I’m going to talk about in the following article, might be commonly used by support engineers working with any kind of product. In fact, everyone may use these extensions for a different purpose, and while I work as a WordPress technical support professional, these extensions could come in handy in another way. In this article, I’m going to review the top 10 free browser extensions I use as a support engineer and the best thing about them is that all of them won’t cost you a dime!
Grammarly
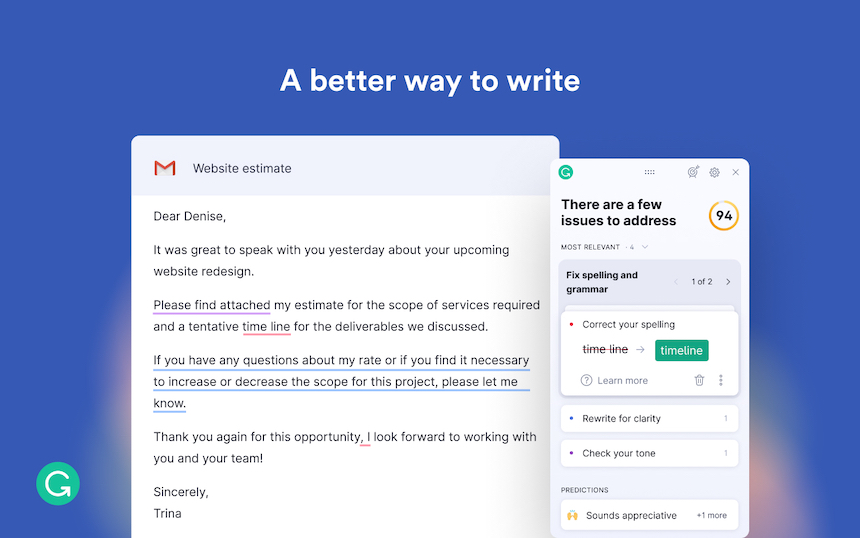
Honestly, I can’t even imagine writing a letter or a response to a client without Grammarly. I’m even using it to write this blog post! This extension is a must-have for every one who is involved in writing any kind of text. It corrects grammar issues, fixes dictation in the free version and suggests improvements to your writing in the premium version. I’m already happy with the free version but if you believe you need more advanced writing assistance you may want to try Grammarly Premium. It already has 10+ million users.
Wappalyzer
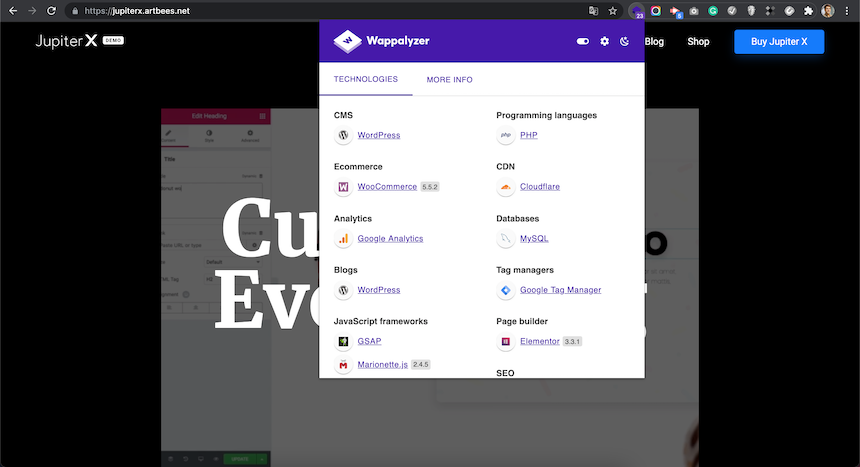
Wappalyzer will detect the framework, technologies and programming languages that are being used on a website. It became my habit to check out the technologies being used on a website even if I don’t want to detect any problem. This free browser extension uncovers more than a thousand technologies in dozens of categories such as programming languages, analytics, marketing tools, payment processors, CRM, CDN and others, making it very useful for a web developer or a web support engineer. 1+ million users currently have this extension installed on their browser.
Awesome Screenshot
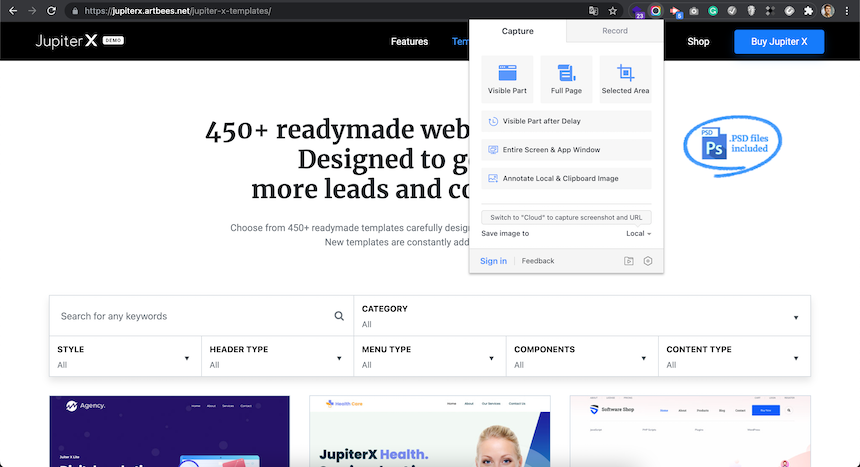
I think Awesome Screenshot is not only a handy tool for all support staff but a must have extension for everyone. Most of the time I need to show our clients how to do something, and a good tool like this saves me a lot of time. Mostly, I use the Full Page Screenshot feature and then crop the image with built in features of this screenshot. This way I don’t need to use photo editor softwares to edit the screenshots or to add notes over the image. If you don’t like Awesome Screenshot, GoFullPage – Full Page Screen Capture is another awesome plugin that does essentially the same job, but only uses one click to capture the entire page. I need to mention that the Awesome Screenshot free browser extension is also able to record videos from your screen. 1+ million installations for Awesome Screenshot and 4+ million installations for GoFullPage are proof of the usefulness of these extensions.
User-Agent Switcher
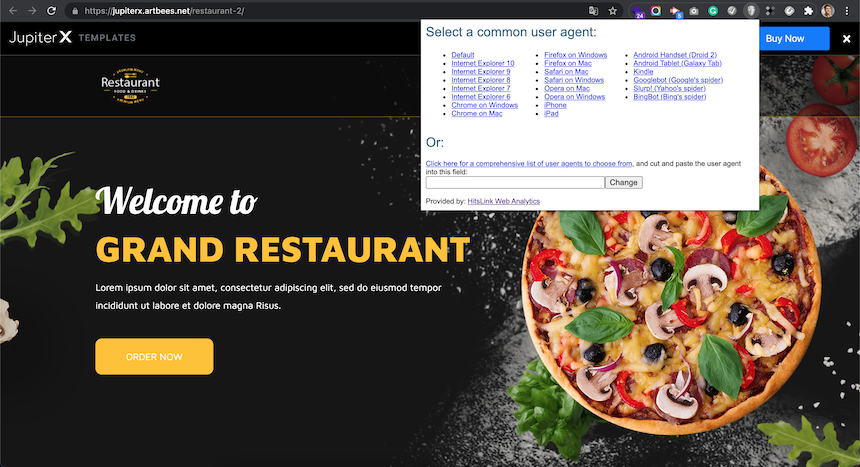
User-Agent Switcher will emulate the user agent to any agent you want, which is extremely helpful for when you want to see how robots or different applications see your website. Detecting crawler issues such as Google search bots, marketing platform bots or even web scanners are all prime uses of this extension for me. Time after time, a Google search console detects issues for a client but without using this extension, resolving the issue becomes a hassle. This free browser extension has 90k+ active installations.
Screencastify
6+ million active installations for Screencastify means that it’s truly handy in many cases. I myself use it to record videos of my browser tab to prove that either an issue for a client is resolved or not happening. The free version of this extension has a 5 minute limitation per video and also only saves the video in WebM format, which so far has been enough for me as a technical support engineer.
The extensions above were the most used extensions on my browser. I am using them on a daily basis and couldn’t imagine my workflow without them. There are more handy extensions for support work that my colleagues are using, but I myself can live without them. In the following I will review my colleagues’ favorite free browser extensions as well.
The Great Suspender
Having so many tabs open on a browser is an issue support staff will always deal with. The bad thing about it is that it eats lots of memory and sometimes makes your device run slowly. The idea behind The Great Suspender is that it suspends the pages that are not being used and still open in the other tabs by replacing their content with the simplest HTML possible. It will free up the memory on your device and will keep your device from lagging.
WhatFont
Although you can inspect the elements on a page and use the developer tools to find out what font is being used for that element, some people prefer a faster tool to find which font is being used in different parts of a page. By using WhatFont free browser extension, you simply click on the extension icon and hover your mouse over the texts on the page. It will show the font name assigned to that text. 6+ million active installations may be due to the many designers that are using this extension rather than support engineers or developers.
Canned Responses – Tray
When you are being bombarded with lots of tickets or chat requests, saving even a second is gold. In these situations, every tool that can speed up your workflow will become handy. Canned Responses is one of those tools that can help you save some time in tough situations. You will collect your most common responses in it and use any of them quickly. It has 2+ K active installation, which is not too many, but it doesn’t mean it’s not handy.
Dimensions
The idea behind Dimensions extension is to detect the left, right, top and bottom distances of the pointer cutting to an edge. The cutting edge will detect color differences, making it a good tool for both designers and support agents as it can help to detect the design issues. This extension has 100+ K active installations.
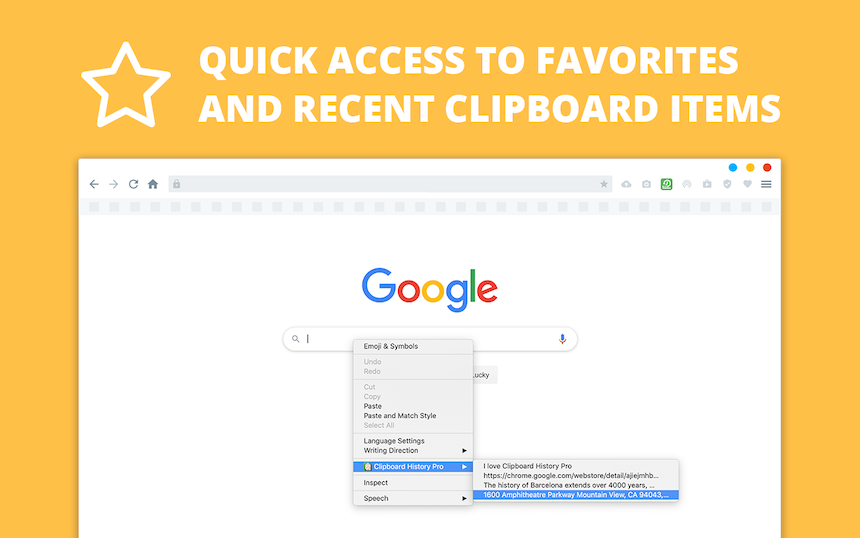
Clipboard History Pro
Clipboard History Pro is another tool that can help you manage your time faster and avoid back and forth copy/pasting some repetitive data. Indeed, it is very useful for support staff who are experiencing heavy workloads and want to save some time. It is common that you need to use a text that you copied onto your clipboard a couple of minutes ago. This will help you use it very quickly. This extension has 90+ K active installations.
This rounds off our list of the top 10 free browser extensions for support staff! Please share your thoughts in the comments about this article or any other useful extensions or tools that support engineers can use.
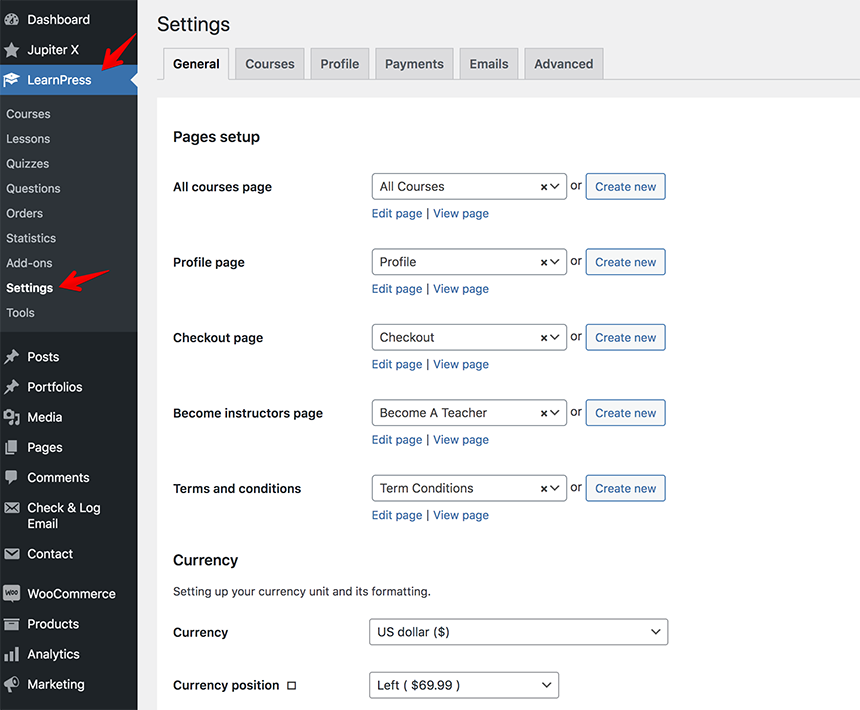
Subscriptions are an important part of sales for any ecommerce store. This is the list of your gold users who are ready for repeat purchases, since sales by recurring subscription is a very popular and easy to maintain channel of income that doesn’t incur big expenses compared to the usual marketing techniques and every step can be managed by the software.
Subscription means recurring sales of products or services by your customers. You may recognize the subscription model everywhere on the internet, ranging from simple grocery stores to retailers like SaaS. It can be used everywhere to drive more sales. Customers love stores offering subscription plans because it automates the purchasing of products that last a short period of time, such as subscribing to receive shaving cream once every two months.
There are many different types of subscriptions for ecommerce. For example, you may subscribe to physical products or services, you may open different levels of support service or access different areas of the website.
If you are not using WooCommerce Subscriptions in your store, it’s a must try feature. In this article, we will dive into setting up one the most popular subscription plugins and we will also review some other popular plugins. You will learn how to quickly set up a subscription store with WooCommerce plugins and sell subscription-based products and services with a recurring payment. Those plugins can be used for any products, virtual or physical, over a predefined time interval. As with all of the transactional and marketing emails, you’ll want to customize WooCommerce subscription emails to be consistent with your brand voice.
YITH WooCommerce Subscription
In this article, we will dedicate more attention to this free plugin since it’s a very popular and widely used subscription based website, setting up this plugin is easy and can be done in several minutes.
First of all, you need to install the plugin from the WordPress repository. You can directly search it from your WordPress dashboard > plugins > Add new, and search for “YITH WooCommerce Subscription.” Here is the direct link to the plugin, so install and activate it.
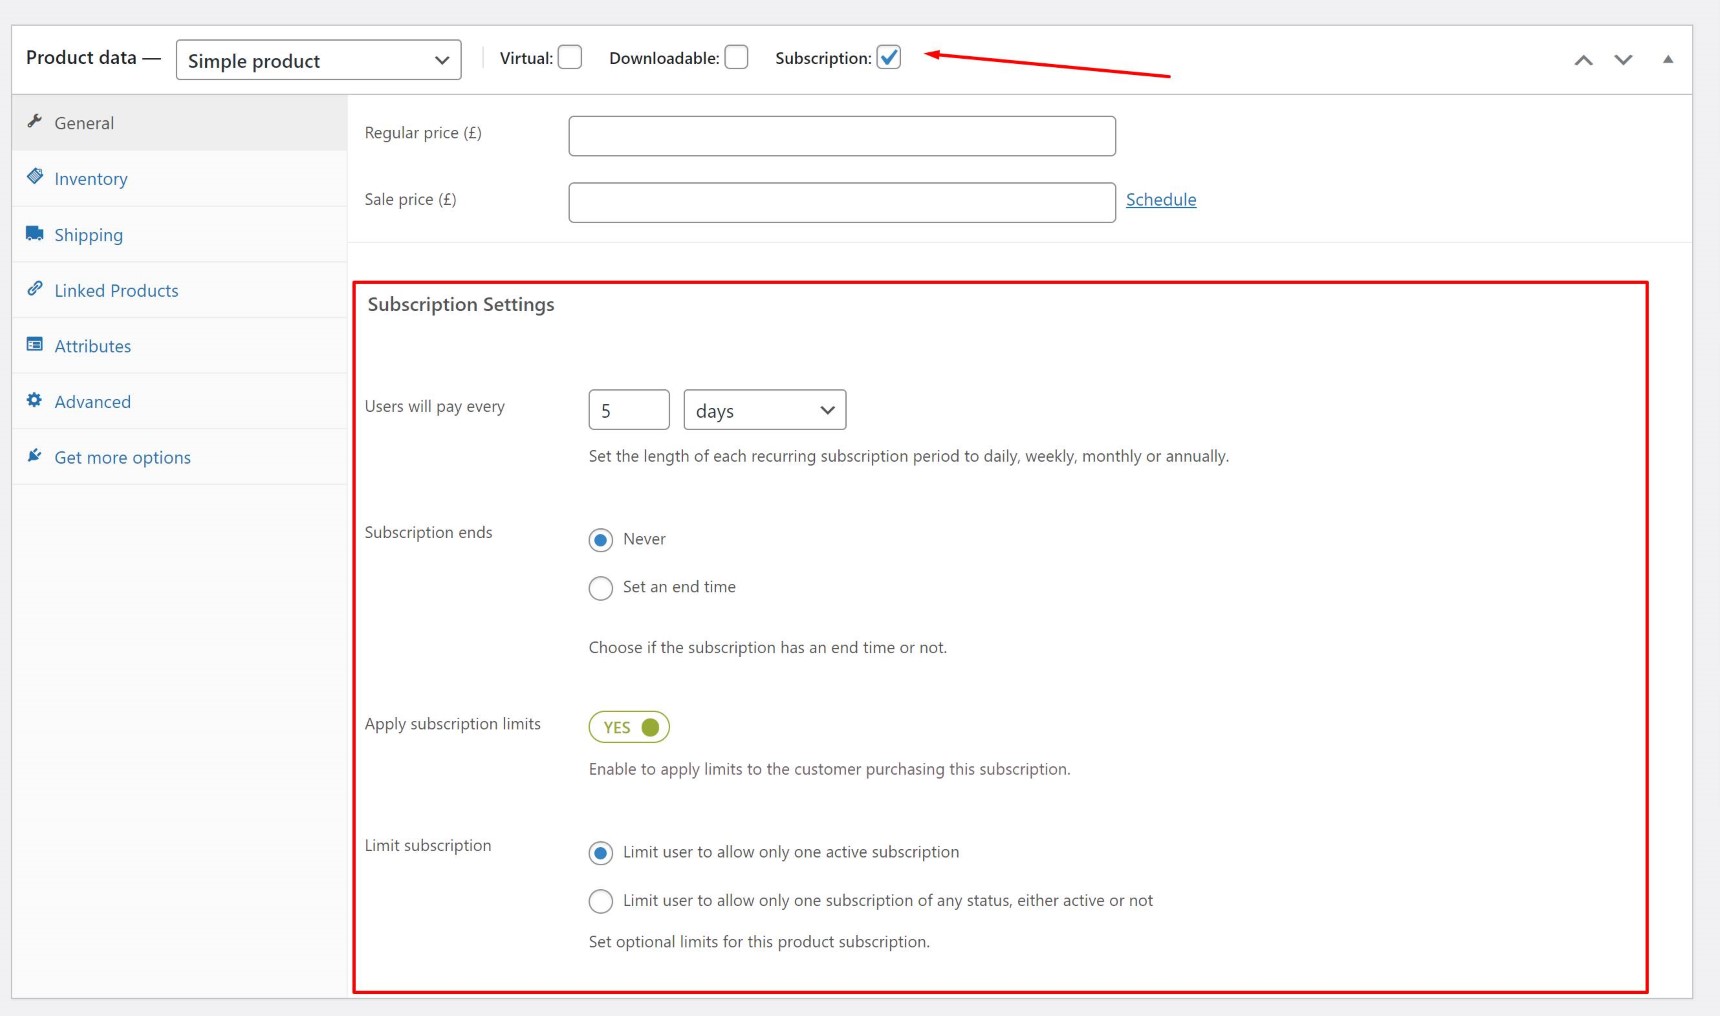
Once you activate the plugin you can immediately start using it. Open any product and you will see a new checkmark in the product details tab. By selecting it, new options will appear on the General tab:
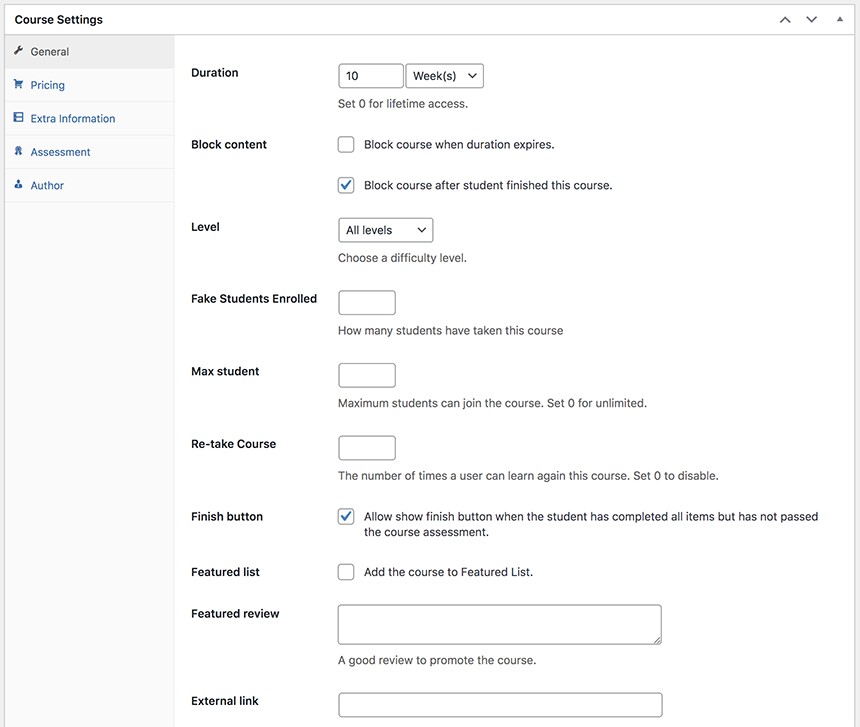
As you can see there are several settings options. However all you need to do is enable the subscription plan for this product, select price for a selected period of the time. While there is no option to set a time period of years, you may use a combination of months or days instead.
In the same tab you also have the option to set the time when a subscription period ends and options for subscription limits. For example, you may limit users to allow only one active subscription.
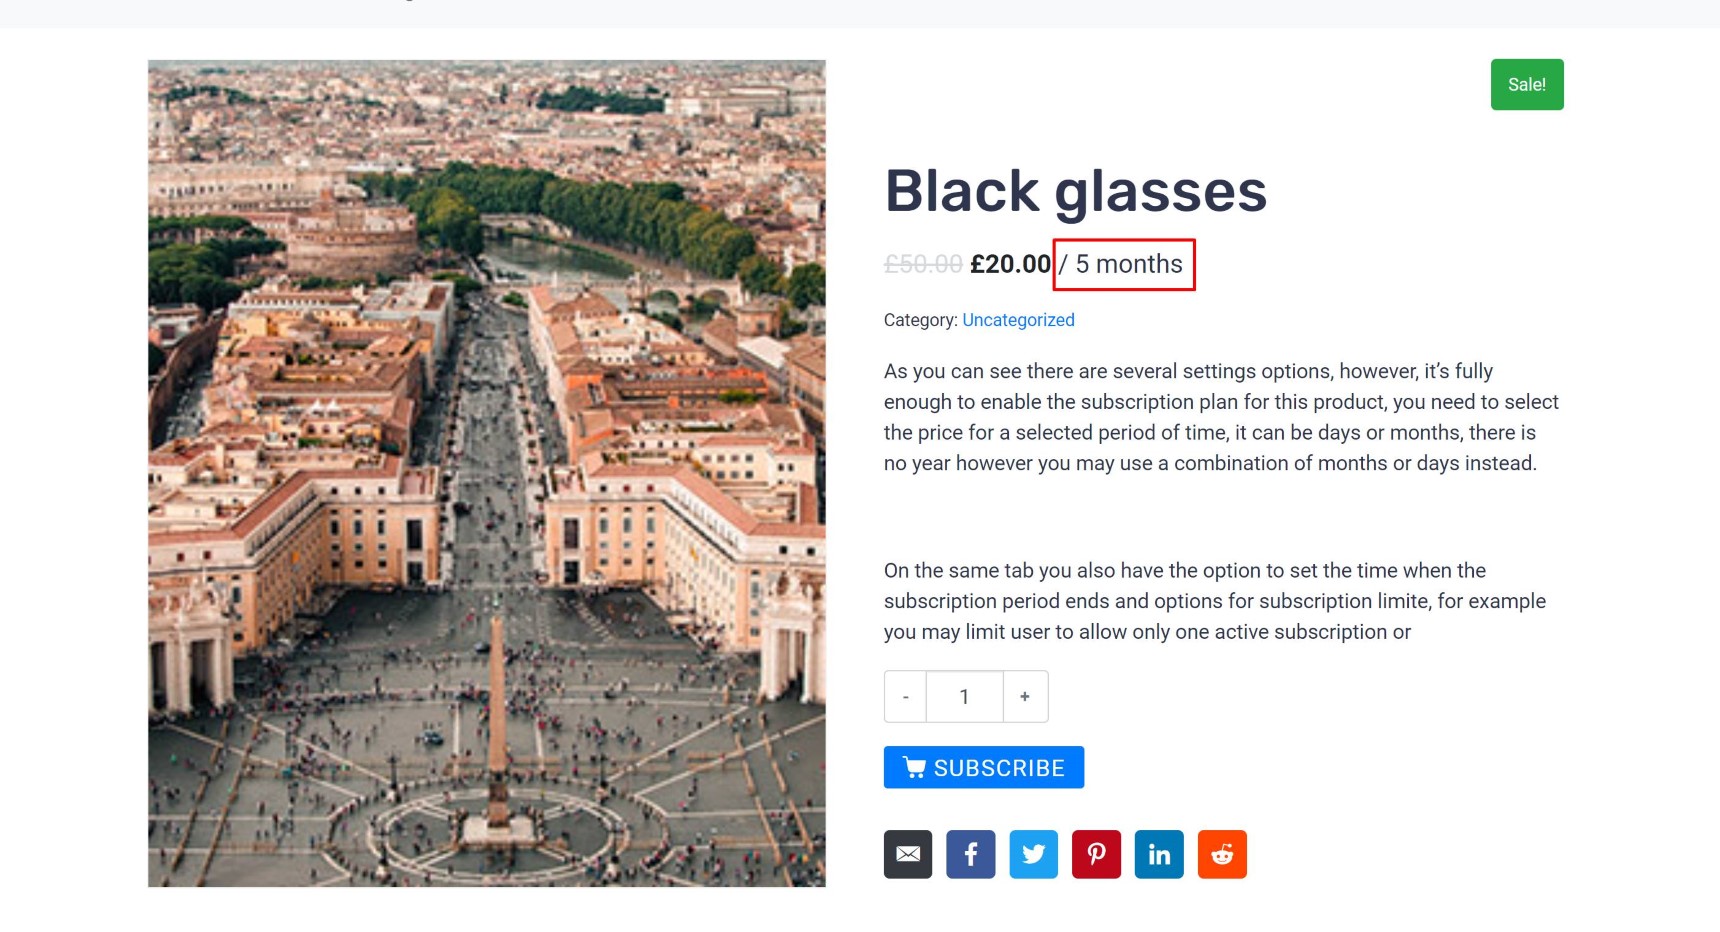
Once you’re done with the product setup it’s ready for publishing. You will see a notice about subscriptions on the product page:
That’s it, we’ve made it, so now when visitors check this page they will see this is a subscription-based product.
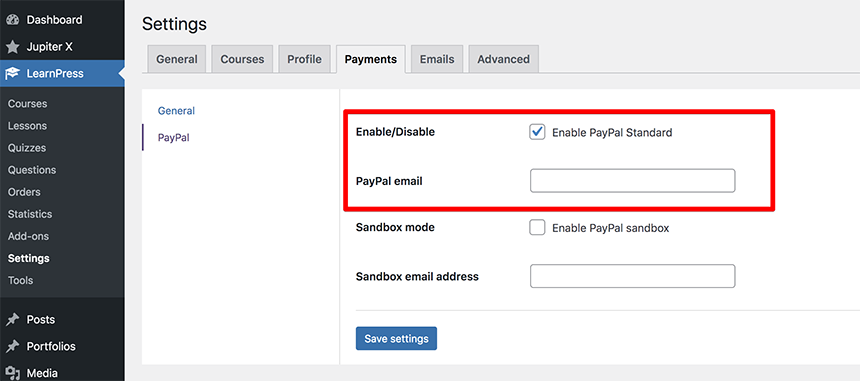
How does payment work?
By default, you need to configure payment in WooCommerce > Settings. PayPal is the payment option configured by default here, so during the predefined period of time (set in the product page) the payment system will charge users the amount of funds predefined in the product page. If funds are not enough, subscription will automatically be canceled and the user will be notified about this.
Users can also use different payment methods and the system will use that method for recurring payments. Please note that the system stores user payment methods and data, so customers will be charged automatically based on their payment method and details.
Where are my subscribers?
You can see all your subscribers in YITH > Subscription > Subscriptions. Here you can view all your current and canceled subscriptions. You also have different types of filters to filter subscriptions by date, status, payment method and customer. You can also bulk delete subcategories manually.
That’s pretty much everything that you need to start subscription-based products sales. We will not cover every piece of the settings in this blog post, so for more information check out the official documentation. The premium version of the plugin offers some other features and full control over subscription management. If you feel you are missing some configuration settings in the free version it probably is already covered in the premium version. Check this link for more information about Pro.
WooCommerce Subscriptions
WooCommerce Subscriptions, is managed by WooCommerce and is an excellent tool for setting up all kinds of subscription plans. It comes with 25 payment gateways for automatic recurring payment and you can set daily, weekly, monthly or annual billing to renew user subscriptions.
Plugin has great support and natively works with WooCommerce plugin It’s a paid plugin and costs $199 per year.
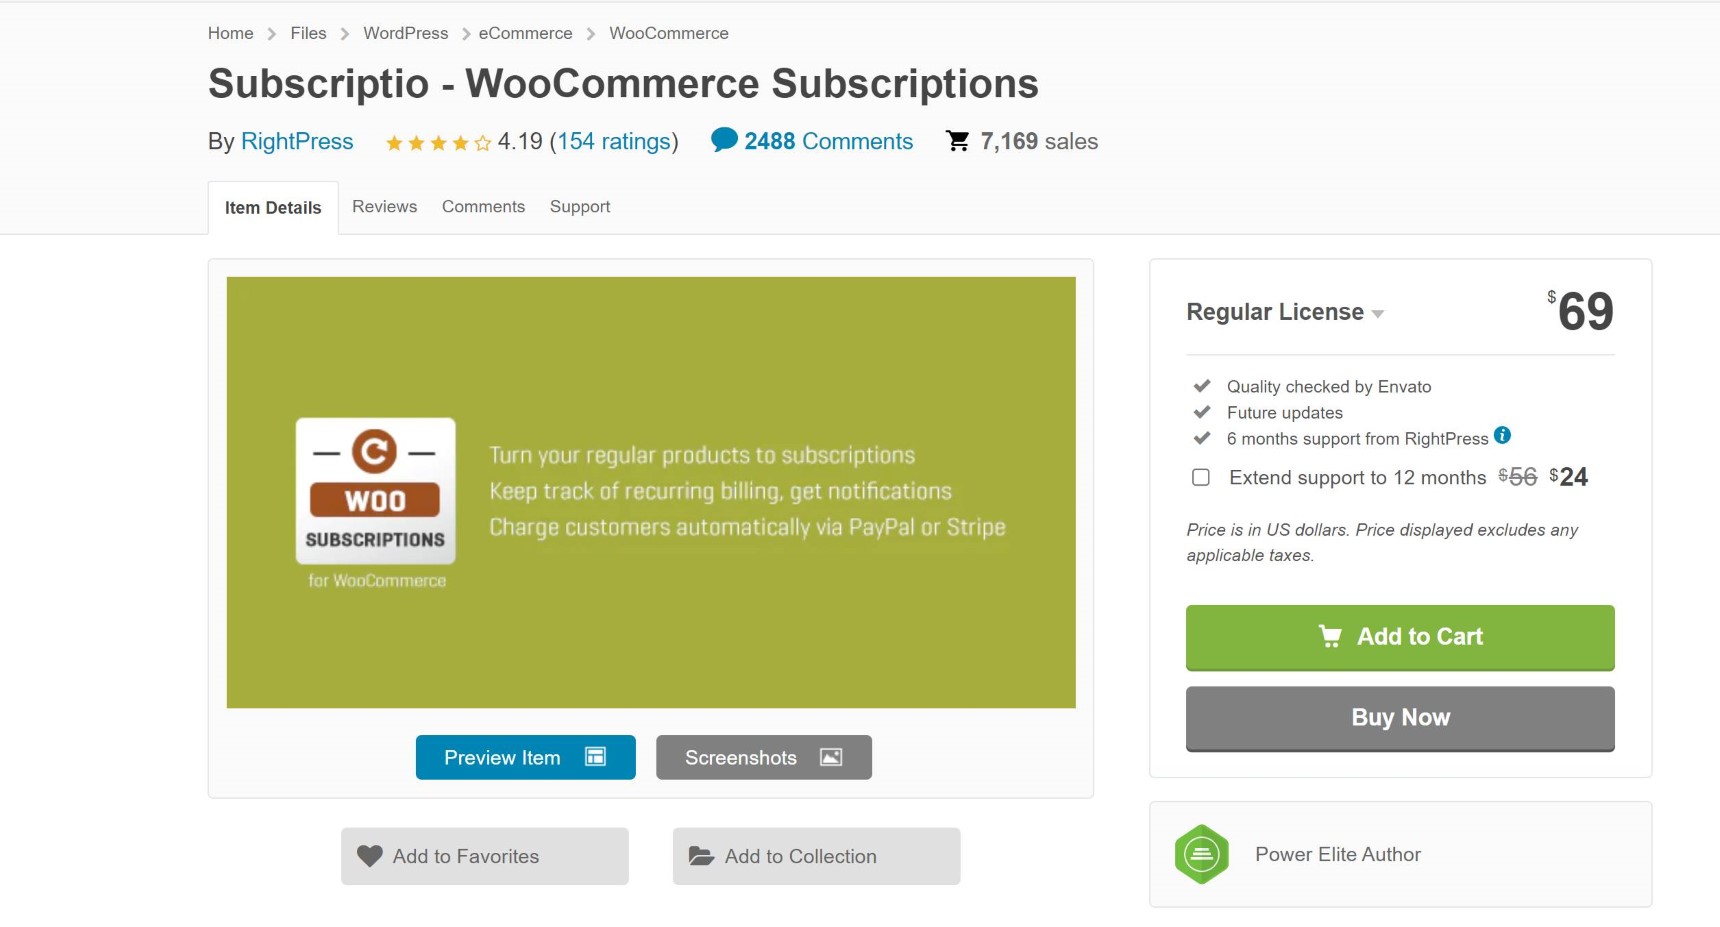
Subscriptio
Subscriptio is a premium plugin you can purchase on Codecanion.net. You can use it to sell subscriptions by default and it also has recurring revenue scheme options. This plugin is a great way to sell e-learning courses, magazine memberships, premium levels of profiles and more.
A regular license for the plugin costs $69 and if you want to extend the license it will cost $299.
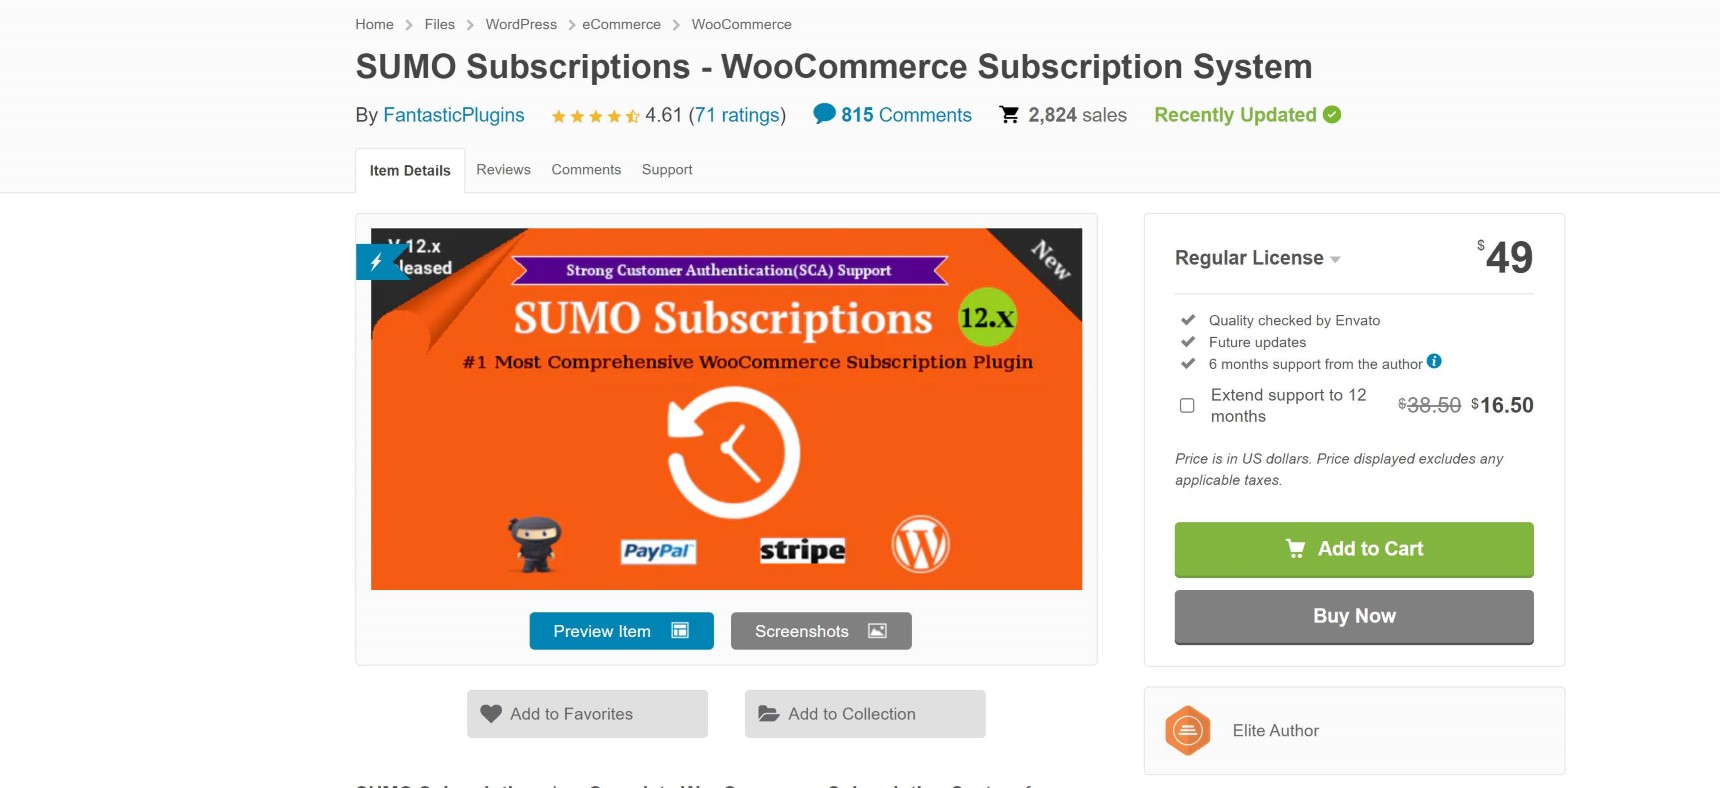
SUMO Subscriptions by Fantastic Plugins
SUMO Subscriptions is a universal tool you can use to create a subscription store with WooCommerce. It can be used for any kind of product and it also can add a subscription feature to your existing products as well. It has 4 built-in payment options, including PayPal and Stripe.
A SUMO subscription varies between $49 to $490 depending on which option you choose.
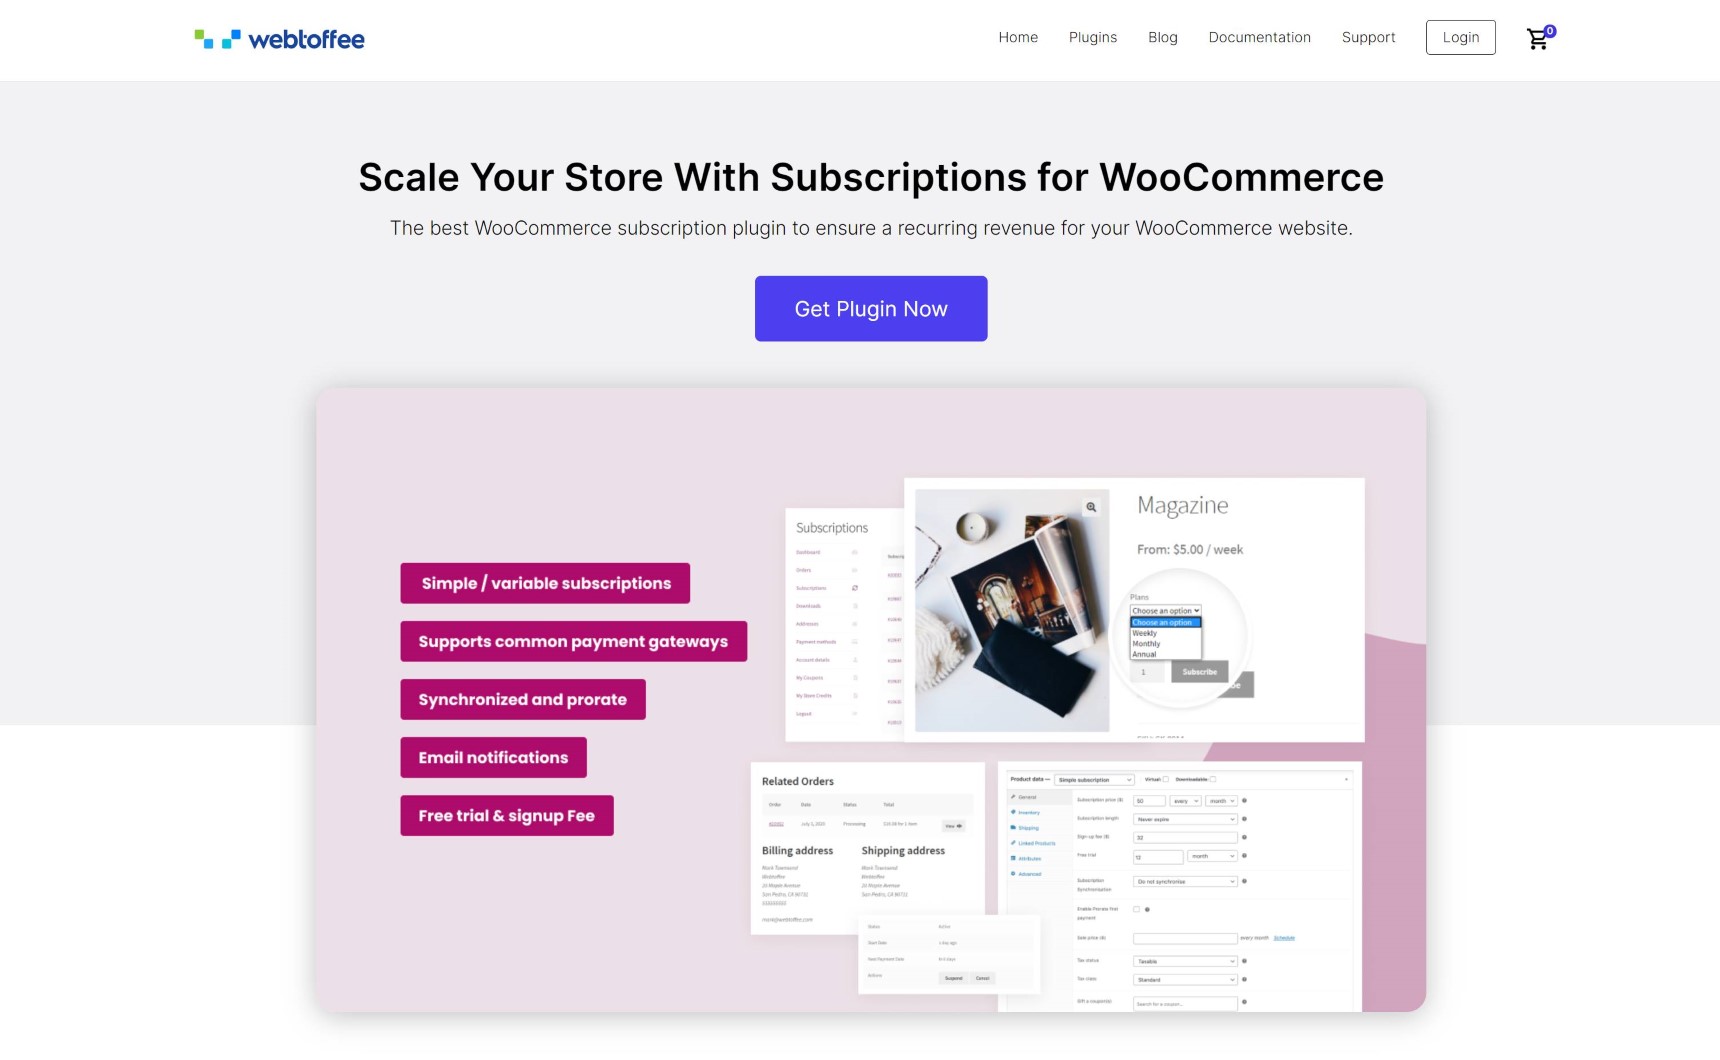
Subscriptions for WooCommerce by WebToffee
WebToffee for WooCommerce Subscriptions is a simple yet powerful plugin that allows you to set up basic subscription plans to any kind of products in your store. This plugin also supports major payment gateways such as PayPal and Stripe.
The plugin can be tested as a free trial before making a final decision. For a single site it costs $89 and a business license for five sites costs $129.
Conclusion
Now that you have a little bit more of an understanding of how subscription for ecommerce works I believe you will have all the necessary information to choose the right plugin. Using the plugins we mentioned here you can quickly sell subscriptions-based products and services and create a subscription store with WooCommerce successfully. If you need more clarification or have any questions please leave a comment below.
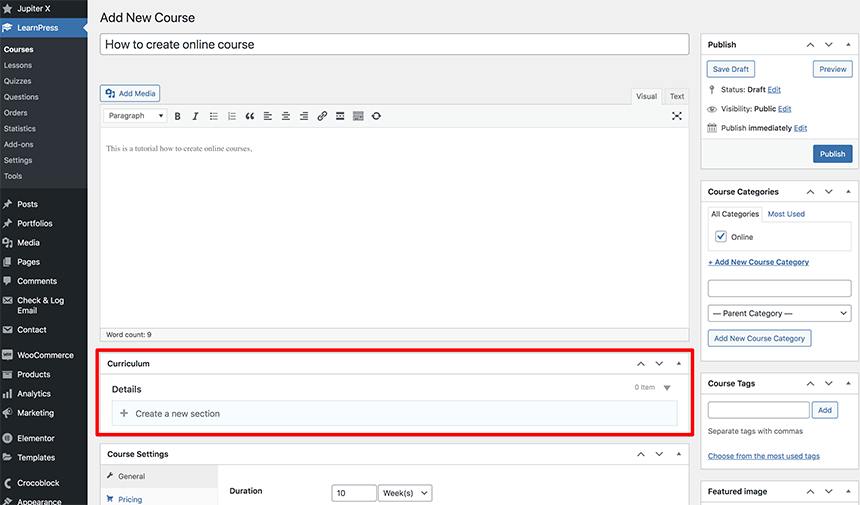
In the first part of this series, we dove into creating a dynamic room listing with room attributes and a nice template that includes those custom attributes, both of which will be filled out by the receptionist. In the second part of the series, we saw how you can create archive lists and add filtering capabilities to them. Picking up from where we left off, we will now build a dynamic hotel website by creating booking forms along with pricing calculators and we’ll see where the entry data goes if someone books a hotel on our website.
As you’ll recall, we created a custom post type for our room called Rooms and then created a listing for it. A listing is an embodiment of the meta fields in a custom post type with a particular design. In the first part, we built a custom post for our rooms and a listing and beautiful design for a single page. What we are going to do now is work on building a dynamic hotel website by modifying the single page template for our Room post type and using Jet Engine forms to add a booking form to each room page.
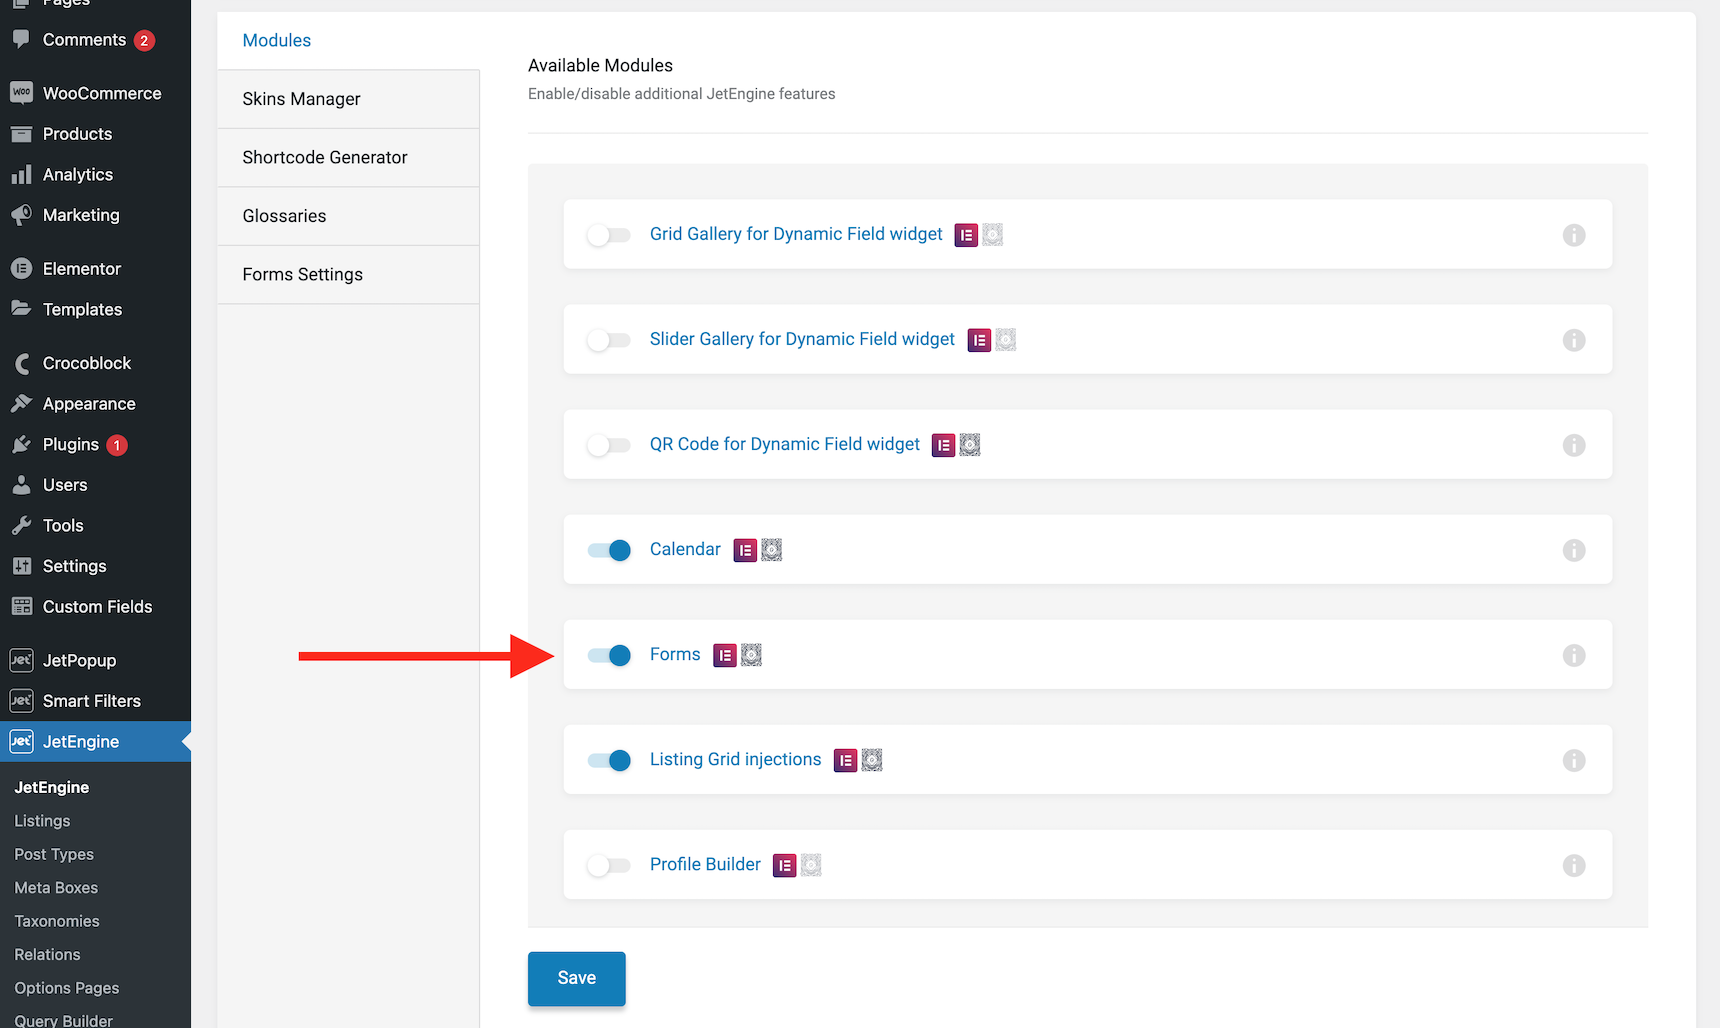
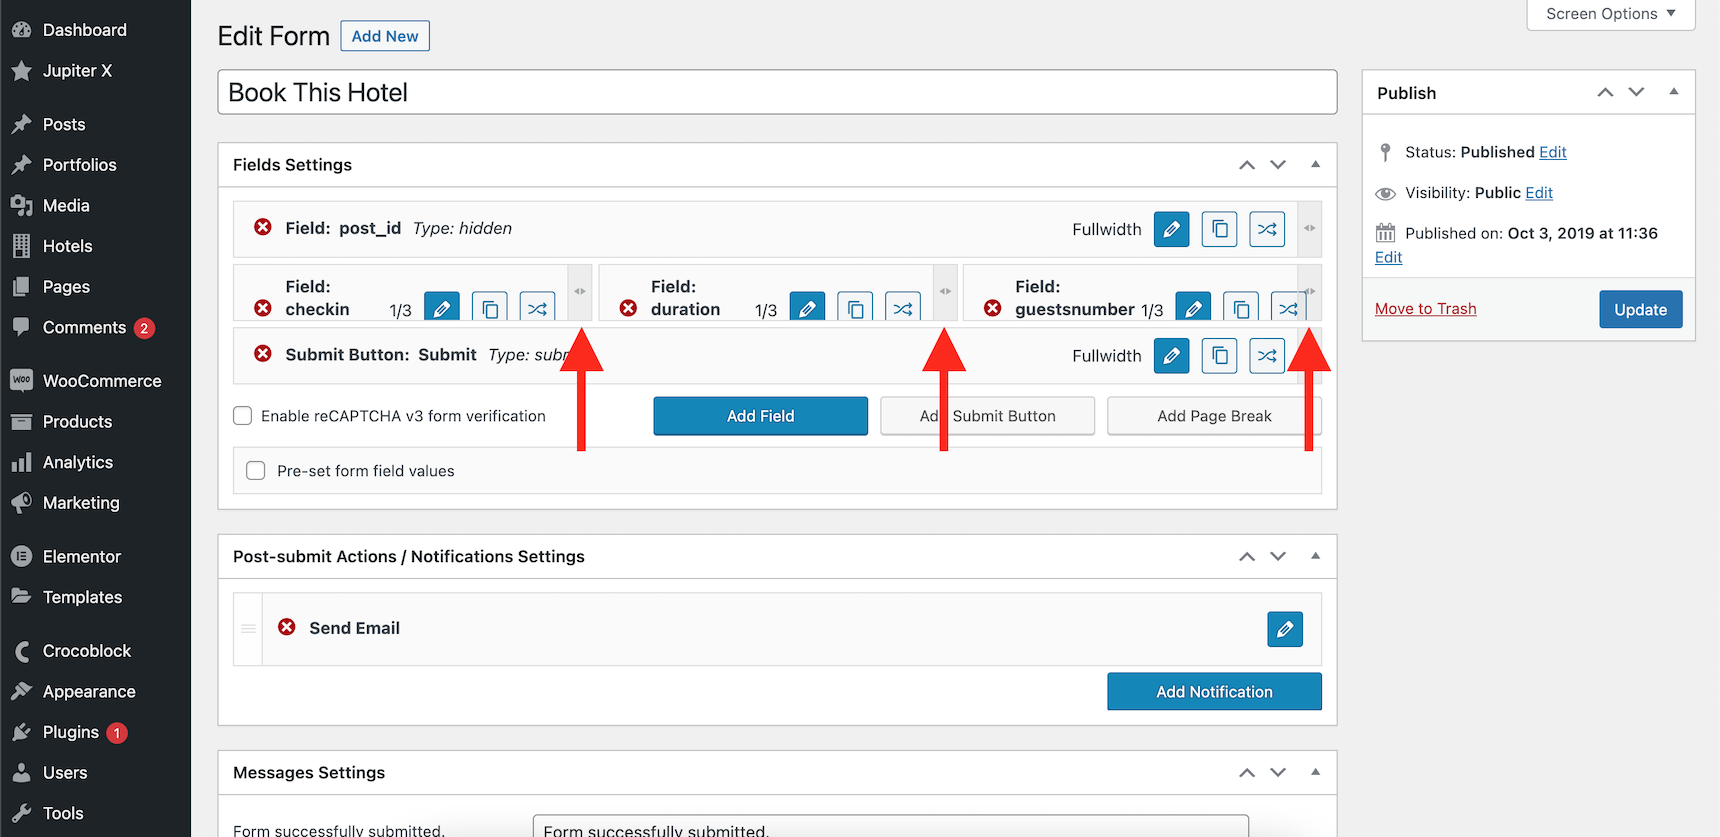
Enabling Jet Engine Forms
Jet Engine Forms are disabled by default. If you want to make booking forms using this feature, you first need to enable it via Jet Engine settings. Open the Jet Engine -> Jet Engine and make sure the Forms module is enabled.
Enabling the Forms module in Jet Engine
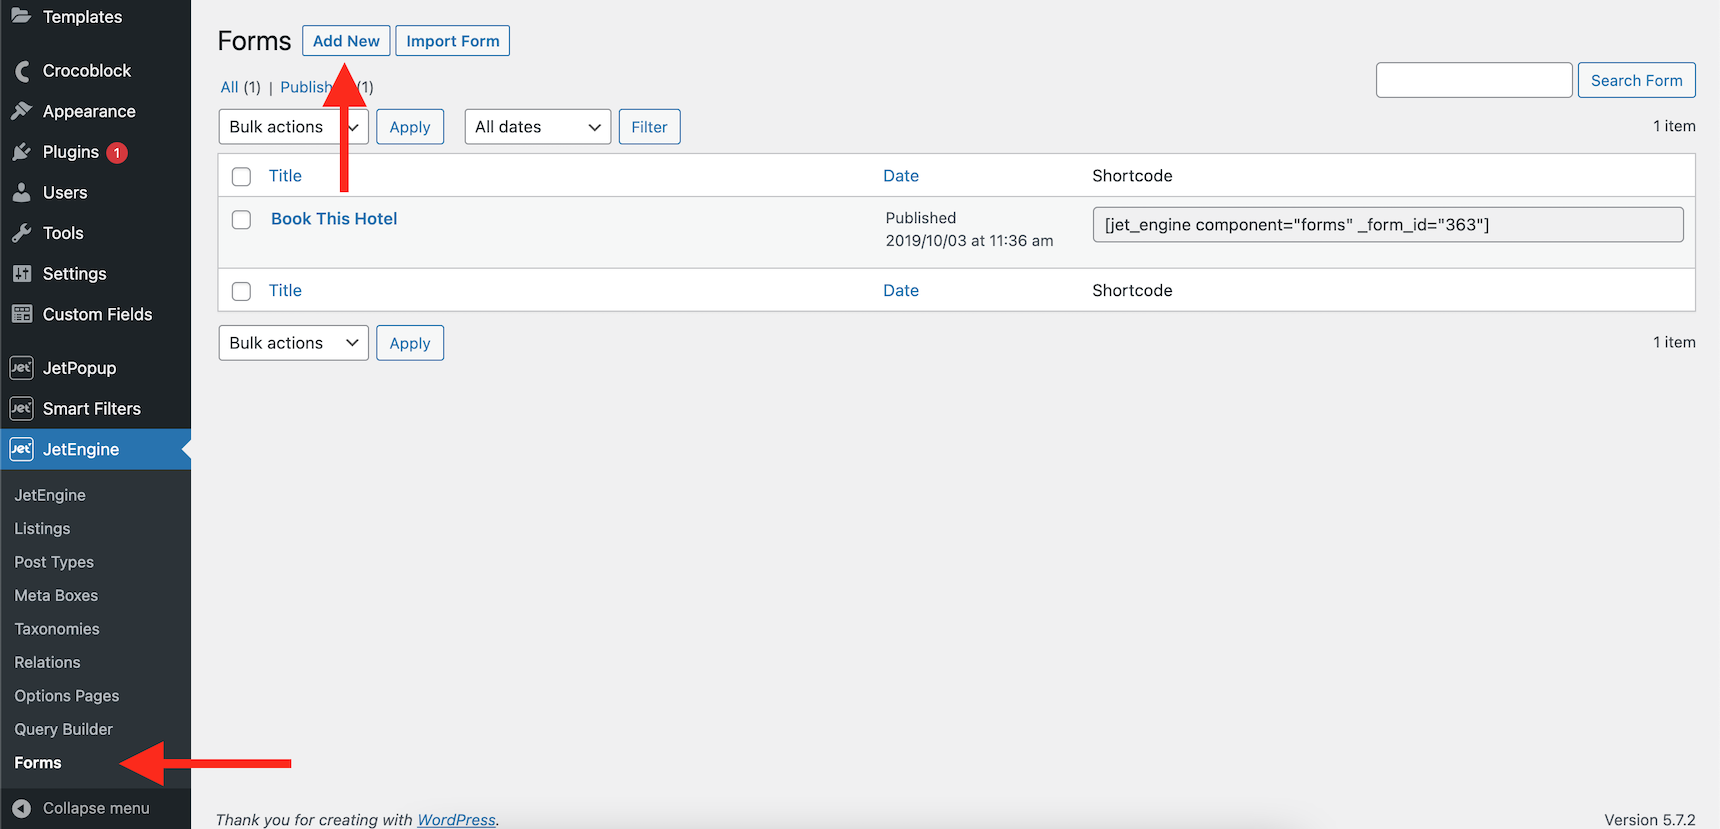
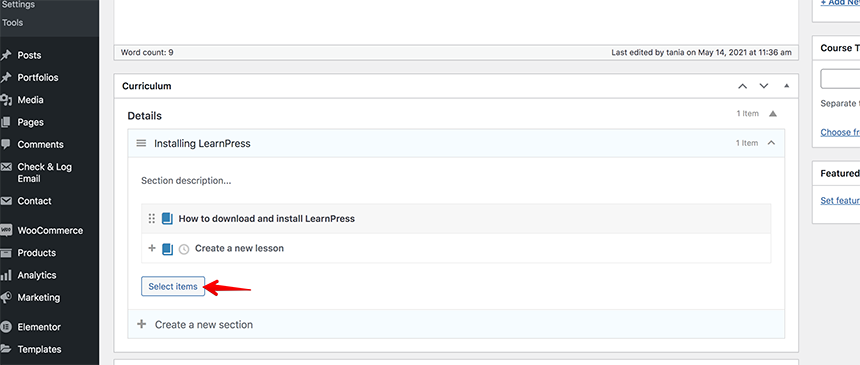
After that, the Forms menu will be available under the Jet Engine menu. Open the Forms panel and click on Add New to create a new booking form.
Adding a new form in Jet Engine
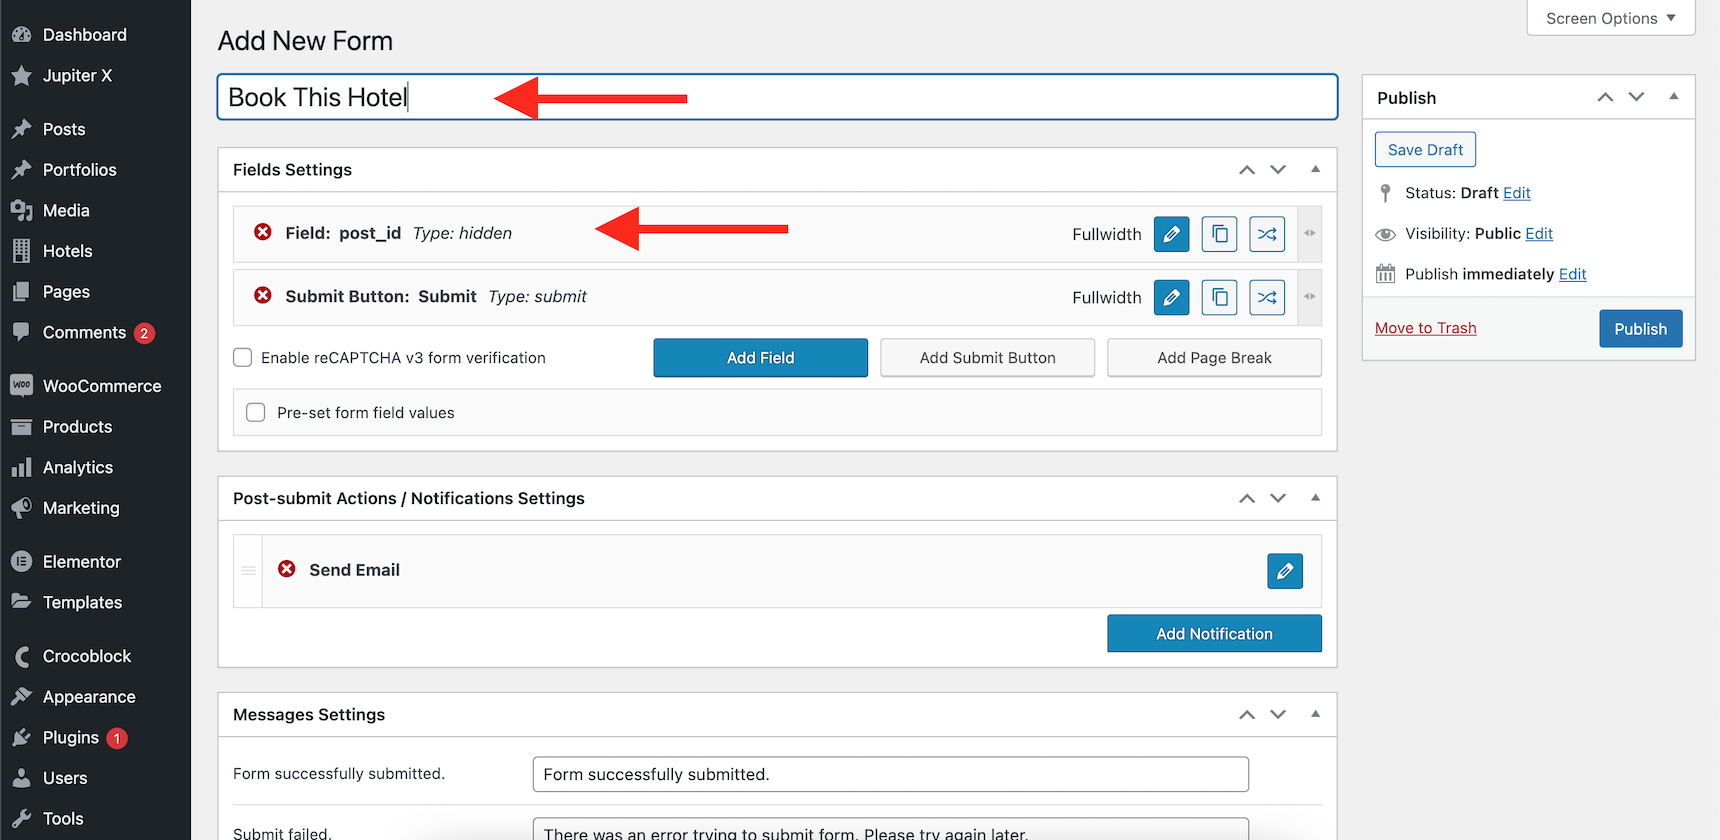
The first step is to define a name for your form. Then, add the post ID as a hidden value in order to be able to use the form in dynamic pages. This will give you the option to see on what post the user submitted the form.
Defining a name for the form
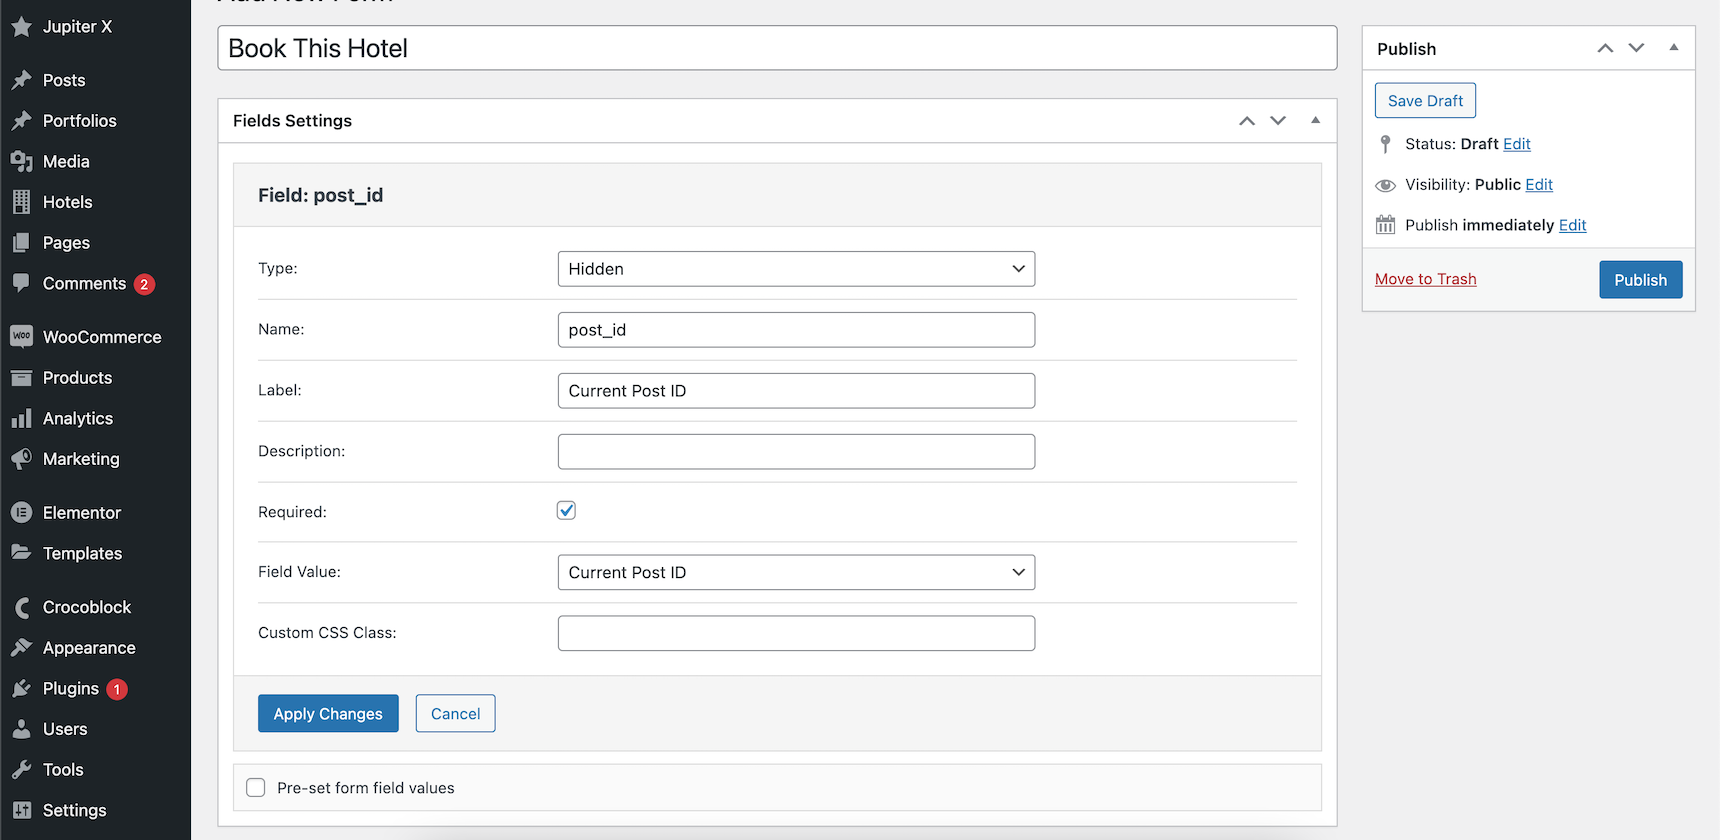
Make sure the post_id field has these settings:
Type: Hidden Required: checked Field Value: Current Post ID
Post_id hidden field will be automatically populated by the current post ID value
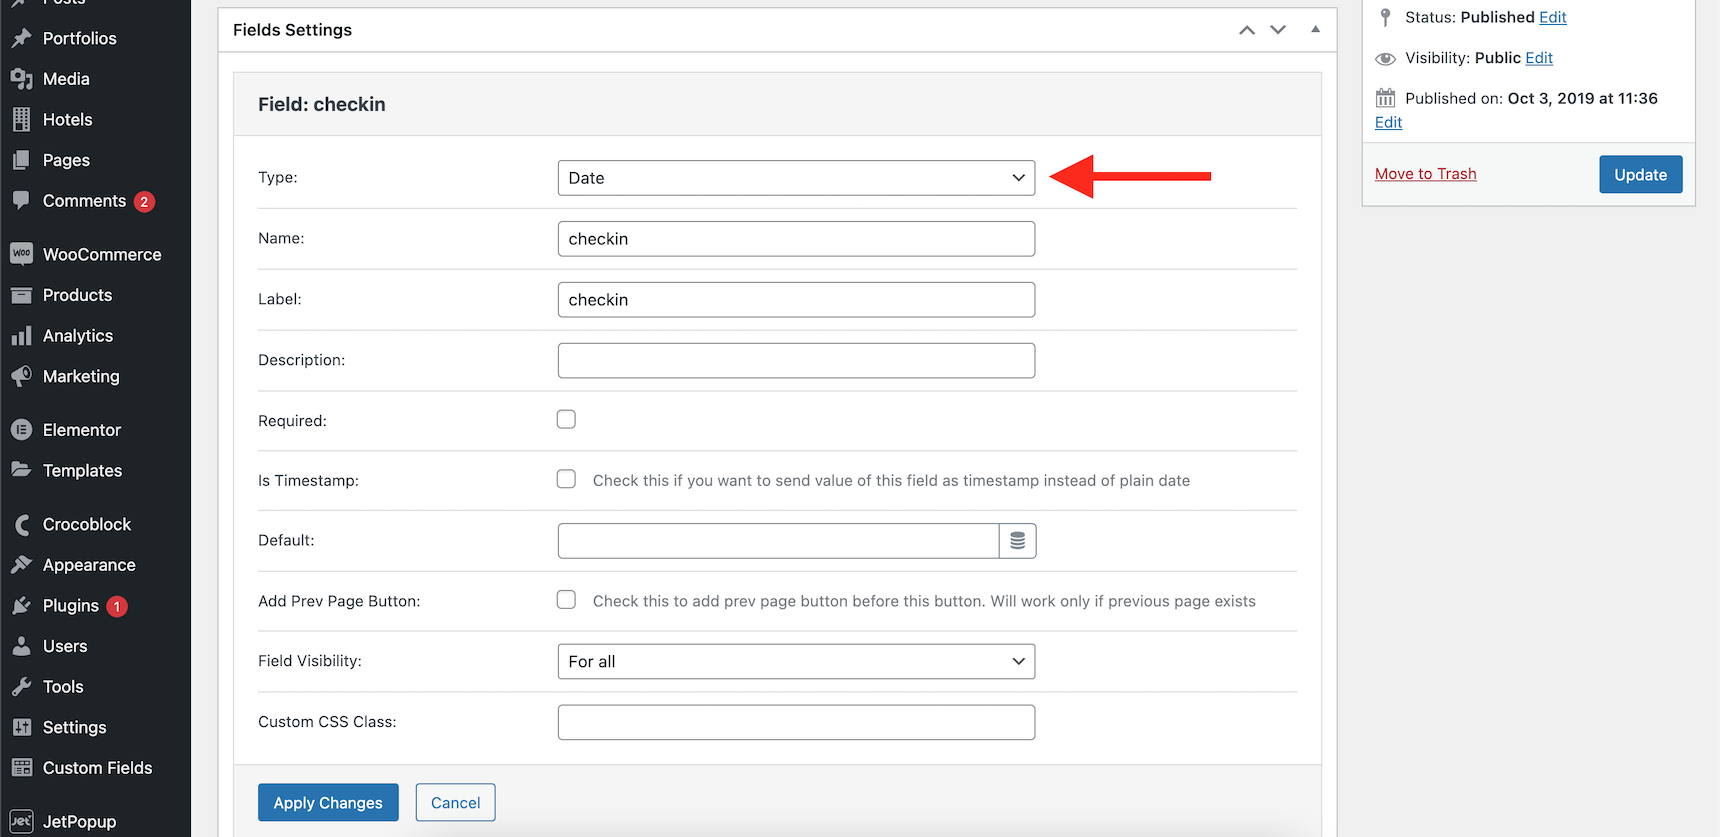
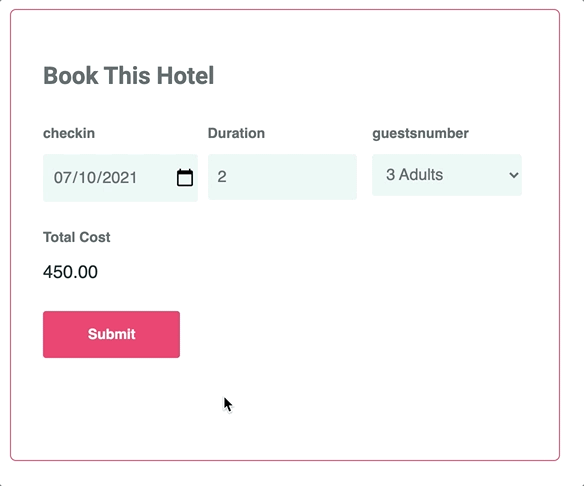
Now we need to add other essential fields to our form to get the user booking information. I will add the check in date, number of nights of stay and number of guests in three separate fields.
The Check In Date should be a datepicker field, so I will set its type as Date.
Inserting a date field to the form
The good thing about these fields is that you can change the width of the fields and change their alignment by simply dragging and dropping them into position. I want my fields to be placed in one line, so I will change the width of each field to approximately 33%.
Making the fields inline
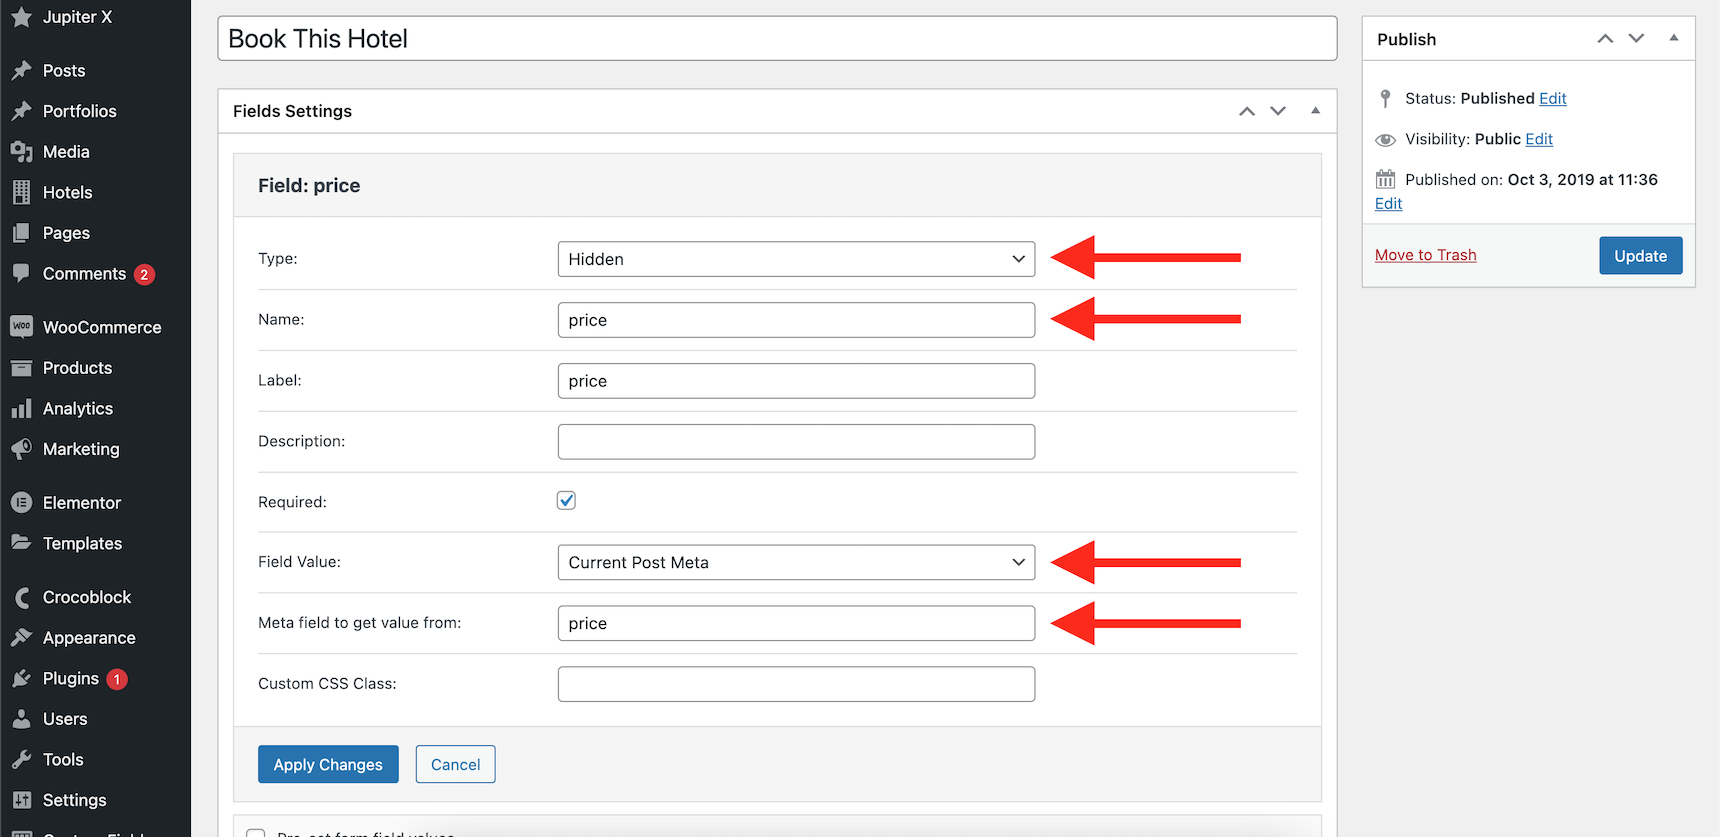
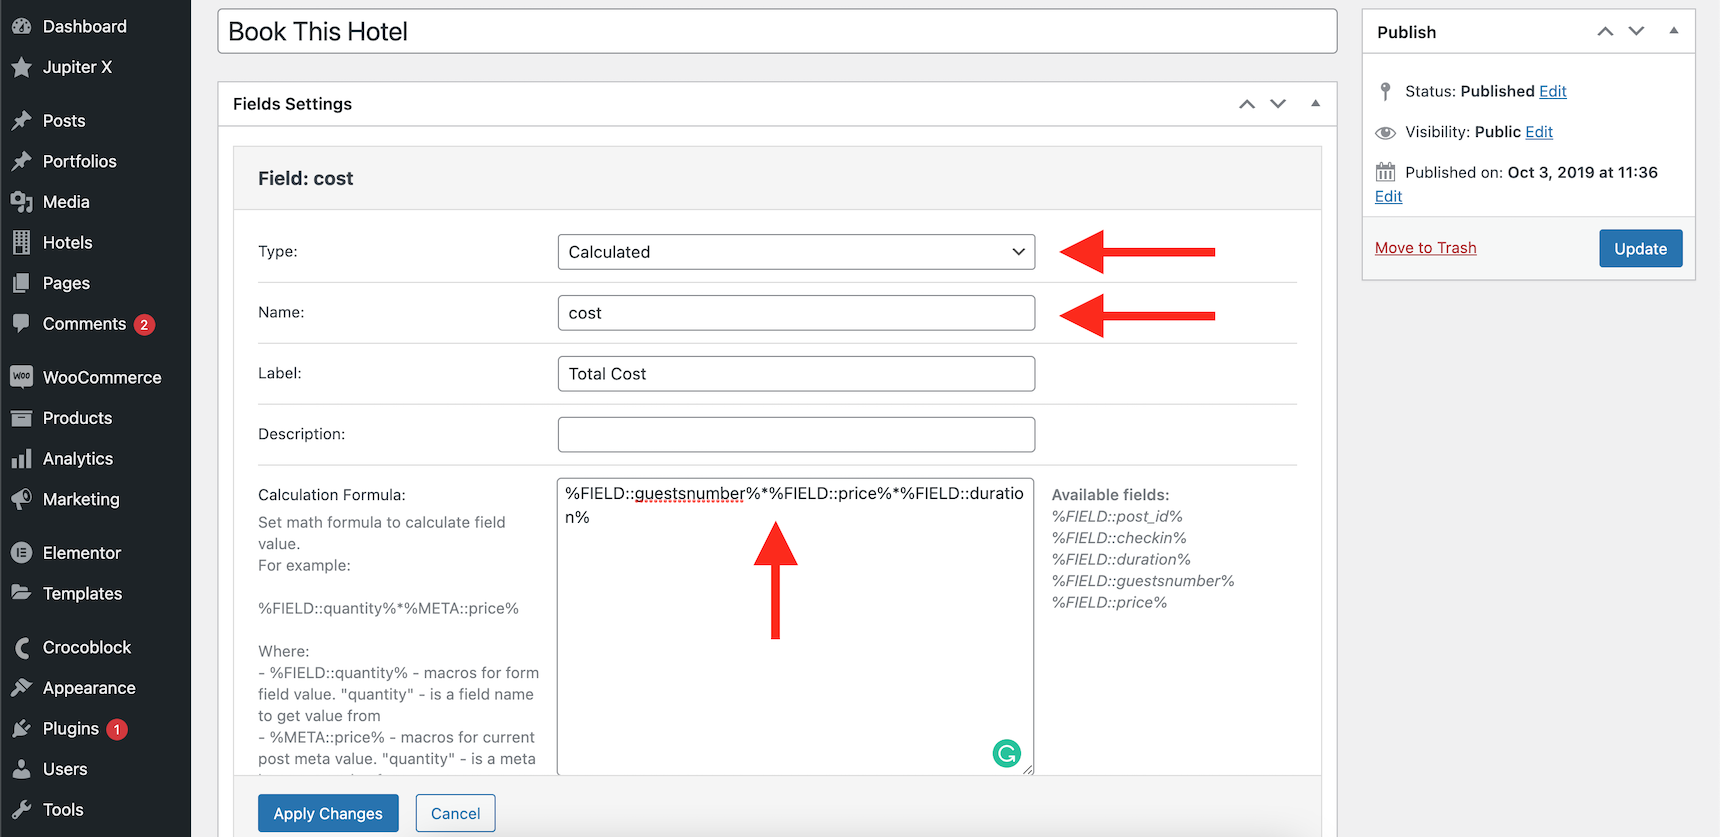
I want to show the price of that room as soon as the viewer changes the numbers on the form. If I didn’t know that Jet Engine provides a “Calculated” field type, I would have to write this part via Javascript. Fortunately, I can do this easily if I just define my formula in a “Calculated” field type. In order to do that, I will add a new field named “cost” and then define a formula for how to calculate the cost. However, I need to get the price of the room from the meta fields first and then we can use it in our formula. So, let’s add a hidden field named “price”.
Get the price field by defining a hidden field populated by post meta
Now set the Field Value to be “Current Post Meta” and put the meta key “price” inside the “Meta Field to get value from” section.
Now It is time to add a calculated field into the form. Add a new field and set it to be “Calculated”. Then define the formula as follows:
By using this formula, we are saying that we need to multiply the guest number by price of the room multiplied by duration in terms of nights.
Defining the formula for our pricing calculator
So, if a room costs 50$ per night and a person, it would cost 50x2x3 = 300$ if there are two guests and they want to stay 3 nights in that room.
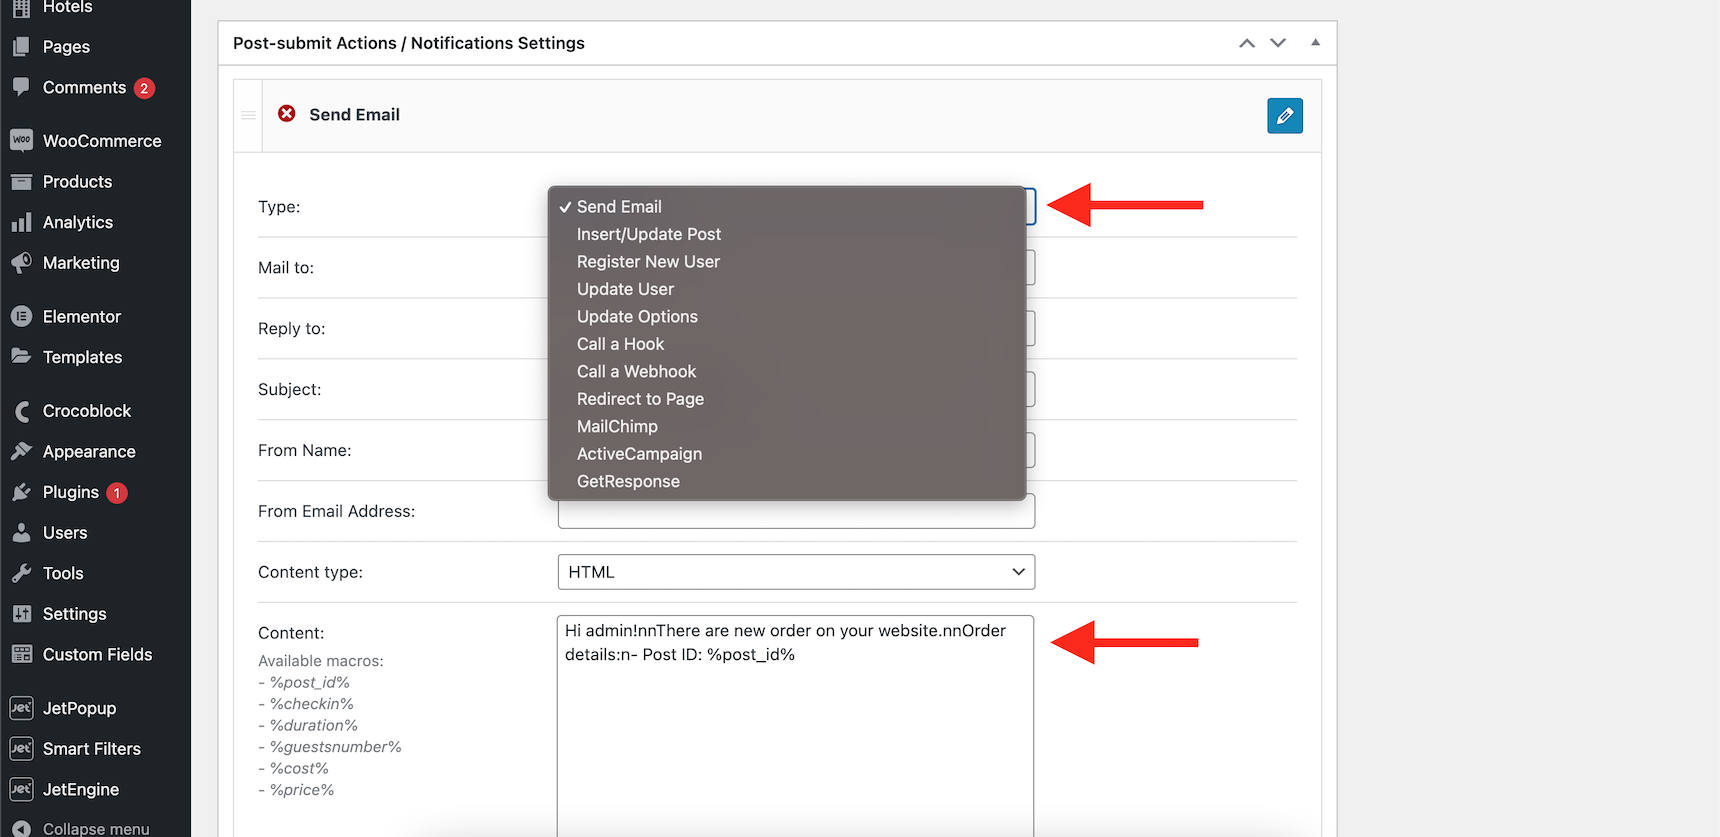
After that, apply the changes and define how the form should act when the user submits it. Scroll down to the “Post-submit Actions / Notification Settings” and add as much as you want. Here I just want to get notified via email but you can use MailChimp, Active Campaign, create a user or even call a webhook to connect your website to your hotel booking software (with a little bit of coding).
Define actions on form submission
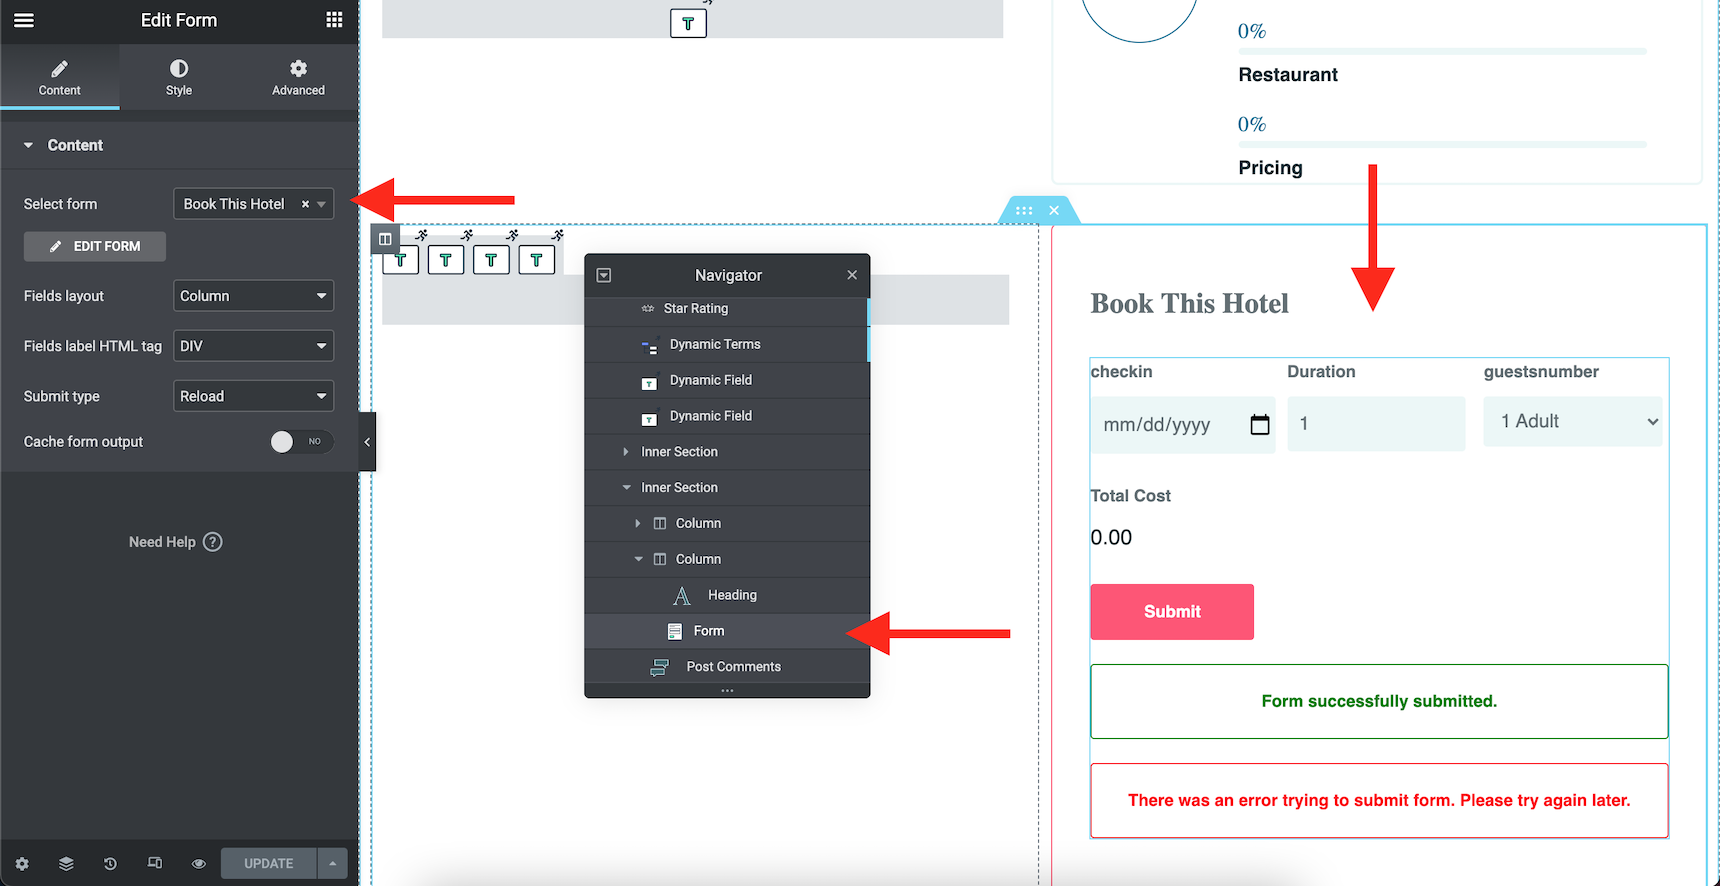
Now save your form and open the room’s single page template and edit that via Elementor. Then drop a “Form” widget from the jet engine widgets and then select the form you created.
Adding the jet engine form as the booking form on the room’s page template
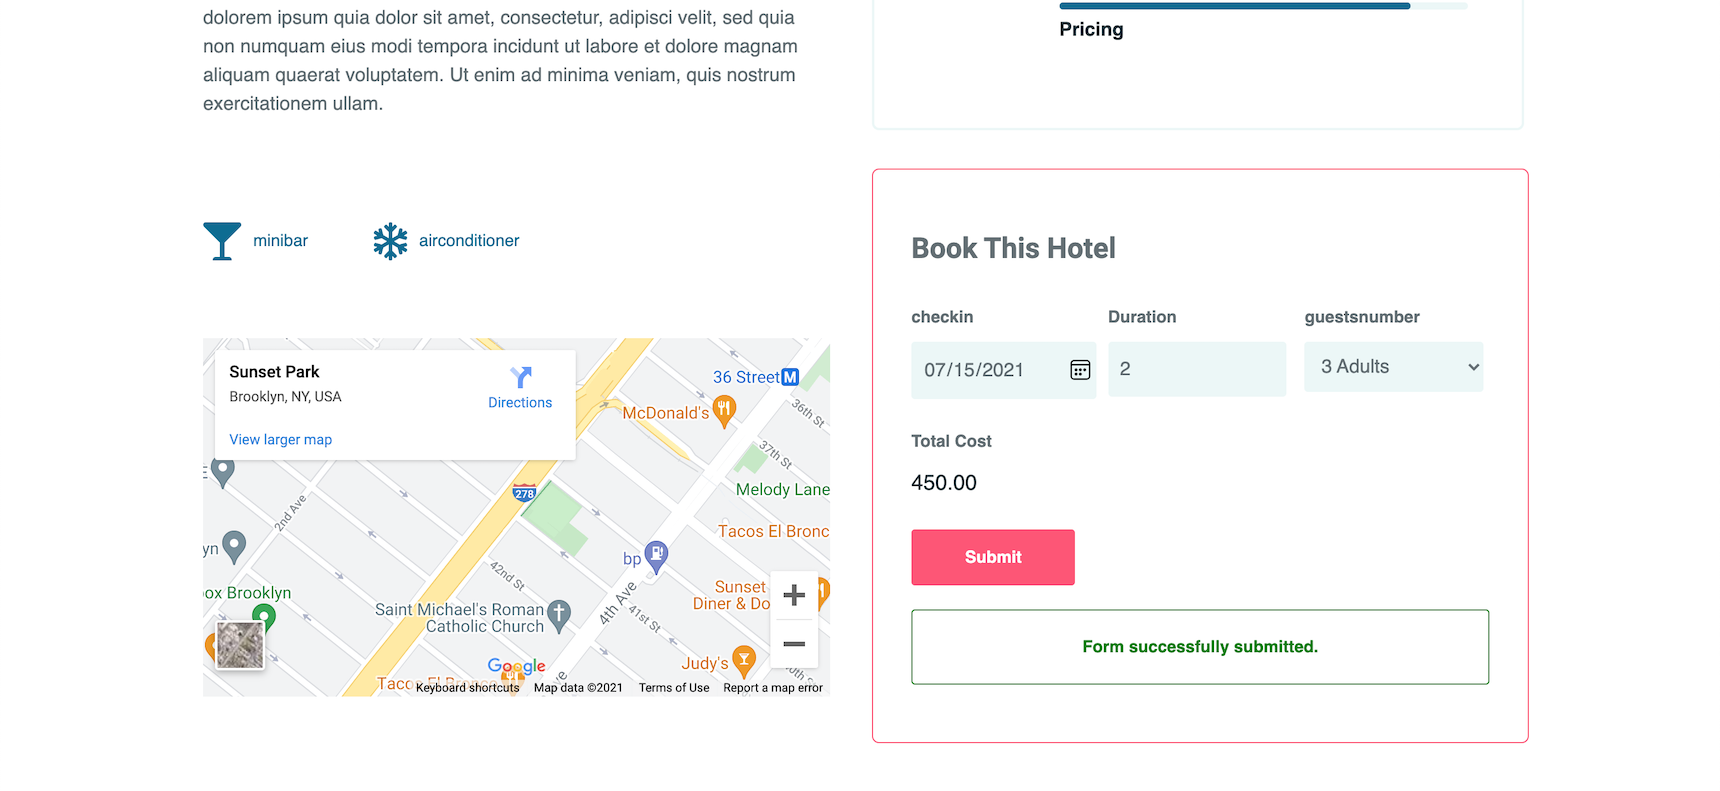
That’s all. Now save the page template and visit one of the hotel’s pages.
By submitting this form, since I set the notification email to be sent to my website admin, she will receive an email as soon as someone books a room.
The booking form within the page
Building a dynamic hotel website series ends here and we hope that it shed some light on the possibilities and features offered by the Jupiter X theme and its bundled plugins. Some users may need advanced booking forms. The booking forms here can get really advanced and complex. However, advanced features such as integration with WooCommerce or storing the data in custom tables are possible via the Jet Bookings plugin, which is not bundled with Jupiter X.
If you have any questions or feedback on building a dynamic hotel website and this series in general, feel free to post it in the comments below. We love getting feedback and would like to hear from you.
WordPress is the most popular CMS platform out there. If you’re reading this article, you probably already use WordPress for your site, but it’s important to be mindful. Many users, especially beginners, make mistakes when they start managing a website. But many of these mistakes are easy to avoid, and if you read further, you’ll be able to fix mistakes before they harm your website. Let’s check out the list of the most common WordPress mistakes you should avoid
Ignoring website backups
A lot of website users think “It won’t happen to me,” but that’s wrong. One day you can find that your site was compromised and all data was lost. The server may crash or the site may be hacked. You’ll be so upset if you need to start everything from scratch. If you didn’t make a backup, that will be your only option.
When installing WordPress, you are provided with setup options. One of the options is to set a username for your account. By default the username is set as “admin”, but you should change it ASAP. The security of using “admin” as your username is weak and if you use a weak password as well your website will definitely be hacked. You should avoid using short and weak passwords. Your password must be long and consist of a letter, number, and symbol combination. Avoid using any common usernames, like “admin” or “administrator”.
You can also add two-factor authentication to your WordPress website. This article will give you more information about it.
Ignoring updates
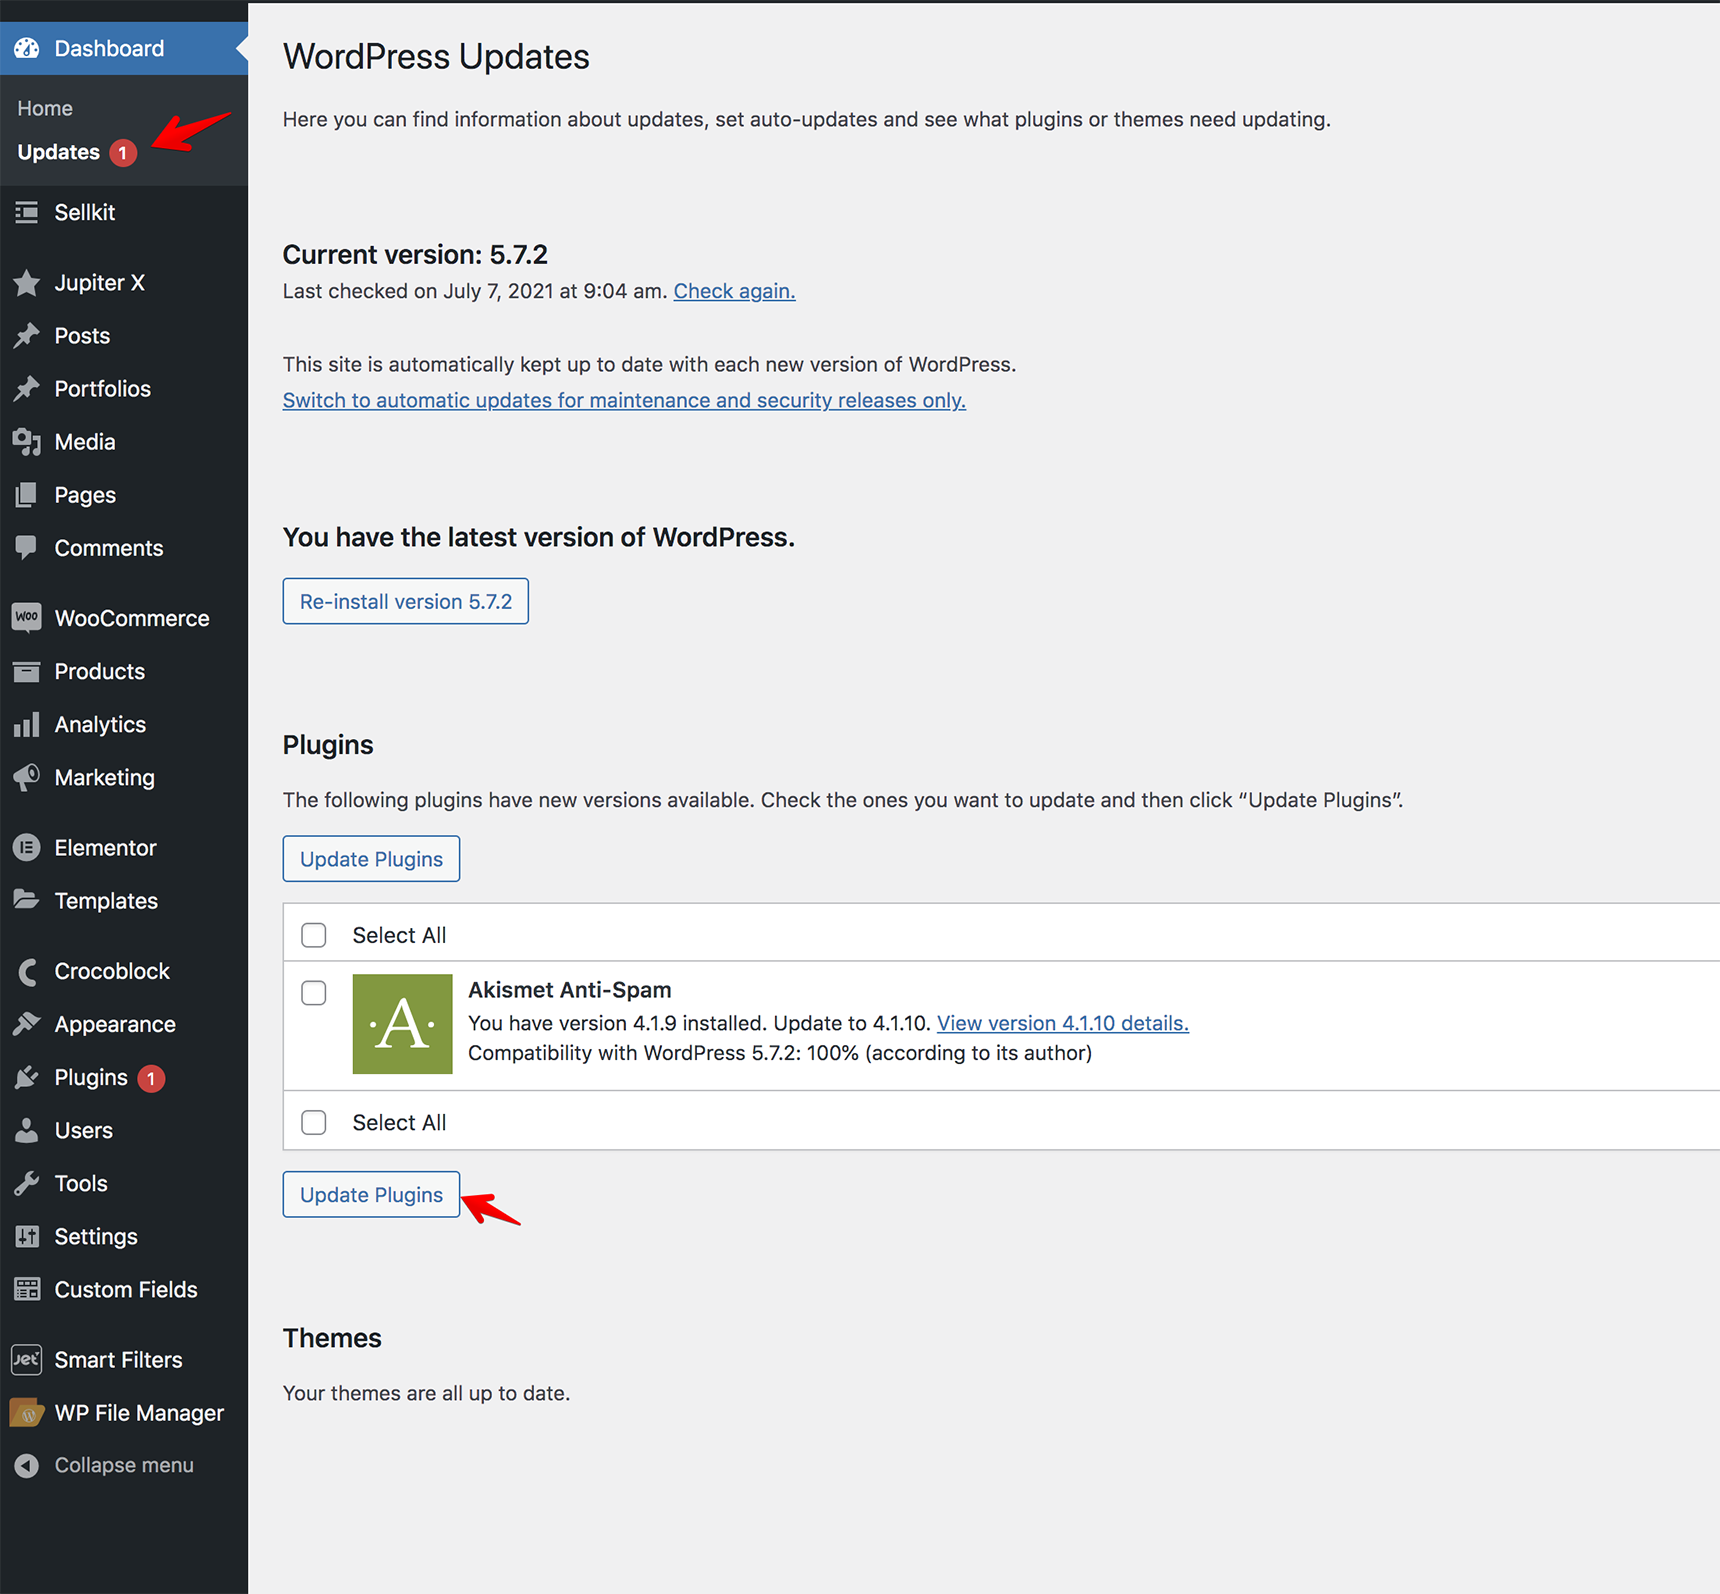
There are regular updates for WordPress plugins and themes. When you install these updates, you’re getting new features and security improvements. Many users choose not to update as they are afraid their website will crash. If you are afraid of this too, you can run updates on a staging site and then proceed on a live site to see if everything runs smoothly. If you keep old versions, your website will be open for hackers. You should always update as soon as a new version is released, whether it’s for your WordPress sites, themes or plugins.
Forgetting to install a caching plugin
Deciding not to use a cache plugin is a bad idea. These plugins will help you speed up site loading and optimize your site. If your website loads too long, your visitors will probably close the page and move to another website.
There are a lot of great WordPress cache plugins out there and you’ll definitely see the benefits if you install one of them. If you are using the Jupiter X theme and want to optimize the site to speed up loading times, you can follow the instructions from this article.
Leaving images unoptimized
Using data-heavy images will slow down your website, causing it to take too long to load. So, before uploading images to your WordPress site, you need to optimize them. We already have the article “How to Optimize Your Images for SEO and Speed” where you’ll find detailed instructions on how you can optimize images to improve performance.
Adding Forms to your website without anti-spam validation
When creating a contact form on your website, it’s important to protect it from spam. If you don’t do it, one day you’ll wake up and find your mailbox full of spam. To prevent such issues, it’s recommended to use captcha for the contact form. You can read about custom contact forms in this article.
If you created a website with the Jupiter X theme, you can find how to enable captcha for Jupiter X Contact Form here .
Allowing spam in the comments
It’s a great idea to allow your visitors to leave comments under posts, but a mistake you may make is failing to moderate the comments and deactivating the Akismet plugin. If you approve spam comments, it will hurt your SEO.
The Akismet plugin is one of the best methods of protection. It will block blog comments and pingback spam. Keep it activated to filter out spam messages.
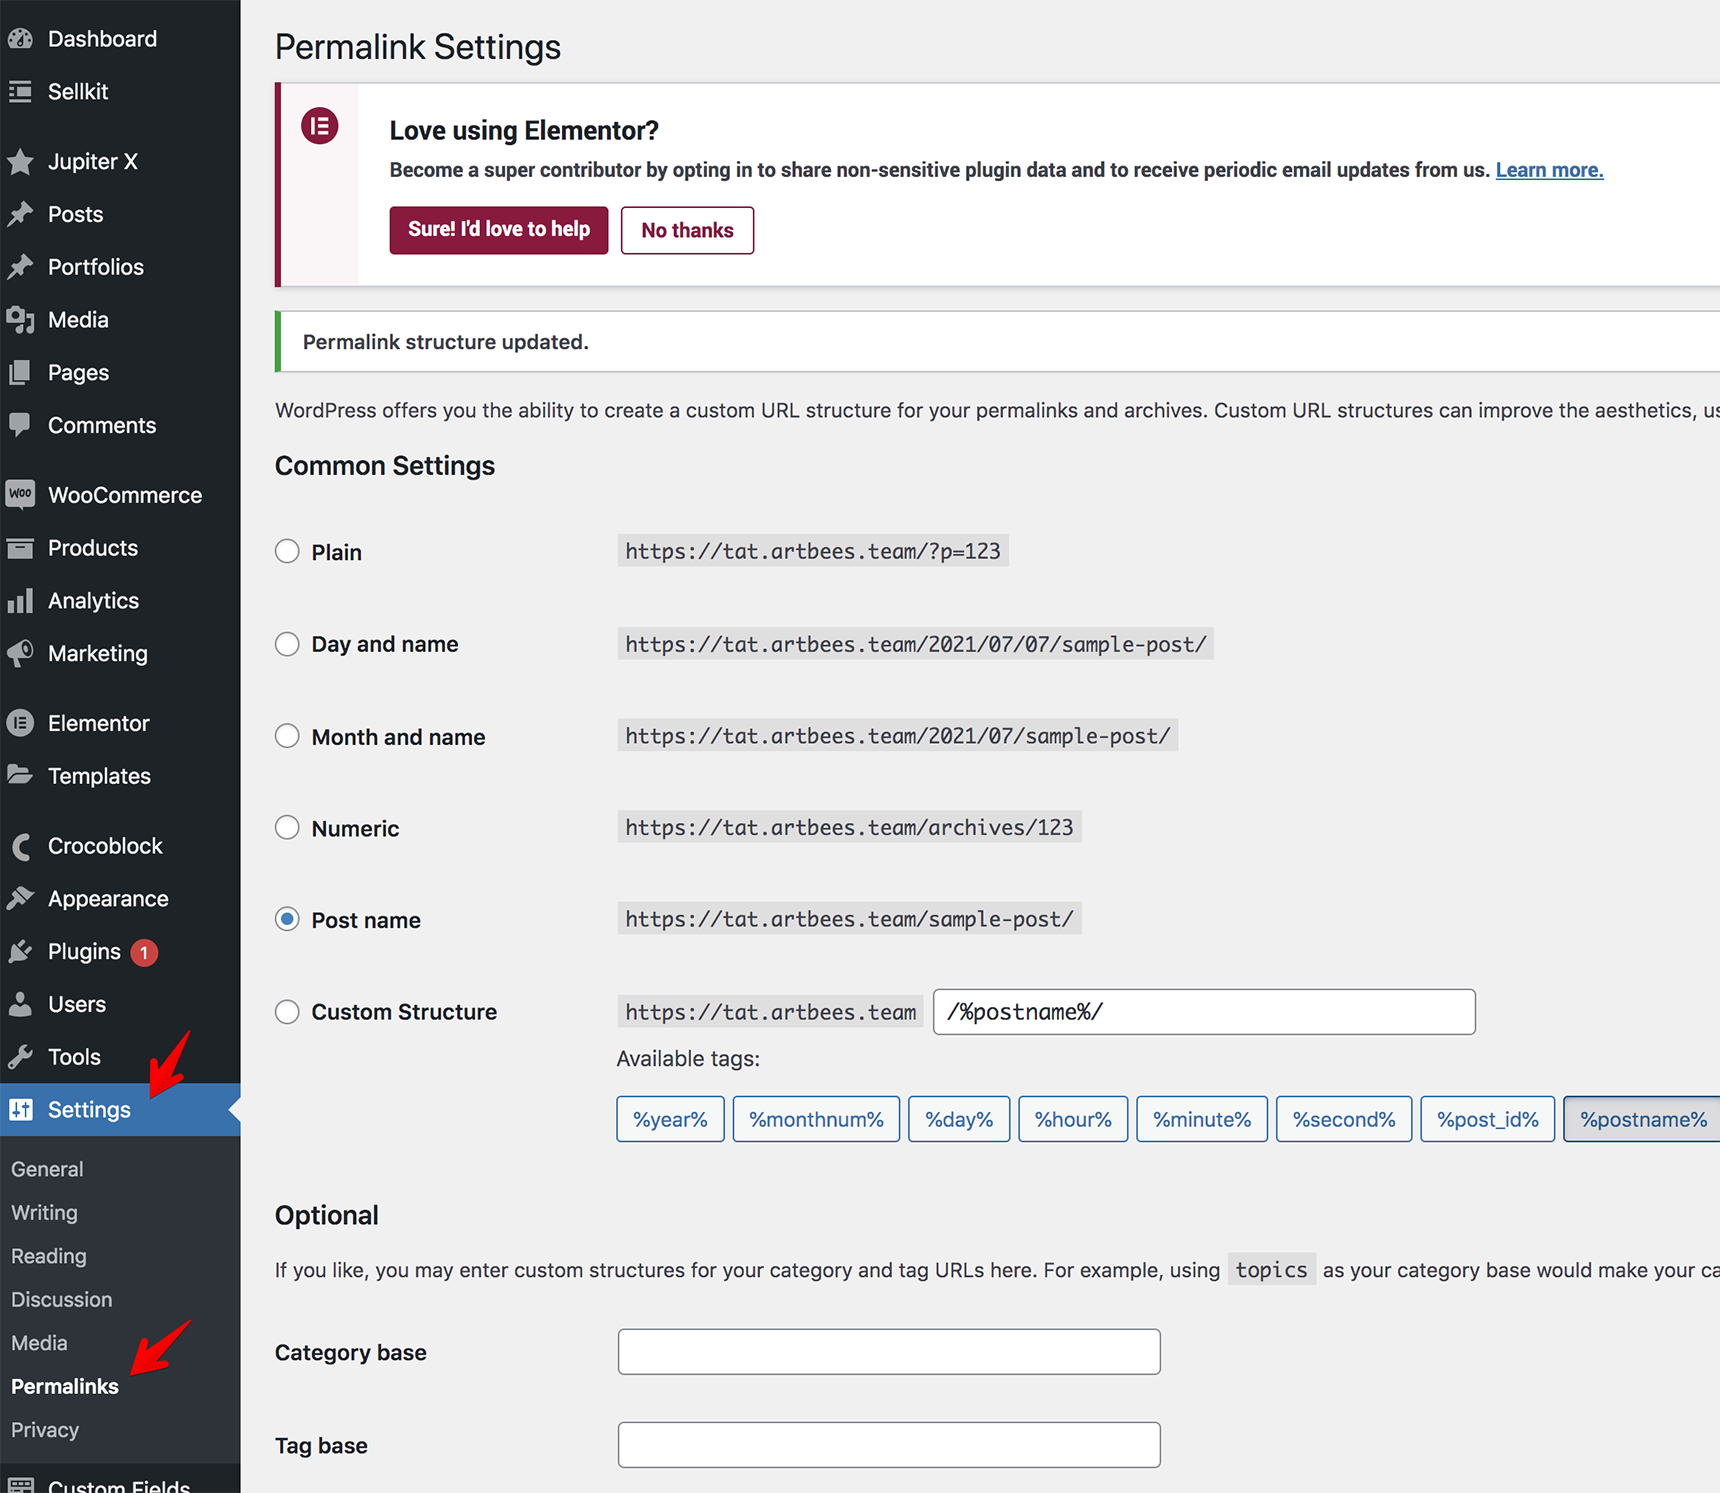
Using ugly plain permalinks
Permalink structure is very important in a WordPress website. Many website owners use a default URL structure like yourdomain.tld/?p=18. It’s bad practice to leave permalinks like this, since it’s bad for both SEO and for user experience.
Creating custom permalinks in WordPress is not difficult. To avoid this common WordPress mistake, log in to the WordPress dashboard, go to Settings > Permalinks and update your permalinks.
Forgetting to remove a default favicon
WordPress themes come with a default favicon. It is a mistake if you don’t remove it! Instead, it’s better to replace it with a favicon of your own, so your site looks professional. Usually a company logo is used as a favicon. It’s displayed in the tabs and bookmarks of a browser, and users will identify the site by its icon.
Leaving test pages published
Sometimes you create test pages to test some elements or features on your site or leave sample pages that come with WordPress themes or plugins. You’re making a mistake if you are not deleting them. Such pages will be indexed by search engines and will be recognized as duplicate content or even spam and your SEO score will decrease. So, before publishing the site, make sure you have deleted demo content and test pages.
Wrapping up
WordPress is a great choice to manage your website. While it’s an easy and powerful tool, it’s also easy to make mistakes with it, especially if you’re a beginner. To avoid such mistakes, it’s better to pay attention to each step in this article. If you are aware of other common WordPress mistakes that are missing here, feel free to share them in the comments.
About 4.4 million e-commerce websites are using WooCommerce in 2021. In order to survive and prosper, you should know where you stand in this competitive and crowded community and find a way to attract the attention of users as effectively as possible. In addition, you should try your best to make it easy for the attracted users to find what they are looking for as soon as possible.
For average users, some say you have about 15 seconds and others say 50 milliseconds to capture their attention. According to some studies, shopping cart abandonment emails sent within an hour increase conversions by 6.33%. One thing that is obvious from these numbers and this vicious market is that you should be precise and speedy to attract users so they may consider you as an option and also keep track of your marketing actions to increase and optimize the chance of converting them into customers. But how can you achieve that? Is there any tool to help you do all of this?
Some believe your website personalization strategy has the largest effect on improving your WooCommerce conversion rate – prior to website design. In this article we will show how to tap into a user’s interests, attributes and behavior and track conversion in your WooCommerce store.
First, let’s figure out what conversion rate is.
What is Conversion Rate?
Simply put, your conversion rate is the percentage of visitors that take the action you want them to. This could mean subscribing to a newsletter or placing an order on an e-commerce website. Depending upon the goals you have set at different stages of your site, once visitors reach those goals, you can consider them converted users.
Dividing the number of converted users for the specific event by the total users involved in that event will give you the conversion rate.
Why is it important to measure and track your WooCommerce conversion rate?
1. Get a better understanding of your users and what really works
Tracking conversions means mapping the path that visitors take on your website before they are converted. You can learn plenty of useful things from this information: what ads are performing the best, which of your webpages gets the most traffic, what the most popular item in your ecommerce store is or which social media posts have brought the most traffic to your site. Armed with this data, you can develop more effective marketing strategies and tweak your campaigns to attract higher traffic, convert more visitors and help you reach your goals faster!
2. Boost ROI while lowering costs
Every business aims to get a high return on investment, but how can you achieve it? Let’s take a look at an example: if you track the conversions made from an ad you are running, you can determine how many customers the ad has converted versus how much you invested in the ad. This kind of analysis will help you decide whether to tweak or pause the ad to lower costs or improve its performance.
3. Segmenting your audience
In order to categorize your audience into the most effective segments, it’s vital to learn what specific content or web pages appeal most to each part of your audience. With that information at hand, you can target those groups of customers with relevant content specifically tailored to them, as with retargeting campaigns. You could also use RFM segmentation to segment active and inactive customers to target with personalized campaigns.
Analyzing your WooCommerce conversion rate
Let’s run a little thought experiment. What if, during the first week after your website launches you receive a total of 100 visitors. Out of those 100 visitors, 20 register on your website. That would make your conversion rate a whopping 20%, right? Not so fast. A meager 100 visitors is not a big enough number for statistical analysis, nor is a week a long enough time to show what routine traffic will be like. Lean Analytics places the average conversion rate for an ecommerce site at just 1% to 3%, while more popular sites boast rates between 7% and 15%. Amazon, for example, had a 2020 conversion rate of 9.55% based on total clicks (adbadger).
Improve conversion rate with personalization
A 2016 study by Emerald involved analyzing data from 85 of the top 100 US online retailers. According to this study of conversion rates, there is a statistically significant relationship between conversion rate and user experience. But user experience does not just depend on your site design and user interface. Rather, providing a good user experience is about delivering the right content to the right people. In short, a good user experience is all about personalization, but not limited personalization like addressing a user with their first name in emails and on the website. Instead of shallow, one-size-fits-all personalization, you need a strategy for personalization at scale that is deep, harmonized and cross-channel to get the best conversion rate. The following are some key personalization tips to help boost conversion.
Which tool can help improve WooCommerce conversion rate?
To improve conversion, you’ve got to be able to track it. The most well-known tool for the job is Google Analytics. While there are a number of analytics plugins on the market that track conversions, most of them get their data from Google Analytics anyway.
While Google Analytics sets the industry standard, it does come with a few disadvantages:
Google Analytics tracks data via cookies, which means it cannot access the WordPress or WooCommerce user base and the valuable information contained there.
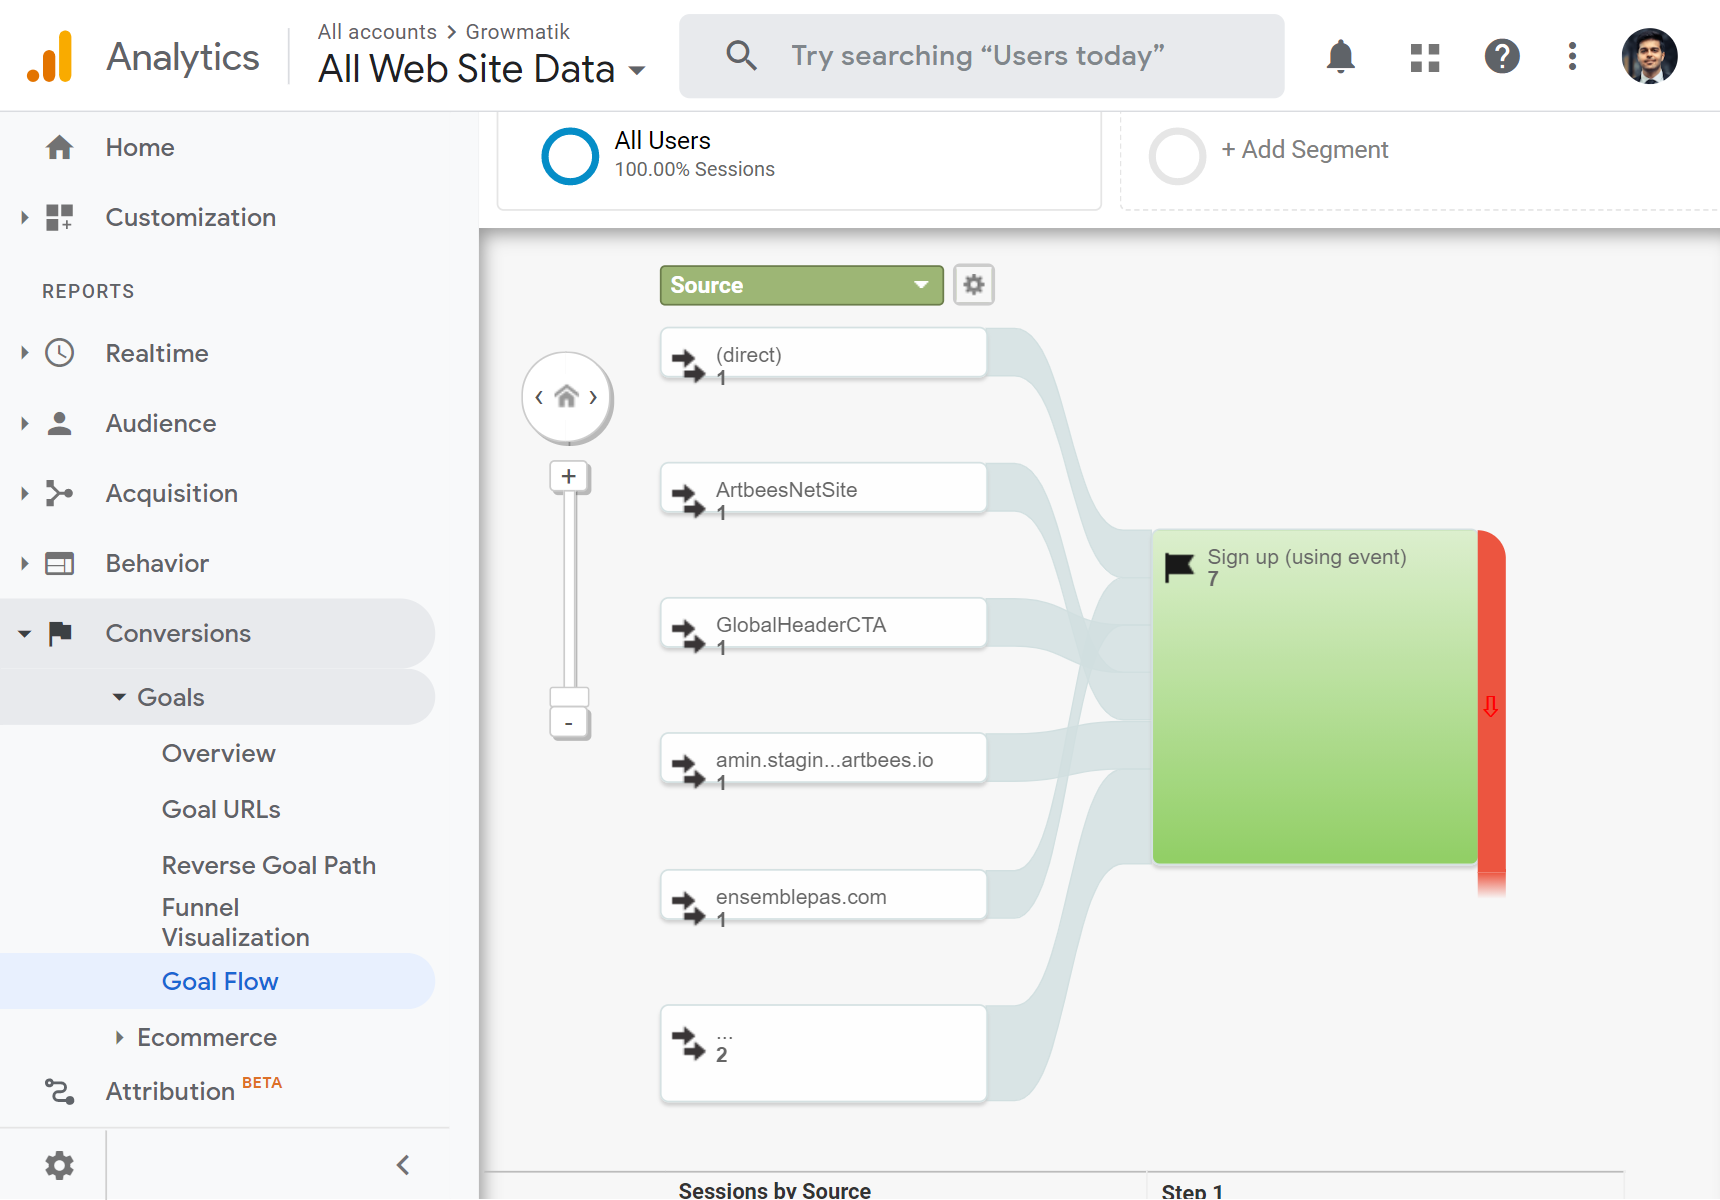
Google Analytics conversion reports do not give long term historical data but are based just on individual sessions. There’s no chance to look at the behavioral trends behind those sessions.
Google Analytics does not distinguish between leads and customers. This means that it treats all sessions as the same without differentiating the type of user.
What alternative to Google Analytics can address these shortcomings? Is there a tool out there capable of generating accurate conversion reports to help you improve your rates? You’re in luck!
Growmatik is an all-in-one tool that has access to WooCommerce data and keeps track of leads and customers throughout their journey in your online store. It provides reliable reports on conversion and revenue on each marketing activity on every marketing channel as well as helping you to drive more engagement and sales by automating and personalizing those activities.
Growmatik
Growmatik is a marketing automation tool that specializes in automated personalization. It works across channels, helping you personalize your customer journey through custom popups, emails and landing pages. It also creates reports based on data collected from visitor sessions and cookies, plus WordPress and WooCommerce data to help you analyze the behavior of different user types. Thanks to all of the sources of information that Growmatik utilizes, it composes detailed reports on user behavior and in-site activity to help you better tailor your marketing materials.
You can track conversion in 3 different sections of the Growmatik interface, each with their own approach to analytics: the General analytics page, customer journey and automation performance report.
Measure and compare conversions via Analytics page
Growmatik boasts a built-in tracking, analytics and metrics system for compiling reports with comprehensive analytics about your audience and the kind of traffic reaching your site. You can use this powerful tool to track all kinds of metrics about engagement, sales and customer behavior. Growmatik even collects data based on engagement and performance for your email campaigns. Since these reports are time specific, you can track the changes in a given metric over a specific time period.
Track conversions with Customer journey
To examine the different funnels on your site, especially top performing funnels from referral sources, subscription channels to landing pages, use Growmatik’s customer journey feature to help plan your next steps. This feature can help you determine which channel brings the most traffic, what products customers buy the most, who your loyal customers are, how visitors navigate through your site and what you should invest in for marketing.
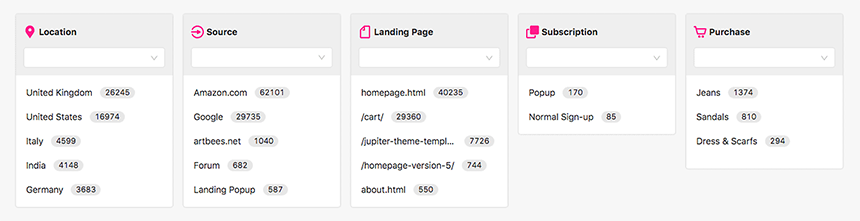
This information ultimately helps you craft better customer segments, which in turn means more effective and cost-efficient marketing campaigns. To get a better idea of how it all works, let’s look at a clothes ecommerce website and examine 5 key dimensions of its customer journey over a period of 3 months.
In the image above, you can see the top performing channels in the 5 key dimensions. Visitors to the clothing website come primarily from the United Kingdom, the United States, Italy, India and Germany. Amazon is the primary referral source for traffic from these countries, most visitors landed on the homepage before performing any action, popups were the primary channel for newsletter subscription and most customers bought jeans as the last step of their journey.
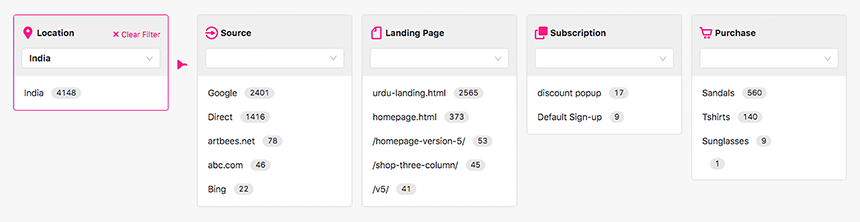
In Growmatik, you can select a specific funnel to track the customer journey specifically through that funnel. Let’s take a look at the location.
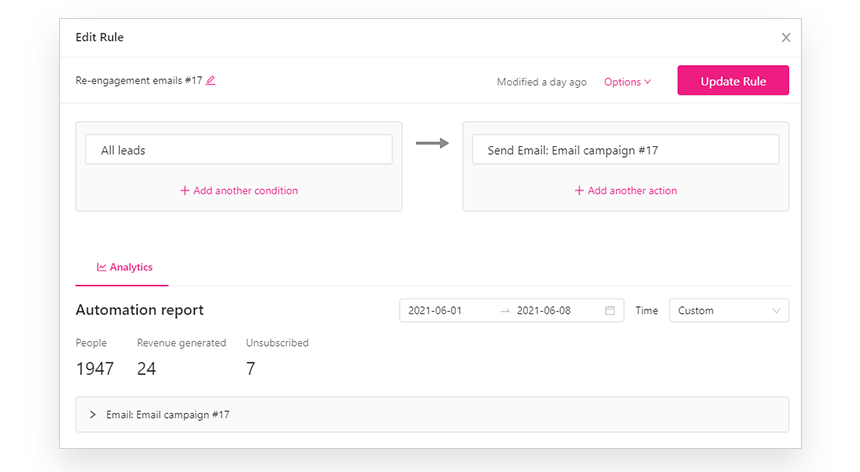
Check out the performance of each campaign
The automation reports provided by Growmatik will help you track the performance of each automation you create, allowing you to measure and manage conversion and ultimately plan your next step. You can automate everything from email campaigns to personalized site content and popups, all while tracking how each automation type performs by monitoring specific metrics.
Improve conversion rate by Automating personalization
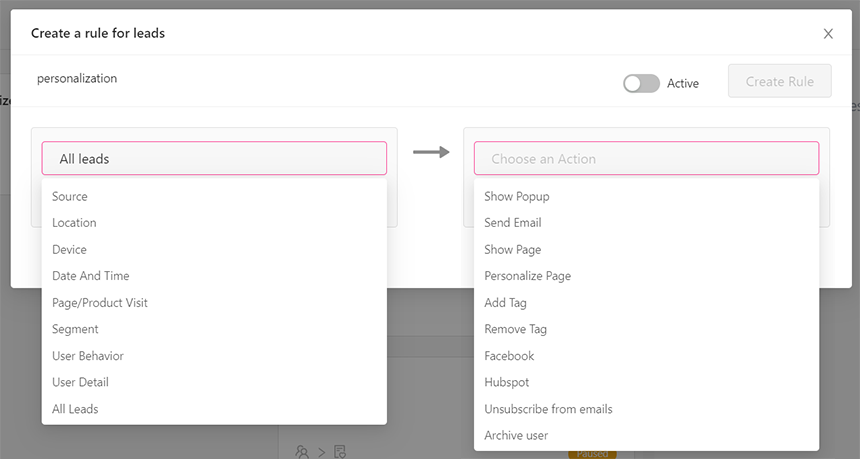
In Growmatik there are two simple steps to implementing automated personalization for WooCommerce:
Create segments- This means grouping users you’d like to personalize your content for. These will be the segments of WooCommerce customers or leads that matter to you based on the attributes and behavior you’re targeting.
Create personalized automation for each segment- To improve WooCommerce conversion rate through personalized automation, we can create automations by using the “IF this THEN that” structure. Once the condition(s) is triggered, the action(s) will be executed.
Some practical examples using personalization to improve conversion rate
Let’s check out some real world personalization examples that you can use for your e-commerce store. All of these can be done using Growmatik.
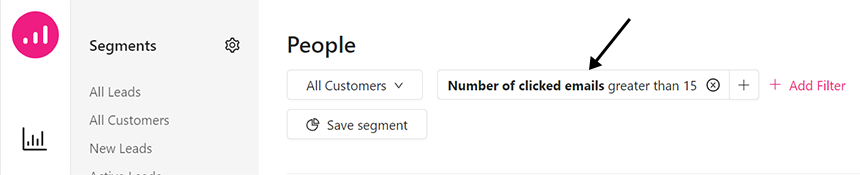
Please your loyal newsletter subscribers with exclusive offers
To motivate your active newsletter subscribers and keep them engaged, you can send an email with special discounts to those who clicked your emails more than specific numbers; for example, customers who have clicked on more than half of your emails. Go to Growmatik’s People page and select all leads or all customers and input the following filters:
Subscription > Number of clicked emails > more than X
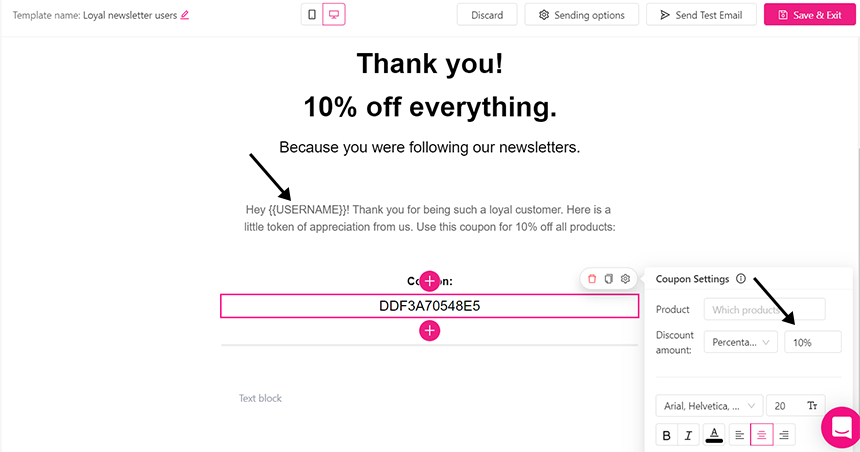
We can design our email and use some dynamic keywords such as the user’s first name in the content of our email and send them a custom offer. In Growmatik, do the following:
Go to Workshop > Emails
Click Create Email
Select a template to get started
Edit the template by selecting text and clicking on . Then, click on Dynamic Keywords to insert any keyword.
Save the email template and send it to the targeted segment.
Encourage users to purchase based on their page visit
Chances are, customers will want to see content related to the products and information that they frequently browse on your site. Give them what they need by sending them emails or popups with discounts related to their in-site activity.
For example, create a segment for users who visited the watch page. Go to the people page and select all leads and input the following filter.Site activity > Visited pages (URL) > Contains watch collection
For creating a popup, go to Workshop > Popups and click on Create Popup.
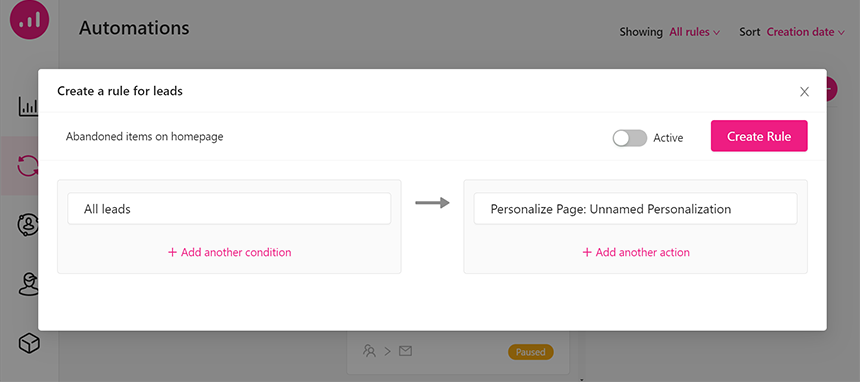
Show abandoned items on the homepage
According to Baymard, more than 69% of online shoppers abandon their carts without checking out. You should definitely carry out a strategy to encourage them to finish their shopping. It’s a good idea to display their abandoned cart items and remind them to finish the purchase.
Go to Growmatik’s People page and select all leads or all customers and input the following filters:
Shopping activity > has abandoned cart > yes
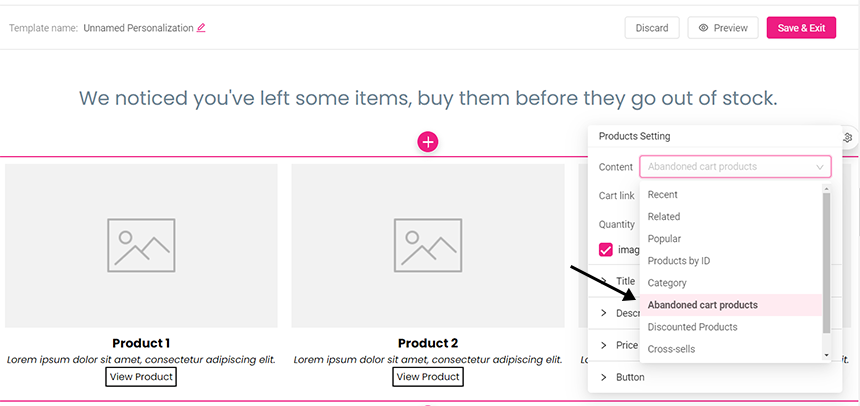
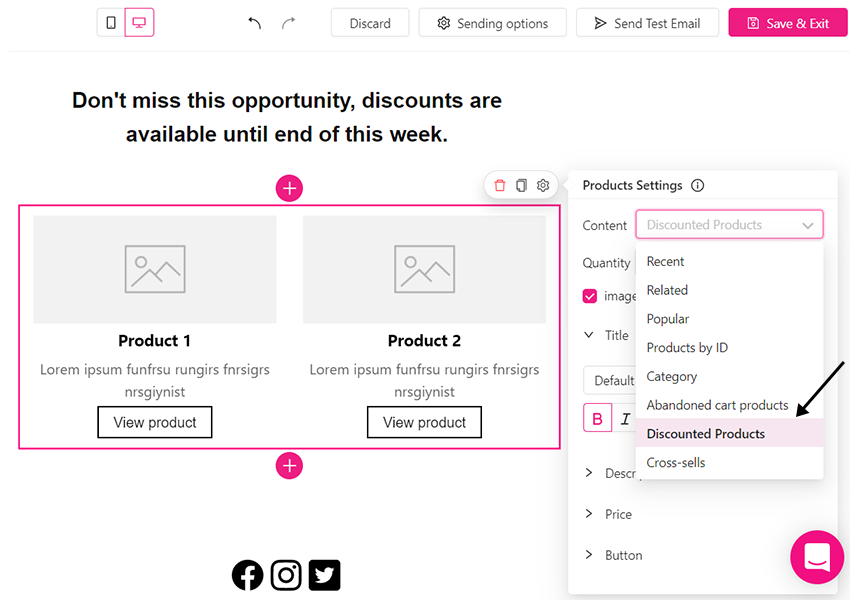
Then you can go to the WorkShop > personalization and click on create personalization. Then, select the page you want to add items to:
On the selected section of the page, click the icon to open the elements list, then select products.
Click on the and, by clicking on the content (which shows most recent by default), you can choose abandoned cart items to be displayed on the webpage.
Click save & exit
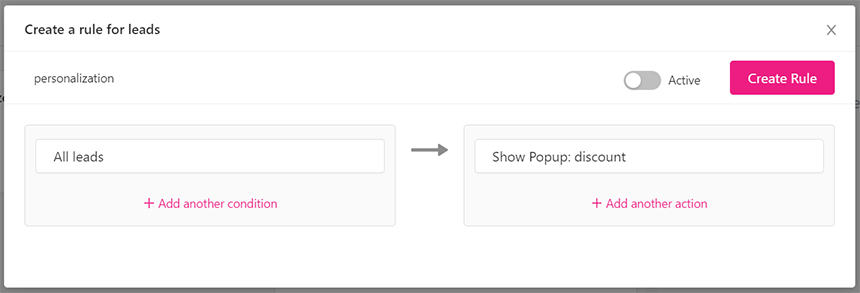
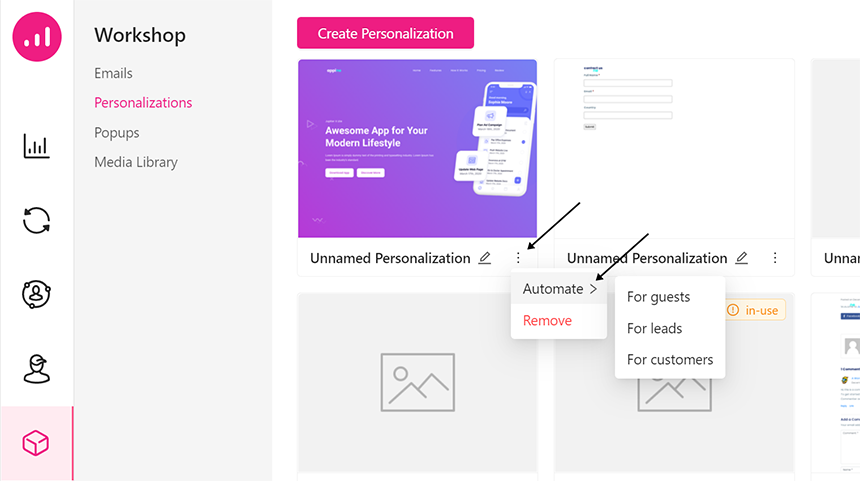
To automate this, go to the WorkShop > personalization and find the personalization you want to create a rule for. Then, click on the icon, choose Automate and select an audience type.
Then you will be redirected to the Automation page, where you should give a name to your automation, and click on the Create Rule button to automate that personalization.
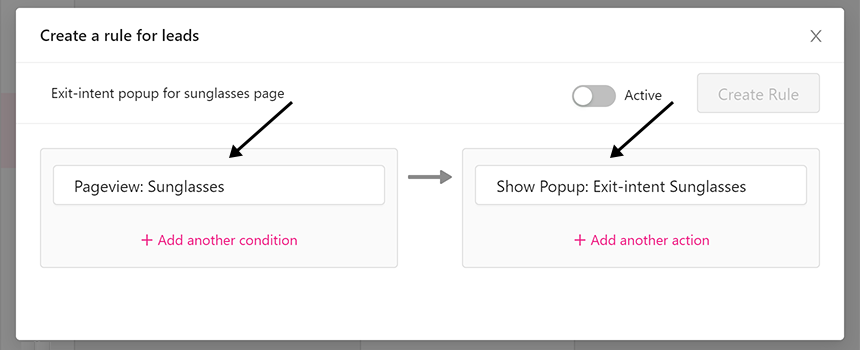
Display an engaging exit-intent popup
Consider a user who visited a sunglass product page on your WooCommerce site and didn’t buy it. By offering a good discount on this product at the last moment, you can increase the chance of converting him to a customer. Exit-intent popups are effective if you know where and how to use them properly.Just go to the Automation page and select the Pageview as a condition and enter the URL of that specific product.
Then select Show Popup as action and choose On exit. Now click on the Create Popup button and design your popup.
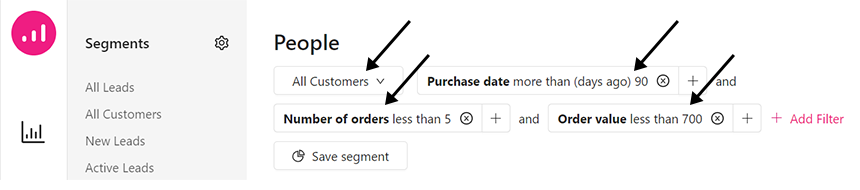
Using FOMO to re-engage inactive customers
You can use FOMO “fear of missing out bias” to reactivate your inactive users. Catch their attention by talking about latest updates or anything else that may have happened at your business while they were gone.First, You should identify inactive customers. In order to do that I suggest using RFM segmentation. In Growmatik, go to the People page, select All Customers and add the following filters for Shopping Activity.
Purchase date > more than X days
Number of orders > less than x
Order value > less than x
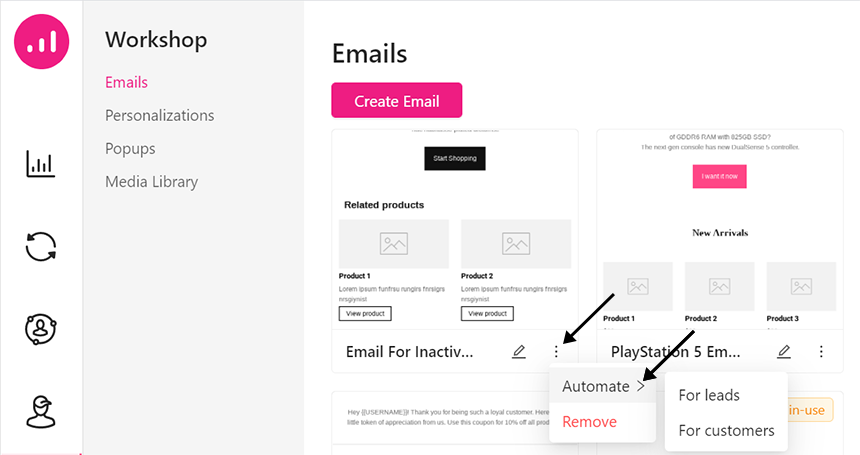
Now you can send an email to these users and include products with discounts for a limited time. Go to WorkShop and click on Create Email, choose a template and add your discounted products in your email.
Now you can automate this by going to WorkShop > Emails and finding the email you just created. Then, click on the icon, choose Automate and select an audience type.
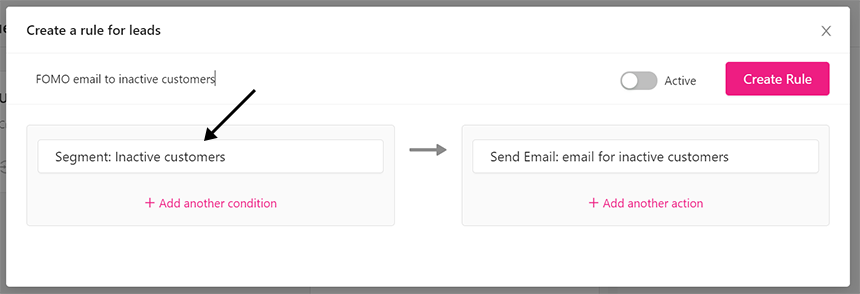
It will redirect you to the Automation page. There, choose the created segment for your inactive customers and give a name to your automation. Then, click on the Create Rule button to automatically send emails.
Final words
In this article we showed some samples in three main marketing channels – Email, popup and webpage. Personalization is quite a simple process nowadays, but it’s a necessity for WooCommerce businesses hoping to stay relevant.Fortunately, you can now improve your WooCommerce conversion rate using personalized automation tools faster and easier than ever before.
This is a guest post contributed to Artbees Themes blog by Haritha.
WordPress is a popular content management platform used to build different kinds of websites. You can use the WordPress platform for everything from building an eCommerce site to creating your personal blog.
To make all this possible, WordPress supports different post types such as pages, posts, menus, users, comments, and more. There are default post types that come with WordPress, but the platform also lets you add many custom post types.
When you do a minor site re-design or create a backup, you will need to selectively export one or multiple post types rather than exporting an entire website’s data.
In such situations, different import-export tools come in handy. Although WordPress/WooCommerce comes with default import-export tools, they lack certain advanced features, making migration more difficult for users. To make the process easier, you’ll likely need to add plugins to your store.
This article lists some of the most popular and useful WooCommerce and WordPress import/export plugins that you can refer to whenever you find yourself having difficulty exporting and importing a particular post type from one WordPress or WooCommerce site to another.
Product Import Export Plugin for WooCommerce – Easily Import Products to WooCommerce
Are you looking for a free and simple solution to help you export and import all your WooCommerce products? This product import-export plugin lets you bulk upload products to CSV and imports products from CSV to your store.
This plugin comes with both export and import mapping functionalities. With the plugin, you can take advantage of an easy product bulk edit feature that eliminates the need to edit data using spreadsheet programs. The plugin’s powerful export filters let you custom export products by category, tags, etc.
To migrate variation products, you will have to purchase its premium version. The pro version also offers XML support, scheduled FTP import/export, additional export filters and custom/meta import-export options.
WP All Import – Import any XML or CSV File to WordPress
WP All Import is a powerful import-export plugin with lots of features to make the import-export process easy and flexible for you. It comes with a powerful drag and drop interface that can quickly import any XML or CSV file to your WordPress website.
For the plugin to work properly there is no need to arrange the elements of your file in a certain way. The plugin has a four-step import process with which you can transfer posts, users, or any other site data without any hassle.
Other than importing site data from any XML or CSV file to WordPress, the plugin also helps you build a real estate portal or a store with an affiliate data feed displaying live stock quotes or sports scores.
The WP All Import plugin also integrates with the companion plugin WP All Export to make your export process easy. Importing files from URL, scheduled imports and importing to custom fields are all features available only in the premium version of the plugin.
This all-in-one import-export suit plugin allows you to transfer multiple post types from one WordPress/WooCommerce site to another. It supports the import and export of post types such as users, customers, products, ratings, reviews, orders, coupons, subscriptions and more.
With the plugin, you can import and export data in both CSV and XML formats. You can enable scheduled import and export via FTP and make use of the many export filter options provided by the plugin to make the import and export process run more smoothly.
User Import Export for WordPress – Ensure Safe Transfer of User Data
The WordPress user import-export plugin is a great tool for transferring your WordPress users from one website to another. With this free plugin, you can export and import user data, including passwords, to and from your website.
This user import-export plugin exports and imports users using a CSV file. Excellent filter options are available to help selectively export users from your website. You can export users based on user roles, user email, user registration range, and more.
Apart from user migration, you can also use this plugin to bulk update existing user data on your website. The plugin comes with an intuitive interface that allows you to easily map the columns of your CSV file with WordPress. You also have the option to save the mapping for future imports as well.
Retaining user passwords is an important feature offered by the plugin so that your users can use their old passwords on the imported site as well.
This import-export plugin supports Chinese and Dutch in addition to English. Multisite compatibility is another plus of this plugin.
The plugin’s premium version offers compatibility with popular plugins such as BuddyPress, Ultimate Member, Ultimate Membership Pro, Advanced custom fields, etc., along with offering a scheduled import-export option.
Export All URLs – A Simple Method for URL Export
If you are looking for a simple plugin that allows you to import and export all your site’s URL’s post IDs, titles, and categories, this plugin is exactly what you need. It will come in handy during site migration, security audits, SEO and redirect purposes.
The plugin comes with powerful filters that let you filter by author and date range. It also allows you to exclude the domain URL, set a post range, and allows you to randomly generate a CSV file.
WordPress Comments Import-Export – Make Comment Migration Easy
If you need a single plugin to import and export all your WordPress comments from one WordPress site to another, you can certainly choose this WordPress Comments Import and Export plugin.
With the free plugin, you can easily import and export both article and product (WooCommerce) comments. You can either export and import comments in bulk or use filter options to choose selected comments for export. The plugin supports filter options, including article, date range, limit, and more.
The plugin is compatible with WooDiscuz and wpDiscuz plugins, thus enabling you to import and export comments generated using these plugins on your website. The comment import-export plugin only supports CSV format. You can upgrade to its premium version for XML format support and scheduled import-export.
WP Import Export Lite – Complete Import Export Solution for WordPress
The WP Import Export Lite plugin is an easy import-export solution for all your WordPress website data. The plugin supports multiple file-formats including CSV, XLS, XlSX, JSON, TXT, and XML for exporting site data and lets you import those files into any of your websites.
The plugin covers the import and export of all types of site data including posts, pages, custom post types, taxonomies, comments, and users. To make the import-export process flexible, you have the option to pause, resume, and stop during the process. You can also run multiple import-export processes at the same time.
The plugin comes with excellent filter options and supports drag-and-drop field mapping for easier import and export. Background import & export, import process log, third-party plugin support (ACF, WPML, Google Drive Import, Onedrive Import, DropBox Import, etc.,) are the additional features offered by the plugin. Automatic scheduled import and export of site data are premium features of the plugin.
Widget Importer and Exporter – Make Your Site Widget Ready
Just like the import and export of different WordPress post types, you can also import widgets from one WordPress website to another using the Widget Importer and Exporter plugin.
Generally, an export file is created for importing widgets from one site to another and you can use this file to import widgets to any WordPress website. Once an import is completed, the import result will be displayed to you in a table with an explanation of what happened with each widget area and widget.
To export widgets from a WordPress website, you can install the plugin and it will create an export file out of the currently active widgets. With this file, you can either import these widgets to another site or restore widgets to the same site later.
Export WordPress Menus – Easily Migrate Menus Between WordPress Sites
Next on the list is a plugin that allows you to export all your WordPress menus. With the Export WordPress Menus plugin, you can export WordPress menus month-wise to an XML file. Even custom menus are supported by the plugin.
Once you export, all menus will be downloaded as an XML file. Then you can use the import functionality of the plugin to import the file on another WordPress installation.
Customizer Import/Export – Easily Transfer Customizer Settings
Are you looking for the right plugin to help you with the import and export of your WordPress customizer settings? If your theme makes use of the WordPress customizer for its settings,
this plugin would be just what you need.
With the customizer import/export plugin, you can easily export or import your WordPress settings directly within the customizer interface. With the plugin, you can export options saved as theme mods using the get_theme_mods function along with the settings saved as options. Import can also be performed with a single click.
Export User Data
Export user data is a simple WordPress plugin that helps you export WordPress user data and its metadata. It comes with several powerful filters that allow you to export users by their role, registration date range, and user meta option. The plugin supports exporting user data and metadata to Excel and CSV formats.
Export Media with Selected Content
Using this plugin, you can include linked media with the selected post type content, as they are not included by default.
This plugin adds an “Export media with selected content” option. When you enable it, the plugin tries to find featured images and included media in the post_content, adding them to the export file.
Conclusion
Hopefully, the above listicle provides a comprehensive review of all the WordPress import/export plugins available for different post types. If we left out any plugin that would have been a great addition to the article, please let us know in the comments!
There are two types of blog owners – those who write a blog to earn some money, and those who do it for free to share some information or ideas. Maintaining a blog requires some money, however. You need to pay for web hosting and renew your domain name annually. So, if you run a blog and are planning to earn money from it, this article will give you some tips on how to monetize a WordPress blog. Since WordPress is the default blogging platform, I’ll recommend some plugins that will be useful for monetization.
Pay Per Click Advertisements
One of the most popular ways to monetize your WordPress blog is to display advertisements. You can integrate these ads into your pages as static displays or as popups. There are two payment models for display ads:
pay-per-click (PPC): You are paid when someone clicks on an ad on your site.
pay-per-impression (PPI): You get payment when a user sees an ad.
The PPI type is cheaper, as you don’t need users to click on any of the ads, but the PPC type will give you more money as long as users click on the ads at a consistent rate. Note that running ads requires your website to have a lot of traffic. Also, make sure you don’t include too many ads on one page, as you’ll end up annoying readers.
To start advertising, you’ll need to sign up for an ad network. Google Adsense is one of the most popular options, but there are many other networks as well. Additionally, WordPress provides some helpful plugins you can check out. As an example, the AdRotate Banner Manager plugin helps you to manage all of your ads directly from WordPress. You’ll be able to customize ad placement, check analytics and connect to several ad networks (including AdSense).
I also recommend you to read this official blog about AdSense to learn more.
If you are wondering how to set up ads, you can find instructions from Google Support. Once your AdSense is approved, it’s time to place the ad code on your website. This guide from Google Support will be helpful as well.
The advantages you’ll get from PPC include easy to set up passive income. Once you put the ad codes on your site, you don’t need to do anything else. Relevant ads will be shown automatically. As for the disadvantages of PPC, if there are no clicks on the ad, you’ll get no money. You won’t be paid much with page views only.
Using Affiliate Links
The easiest way to start making money from your blog is with affiliate links. Affiliate links are links that you put in your text or on images that will redirect your readers to a third party website. If your visitors make a purchase on that website, you’ll receive a commission for referring them. Becoming an affiliate marketer is easy. Many websites that sell products or services have a link for “affiliates”. Other sites work through an affiliate network. With these sites, all you need to do is click a button to apply for their program. One of the most successful affiliate networks is Envato. You can read their affiliate program terms in this PDF document.
Important things you need to know about affiliate marketing:
Affiliate programs have strict terms and conditions. You’ll need to read them attentively to prevent being banned.
Don’t forget to notify your users that you are using affiliate links. It might be obligatory in some countries. Additionally, Google might delete your website from search results if you do not mention it.
Use affiliate links only in the right context, as you might lose your visitors because of bad user experience.
The pluses of affiliate links are that you’ll get high passive income. It’s much better than PPC, assuming that users buy products referred from your site. As for the minuses, if users don’t make purchases, you’ll get no income.
You can read more about creating an affiliate website via this blog post.
Sponsored Posts
If you’re running a popular blog, you can help external websites to get a lot of traffic. Many companies prefer to pay such blogs to publish sponsored posts forwarding blog visitors to their sites.
You’ll make money for your blog much quicker with sponsored posts than with affiliate links or ads. If you don’t get proposals for sponsored posts or reviews, you’re free to contact companies requesting sponsorship. If your site audience is large you’ll probably get an agreement for a sponsorship deal. Companies need to be sure that your sponsored post will lead to sales so that their investment is not a waste of money. This form of monetization will be better for bloggers with lots of experience rather than for beginners.
Sell Your Products
Another way to earn money with your site is to sell some products online. You can create an ebook, sell your photos or sell a service such as counseling on your website. You can even sell online courses. If you’d like to create an eCommerce site, you can achieve this with the Woocommerce plugin, which is bundled with the Jupiter X theme. Jupiter X also provides a lot of Shop templates you can choose from, saving you a lot of time when designing a product website.
An advantage of selling products is that you won’t end up banned, which could happen with PPC or affiliate marketing. On the other hand, you have to be patient and wait until you find your audience for your sales to increase. You need to promote your products and provide a good service to your buyers. If your products and your attitude are good, you’ll make a lot more money!
Accept Donations
The next option to monetize your WordPress blog is to allow your audience to make donations. To achieve this, you can use WordPress plugins such as Give, Charitable or PayPal Donations. You also can create a Call To Action button in the header and forward visitors to the donation form to make a payment.
To get donations, you should create valuable content for free first. You need to spend a lot of time researching to create a blog post that will interest a variety of readers. If you do, your audience will notice your hard work and will be ready to donate. When using WordPress plugins for donations, you should be ready to set up everything yourself, and if there are any transactional errors you will have to investigate them yourself or ask for help at the plugins support.
There is also the possibility to take donations for your products using the WooCommerce plugin. If you use this plugin on your website, we recommend reading this article.
Freelance Blogging
If you are fond of blogging, you can use your own blog to advertise yourself. Potential clients will find you to blog for them and will be ready to pay. This way of earning money is very popular in some blogging niches. For example, you can run a personal blog and create a “Hire Me” page to find freelance clients.
If someone likes your writing, they will definitely contact you and propose some work. To be noticed by clients, you need to have a lot of traffic to your website. Here are some tips you can use to triple your WordPress blog traffic.
Wrapping Up
So, what option will be the best for you? How you monetize a WordPress blog all depends on what you want. If you want to get passive income, you should consider using PPC or affiliate marketing. You should think about the quality of your blog and ensure that the content is valuable for your readers so that they will want to come back to your blog again and again. It’s important to note that you won’t get a lot of income right away. You should try all methods, mix them, and then decide which one works best for you.
Blogging is a balance of quality content, good traffic and an engaged audience. If you achieve all of this, you’ll make your blog profitable for sure!
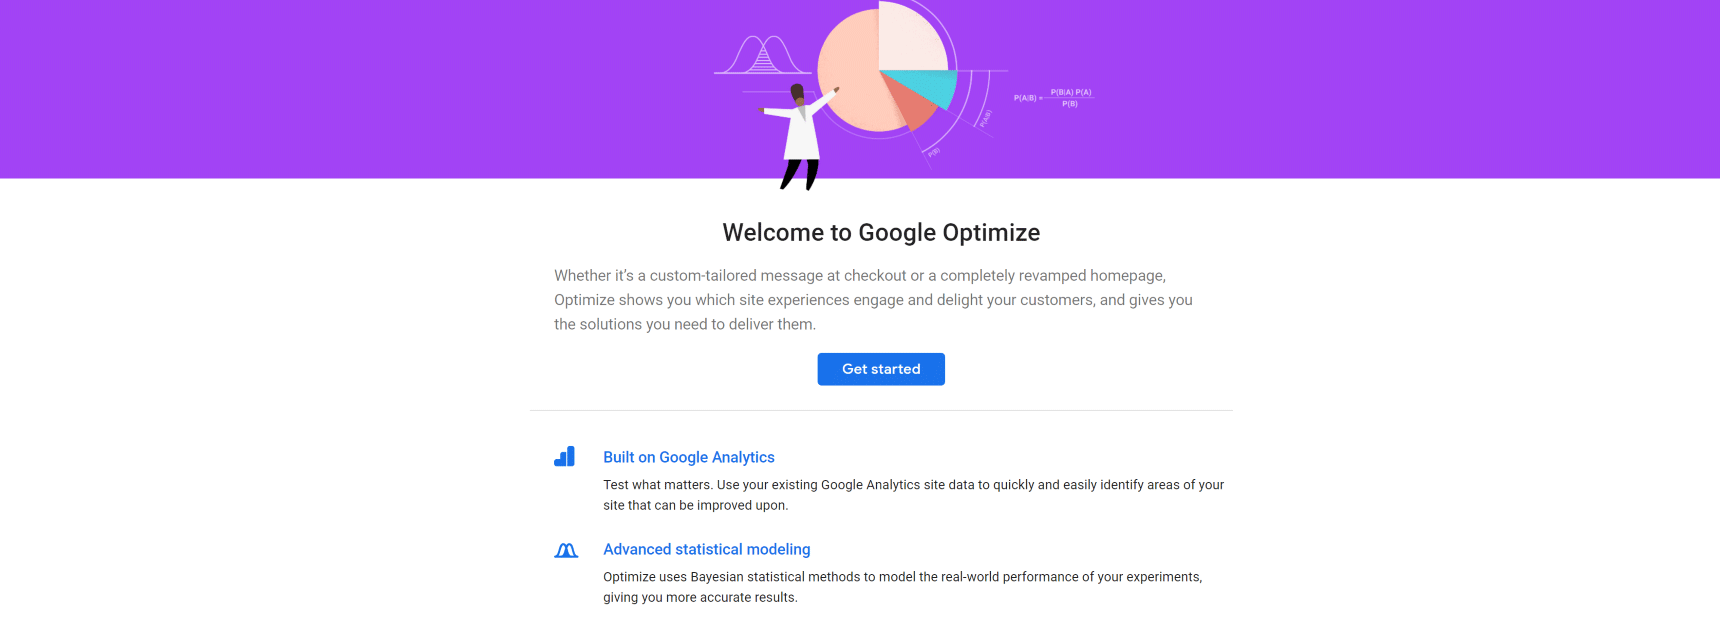
So you’ve decided to run A/B testing on your WordPress site with Google Optimize but you still don’t know much about it?
Google Optimized is probably the best tool out there to help you analyse the results of A/B testing on your site. It’s a widely popular tool that helps you gather important data about your website visitors’ behavior and use those results to improve your conversion rates.
In this article, I will cover the basic steps that are essential to running successful A/B testing in WordPress.
What is A/B Testing?
A/B testing is a user experience research technique also known as Split Testing. This technique is best used when we want to receive user feedback on the new design of a page/post/product, for example.
Site owners tend to use default pages for products, pages and posts. These pages contain all the necessary information users need, such as product information, images, process, etc. Each page has a predefined layout and style; however, things change over the time, and new trends in design, new technologies in user acquisition or shifts in user behavior may trigger us to make changes to our pages. Unfortunately, changing your webpage can be a difficult process, and it’s tough to decide which changes are worth it and which are not. That’s where A/B testing comes in handy.
Before making significant redesigns to the site by adding a new design or removing some information, it’s a good idea to experiment with these new features by running A/B testing to reveal how users will interact with the new changes. A/B testing is good to use when:
Testing different names for pages or products
Unveiling a new landing page with different content and setup
Testing different colors for CTA buttons
Completely redesigning a page using different content, layout, media and CTA buttons
The process of A/B testing involves a random experiment where two or more page designs (posts, product pages, etc.) are displayed for different segments of the audience. The purpose of the experiment is to define which version has the greatest impact on sales or makes the biggest impression.
Suppose you need to test a redesigned landing page with new pictures and videos. You can’t simply make changes to your real working page. Instead, you have to create a new page and redesign it with new content, new media and layout. Once you’ve done this, you can run a time-scheduled experiment by randomly sending your users to those pages.
After finishing your A/B testing, all you need to do is collect and review the results of your test. These results are usually highly dependent on the characteristics of your A/B testing, but in general this technique will simplify the process of making changes to your pages.
It’s also very important to choose the right tools to perform your A/B testing. In this blog post, we will use Google Optimize, the most popular tool for running A/B testing for WordPress.
Setting up Google Optimize
There are many A/B testing tools out there and they all have their advantages and disadvantages. Some of them are expensive and some of them are completely free to use, some of them have features that you will never use and some of them are just the essentials.
In my opinion, Google Optimize is an excellent tool to start experimenting with A/B testing because it’s free to use and easy to set up and, while it does not have a dedicated plugin for WordPress, it’s very easy to integrate in WordPress. Another benefit of Google Optimize is that it ties in with another great tool, Google Analytics, which you are probably already using. The integration of those two plugins makes Google Optimize even more useful than its competitors.
Setting up Google Optimize is easy and can be done in several steps. Let’s dive in and see how it works:
Open up the Google Optimize page and click the Get Started button to start:
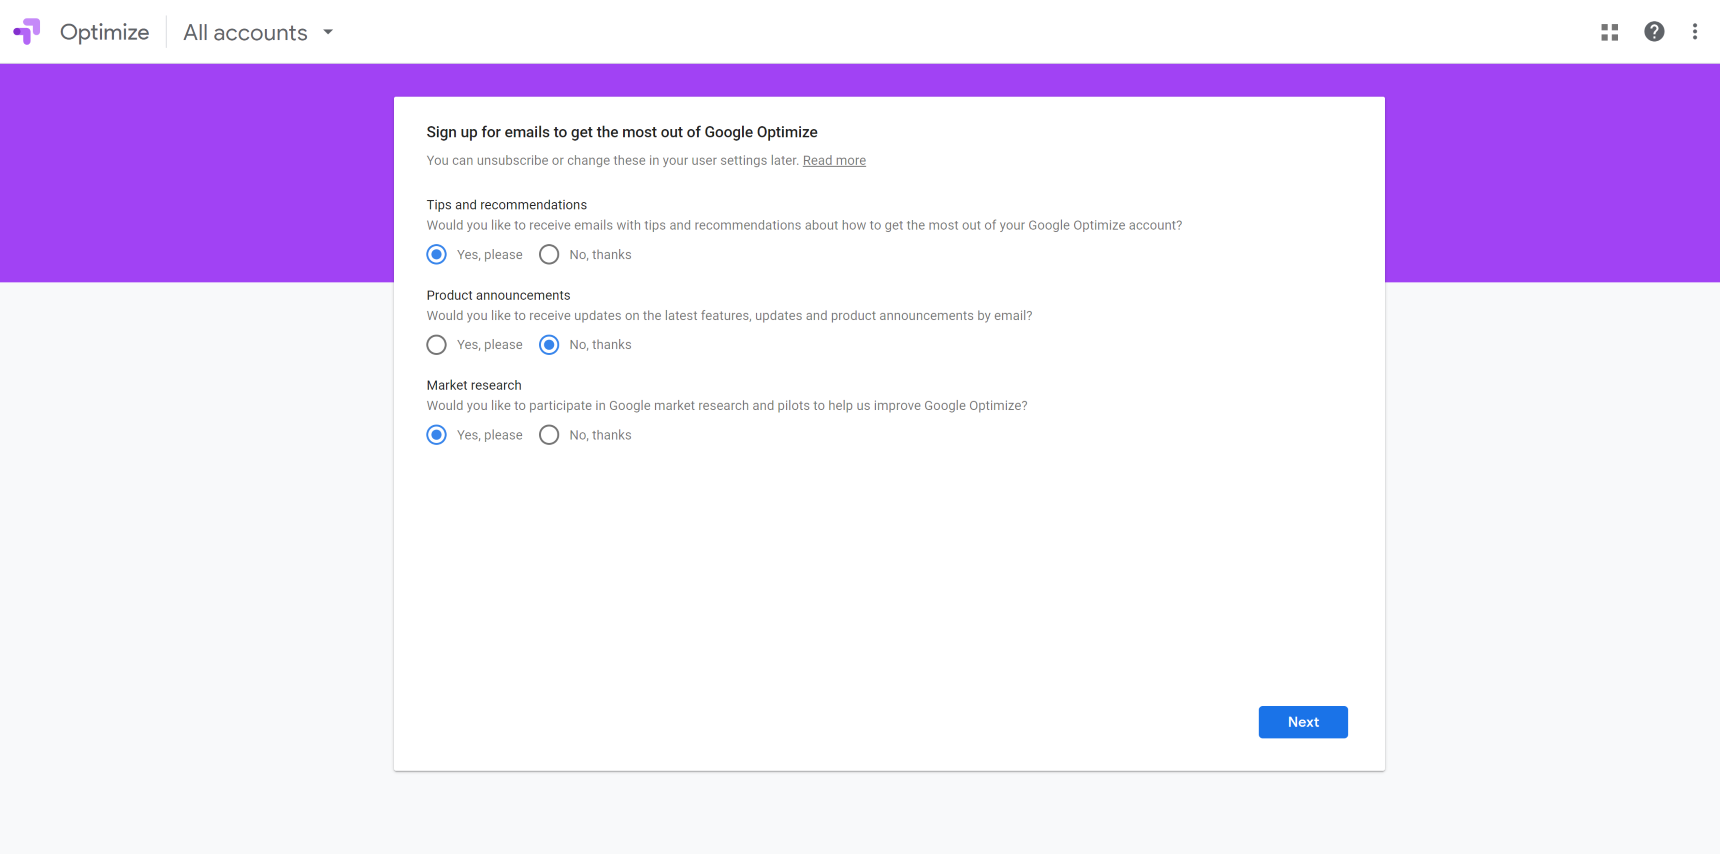
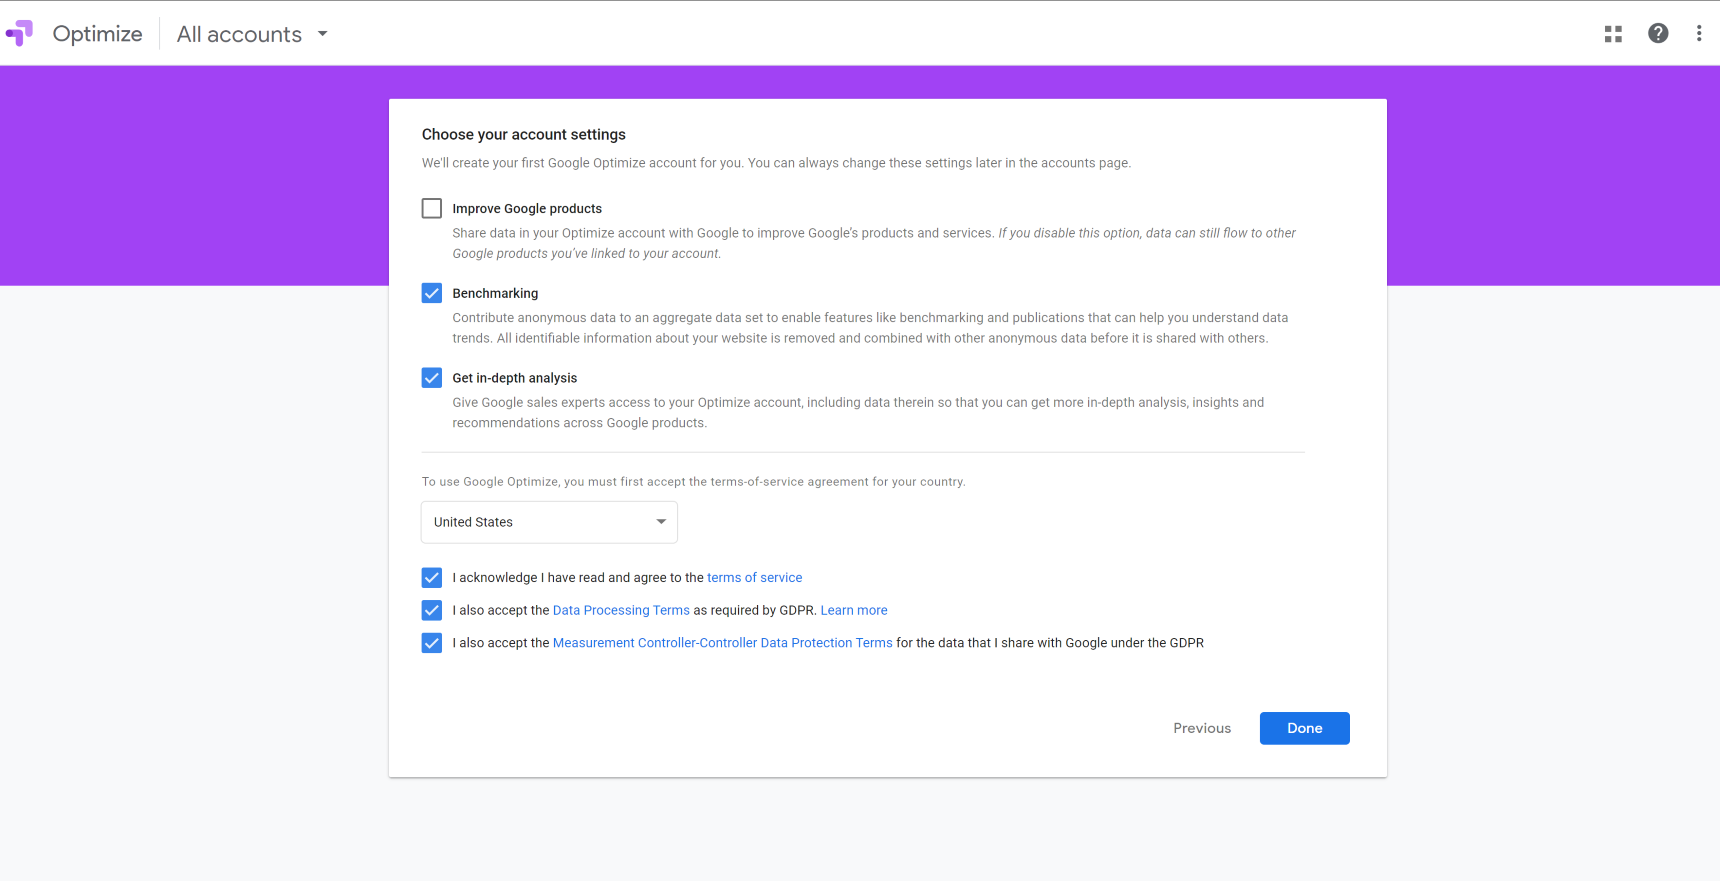
Google will ask several questions about sharing your data with other services. You may select whatever options you want here as it will not affect the functionality of the service.
In the final step you will have to agree with the offered services and click Done. Then you will be able to view the Google Optimize dashboard.
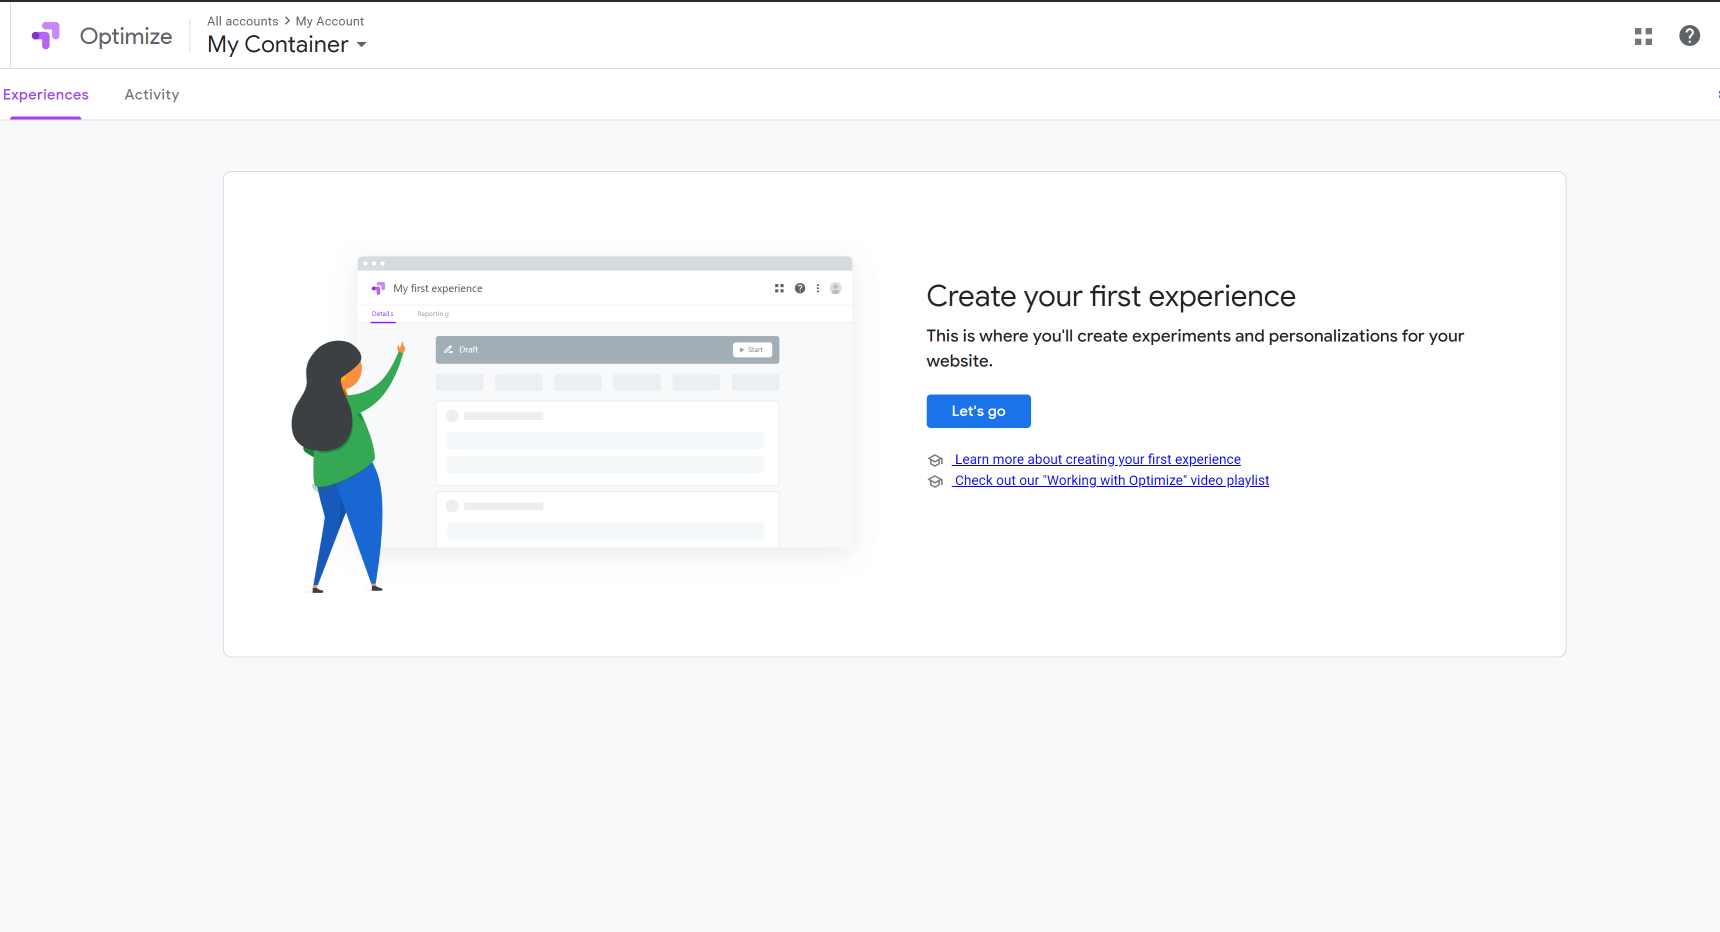
You will see this window in Google Optimize where you can start a new campaign starts by clicking on the Let’s Go button:
Pretty easy right? Once those steps are complete, we’ll need to link our site to the Google Optimize dashboard.
Linking your site to Google Optimize
Google Optimize can be linked to your site through two different methods:
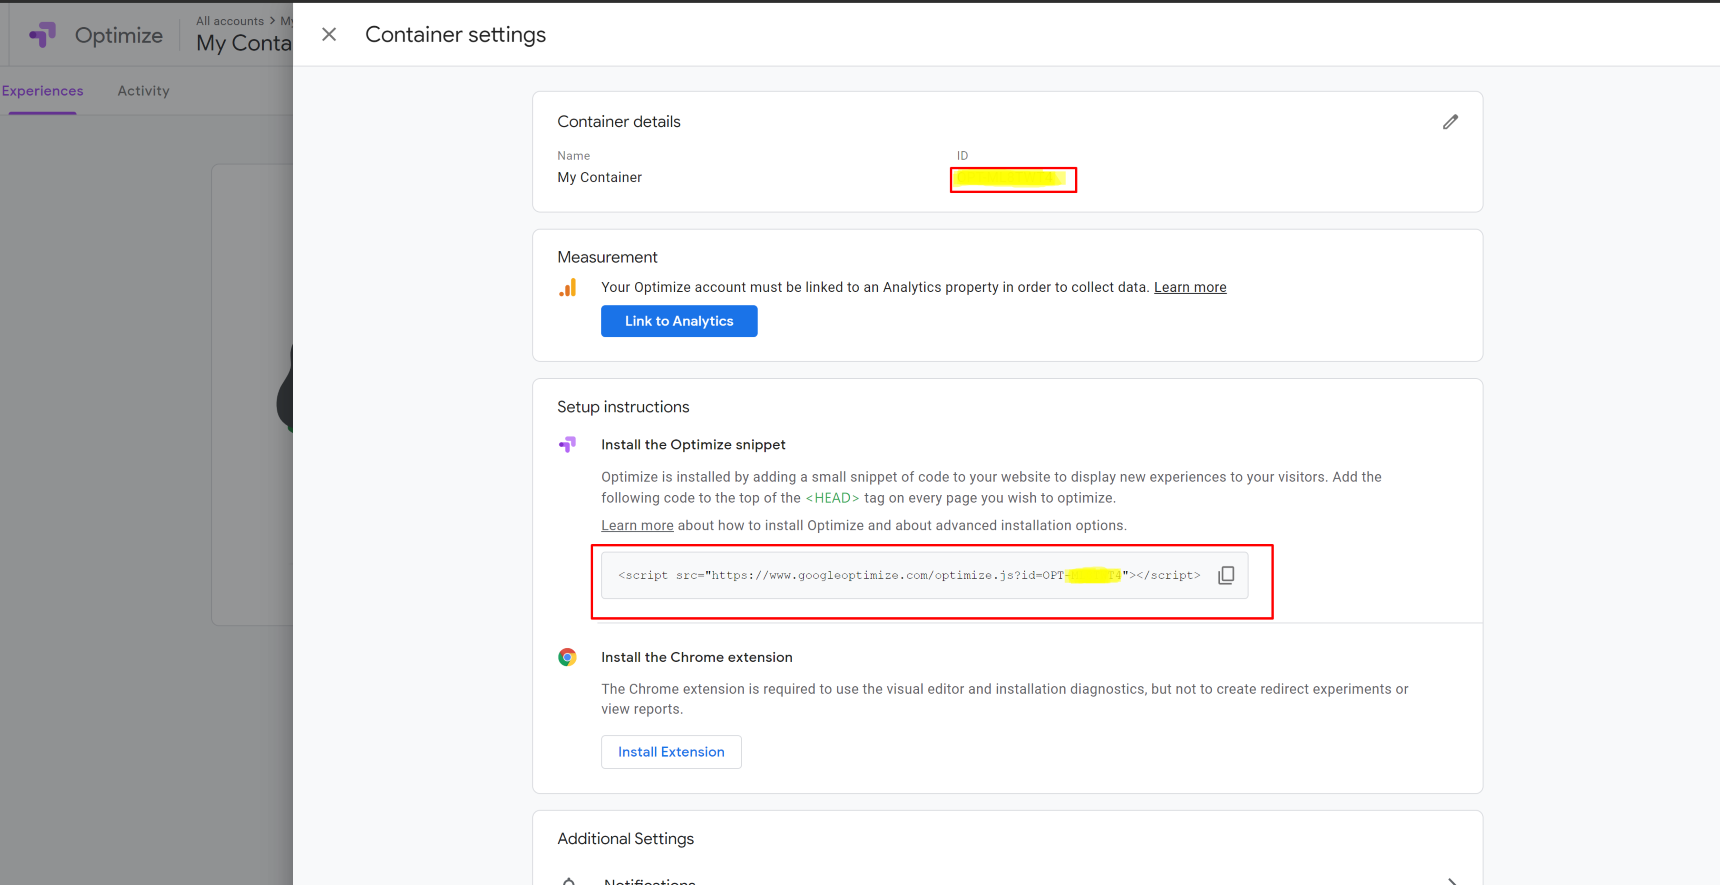
The first method is to simply add this code snippet at the top of the <head> tag of your website:
This code is unique, contains your Google Optimize code and can be found in your dashboard by clicking on Settings at the top right corner:
We will not cover in detail how to add such snippets to your WordPress head tag in this article. Instead, I recommend checking out this link covering the entire process in detail.
Luckily, adding this code in Jupiter X is very easy! Simply go ahead and navigate to Jupiter X > Control Panel > Setting. There you will see the option to add a linking code snippet:
The second method is easier and can be done using WordPress plugins. These plugins take care of integration since they already support Google Optimize in addition to their main functions. These plugins include:
Google Site Kit: This is an official plugin from Google that’s used to connect several other Google products to your website, including Google Optimize.
GA Google Analytics: In this plugin, you’ll need to provide a Google Optimize tracking code to connect Google Optimize. Please see the above image for an Optimize code.
Based on this information, it’s up to you to decide which method to use. If you only want to add Google Optimize, you may need to add the link to your WordPress Head tag. If you are thinking of adding some other Google products, then you may consider using the Google Site Kit.
Create and run your A/B testing
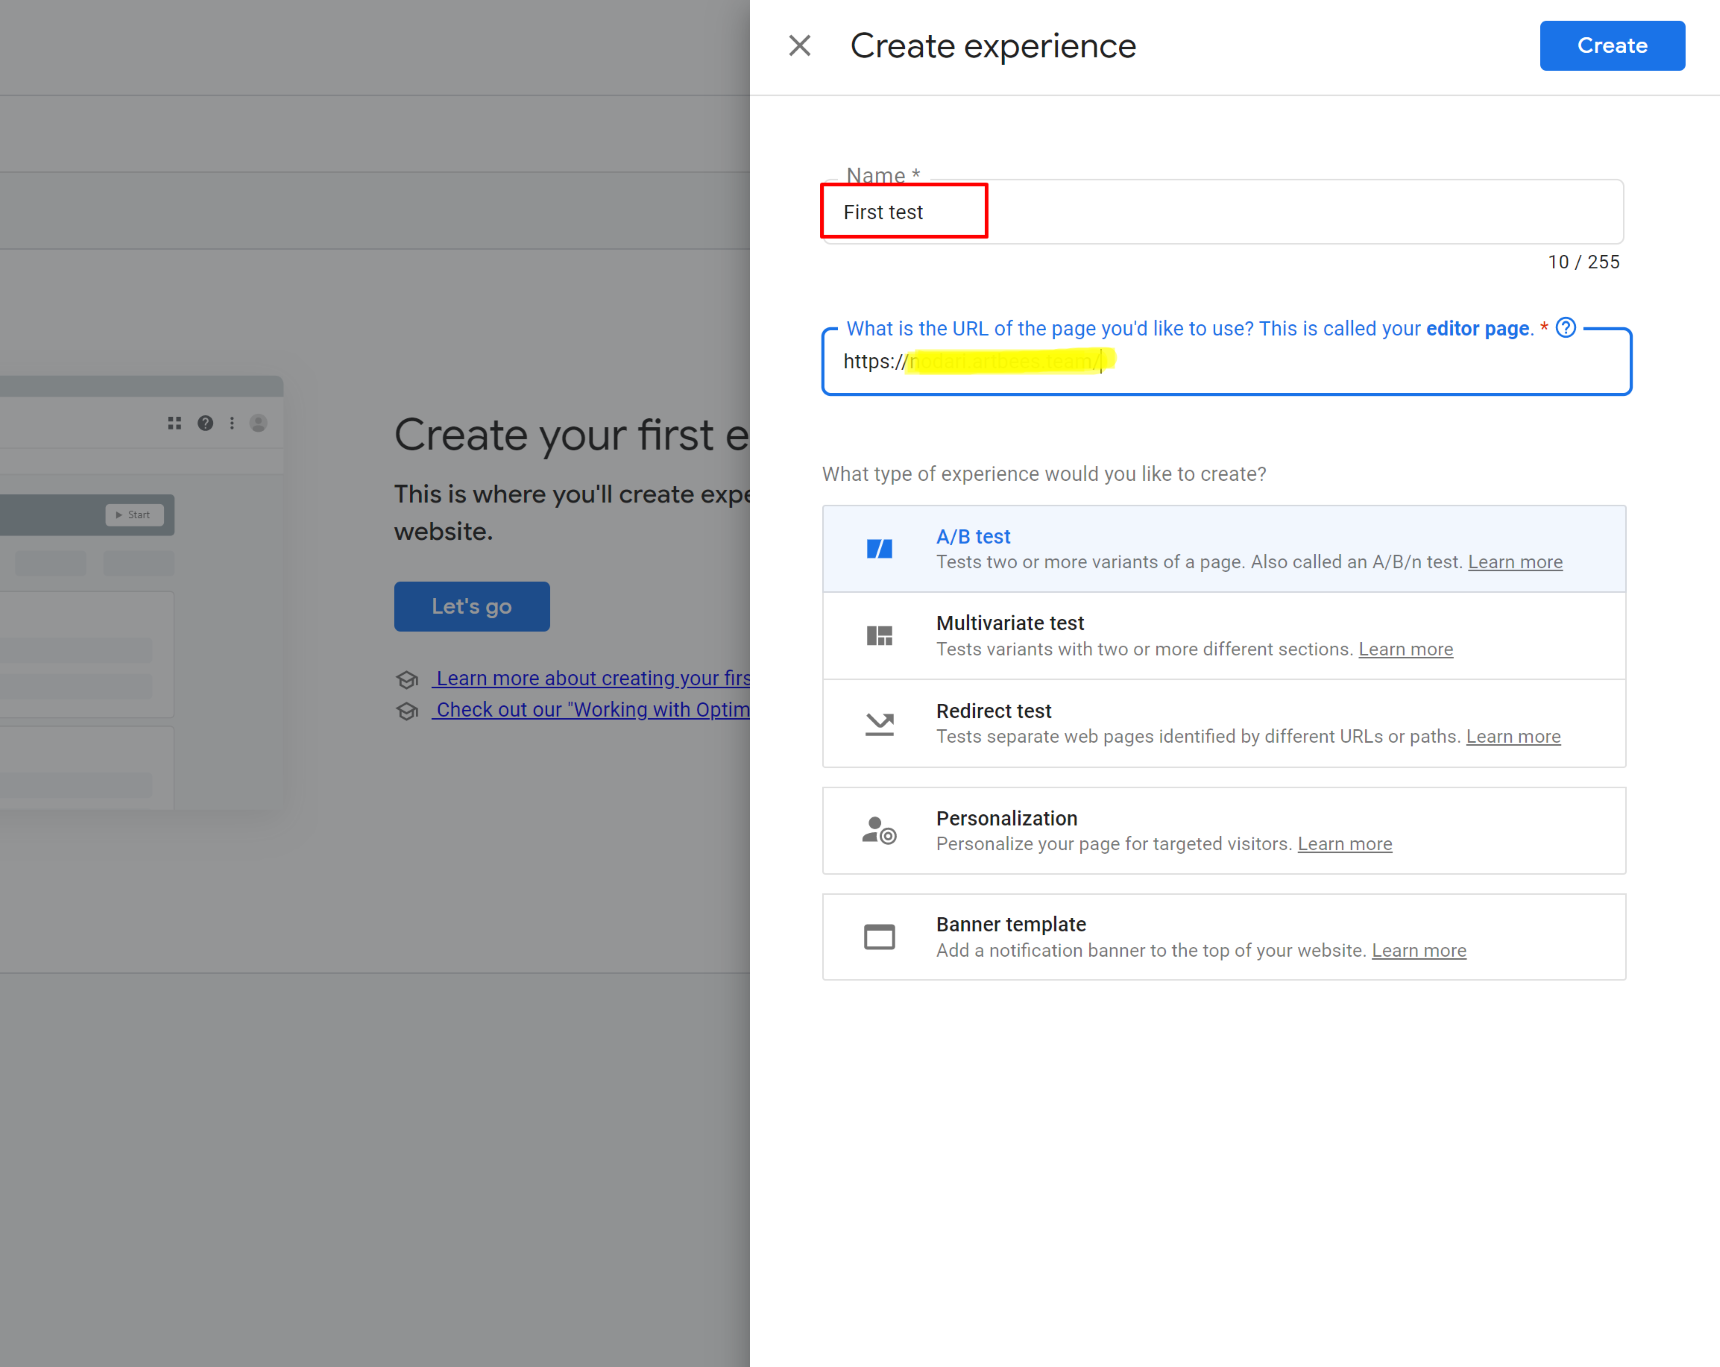
Now that we have everything set up, we’re ready to create our first A/B testing! Go ahead and click on the Let’s Go button (we posted a screenshot above) and give your project a name. You’ll also need to provide a link to the page you want to A/B test:
Once you click on the Create button you will be redirected to a page where you’ll need to add variants of your existing pages:
Use the Add variant button (Please note that the Google optimize Chrome extension is required to edit pages via Google extension. The program will offer to install the extension when you first click on Add Variant). Input the name of your test page, such as “Better Color for CTA,” for example, and click Done. A variant of the page will be created for testing and you will see this screen:
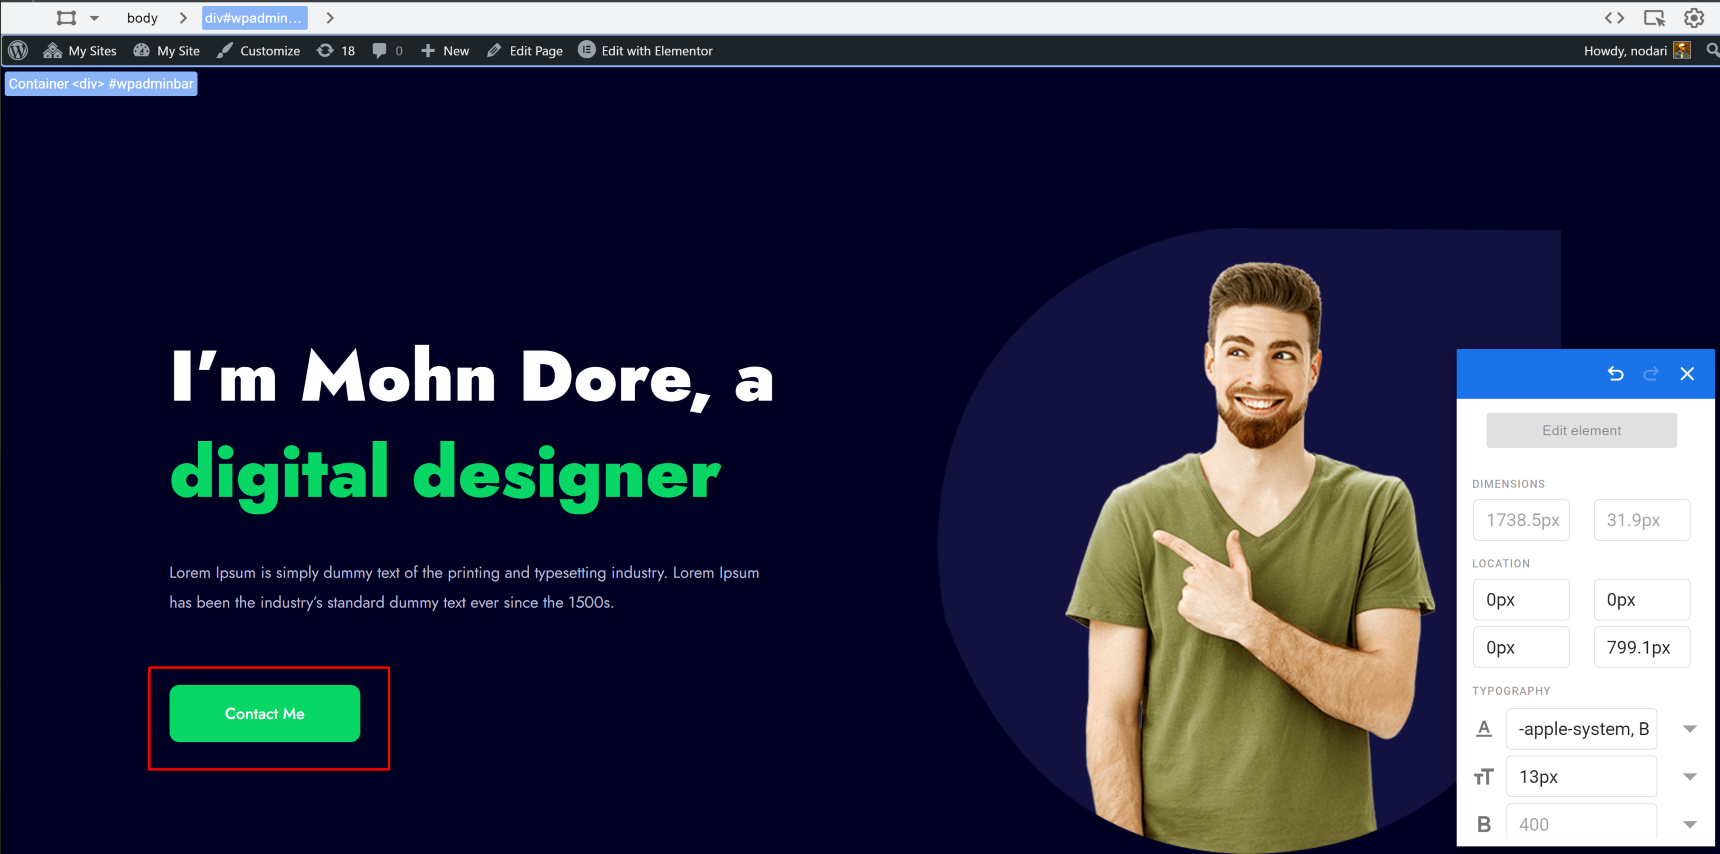
Now, click on the blue Edit button and your page will open in an editor. For example, this is original page view before editing:
And this is the same page after editing:
As you can see, I changed how the CTA button looks. I’m interested in determining which button is more attractive: a transparent button or one with solid color.
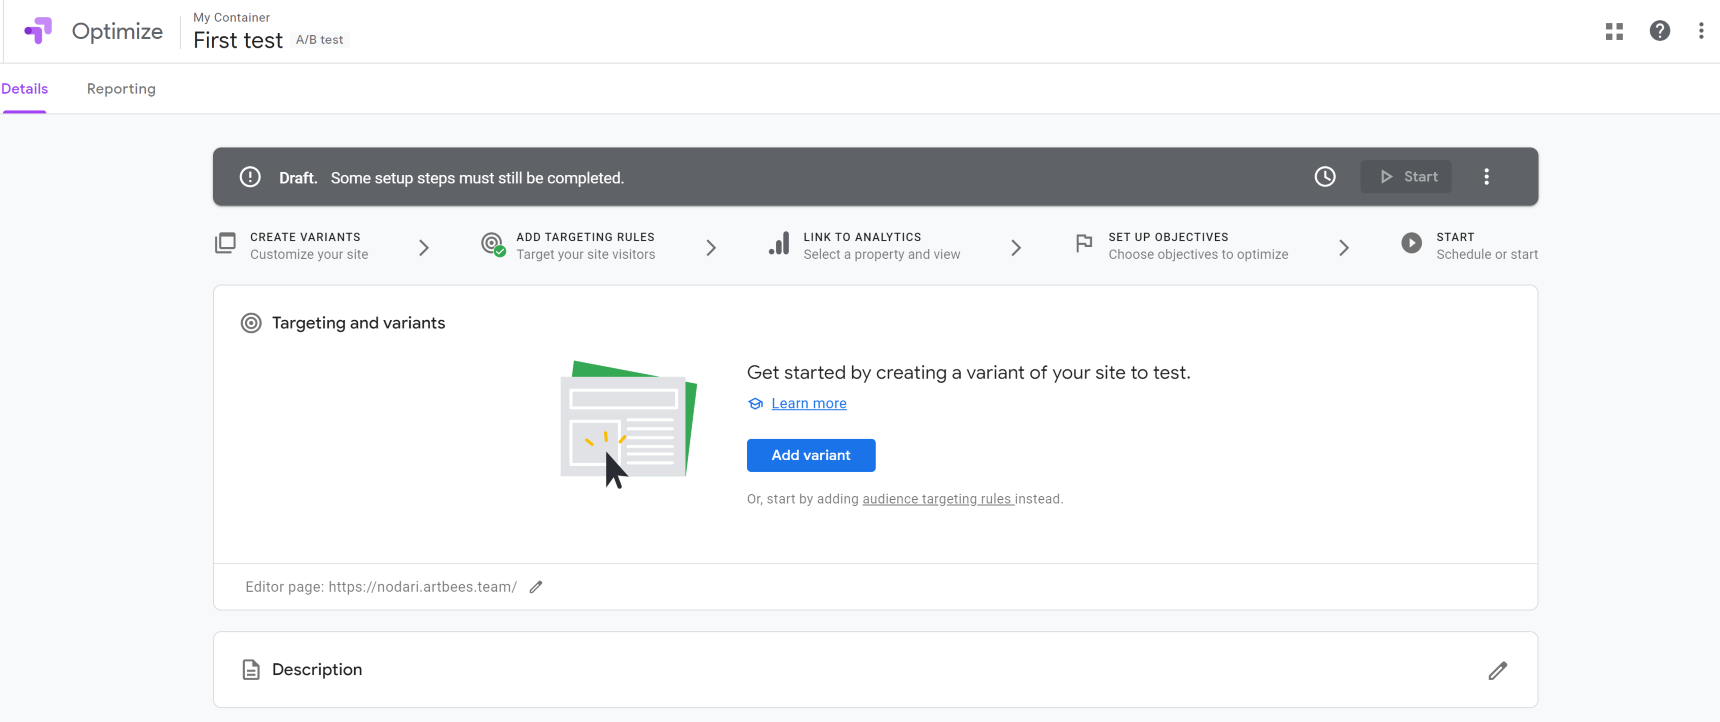
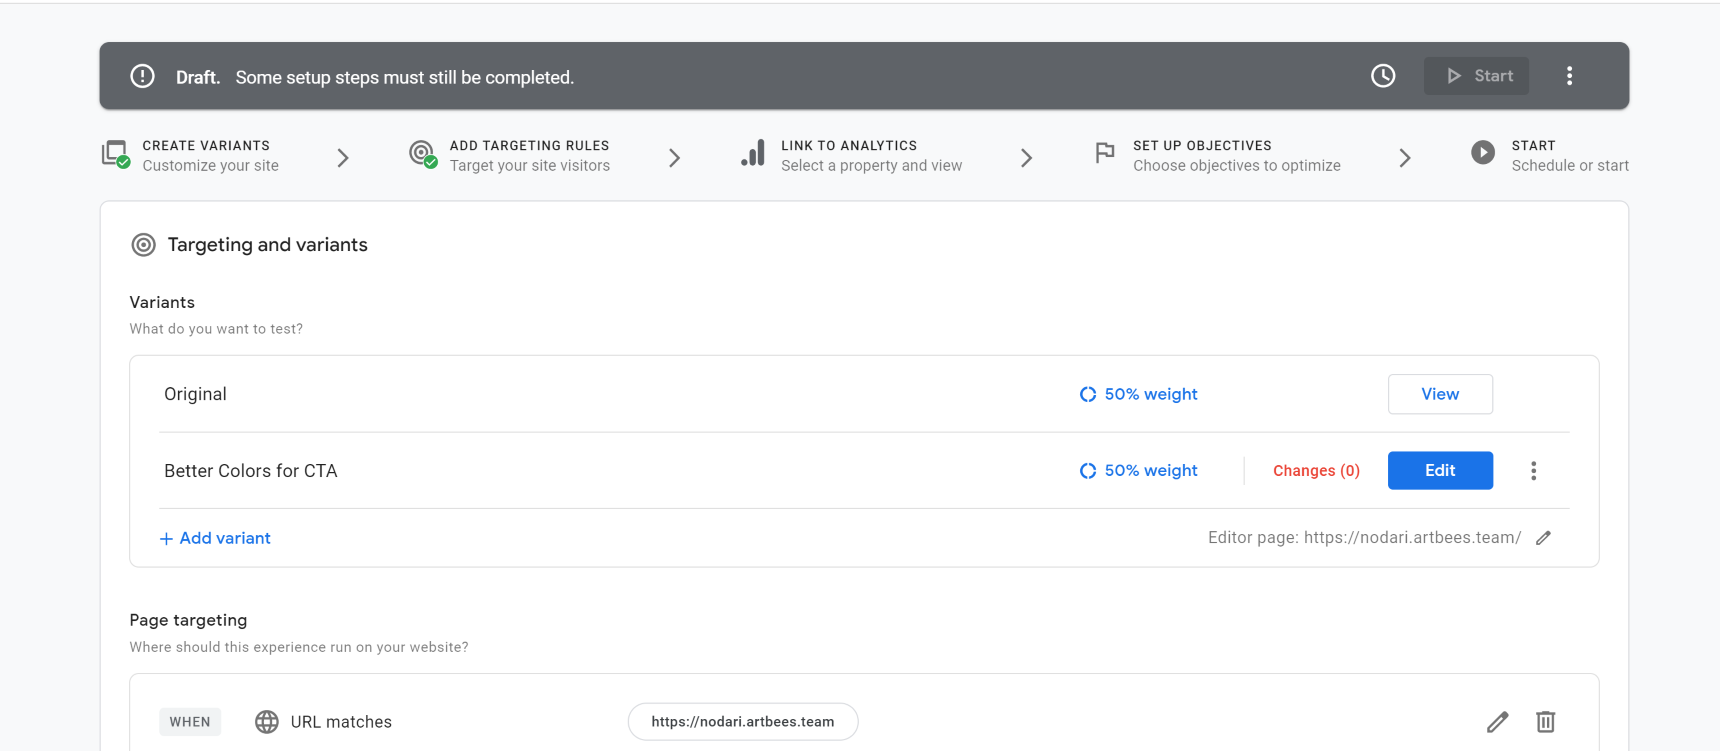
Once you are done, click on the Save button at the top corner and then Done. Your testing page has already been published and you will be redirected to the screen containing the variants page.
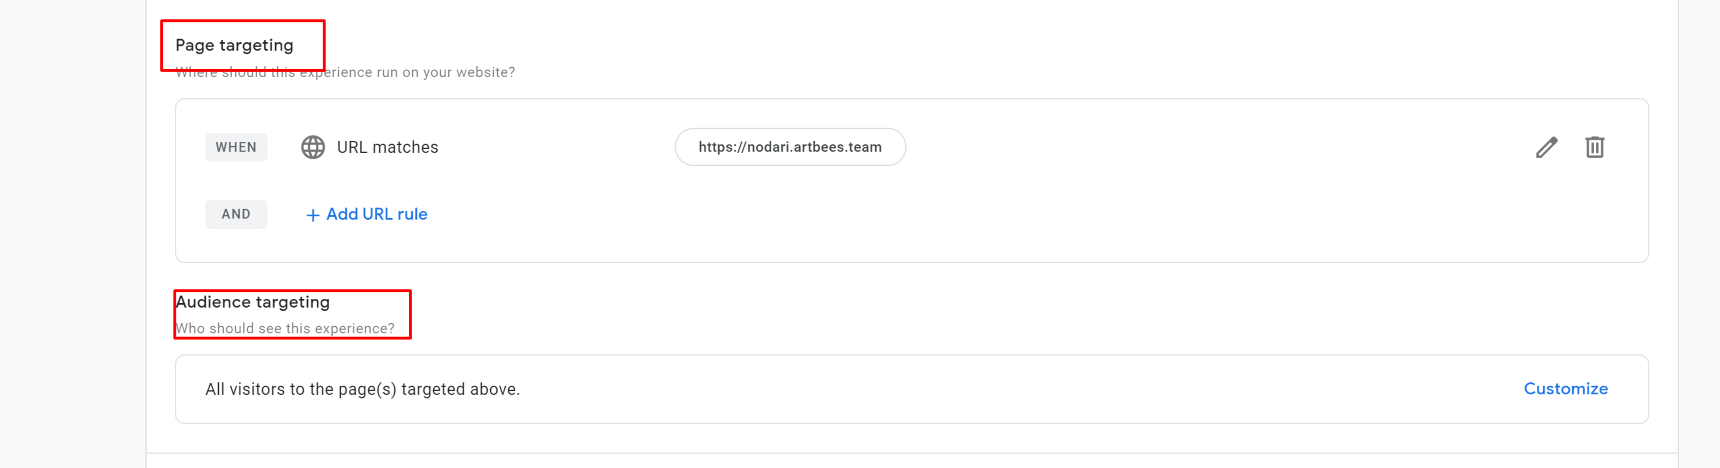
From there you can add as many variants as you want. After you make your test pages, just scroll down to see the Page targeting and Audience targeting sections. Here you’ll need to set up rules of appearance for your test page and select the audience you want to show your test to:
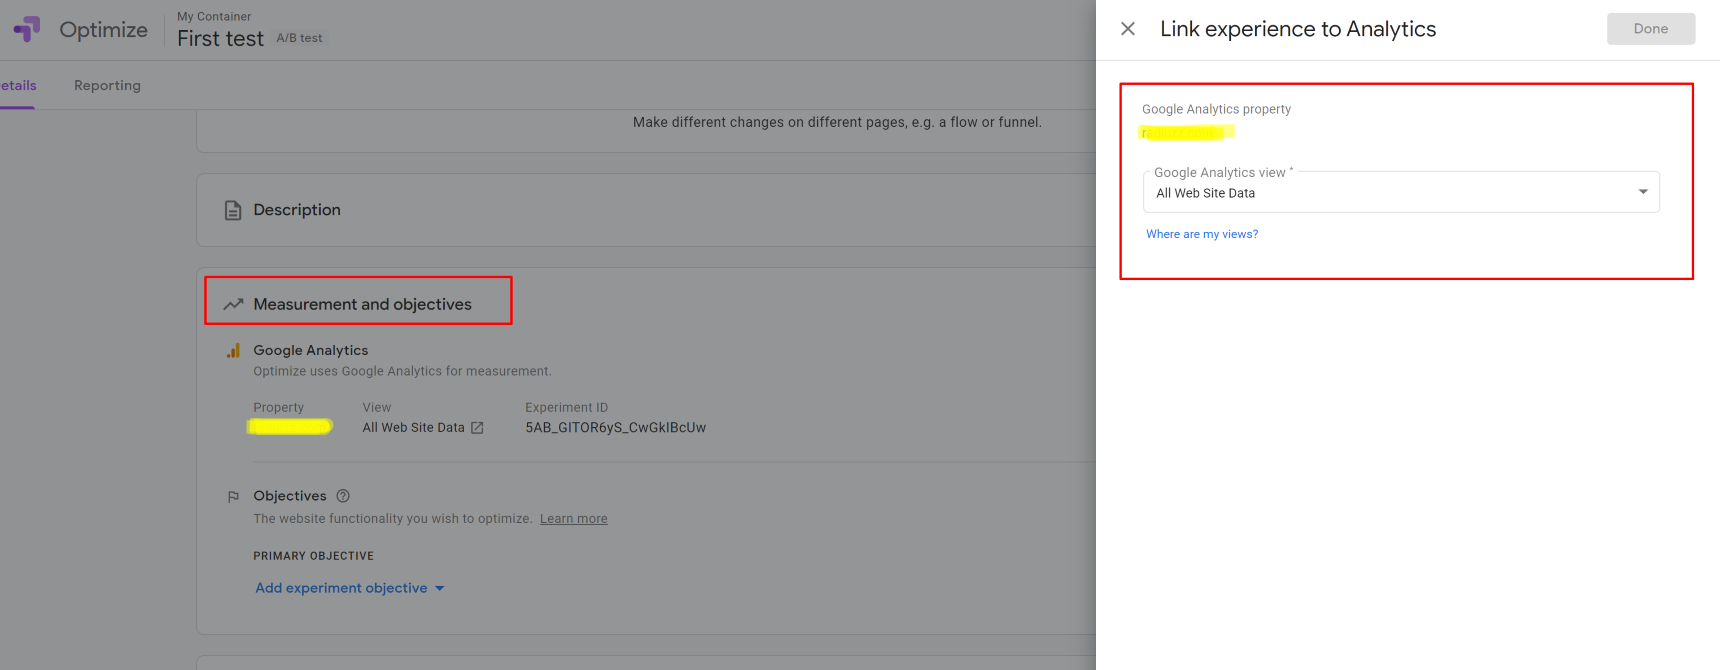
On the next step in Measurement and Objectives, Google will ask you to link Google Optimize to one of your Google Analytics. Choose one from the link and it will be selected:
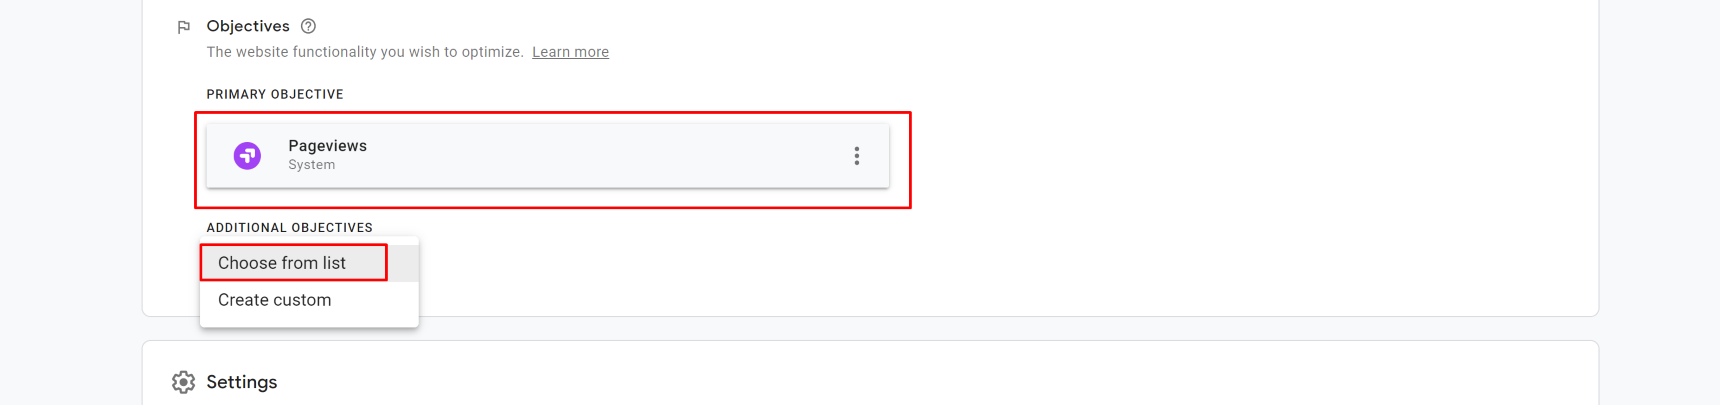
On the final step in the Objectives, choose the objective of your test and save it. There are predefined objectives to choose from but you can also add custom objectives as well:
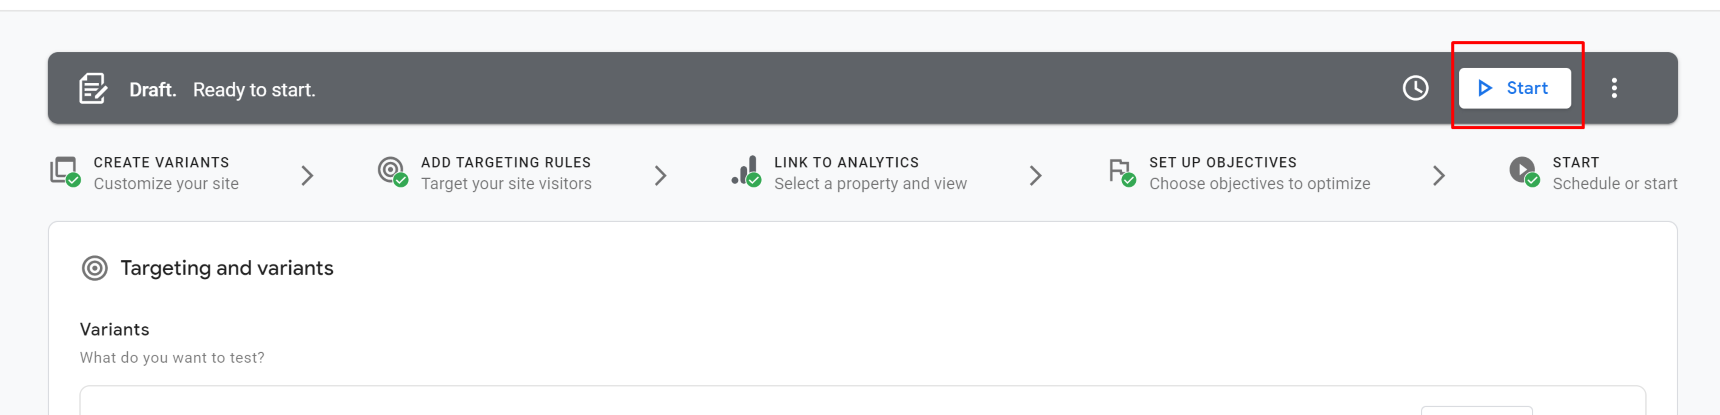
Once you have completed all of these steps, scroll up and you will see that the Start button has been activated. This means that you’re ready to go!
Test results review
Now, once you have everything set up and are running your A/B testing, you can take a break and wait for the results. Don’t expect to see them immediately, as it will take more than a week to see normal results on your results page, which will look like this:
As you can see from the results above, you should now have a clear understanding of how the experiment was performed. Conversion rates for the original page are still better than conversion from the special offer test page, which means that the changes are not so effective since the original page performs way better than the new test page.
Conclusion
Now that you know more how to properly perform A/B testing with Google Optimize, you have the chance to steer your website in the right direction. Making changes on your website, especially if you have a large audience, may be risky unless you test them first. With a clear understanding of A/B testing in WordPress, you can stay one step ahead and run experiments and testing campaigns to get more constructive feedback from your audience.
Not so long ago, I completed a project that involved running an affiliate marketing program on a Jupiter X website. I learned a lot about affiliates and how to integrate them into a WordPress website. I thought it would be useful to share what I learned with the readers of this article. If you want to run an affiliate marketing in WordPress and don’t know where to start, read on!
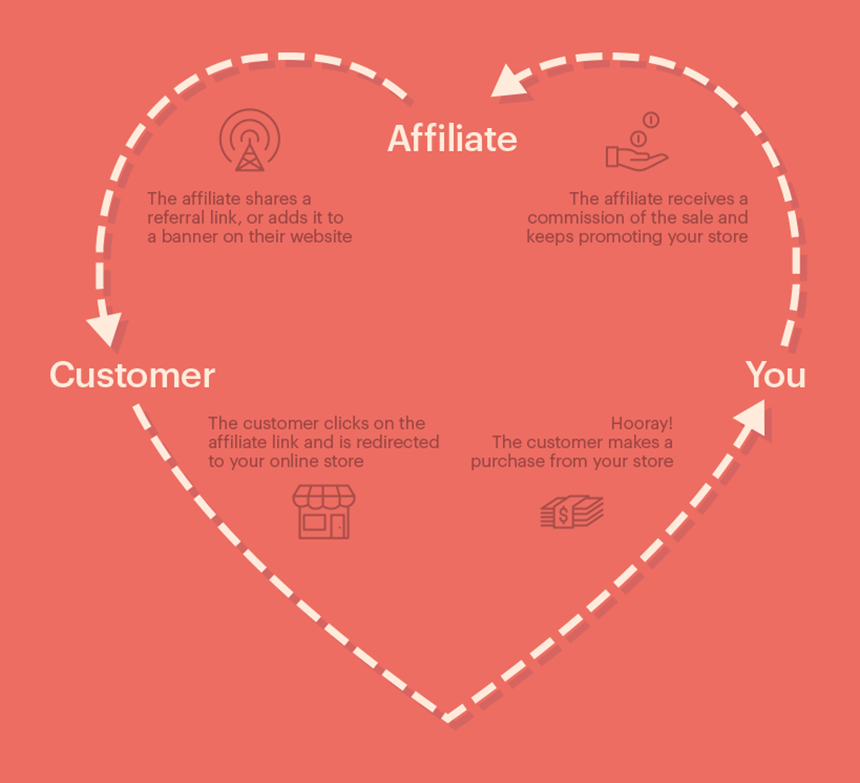
Before we get into the details, let me explain what affiliate marketing is: it involves selling a product or a service and paying a commission to those who introduce your product or service to new buyers. This is a win-win situation for everyone involved: the product owner will sell their product or service, the affiliate will get rewards for sending real buyers to the seller and the buyer will get what they want. Many companies use affiliate marketing as their main marketing strategy with excellent results.
I’m not going to talk about why affiliate marketing is important or introduce ways to get the most out of it. Instead, I just want to guide you through what I did to set up an affiliate marketing program in WordPress.
The basics of affiliate marketing
The goal of affiliate marketing is to reward those who connect buyers to your brand. Based on this, to have an effective affiliate marketing program you need:
A place where you register affiliates and store their data.
A way to recognize and track affiliate income traffic and affiliate sales.
A method to pay affiliates upon request.
In this case, we’re choosing to store the data via a WordPress website, complete with a Jupiter X shopping templates theme. In order to run the affiliate marketing program, I will use the WP Affiliate plugin. This plugin has the basic features required to run an affiliate website and also include great addons that can add to the site’s overall functionality. In order to see the complete list of addons, check out this page.
The best way to recognize and track affiliates would be to generate a specific link for each of them. The affiliate would then use the link wherever they advertise your brand. The link would look something like:
Here the “ref” query parameter is the referrer’s ID on the website. When a user visits via that link, a cookie value will be stored on the visitor’s browser containing the referrer’s ID. From then on, until the cookie expires or gets deleted, every activity that user completes on the site will be linked to that referral ID. If the user buys something, the website knows that this sale was made via a referral and therefore involves a commission fee. Based on the product or service, you may want to decide on how many days a referral link should remain valid. In my experience, more expensive services or products require more time for visitors to decide if they want to buy it. For such items, you’ll need to increase the cookie expiration interval in the plugin settings. By default, browsers will store cookies for 7 days, so if a user clicks on the affiliate link, leaves the website and returns at any time over the next 7 days, the commission still goes to that referral. Check out this page for the answers to some common questions about how this process works.
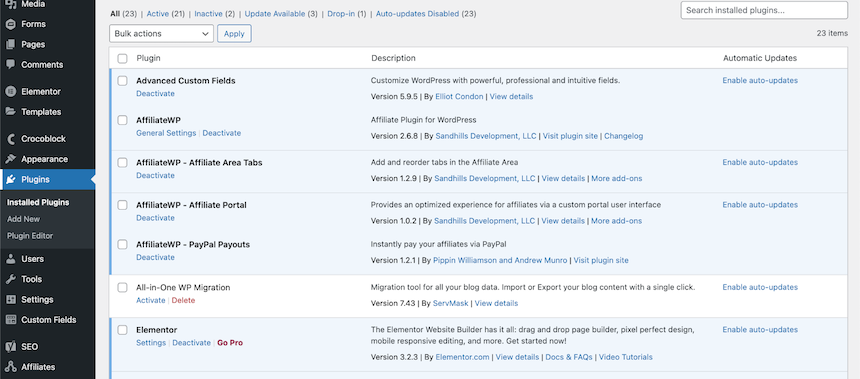
In order to use the Affiliate WP plugin, you need to purchase it from its developer’s website. Check the prices here and choose your plan, then proceed with the process and download the plugin package from the website. Next, go to your WordPress website admin area -> Plugins -> Add New, hit the Upload button and upload the AffiliateWP-x.x.x.zip package. After installing the plugin, simply activate it via the plugins list. I also recommend that you install the Affiliate Portal addon because it will give your affiliate page an excellent makeover.
Activating the AffiliateWP plugin
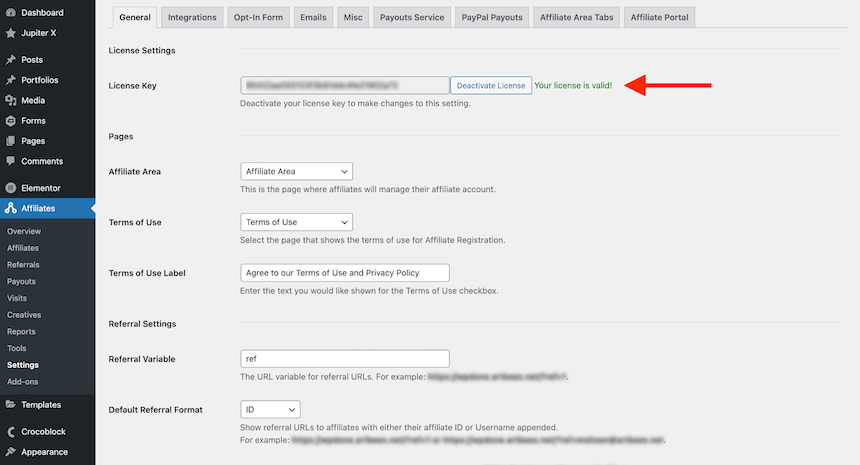
The next step involves activating the plugin by adding the license key to it. Do this via the Affiliate settings page.
Registering the AffiliateWP plugin license
Configuring the AffiliateWP plugin
The next thing you’ll need is a page to act as your affiliate area. Create a page and put this shortcode into it:
[affiliate_area]
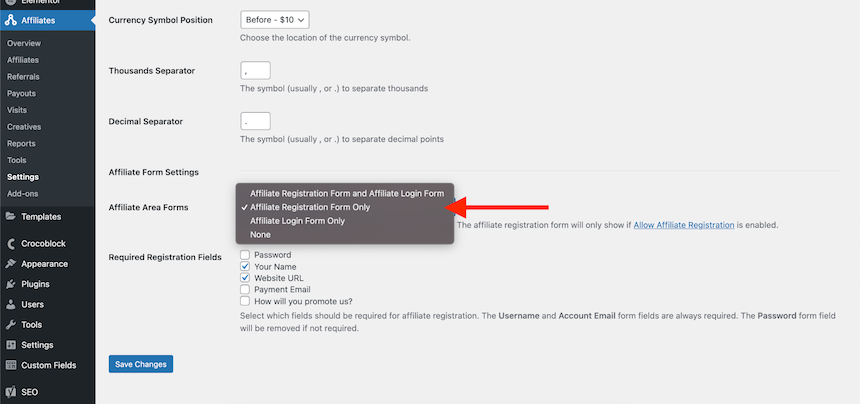
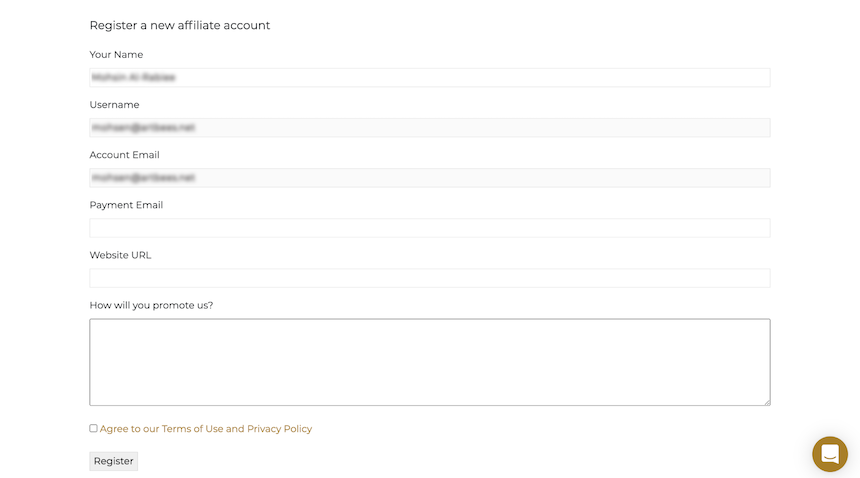
Then, come back to the Affiliate Settings page and set that page as your affiliate area. Some other configurations may still be required to make it work as you want it to. In my case, I wanted users who were already registered on the website to have the option to register for the affiliate program as well. Below the settings page there is an option that allows you to choose whether you want to show only the registration form or login page or both. For my site, I chose the option to display only the registration form.
Setting the affiliate form registration method and fields.
Now if I check the affiliate area, the page would appear as follows:
Affiliate area page for registering as an affiliate
You can set the required form fields in the settings page. You can also modify the form fields using the hooks available on this github repository. (Snippet available here as of the date of writing this article)
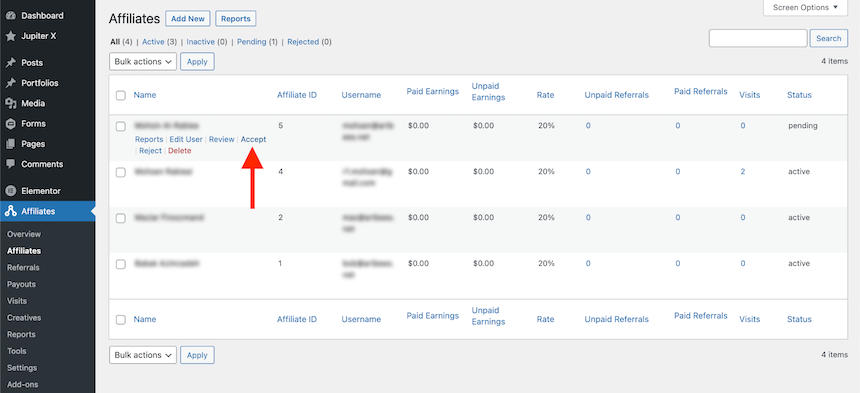
After registering as an affiliate, the user will need to wait for the website administrator’s approval. While the affiliate is pending approval, they will see this notice on the affiliate area page:
Once an affiliate has registered, the administrator can approve them via the WordPress admin area -> Affiliates -> Affiliates.
Accepting an affiliate
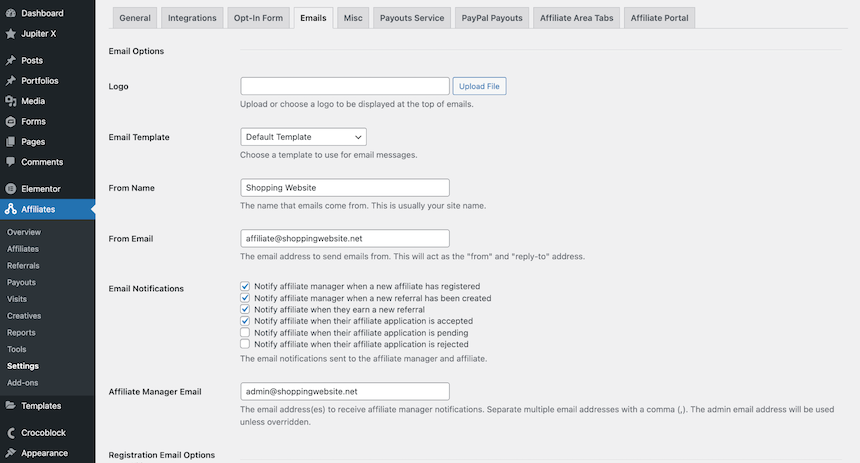
Once approved, the new affiliate will receive an email notification. In order to change the email content, you can override the email template on your child theme. For more information, please read this article. You can modify the current email template and settings via Affiliates -> Settings -> Emails.
Overriding email settings and notifications
Each action has a corresponding email notification here that you can manage and customize.
Once you’ve approved the affiliate, if you have not installed the Affiliate Portal Addon yet, your affiliate page will look like this:
Affiliate area page
However, if you have installed the Affiliate Portal Addon, your affiliates will see this page:
Affiliate area after installing Affiliate Portal Addon
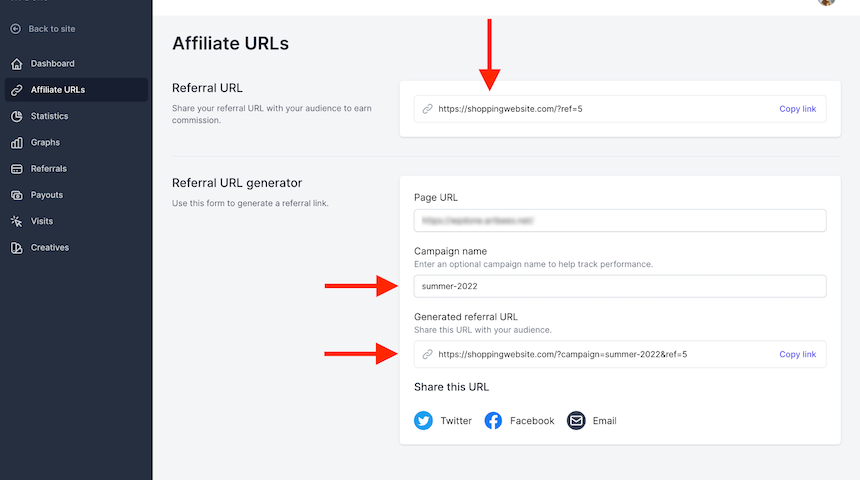
On the affiliate area page you can see your affiliate statistics, including visits, number of referrals and other handy figures. The affiliate can generate a link to the website and use it when promoting your brand. The links generated on the Affiliate URLs tab will all end with the “ref” query parameter. You can also add a specific campaign name so that the links look something like this:
Adding a campaign name can help track visitors and will show which campaign was the most beneficial for affiliates.
Affiliate URL generator
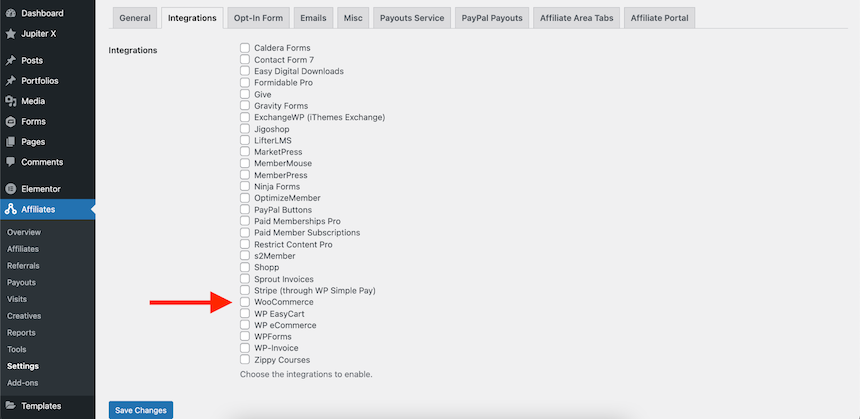
So far, so good. Now it’s time to integrate it all with your shop. You may use the affiliate model for all kinds of e-commerce. It doesn’t matter if you sell goods, run a learning website, a membership-based website or even a donation service. The biggest benefit of AffiliateWP is the long list of available plugins that you can simply integrate it with. In order to see the available integrations, navigate to AffiliatWP’s settings page and open the Integrations page.
Integrating WooCommerce and AffiliateWP
As you can see above, I’ve just enabled the WooCommerce integration. You don’t need to do anything else to integrate the plugin with WooCommerce. As soon as you check that box and save the settings, the integration will be complete. The rest of the process is as follows:
The affiliate will register and generate a link to your website containing a unique referral ID.
Visitors will click on that link included in affiliate ads.
The visitor will then browse your website and consider buying something.
The visitor then buys something via the same device they originally entered your website with over the course of the next 7 days (or whatever time interval you set for cookie expiration in the AffiliateWP plugin)
The commission will be added to the affiliate account and wait for the affiliate to request a payout.
There is another step before the commission goes to the affiliate. The visitors may add something to their cart, but pay for it later. Before the payment is complete, the visitor still counts as unpaid. As a result, there are 4 statuses for an affiliate transaction with the AffiliateWP plugin:
Pending – This is a referral that has been generated but has not yet been confirmed
Unpaid – This is a confirmed referral that is waiting to be paid out to the affiliate
Rejected – This is a referral that has been rejected
Paid – This is a referral that has been paid to the affiliate
“All referrals begin with a status of Pending and are then updated to one of the other three statuses when particular events occur. A pending referral means that it is waiting to be confirmed as valid. Referrals are confirmed when orders in the eCommerce platform are completed.
A referral is marked as rejected when the corresponding order in the eCommerce platform is refunded or deleted. In Affiliates → Settings → Misc, there is an option to automatically mark referrals as Rejected when orders are refunded or deleted. If enabled, AffiliateWP will mark referrals as Rejected for you. If disabled, or your eCommerce platform is not fully supported, referrals will need to be rejected manually.
Referrals are marked as Unpaid when the corresponding order or signup is completed in your e-Commerce or membership platform. Once marked as Unpaid, the referral is considered earned and should be paid out to the affiliate.
Referrals receive a status of Paid as soon as they have been paid to the affiliate. Once marked as Paid, a referral is considered closed and no further status changes are applied to it.”
Full documentation on the referral status is provided here.
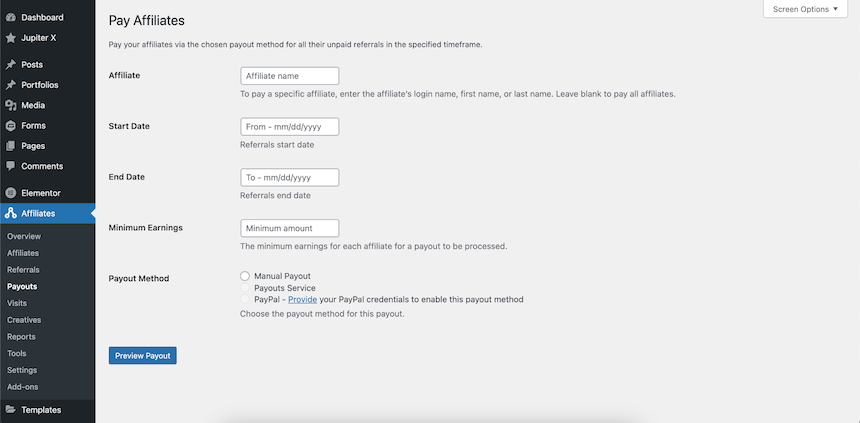
Payouts
Your affiliates will get paid as soon as you generate a payout for them or pay them and then add the payment info as a bank transfer invoice to their payout list. There is currently no automatic paying out system. You can generate a form to get in touch with your affiliates and allow them to request payment.
You can integrate your website with a payout service as described in this article. Using payout services allows you to pay affiliates in more than 30 different countries directly to their bank accounts in as little as 3 days. Learn more about using Payouts Service here.
There are other methods that allow you to pay your affiliates with PayPal, for example. Check the above article for more info.
The payout workflow involves you, as your website administrator or affiliate manager, generating a payout. This payout then goes out to all users for referrals that are paid to you within a certain date range and for a minimum withdrawal amount.
Generating a payout to affiliates
After the payout is complete, the status for each referral within that date range will change to Paid and will not be considered for upcoming payouts.
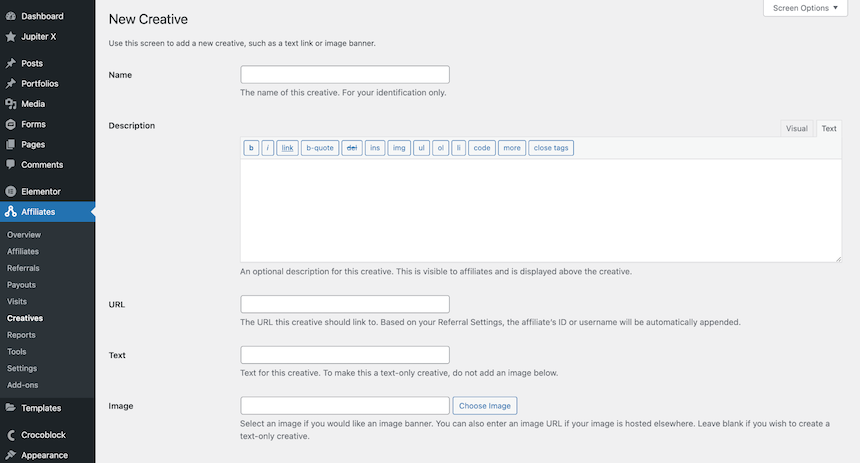
Creative Banners
It’s possible to provide banners and visuals for your affiliate marketing program, complete with embed codes that let your affiliates use them for whatever promotions they run on their websites. In order to add banners, you should navigate to Affiliates -> Creatives and add a new Creative. Here you need to add the title, description and, most importantly, an image that will serve as your affiliate advertising. Here you can find some marketing advice on how to get the most out of your banner images.
Adding a new creative banner to the list of available creatives
After adding the creative material, your affiliates are able to see and copy the code through their affiliate area page and simply paste it to their website.
Creatives on the affiliate area page
Wrapping up
In this article we reviewed how to run an affiliate marketing program in WordPress with the AffiliateWP plugin. To be honest, when I accepted the project to integrate a WordPress website with this plugin, I had no idea what I’d gotten myself into. The website that I was going to integrate it to wasn’t using any premade integration services. I had to find out for myself how affiliate marketing programs work and then try to implement one using actions and hooks. The key point I want to share with you here is that you need to know the status of each visit. What happens to a user that decides to buy a product after 10 days? What happens if they open the website using another device? What if the service you are selling requires two payment steps? These are the sorts of questions you should consider. Fortunately, the documentation of this plugin is great. The codebase is standard and you can find some samples in the github repository. This all adds up to make a great experience for both users and the developers who work with this program.
Please share your comments and questions below in the comments and don’t forget to subscribe to our newsletter.
When talking about online learning, we usually imagine online courses where someone can be taught new information using digital technology. Online courses are convenient because students can complete the course from the comfort of their home and usually for a lower price.
Also, online courses can provide different types of information. For example, many involve videos, images, slideshows, and other multimedia and interactive elements.
There are a lot of free and paid WordPress LMS (Learning Management System) plugins that you can find to build online courses. Among these plugins, LearnPress plugin is the most useful and popular LMS. It also happens to be free to use! The plugin has a very good user interface allowing you to intuitively manage your online learning website. With this WordPress LMS plugin, you can easily create an educational online learning website even if you don’t know how to code.
In this article, you’ll find instructions on how to create an online course and thus, an online learning website with the LearnPress plugin and Jupiter X theme.
Installing LearnPress
The process of installing the LearnPress plugin is very simple.Navigate to Plugins > Add New on your WP Dashboard, search for “learnpress”, click on the “Install Now” button and activate it.
Once it’s installed and activated, go to LearnPress > Settings to configure the settings to fit your needs.
In the “Pages Setup” section, you’ll see the pages that were automatically imported and assigned after the plugin installation. You are able to edit them or create new ones.
In the “Currency” section, you can set up the type of currency you want to accept for your online course and select how it will be formatted visually on your site.
In the “Payments” area, you can enter your email address associated with PayPal. You’ll be able to accept payments without needing to have an active shopping cart. Simply click on the “PayPal” link and enter your PayPal account email address. Then, click the “Save Settings” button.
Configure the other settings tabs to complete the installation.You can install a sample course under LearnPress > Tools > Course Data. I suggest you do this so you understand what courses will look like.
You will be able to view the frontend of the sample course on your site.
Creating a New Course
Now it’s time to create an online course. In your WordPress dashboard, go to the LearnPress tab and select Courses. Click on the “Add New” button.
You’ll notice the page editor looks like a standard WordPress page. Enter a course name and a description to explain what the course is about.
You can also add a category to your course. It’s useful for keeping things organized if you plan to create multiple courses. Next, under the Curriculum section, add your lessons and sections.
Sections are subsets of the entire course. Lessons produce the actual content in each section. Note that the Select Items button provides options to connect quizzes and other lessons that have been already created under LearnPress > Lessons.
Configuring the Course Settings
Under the Curriculum section you’ll find the Course Settings section, which consists of 5 tabs:
General
Assessment
Pricing
Extra Information
Author
In the General tab, you can configure the duration of your course, how many students can join, how many have already taken the course, whether you allow users to re-take your course, as well as block the content once the course is completed and set an external link to redirect users when they click the “Buy” button.
The Pricing tab allows you to set the price for your course. You can even set a sale price. If you don’t want to add a sale price, simply leave this section blank.
In the Extra Information tab, you can add additional info such as requirements for your course, a FAQ section with popular questions and answers or a description of your target audience.
The Assessment tab gives you options on how you prefer to evaluate students. You can choose the following:
Evaluate via lessons
Evaluate via results of the final quiz
Evaluate via quizzes passed
Evaluate via questions
Evaluate via mark
The name of the course instructor is shown in the Author tab. Note that you need to create a WordPress user when adding a new instructor.
Adding Lessons and Quizzes
Now let’s add the course content via the LearnPress > Lessons menu.
You can add any content to the WordPress editor, including text, video, audio, PDF documents and images. However, adding content via the Elementor editor is a much better route. You just need to enable “Lessons” in Elementor > Settings > General.
In the Lesson Settings section, add the time in minutes of the lesson duration. Also, don’t forget to uncheck the Preview Lesson option. You can enable it only if you want visitors to preview the lesson content without signing up for the course.
Once you have created all the lessons, it’s time to add quizzes.Under LearnPress > Quizzes click on New Quiz.
Add a title to your quiz, then write a description or instructions for your quiz in the text box. After that, start adding the questions to your quiz under the Questions section.
When you write a question, you can click on the Add as New button to select a question format, such as:
True or false
Multiple Choice
Single Choice
Fill In the Blanks
Once you have added all questions, you can customize the quiz in the Quiz Settings section.
For example, you can choose whether to show the correct answer when a student selects one, set the duration of the quiz, enter a minimum percentage for a passing grade and more.
Here is how a student sees a quiz on frontend:
Link Lessons and Quizzes to the Course
When all lessons and quizzes are created, you’ll need to link them to the proper courses.To do this, go to LearnPress > Courses and open your Course in the editor. Under the Curriculum section, click on the Select items button to choose a quiz you have already created.
You’ll see a window with two tabs: Lesson and Quiz. Click on “Quiz”, and select the quiz, then click on the “Add” button.
Repeat this process if you need to add more quizzes or lessons. Once you’ve added all lessons and quizzes to your course, make sure you have saved the changes by clicking the “Update” button in the WordPress editor.
Here is how the course will look on frontend:
Note that, before starting a course, a student must log in first to enroll in the course. After they click the “Start Now” button, they will be redirected to the Checkout page to pay for the course if it’s not free and will need to sign in.
After passing each lesson, the student can take the corresponding quiz. Once the whole course is finished, he or she will get a certificate. More detailed information can be found in the LearnPress documentation.
Promote Your Online Course
The next important step is to promote your online course, especially if you are going to sell the course. Here I’d like to recommend to you the most effective methods, such as:
Creating a unique landing page. It’s a good idea to create a landing page for your online course and provide a link to it in your promotions. Jupiter X templates are very helpful in this case, as you only need to import the pages rather than creating a landing page from scratch. Check this demo to see an example of an effective landing page.
Sharing on social media. Use your social media channels to post a link to your online course.
Explaining why your course is different from others. What unique options or benefits set it apart from others? Don’t forget to highlight that in your promotions.
Promoting the online course via your email list. If you have a newsletter, use it to spread the word about your online course.
Offering a discount to your social media followers is a good idea as well.
For example, you can add a ‘sale’ price to your online course in the LearnPress plugin. To do this, go to LearnPress > Courses. Open your course, then click on the Pricing tab under the Course Settings section:
After you enter the sale price, you can schedule a start and end date of the Sale. Click on the “Schedule” link and, once the changes are done, be sure to update your changes.
Wrapping Up
As you can see, LearnPress is a great, easy-to-use plugin to start building your online learning website. This plugin has a lot of amazing features and functions, so don’t hesitate when deciding what plugin to choose, as LearnPress is a great solution for schools, universities, or education institutes. If you want to check the LearnPress documentation, you can find it on this page.I hope this article has helped you create your online learning website using LearnPress and that you didn’t find it complicated, as the process is quite simple. You can also view Jupiter X demos for courses and install one of them on your WordPress site, then include courses using LearnPress.