You might be thinking that taking over an existing website is a good deal to make. After all, you don’t need to create anything new as everything is already done, right? All you need to do is ask for login credentials, and you’re well on your way.
Unfortunately, it’s not as easy as that. If there’s something you’ve missed or overlooked, you won’t be able to administrate the site fully, and the previous admin will still have access and may do harm to your website or ruin the changes you’ve already made. You also might be unaware that the site you took on has some malicious code, which could make your site vulnerable to getting hacked. That’s why it’s so important to follow all the steps below when inheriting a website. Here’s a list of what you need to check and remember for successfully taking over an existing WordPress site.
Get All Login Credentials
When inheriting a website, the first thing you need to do is to get all login credentials. It doesn’t mean you only need the username and password for your WP Dashboard. Here’s everything you need to get:
Access to WordPress dashboard (make sure you have an Admin role so you can manage the dashboard freely)
Hosting account (you need this to be able to change certain settings, for example, PHP version or to edit the files to troubleshoot)
Domain registrar (usually domains come together with hosting, however, it may be separate. You need to check that you have access to the domain management to be able to update its registration or change DNS)
CPanel (some hosting providers have management panels like CPanel or ISP Manager, so you should make sure to get access to that panel where you can manage your site easily: change PHP version, create backup, edit files via File Manager, etc.)
CDN (make sure you have access to this as well. A great tool to speed up WordPress, it may be Cloudflare)
Email accounts – there are email accounts that may be connected to your site. You need to have access to all of them for administration.
Change All Passwords And Emails
Another step in taking over an existing WordPress site is to change all the passwords after receiving the login details. You don’t know who else has them, so to secure the website, change all the passwords immediately after you’ve received that information. As you already know, your passwords should be strong. You can use this password generator tool to generate robust passwords.
Another thing you need to do is to change the email address to yours: go to Settings > General and replace the email address there so you can get any notifications.
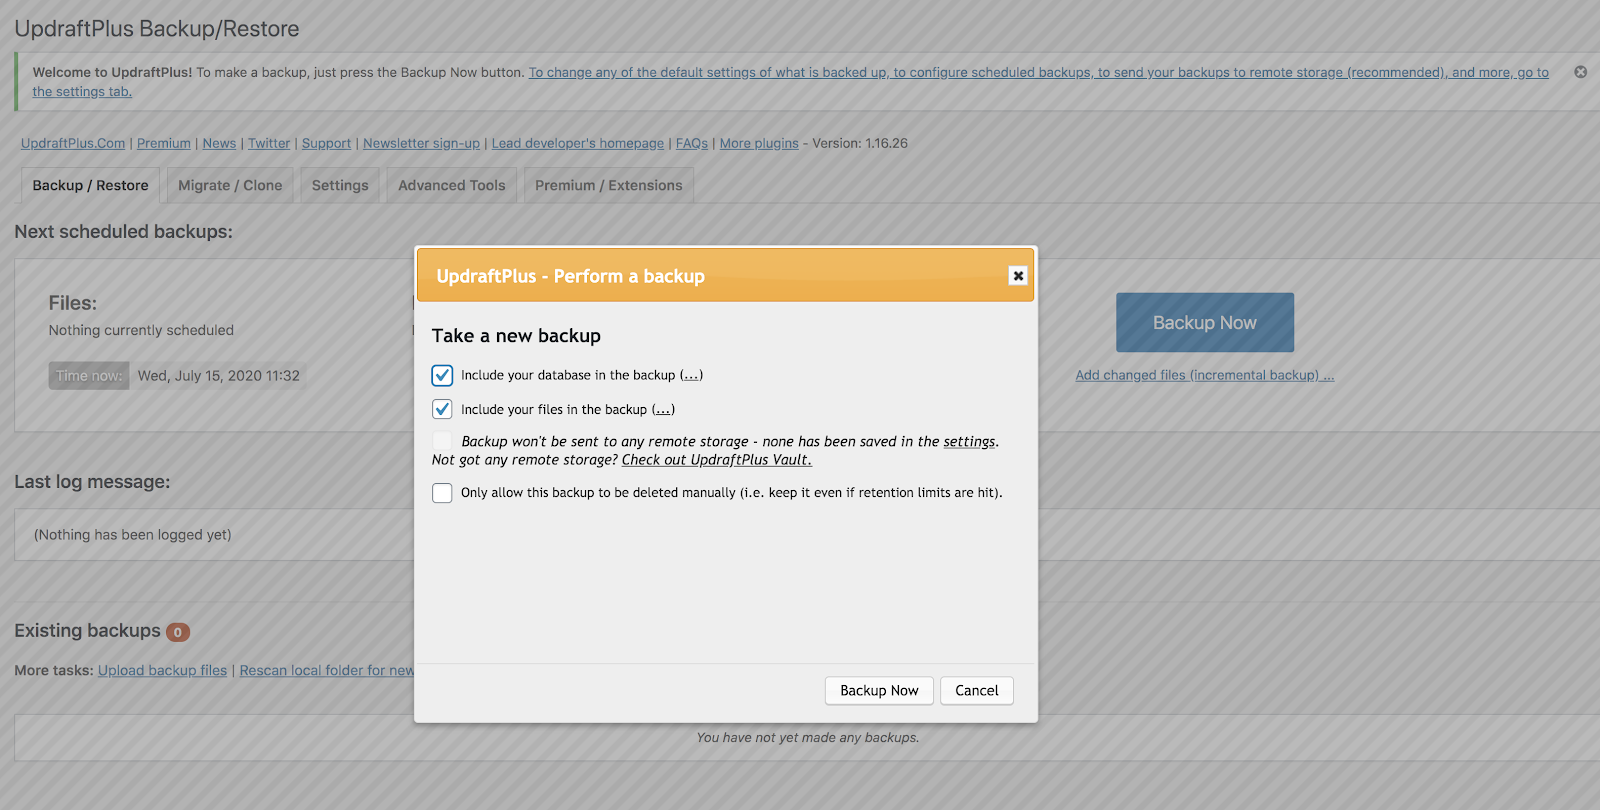
Set up Automatic Backups
It’s necessary to make regular backups so you are able to restore the data if something goes wrong. You can create a full backup via CPanel or use a WP plugin like UpdraftPlus.
The following articles will be helpful for you to get more information regarding backups:
As an admin, you need to be sure that you have solutions to restore the site data if something is corrupted.
Update User Roles
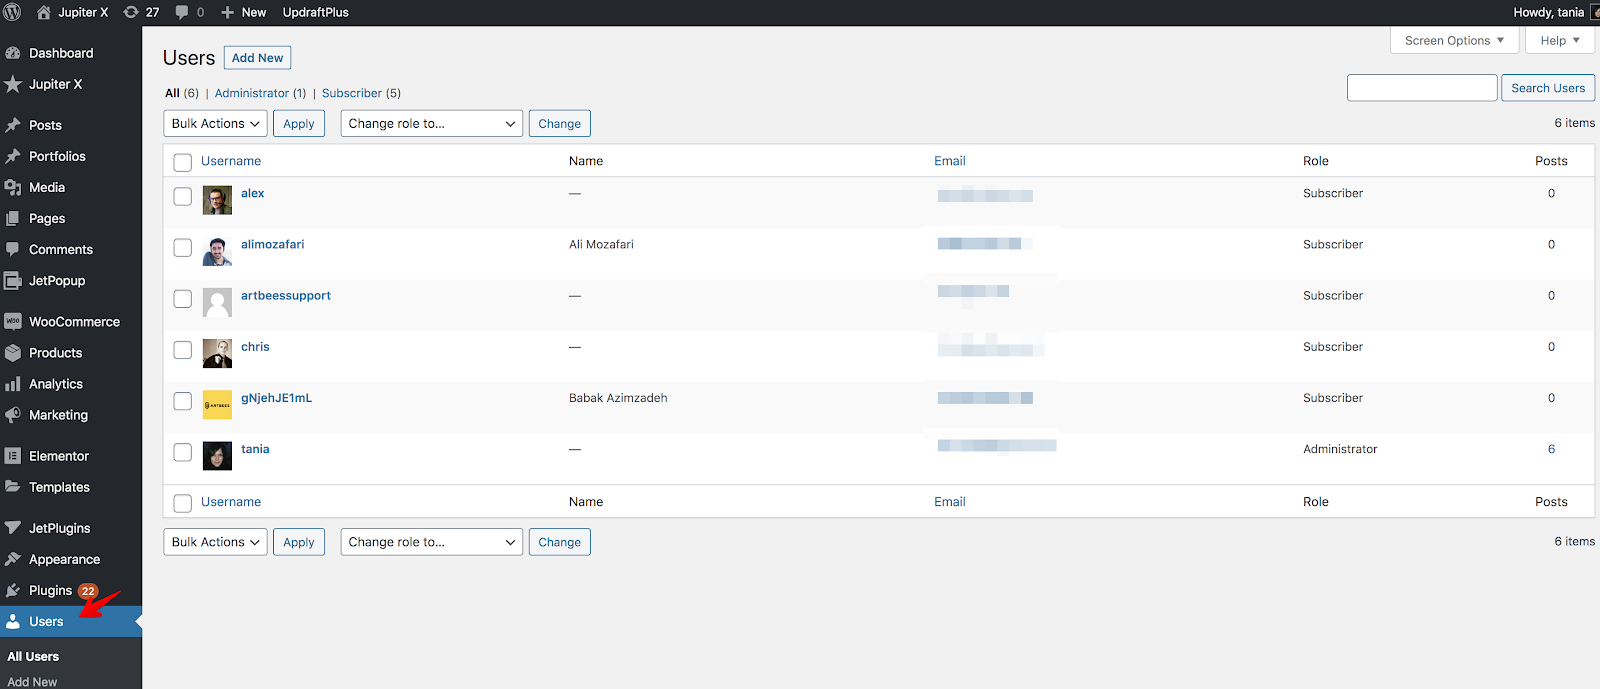
Another important point in taking over an existing WordPress site is checking the user list. Go to the Users menu on the dashboard, find the person who managed the site before you. It’s better if you remove his/her access or downgrade the role so he/she can’t administrate the site. If you see other users with Administrator roles in the list, but you are supposed to be the only one, be sure to delete those users.
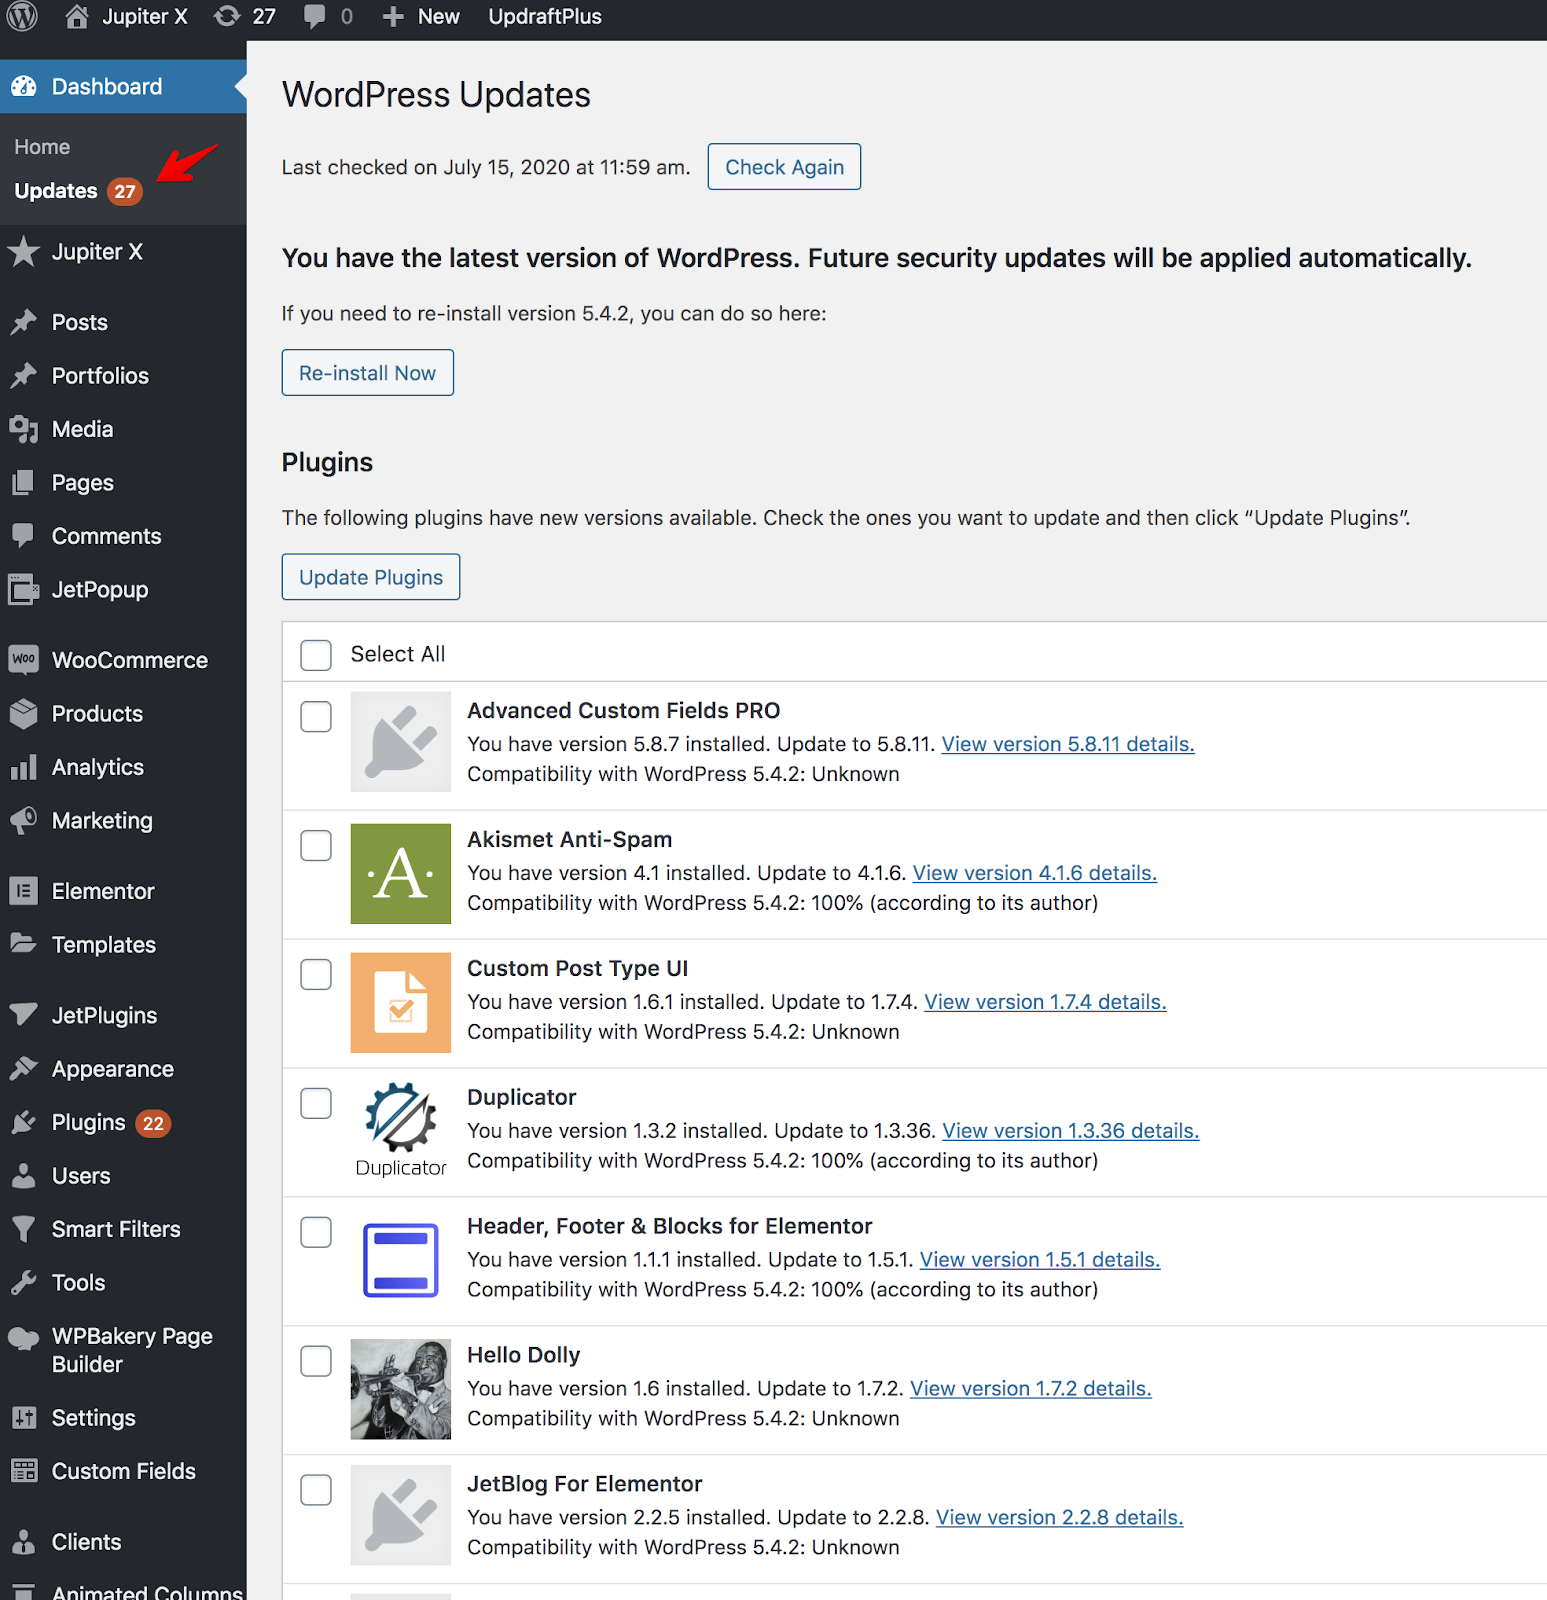
Update Outdated Items
Now it’s time to update the site. When taking over, you’ll definitely get some plugins or themes that are out of date. If not, then you’re lucky! So, before starting an update process, you need to create a backup to be able to restore the site if something is broken during the update. Don’t proceed with a bulk update, do it one by one, especially when it comes to plugins. You’ll want to update plugins one after the other and then check the site after each update. This way you’ll know which plugin caused the issue if your site got broken after the update.
Another recommendation is to do this maintenance work on the local or staging environment, so the live site is safe and visitors don’t see a broken layout.
By the way, there’s a great tool that helps in managing all your WordPress websites at once – ManageWP. You can run all updates with one click and automate the backups. It’s very handy and helpful if you have many WordPress websites which you can manage from one place.
Scan a Website for Security
The next step while taking over an existing WordPress site is checking if your website is secure and that there is no malicious code. You can find free online tools for a security scan, such as Sucuri SiteCheck. Also I’d recommend that you install a security plugin (if you don’t already have one) like WordFence, Sucuri or iThemes.
If your site doesn’t have an SSL certificate, it’s better to install it. Your hosting provider should help you with this. Also check your site for performance: you can use online speed test tools like GTMetrix and Pingdom. And if you need to enhance your site’s performance, you can use a caching plugin such as WP Rocket, WP Fastest Cache, etc. Refer to this article for more detailed information.
Check Premium Features
It’s likely that the previous site owner used premium themes or plugins. Check to see if you’re able to receive automatic updates for those items. You’ll need a purchase code or API key to gain premium access. If possible, contact the previous admin and switch all licenses to your account. If needed, make a purchase under your account and re-register the theme or plugin, and you’ll definitely get premium support and automatic updates.
Delete Unnecessary Items
It’s good if you get rid of the unnecessary things on the site: uninstall the themes and plugins that you don’t use and delete user accounts that you don’t need. It’ll make the site more secure, and because using too many plugins slows down site loading time, your site’s performance will be enhanced. Also, you’ll want to make sure to optimize the database as some plugins may keep their tables in the database even after uninstalling them. The WP Optimize plugin will help you with this.
Wrapping Up
All the steps we’ve mentioned in this article are important to successfully taking over an existing WordPress website. And the responsibility falls on your shoulders – now that you’re the site owner, you’re the only one who can ensure that the site is functioning properly. As we’ve mentioned in the post, don’t forget to regularly update the site after gaining full access – in other words, keep improving it! The more work you put into your site, the better the outcome will be.
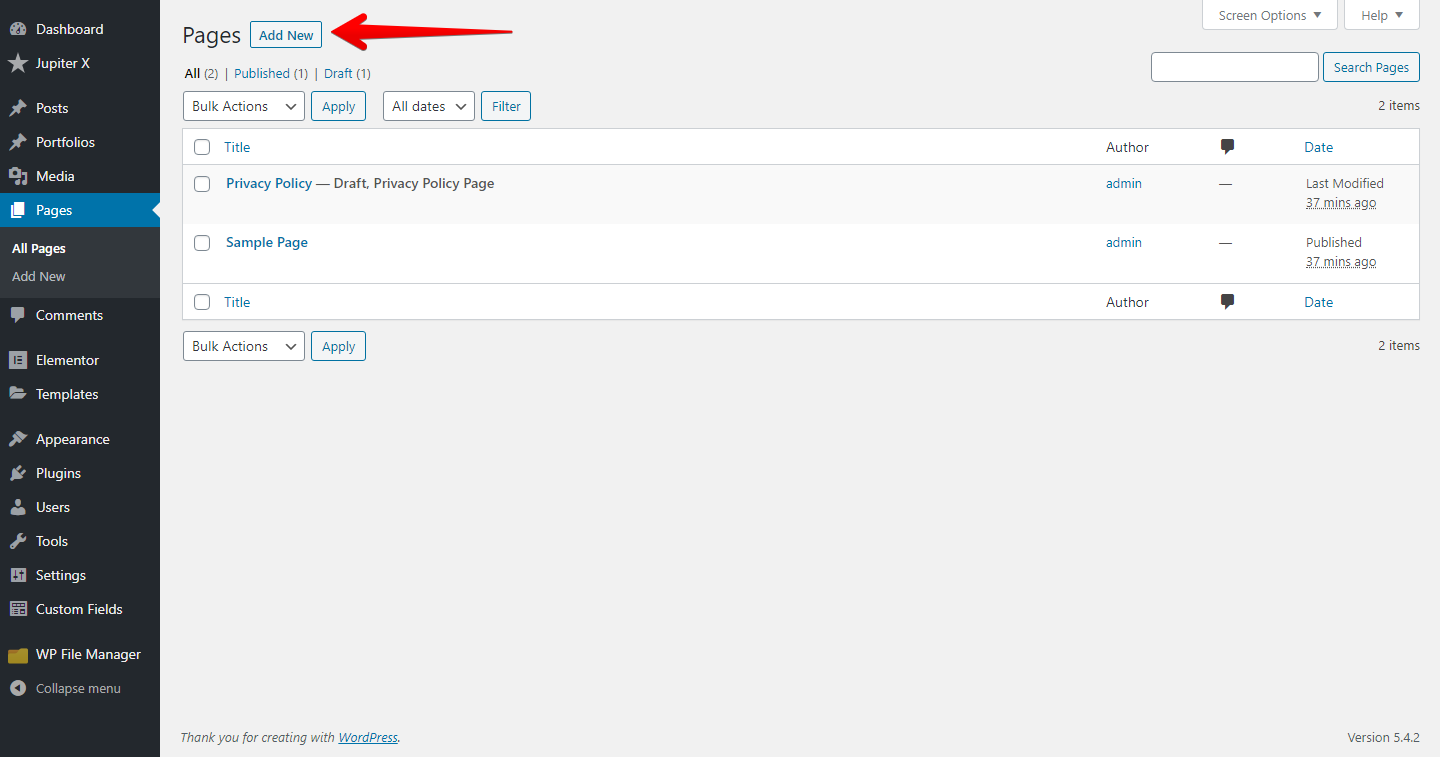
As the world suffers from the Covid-19 pandemic, many have lost the opportunity to follow through with their vacation plans this summer. As a travel enthusiast, I haven’t completely lost out and was able to spend time with family visiting places I had never had the chance to see before via Google Street View and a couple of virtual tour websites. For the first time, the Louvre museum provided a way to virtually visit its exquisite treasure of artwork that I’m sure only few people would have had a chance to see, even if this pandemic had not overwhelmed the world. This article will provide an overview of the fundamentals of virtual tours and will show you how you can create a virtual tour for your own website.
What is a virtual tour?
A virtual tour gives the audience the feeling that he/she is visiting a place – whether it’s a catalog, video, game, audio – or even listening to someone explaining something to you can be classified as a virtual tour. a. However, the most popular meaning of a virtual tour is a combination of panoramic images that are linked together and provide extra information on them, such as a map, tour guides, hotspot tips, videos, music, etc.
A good virtual tour will give you a good sense of the atmosphere of that place. Check out this Forbes article and enjoy visiting the top-15 ranked virtual tours around the globe.
How can I make a virtual tour?
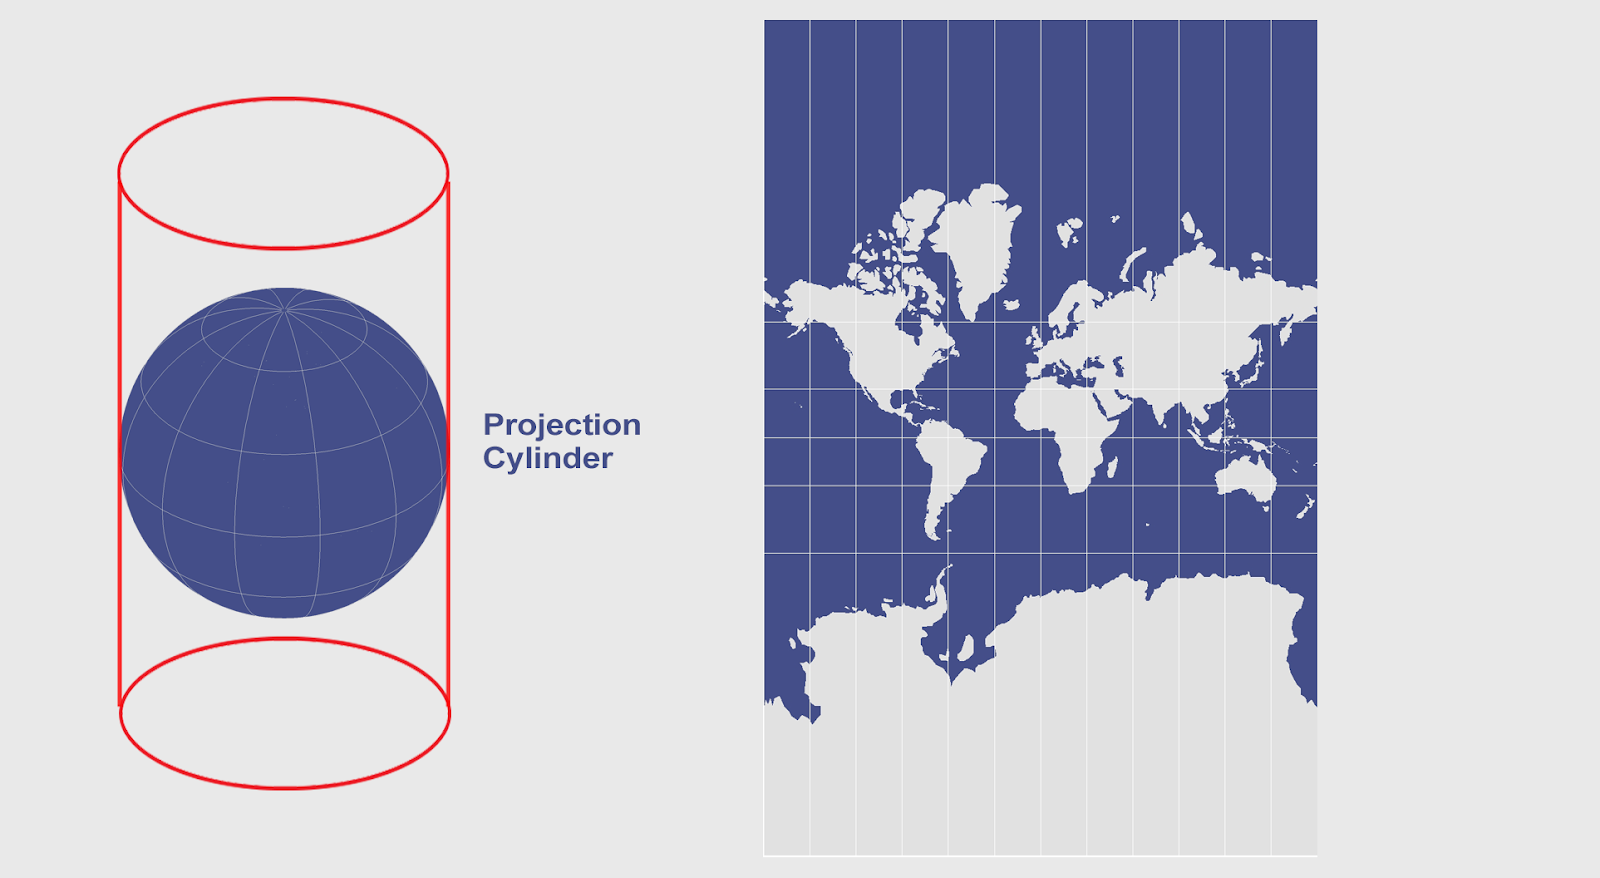
To create a virtual tour on your website, you’ll need a camera, a tripod, an image stitcher and a virtual tour maker software. You’ll also need to take a 360° image by shooting the area around you using the tripod and camera, stitching them all together into one panoramic image and then putting it on a tour maker app. After adding your hotspots (among other things), you’ll need to build the output. In order to make a good panoramic image, you should understand projections. Imagine you want to project a sphere into a rectangle. There are multiple ways of doing that. Cartographers are already familiar with projection concepts, because they have to draw the map of a sphere on a surface.
More information about different projections can be found here.
We’re first going to use an image stitcher to create a panoramic image. There are tons of image stitchers out there. One of the best free image stitchers is “Image Composite Editor” from Microsoft. Since it’s only available for Windows, if you’re using a Mac, you may give some other software a try here.
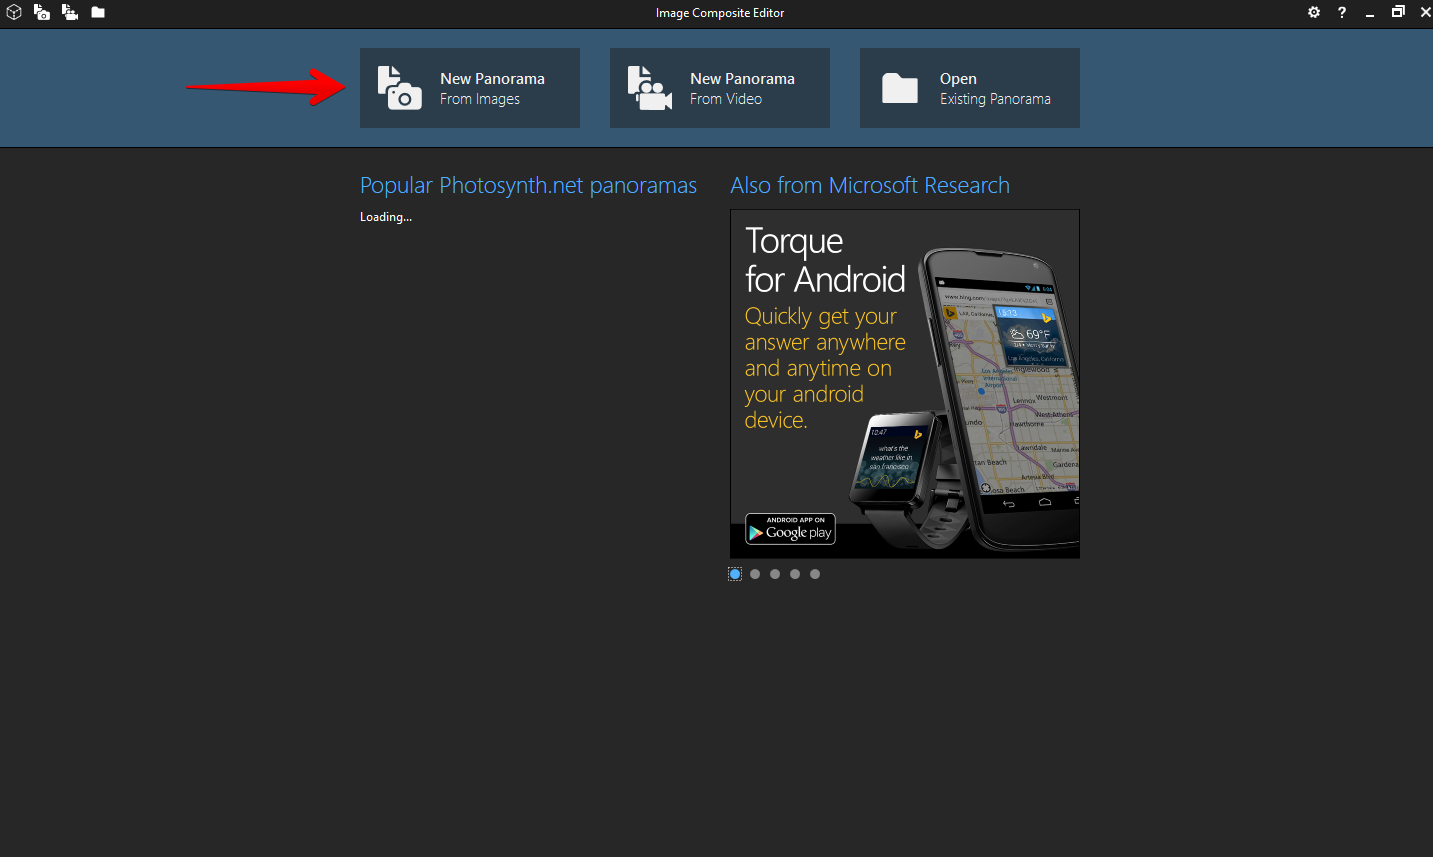
So, we’ll start by installing the Image Composite Editor app from here. After installing, click on New Panorama button on at the top.
Creating a new Panorama using the Microsoft Image Composite Editor
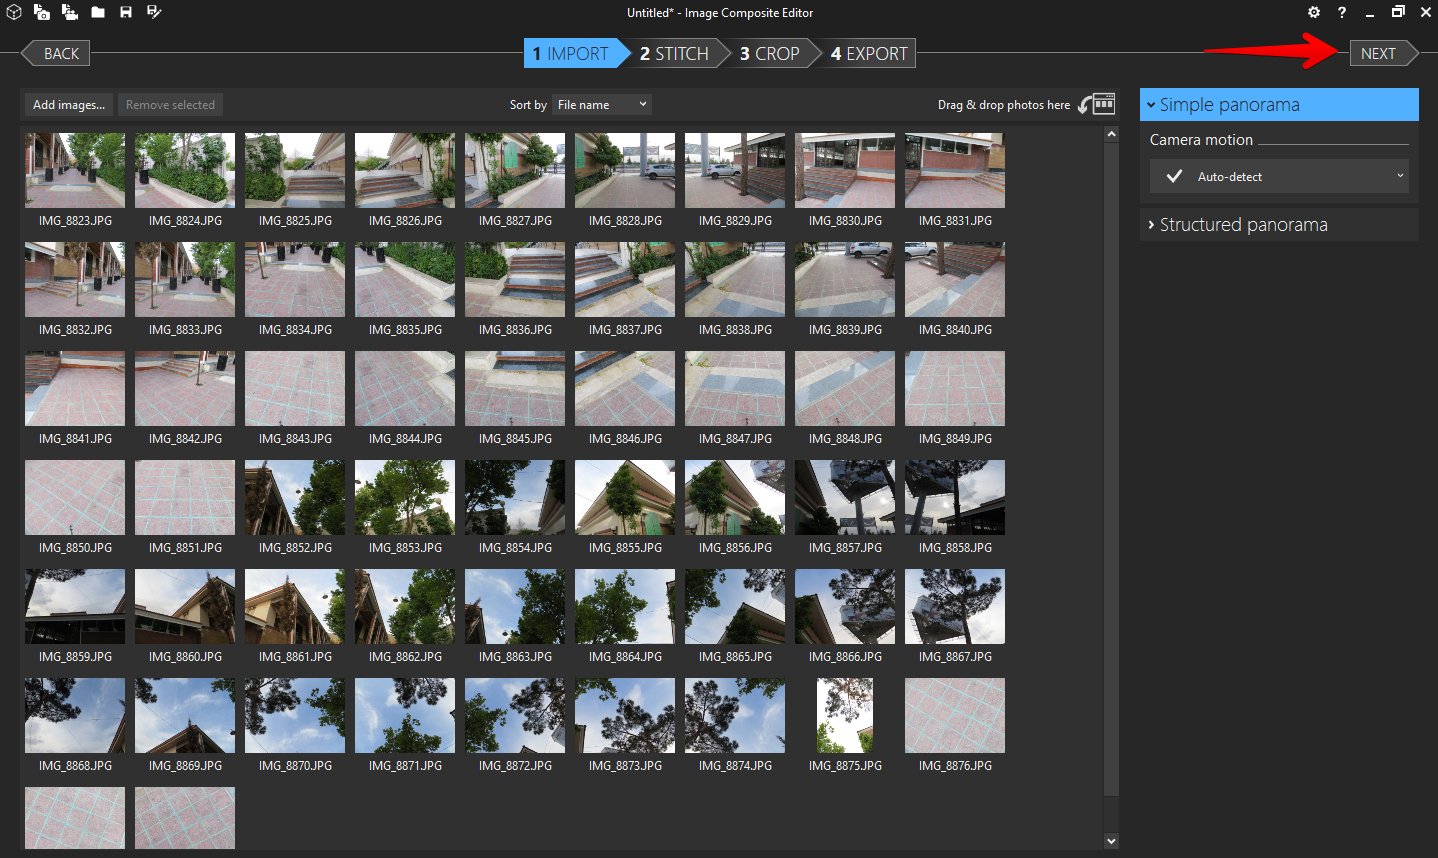
Here, you should select all the images that you shoot on a tripod, which should encompass the entire area around you. Depending on your camera’s wide-angle lens, the number of images might vary. Read this article to find out more about how to shoot a good panorama image.
After selecting all the images, click on the Next button.
Reviewing the images. Better to shoot and import the images in clockwise order.
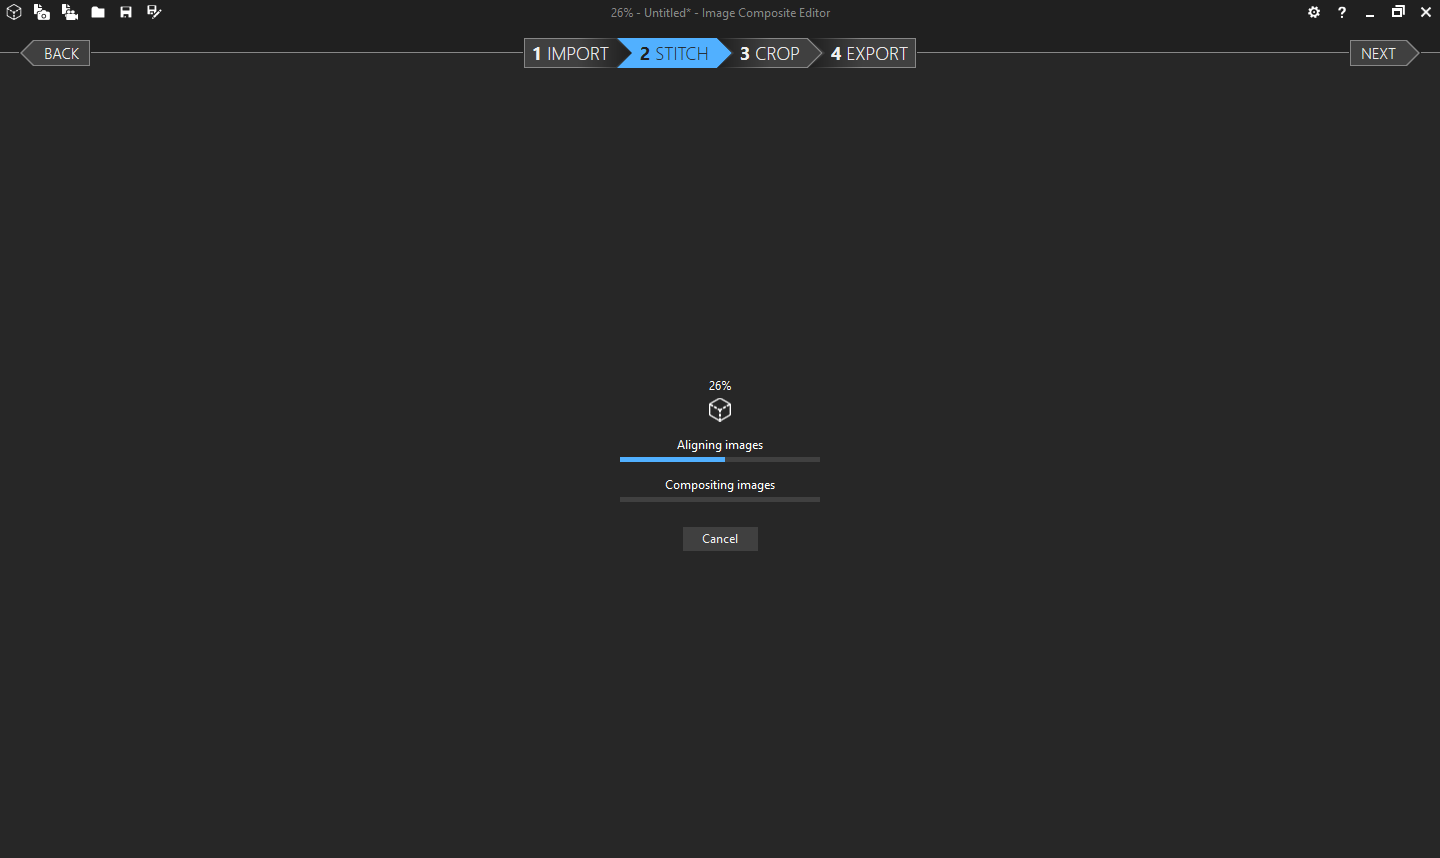
Let the app find the overlaps on each image and stitch them all into one.
Aligning and compositing the images
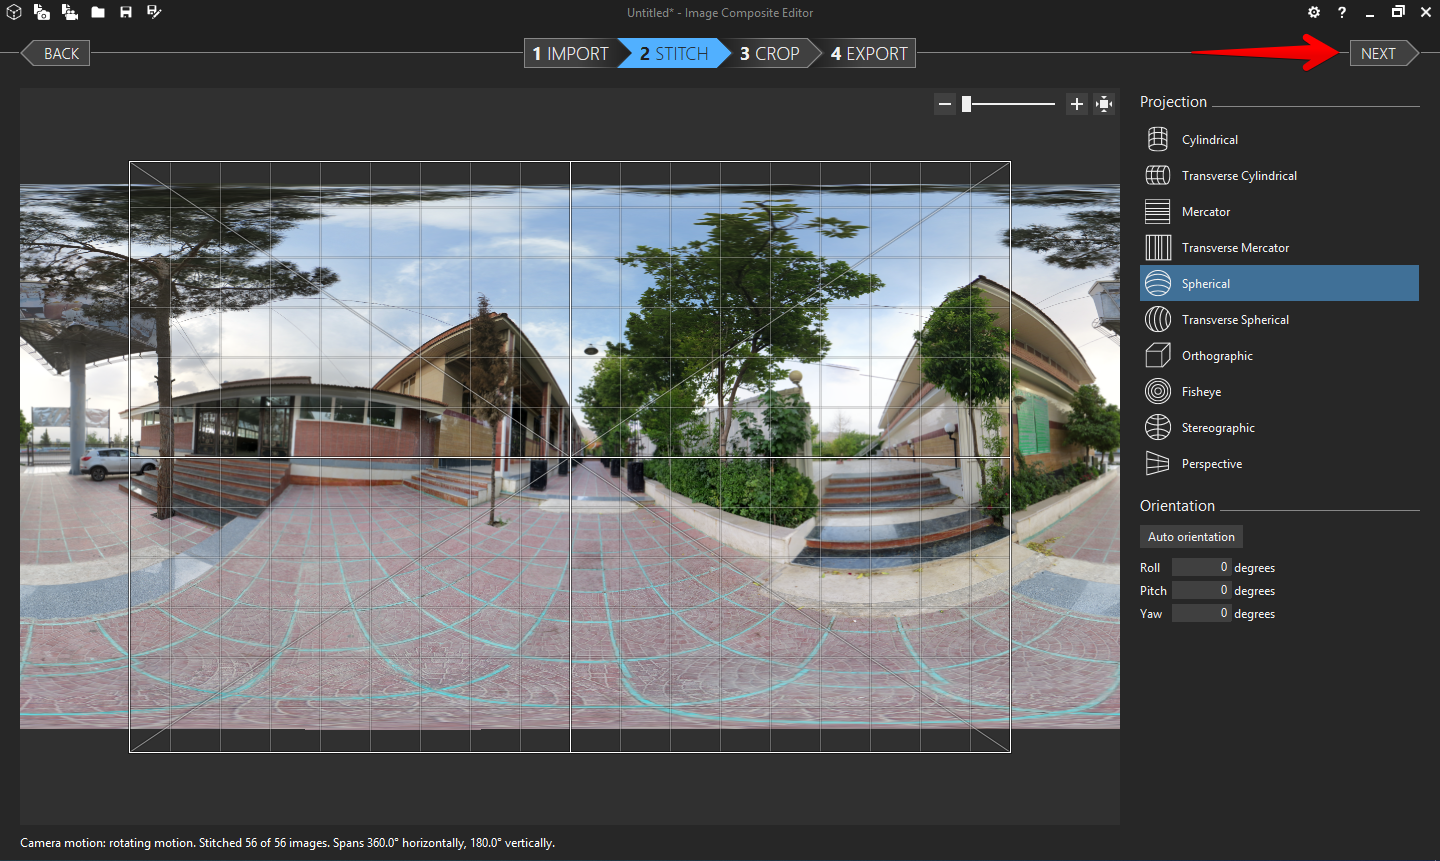
If you’re with the results, click on the Next button. But make sure the image dimension is 360×180 degrees, otherwise you’ll have issues with some virtual tour viewers.
Review the un-rendered image and set the horizon.
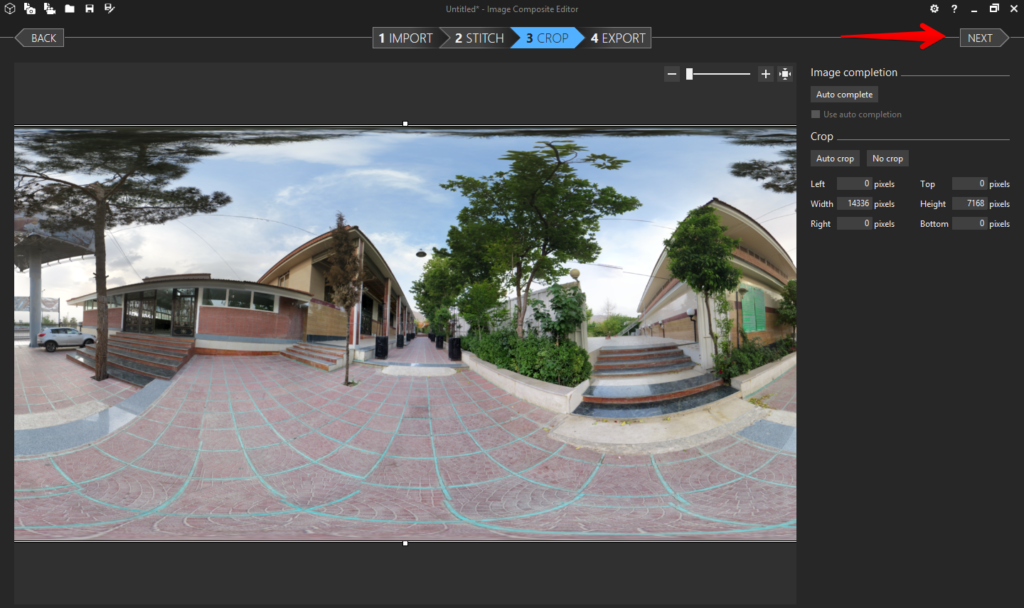
Here, you can resize the merged image and crop it, how you want. If you’re satisfied with it, click on the Next button.
Resize and crop the final panorama image
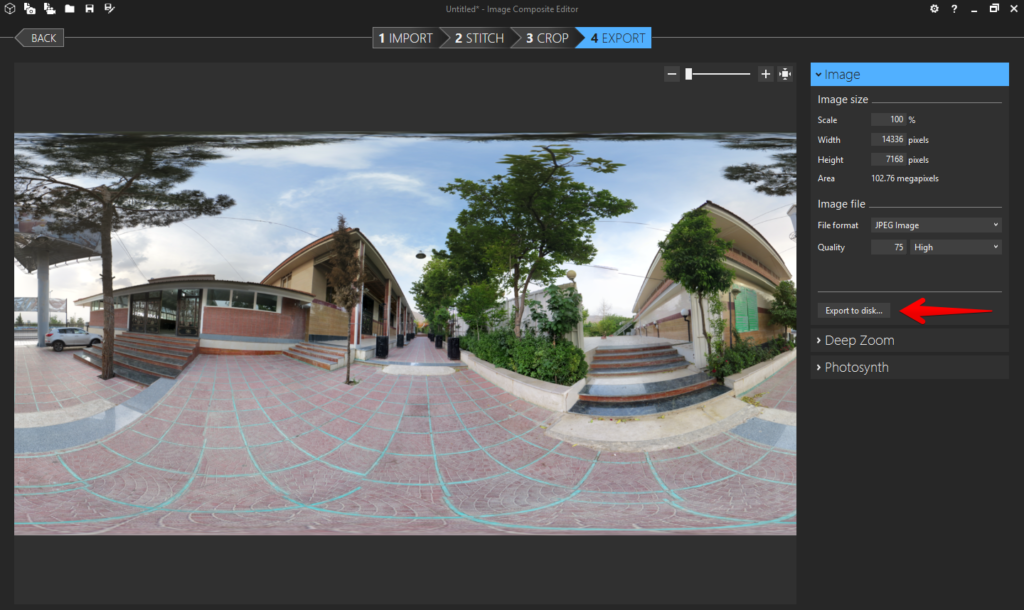
It’s time to export the image to get one panorama file.
Export the result into one panoramic image.
Save the file and build more panoramic images for the place you’re going to create the tour. The more nodes you make, the more details you can cover on your virtual tour.
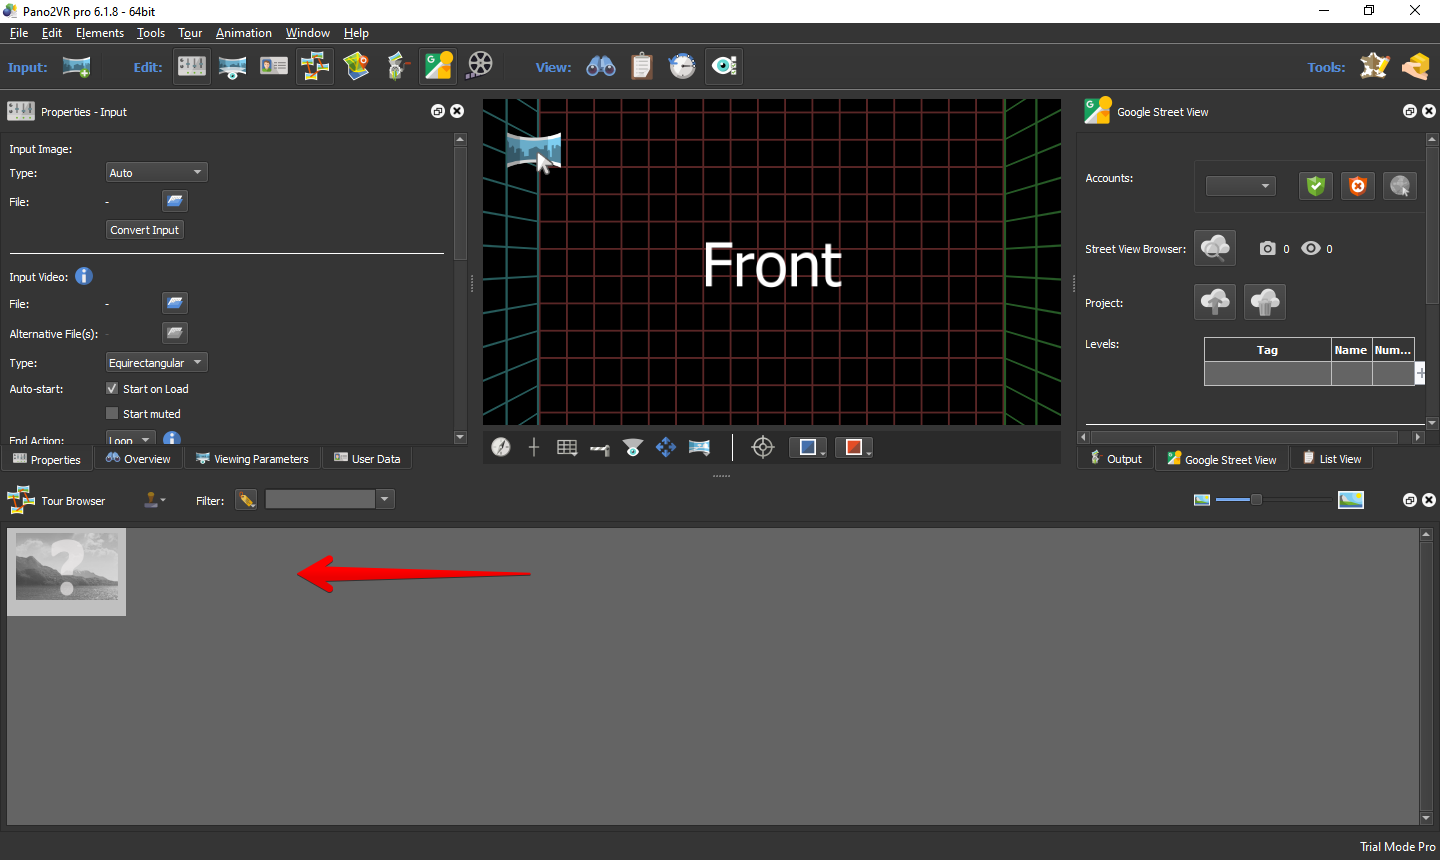
Now it’s time to create the virtual tour using the Pano2VR app. Download and install it from here. After installation, right click on the Tour browser pane and import your panorama images.
Import the panorama images into Garden Gnome Pano2VR app
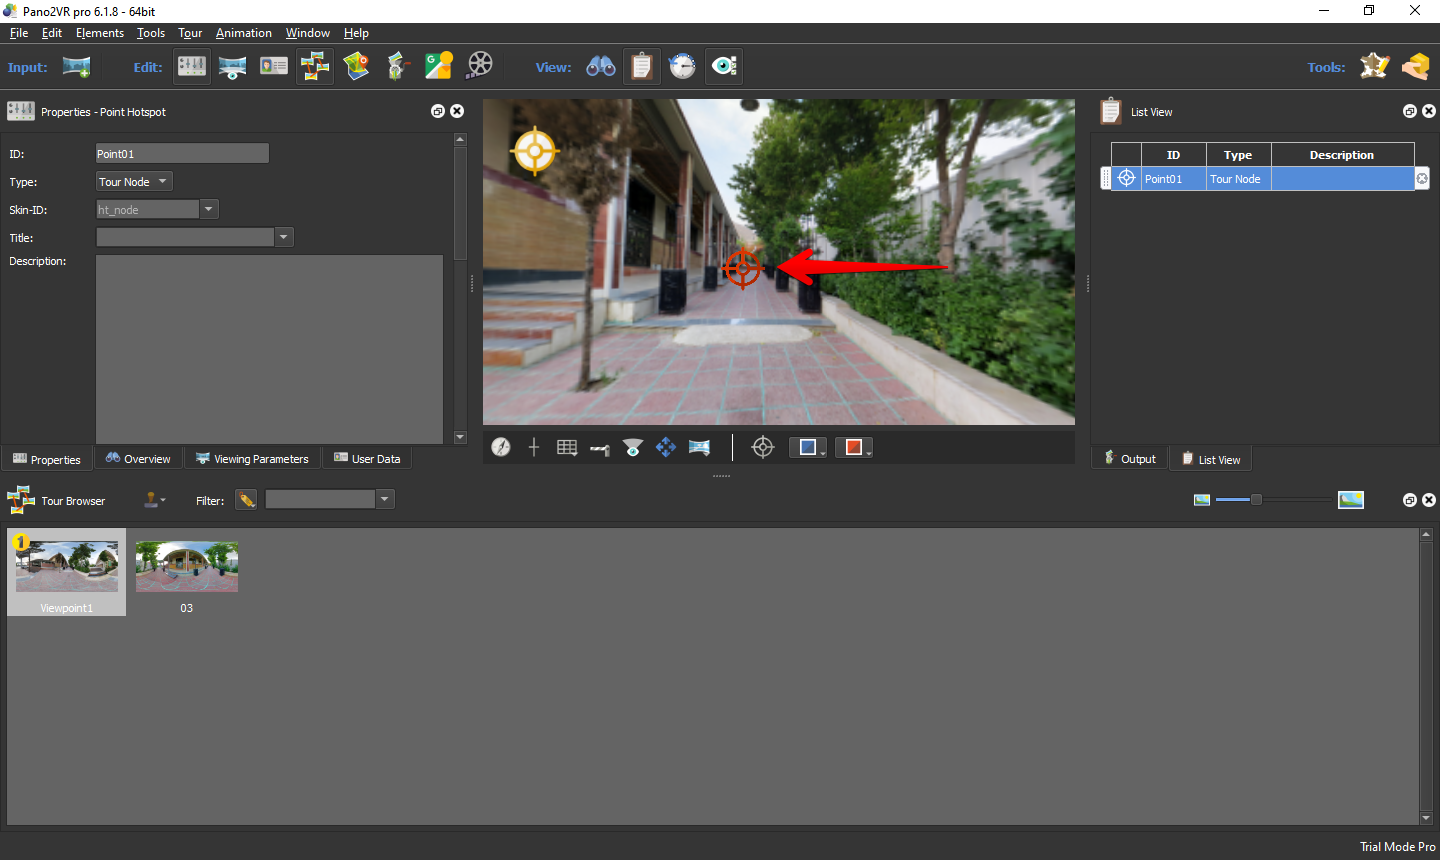
Add the hotspots, effects, skin, map, tour guide and anything else you want here. I added a hotspot to be able to move to the next panorama in my tour. You can find the documentation of this software here. Follow it to make an amazing tour.
Add a hotspot and allow users to move to the next panorama by clicking on that hotspot.
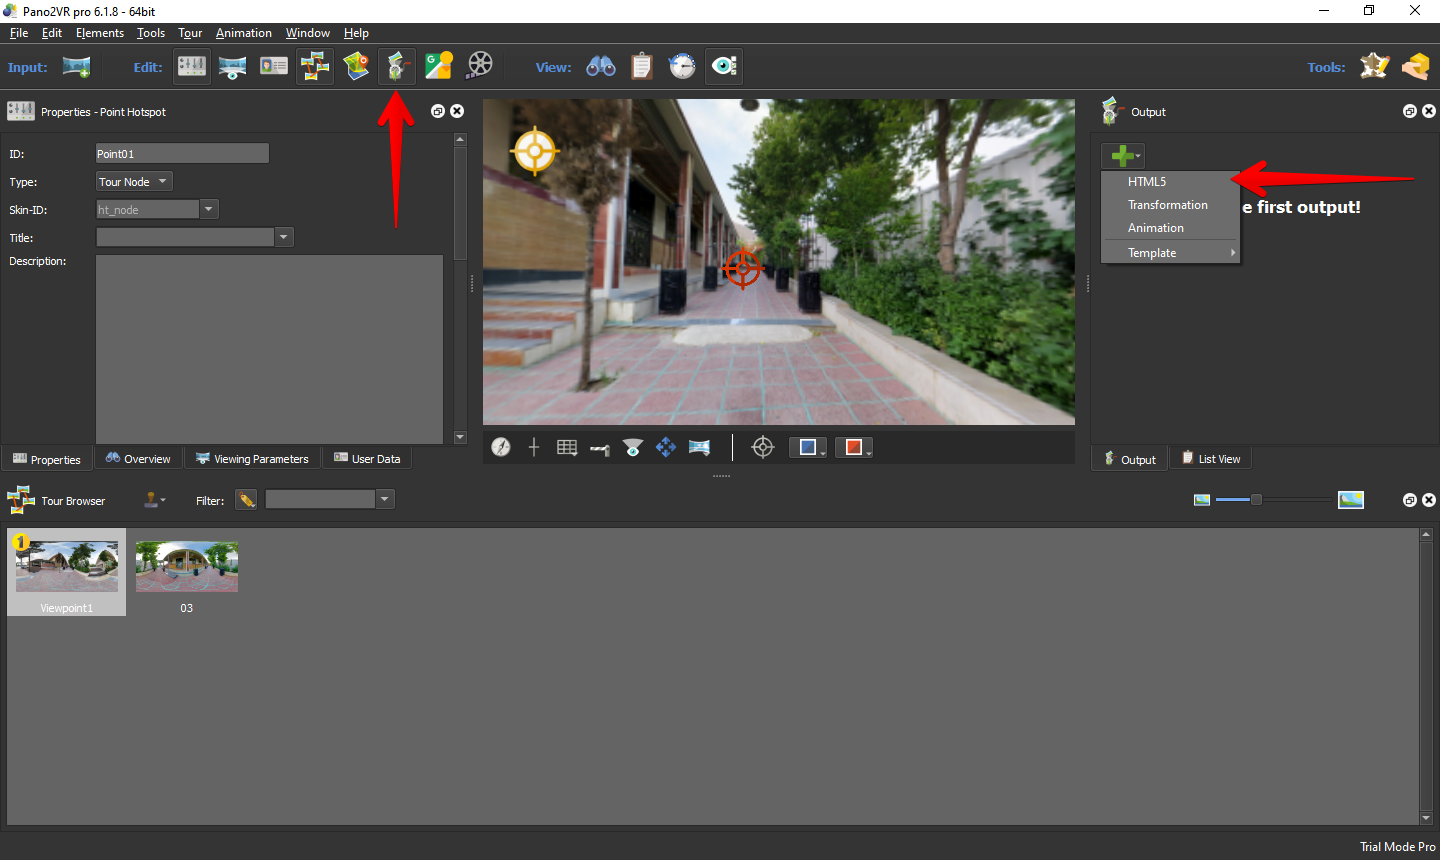
Now, click on the output icon and add the HTML5 output on the right panel.
Add the output type and settings.
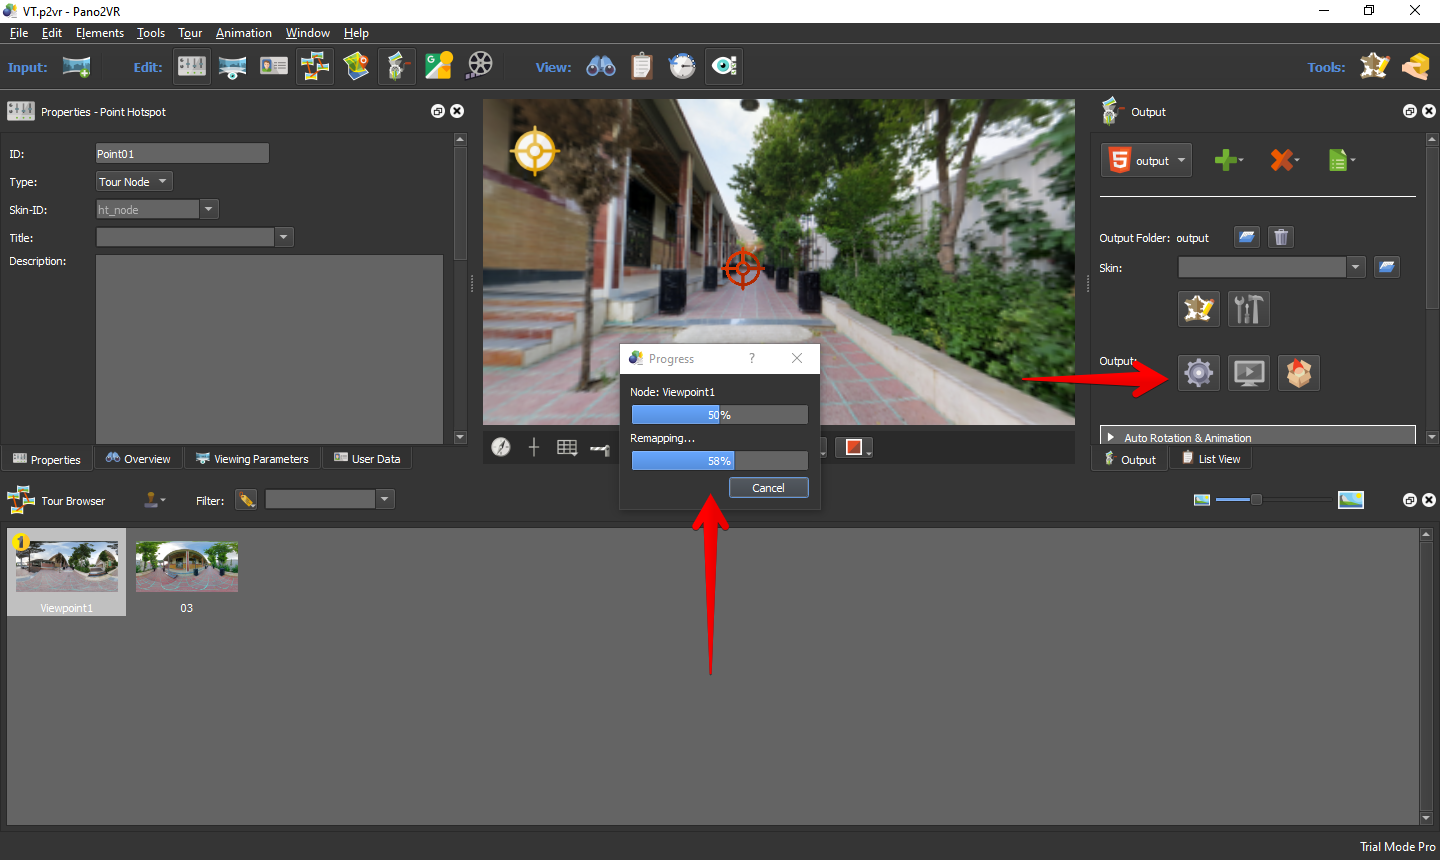
Set the proper output settings, click on the gear icon and wait for it to be finished.
Build the output and wait for it to be finished.
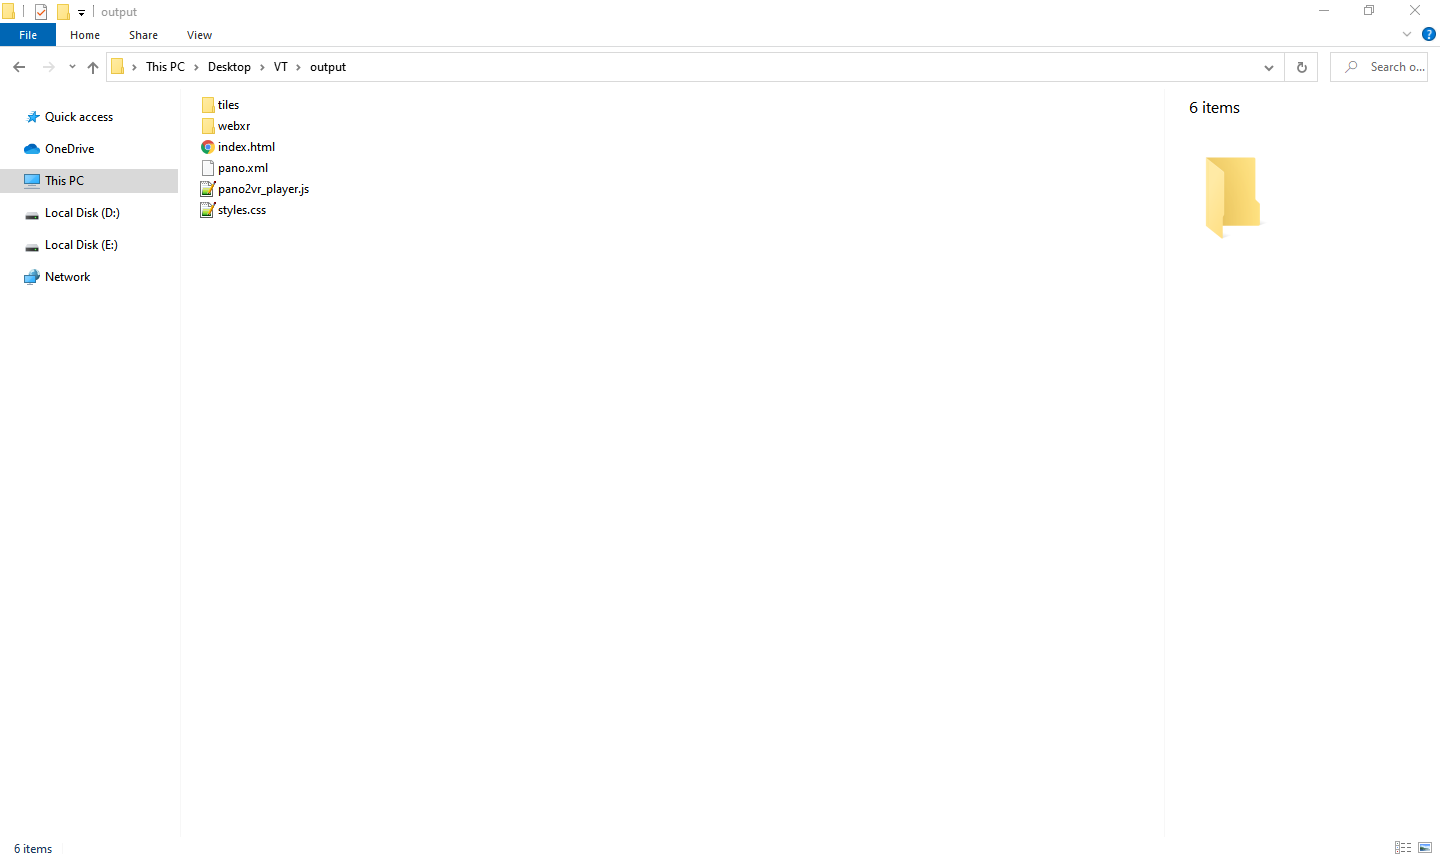
After completing the process, you’ll find the output folder like this. You’ll need all the files and folders here.
Output result. The tour is ready.
In the next step, we’re going to embed this tour onto a WordPress website.
How do I show it on my website?
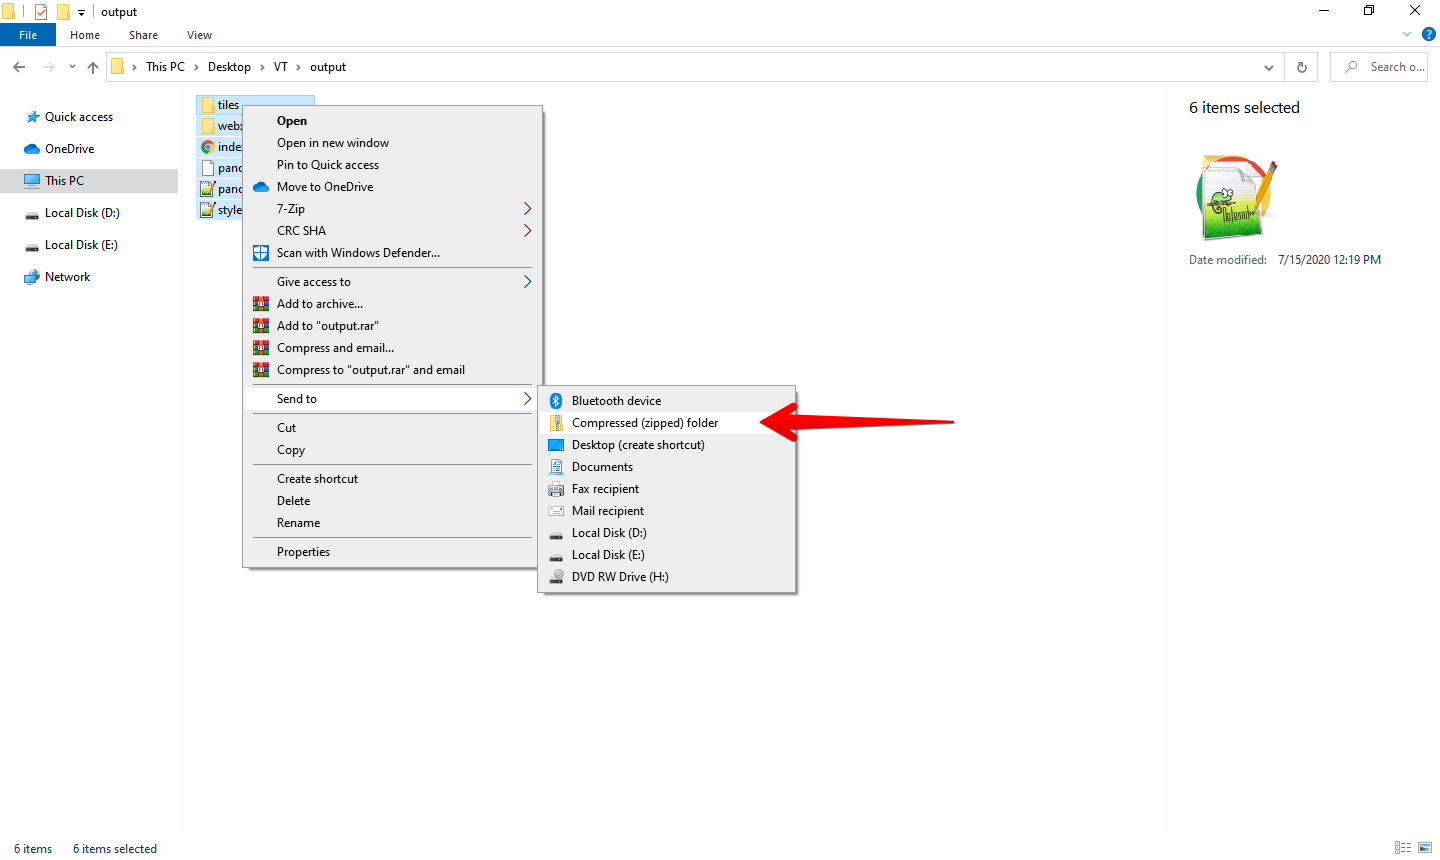
In order to embed the tour onto your website, you’ll need all the files on your output to be uploaded first. Simply make a zip package out of it first.
Make a zip package of all the tour files and folders.
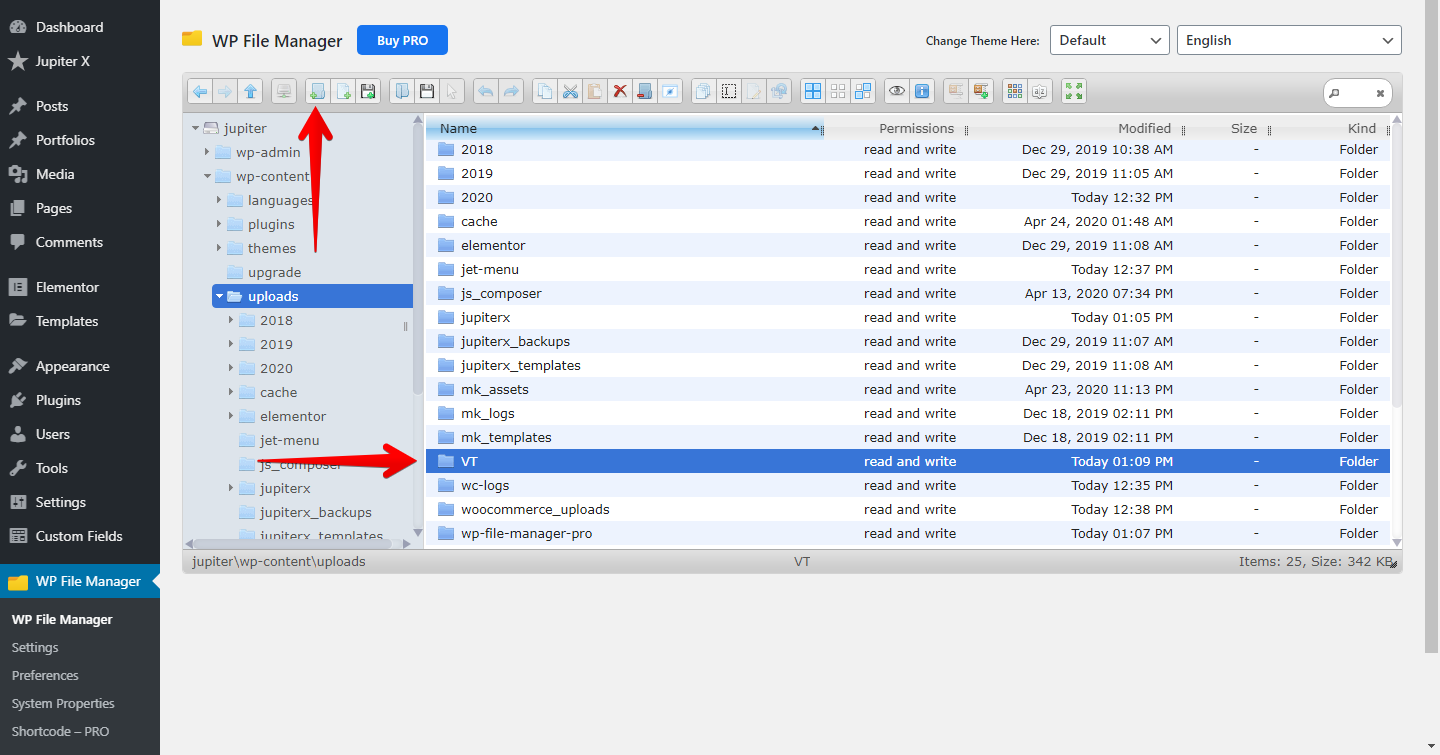
Using a File Manager plugin, create a folder on wp-content/uploads/ named “vt” to better organize your tour.
Create a folder named “vt” in the uploads folder.
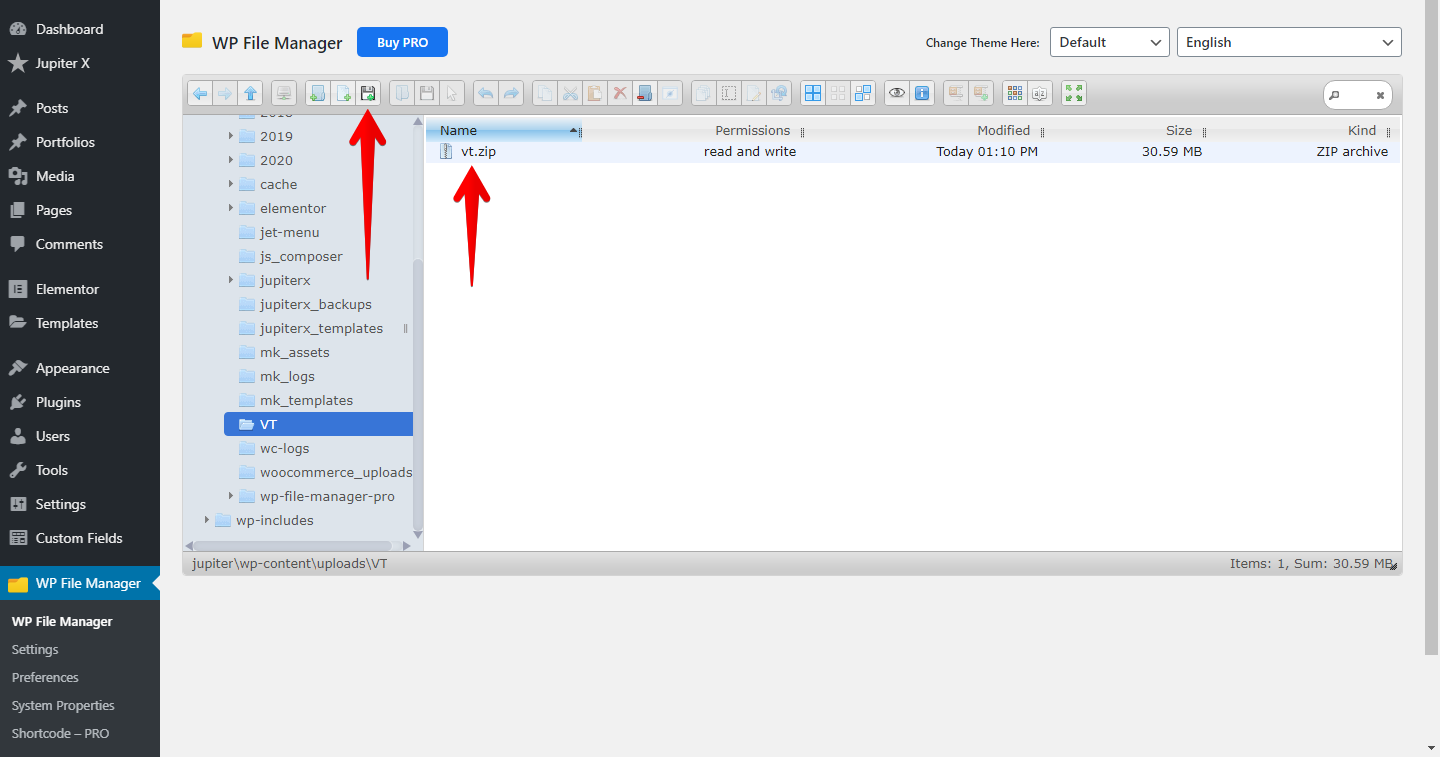
Now upload the zip file into this directory.
Upload the zip file into the vt directory.
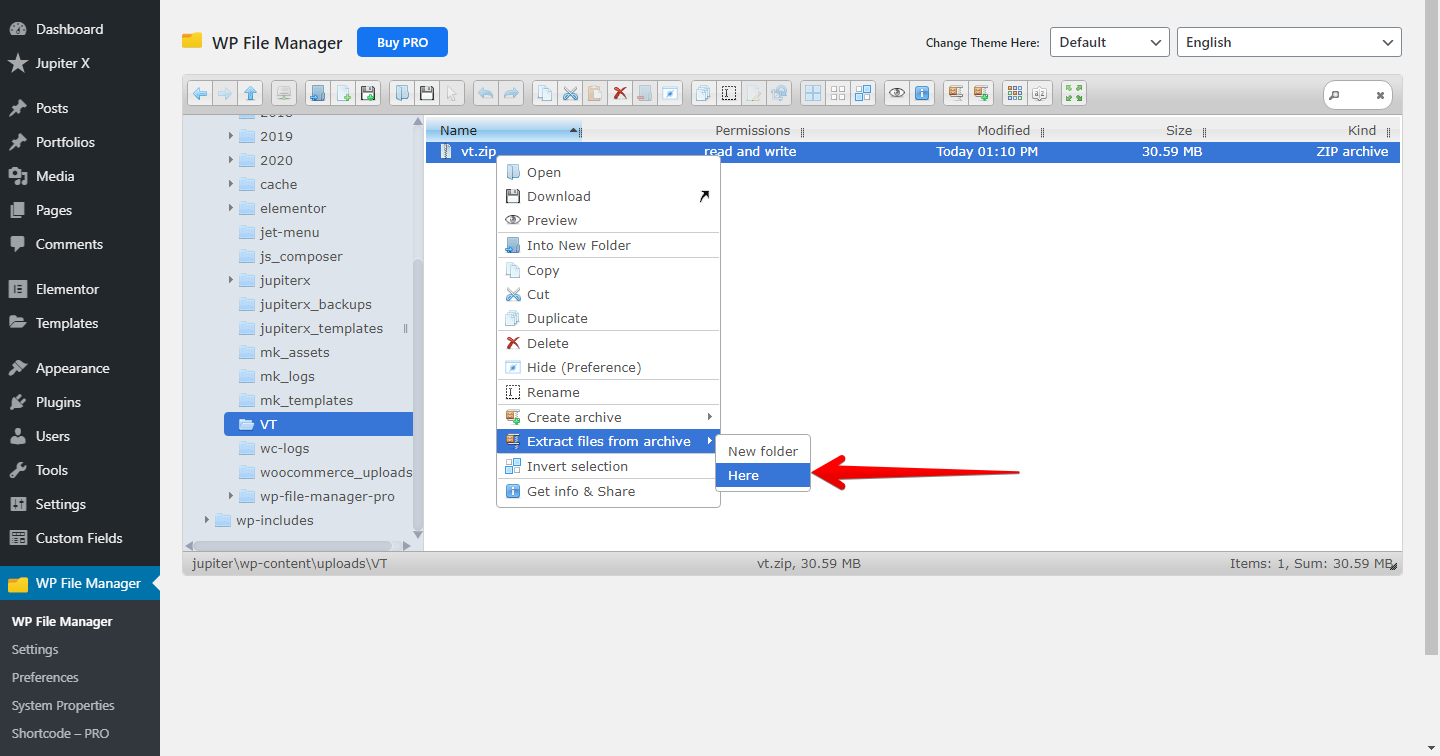
Right click on the zip file and extract it here.
Extract the tour package
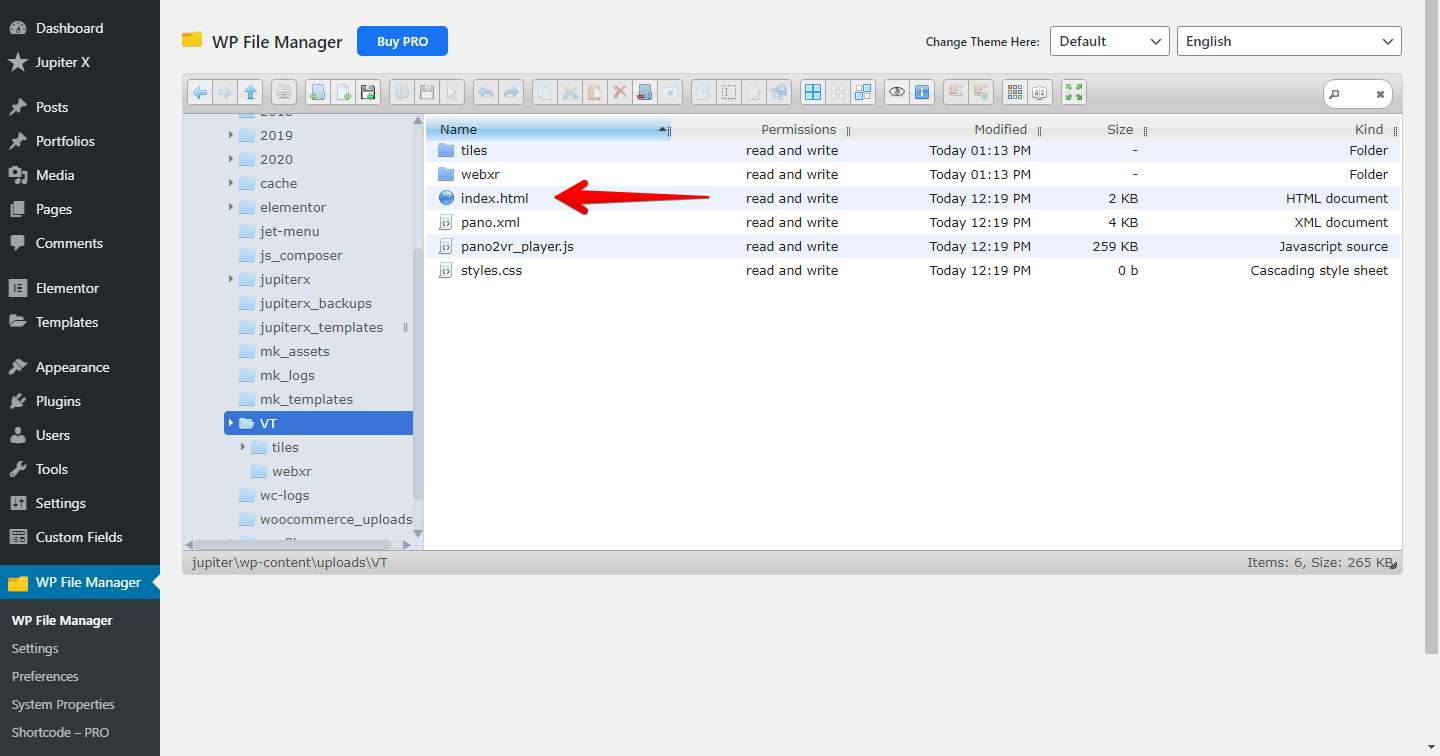
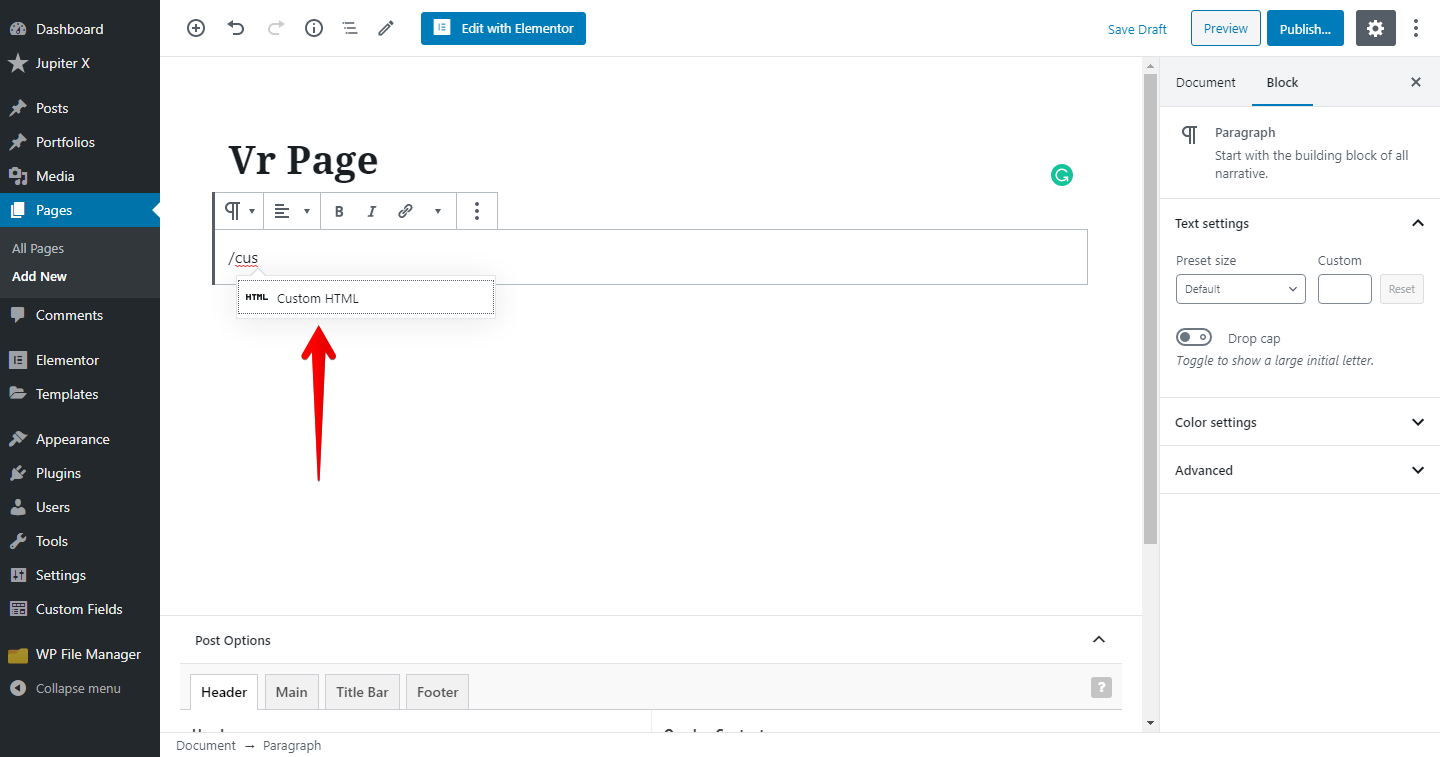
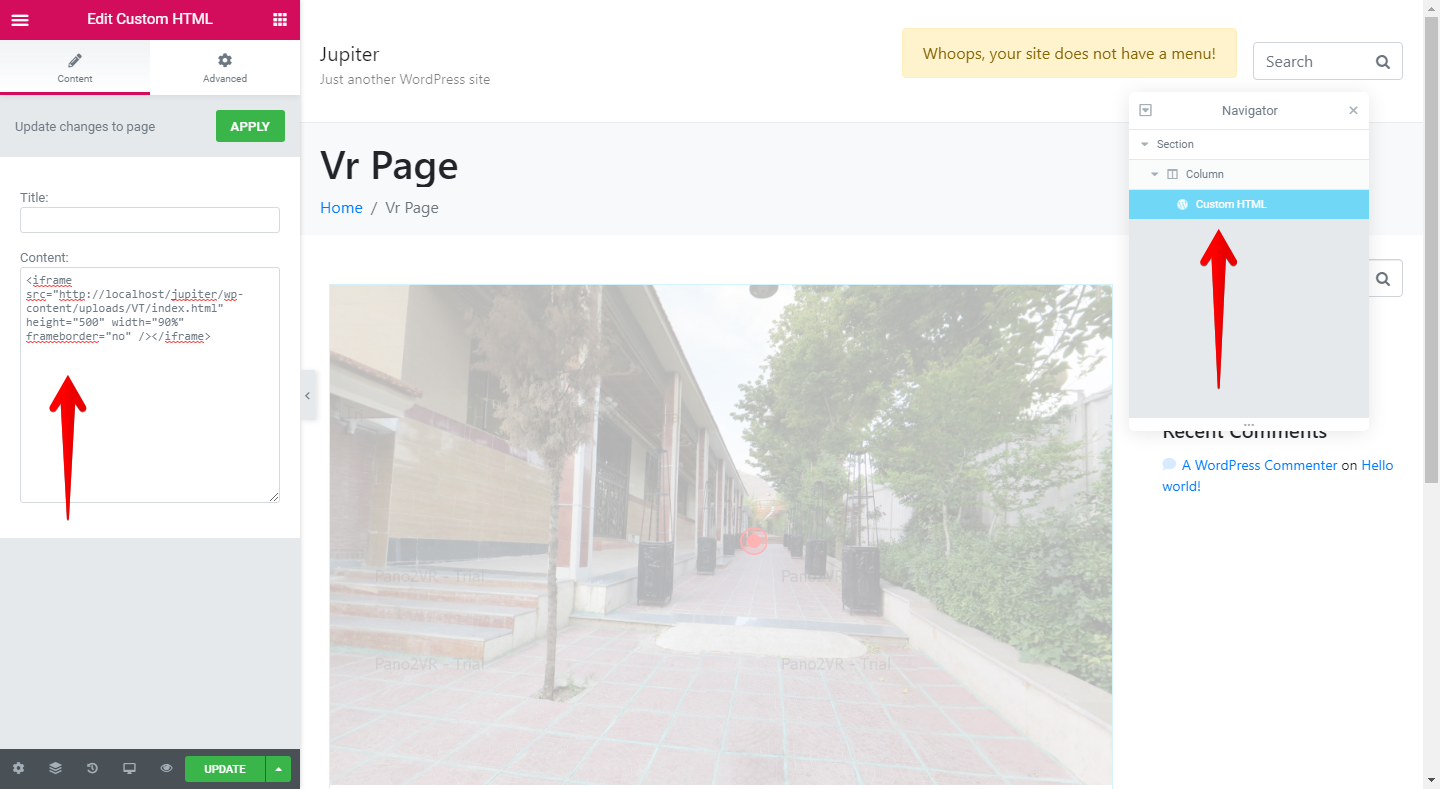
You can remove the zip file. Now, you’ll need to embed the index.html file into your page using an iframe.
The tour index.html file
Since I was using a local machine to make this sample, the URL of the tour file will be like this:
You can use the same method to add the tour in Elementor tour. While editing the page via Elementor, add the Custom HTML widget to your page and put the same code on it.
The results will be like this:
Final Words
Tip: Alternatively you can use tools like WP VR to create virtual tours on a WordPress website.
In this post, we learned how to create and embed a virtual tour onto a WordPress website. However, there are dozens of different methods to go about doing this. But the method mentioned above means that you won’t be restricted or limited in building a virtual tour. Although, it’s worth mentioning that other plugins might have fewer steps to take in embedding the panoramas onto a WordPress. However, they have their own limitations and you may need to look for a way to be able to bypass those limits. This method can work on any other website as well, not necessarily a WordPress website.
In today’s digital era with the rapidly increasing number of internet and email users, marketers use email as an essential part of their campaigns to get in touch with new and potential customers. However, not all email marketing campaigns are created equally, with some having more success in grabbing people’s attention than others. In other words, if you don’t send engaging marketing emails, then it’s likely those emails are lost into the void or simply ignored.
In this article, we’ll explain how personalization plays a key role in building a lasting relationship built upon value with your audience and maximizing their engagement using all your marketing material, including email campaigns. We’ll also provide some killer personalization techniques to guarantee higher open and click rates. Let’s dig in!
Marketing is a contest for attention relevancy!
If we want to add to Seth Godin’s famous saying, “marketing is a contest for people’s attention,” then in the 2020 context, we should say that marketing is a contest for relevancy. Because in a world that is overly-saturated with marketing and advertising, only relevant messages will get attention. This applies to all channels through which they interact with your brand: your website, ads, marketing campaigns and so forth.
Each of your customers have certain personal/contextual details and preferences and react differently in your online shop. All these differences will cause them to have different expectations and demand various kinds of content. With relevant content, we are able to show that we acknowledge their differences and tailor our solutions to fit their exact characteristics and attributes.
Why personalization is key in email marketing success
Providing your users with exactly what they want has a deeply positive effect on them and can extend their loyalty and lifetime value. The more personalized the experience, the healthier the relationships between the two parties. That’s why personalization just might be the most important factor to consider in every attempt to improve your audience engagement with your email campaigns.
Personalization in email marketing is executed through two major steps:
Segmentation
Automation
In this article, we’ll use Artbees’ new Growmatik plugin to practice personalization in email marketing. Growmatik is a marketing automation and personalization tool for WordPress that utilizes user attributes, behavior and interests to personalize customer experience across all main touchpoints (website content, email and popup).
How to do segmentation
If we want to address our audience by their different attributes and behavior, we should identify a special segment for each attribute or behavior. And when we send different email(s) to each segment, then we can say that we truly send engaging marketing emails that are personalized.
Segments can be defined based on a variety of attributes – for example contextual, personal or behavioral. It’s your job to find the criteria to consider when making segments for your business. Which groups of users constitute the biggest chunk of your audience? Or which types of users matter more for your business?
The example below shows that metrics/attributes are normally important to consider for a typical business. You can use them directly or use them as a starting point to find the segments that matter the most to you:
Personal
Language
Country
City
Timezone
Contextual
Date
In-site Activity
Sign-up date
Total visits
Last visit date
Average time spent per session
Number of viewed pages
Email Activity
Number of opened email
Number of clicked emails
Number of unopened email
Number of unclicked emails
Shopping activity
Number of purchased items
Number of orders
Total order value
Last purchase date
Has abandoned cart
Number of coupon used
Top purchased item
By using the above metrics, you can form the example segments as seen below:
Metrics to identify important segments in email marketing
As you can guess from the table, you can create segments using one or a combination of these metrics based on your business or campaign goals. Now, you should create these segments on your email marketing platform. Let’s take Growmatik as an example.
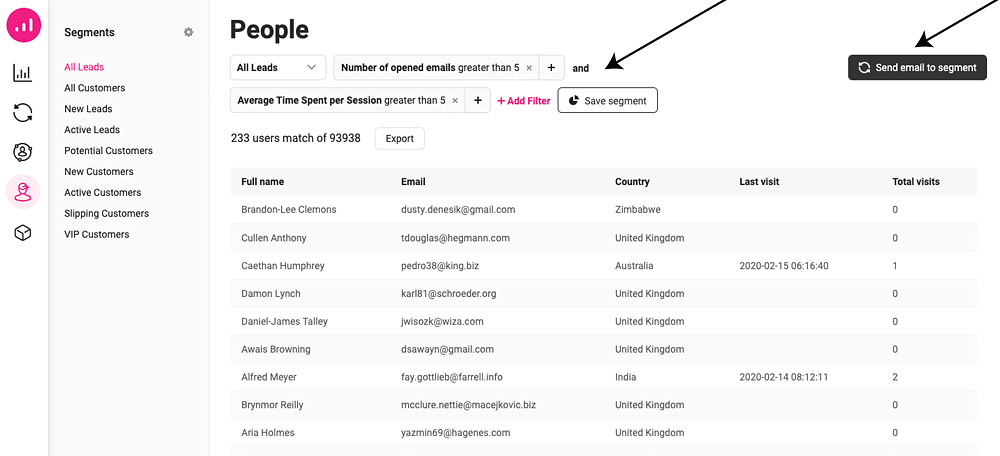
On the left side, the default and custom created segments are listed.
The upper right side of the page displays the filters to create segments.
Select a user type and add filters based on the segment you want to create.
In order to create compound filters, you can group multiple filters and use the and/or logic between them. For example, the filter below means ….
Click on the Save Segment button.
How to create email automations for segments
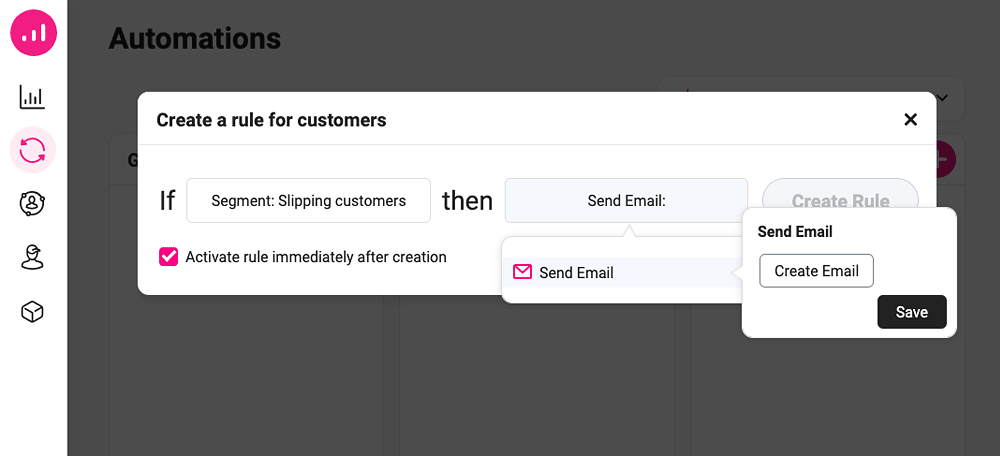
With our segments created, we now need to create automations for each segment. You should first check if your email marketing solution provides an automation feature for different segments. Different solutions have their own way of defining automations for different segments, but an ideal automation tool allows you to define one condition and one action for your automation. Once the condition is triggered, the action gets fired. Within Growmatik, you can define automation within the “IF this THEN that” structure. Let’s create one.
Once you create your segment in the last step, click on the Automate Segment button next to your filters.
The Automation page shows up, and your selected segment is set as the condition.
Now set an action for your automation, which in our case, is Send Email.
Effective Email Personalization recipes
Smart nurturing email for leads
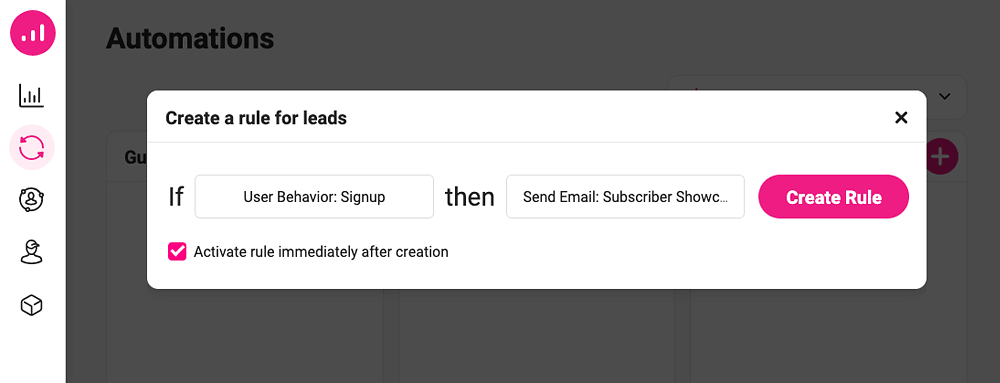
If you’re running a blog, you can send nurturing emails for your leads as part of an overall plan to send engaging marketing emails. This includes welcoming them as a subscriber to your blog as well as routine feed about your new posts, e-books, freebies or anything that they might be interested in.
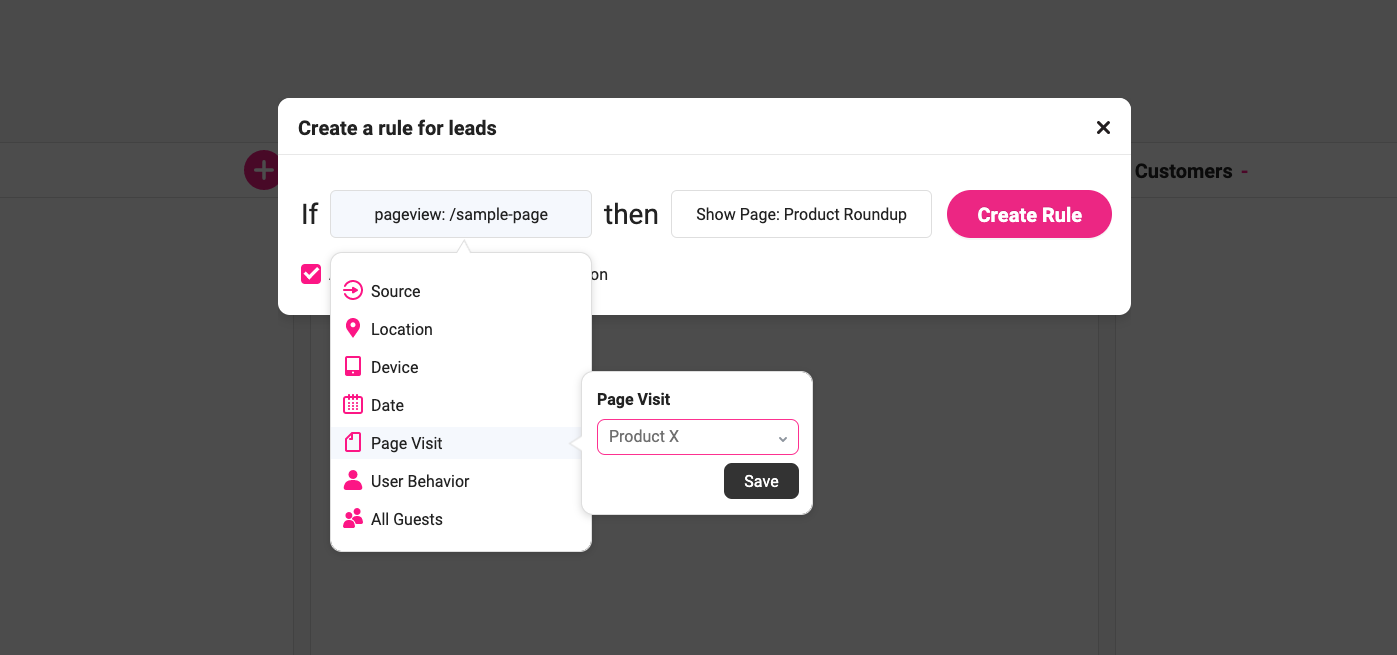
In Growmatik, go to the automate section, and create new automation by clicking on the plus button in the leads column. Then set the condition to choose User behavior > Sign up or All Leads and set the action as Send Email. Once the email builder is open, start creating the content based on your goal. Make sure to use Dynamic tags > First Name to make your email look more personalized and intimate. Find the blog elements in the Growmatik email builder toolbox. You can set it to show Recent, Related or Popular blogs. If you want to notify them about your blog posts, you can set it to Recent. If you want to show the most popular posts, set it to Popular, and if you want to show everyone only the post they are interested in – which I would recommend – you can set it to Related.
Smart upselling/cross-selling email for customers
Your audience is fond of new things as long as it’s related to what they want and the value they seek. It’s a good idea to target your existing customers with similar items related to what they have bought. This can happen right when they checkout their order by suggesting upselling, downselling and cross-selling items or via email after they purchase an item. This is an effective way to increase the lifetime value of a customer.
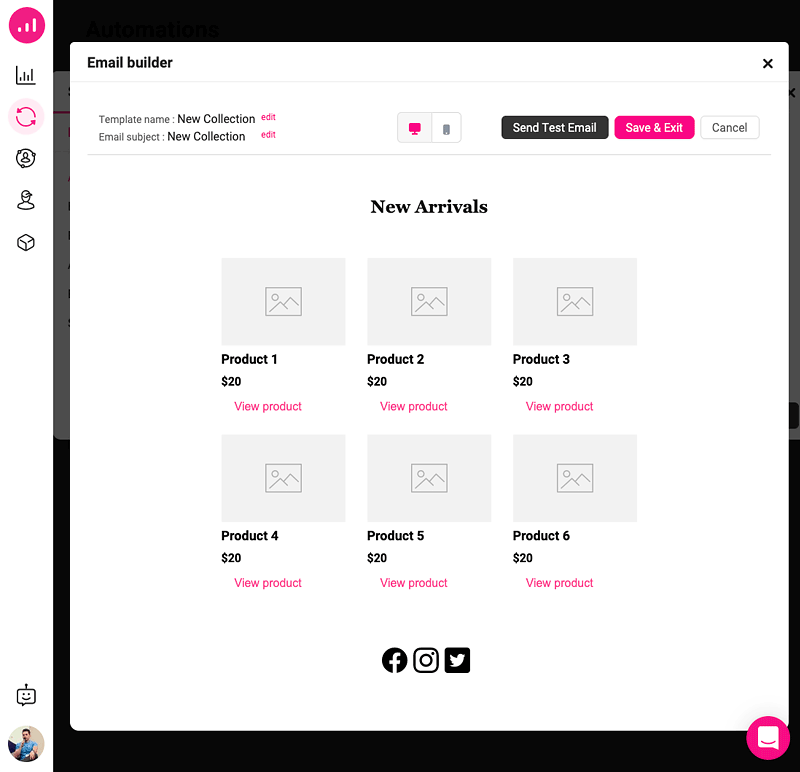
In Growmatik, you can simply create upselling/cross-selling emails by creating an automation with a condition in the Customer column User behavior > Purchased, then define a product for the condition and then define sending an email as the action. Once the Growmatik email builder asks you to create a template for your email, you can include the cross-selling product that you want offered manually yourself or set Growmatik to automatically include the related product based on the user’s past purchase history.
Follow up with cart abandoner email
One excellent way to increase sales is through sending out abandoned cart reminder emails. But you can take it one step further with more personalization. In Growmatik, head over to the automate section, create a new automation by clicking on the plus button and then set the condition as User behavior > Abandoned cart.
After doing this, then you can set the action to Send Email. After the email builder is opened, you can let your imagination run wild to style it. Remember to include the customer’s name using the Dynamic Tags options.
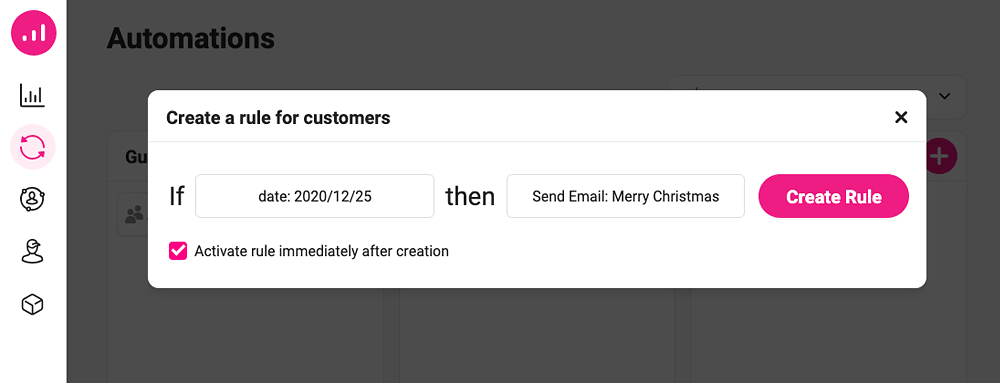
Occasion-based emails
Let’s say that you want to send out an email on a specific calendar day. You’d send out an occasional email. For instance, this could mean sending out a promotional email for Black Friday or even a simple Happy Birthday email. Sending out these types of emails that are extremely relevant to a certain time of year and the holidays is an excellent way to cement your relationship with your subscribers or to drive direct conversions.
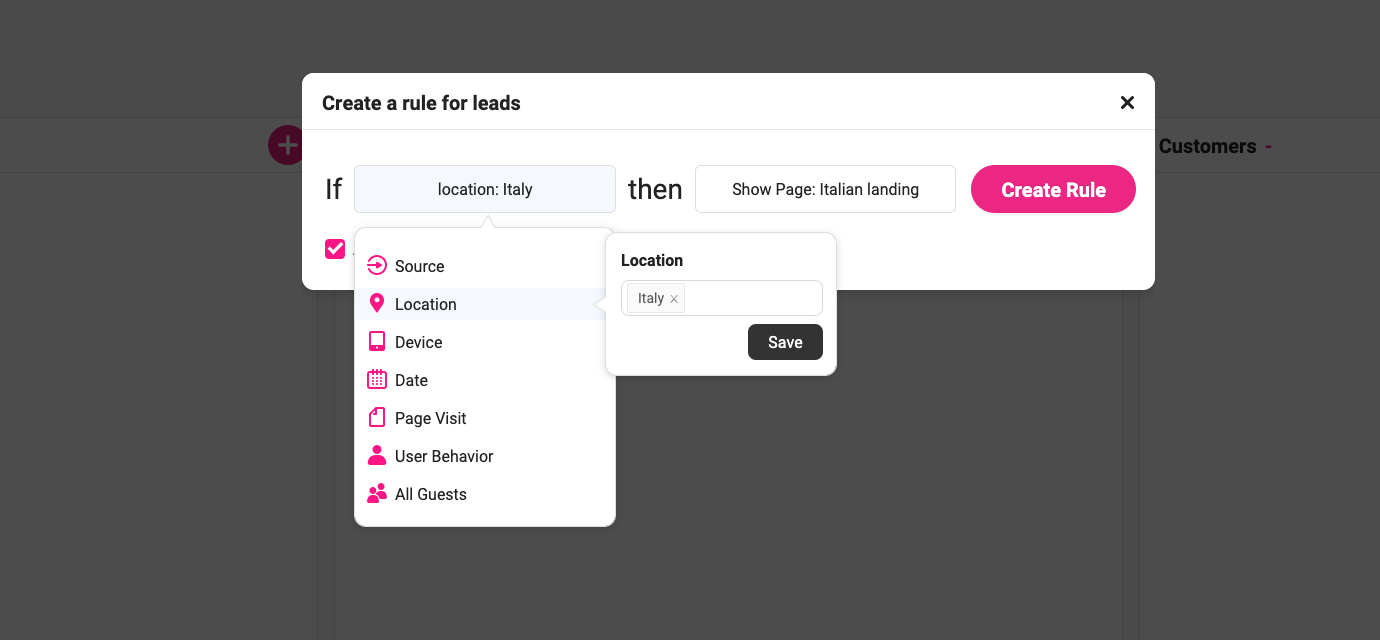
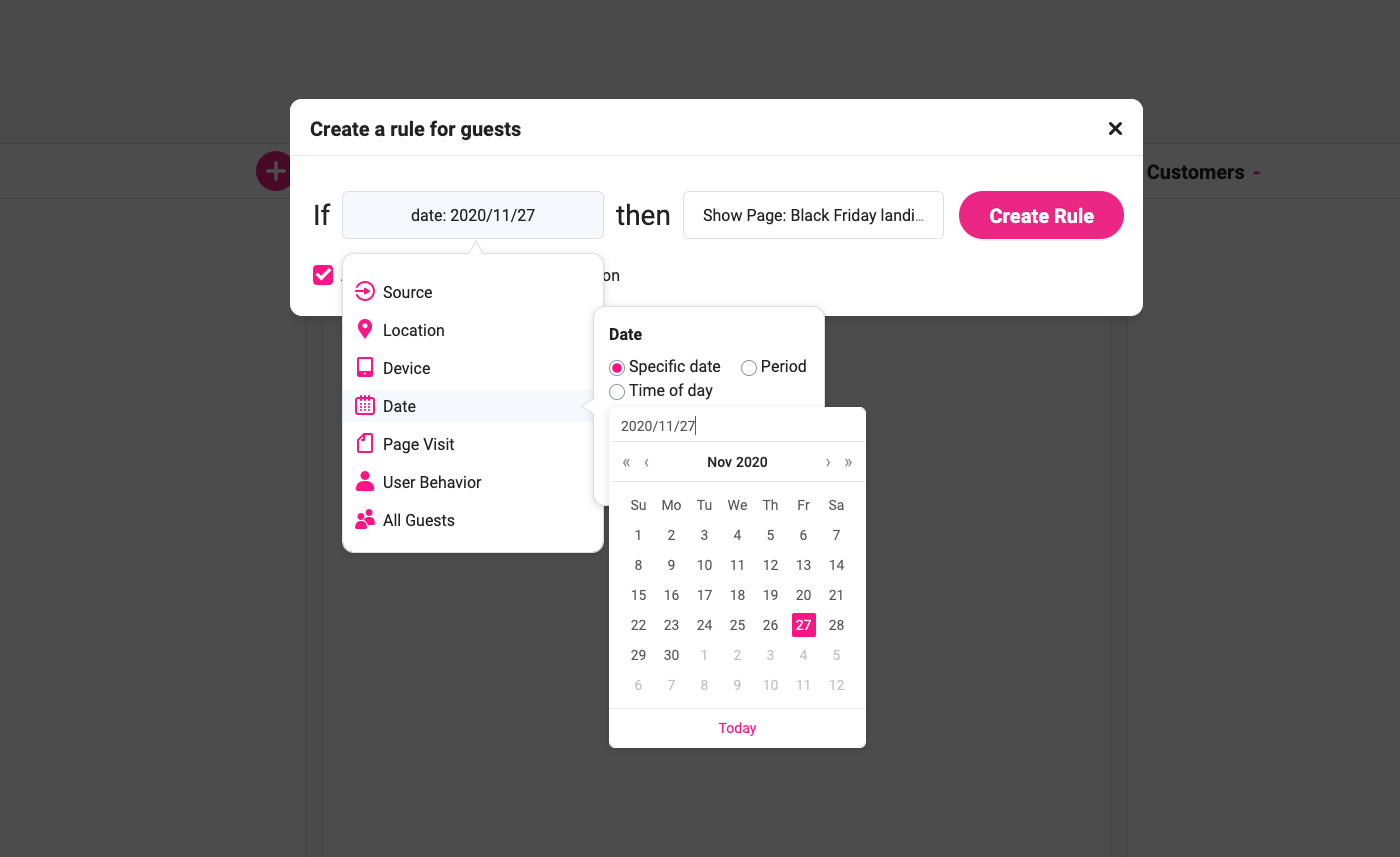
And in Growmatik, you have the opportunity to create completely automated occasional emails. And here’s how you can do it: go to the Automate page and click on the plus icon to create a new rule. As the condition, choose Date > Specific date. You can select a date and save it. For the action, choose Send email and personalize the content of the email in the email builder. For this part, remember to add customizations to the email using Dynamic tags.
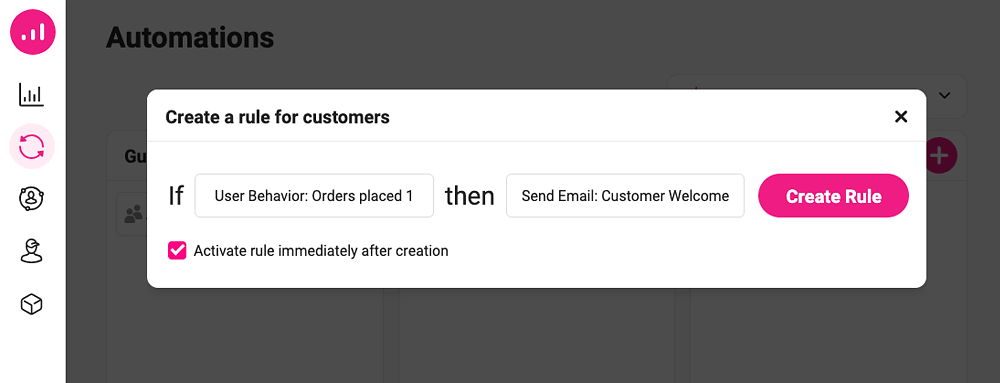
Welcome your new customers
Another great way to strengthen the relationship between you and your customers is by welcoming them onboard. This is an important part of sending engaging marketing emails as it allows you to send them content that is highly relevant for them at the right time when they are mentally ready. When it comes to welcome emails, the content of the emails depends entirely on your customers and the type of your business. This might be a simple greeting complete with useful links to your site or it could be a step-by-step onboarding tutorial.
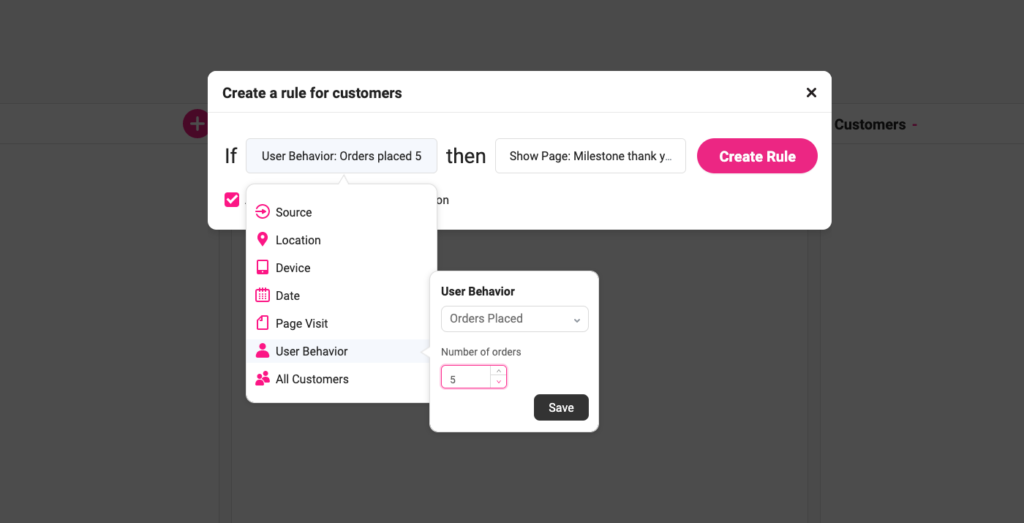
In Growmatik, head to the Automate page, click on the plus icon and then create a new rule. . For the condition, choose User behavior > Orders placed and define the number of orders to 1. This will allow you to target customers who have placed only one order on your site. Save it and set Send email as the action. Once the email builder is open, you can begin creating the content, which will depend entirely on your goal. Make sure to use Dynamic tags > First Name so that your email appears more personalized and intimate.
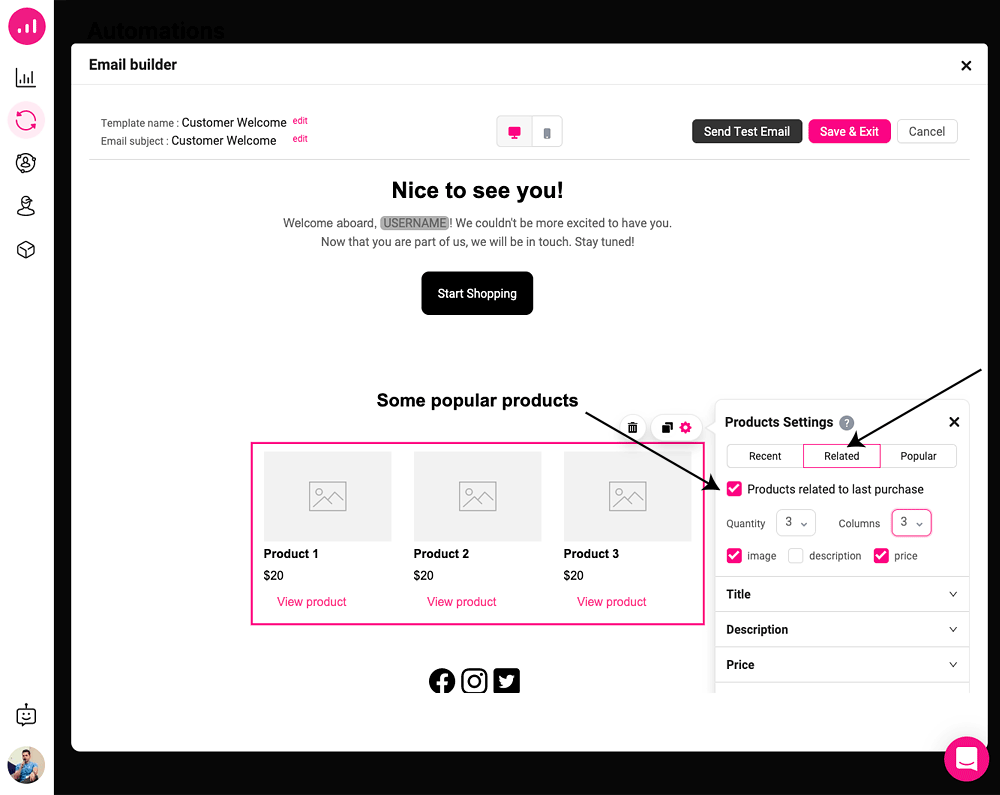
If you sell more than one product, then you can take personalization to the next level and introduce the products that are related to a recent purchase that your customer made. To do this, use the products element. Then, you’ll want to click on the gear icon to open the option panel. Choose the Related option. You’ll then want to checkmark the Products related to the last purchase option. If you want to display the products that are related, then you can increase the number of products.
Appreciate loyal customers
There’s no doubt that sending engaging marketing emails will help keep people in the loop. And there are several ways of doing this. In order to appeal to your audience and cement your relationship with them – you can acknowledge and show appreciation for their presence, which will then act as motivation for them. You can also convey to your audience how much you value their time and generosity through expressing gratitude.
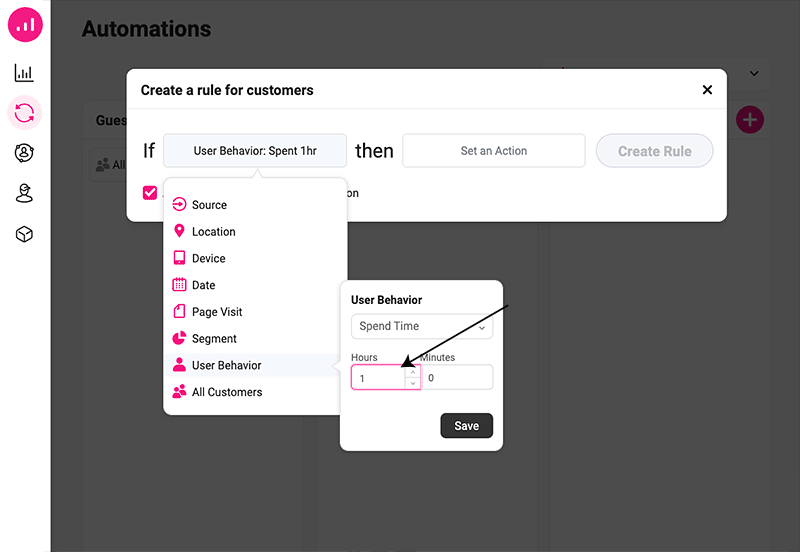
To find high-value users, Growmatik offers quick conditions such as User behavior > Orders placed and Total Spent time in the automation dashboard as well as custom segments based on any combination of the criteria we explained earlier. After setting the segment as the condition, then set Send email as an action and start crafting the content of your email.
To extend your gratitude even further, you can even offer your audience a discount. You can easily accomplish this in Growmatik by using the Coupon element. After putting the Coupon element in the email’s body, select it and change the discount options by clicking on the gear icon at the top.
Follow Up with away users
In Growmatik, you can go to the Automate page and click on the plus icon to create a new rule in the leads or customer columns. Use one of the predefined segments such as User behavior > Away and set a time period of inactiveness or create a more advanced segment in the People section using a combination of the metrics we explained in the table. For the action, choose Send email and then create the content of your follow-up email.
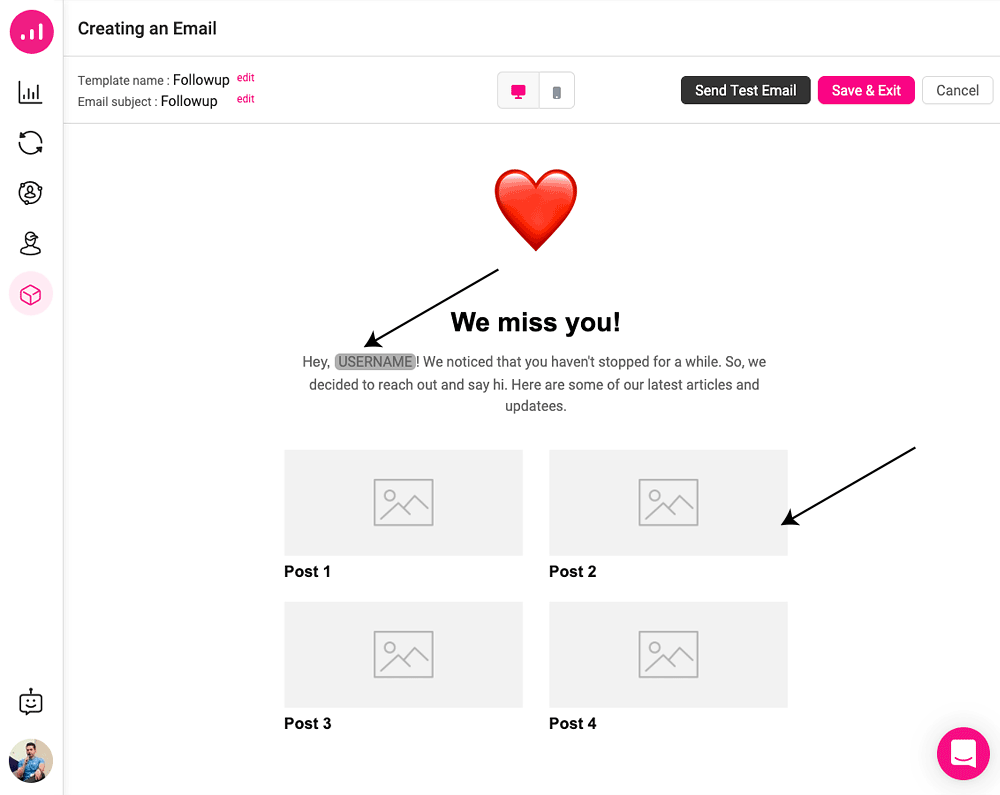
After opening the email builder, begin by saying “hello” to the user. All you need to do is place a text element at the top of the email and set the cursor in the correct place. Make sure to use Dynamic tags and choose First name. You can do more to add a more personal touch to your emails, such as adding products and articles relevant to the user’s interest.
It’s important to add that the email should include an emotional message to convey the sentiment that you miss that user and would like to have them back. You can use this message as your subject line as well. Also, offering discounts is a great way to attract user’s attention. If you have an e-commerce store, then you might want to take this into consideration to see if its doable. After opening Growmatik’s email builder environment, insert the Coupon element. Set its associated options and then you’re done!
Final words
Email marketing is all about sending people what they’d like to see in their inbox. Once they see it, they won’t be able to help themselves and they’ll open and click on it. In this article, I tried to explain why personalization is an efficient way to deliver value to the audience’s email inbox as part of marketing campaigns. I also provided sample recipes of personalized email campaigns that you can try as your next email campaign with Growmatik for free! You can send up to 15/000 emails every month with Growmatik for free, including all the features such as segmentation, automation and the email builder.
If you have interesting experiences about sending your audience personalized marketing emails or have a suggested recipe to add to our list, please share them in the comments.
Once I had a customer who wanted a simple slider on his website and had no interest in using advanced slider plugins such as Revolution Slider or Master Slider. What he asked for required minimum slider functionalities and he wanted to populate the sliders time by time out of his page editor. In Jupiter v6, there was a reliable shortcode named “Edge Slider (Doc)” which was exactly doing the same thing as required here. However, I didn’t want to use the WPBakery page builder anymore, so I decided to create a slider with a trick. In this article, I’ll share my experience on how to develop a custom slider in the Jupiter X theme without even a single line of code.
Jet Engine plugin (bundled with Jupiter X for free)
After installing and activating the Jupiter X theme on your WordPress website, you need to install the Jet Engine plugin. Follow this tutorial to find out how to install it. Now, we’re ready to make our custom slider in Jupiter X.
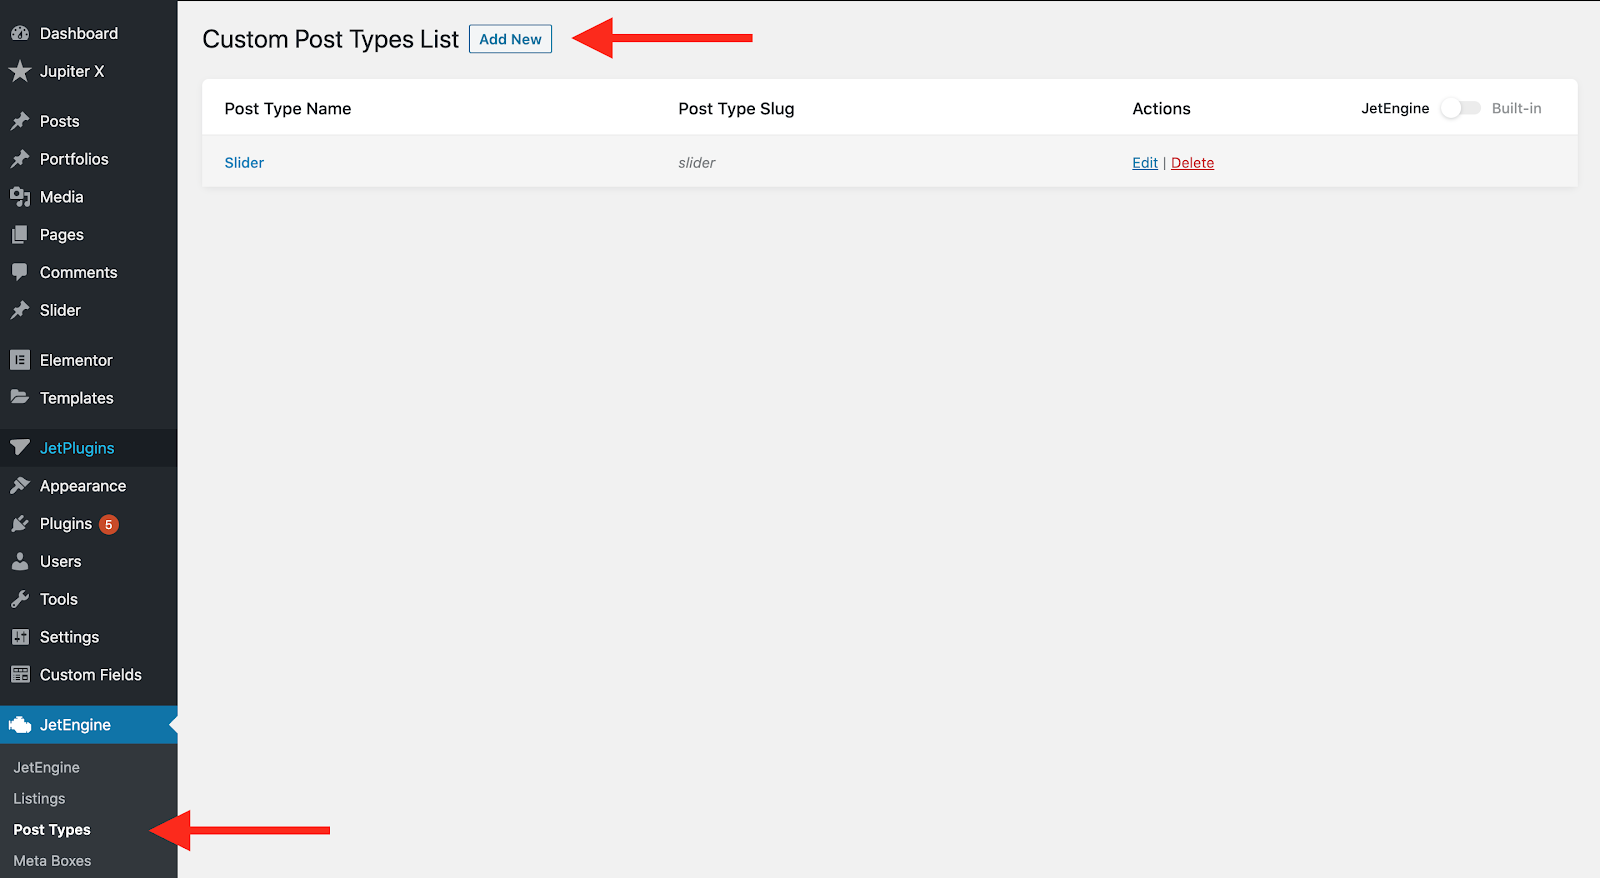
Create the Slider custom post type
Creating a new post type named Slider
Then expand the Advanced Toggle and add the Thumbnail feature to your slider post type. We’ll use this as the background image on our slides.
Add the thumbnail feature to the post type
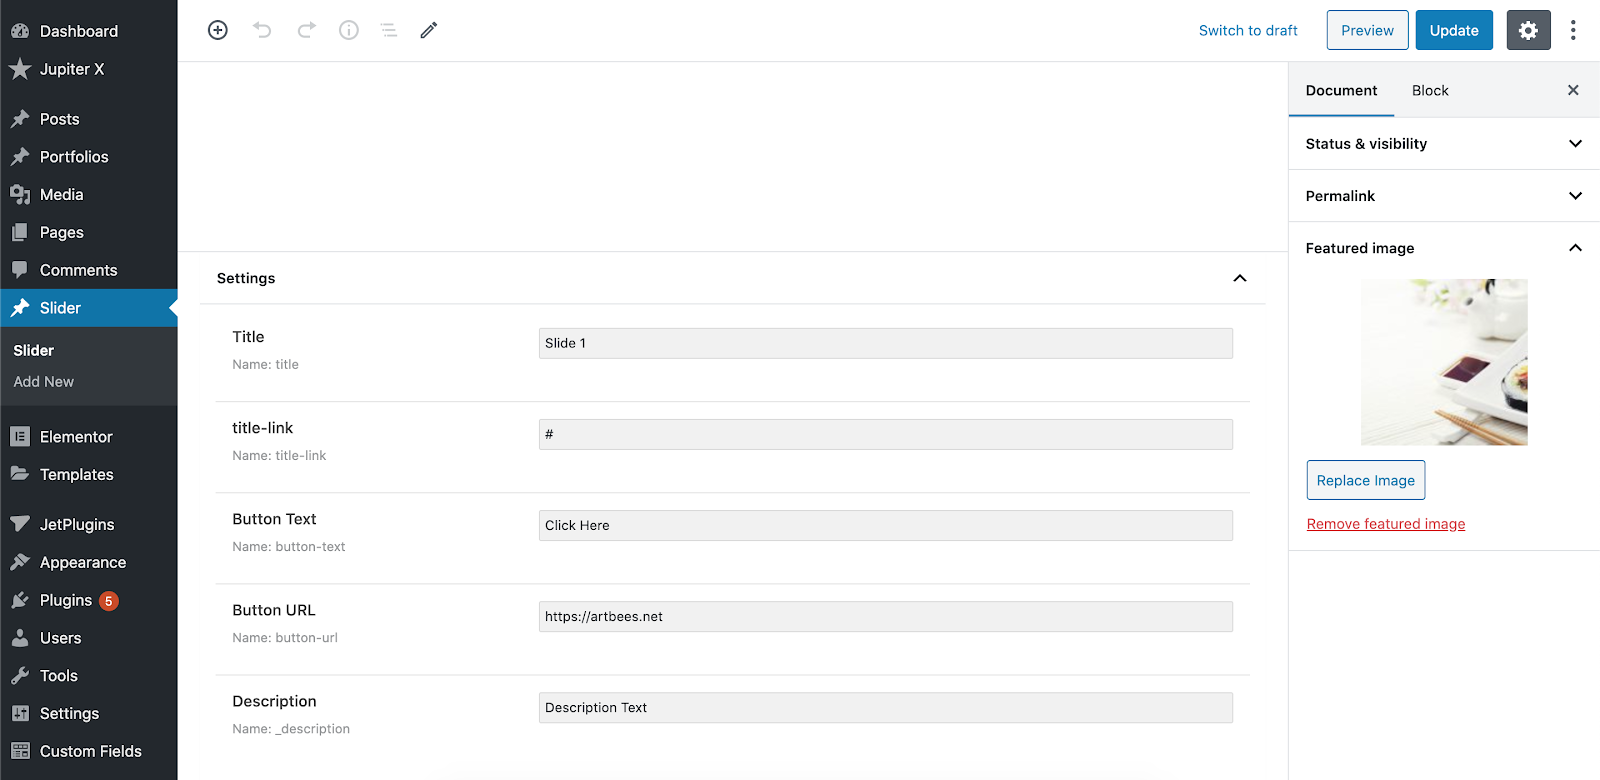
Now add the Title, Title Link, Description, Button text and Button link to the post type meta fields. You can skip the Title field and use the post title instead.
Required meta fields for the slider post type
Remember that you can add as many meta fields as you want. As an example, you may need to have a secondary button for another call to action on your slider. If that’s what you need, simply add two more meta fields: Button 2 Text and Button 2 URL.
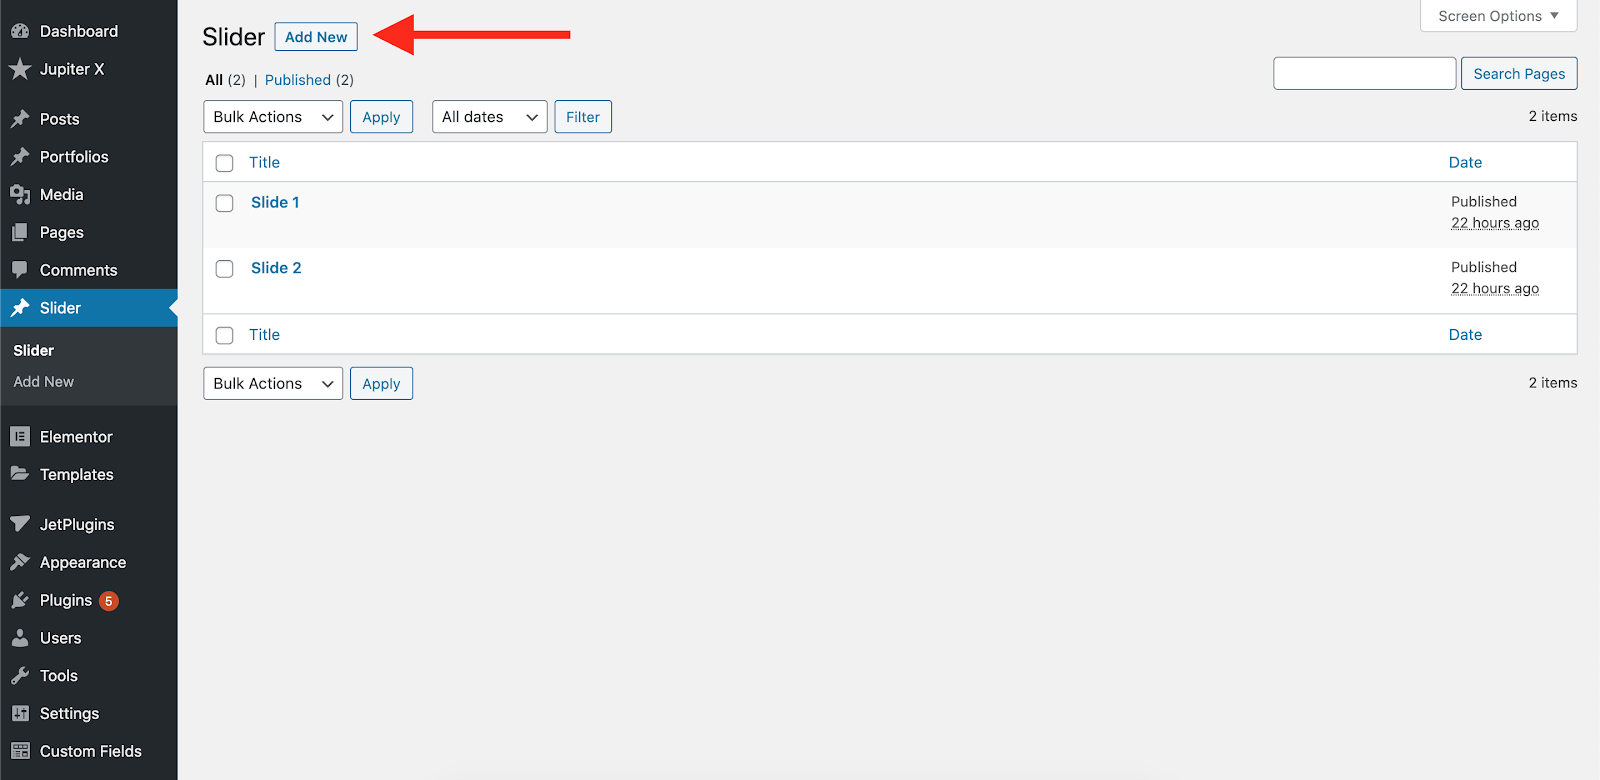
Now hit the “Update Post Type” button and navigate to WordPress admin -> Slider and add a new entry.
Adding the Slider entry
Populate the post meta fields and remember to add a featured image to it.
Simple post type entry example
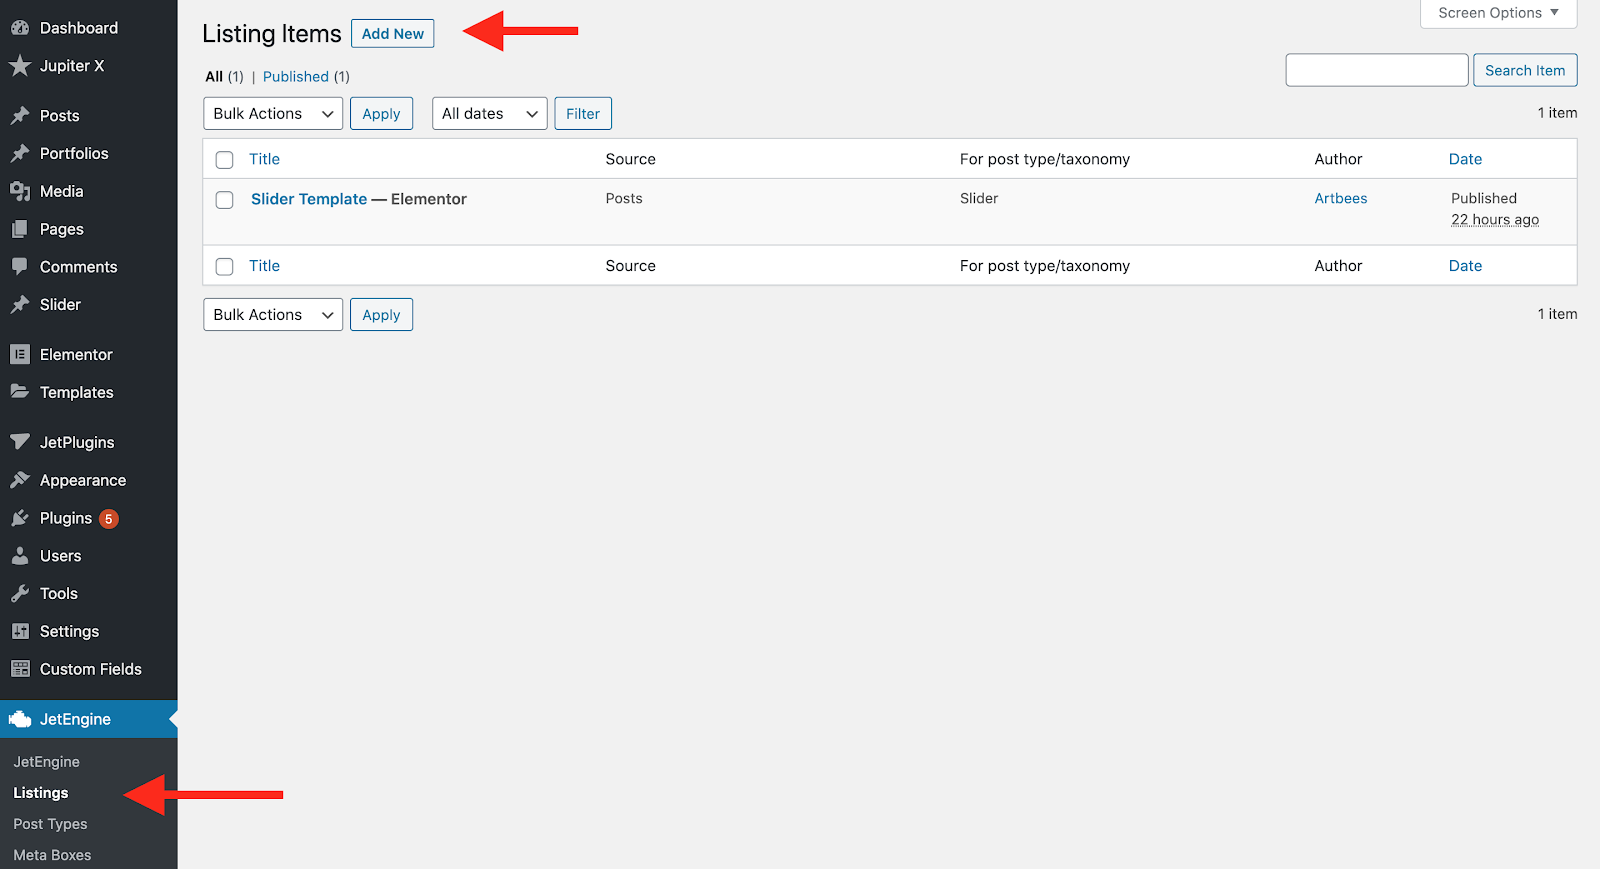
Add a couple of more items and then create a listing template from Jet Engine -> Listings.
Design your Slider template
Add a new Listing item
Choose to edit the listing template via Elementor and make sure you select the Slider post type when creating it.
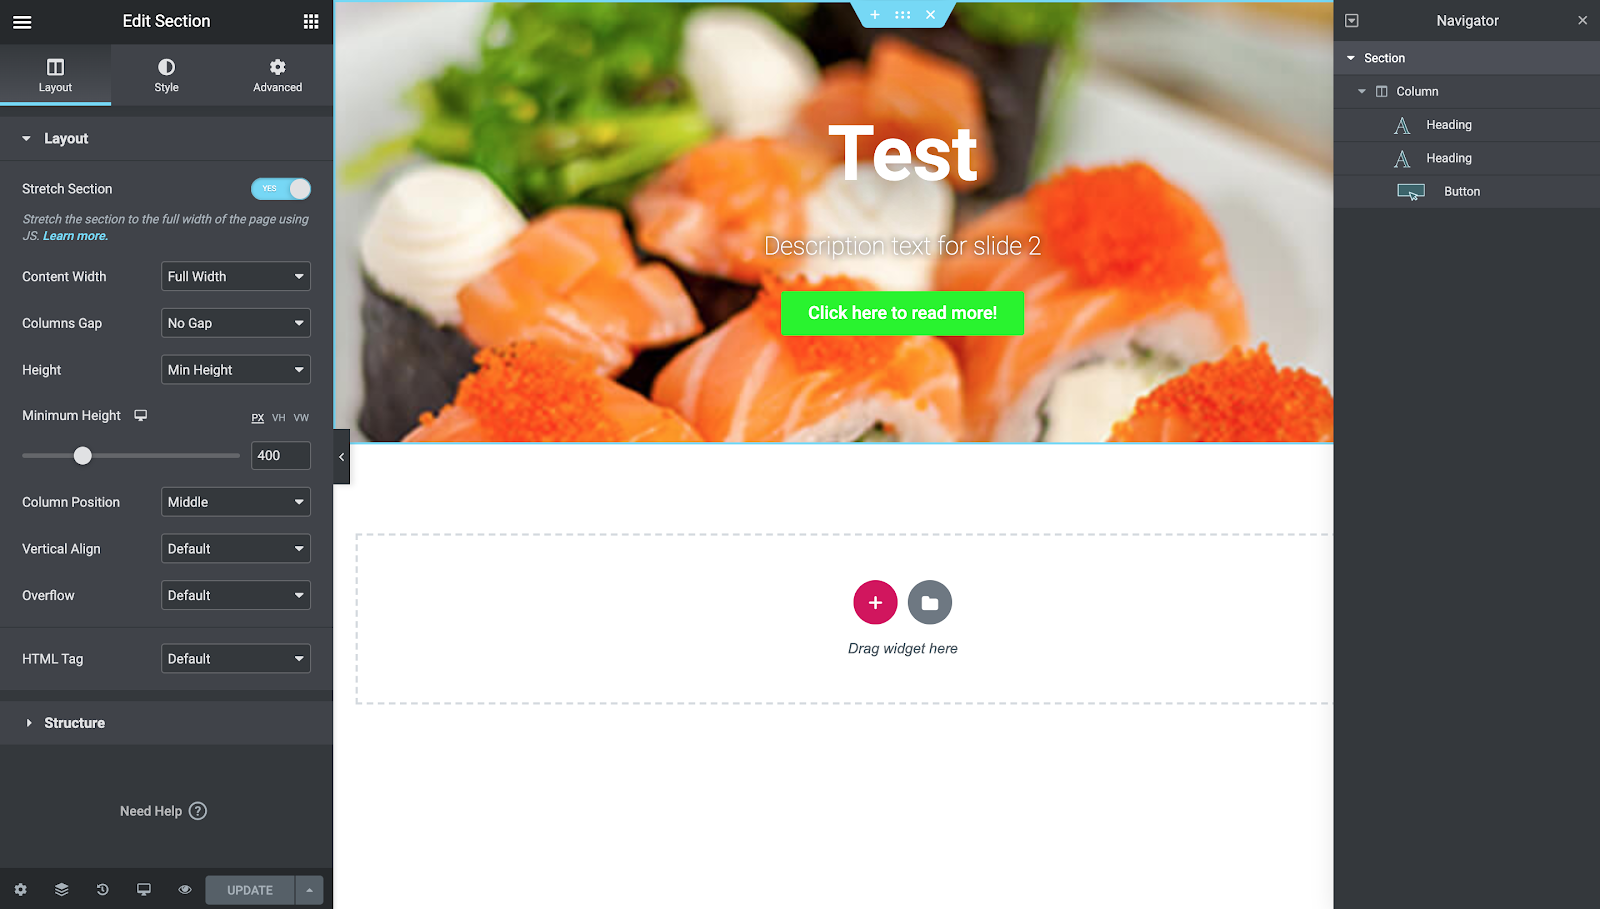
Using the Elementor editor, add a full-width section and add a minimum height to it like below. Also, set the column position to Middle.
Add a full-width section that represents the container of the slider
The above section will be considered as your slider template. So, it’s up to you how you’d like to set the height, color and effects it should have. Also, you are free to change the layout and design the proper slider template as you wish.
The next step in creating a custom slider in Jupiter X is to add a background image. In order to do that, navigate to the Style tab while the section container is selected. Now choose to have a background and select the dynamic background and then select the Featured Image. After that, set the background size to be “Cover”.
Assigning the dynamic background image to the slider template
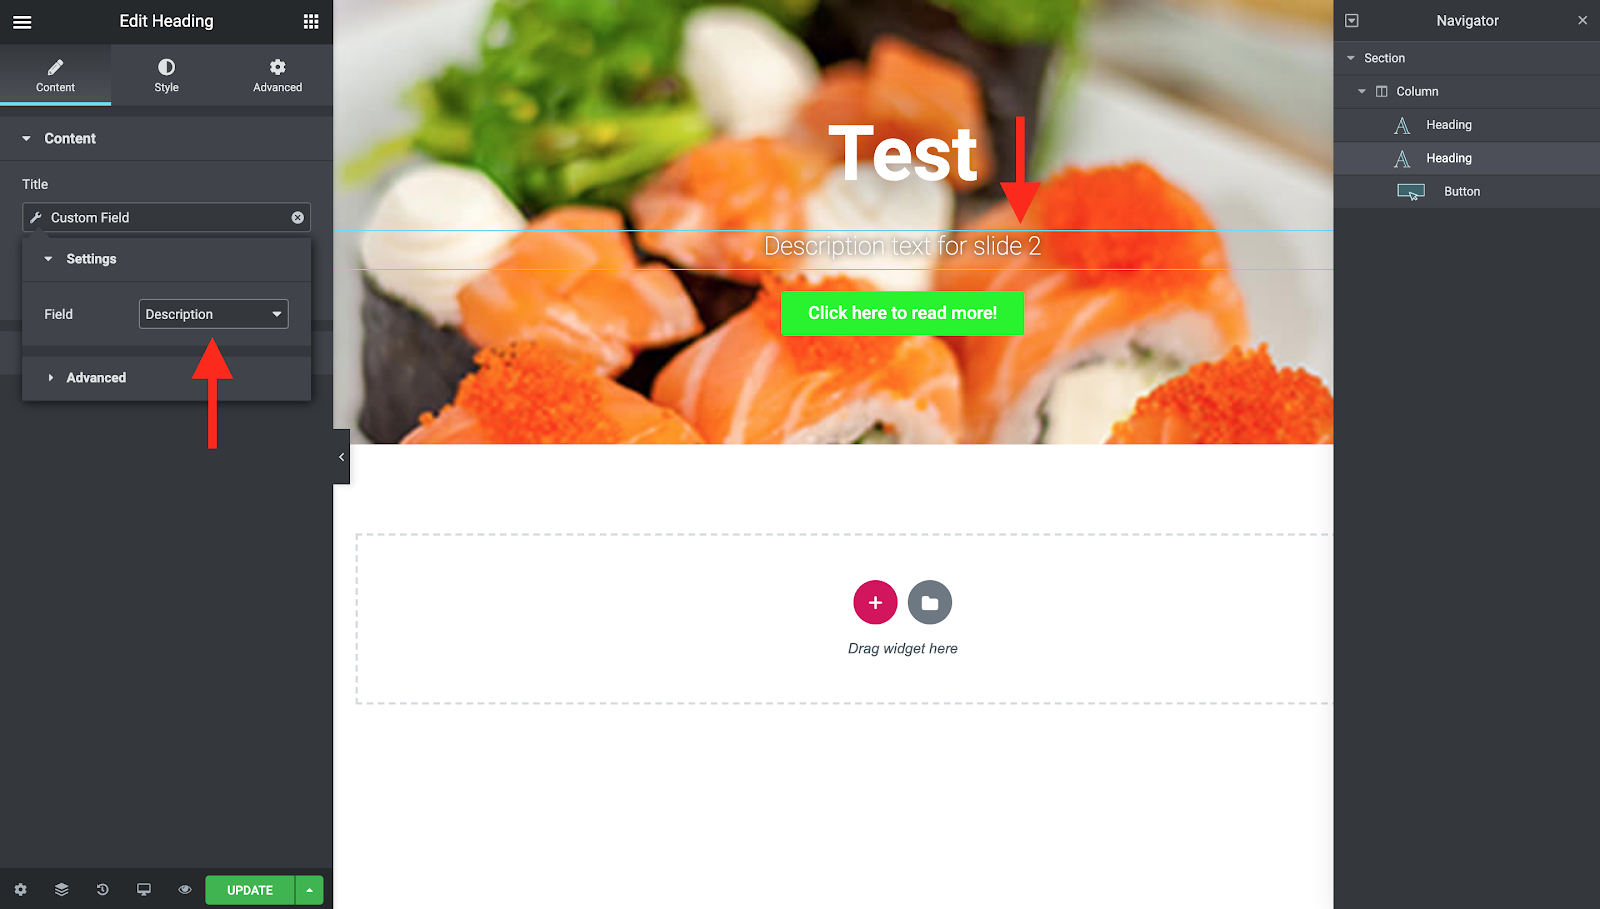
Now add two Heading and one Button to the section and associate the title and links on them with the custom meta fields you created for your post type. More information about dynamic fields can be found here.
Dynamic Description on the slider.
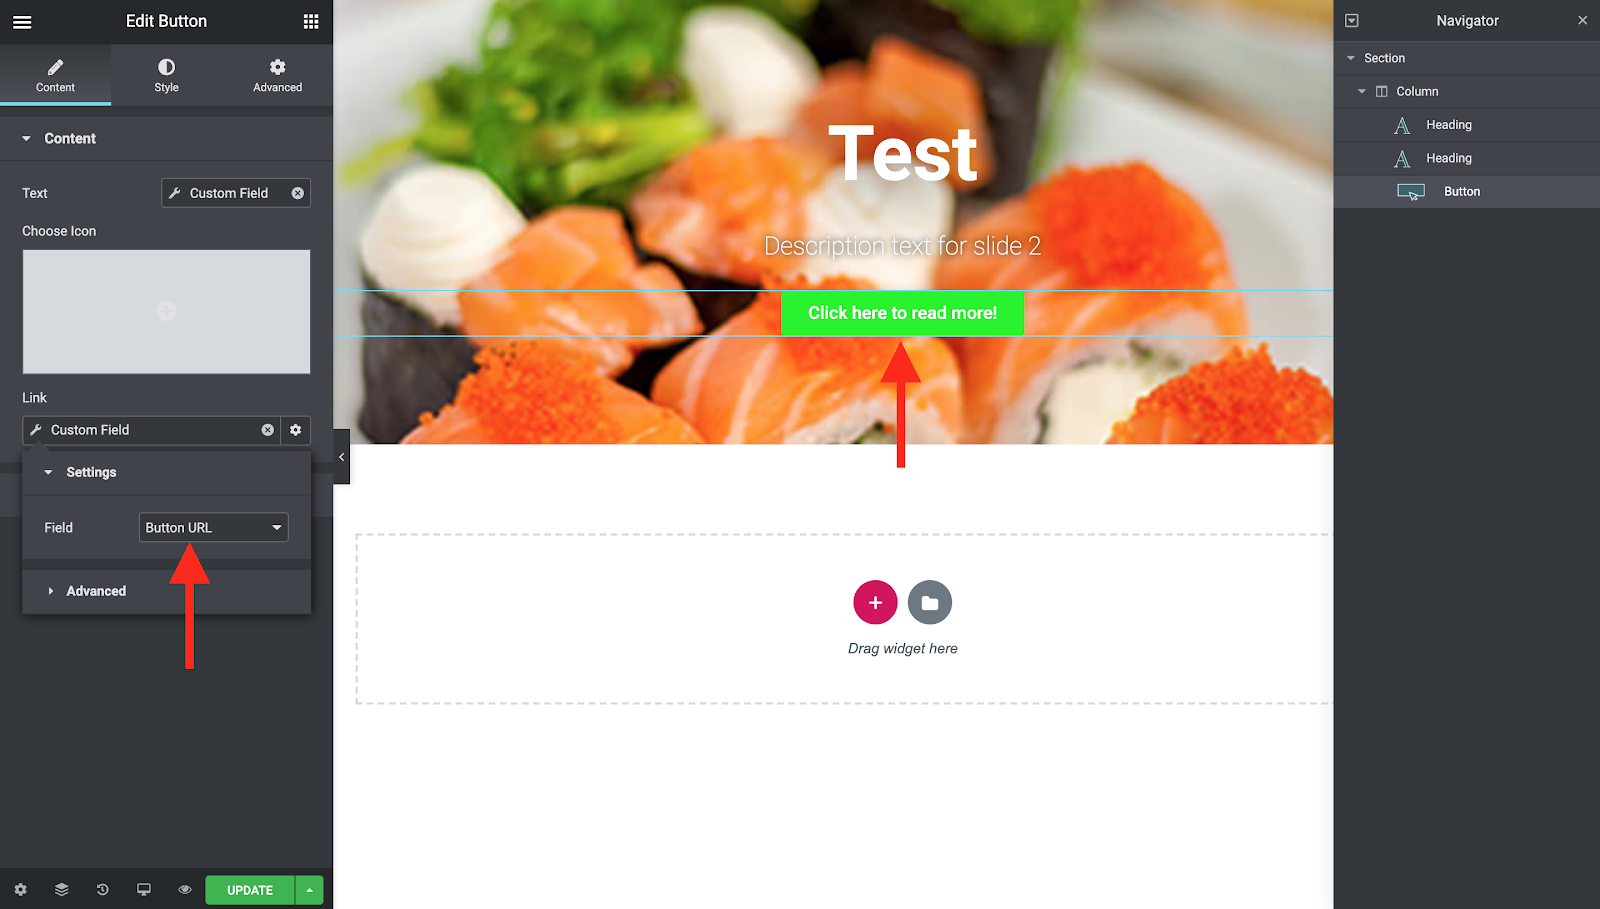
As for the button and the title, since we need them to have a link to somewhere, we need to set the link attribute dynamically with the meta field value we created on the post type.
Dynamic link URL for the button.
Use the slider on your page
Now update the template and get back to the WordPress admin. Create a page and drop a “Listing Grid” element into it.
Set the number of columns to 1, and scroll down the options and enable the “Slider” and update the page. You may want to add the navigation buttons or Dot navigation and style them on the style tab.
The final results will look like this:
You can add a category to your Slider post type, select a different category on your page and a ton of other cool filtering options. As soon as you publish a slider post, it will show up on your slider.
Conclusion
In this post, we learned how to create a custom slider in Jupiter X and Jet Engine template. In general, the dynamic post types play an important role in WordPress and allow you to add unlimited functionalities to your website. By using dynamic post type features, we were able to create a simple slider like the old Edge Slider and allow the site admin to manage the slides without editing the whole page.
According to W3tech, WordPress currently supports more than 40% – or one-third – of all websites. Of course, this is awesome – however, for all the opportunities that WordPress provides us, it also has its challenges such as security and performance issues of its sites.
Enhancing the performance of a WordPress site is a hot topic these days. It’s possible to find dozens of articles and methods online on how to improve overall speed and performance, which are crucial as both affect your site’s search engine ranking. Furthermore, visitors to your site will quickly leave if the load time is longer than acceptable. This is extremely important for sites with shop functionality where speed is one of the most important factors. In this post, we’ll discuss the top five causes of a slow WordPress site and how to improve them.
1. Low performing WordPress hosting service
It’s not news that high-quality hosting is a cause of a slow WordPress site if the files of your project are hosted on a reliable, fast and high-performance web server. So if chosen wisely, one of the most important tasks of performance improvement is done right. There are many guides out there about choosing the right WordPress hosting but the mark the most important factor, I recommend the following list.
Shared hosting We may think its good idea to host our project on shared hosting that temptingly offers “unlimited” space, email accounts, bandwidth or other features. But the key point we miss in this offer is that shared hosting never offers the level of performance that is needed to run a normal project, especially during peak traffic hours. Most of the shared hostings fail to provide 99% of uptime within the month.
Another major disadvantage of shared hosting is that your project files are placed among countless other websites. Your files essentially share one space, and there is no information about how many resources are used by other websites. In other words, you simply don’t know how well your shared hosting is optimized for performance. The cost of shared hosting is cheaper than any other hosting and starts from $2.
Do-it-yourself VPS hosting These are hostings that must be manually created, configured and optimized. The crowd behind these servers are startups, developers, DIY enthusiasts and those who want to save money from already-configured VPS hosting. The most popular and cheapest server provider on the market is Digital Ocean with a $5 plan.
Similar VPS hosting is great, but it can also be really challenging. If you don’t have enough experience to deal with the problems that come with it, then there might be some serious implications. We don’t recommend that you opt for this type of hosting if you’re not tech-savvy and if your project is important for you. This type of hosting is best used for experimentation.
Managed web hosting This is similar to the above do-it-yourself VPS hosting. However, in this case, the company between you and the cloud platform provider manages everything instead of you. You have nicely designed backend functionality where with just mouse click, you can deploy, restart, stop or pause the VPS server. Such companies also provide support when needed, and they have great optimization features. Due to the popularity of WordPress, in recent years, there has been a rise in dedicated WordPress VPS servers. Such servers offer a fully optimized environment for WordPress as they have the best configuration of files and databases.
There are many popular managed hosting providers on the market, including Kinsta, Cloudways, WPEngine, Flywheel, and others. The prices of such hostings are the highest and start from $10 or $15.
2. Not using the right themes and plugins
Choosing a good theme for your project is probably one of the most important decision you will make, sure thing you want to have the best-looking website but very often shiny and beautiful themes come with many “features” they have dynamic content, custom header, and footer, sidebar, many widgets, all these benefits are great to have in the pocket but they will definitely affect the overall performance of the theme and can cause slow responses from the hosting. Based on this you have to always choose a theme with a good framework, with good performance score.
How to choose the right theme? There are two things you should take into consideration when asking this question:
Less is more, and this goes for themes as well. You’ll want themes with only the features you need for your projects. Such themes are niche-specific themes. For example, let’s say you’re working on a personal resume website, and you choose a theme that has been created solely for resume sites. Generally speaking, this theme has everything you want to have. Such themes are lightweight, easy to maintain and they don’t require resources from the server.
You can choose to use a general-purpose theme but with options to disable features. These themes offer feature-rich options that can be disabled if you don’t need them. So for instance, there are many themes out there that include many different demos. Make sure features in these themes can be disabled. If you’re not going to use them, they will add useless weight to your project.
Page builders
In the era of page builders, it’s hard to find themes that don’t use page builders. Working with a page builder is quick and easy-to-use, however they add extra weight to your project. Sometimes, they are much heavier than the themes themselves. So, seriously take into consideration whether you need a page builder to utilize or not.
Too many plugins
Adding a new plugin to WordPress site today is just a single click away, however, having too many plugins is a common cause for a slow WordPress site. As we mentioned before, WordPress supports more than 37% of all sites. Because of the popularity of WordPress, new plugins for every occasion pop up on a daily basis.
It’s easy to find a plugin for nearly any purpose. Plugins can be free or premium and come with or without support. Of course, getting support offers us the opportunity to receive technical help in solving our problems, but we should only hold onto important plugins. It’s better to critically ask yourself: is this particular feature important for you? Or is it just a feature that’s nice to have but jeopardizes the performance of your project?
3. Not using caching tools
When it comes to WordPress optimization, caching is one of the most important and easiest ways to speed up a WordPress site.
Let’s check your site through Google PageSpeed insight or ySlow. You’ll see a warning about Javascript and CSS files minification. Without minification you’ll have a bounce of calls of these files to the server, and minification reduces these calls and minifies files sizes of CSS and JS files. In the end, you’ll have fewer calls to the server and less weight of the files to load.
The caching tool – in this case – the caching plugin stores some files to the disk of the server (depending on configuration, it can be stored in the RAM as well), and it remembers the same content that was served in the past session. It reduces server resources that respond to user requests and, as a result, makes a website work much more quickly.
There are many great plugins available for caching. Some of them are dedicated only for caching Javascript and CSS files (for example, Autoptimize) while others do more complex work. Aside from JS and CSS modification, they offer other important optimization works such as image optimization (for example, WpSmush, Wp-optimize), which is one of the important points in WordPress optimization.
Loading media files that haven’t been optimized to the front will greatly increase the loading speed of the website. That’s why you definitely need to consider their optimization, and be aware that image compression is one of the mandatory factors that must be taken into consideration.
4. Not using a content delivery network
A Content delivery network – or CDN – will not disappoint you if you use it for site optimization. The main purpose of CDN is to deliver your content to the user, no matter where they’re located on the physical map. Needless to say, your website will not load at the same time for a visitor from Singapore and visitor from California. This is where CDN comes into play. It stores a copy of your website in various data centers in different places in different countries. By doing this, your visitor will be served from the nearest CDN point, which will dramatically increase the website’s loading speed.
There are many great CDN services out there: Cloudflare and MaxCDN are two of the most popular and widely used CDN networks.
5. Version of PHP
Well, its fact that recent versions of WordPress started warning users about upgrading their PHP version from 5.6 to the 7.4 version. You can learn more about it in WordPress’s official recommendation.
Please note that Worpdress is currently supporting the version of PHP 5.6, but all versions prior to version 7.3 will not receive updates. They are at the end of life (EOL), which means that your site might be exposed by security vulnerabilities.
Now let’s take a closer look why you might want to update your PHP to the latest 7.4 version:
Improved bandwidth Versions above 7.0 perform a minimum of twice as fast as 5.6
Lower latency Latency is the time between the first request and the first response from the user to the server. In this case, lower is better, and the PHP version above 7.0 is showing twice – and some times three times – better results than the 5.6 version. For example, if the average latency for the 5.6 version was 156 ms, then it’s about 68 ms for 7.4.
WordPress support WordPress versions above 4.0 are specially optimized for PHP version 7. According to tests on the same hardware and software, but with a different PHP version, it doubled in performance.
Security Nowadays, running the PHP version 5.6 for any software means you’re not protected. All this software is EOL (mentioned above). By not updating your PHP to the latest version, you’re putting your project at risk as even version 7.2 is not very well protected.
Significant performance changes Someone from WP Engine tested WordPress with different PHP versions. This test showed WordPress on PHP7 is 6.6 faster than on version 5.5. You can take a look here.
Now, since you already know one of the causes of slow websites, check the version of PHP on your WordPress site and safely update it. Also please note that backing everything up is always a good idea.
Wrapping Up
One of the main reasons for optimizing and lowering your website’s loading speed is to enhance user experience. No one wants to browse a slow WordPress site that is not optimized. This is a major point to keep in mind when creating a WordPress site for all devices. A smooth browsing experience is a must for all types of devices – including phones and tablets. Aside from this, you’ll also improve your ranking in search engine results.
Above, we only listed reasons that a WordPress site might be slow – this isn’t a comprehensive list. We only discussed the major reasons for a poorly performing site but of course there are more. If we missed something, don’t hesitate to write us a comment in the section below!
Many people underestimate the power of CSS. Some of the fancy features that we see on the websites use JavaScript codes, but they can be implemented with pure CSS these days. For example, parallax sections almost always use JavaScript libraries, but in this article, we’ll cover how to build a pure CSS parallax section in just a few minutes.
Using pure CSS parallax can be easier and more performant since we don’t need to use JavaScript libraries.
What we’ll build
In this article, we’re going to build the following parallax sections with pure CSS. You can see the live demo at CodePen.
Understanding the used properties for pure CSS parallax
This technique relies on the CSS3 transform and perspective properties. By using these properties, we can create 3D elements in the space and scale and move them as necessary.
Transform property
This property enables you to transform elements in a two-dimensional and three-dimensional space. By using this property, we can rotate, scale, move and skew the element in the space.
You can see different examples of transform properties in this pen.
Perspective property
This property is used to enable three-dimensional space for the element. The children of the element can be positioned in the space.
In this pen, you can test the perspective property live.
Implementing the technique
Now that we’ve learned a bit about transform and perspective properties, let’s get our hands dirty and write some actual codes. The codes will be divided into two sections: HTML and CSS codes.
Markup
We need some simple markups for the parallax section. The role of each markup is explained below.
.main is used for setting perspective and overflow properties.
.section is used for setting general styling, not necessarily related to parallax.
.static is used for setting the static section properties.
.static-(one|two|three) is used for setting different background colors for static sections.
.parallax is used for setting ::after (pseudo-element) which holds the transform properties.
.parallax-(one|two) is used for setting different background images.
Styling
This is where the magic happens. The necessary lines are commended to help you understand the codes.
.main {
  /* Fill the available space */
  height: 100vh;

  /* Make the children of the element closer to the viewport */
  perspective: 2px;

  /* Hide the overflow */
  overflow-x: hidden;
}

/* General styling, not necessarily related to parallax effect  */
.section {
  position: relative;
  display: flex;
  align-items: center;
  justify-content: center;
  height: 80vh;
  font-size: 40px;
  text-transform: uppercase;
  font-weight: bold;
}

/* Different background colors for demo purpose */
.static-one {
  background-color: #feceab;
}

.static-two {
  background-color: #aacfcf;
}

.static-three {
  background-color: #c06c84;
}

.parallax::after {
  /* Position the pseudo-element to fill the parent */
  content: '';
  position: absolute;
  top: 0;
  right: 0;
  bottom: 0;
  left: 0;

  /* Scale the image to full */
  background-size: cover;

  /* Move the element back then scale the element, it helps to appears more slowly */
  transform: translateZ(-1px) scale(1.7);

  /* Set the parallax section before the other elements. */
  z-index: -1;
}

/* Different background images */
.parallax-one::after {
  background-image: url(https://source.unsplash.com/vs6a4EHj_Ro/1600x900);
}

.parallax-two::after {
  background-image: url(https://source.unsplash.com/P86-JPbDnPY/1600x900);
}
Wrapping up
In this article, we covered one of the coolest CSS implementations. By learning these types of techniques, we’ll understand how CSS is powerful and what we may be able to create in pure CSS.
This implementation was one of the most straight-forward ones, you can see the following ones for more advanced usages.
Are you in the habit of updating your WordPress website (including its themes and plugins)? If not, your website could be open to security threats or could be repelling potential customers. As a member of the Artbees support team, I saw that the reason many customers didn’t update their themes/plugins is that everything was working well, and they didn’t want to risk losing functionality. But this is problematic: by using outdated files, your website becomes vulnerable and could be hacked. Or sometimes people thought they were keeping their entire site up to date by only updating WordPress while they were using old themes and plugins. This often causes incompatibilities, and it’s likely some functions won’t work on the site.
Why is updating WordPress so important?
WordPress websites use themes and plugins that are created by third-party organizations. This means that when a new WordPress version is released, they update their products to fix any incompatibilities too. So let’s say you update the theme/plugins but keep using the old WordPress version, you may experience some troubles on the site like layout problems or some functions not working properly.
Another reason to update WordPress is to get your hands on new features. Sometimes you won’t notice them right away as the features could be minor – or they could be major and be exactly what you wanted.
If a vulnerability in an old WordPress file is fixed in the new version, you’ll want to update it without hesitation on your part. Not getting rid of the vulnerability will make it easier for hackers to quickly and easily hack your site.
Hackers typically check the WordPress changelog, and they can see where the vulnerabilities were fixed, so they can easily get into the sites with the old WordPress version. So be sure you always use the updates.
It’s no secret that if you’re using an old version of WordPress, you might experience website issues like slow loading speed, navigation-related problems or redirected pages. Outdated plugins and themes can increase website response time, and your visitors may leave the site quickly.
When you face some problems on your website and want to contact online support for help, most answers will be related to new versions of WordPress and you’ll definitely be suggested to update yours.
In this article, you’ll be able to find detailed instructions on how to easily and quickly update a WordPress website.
Problems of using outdated WordPress plugins and themes
Once you’ve updated the WordPress version, you need to also update all of your website’s WordPress plugins and themes. Along with new features, the plugins/themes authors might also include security solutions. This means that installing the latest version of the WordPress plugins and themes makes it harder for hackers to break your website.
If you don’t update the plugins and themes, old versions might have a negative effect on your website speed and performance in several ways. They can increase your website response time, which will result in fewer visitors on your site.
Installing the latest plugins and themes is much better as they are more optimized for the latest WordPress technologies, and you’ll improve both performance and user experience.
Tips for safely updating your WordPress website
Before hitting the “Update Now” button, it’s important to follow the steps below to keep your site safe:
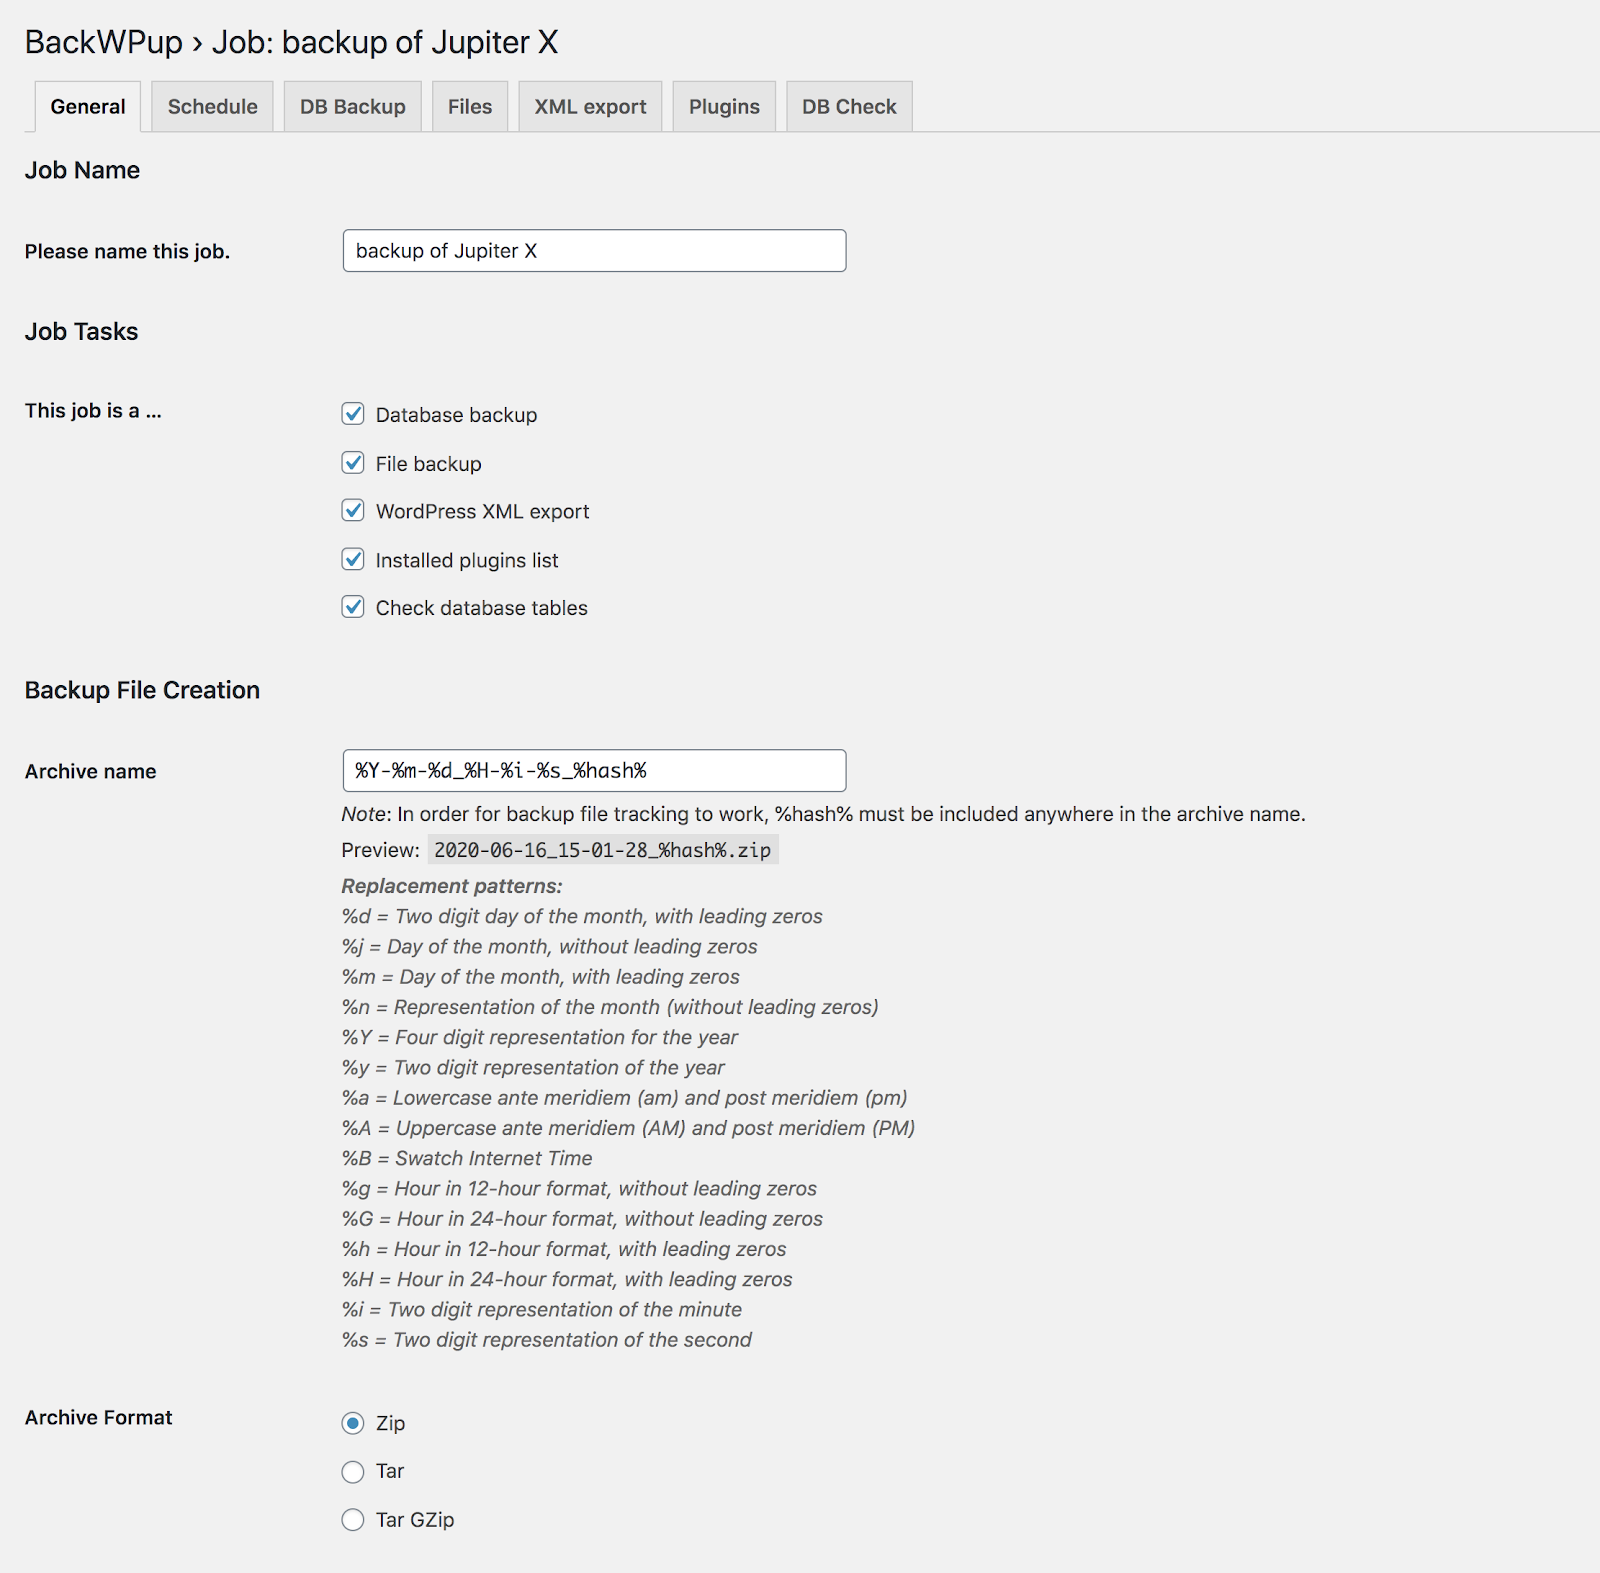
Make sure to backup all your WordPress files and database. You can do this via your hosting control panel or using some plugin, for example, BackWPup.
Use a staging environment before applying updates to your live site. After testing the update on the staging site, you can overwrite the live environment with the staging. It takes more time, but you’ll avoid any problems that may be caused on the live site. To create a staging environment refer to these two articles: Update your WordPress Website Using a Staging Site and How to Setup your WordPress Development Environment.
Check the plugins and themes changelog to avoid any risks that may occur.
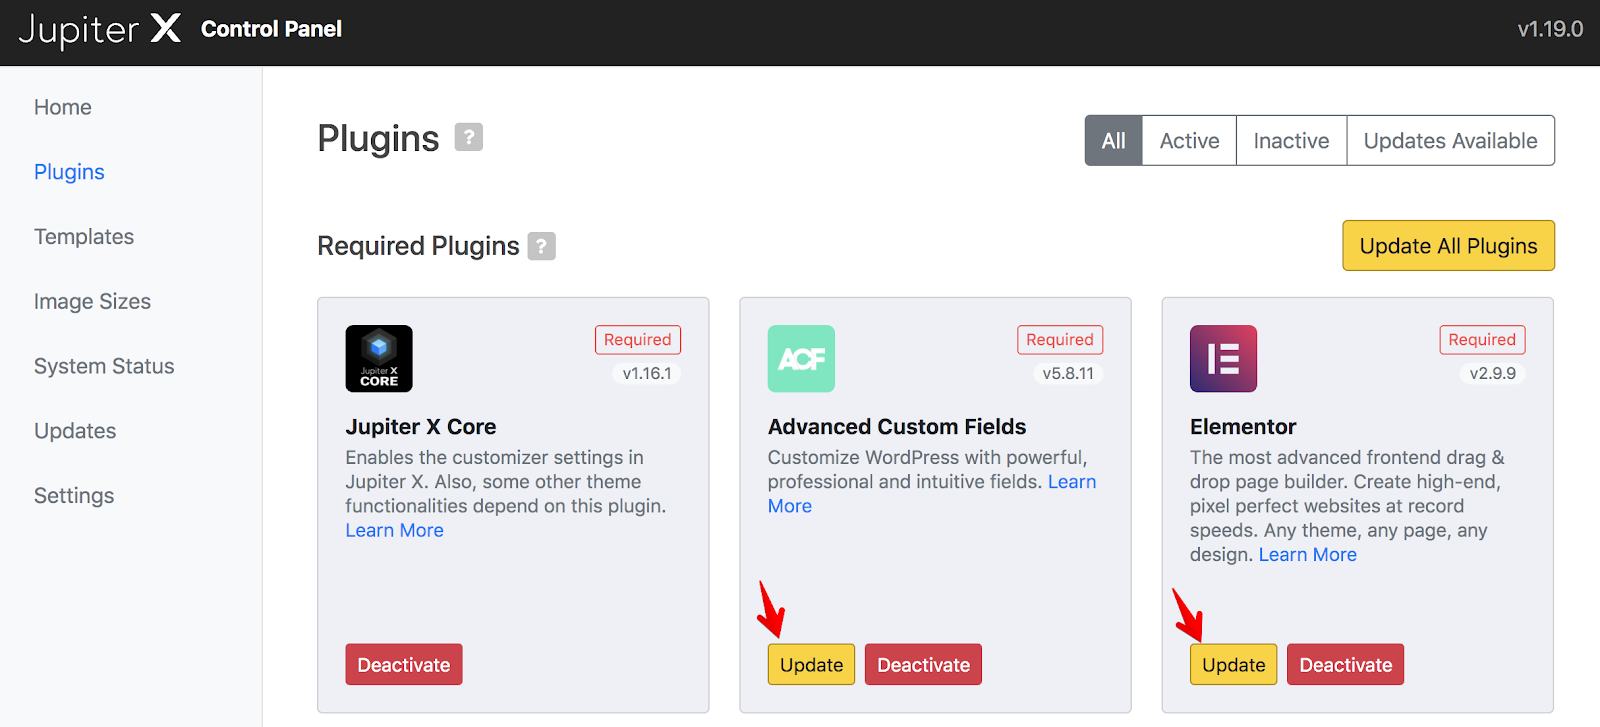
First update WordPress installation and then update your plugins and theme. Many of the WordPress plugins can be automatically updated from the WordPress plugin repository. It doesn’t work like this, however, for premium plugins and themes. You may not receive a notification of the update. And by overwriting the files on FTP level or through a special control panel of the theme you can only update the plugin or theme.
Don’t forget to test the site after you made the updates. Make sure the frontend is functioning properly. The most important steps to test:
Check the homepage and a few other pages
Fill in a form and check if the message is delivered
Check if the multilingual function is working (if using WPML or Polylang)
Check elements such as sliders, pop-ups, call-to-action
Test the search function
What to do if the update goes wrong?
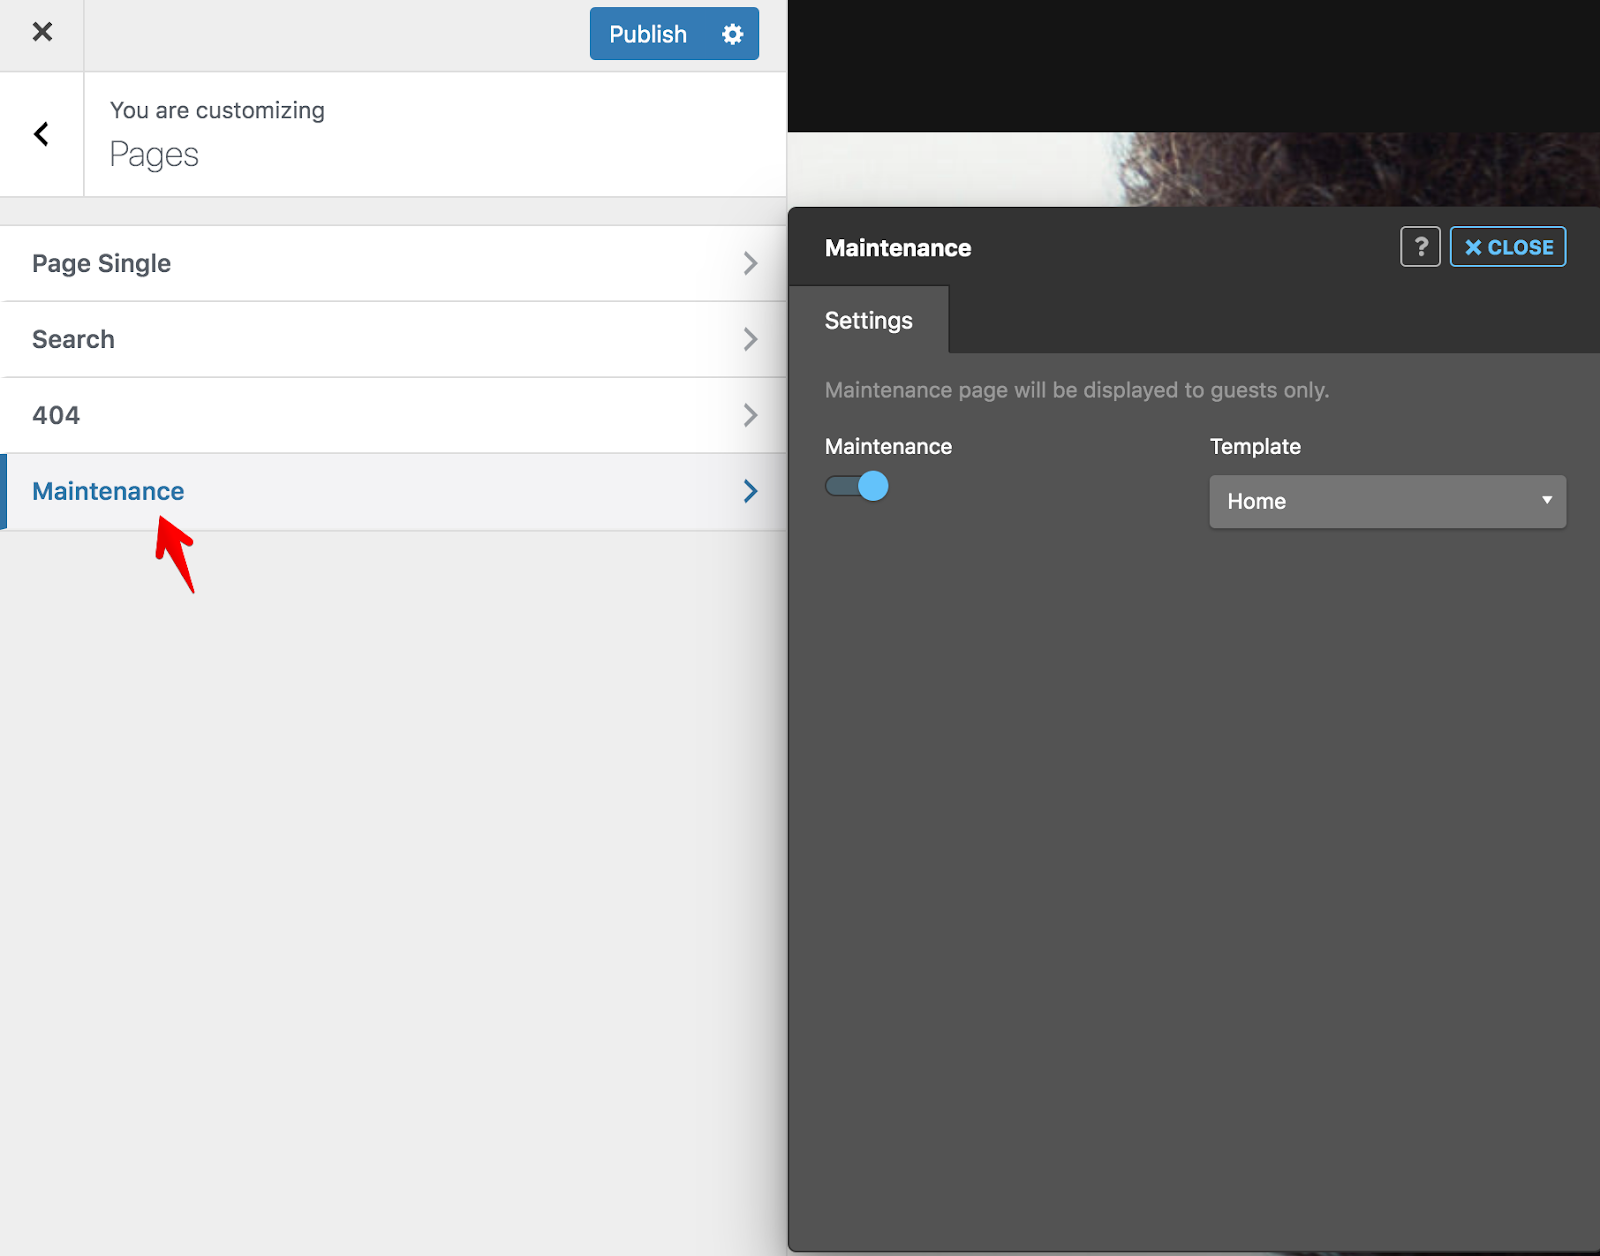
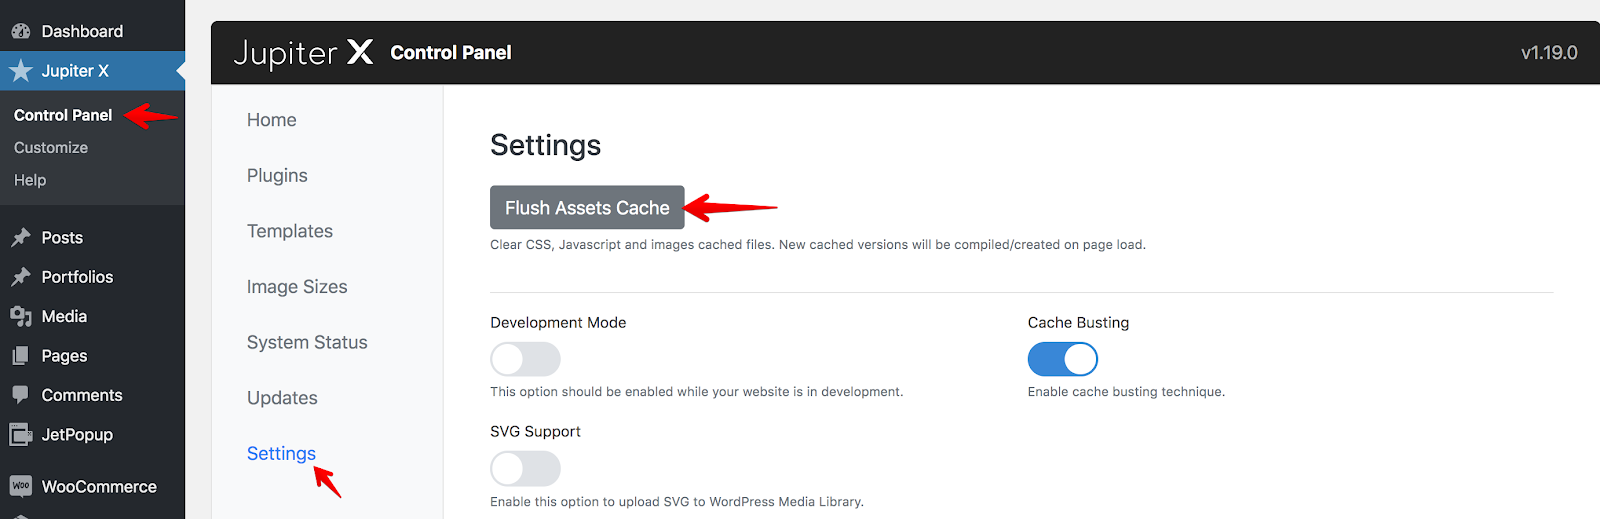
If for some reason your live website got broken after the update, you should hide it from the public to fix it before showing it again. This means that you should enable the maintenance mode for the website. For this, you can use a plugin such as the WP Maintenance Mode, or, if you’re using the Jupiter X theme, you can enable the maintenance mode in Customizer.
Make sure to clear the cache of your website to see all the features or changes that came with the current update.
Check the theme or plugin’s support forums. Perhaps the issue you have was already discussed, and you’ll be able to find a solution to your problem quickly.
Some themes/plugins may require to re-save the options to update the database. Try to re-save theme or plugins settings, and don’t forget to clear the cache.
Contact the support team. If you have a premium theme, then you’ll get a fast response. Just be specific in your description, provide screenshots of the errors, as well as the login details to the wp-admin panel and FTP, so the support agents can investigate the problem.
If you’re unable to find a solution, it’s better to restore a site from the backup. You can ask for help from your hosting provider support to get your site restored. Then contact a theme/plugin support, so they can investigate the issue with the update. It’s also better to provide your staging environment where the support team can test.
Wrapping up
It’s important to continue updating your WordPress site so that it’s safe, and hackers cannot get to it. You may think you don’t need an update as the site is now functioning properly. But please note that further down the line, ignoring updates will cause more problems.
Updating your site will provide several benefits: improved performance, new features, and a secure website! Stay updated – stay safe!
Sending out a notification on a website that users can interact with plays a significant role. When users do something on a website, a notification system can keep them motivated and encourage them to do more. And the great thing is that there are plenty of ways you can send notifications to your users: emails, SMS, direct messages, push notifications on browsers and also internal notifications on the website itself. In this post, we’ll provide an overview of how you can build a WordPress website notification system, which could then be used as a base structure for all kinds of notifications.
Scenario:
Let’s say we have a website where users can edit their own profiles and have different roles and by doing an action, the user should receive a notification. We might ask users on our website to take quizzes, and in this case, we would then need a way to notify them of whether or not they passed a quiz.
To begin setting up your WordPress website notification system, install WordPress and navigate to Dashboard -> Plugins -> Install Plugins.
Search for Ultimate Member and install the plugin.
Installing the Ultimate Member Plugin
After that, activate the plugin and create the default pages.
Activating the Ultimate Member plugin and setting up the default pages
We are done here. It’s time to configure the plugin and add the notification plugin.
Configuring the Member’s directory and user profiles
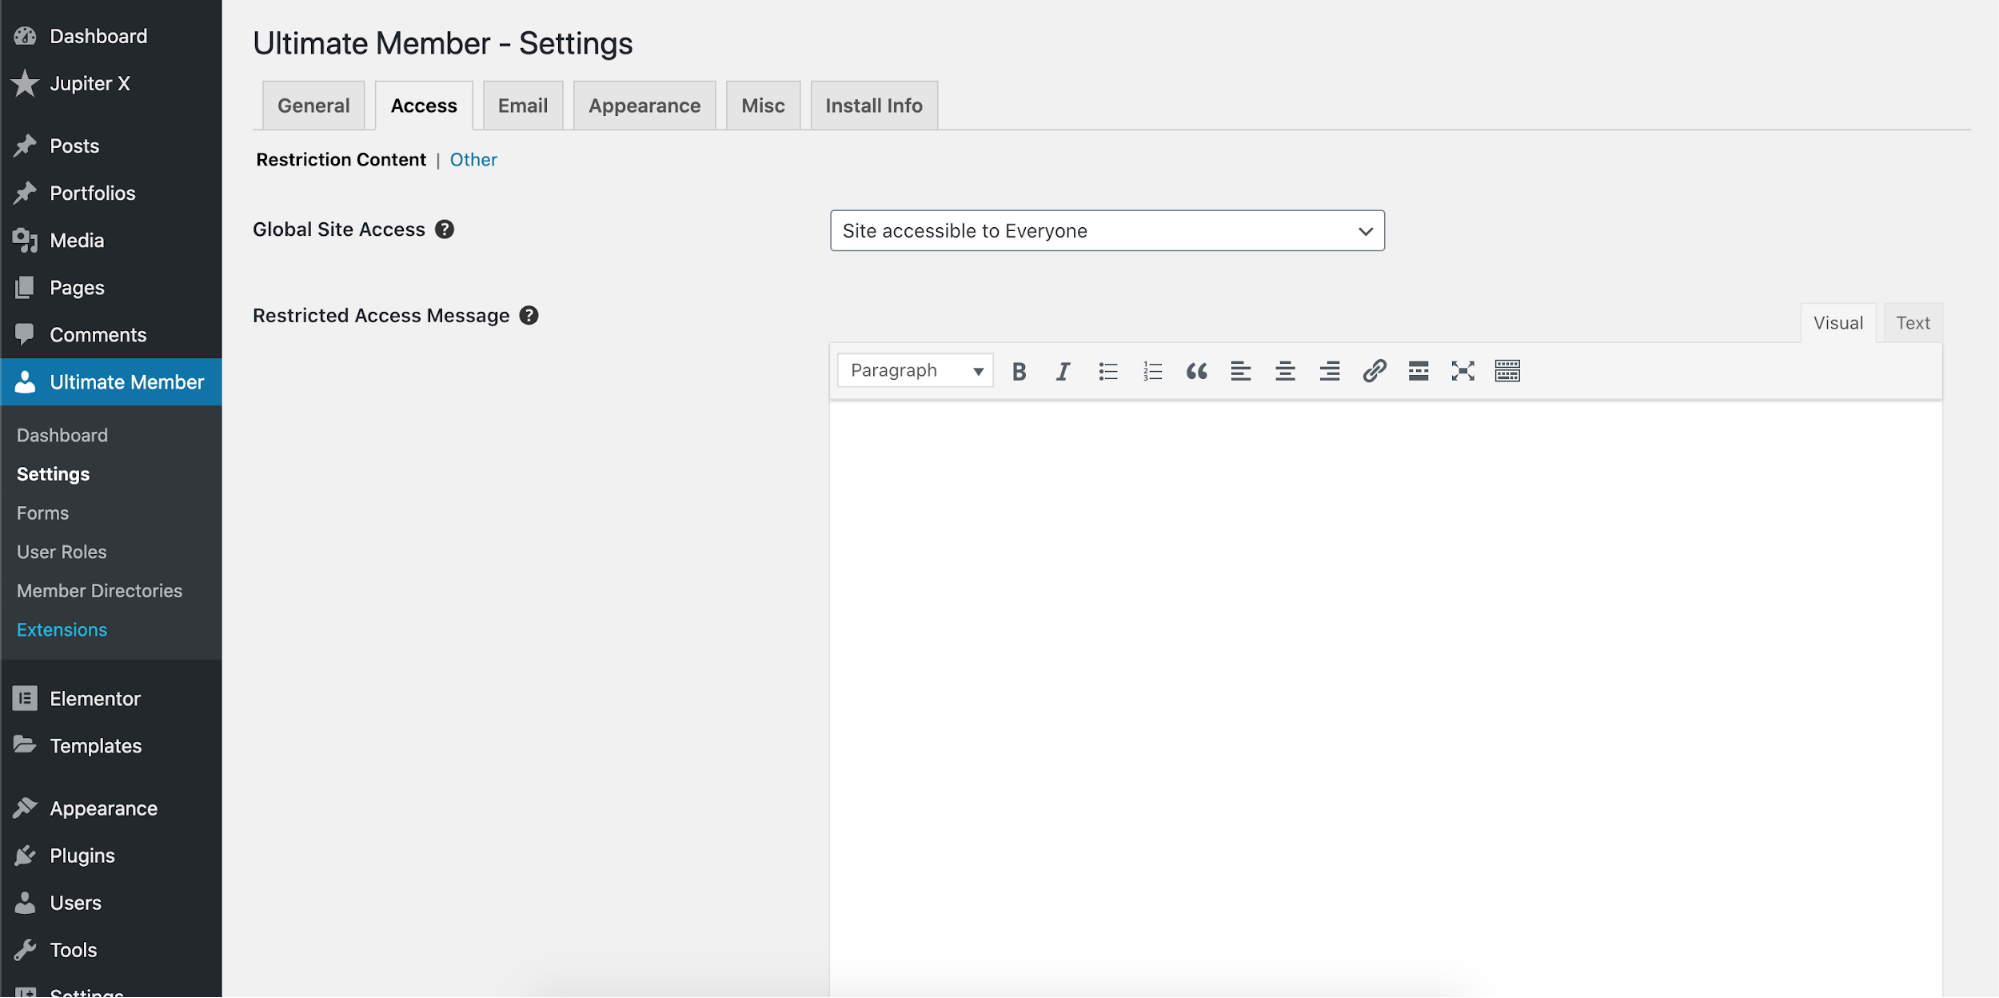
The Ultimate Member plugin extends the WordPress user management system and adds a lot of capabilities to it. The good thing about the Ultimate Member plugin is that it has a vast variety of add-ons, and you can even build and shape a real social network using this plugin. Each user can have a profile and you – as the admin – can choose to have different registration fields or user profile details on the website. It’s a very good choice to run a membership directory website. Ultimate Membership will add restricting access capability to your content and menus. You can define different user roles and show different content to them. The plugin settings are located in Ultimate Member -> Settings.
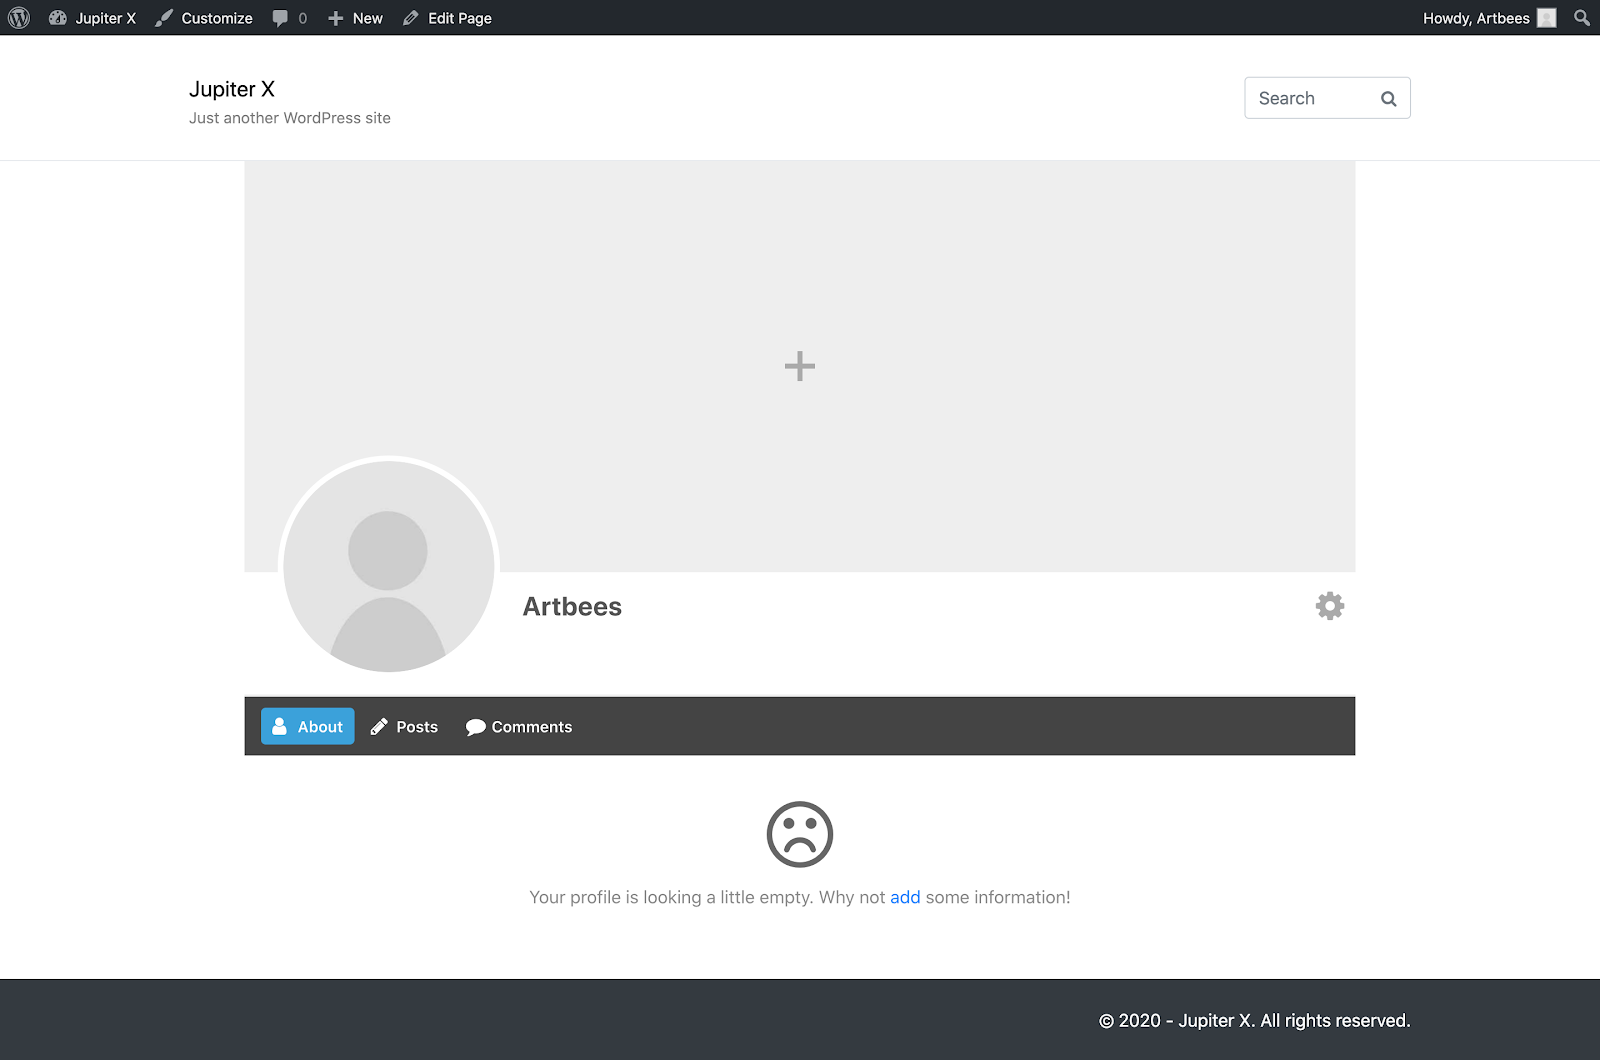
Configure the plugin with your optimal setting and also create your user roles and registration forms under Ultimate Member -> User Roles and Ultimate Member -> Forms and test the registration and check the user public profiles.
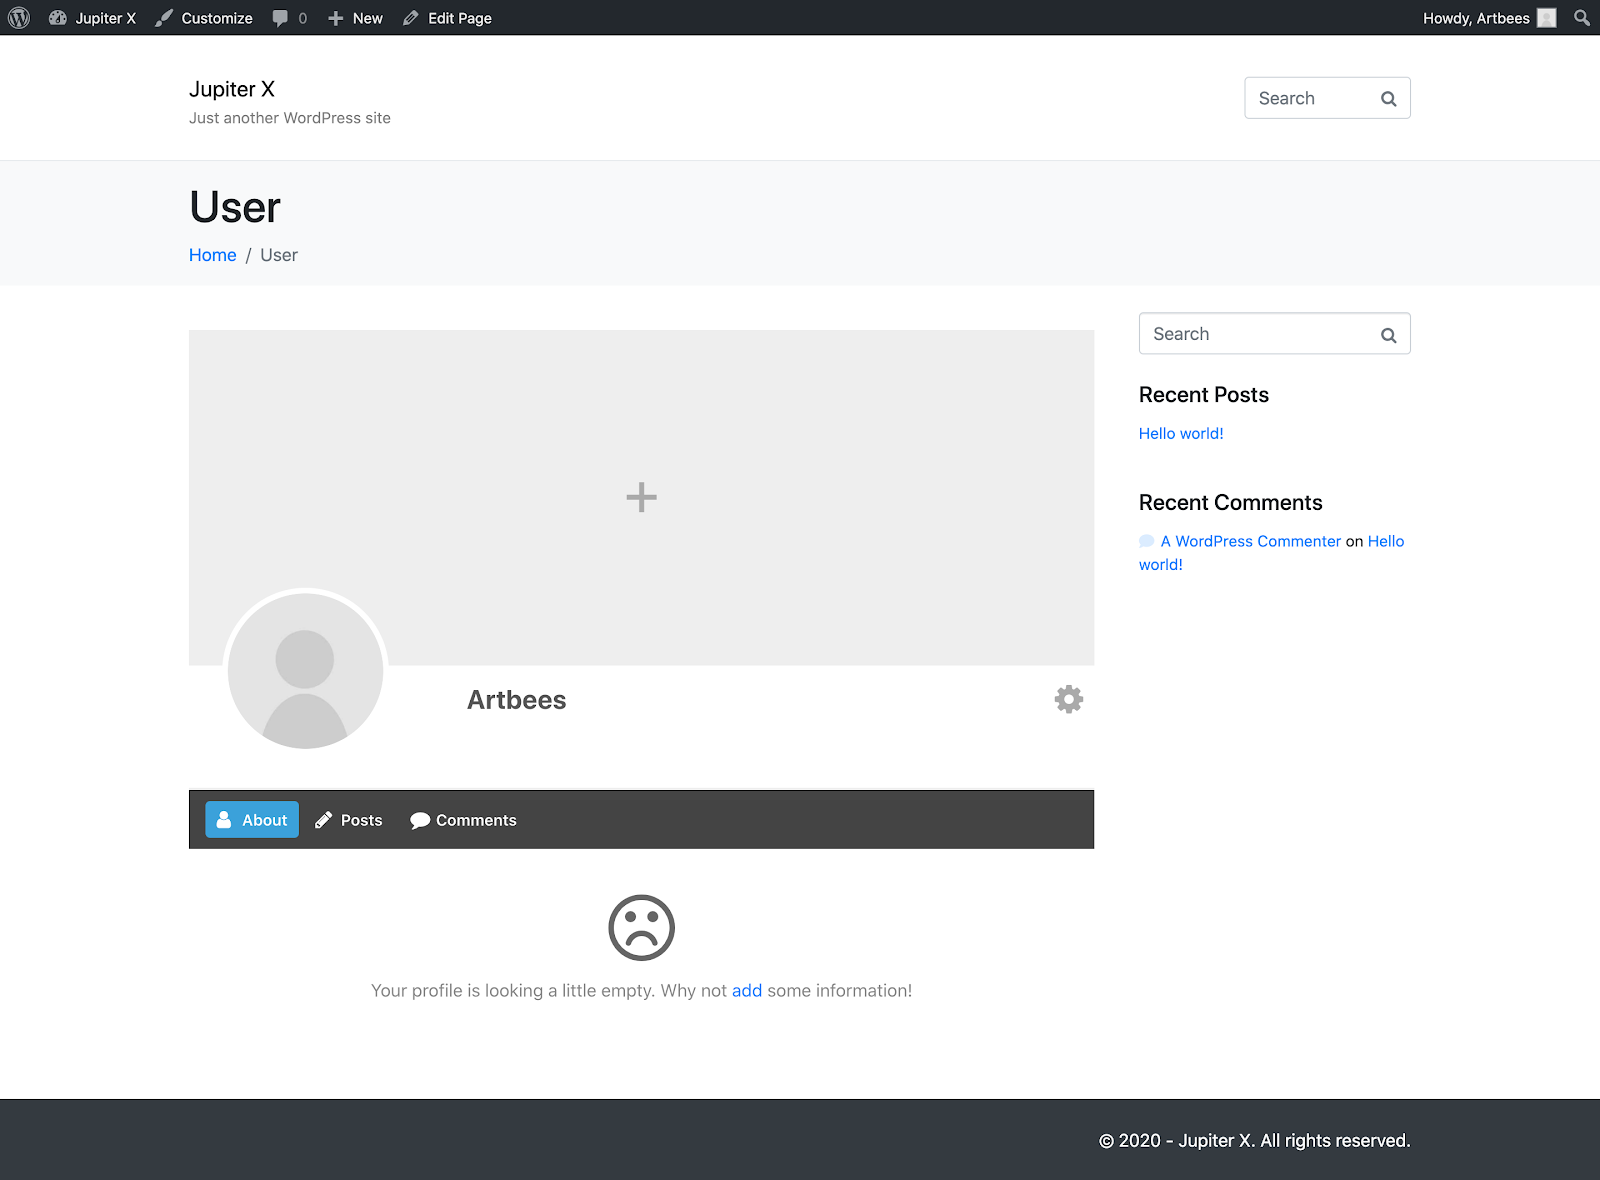
Default profile view of the Ultimate Member plugin using Jupiter X
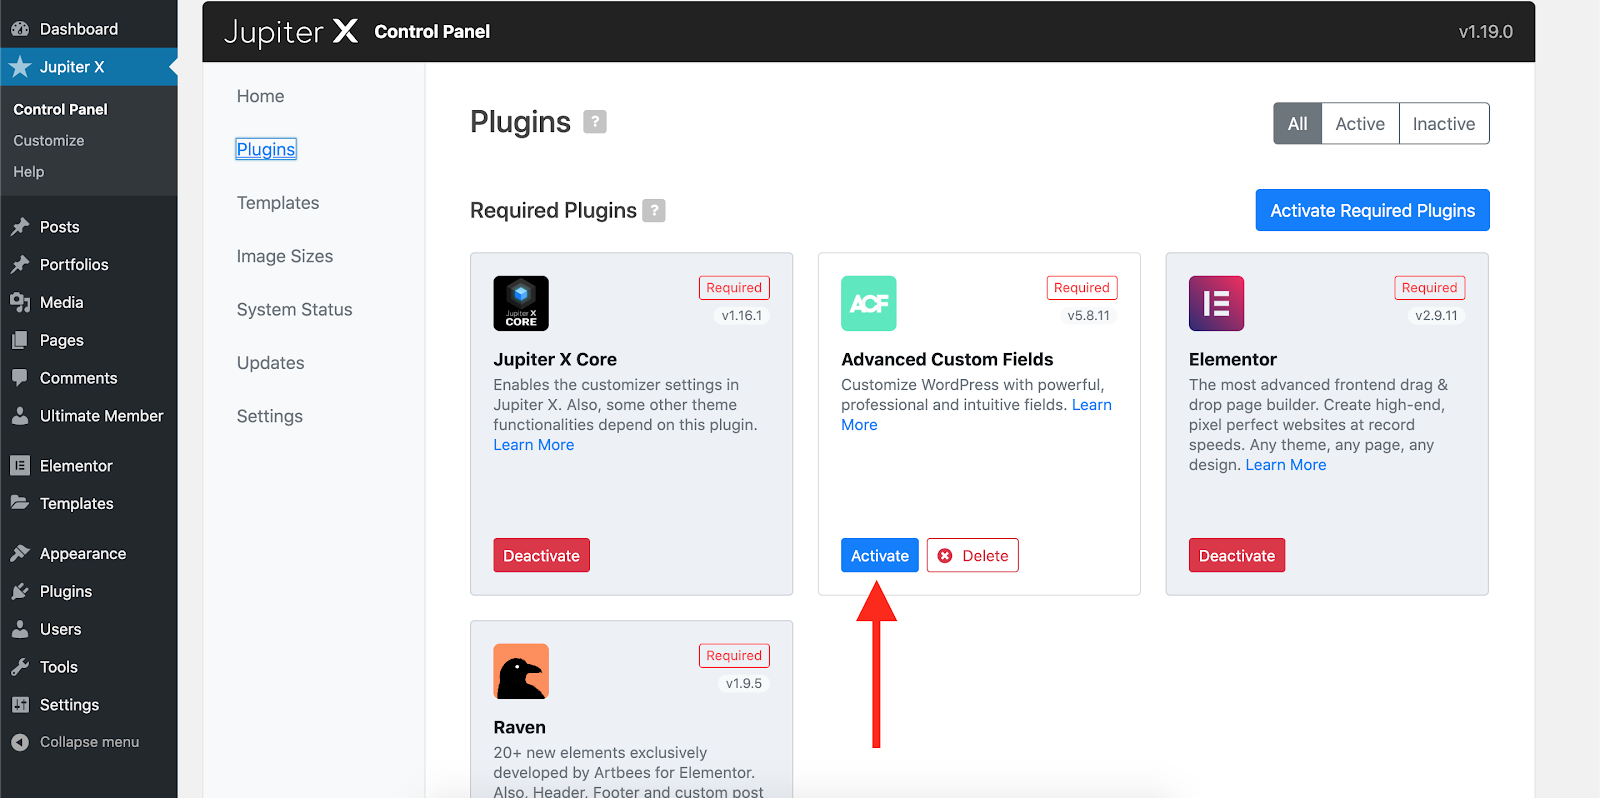
I want the sidebar to be removed on the profile pages. I also want to hide the title bar on top of the profile pages. So, I’ll install the ACF plugin from Jupiter X -> Control Panel -> Plugins and edit the profile page like this:
Activating the Advanced Custom Fields plugin in Jupiter X.
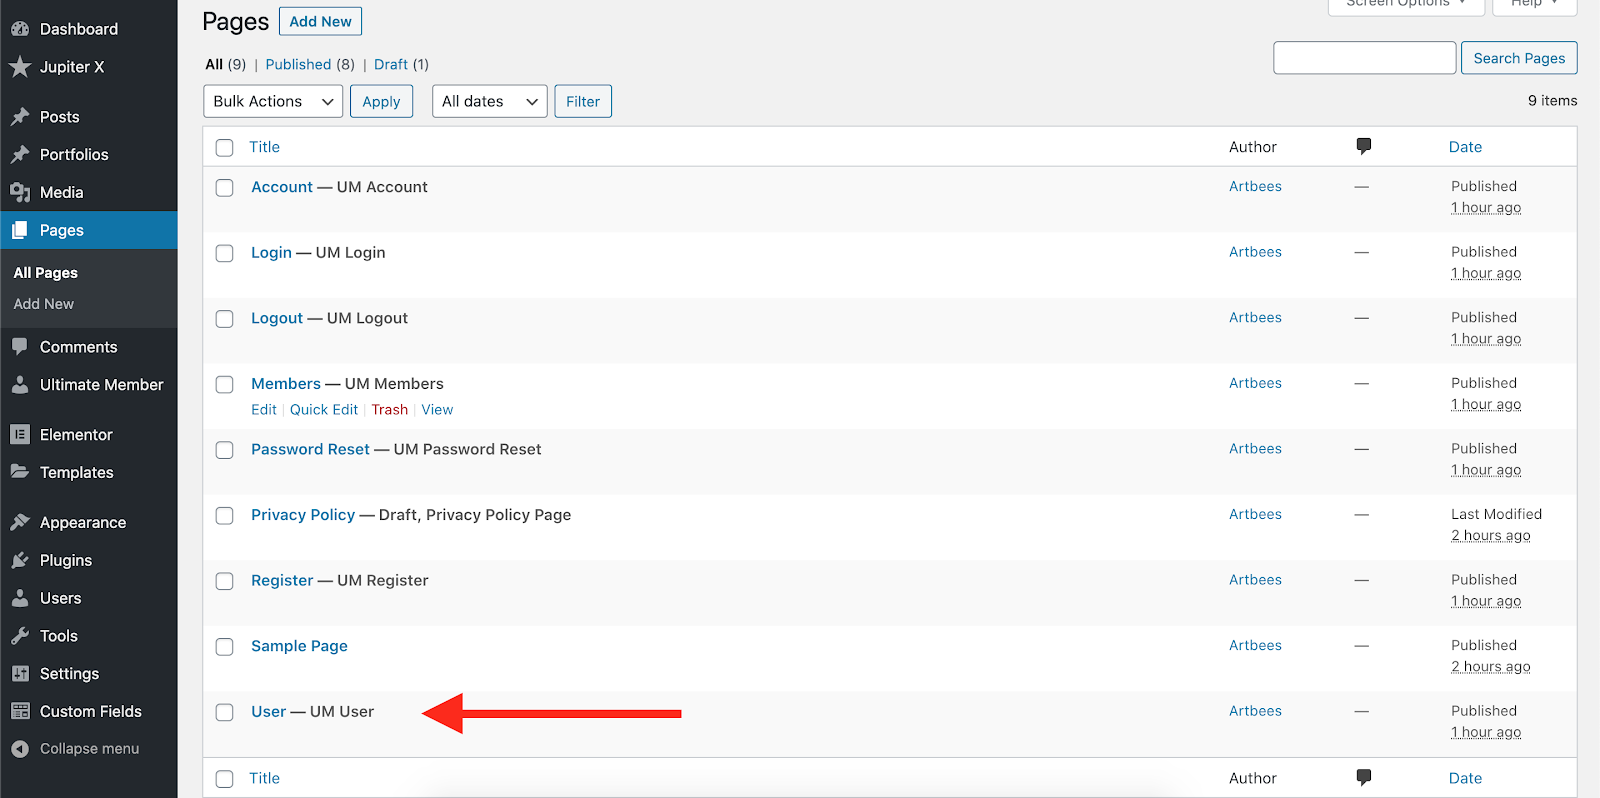
Now I’m going to find the profile page in the list of my pages. It’s named as “User.”
User Profile Page
I’ll hide the sidebar and title bar by setting the layout options and disable the title and description on the page.
Disabling the sidebar and title bar on the profile pages
This can also be done by simply selecting the Full Width template from the page attributes. Using this method you can also remove the extra gap on top and bottom of the page.
A Full-Width profile page without any gaps on top and the bottom
The result would be like this:
Now you can add a cover photo, custom avatar and all the profile details you want. More information can be found here.
Installing and configuring the Real-time Notifications extension
The good thing about Ultimate Member is that it lets you use extensions, particularly those whufeful when setting up a WordPress website notification system. Most of its extensions are not free, but indeed worth buying. A list of available extensions is provided here. It also has a developer API available here.
We want to add the Internal Notifications feature, so I’m going to buy and download the Real-time Notifications extension. On the extension description they say:
Add a real-time notification system to your site so users can receive updates and notifications directly on your website as they happen. This helps to increase user engagement and keep users on your site.
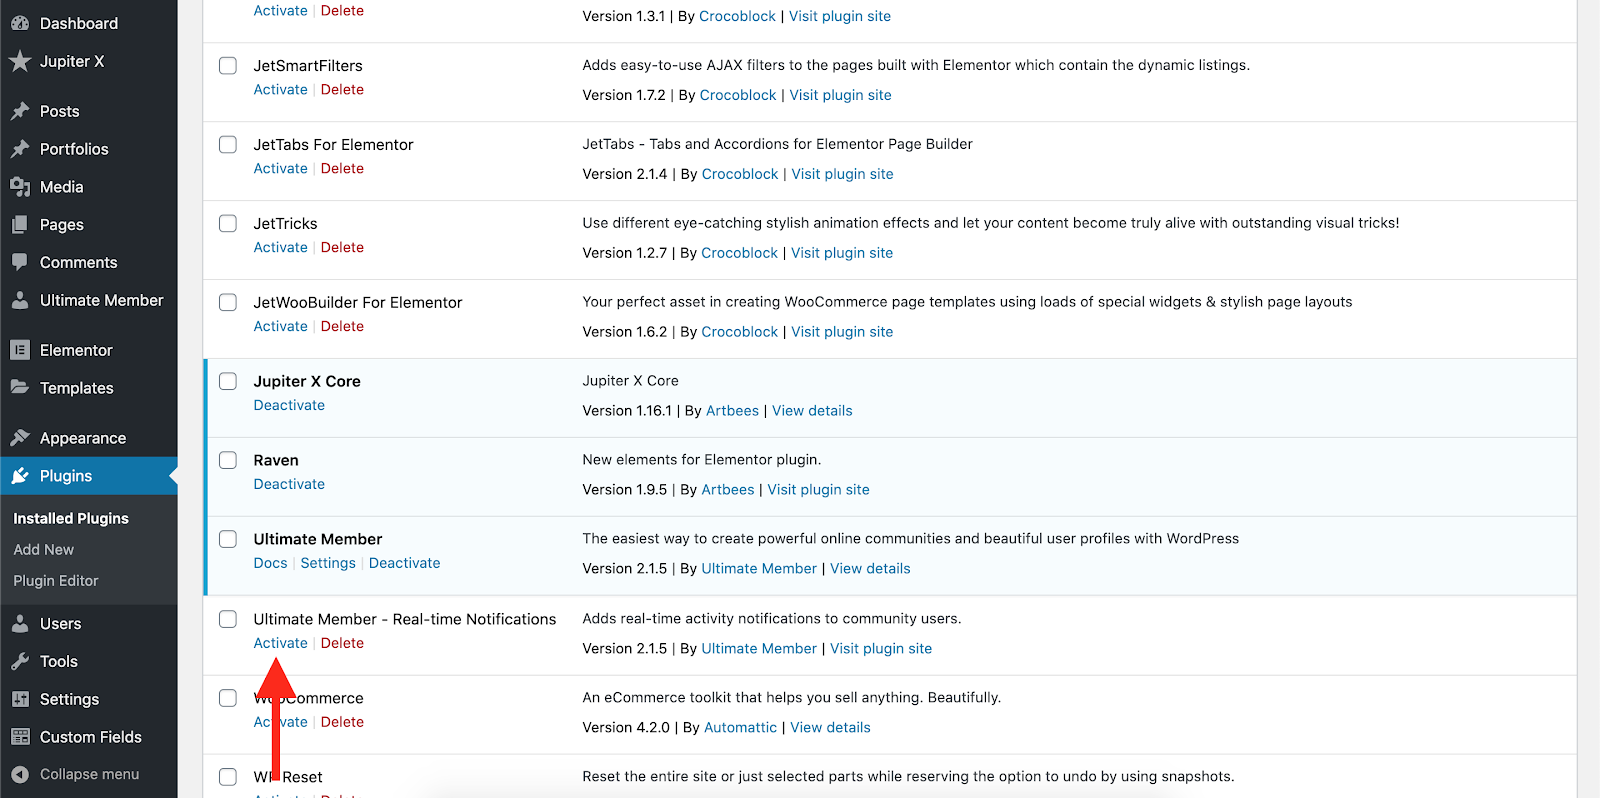
Great! So, after purchasing the extension, we need to install it like every other plugin. Navigate through Plugins -> Add New and upload the package and install. Then activate it through the plugins page.
Activating the Ultimate Member – Real-time Notifications
Register the plugin with your purchase key and go to Ultimate Member -> Settings. Right after the activation, you can see that a new tab named as Extensions is added to the settings page of the plugin.
Ultimate Member Extensions settings
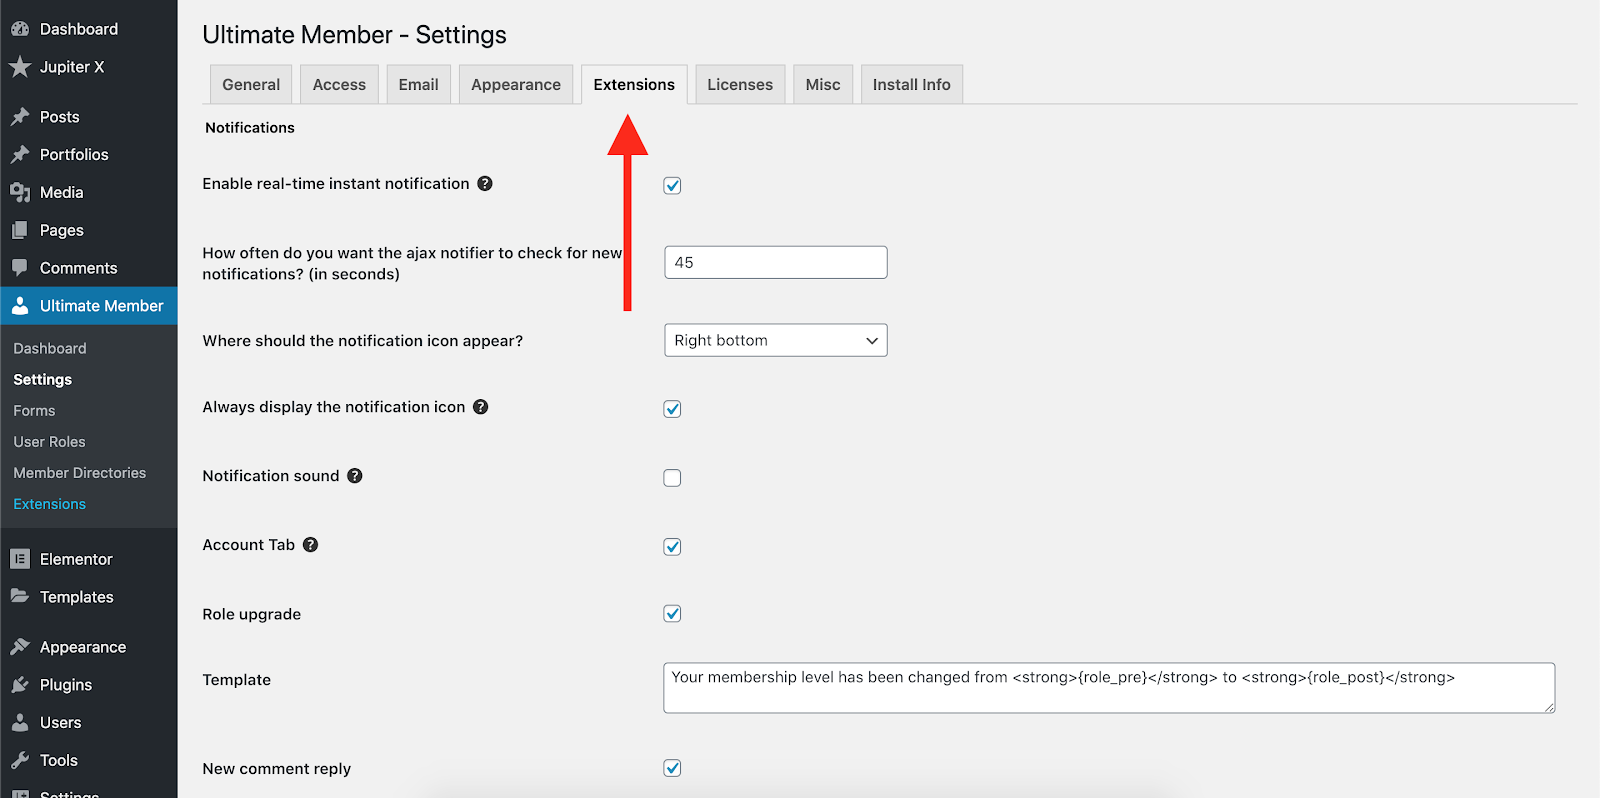
The first available settings on the extensions, prior to the installed ones, is notifications here. Configure the plugin as you wish. I would like to enable the instant notification to send the notifications even if the user has not refreshed the page.
Here you can find out about the features that this plugin offers. As the plugin doc says:
Enable real-time instant notification – It is recommended to turn this setting off if your server is getting some load.
Change the location of the notification icon to either bottom left or bottom right.
Modify the number of seconds on how often you want the ajax notifier to check for new notifications.
Always display the notification icon – If turned off, the icon will only show when there’s a new notification.
Account Tab – Show or hide an account tab that shows the web notifications.
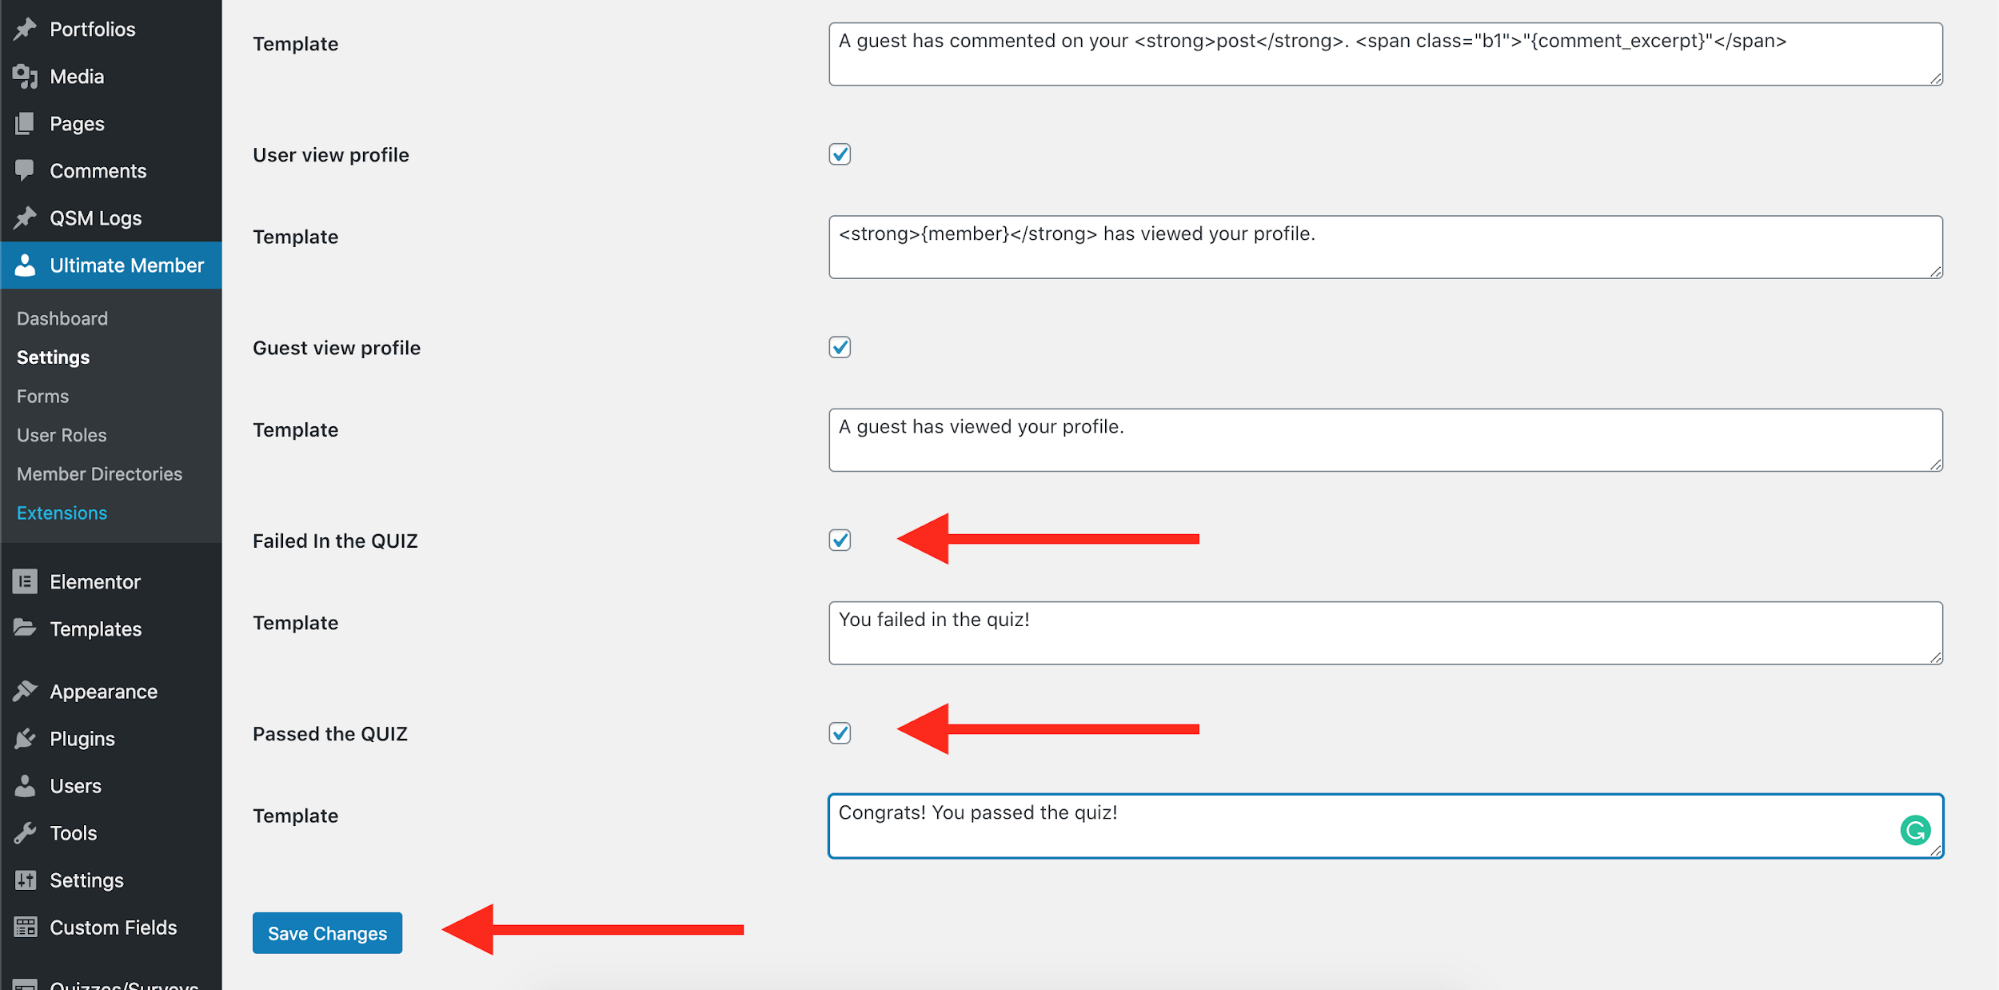
You can turn on or off notifications and edit the templates for the following :
Role upgrade
New guest comment
User view profile
Guest view profile
User awarded points for action
User deducted points for action
User receives points from another person
User gets a new private message
User gets a new wall post
User gets a new wall comment
User gets a new post like
User gets a new mention
User account is verified
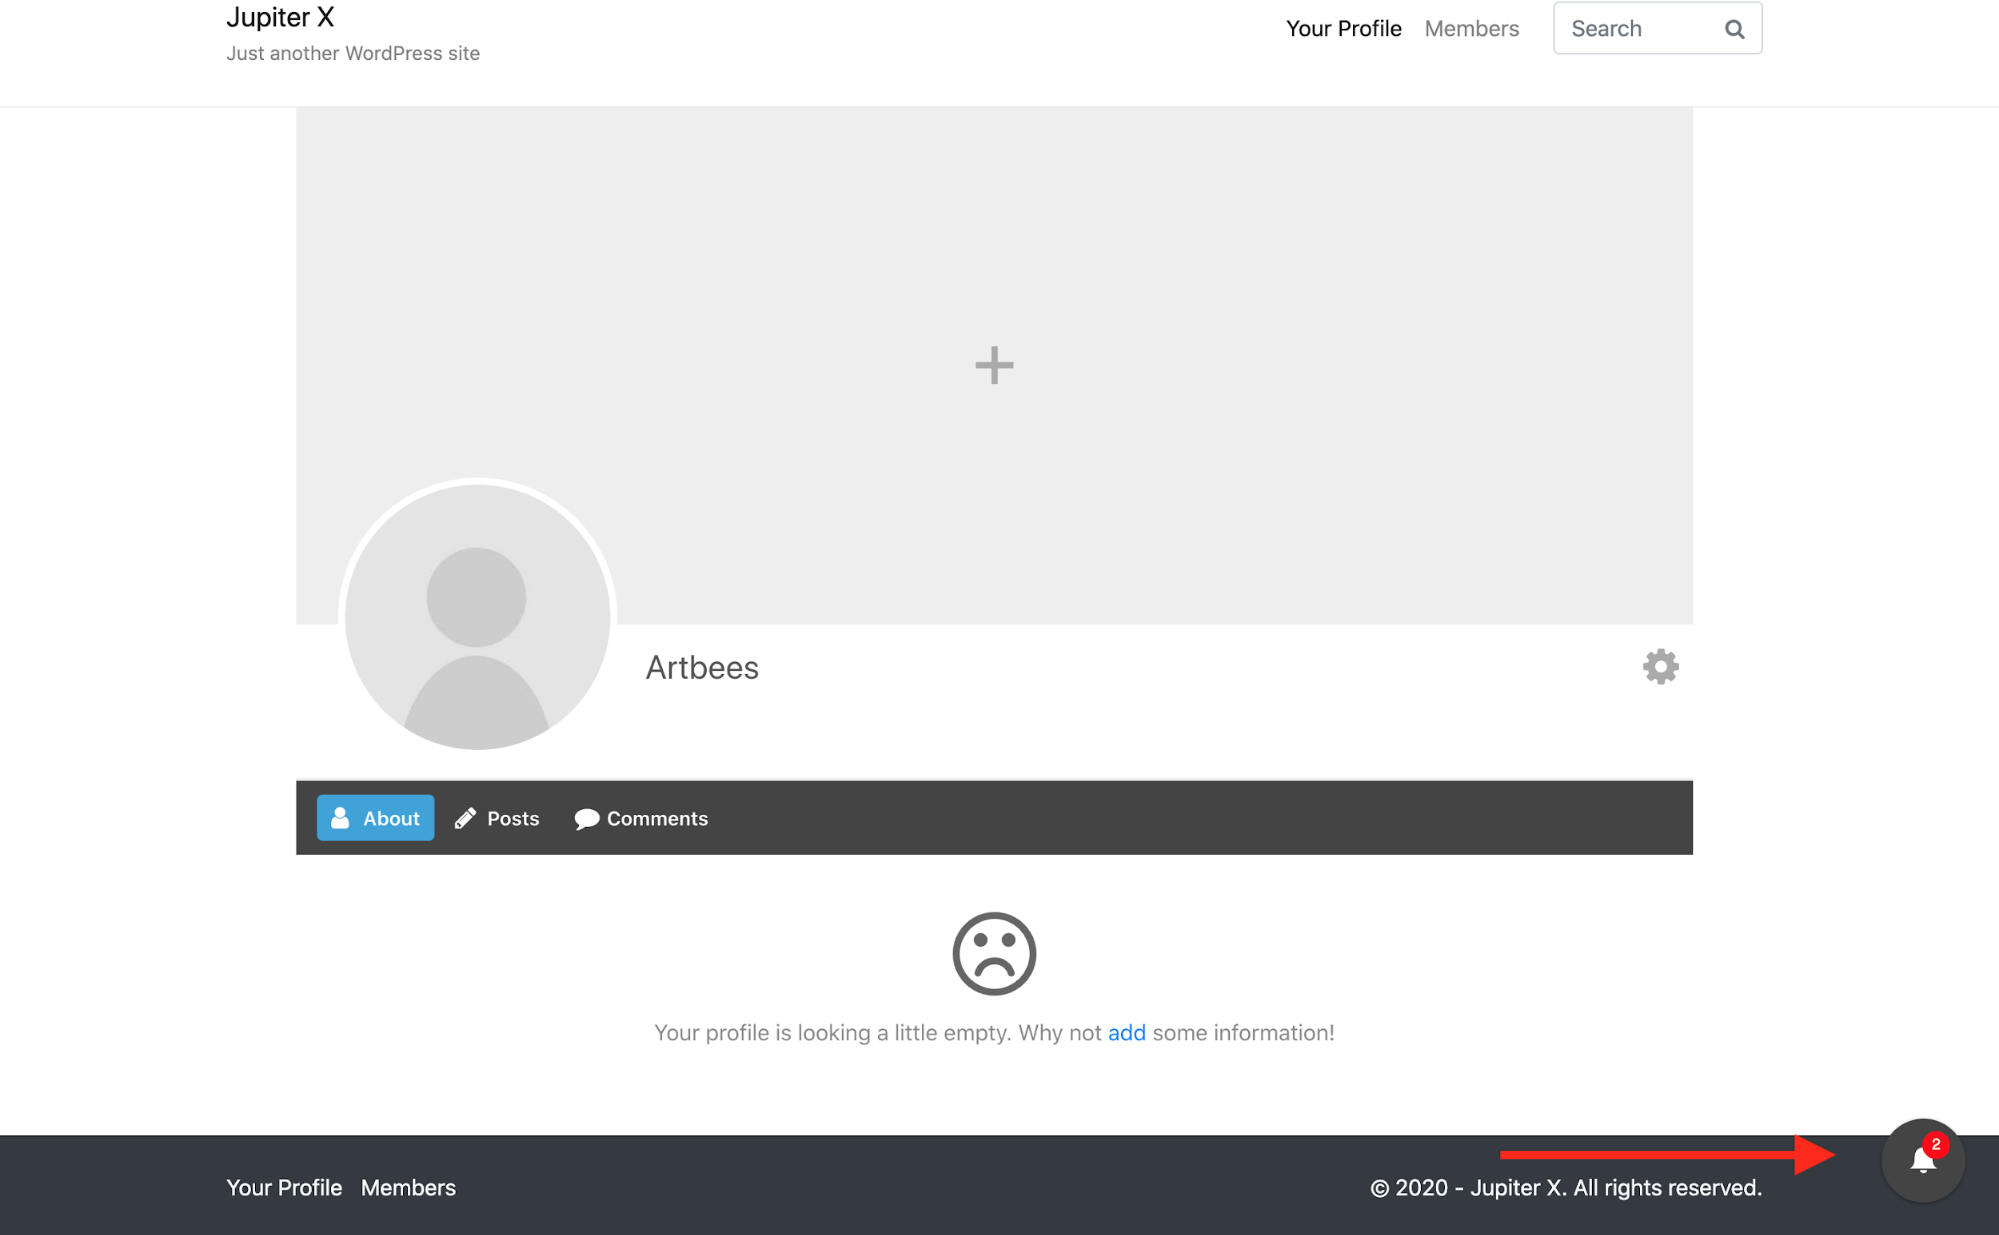
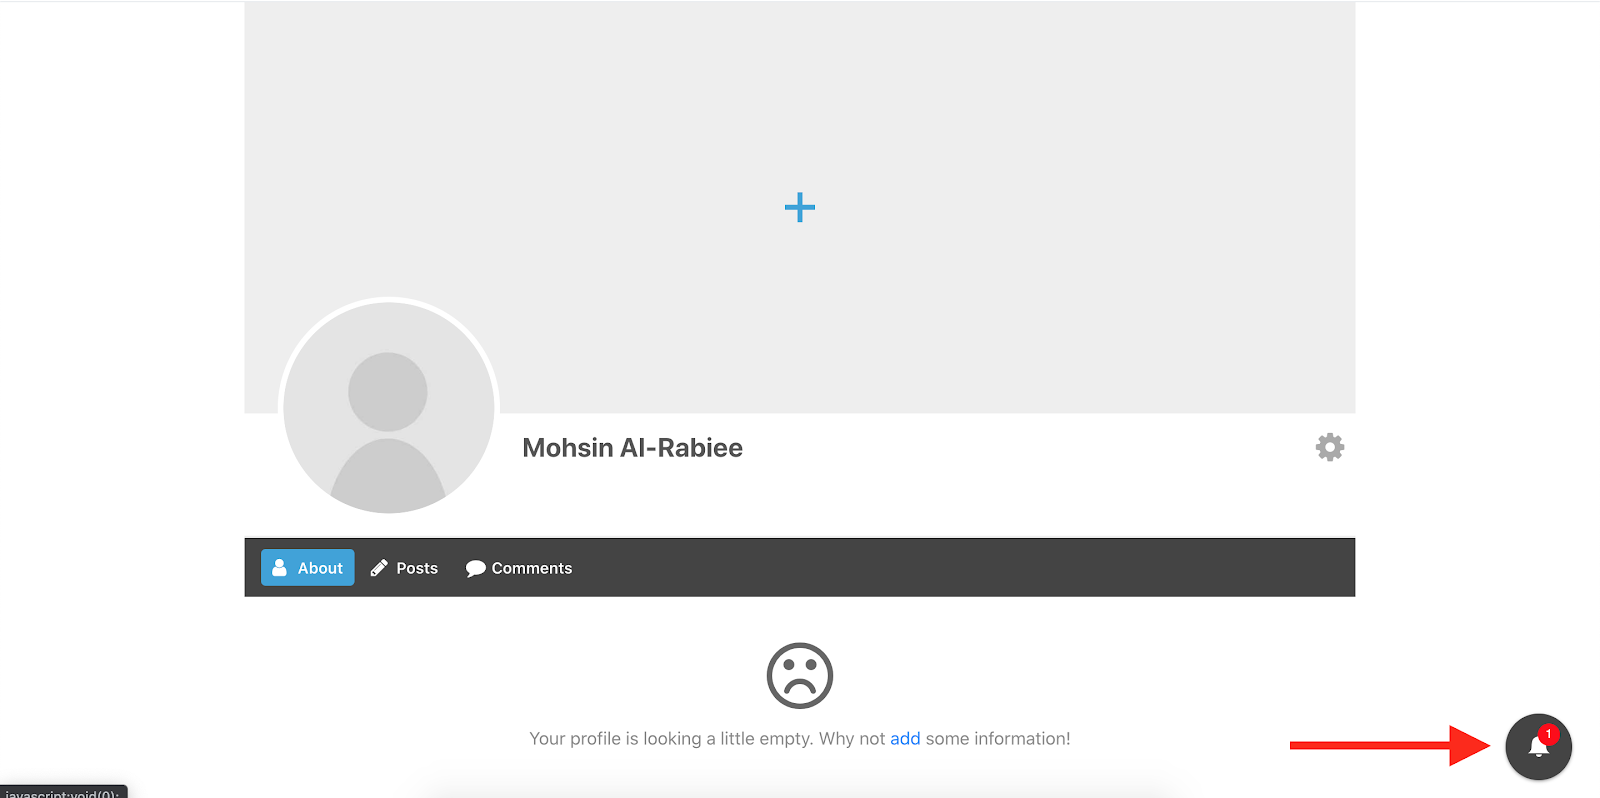
I’m going to create a temporary profile and test the functionality when I visit that profile. As soon as a guest or a member visits a profile – since we have enabled the “User View Profile” notification in the settings – he/she will get notified that someone visited their profile.
Notification received
By clicking on the notification button, the following notification will be shown:
Notifications listed and sorted by date in descending order
In the next step, we’re going to notify a user with a customized notification while triggering an action. For example, you may need to send a notification to a user when he/she downloads a file or when the user membership is about to expire.
Adding custom notifications using API
Let’s say that you have an online quiz website. The users register to your website, purchase a membership plan or a quiz and then want to take that quiz and get notified about the results. I skip the part that you take to provide the membership plan and monetize the quiz, but in brief, you can do it with a combination of the WooCommerce and Ultimate Membership plugin. You can add a new user role, then add a new WooCommerce product and use this extension to automatically assign that role to the user right after purchasing that product and then restrict your content for that user role.
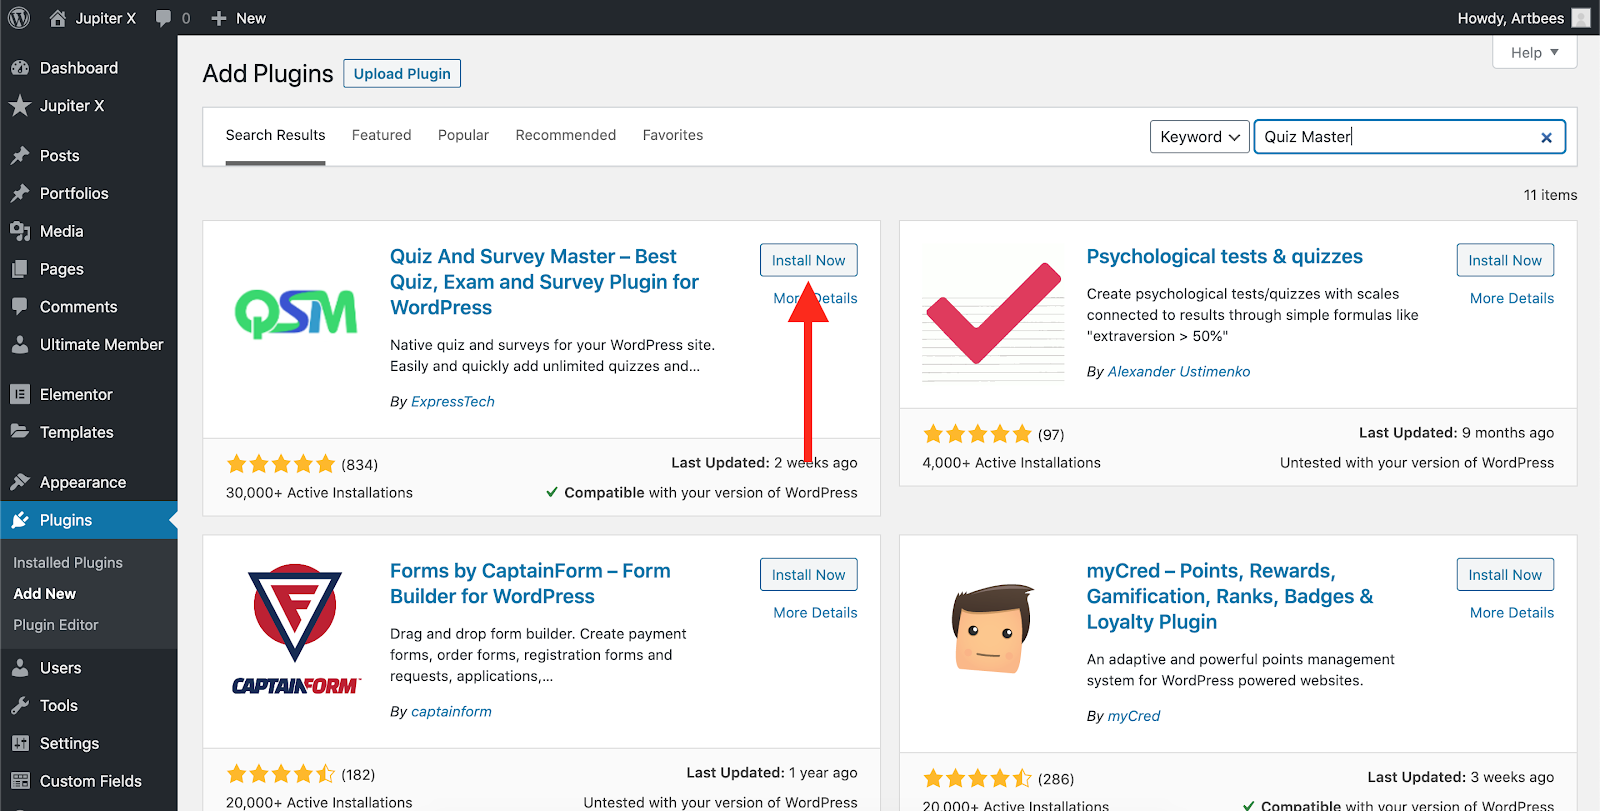
Assuming that you are using the Quiz Master plugin, we want to send a notification to the user who finished the quiz and notify them as to whether or not they passed the quiz.
For the first step, I’m going to install the Quiz Master Plugin.
Installing the Quiz Master Plugin
After that, from the Quiz Maker menu, I’ll add a new quiz.
Add a new Quiz/Survey
Then I’ll provide the questions inside the quiz. You can find information about this process here.
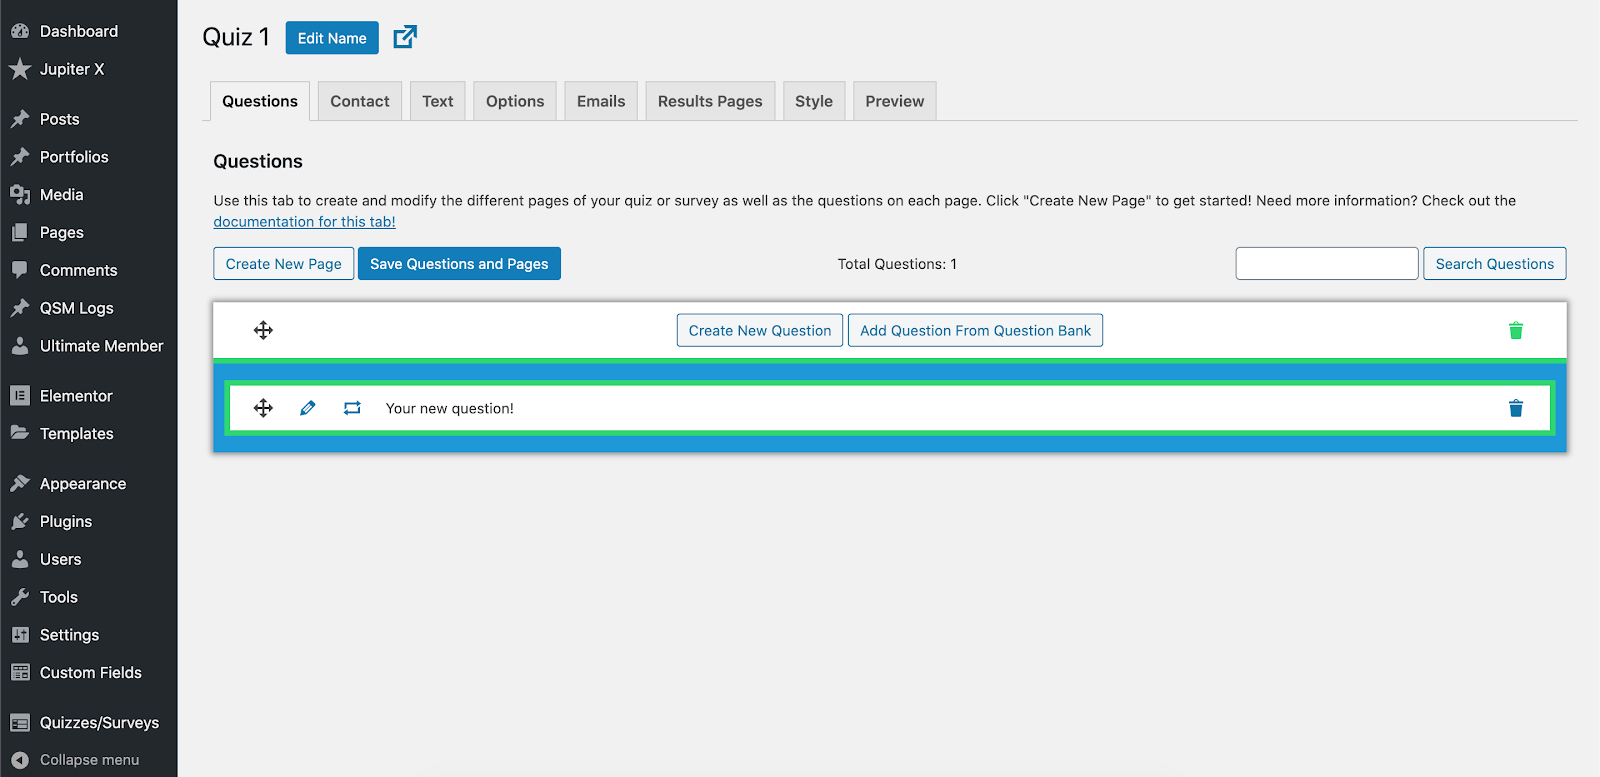
I’ll add a page and a question and save the quiz.
Creating a page and question in a quiz
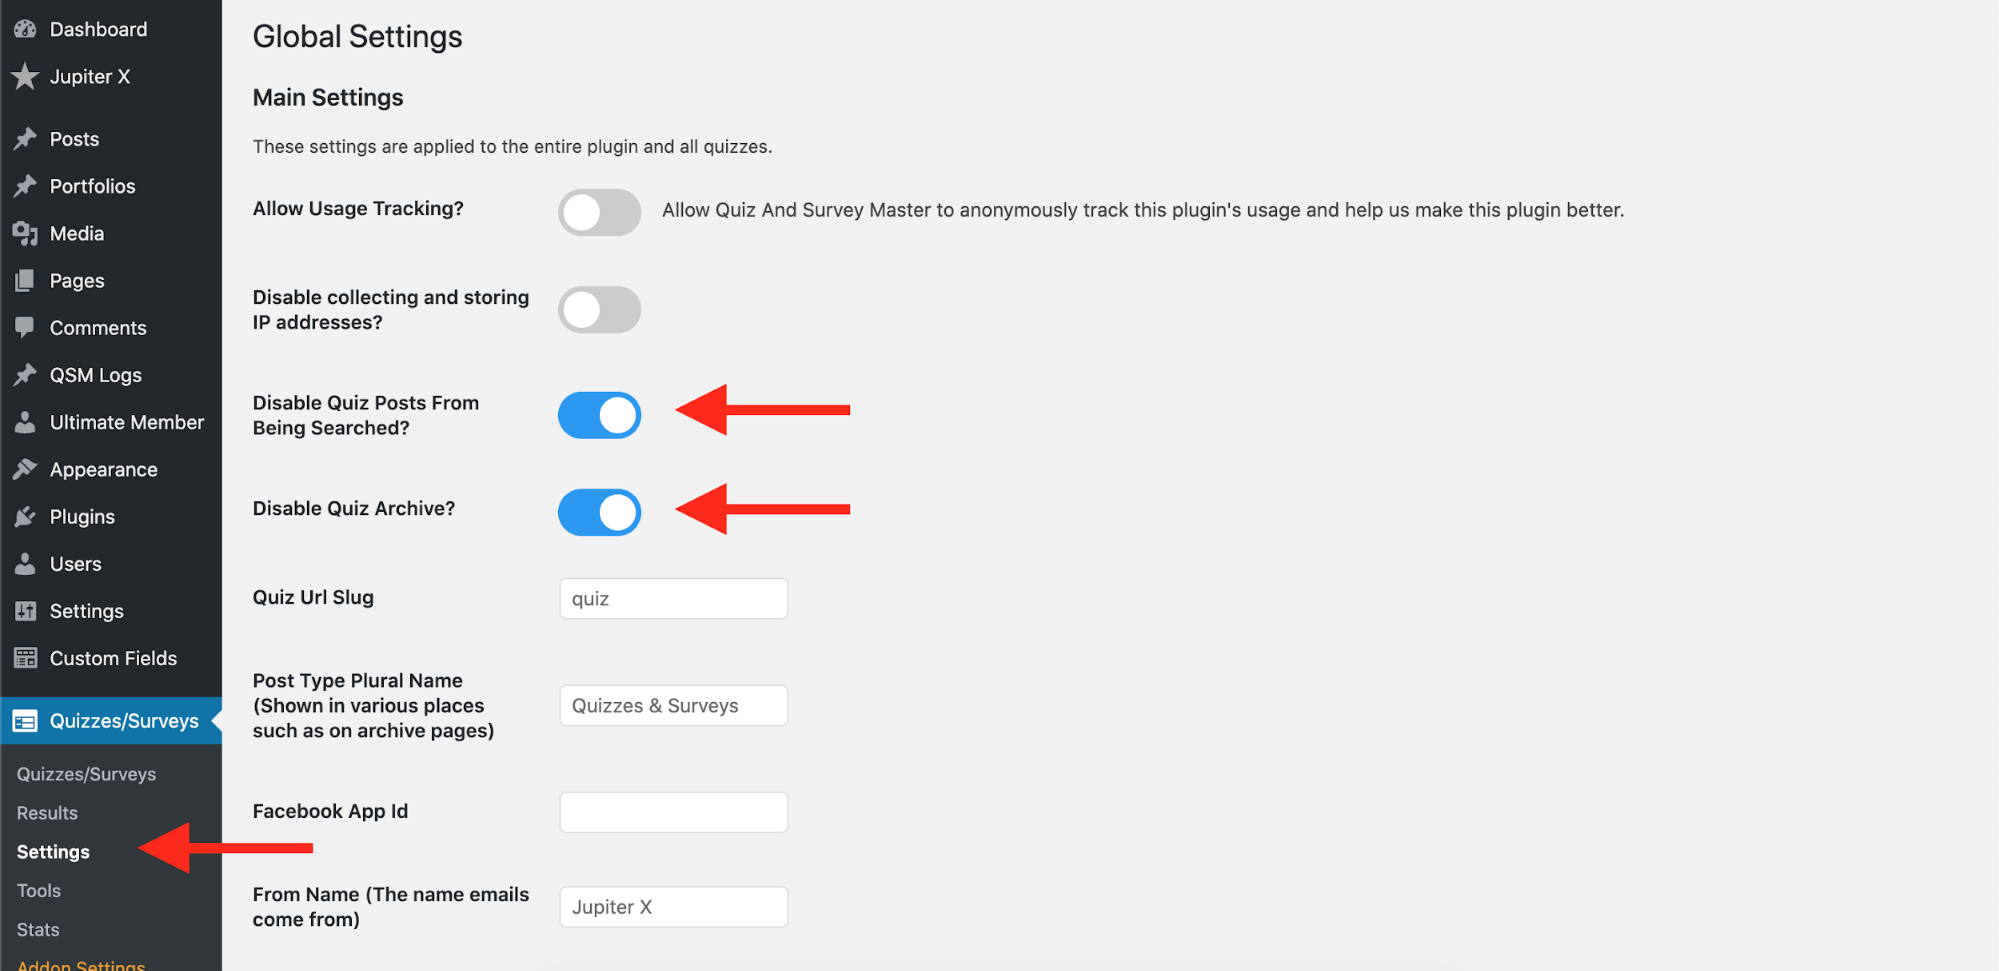
Then in the Options tab, I’ll make sure the quiz is only available for the logged-in users. If you want more restrictions, you need to redirect all the single quiz pages to the login or content restriction page using a redirection plugin. Then embed the quiz with a shortcode into a page and using Ultimate Member, restrict the quiz to the specific user roles. Also, make sure these two options are checked and activated in the Quiz Maker settings:
Disable Quiz Posts From Being Searched?
Disable Quiz Archive?
Configuring the quiz plugin settings
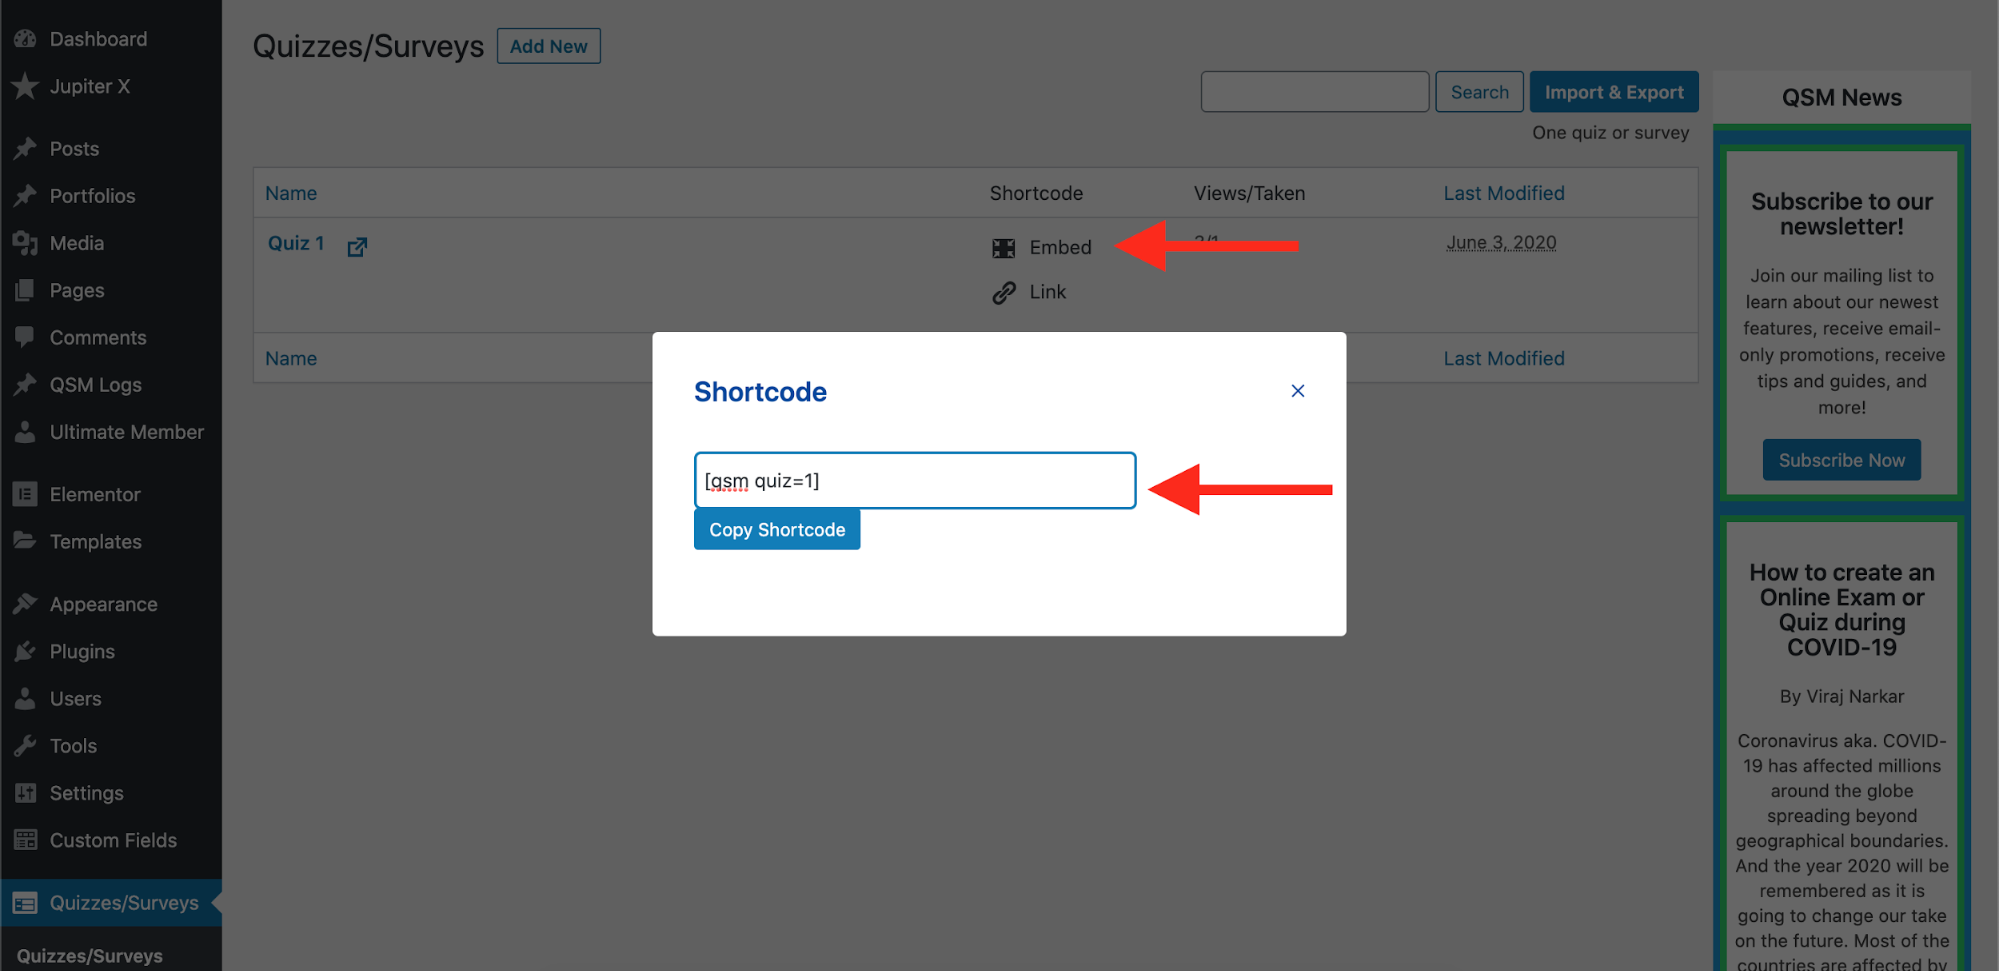
By clicking on the Embed link on the quizzes page, you can get a shortcode and put it on the page you want.
Getting the embed shortcode of the quiz
After copying the shortcode, create a page and add it to the content of that page. Then configure the page visibility for different user roles and, by doing that, you are restricting the quiz to specific roles.
Restricting the quiz to different roles
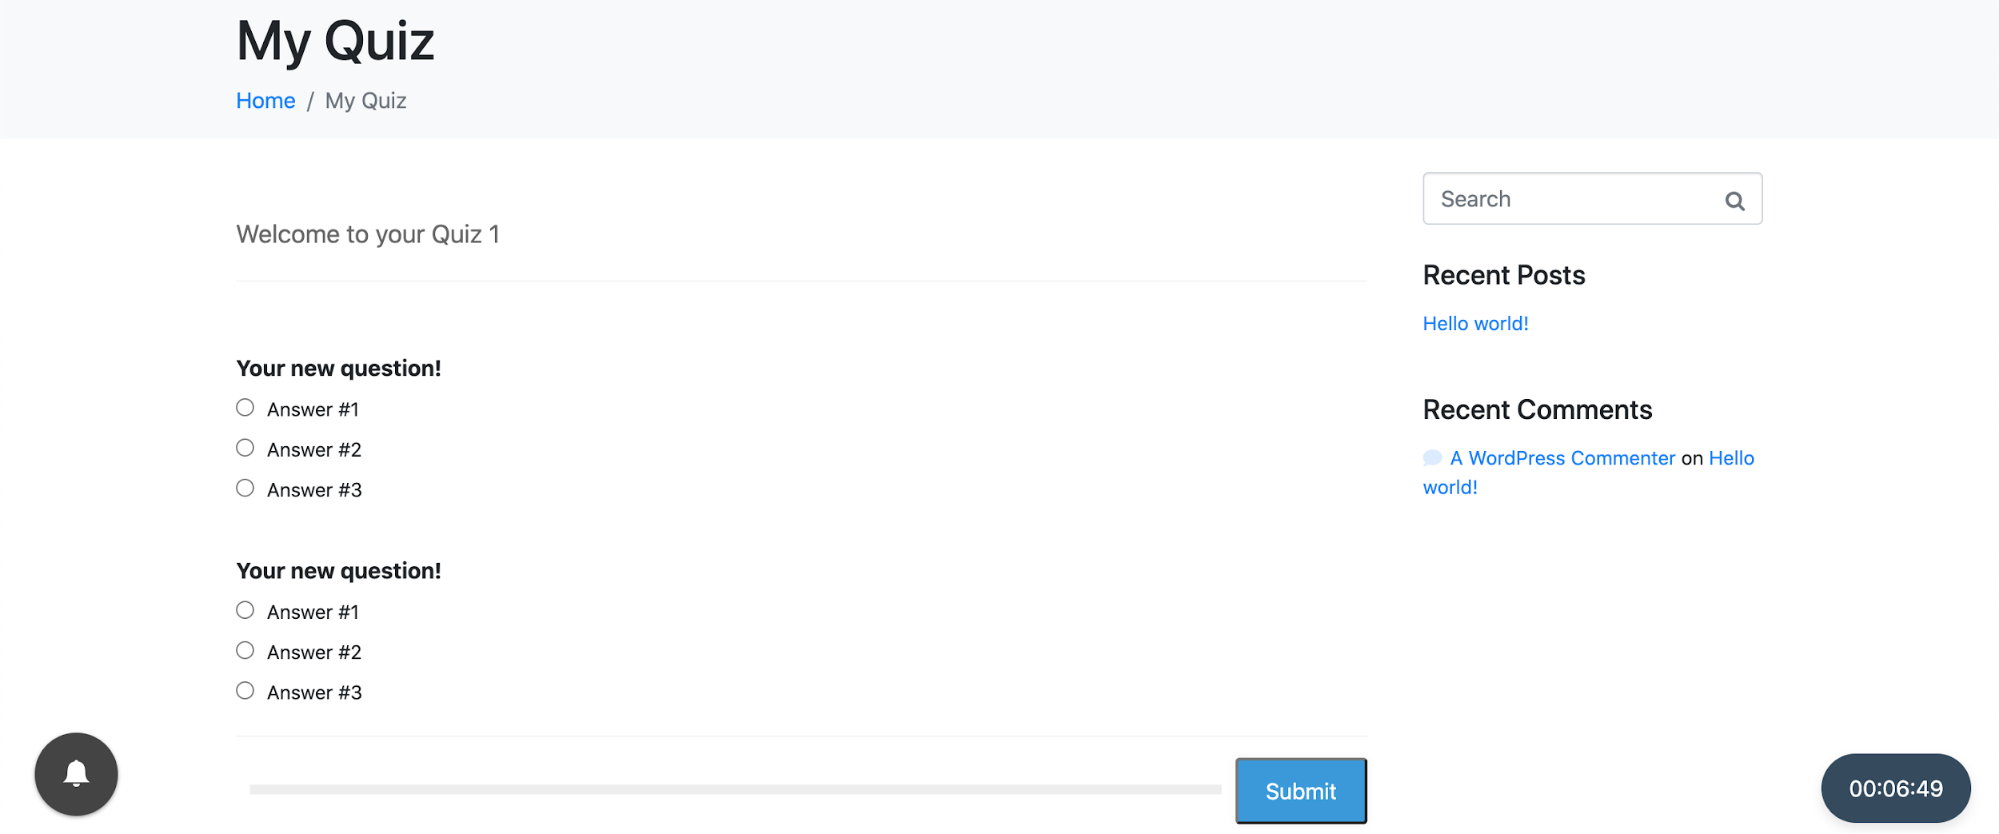
Now while visiting that page and have the correct user role, you can take part in that quiz.
The quiz page. Use the page settings to remove the sidebar and title bar if you wish to have a clean quiz page.
Here, I’d like to add a custom notification for the users to be notified about the results of their quiz. To do that, I need to activate my child theme and write some codes. As the first step, install and activate your child theme like what’s described here. Then, in the child theme’s functions.php file, I will add these codes:
/*

This code sample shows you how to use the API to create
and add custom notifications (for real-time notifications)
plugin.

STEP 1: You need to extend the filter: um_notifications_core_log_types with your
new notification type as follows. For example:

*/
add_filter('um_notifications_core_log_types', 'add_rad_shodan_notification_type', 200 );
function add_rad_shodan_notification_type( $array ) {

	$array['failed_in_quiz'] = array(
		'title' => 'Failed In the QUIZ', // title for reference in backend settings
		'template' => 'You failed in the quiz!', // the template, {member} is a tag, this is how the notification will appear in your notifications
		'account_desc' => 'When the user failed in the quiz', // title for account page (notification settings)
	);

	$array['pass_in_the_quiz'] = array(
		'title' => 'Passed the QUIZ', // title for reference in backend settings
		'template' => 'Congrats! You passed the quiz!', // the template, {member} is a tag, this is how the notification will appear in your notifications
		'account_desc' => 'When the user passed the quiz', // title for account page (notification settings)
	);

	return $array;
}

/*
STEP 2: Add an icon and color to this new notification type.
*/

add_filter('um_notifications_get_icon', 'add_custom_notification_icon', 10, 2 );
function add_custom_notification_icon( $output, $type ) {

	if ( $type == 'failed_in_quiz' ) { // note that our new action id is "new_action" from previous filter
		$output = '<i class="um-icon-android-close" style="color: red"></i>';
	}
	if ( $type == 'pass_in_the_quiz' ) { // note that our new action id is "new_action" from previous filter
		$output = '<i class="um-icon-android-done" style="color: green"></i>';
	}

	return $output;
}


//get the results of the quiz and in case the user was having the acceptable number, change his role to "passed_quiz_1"
//Add this custom action to php\classes\class-qmn-quiz-manager.php at one line before return the results in submit_results() function in order to be able to get the final results and parse the array based on category results
//        do_action('qsm_quiz_submitted_custom', $results_array, $results_id, $qmn_quiz_options, $qmn_array_for_variables, $result_display);

add_action('qsm_quiz_submitted_custom', 'get_the_results', 10, 5);
function get_the_results ($results_array, $results_id, $qmn_quiz_options, $qmn_array_for_variables, $result_display) {


	// Test if quiz name contains the word "Quiz 1"
	if(strpos(strtoupper($qmn_quiz_options->quiz_name), "QUIZ 1") !== false){
		$user_id = $qmn_array_for_variables["user_id"];
		// Fetch the WP_User object of our user.
		$u = new WP_User( $user_id );
		$matches = array();

//use the placeholder we put in the results text to fetch the results of different categories
preg_match('/\[points\]?(?:(.+?)?\[\/points\])?/', $result_display, $matches, PREG_OFFSET_CAPTURE);
		if(!empty($matches)) {
				$score = $matches[0];
				$category_results = explode(" " ,$score[0]);
				$CATEGORY_1 = $category_results[1];
				//$CATEGORY_2 = $category_results[2];
				//$CATEGORY_3 = $category_results[3];
				//$CATEGORY_4 = $category_results[4];
				//$CATEGORY_5 = $category_results[5];
				//$CATEGORY_6 = $category_results[6];
				//$CATEGORY_7 = $category_results[7];


//If the score in between equal 5 to 7 give him the score 7.5 and store the result in a meta field for the user
			       if($CATEGORY_1 >= 5 and $CATEGORY_1  <=7){
					update_user_meta( $user_id, 'CATEGORY_1', 7.5 );
					$CATEGORY_1=7.5;
				}
				else {
					update_user_meta( $user_id, 'CATEGORY_1', $CATEGORY_1 );
				}

				//Add as many customizations as you like in the results.

				if ( $CATEGORY_1 > 7 ){
						$u->add_role( 'passed_quiz_1' );
						$u->remove_role( 'subscriber' );
						UM()->roles()->set_role( $user_id, 'passed_quiz_1' );
						$user_data = wp_update_user( array( 'ID' => $user_id, 'user_url' => '' ) );

//Link to congratulations page and the other restricted content for the new user role. This link is being used when the user clicks on the notification.
	   $vars['notification_uri'] = get_the_permalink(1);

//trigger the notification API and send it to the user

UM()->Notifications_API()->api()->store_notification( $user_id , 'pass_in_the_quiz', $vars );
				}
				else {

						$u->add_role( 'failed_quiz_1' );
						$u->remove_role( 'subscriber' );
						UM()->roles()->set_role( $user_id, 'failed_quiz_1' );

						$user_data = wp_update_user( array( 'ID' => $user_id, 'user_url' => '' ) );

 						//Link to failed page and the other restricted content for the new user role. This link is being used when the user clicks on the notification.
						$vars['notification_uri'] = get_the_permalink(2);

						//trigger the notification API and send it to the user
						UM()->Notifications_API()->api()->store_notification( $user_id , 'failed_in_quiz', $vars );
				}
		}

	}
	return;

}
The above code will create two new notifications type:
failed_in_quiz
pass_in_the_quiz
It will trigger them in the ‘qsm_quiz_submitted_custom’ action as provided in the code.
You also need to modify the Quiz Master plugin a little bit and add a custom action to be able to fetch the results and do your calculations. Add this custom action to:
php\classes\class-qmn-quiz-manager.php at one line before return the results in submit_results() function in order to be able to get the final results and parse the array based on category results
You need to know that, after adding a custom notification type, you need to activate it through the plugin settings to make it work. So, just navigate to Ultimate Member Settings -> Extensions and activate the new notification types and save the changes.
Activating the new notification types
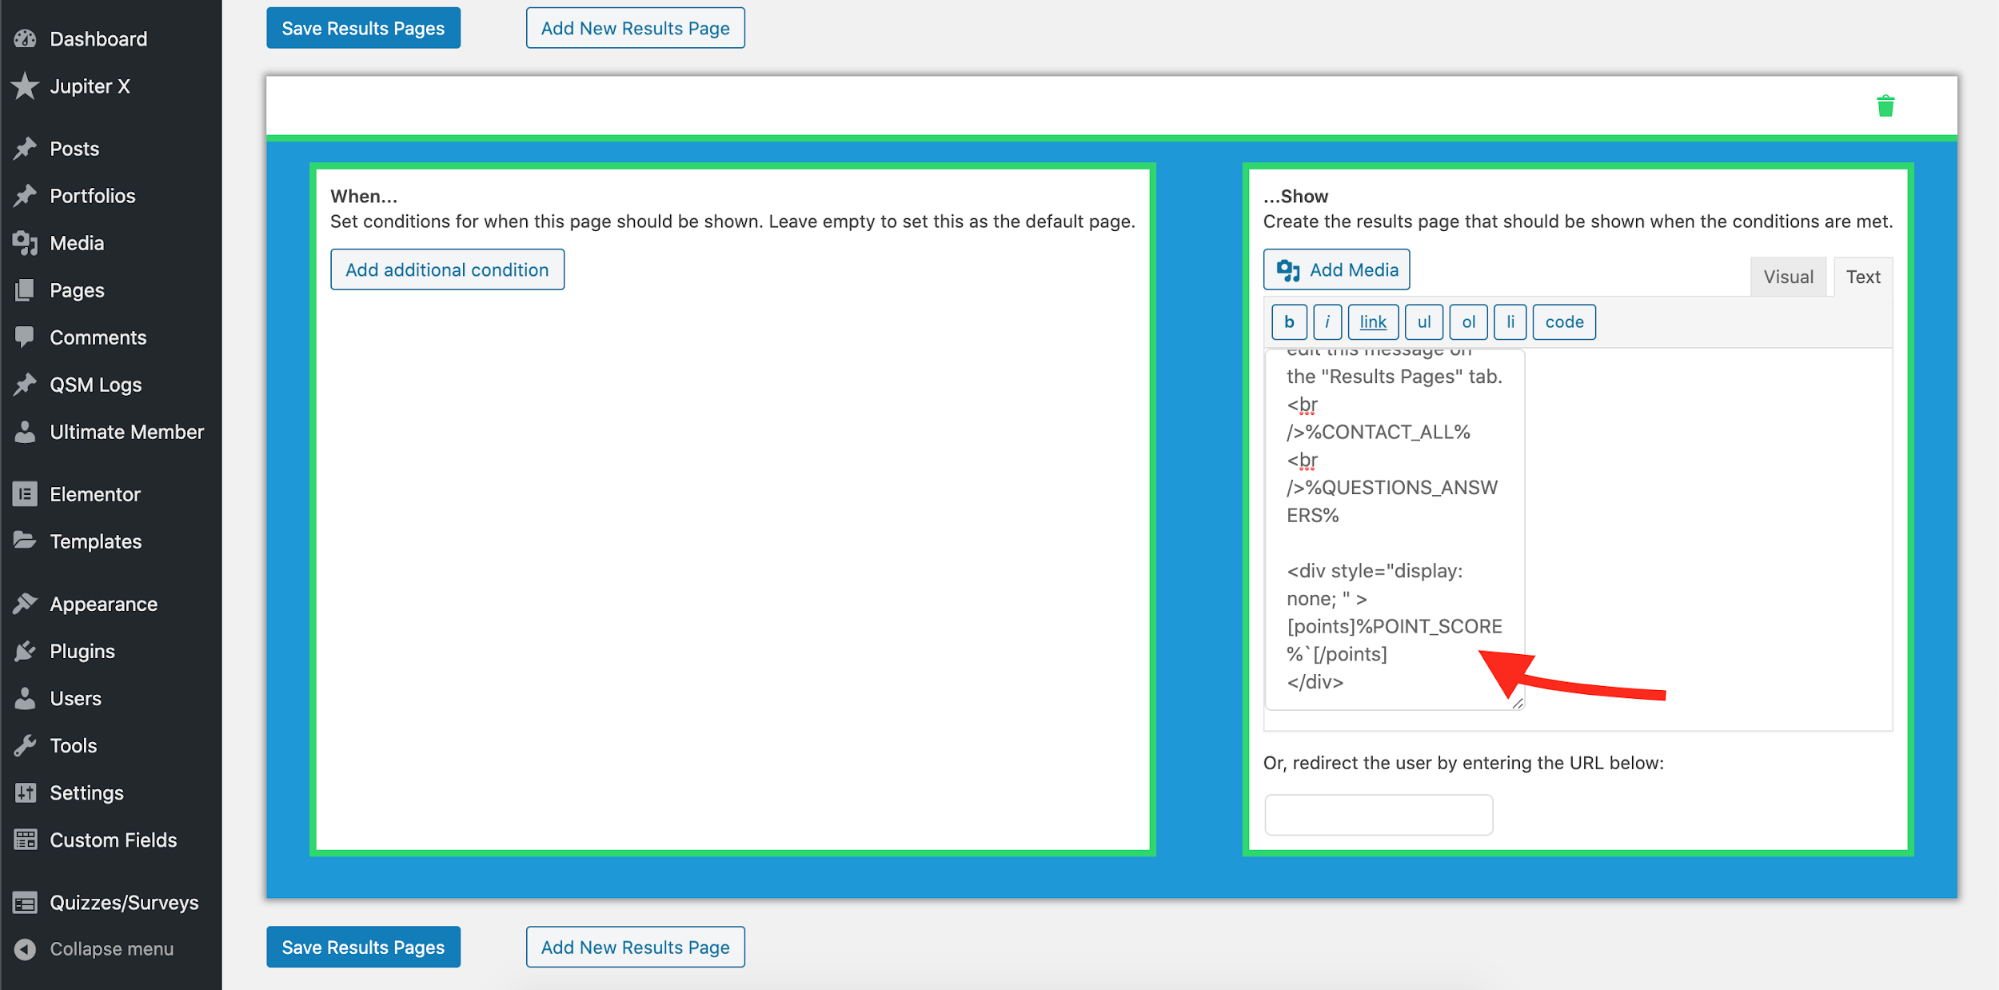
To make sure the code is fully functional, you need to pass the score to the results in a hidden div and fetch it the code using regex. Maybe in the next versions of Quiz Master plugin, they will do this favor and provide a way to fetch the category scores individually. But for now, this is the best way you can get the category scores one by one. So, I will add this code to the results of my quiz to make my code work:
Printing the score in a hidden div in a shortcode structure to be able to fetch it via actions
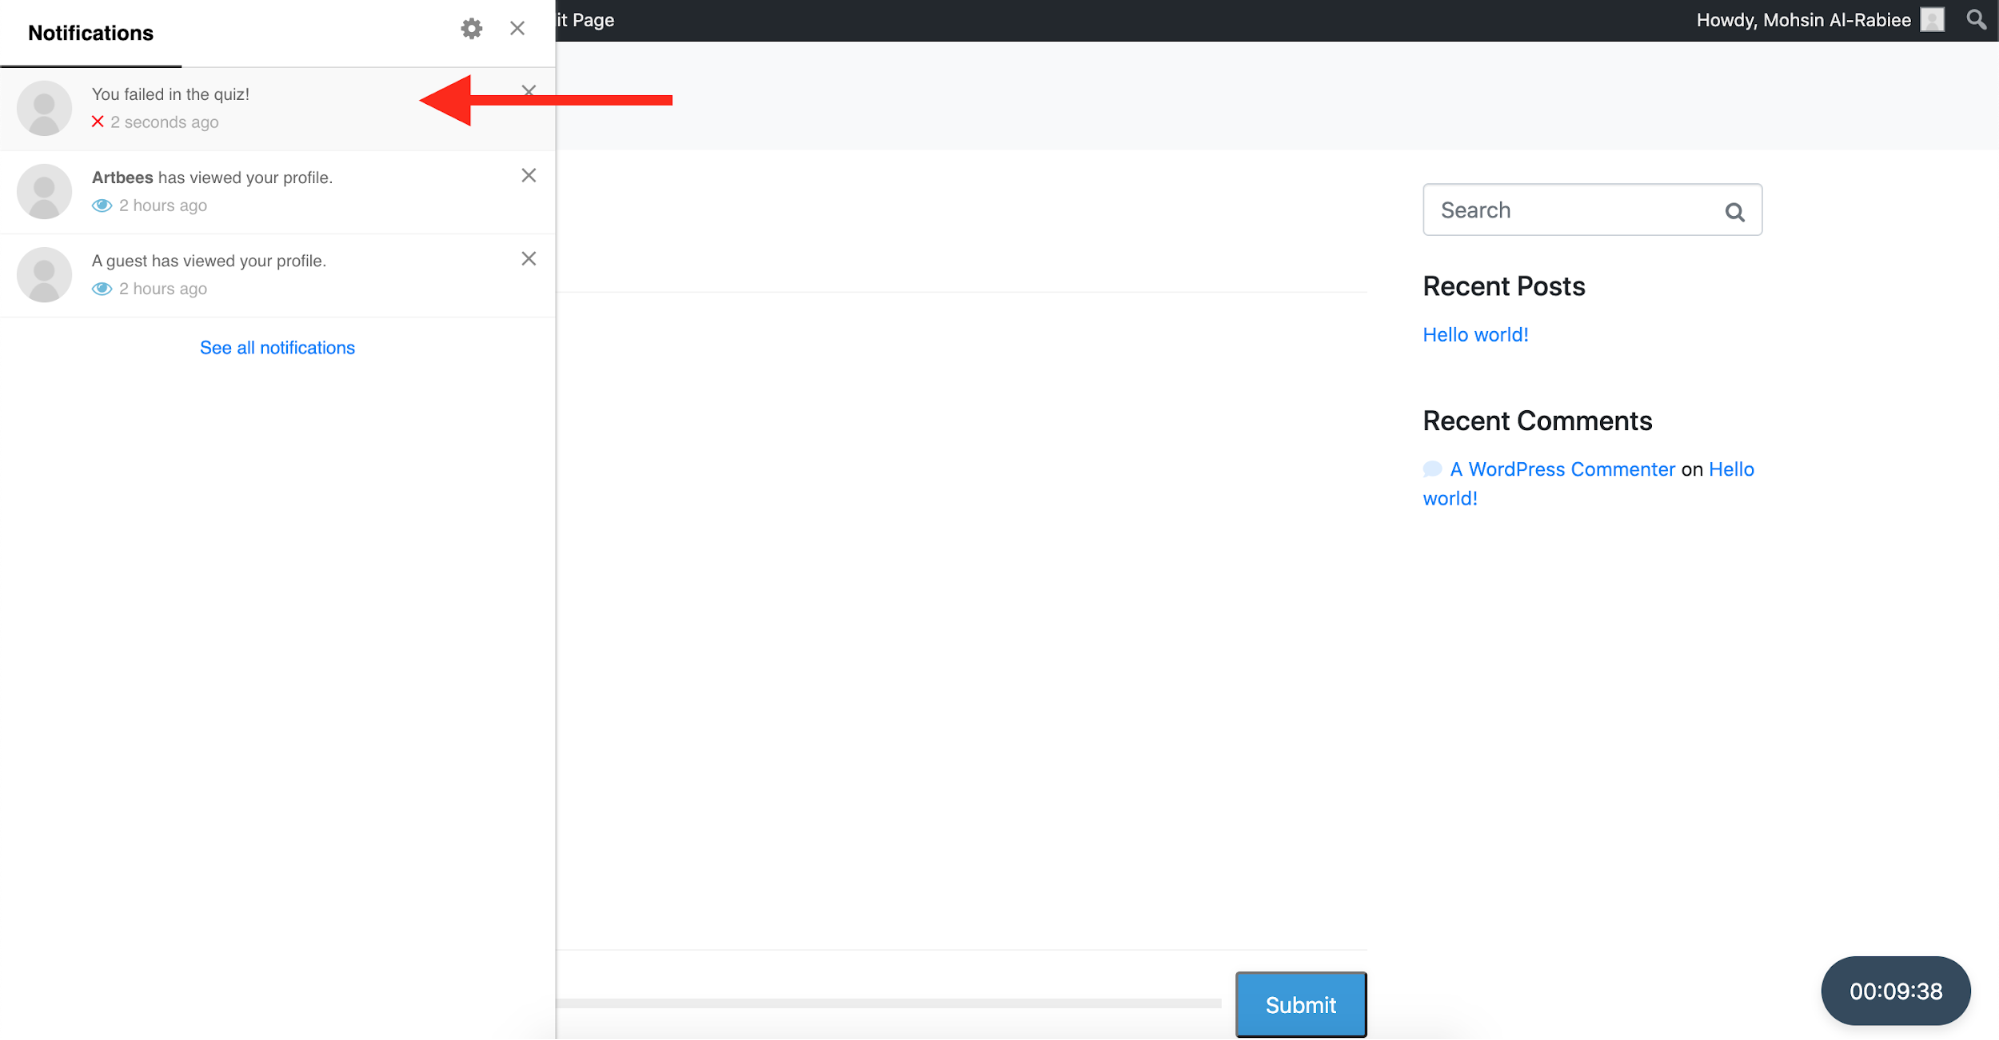
The results would be like this:
User takes the quiz. If the user gets a minimum score, he/she will be considered as passed and his/her role will change to passed_quiz_1.
If the user doesn’t get the minimum score (which is 7 here), he/she will be considered as having failed it, and his/her role will change to failed_quiz_1.
In any of the cases above, the user will receive a notification prior to his/her acceptance or failure. This will be done by calling the notification API type pass_in_the_quiz or failed_in_quiz.
Custom notification in action
Add the notification button in the header
By default, you can only choose to place the notification button in the bottom left or right corner of the website. However, using Jupiter X, you can put it anywhere you want! Using a custom header template, I will put the notification button on my header and will hide the bottom corner button via custom CSS. In order to add the button in a header, create a custom header template like this and just add this shortcode anywhere you’d like:
[ultimatemember_notifications_button]
Adding the notification button to the header in Jupiter X
Find more how to create a custom header in Jupiter X here.
Final Words
In this article, we learned how to create a WordPress website notification system for our website using the Ultimate Member plugin and its addons. It still has a way to go – however it’s still possible to set up your internal notification system.
You may need to send an SMS or Email to inform the users and notify them about the things that are waiting for them on your website. Or you may need to provide a way to push the notifications in your user’s browsers. While there are so many other functionalities to discuss, we learned the fundamentals of running a notification system and also integrated it with custom functionalities like a quiz. If you had any questions or issues regarding the above code, kindly let me know in the comments below.
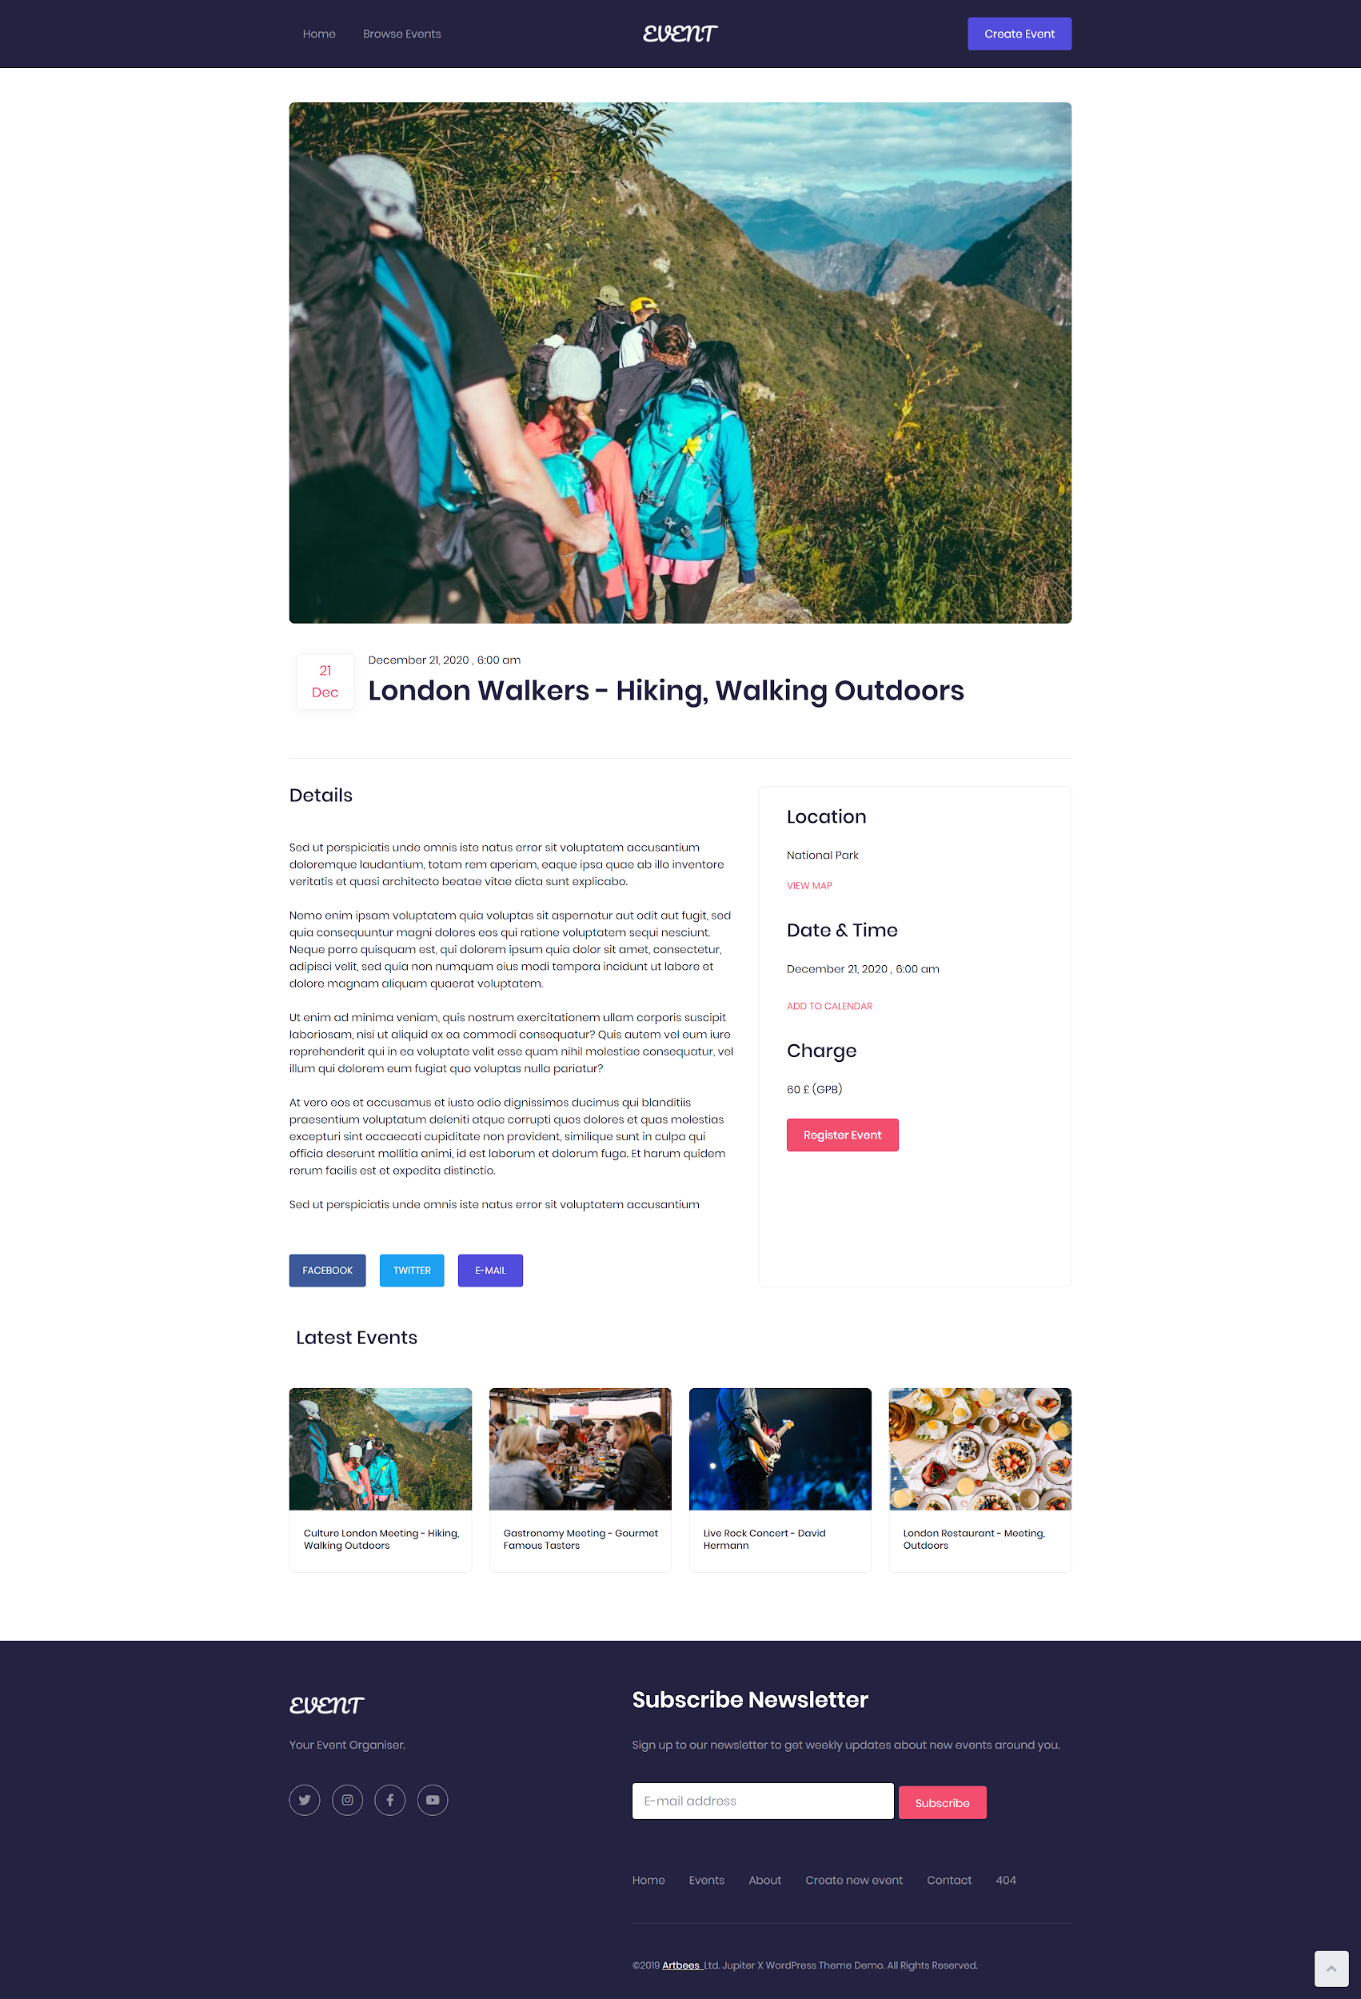
Various types of events or occasions such as birthdays or weddings mark significant milestones throughout our lives. Or important meetings for start-ups that propel a business forward. And it can be quite annoying if anything goes wrong during one of these events – many of these mistakes can be avoided through proper planning and organization, which starts out on an events website. However, doing so requires solid planning skills and appropriate tools. There are tons of resources out there for planning any kind of event that it can be difficult to choose which to use to fit your needs. In this article, we’ll give you all the info you need to incorporate key elements to create an events website while working in Jupiter X so you don’t miss anything when planning your next event.
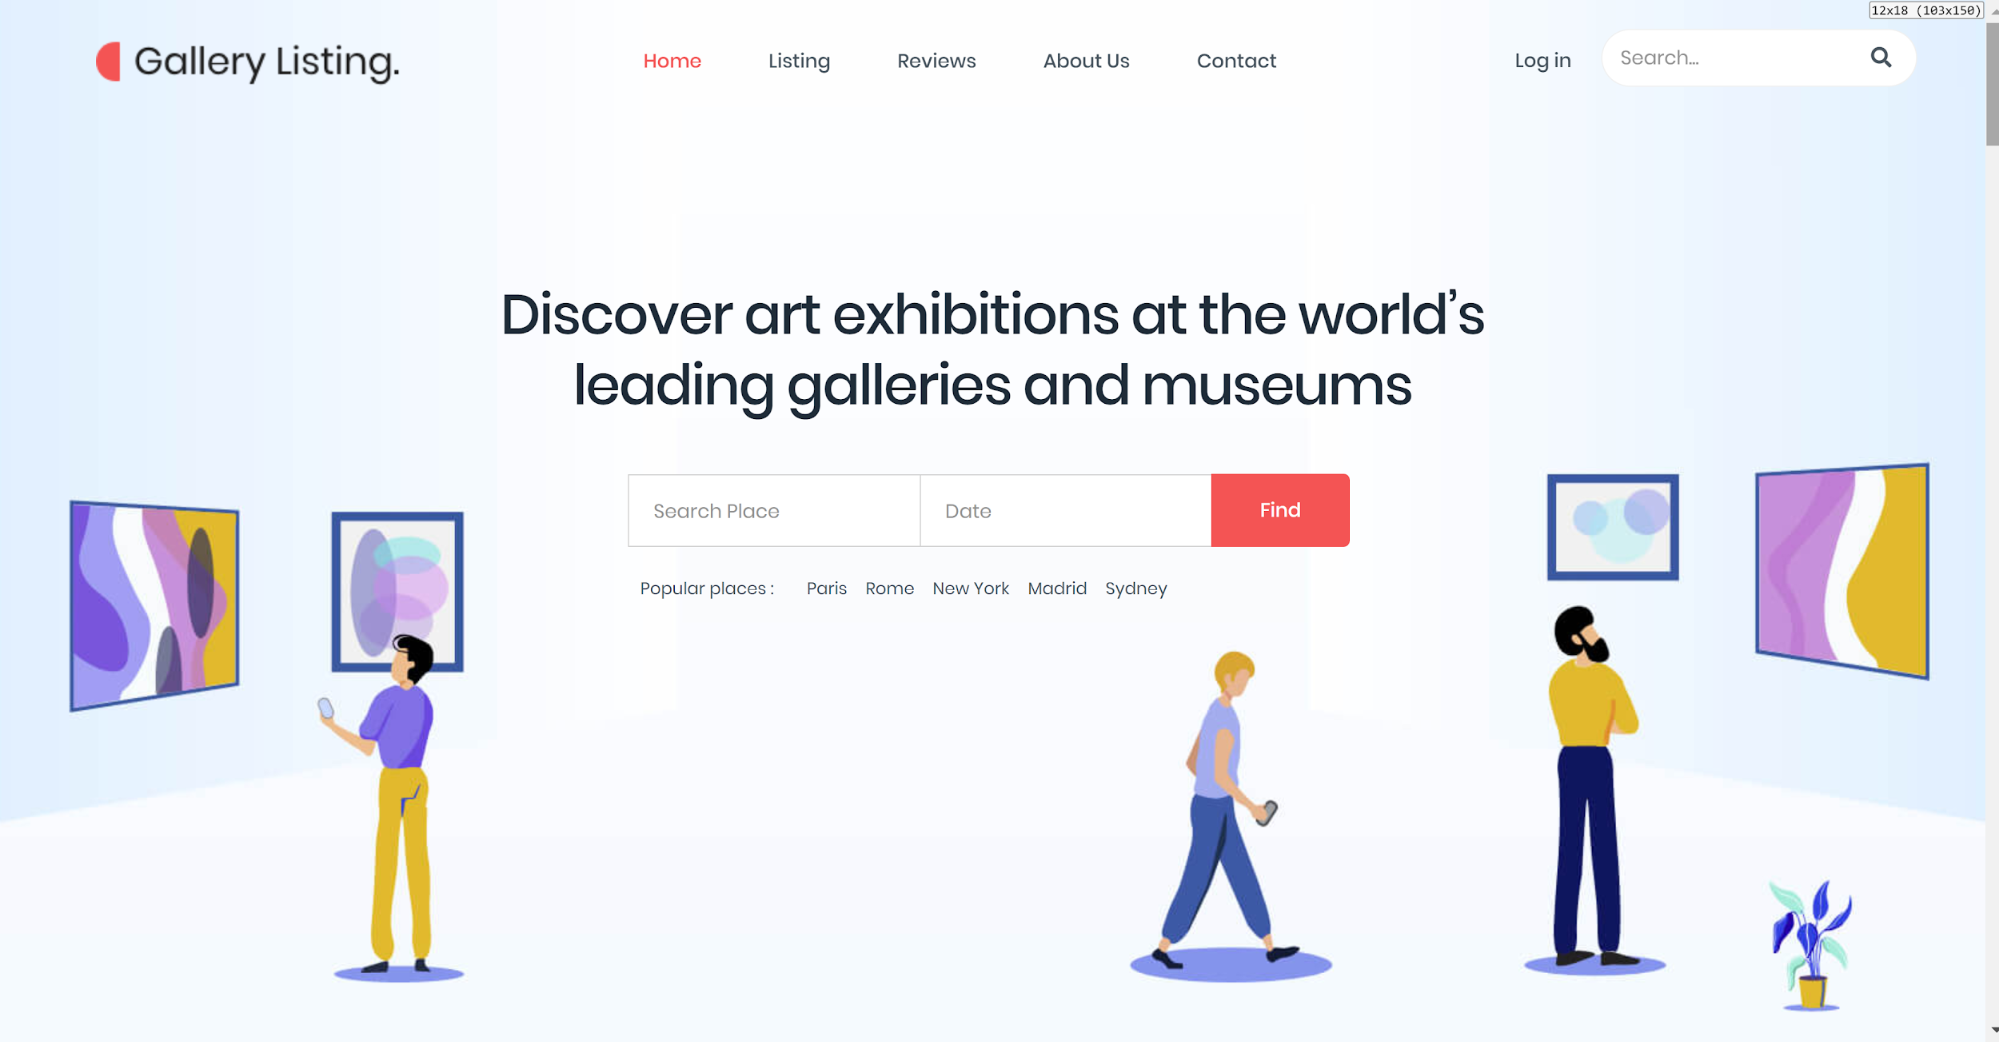
1. Menu and hero section
Making a good first impression is crucial when a visitor lands on your site, so having an appropriate top section is much more important than other aspects of a site. This should be at the top of your priority list when you sit down to create an events website. In other words, the menu and hero section can greatly impact what the visitor will do after going on your website. Depending on the type of event, the menu and the hero section might contain a slider or a single image of a previous or upcoming event, important links in the menu (including contact info such as an address or phone number and a booking button.
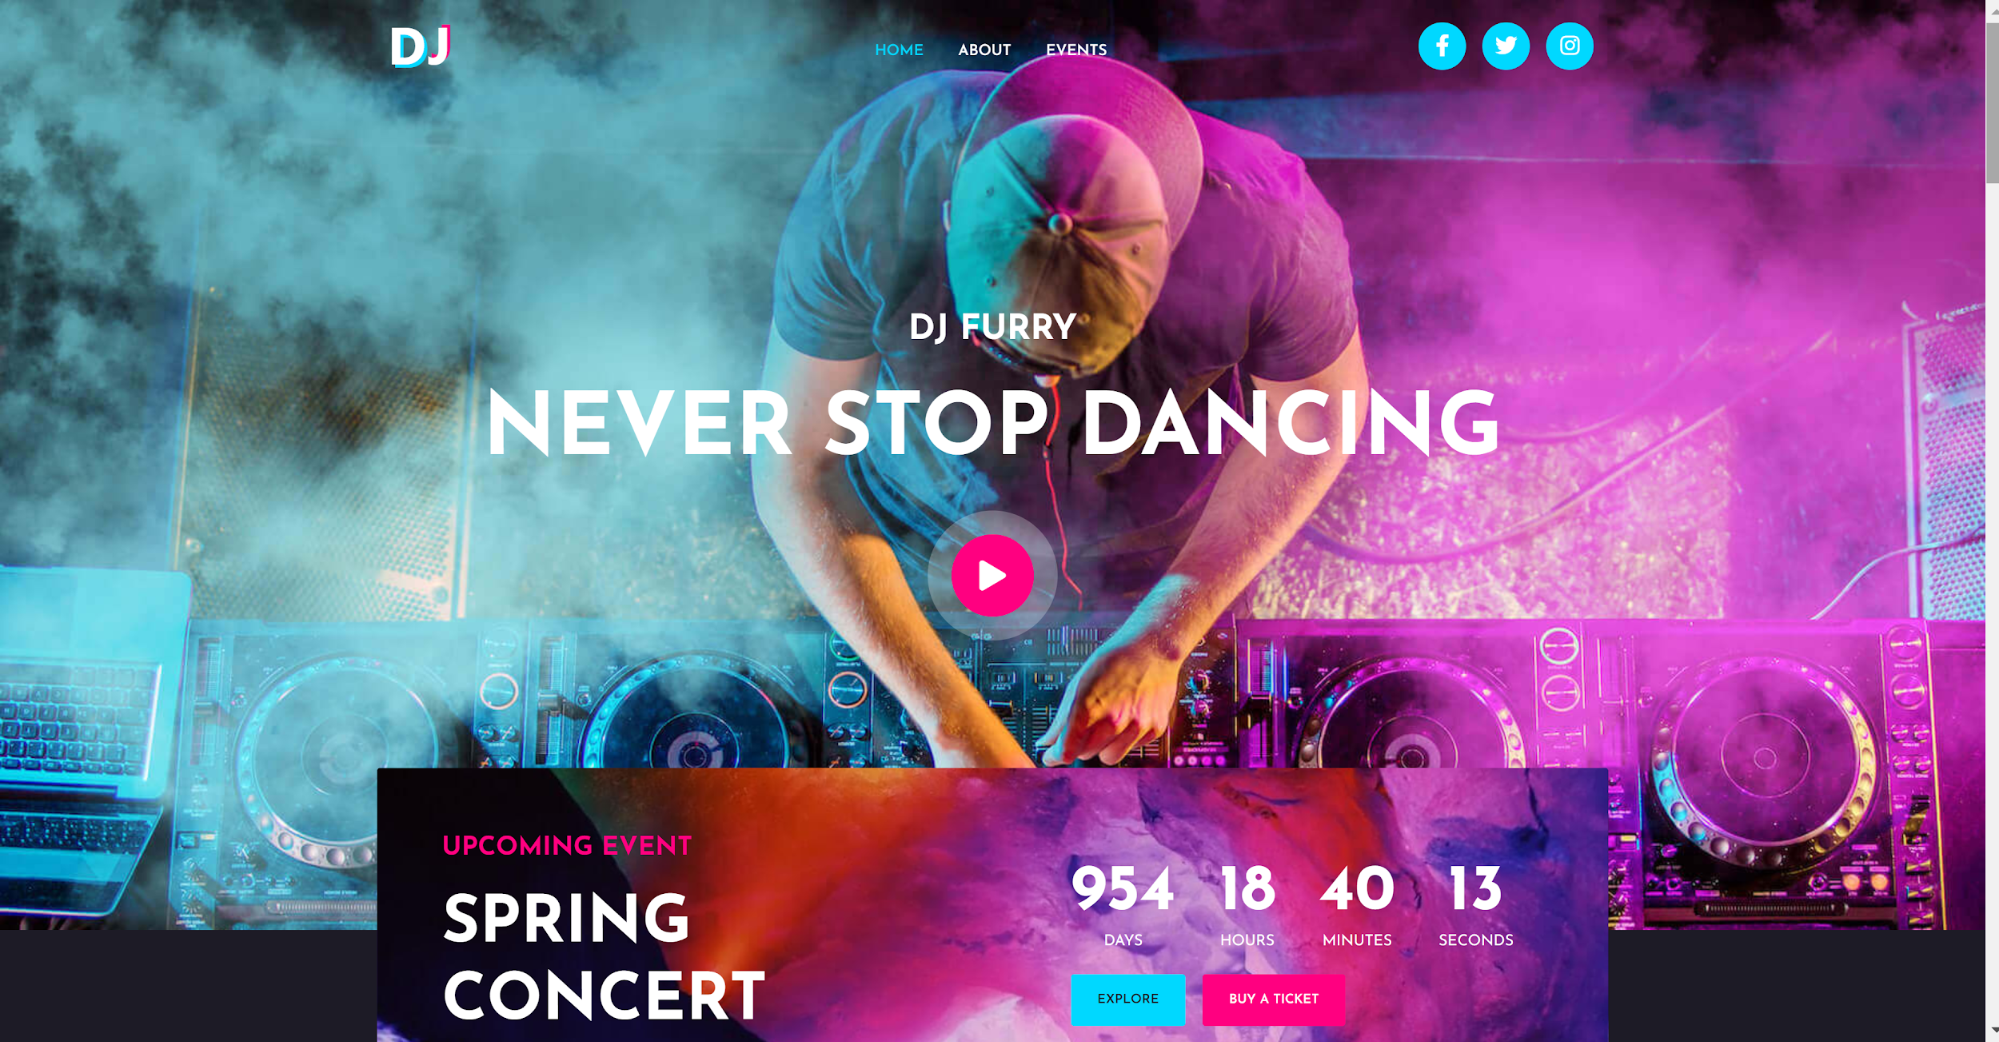
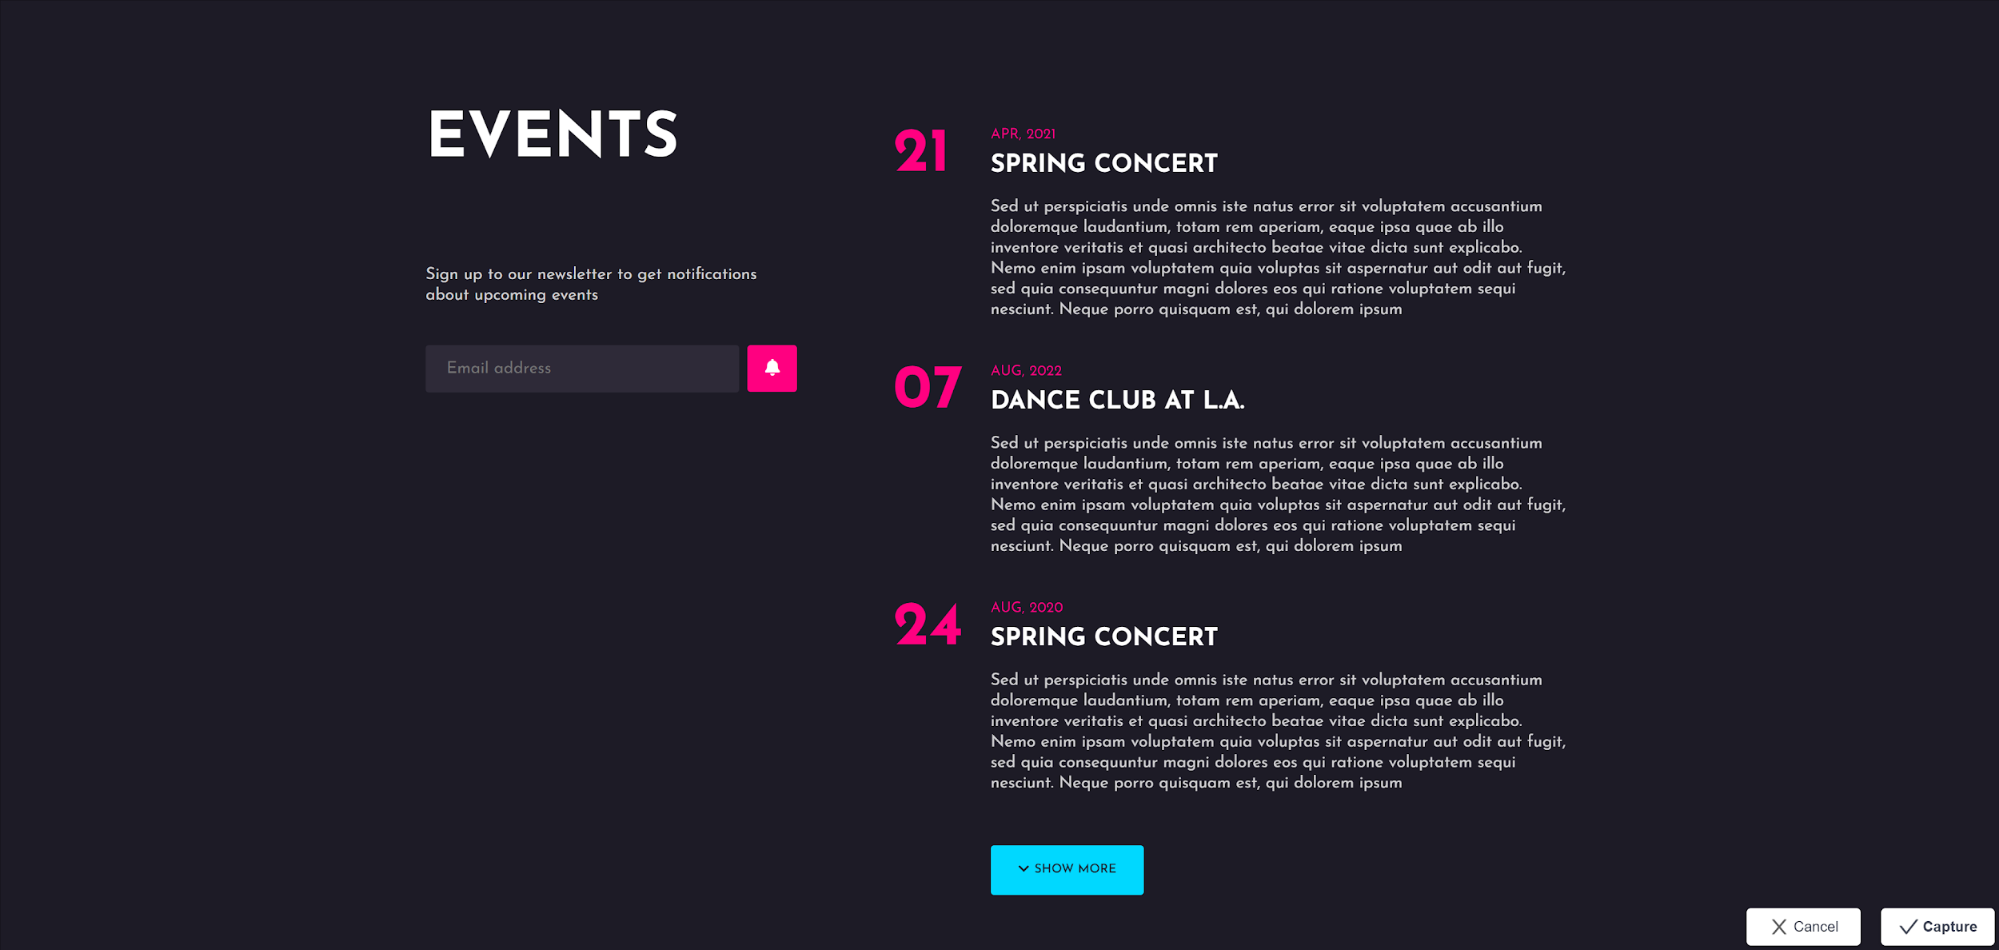
After we’ve introduced our site with a stunning hero section and formed a positive first impression, it’s now time to provide more details about the event. Typically after a hero section, we might want to give some teasers of the event such as a countdown, the address, a shortlist of attendees. The details you choose to reveal will be different depending on the type of event.
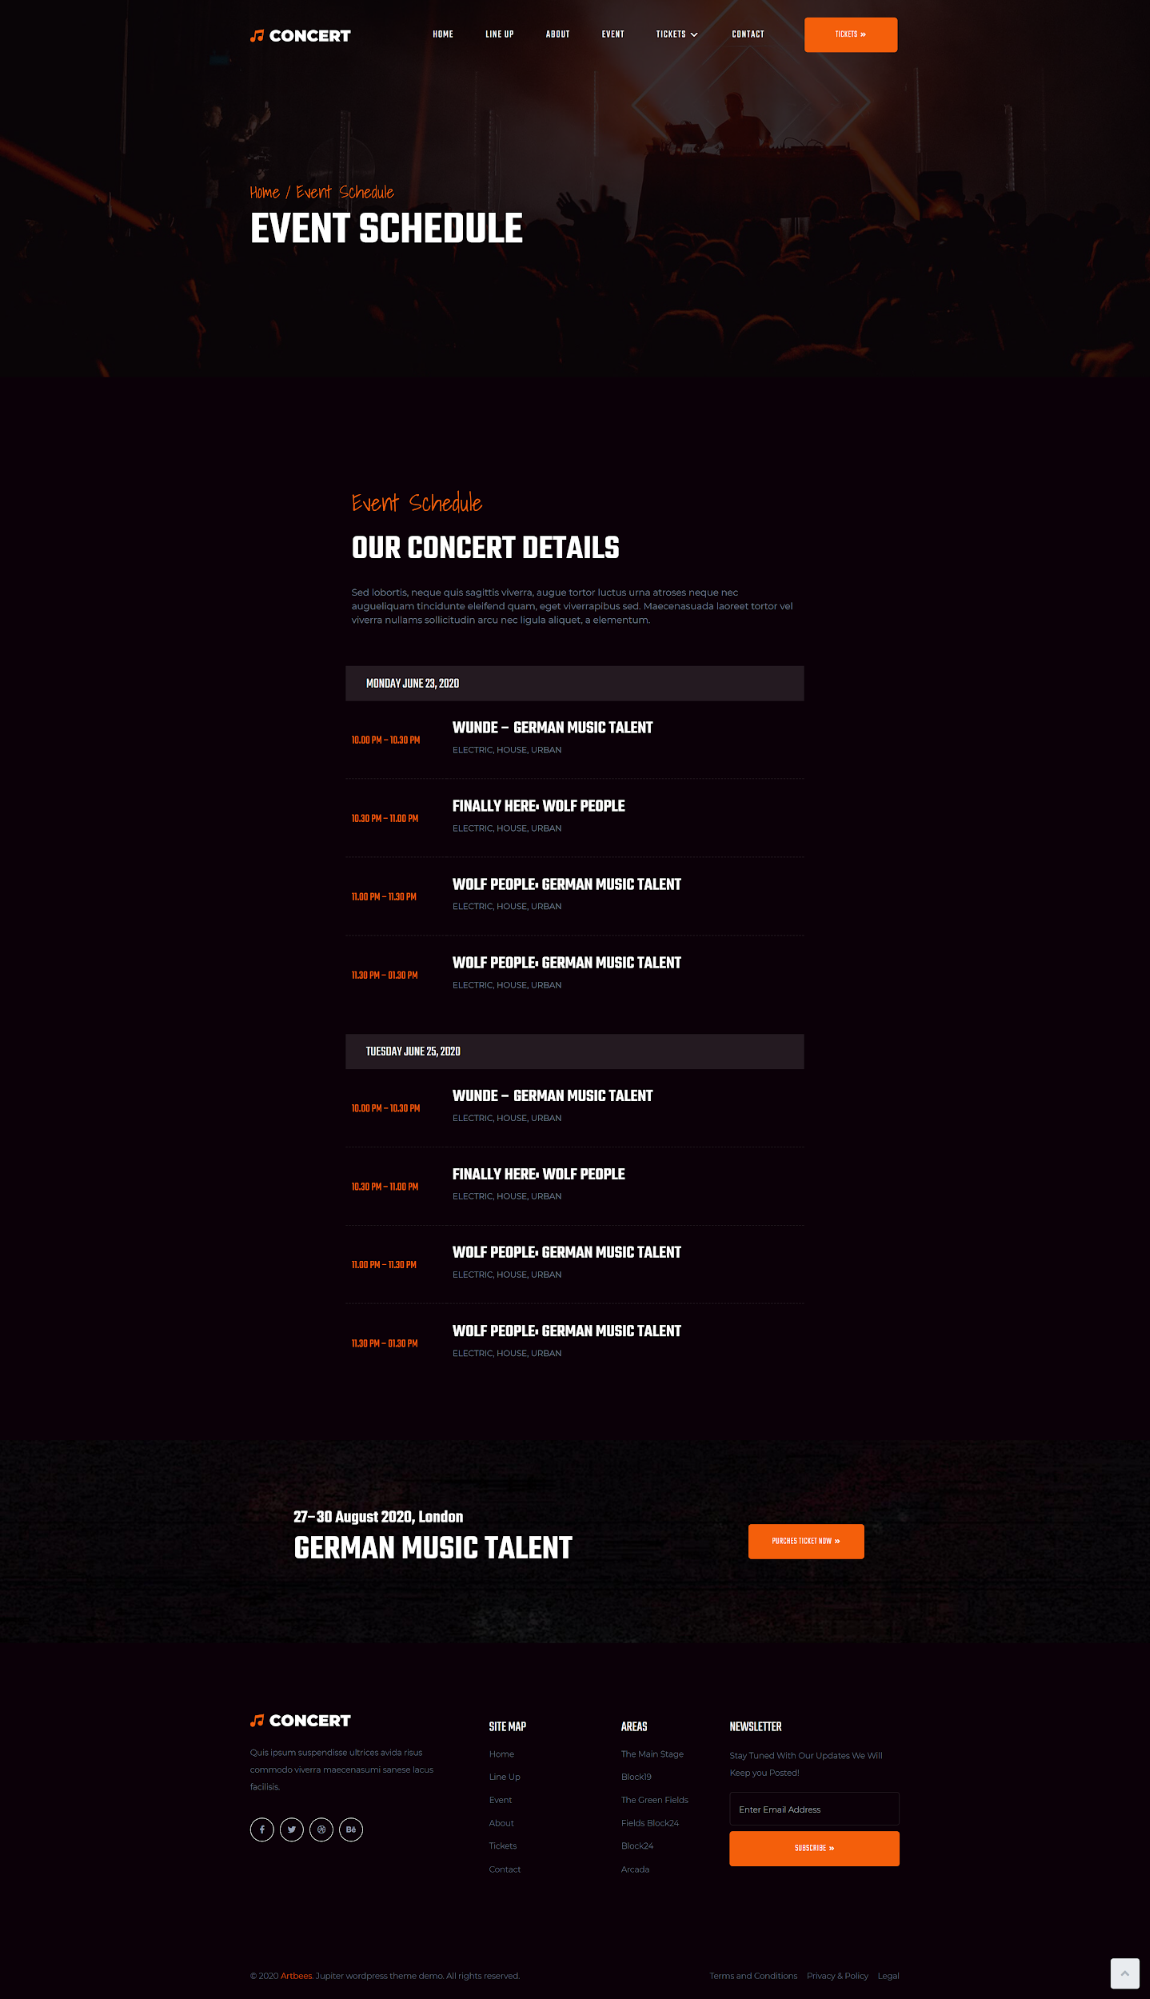
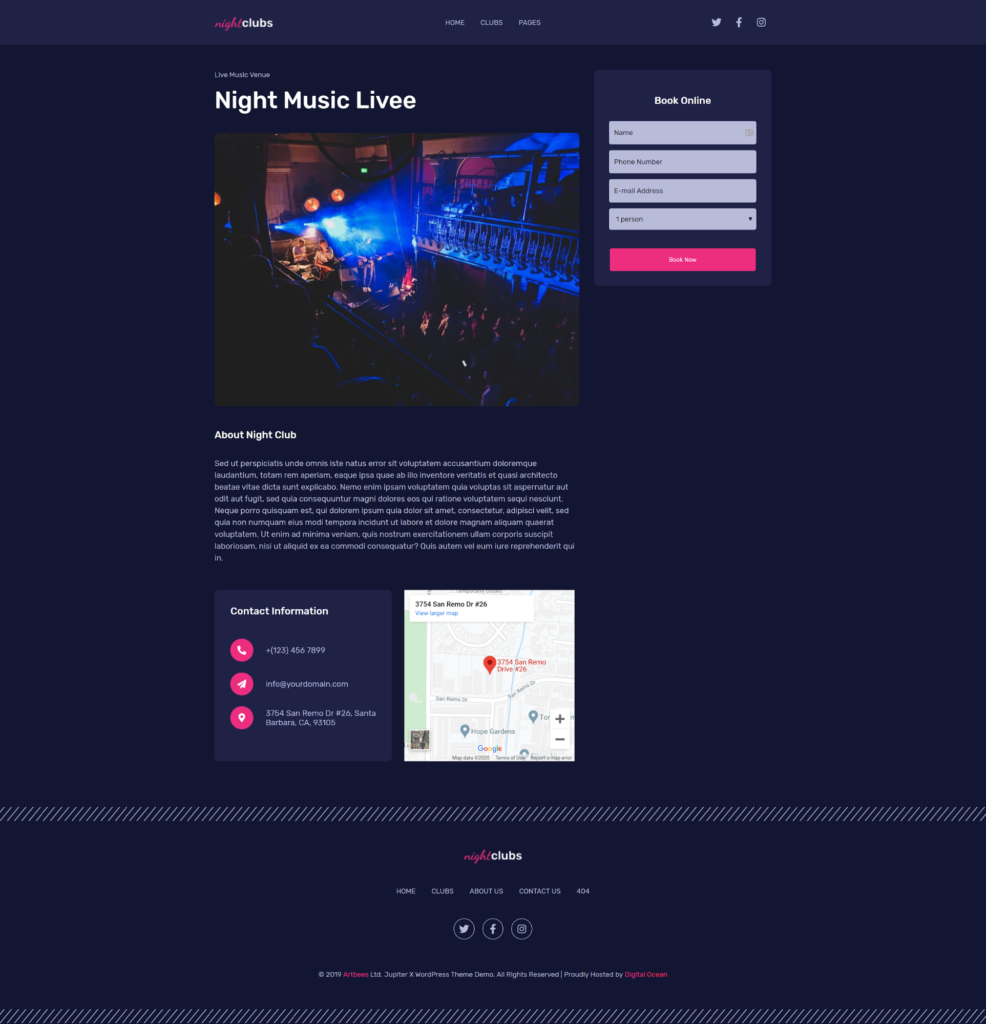
3. Event details (date, place and other event-specific details)
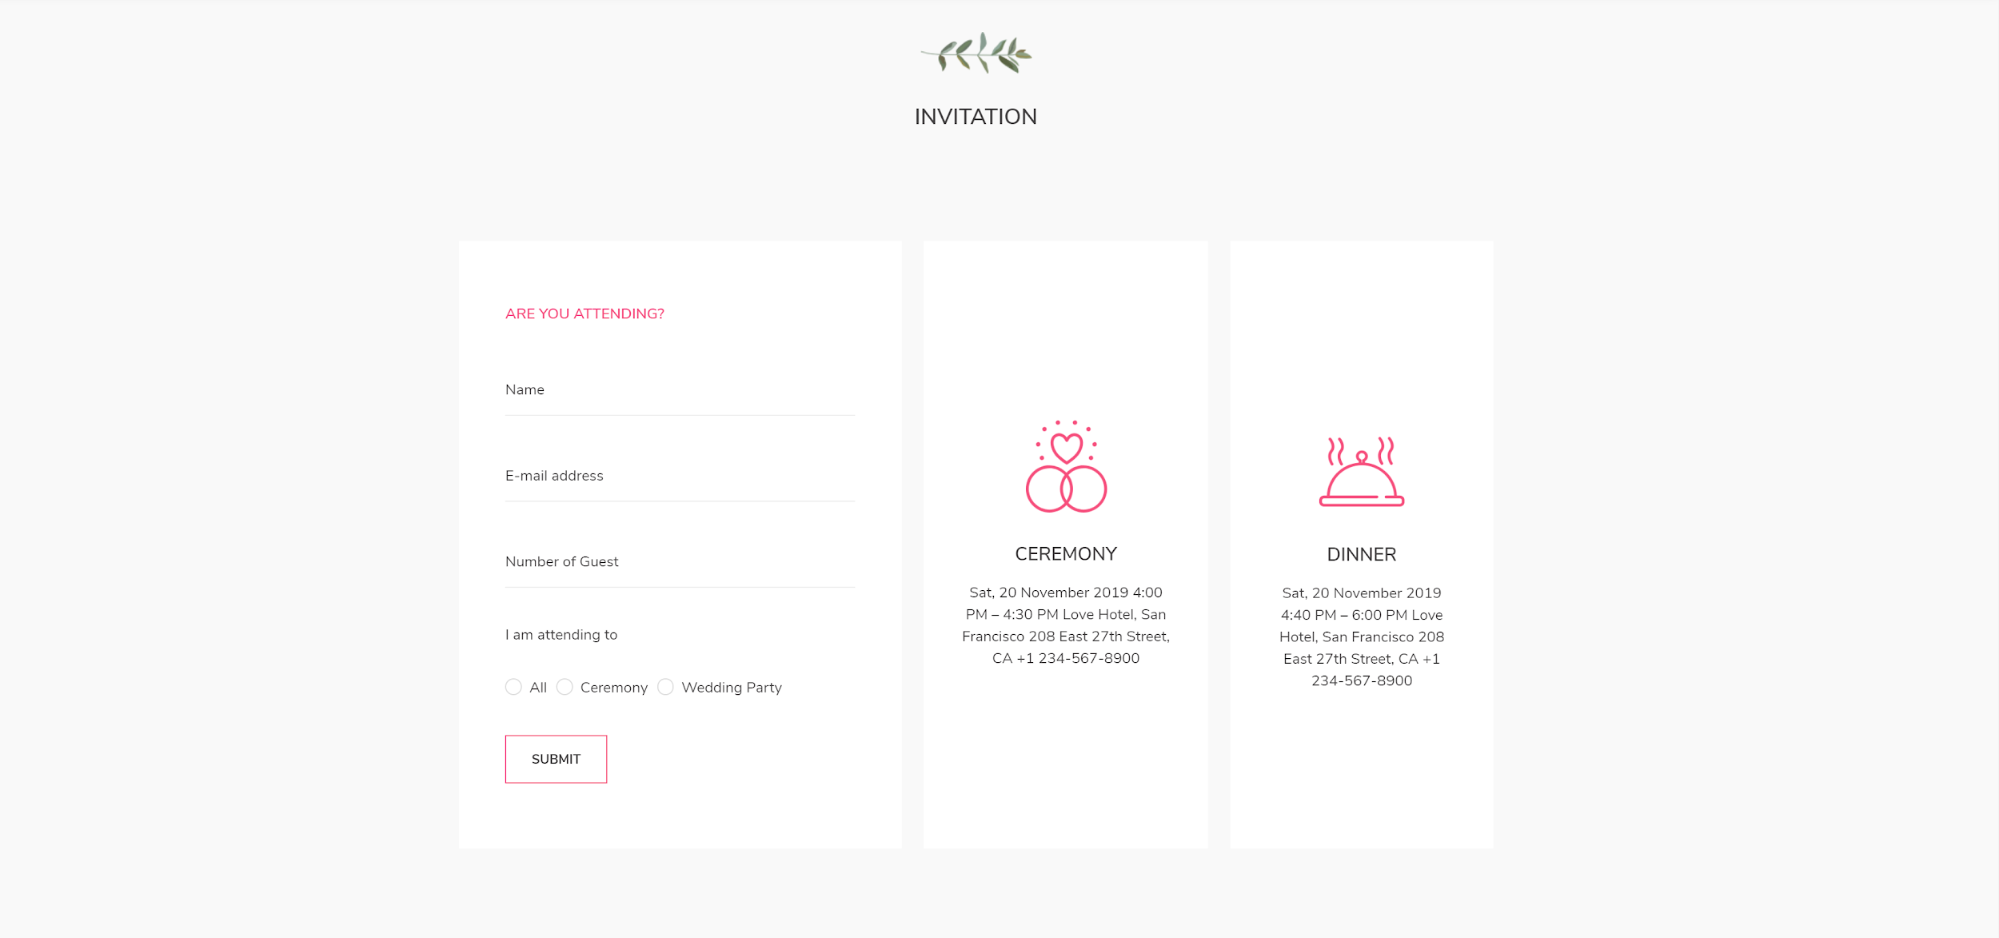
This is another significant aspect of your events site, since it’ll contain all the necessary details about the event. When you set out to create an events website, try to be as informative as possible while only including necessary info such as the date and length of the event, where it’ll take place (and how to get there), attendees, as well as booking and cancellation details.
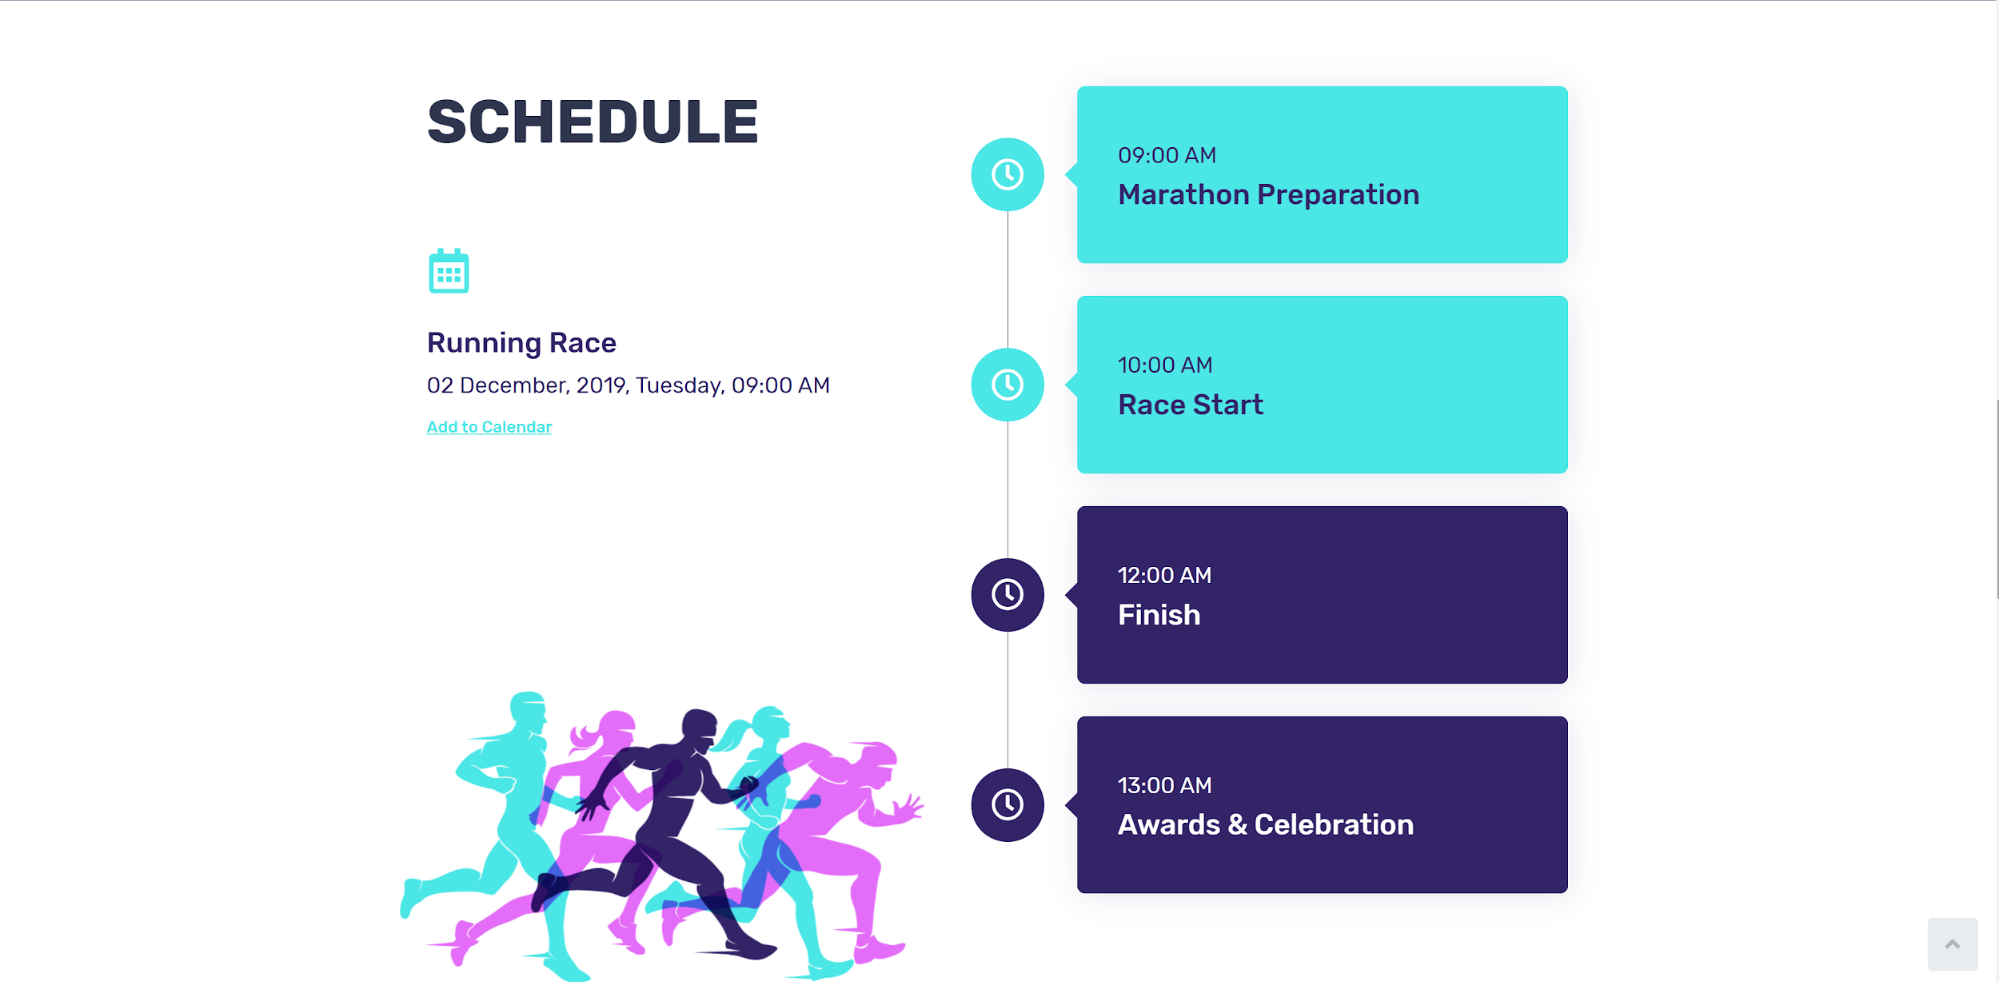
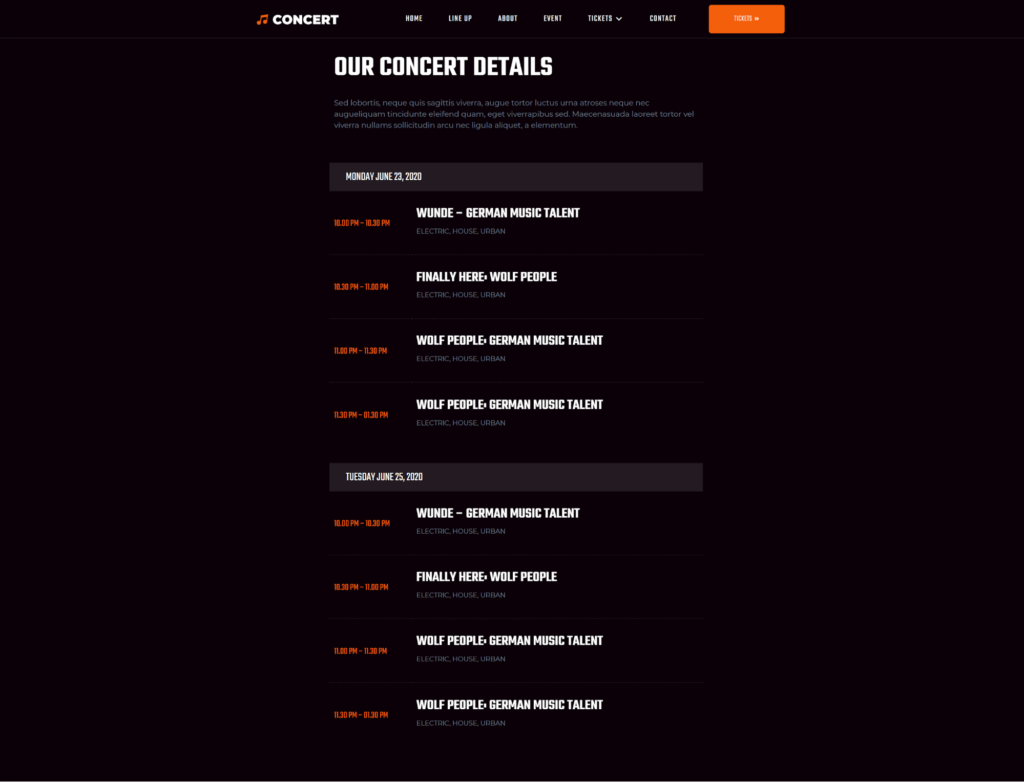
As we previously mentioned, not all events were created equally. This difference requires various approaches when listing event details. For instance, the schedule for a wedding will vary drastically from a nightclub event or an Halloween event. Luckily, Jupiter X has you covered with its wide array of layout and style choices for different events.
This section can contain details about event booking, tickets details and seat placement at the event. Again, depending on the event, you may also need to release early bird tickets, which might contain different plans with different prices.
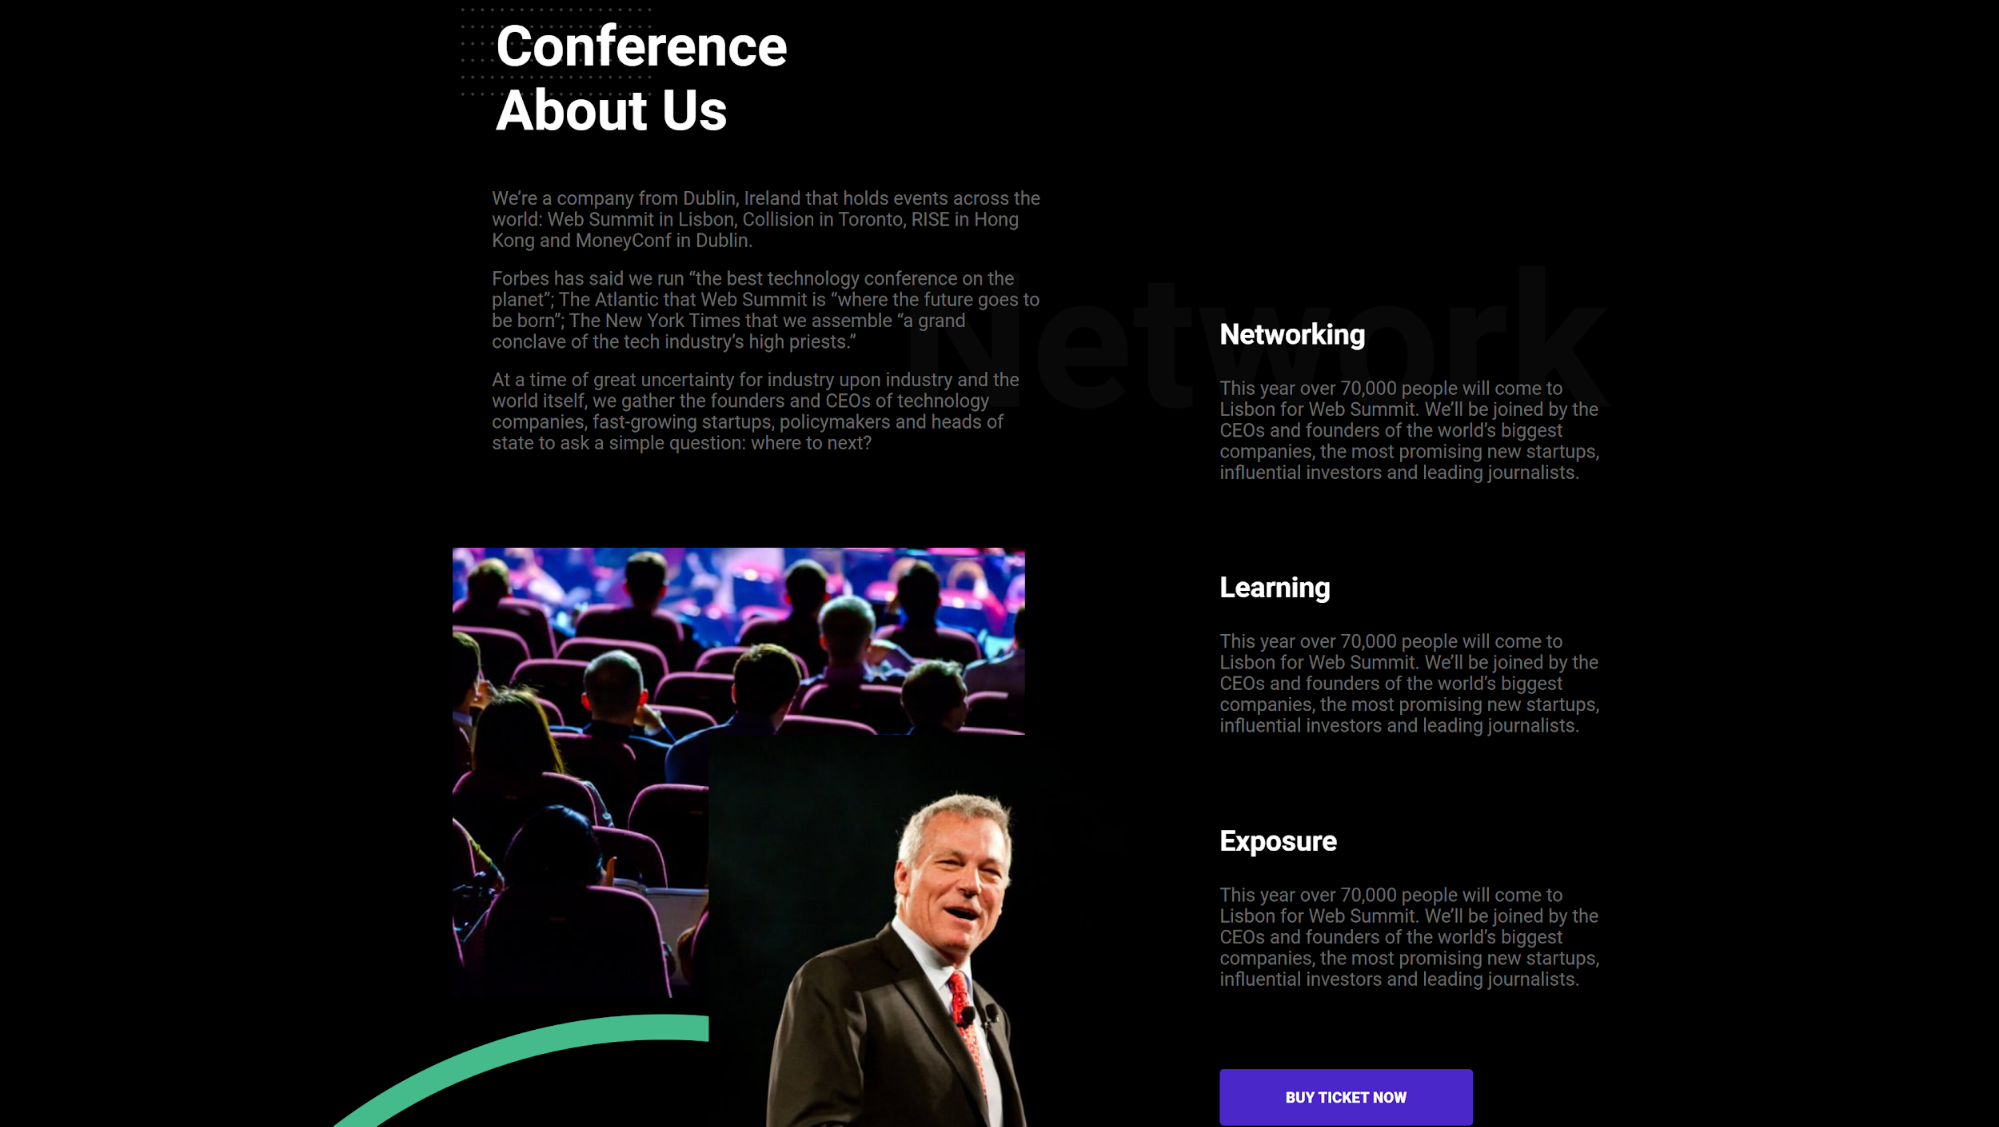
Another important element of creating an events website is listing the sponsors and supporters of the event. These are important people or organizations who are providing some sort of support – listing them can add weight to your event and attract more visitors.
In creating this section, you’ll need to include the logo of the sponsors, their names and links to their sites. And if possible, you can also include a few words about them.
You can see how even sponsors are showcased in the Conference and Running Race templates.
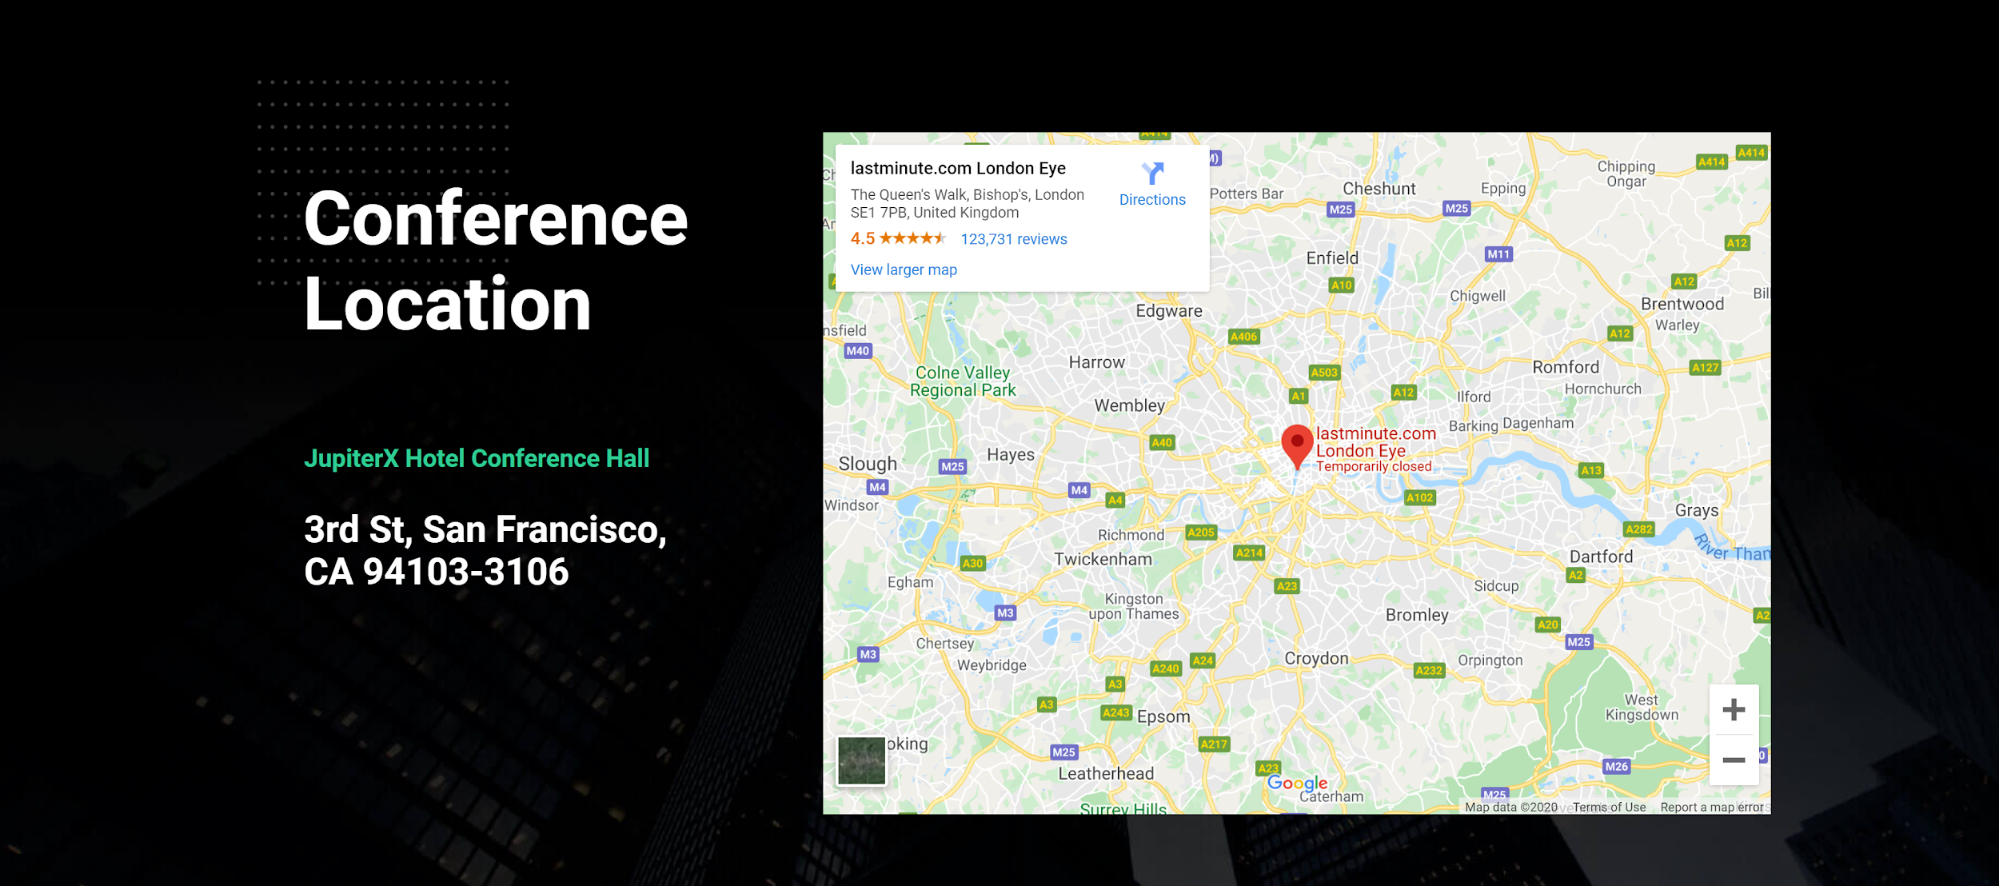
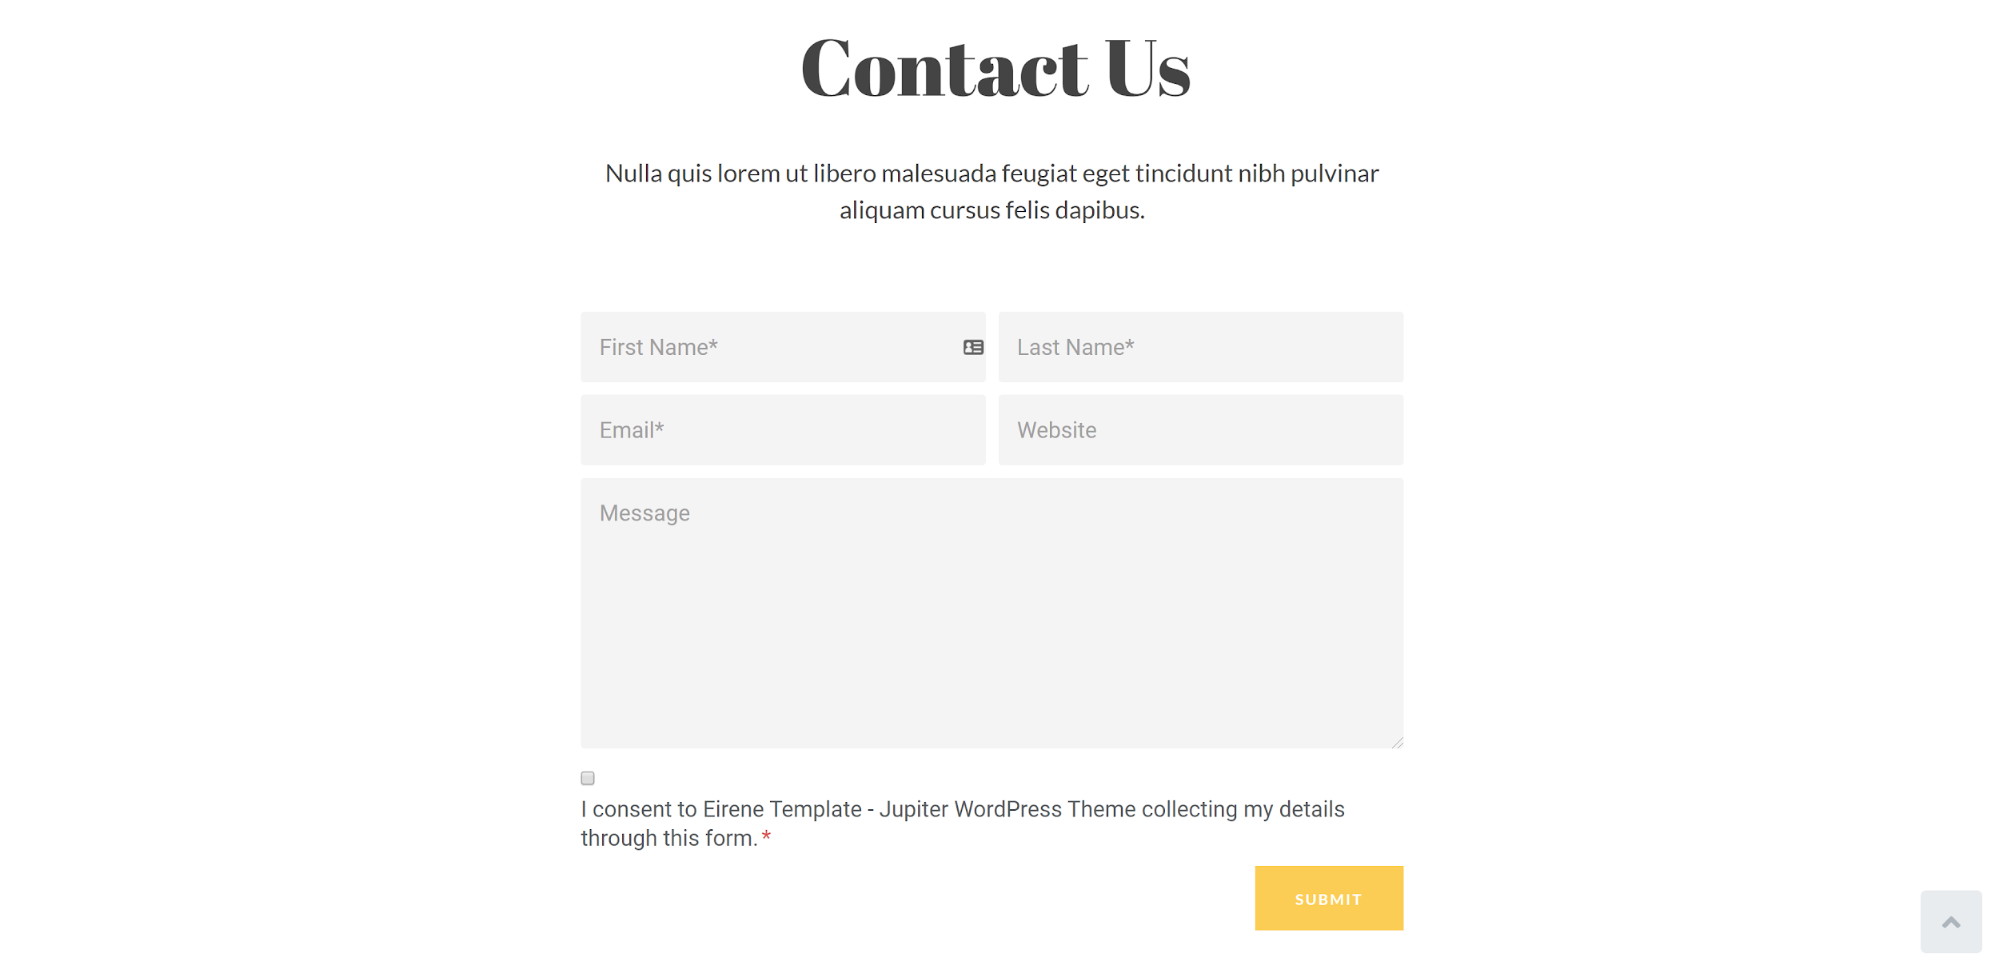
7. Contact details and directions
For this section or page, you’ll want to provide as much information as possible about how to contact the event organizers and how to get to the event venue itself. Basically, you should try your best to answer all questions your visitors might have and not leave anything to chance.
In this article, we discussed the most commonly used, must-have elements needed to create an events website. For this, Jupiter X is there by your side to help you in easily designing your site by offering sleek ready-made templates – and all you have to do is import them! Why spend your precious time on redundant tasks when basic templates are available at your fingertips? Simply make a couple of changes here and there, and you’re good to go.
URL redirection is a method to redirect visitors to a specific page or section of your website. It’s most commonly used when a website is rebranded or under maintenance – through a simple URL redirection, visitors are redirected to the new website or the “under maintenance” page. However, what a lot of people don’t realize is that URL redirection can do a lot more than that; it can also be a powerful marketing tool. In this article, I’m going to explain how to effectively use redirection to personalize your WordPress website.
What is a URL redirection?
A URL redirection sends users and search engines to a different URL from the one that they requested.
There are two different types of redirections, and each has different use cases:
HTTP level redirection
This is done by 301 (moved permanently) and 302/307 (moved temporarily) redirects.
301 Redirect Facilitates permanent redirects of a page or domain to the new URL.
302 Moved Temporarily Facilitates temporary redirection of a page or domain to the new URL.
HTTP-level redirection lets search engines know about the redirection. So, for example, if your website declares a 301 permanent redirect to Google, Google transfers your old page or domain ranking power to the new one. But if you use 302 temporary redirects, the old site’s ranking power won’t be transferred to the new page or domain as the redirection is temporary.
This type of redirection is useful for rebranded or migrated websites as well as to update obsolete pages within the websites but If you want to use HTTP-level redirection you have to be cautious with its SEO implications.
You can do HTTP redirects by directly editing the .htaccess file in your server or by using SEO tools such as YoastSEO and UltimateSEO.
Browser-level Redirection
There is also a second method in implementing conduct redirects right within the browser without changing anything at the HTTP level and letting search engines know about it. This is useful when you want to redirect your visitors to different pages based on specific conditions but you don’t want this to affect your website’s and individual pages ranking power. For example you want to redirect the traffic coming from a specific source to a special page optimized for that source but you don’t want this to affect the SEO ranking power of your main landing page.
Browser-level redirection can be done by coding or readymade tools. This type of redirection is most useful for personalization and marketing purposes. For example:
Redirecting users from a specific source such as Instagram to a special landing page
Showing different homepages to visitors based on their stage. For example guests, leads and customers seeing different versions.
Redirecting users from Brazil to a Brazilian version of your homepage with local content
Showing a totally different and optimized homepage to your mobile users
Showing a temporary and exclusive landing page to a loyal customer when they hit a certain number of purchases
In this article, we’re going to further cover this kind of browser-level redirects. We’ll use our newly introduced marketing automation and personalization tool for WordPress and WooCommerce websites called Growmatik as a case study to show how to create conditional redirections to personalize your website for different segments.
Growmatik creates automation in the form of a ‘IF this THEN that’ rule. You can define different conditions (such as specific source, location, device or date) to trigger a redirection, and the redirection will automatically get executed when the condition is triggered.
Redirect traffic from a specific domain
If your website has a noticeable amount of traffic from a specific website such as a social media website or a partner blog, you can consider showing them a special landing page on their first visit. The content of this page can be optimized based on the source they are coming from and boosted with exclusive items such as discounts.
Using Growmatik, we’ll define this rule: IF [Source is X] THEN [Show Page Y].
In the Growmatik automations page, click on the + icon in one of the columns. This defines the user type you want to target with this redirection. It can be guests, leads and customers. We’ll select customers for this example.
Select Source from the conditions list (next to If)
Select domain and enter the website you want to define as the source. Let’s say it’s instagram.com and click Save.
4. Select Show Page from the actions list (next to Then). You will have two options from: By internal, you can choose a page inside your website and By external, you can define an external website to refer the visitor to
5. Check the ‘Activate rule immediately after creation’ if not checked and click on the Create Rule button.
Using the above simple rule all of the customers who are referred by Instagram, will be redirected to Instagram landing. Please note that this applies only to your existing customers as we defined that user type when creating the rule.
Redirect your ads traffic based on URL parameters (UTMs)
You can redirect the traffic coming from specific ad campaigns that you publish via Adwords, banners or blogs you do outside your website to personalize your content accordingly. For example, a nice special landing page exclusively built for your Adwords ads, a page built for your promotional email campaign or a special landing page for an online event or visitors of your booth who get a QR code to visit your website and join a competition, get discounts and so on.
You will need to define URL parameters in the form of UTMs in links you put in your ad campaign to your website. UTM values help you identify the source of the traffic in a narrower level than domain. So for a promo email campaign, you can use the link: https://your-website.com?UTM_source=PromoEmailCampaign
We will create a redirection rule such as the previous one just this time source should be set UTM values: IF [UTM_source is X] THEN [Show Page Y]
Redirect your mobile visitors to an exclusive landing page
All of us know the importance of optimizing websites loading speed and responsiveness to improve the mobile experience, but this is actually being done by many already. So if you want to take it a step further to stand out in the competition you can create a totally different landing page for mobile users with optimized design and exclusive content.
IF [device is mobile] THEN [Show Page X]:
In the Growmatik automations page, click on the + icon in one of the columns to define the user type you want to target with this redirection. For this example, we’ll choose customers.
Select Device from the conditions list.
Select the device type you want to target with: mobile, tablet or desktop
4. Select Show Page from the actions list and define an internal or external URL to redirect the segment and click on the Create Rule button.
With the above automation, your new mobile visitors will be automatically redirected to the page you specified.
Redirect visitors from a specific country
Next up in your redirection list should be geographical redirection to personalize your WordPress website.
It’s good practice to show optimized or even different content on your website to people from different countries. More relevancy will increase engagement from your visitors in different stages across your website.
For geolocational personalization, you need to first find out the main countries that sent traffic to your website and create special landing pages preferably with translated and more localized content.
IF [Location is Italy] THEN [Show Page X]:
Let’s create a simple automation in Growmatik:
In the Growmatik automations page, click on the + icon in one of the columns to define the user type you want to target with this redirection. I’ll choose leads.
Select Location from the conditions list and choose the country you want to target with your redirection. You can select one or multiple countries to target.
3. Select Show Page from the actions list and define an internal or external URL to redirect the segment and click on the Create Rule button.
With the above redirection automation, your leads from Austria will see the German landing page when they enter your website.
Redirect only on a specific date
Running occasional promotional campaigns can be an effective way to engage your visitors. Think of a special landing page made for Black Friday or a special homepage during a period (like the COVID-19 pandemic maybe just you don’t know when this occasion is going to end!)
So the redirection rule you need to define is:
IF [date is X] THEN [Show Page Y]
In the Growmatik automations page, click on the + icon in one of the columns to define the user type you want to target with this redirection. I’ll choose guests.
Select Date from the conditions list.
Choose the date or date period you’d like redirection to happen.
4. Select Show Page from the actions list and define an internal or external URL to redirect the segment.
The above redirection automation will redirect all your guest visitors during 2020 November 27 to your Black Friday landing page.
Redirect when a specific page is visited
When your service is under maintenance or a product is out of stock, and you don’t want to show a null ‘check back soon’ or ‘under maintenance’ page to your visitors, you can redirect them to a temporary page with useful links and alternative products or service they might like to check and prevent a hard bounce.
So the redirection rule you need to define is: IF [page X visited] THEN [Show Page Y]
In the Growmatik automations page, click on the + icon in one of the columns to define the user type you want to target with this redirection. I’ll choose leads.
Select Page Visit from the conditions list.
Choose the page you want to trigger the redirection when visited.
4. Select Show Page from the actions list and define an internal or external URL to redirect the segment.
By using the above automation, all of your leads that visit the product X page will be redirected to your product roundup page.
Redirect when a user made a specific number of orders
If you have a retention strategy for your WooCommerce business, you should definitely consider gamification techniques in your business and website. This means you can define milestones for your customers to do specific actions on your website such as visiting a page or buying a particular amount of products. Imagine users will see a temporary ‘thank you page’ with a special design, cross-selling links and probably discount coupons everytime they hit an order count milestone.
The redirection rule you will require is: IF [X orders placed] THEN [Show Page Y]
In the Growmatik automations page, click on the + icon in one of the columns to define the user type you want to target with this redirection. We will target customers in this example.
Select User Behavior > Orders Placed from the conditions list.
Choose the number of orders that should trigger the redirection.
4. Select Show Page from the actions list and define an internal or external URL to redirect the segment.
The above redirection will show the ‘Milestone thank you page’ every time a customer hits a total count of 5 orders in your website.
Wrap up
If there’s one way that marketing in the 2020s will differ from the past decade, it’s deeper personalization and more automation. Using smart redirections can help you make more relevant experiences for your WordPress and WooCommerce website visitors. In this article, I tried to show how to use redirection to personalize your WordPress website without affecting the search engine ranking of pages on your website.
In a future article, I’ll share more tips on how to achieve a deeper level of personalization in WordPress and WooCommerce websites with Growmatik. If you have experiences with using redirection for marketing and personalization purposes, please do not hesitate to share in the comments below.