Let’s consider for a moment a hot topic when it comes to the web: security. Poor security on WordPress websites could lead to secrets being exposed, reputations getting lost in the market and even a service getting shut down.
Yes, security is the most important thing on the web and, unfortunately, many users and even administrators don’t have enough know-how about this matter.
In this post, we’ll take a glance at WordPress security to become familiar with the most crucial things about securing a WordPress website.
As an immense open-source project, WordPress is the most well-known CMS (content management system). Based on statistics, WordPress powers 34% of websites on the internet and more than 60% of websites that use a known CMS use WordPress. This also makes it the most attractive platform for hackers as well. Indeed, if you find an important security hole in WordPress, you can affect 34% of the internet.
You may have heard about WordPress websites getting hacked, and the main question that comes to mind is: “Is WordPress secure enough?” In this post, we’ll address this question by reviewing some stats, layers of WordPress installation security and the performances of administrators. Read until the end to get a good idea of the state of WordPress security.
WordPress Security Statistics
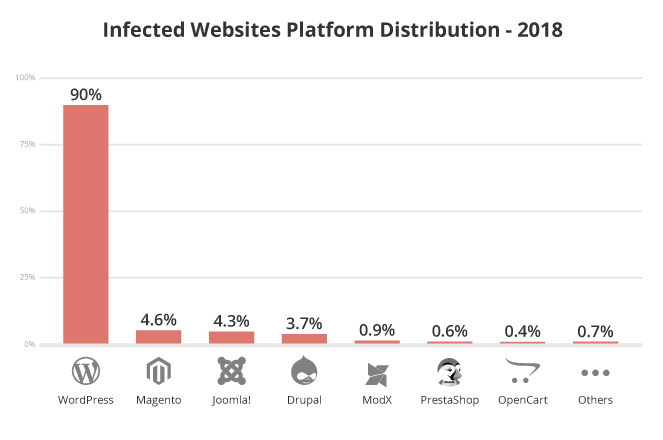
According to a report from Sucuri & GoDaddy, from a total of 25,466 infected sites in 2018, 90% of them used WordPress. The report reveals an increase in WordPress infections from 2017.
When looking at the most significant problems, you won’t find anything related to WordPress core security. Interestingly, common issues with WordPress security are not related to WordPress itself. What matters are the configuration, the usage and what administrators do.
We know that WordPress is an open-source project, meaning that everyone can see the codes and make some changes to them. On the one hand, this would seem to be an open-source CMS that could potentially cause more security problems because anyone can see the codes, discover a security bug and later use it to attack websites.
On the other hand, any individual can watch the status of a project’s security and report any possible security issue privately to the team. WordPress applies security patches immediately, and a new version becomes available to download as soon as possible. Each time a new version comes out, they mention how many security problems have been fixed in the changelog.
Based on the statistics, there is no common effect on websites due to WordPress core security problems. In other words, it works!
Layers of WordPress Security
We first need to wrap our heads about the fact that the security of a WordPress site is not only about WordPress itself. It depends on some other aspects such as themes and plugins, as well as some third-party tools like hosts and servers – and above all, site administrators.
WordPress Core Security
We briefly reviewed WordPress core security in the previous paragraph and mentioned that WordPress patches any security problems immediately. But, what will happen if you don’t upgrade your WordPress installation with the latest version? Then, you’re an excellent target for hackers.
Detecting the version of WordPress is not hard to do. Even if you use plugins and codes to hide which version of WordPress your site is using, there’s no guarantee that hackers won’t be able to detect the version of your WordPress. And after that, there’s a list of security problems (which are fixed in the latest version) that you won’t have access to it unless you upgrade WordPress. With a list of potential security holes in your site, the chances of being hacked increase. Therefore, it’s better to constantly keep your WordPress site up to date.
Security of Themes & Plugins
Unknown Sources
Most WordPress sites get hacked because of their backdoors. So, if you download a theme or plugin from an unknown source or a site that provides a nulled version of premium themes, you are at risk. It’s all too easy to inject some codes into the package and provide a zip package to download. Unfortunately, some users are not aware of this and, for that, administrators are responsible.
Non-updated Themes or Plugins
Similar to WordPress core, you should keep plugins or themes up to date because they are even more vulnerable. Sometimes it takes time to patch a security problem. If you read the fascinating facts surrounding the Panama Papers hack on Wordfence’s site, you may never forget to update your themes and plugins with the latest version.
Host, Server and WordPress Installation Configuration
Sometimes, a website gets hacked in shared hosting. After hacking a website, the hacker may penetrate the host and then access other websites on that server.
Consequently, it’s crucial to host your website in a known and secure host provider. And it’s better to configure the hosts accurately. There are many factors to consider while configuring a server for a WordPress installation. As a quick checklist, you should be aware of the firewall, backup system, SSL and SFTP, automatic security checks, malicious activity detector, email security, and file permission. We’ll take a deep dive into these matters in a later blog post.
Moreover, it’s necessary to be aware of configuring the installation. Changing default database table prefixes, using a strong password and not using “admin” as the username can decrease the chances of your website getting hacked. Following these simple steps can help you to avoid any possible security problems on your website. We’ll also describe in detail WordPress configuration problems in another blog post.
Administration
As mentioned previously, admin is one of the biggest problems and the main reason why websites get hacked. As we can gather from the statistics, the most prevalent problem is website administrators and webmasters. Unfortunately, not enough attention has been paid to this matter.
The security of a website is highly dependent on the performance of webmasters. They can simply allow hackers in by setting an easy-to-guess password or username like “admin” and “12345678.” Sometimes, webmasters aren’t informed about security patches or small updates, and it can put the website at risk. An administrator should be cautious about user roles and permissions when a website is open for new user registration.
Many of these precautions are easy to take when using a security plugin. We’ll have a blog post about WordPress security plugins that will include a review of the most popular ones.
As a result, it’s easy to say that the WordPress core is highly secure. The community will take care of WordPress security, and if you want to use it for your new project, it’s better to take some time to learn more about common security problems, find a good host provider and correct configuration.