Top 5 Common Issues with the Jupiter X Theme

common issues with Jupiter X featured

As a WordPress support agent, I know about all the conflicts, problems, and issues the users of our products face. Dealing with these issues is always a new and interesting challenge, which is the good part of being a support agent. There is nothing more valuable than learning from an issue, and the support desk is there to help you do just that. Even though many of the issues are a result of a misunderstanding or misconfigurations on the servers, there is always room for learning.

In this article, I’m going to share 5 common mistakes that lead to the issues when using the Jupiter X WordPress theme. These are most probably common for every WordPress website, so in fact, this article is not limited to only common issues with Jupiter X, but rather essential troubleshooting that can teach you a lot about WordPress.

Our previous developer is out of reach, and we need to update the theme”, or “when trying to register the theme, I see purchase code already in use, contact support”. These are simple but confusing issues for many users. In fact, if you know how licensing works, you can avoid many of the licensing issues. Here is how Jupiter theme licensing works.

Artbees is an exclusive author of ThemeForest. This means that you purchase the item from ThemeForest.net. Every legal aspect of purchasing, payment, and refunds will be handled by ThemeForest. In fact, you buy the theme from ThemeForest and ThemeForest has to deal with licensing stuff. It’s also a good idea to extend the support trial on ThemeForest. However, since the Envato market doesn’t give enough features to support users, we at Artbees have added a second layer of authentication for our themes. It allows us to have a separate support desk, update panel, forum, and many other features in what we call the Artbees Portal. What you get from ThemeForest itself is a purchase code. The purchase code is this:

Sample of a valid purchase code on ThemeForest

You will have to use that purchase code to register your theme.
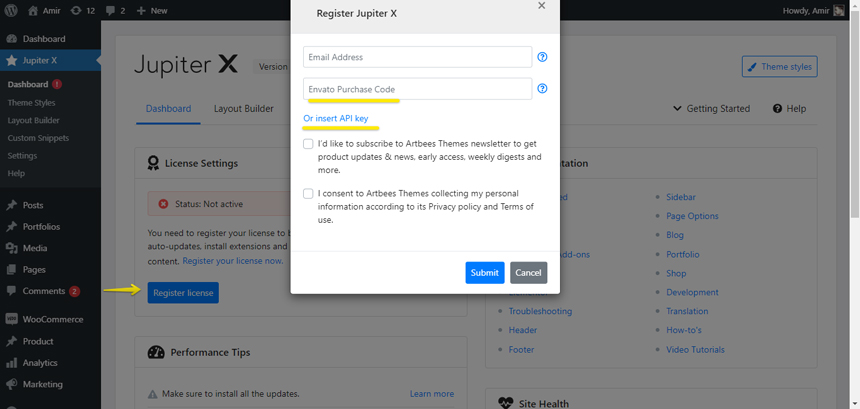
Registration modal of Jupiter X theme

While registering the theme, an account will be made on our portal using your purchase code and email address and the account information will be sent to your email. Using that account, you can open support tickets, download different versions of the theme and, more importantly, manage your registrations.

In fact, each license in Envato is allowed to use only one domain at the same time. We used this rule to empower our customers by allowing them to register the theme on an unlimited number of subdomain folder installations on the same domain and also use the license on staging and development environments. When you finish the work on your staging website, you can simply revoke the license on this page and register it again on another domain.
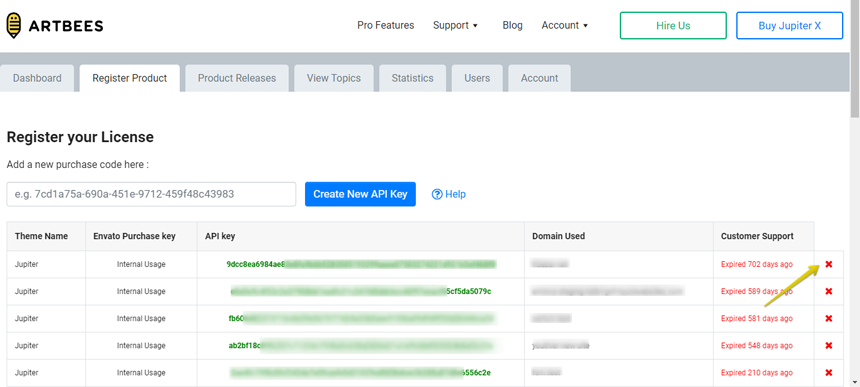
common issues with Jupiter X - registration
Artbees website registration page with revoking button available

Ok, so what to do about common issues with Jupiter X that I pointed out at the beginning? I explained how the licensing works, but this process is not foolproof. Some users will lose their purchase code, some will forget what account they were registered with the first time, some don’t have the purchase code at all because somebody else bought the theme for them.

So what should we do in this case? You first need to find your purchase code.The purchase code is everything you need. The provider of the purchase code is the owner of it and resolving any issue is possible only with the purchase code. If you don’t have the purchase code, try to get it from the person who bought it for you or buy a new one. You can always find your purchase code in your Envato account. If you have found the purchase code, then you can ask to resolve issues with it through ThemeForest. Simply submit your query from here so that we resolve it for you and then you can access the actual support desk afterward.

By understanding the licensing workflow, these questions can be addressed: How can I revoke my license? How can I transfer my license to somebody else? How can I use the theme on localhost? How can I find my purchase code?

Server configuration issues

Many of the most common issues with Jupiter X can be avoided if the server requirements are met. The server requirements of Jupiter X are like this:

  • PHP – Version 7 or greater 
  • MySQL – Version 5.6 or greater
  • mod_rewrite – The Apache module needs to be activated for pretty permalinks.
  • cURL – Supported by the server.
  • upload_max_filesize – 8 MB or greater
  • iconv – this extension must be installed on your server
  • SubstituteMaxLineLength – 20M or greater
  • PHP and WordPress Memory Limit – 256MB 
  • PHP Modules : PHP XML, MBString, SimpleXML, Fsockopen/cURL, SoapClient, DOMDocument, GZip, Zip Archive, Iconv, OpenSSL > 1.0.2

You can always check them through Tools -> Site Health -> Info. If any of the above is missing or not provided, the functionality related to it will become unavailable or work incorrectly. Allow me to share this valuable information with you: The first thing we do every single time we receive a ticket is make sure the requirements are provided correctly. In most cases, one or two modules are missing or the memory limit is wrong. As part of troubleshooting a WordPress theme, it’s recommended to check the requirements first thing. 

Many issues with Elementor not loading are related to low memory limit or missing define( 'WP_MEMORY_LIMIT', '256M' ); in the wp-config.php file. We have already provided an article on how to configure the WP-Config.php file here.
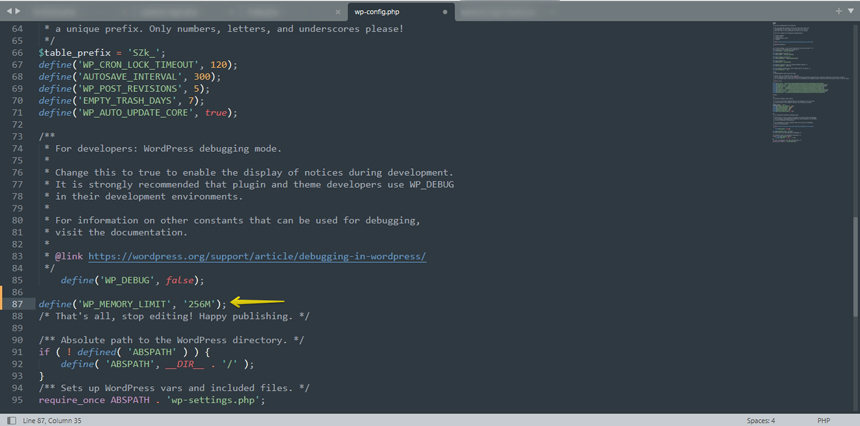
common issues with Jupiter X - wpconfig
The wp-config.php file having wp_memory_limit set to 256M

In case you need assistance enabling the PHP modules or you can’t find where to do it, you need to contact your web host support and ask for help. The place you need to check might be different depending on your hosting control panel, so the best person to help in this case is the hosting support.

For more information about the Server Requirements, please refer to this article.

Template installation issues

While installing demo templates should go smoothly in most cases, some users may face errors while installing the templates. In these cases, the best troubleshooting technique is to make sure your web host meets the server requirements of Jupiter X. I covered it in the previous section.

However, there is another common issue with Jupiter X that I would like to talk about. When you install a new template in Jupiter X and choose the Full Import option, your current content, settings, widgets, etc. will be removed and the database will be reset. These will be replaced with page contents and settings of the new template that will be imported.

While this is what you want to happen when importing on a clean site or when you want to start fresh, it can cause problems when you do this on an existing website with existing content and everything gets removed. The best workaround to avoid content removal is to use a secondary website and import the template to it. Then, after making sure everything is alright, export the pages or the whole website and migrate it to the live website. However, sometimes it’s too late for this advice and your content might be lost before you notice.

Fret not – we have got you covered. While installing a Jupiter X Ready-Made Template, on the very first step Jupiter X takes a backup of the database before it removes everything. This backup is in the form of an SQL dump file placed in this directory of your website wp-content/uploads/jupiterx_backups/
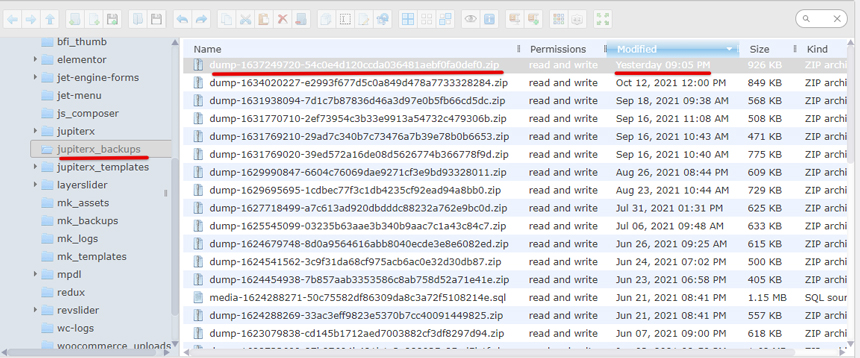
common issues with Jupiter X - backup

This is basically the backup that can be used to restore the contents of the website prior to the template installation. You can restore it with the help of a database expert and get back your content.

Elementor problems

Elementor is the default page builder in Jupiter X. All of the theme’s demo templates are made via Elementor. This means that the theme is dependent on the Elementor page builder. Elementor is an open-source plugin with a large community and a lot of add-ons. Each add-on can add cool features to it, but at the same time, increase the risk of creating an issue.

While one of the most common issues with Elementor page builder is that the page loader is not loading, the reason for this might differ from case to case – don’t worry, I’ll go over some common causes. Please note that each time you encounter an Elementor issue, it may have a different cause, so actually covering all the reasons is not possible.

Check for plugin conflicts

Elementor says that these loading errors are caused due to plugin conflicts, so it’s best to start from here. If the Elementor loading issue is a new problem on your website, then check for plugins you’ve recently installed. Disable these plugins and check if the error is fixed. 

If you are unable to find the culprit, then follow this plugin troubleshooting guide or enable only Elementor (and Elementor Pro if you have it) and check if it is loading properly. If it is, then start activating plugins one by one and check Elementor each time. If you face the loading issue again after activating a plugin, then you’ve found the culprit.

Check Your PHP version and WP Memory Limit

A server with limited WP memory can also prevent Elementor from loading. The Elementor page builder recommends using PHP 7.0 or higher to experience the best performance while using the editor. They also recommend a preferred memory limit of 256M or higher. 

To check the PHP version and WP Memory limit, go to your WordPress dashboard and navigate to Elementor > System Info.

To update your PHP version, you can simply go to your web host admin panel and update PHP or you can contact your webmaster to do so. 

If you’re on an updated version of PHP and still facing the issue, then you should check if the memory limit is 256M or not. To increase the memory limit you can perform one of the below actions.

Edit your wp-config.php file

Add this to the top, before the line that says, “Happy Blogging”:

define('WP_MEMORY_LIMIT', '512M');

Note: WordPress memory can be different from the server – you need to set this regardless of server memory settings.

Edit your PHP.ini file

If you have access to your PHP.ini file, change the line in PHP.ini.

If your line shows 64M, try 256M:

memory_limit = 256M; Maximum amount of memory a script may consume (64MB)

Edit your .htaccess file

If you don’t have access to PHP.ini try adding this to the .htaccess file:

php_value memory_limit 256M

Sometimes the Elementor Widgets panel doesn’t work or load properly. If your Elementor Widget Panel does not load and has the continuously spinning “Loading” icon, as shown in the image below, this is generally due to a resource issue, a conflict with another plugin, or a setting on your server that needs to be adjusted.

common issues with Jupiter X - elementor not loading
Elementor widgets panel not loading issue

In this case, you may do as above (deactivating the third-party plugins, checking server requirements) and also do the following:

  • Check the Elementor -> System Information -> Logs to see if there are any logs related to this issue
  • Check the browser console and see if there are any console errors showing up. A lot of the time the Elementor loading spinner issue is related to javascript errors on the page. 
  • Use a plugin to clear your transients once. Sometimes a third-party plugin causes a wrong transient to store in your database and that transient belongs to a plugin that adds extra library resources to the Elementor library. Some Elementor add-ons have this feature and deactivating those plugins are not enough to troubleshoot the issue. You need to clear the transients once after the plugin deactivation to make sure it’s not a related issue.

Performance issues 

Another set of questions often fielded by our support desk involve performance-related issues. After all, your website needs to perform well, right? Fortunately, Jupiter X is doing a good job here despite the fact that it’s a premium WordPress theme. We have covered this topic in multiple blog posts already so I’m going to make it short and refer you to these articles. Please check these articles to make sure you can get the best performance out of your website:

How to Speed Up your Website in Jupiter X

Jupiter X Performance Tips

Wrapping up

The most common issues with Jupiter X reported to our support desk can be categorized as follows:

  • License related issues
  • Server errors
  • Template installation issues
  • Issues with the page builder or feature not working
  • Performance issues

However, third-party-related issues and customization requests are a never-ending part of it as well. In this article, I tried to cover the top 5 most common issues with Jupiter X that we face every day in our support desk and provided troubleshooting guides to explain how to avoid them.

5 Best Knowledge Base Plugins

Whether you run an online store, blog or provide freelance service, having a knowledge base section on your WordPress website is always a good idea. These pages greatly reduce the amount of support requests, via live chat or phone call. In turn, they increase customer happiness and satisfaction rate. Customer satisfaction allows you to bring in more business and sell more products.

With the right tool in your hand you may solve your problems hassle-free. Creating documentation, how-to articles or knowledge base sections on your website may sound easy but if you don’t have the right tools, it could easily become a nightmare.

Normally knowledge base content can be published by using WordPress pages or posts but if you want to be more organized, or if you have a lot of content that needs good organization, sorting, filtering, and categorizing then you need to find the right tool. In this article we will list the 5 best Knowledge base plugins that will simplify this process.

Heroic Knowledge Base
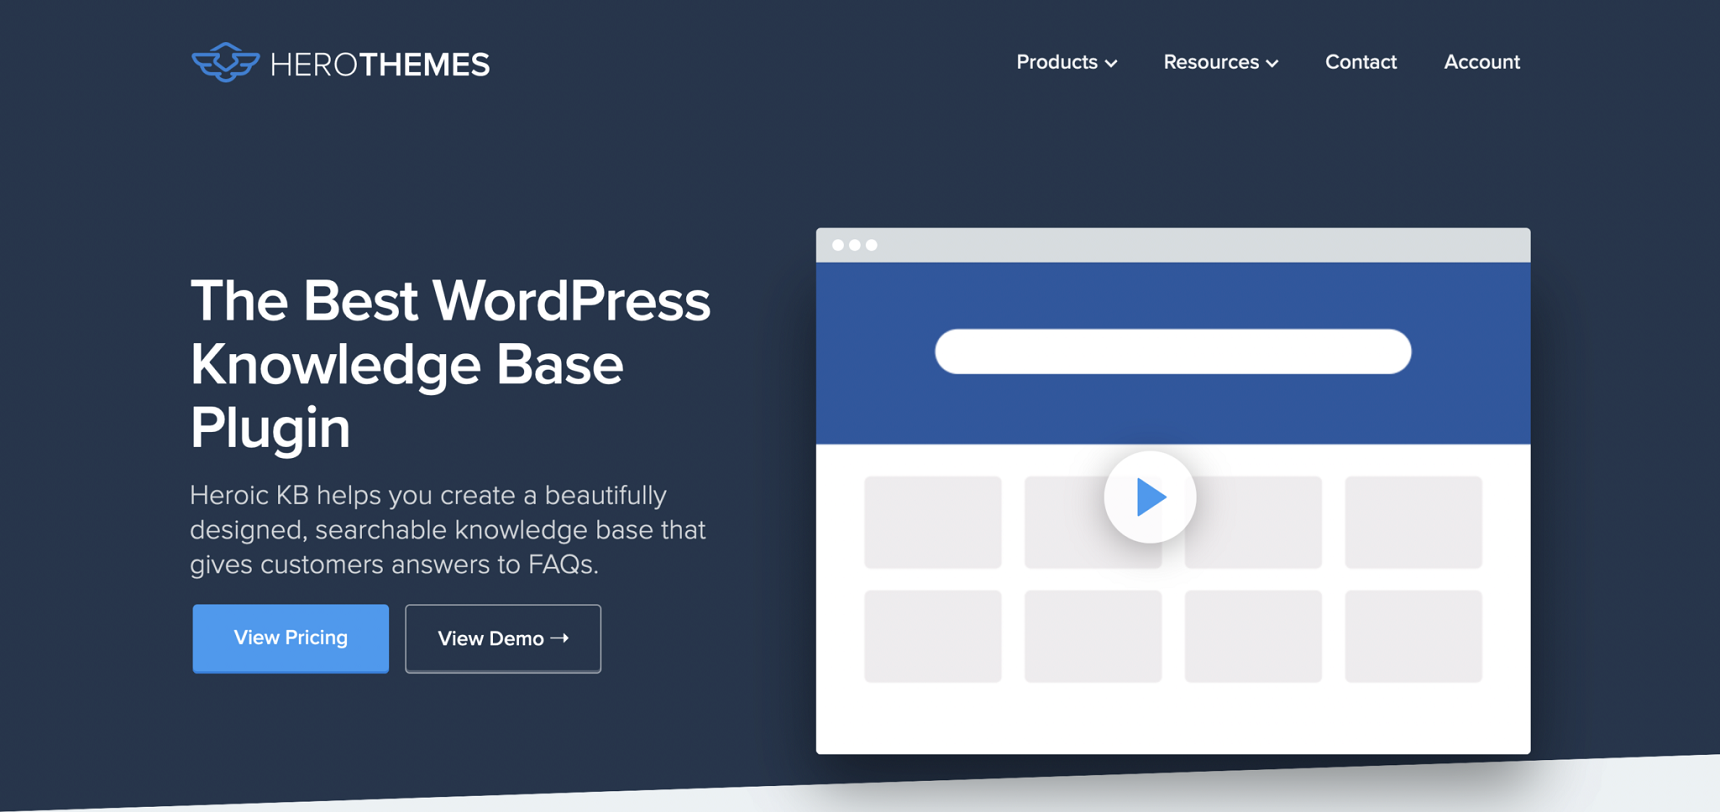
 knowledge base plugins - HeroThemes

Heroic Knowledge Base is one of the most widely used premium knowledge base plugins. The plugin is maintained by well-known companies such as Pagely, Crazyegg, and others, so you are in safe hands with its authors. 

The plugin is very simple to use and it is incredibly strong and feature-rich. One good thing about the Heroic KB plugin is that it allows you to add a searchable knowledge base to your current website which will save your time and it will allow your visitors to quickly find answers to questions. In addition, Heroic KB plugin is famous for its lightning-fast AJAX search tool, allowing visitors to find answers in real time.

Outside of the normal KB plugin options you will find some other options like classification of content, order of the content by drag and drop, articles with attachments, display widgets and many others.

The Heroic KB Plugin also features built in analytics and options to get feedback from the users. This will allow you to collect user insight to improve the quality of your documentation.

While the price may put you off, you receive a ton of functionality that goes beyond simply listing out articles, in addition to the plugin’s gorgeous looks.

A single site license of Heroic KB plugins costs $129.

weDocs

 knowledge base plugins - weDocs

weDocs is another fantastic WordPress documentation and knowledge base plugin. weDocs is  created by weDevs, the same company that created famous plugins like Dokan Multivendor and WP User Frontend Pro. The plugin is simple to use  and lets you organize your documentation pages in sections. weDocs lets you list your content hierarchically making it simple to browse.

The user-friendly interface of the plugin allows you to break your articles into multiple categories and arrange them by dragging and dropping, all from one screen. weDocs layout is straightforward yet effective, with sidebar navigation and a breadcrumb menu.

weDocs also comes with widgets that can be added anywhere within your content, allowing your users to use the search option anywhere from the content to the sidebar or footer section.

Another considerable advantage of weDocs is its design. The out of the box design of the plugin is quite modern for a knowledge base plugin, plus it allows you to add your own CSSto make it even better.

weDocs is 100% free of cost.

Echo Knowledge Base
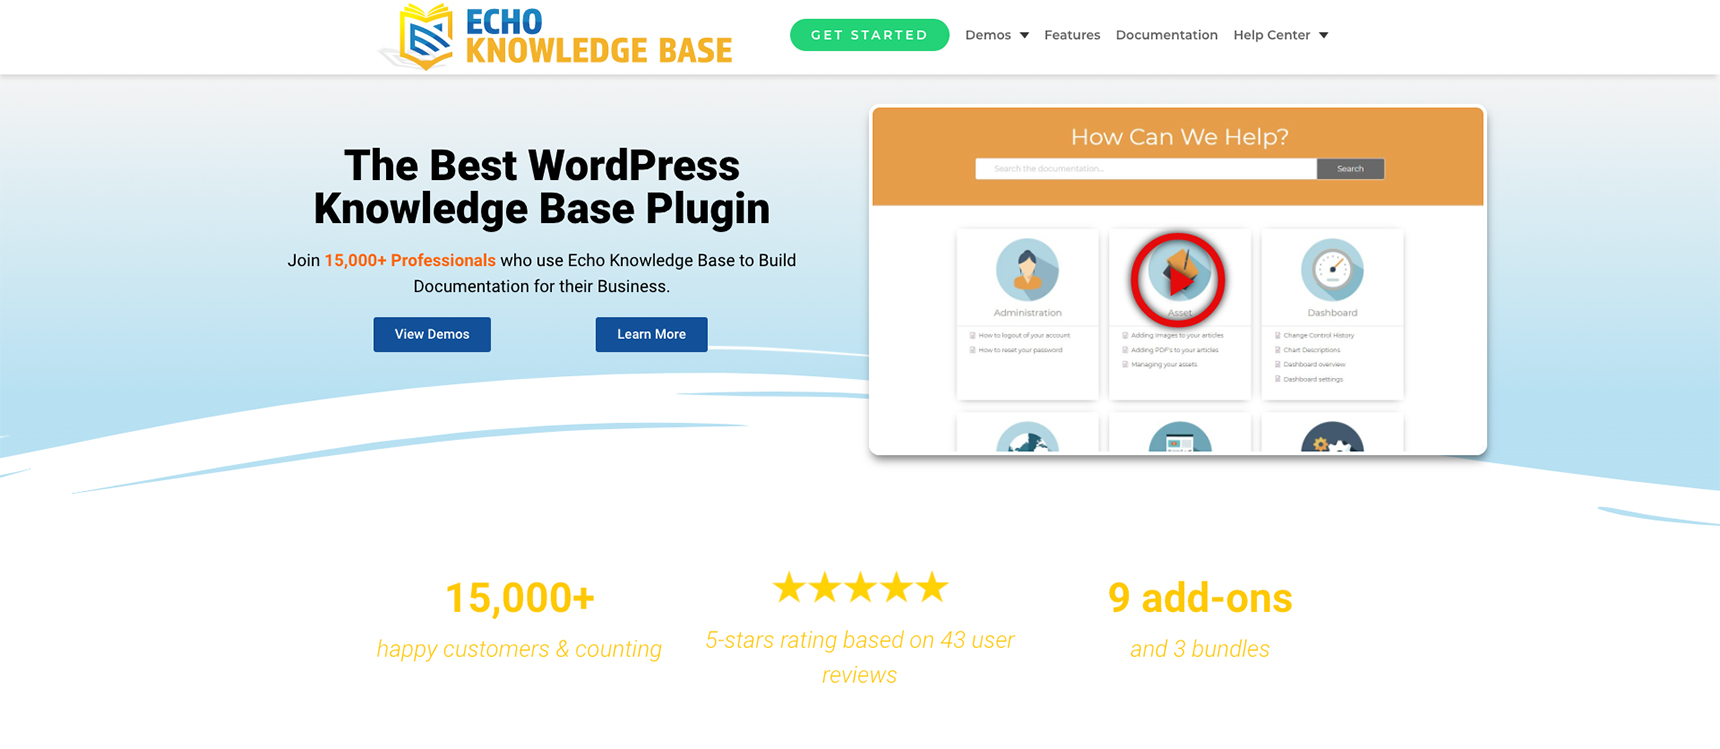
echo - knowledge base plugins

Echo Knowledge Base is a popular free plugin but it also has paid add-ons which include  extra features and capabilities to your documentation portal. The plugin has a setup wizard that guides you through plugin configuration, so you don’t need to browse through different settings, greatly simplifying the setup process.

Beside all of Echo KB’s many functions you also receive a variety of layouts to select from and the ability to tweak every feature, plus more than 25 predefined themes to give your documentation page a nice look and feel.

Among Echo KB’s features you will find:

  • Automatic table of contents generation
  • AJAX Live search results
  • 5 levels of hierarchical documentation 
  • Categories and subcategories
  • Comments to articles
  • Shortcode to create FAQ sections
  • Shortcode to place a search widget on sidebars or footers

The premium version of the plugin has many additional features that can cover all of one’s needs. You can get Echo Knowledge Base for free from WordPress.org but if you want premium add-ons they will cost you $15-$45 each, they can also be purchased in bundles of $50.

BasePress

BasePress is another great documentation plugin offering free and premium plans. The free version of BasePress is available on WordPress.org. BasePress is a great plugin to organize easy to navigate knowledge bases and documentation. Thanks to its drag and drop interface, the plugin enables you to quickly create help pages and a documentation section for your goods or services.

In addition to any normal text editor, BasePress can also be used in Gutenberg since it already has Gutenber blocks, which allows you to construct everything with the block editor.

BasePress allows you to create as many distinct knowledge bases as you need to fully document your goods or services. Because of its clean and simple administration features it is easy to use for everybody.

Articles in the plugin can be organized by section, category, tags and they can be ordered using a simple drag and drop interface. Basepress also has a rapid search bar to assist users by quickly finding answers to their questions.

It is worth mentioning that the plugin has three predefined themes to pick from. Each theme can be easily modified and comes with great color palettes, as well as full customization of the templates.

Free version of BasePress is available at WordPress.org. The premium version starts at $59.

Very Simple Knowledge Base

As the name says, Very Simple Knowledge Base is really one of the easiest and simplest plugins to create Knowledge base pages in no time, so, if you are looking for a fast method of creating documentation or knowledge base pages this plugin is for you

The key benefit of this plugin is that it allows you to reuse existing posts for knowledge base topics, you can use shortcodes to display them. KB items can be sorted by category into a multicolumn layout to showcase additional categories and articles.

Beside normal posts from WordPress, the Very Simple KB plugin is also compatible with any other custom post type, such as products and events.

Compared to the other KB plugins we have reviewed above, Very Simple KB lacks the same functionality, having less rich options. However this plugin excels at being easy to use and can be configured in minutes.

Very Simple Knowledge Base is 100% free.

Bonus tip
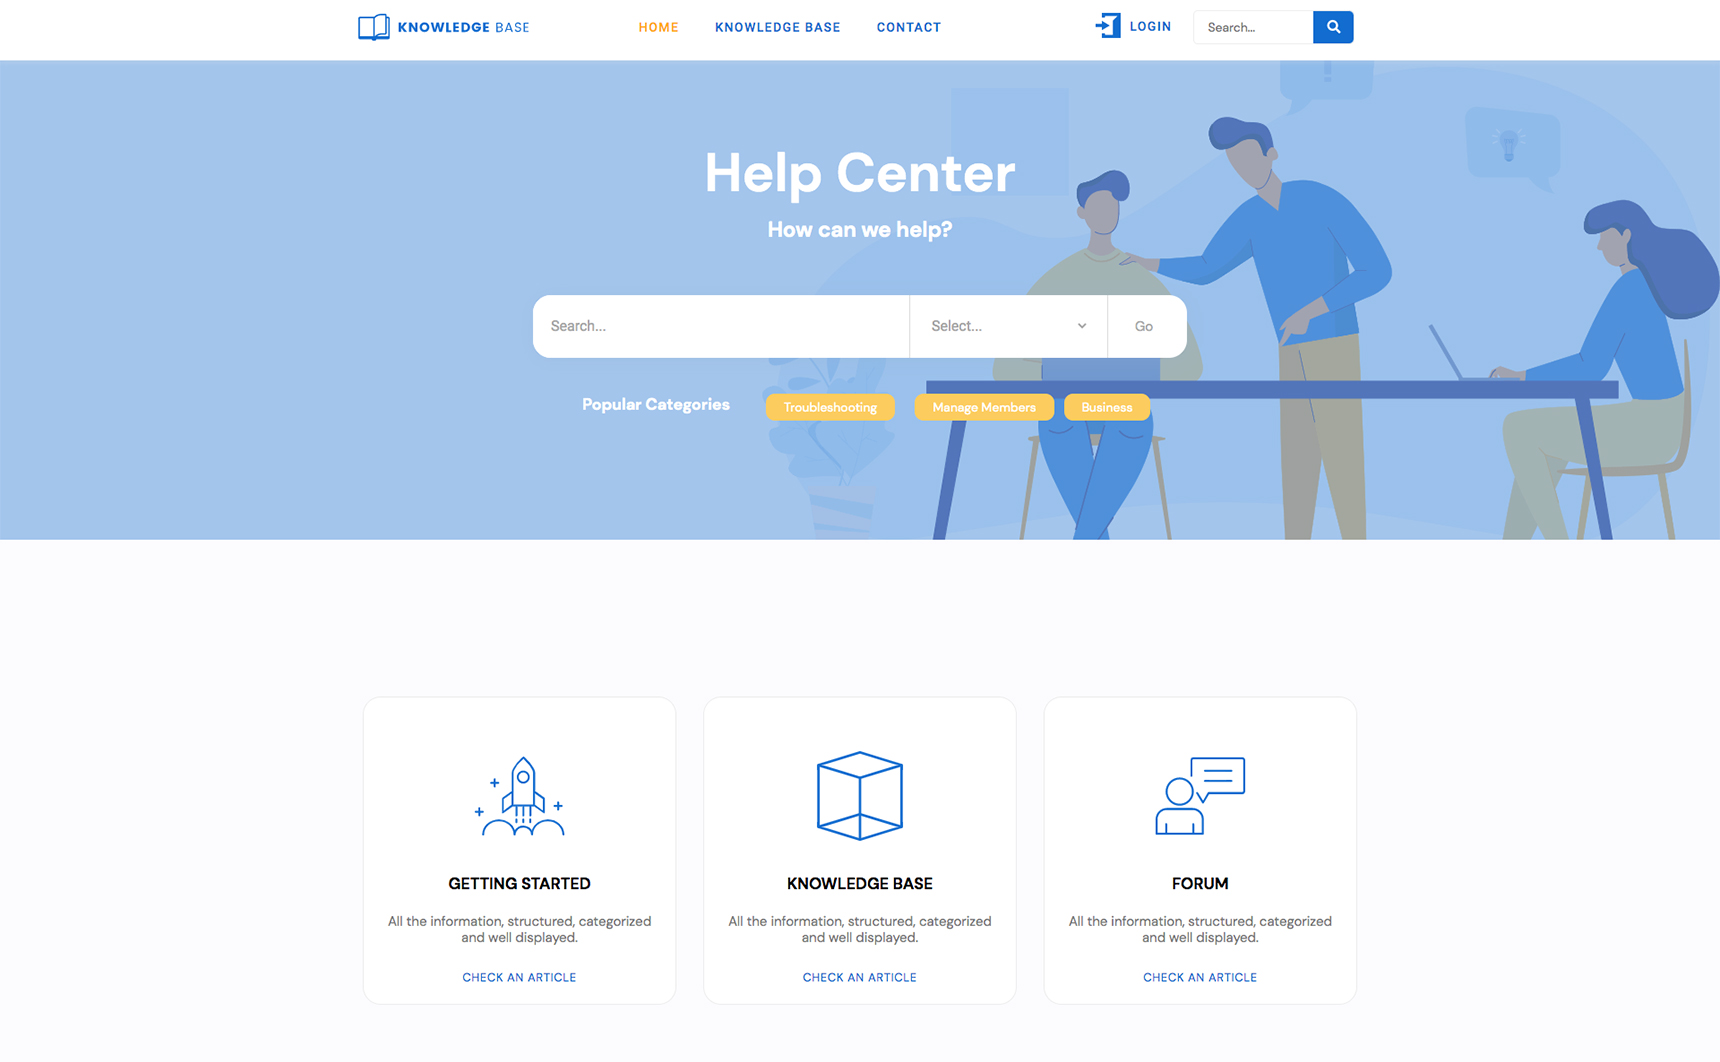
Are you familiar or already using Jupiter X? Then there is good news, in this case you don’t need to install any other third party plugins, Jupiter X already has all the options to quickly setup knowledge base pages, sections or even a subdomain dedicated to knowledge base or documentation of any purpose. We also have one template pre-designed especially for knowledge base, check this link.

Conclusion

We have reviewed the most popular and best plugins for Knowledge base and documentation management, however, this list does not stop here. You may find other tools and solutions in the fast evolving sector. Before making decisions don’t forget to carefully review your options because choosing the right tool is crucial towards saving you time and resources in the future.

If you still have any questions it’s my pleasure to assist in the comments.

Configuring WordPress in wp-config.php File: From Basic to Advanced

During the installation process, WordPress creates a configuration file called wp-config.php. Primarily, this file contains database credentials that allow WordPress to establish a connection with the database. Additionally, there are more settings to configure other database elements, security keys and developer options in the wp-config.php file. In this article, we will explore the wp-config.php file’s functionality, find its location in your WordPress installation, and show custom settings that can be added to it. Let’s dive in to learn more about configuring WordPress in wp-config.php!

What is the wp-config.php file?

The wp-config.php file isn’t included in the default installation package of WordPress, but you can find the wp-config-sample.php file there. This file is located in the WordPress root directory and contains the database configuration details of the site.

configuring WordPress in wp-config.php

When installing WordPress you’re asked to input the following database information: database name, username, password, database host and table prefix. Then, the installer will create a wp-config.php file based on the provided information. From there you should be able to start configuring WordPress in wp-config.php.

configuring WordPress in wp-config.php

In case you need to create the configuration file manually, you can use the sample wp-config-sample.php file. Just rename it to wp-config.php and edit its content, which is required for the installation process mentioned above. Note: Don’t change the order of the code, as rearranging it may create errors on your site. Below you can find the default content of the wp-config.php file:

<?php
/**
 * The base configuration for WordPress
 *
 * The wp-config.php creation script uses this file during the installation.
 * You don't have to use the web site, you can copy this file to "wp-config.php"
 * and fill in the values.
 *
 * This file contains the following configurations:
 *
 * * MySQL settings
 * * Secret keys
 * * Database table prefix
 * * ABSPATH
 *
 * @link https://wordpress.org/support/article/editing-wp-config-php/
 *
 * @package WordPress
 */

// ** MySQL settings - You can get this info from your web host ** //
/** The name of the database for WordPress */
define( 'DB_NAME', 'database_name_here' );

/** MySQL database username */
define( 'DB_USER', 'username_here' );

/** MySQL database password */
define( 'DB_PASSWORD', 'password_here' );

/** MySQL hostname */
define( 'DB_HOST', 'localhost' );

/** Database charset to use in creating database tables. */
define( 'DB_CHARSET', 'utf8' );

/** The database collate type. Don't change this if in doubt. */
define( 'DB_COLLATE', '' );

/**#@+
 * Authentication unique keys and salts.
 *
 * Change these to different unique phrases! You can generate these using
 * the {@link https://api.wordpress.org/secret-key/1.1/salt/ WordPress.org secret-key service}.
 *
 * You can change these at any point in time to invalidate all existing cookies.
 * This will force all users to have to log in again.
 *
 * @since 2.6.0
 */
define( 'AUTH_KEY',         'put your unique phrase here' );
define( 'SECURE_AUTH_KEY',  'put your unique phrase here' );
define( 'LOGGED_IN_KEY',    'put your unique phrase here' );
define( 'NONCE_KEY',        'put your unique phrase here' );
define( 'AUTH_SALT',        'put your unique phrase here' );
define( 'SECURE_AUTH_SALT', 'put your unique phrase here' );
define( 'LOGGED_IN_SALT',   'put your unique phrase here' );
define( 'NONCE_SALT',       'put your unique phrase here' );

/**#@-*/

/**
 * WordPress database table prefix.
 *
 * You can have multiple installations in one database if you give each
 * a unique prefix. Only numbers, letters, and underscores please!
 */
$table_prefix = 'wp_';

/**
 * For developers: WordPress debugging mode.
 *
 * Change this to true to enable the display of notices during development.
 * It is strongly recommended that plugin and theme developers use WP_DEBUG
 * in their development environments.
 *
 * For information on other constants that can be used for debugging,
 * visit the documentation.
 *
 * @link https://wordpress.org/support/article/debugging-in-wordpress/
 */
define( 'WP_DEBUG', false );

/* Add any custom values between this line and the "stop editing" line. */


/* That's all, stop editing! Happy publishing. */

/** Absolute path to the WordPress directory. */
if ( ! defined( 'ABSPATH' ) ) {
	define( 'ABSPATH', __DIR__ . '/' );
}

/** Sets up WordPress vars and included files. */
require_once ABSPATH . 'wp-settings.php';

Basic configurations of the wp-config.php file

In the sample configuration file you can see the following configuration blocks:

  • MySQL settings
  • Secret keys
  • Database table prefix
  • WordPress debugging mode
  • ABSPATH

Let’s take a closer look at these blocks.

MySQL settings

The MySQL settings block consists of your WordPress database configuration, such as database name, username, password and hostname.

/** The name of the database for WordPress */
define( 'DB_NAME', 'database_name_here' );

/** MySQL database username */
define( 'DB_USER', 'username_here' );

/** MySQL database password */
define( 'DB_PASSWORD', 'password_here' );

/** MySQL hostname */
define( 'DB_HOST', 'localhost' );

You can find all the information required by this section in your hosting control panel or by asking your hosting provider support. Also, this block contains the database character set and database collate type settings.

/** Database charset to use in creating database tables. */
define( 'DB_CHARSET', 'utf8' );

/** The database collate type. Don't change this if in doubt. */
define( 'DB_COLLATE', '' );

When configuring these settings you can define database tables with the appropriate character set (charset). As the default charset WordPress assigns UTF8, which supports any language. The database collation determines how the database sorts your data. Mostly, the database collation value should be left blank, so it will be automatically assigned by MySQL based on the database character set specified by charset. Usually there is no reason to change the default value of DB_CHARSET and DB_COLLATE, however, you can change them if needed according to the character sets and collations supported by MySQL. Note: Using the wrong combination of charset and collation values may cause different errors in the WordPress database.

Secret keys

In the secret keys block of the wp-config.php file WordPress stores a set of authentication unique keys and salts, which provide an extra layer of security for your site against attacks by adding random elements to the password. This block contains eight variables that consist of random strings of data.

define( 'AUTH_KEY',         'put your unique phrase here' );
define( 'SECURE_AUTH_KEY',  'put your unique phrase here' );
define( 'LOGGED_IN_KEY',    'put your unique phrase here' );
define( 'NONCE_KEY',        'put your unique phrase here' );
define( 'AUTH_SALT',        'put your unique phrase here' );
define( 'SECURE_AUTH_SALT', 'put your unique phrase here' );
define( 'LOGGED_IN_SALT',   'put your unique phrase here' );
define( 'NONCE_SALT',       'put your unique phrase here' );

You can change the values to yours by changing the “put your unique phrase here” fields. The unique keys can be generated by visiting the WordPress secret keys service.

Database table prefix

The database table prefix is the value placed in front of the WordPress database tables. By default, WordPress sets this value as “wp_” in the wp-config file.

/**
 * WordPress database table prefix.
 *
 * You can have multiple installations in one database if you give each
 * a unique prefix. Only numbers, letters, and underscores please!
 */
$table_prefix = 'wp_';

Changing the database prefix to a unique value is one of the steps to improve your database security against SQL injection attacks. Also, using unique table prefixes in different WordPress installations allows you to store data from different sites in one database.

WordPress debugging mode

The default wp-config.php file has a useful setting for WordPress developers where the debug mode can be enabled. When debug mode is turned on and there is an error, you’ll see the error notification on your site. WordPress turns off the debug mode by default as shown in the following code line:

define( 'WP_DEBUG', false );

To turn the debug mode on you need to replace the “false” value with “true”:

define( 'WP_DEBUG', true );

Note: You should disable debug mode on a live site, as errors and warnings that may be shown to site visitors can provide valuable information about your site and it’s not secure. We will describe later in this article how to use debug mode safely.

ABSPATH

ABSPATH is a PHP constant defined at the bottom of the wp-config.php file, which states the absolute path to the WordPress directory.

/** Absolute path to the WordPress directory. */
if ( ! defined( 'ABSPATH' ) ) {
	define( 'ABSPATH', __DIR__ . '/' );
}

/** Sets up WordPress vars and included files. */
require_once ABSPATH . 'wp-settings.php';

This code snippet is placed after the following comment:

/* That's all, stop editing! Happy publishing. */

That means WordPress does not recommend modifying the lines of code after it.

Advanced wp-config.php configurations

In the previous section we reviewed default settings of the wp-config. php file. In addition to basic configurations for WordPress in the wp-config. php file, you can add advanced ones, which we will describe below. One important thing: All code snippets should be placed above the line “/* That’s all, stop editing! Happy publishing. */”, otherwise your custom settings won’t work. 

WordPress URL

When moving the site to a new domain or server it’s necessary to change the WordPress URL. You can change it in the site dashboard via the Settings > General section.

It may happen that these fields can’t be edited in the dashboard. In this case you can change the WordPress URL by adding the following code snippet in the wp-config.php file.

define( 'WP_HOME', 'http://your-new-domain' );
define( 'WP_SITEURL', 'http://your-new-domain' );

The value of the WP_SITEURL is the address where your WordPress core files are located. The WP_HOME value is the address your visitors type in their browser to reach your website. Both constant values should include ‘http://’ or ‘https://’ and shouldn’t have a slash symbol “/” at the end. Setting WP_SITEURL and WP_HOME in wp-config.php can reduce the number of database calls when loading your site, as by default these values are stored in the wp_options table.

Upload Directory

The Uploads directory stores all media you upload via WP Dashboard > Media. By default, WordPress sets the uploads path to “wp-content/uploads”. You can redefine this value to yours in wp-config.php by adding the following code snippet.

define( 'UPLOADS', 'wp-content/custom-folder' );

To store media files in a directory outside the wp-content folder, use the code snippet below:

define( 'UPLOADS', ''.'media' );

Note: The value doesn’t require a leading slash, as this path is relative to ABSPATH.

wp-content Directory

WordPress allows you to move the wp-content directory, which stores your themes, plugins, and uploads, outside of the WordPress app directory. It’s one of the methods to secure your site from malware injection attacks. To do that you need to redefine WP_CONTENT_DIR: 

define( 'WP_CONTENT_DIR', dirname(__FILE__) . '/new-folder/wp-content' );

and change the location of the wp-content URL by changing the WP_CONTENT_URL value:

define( 'WP_CONTENT_URL', 'http://yourdomain/new-folder/wp-content' );

Theme Directory

The theme directory can’t be simply changed via wp-config because its path is hardcoded relative to the wp-content folder:

$theme_root = WP_CONTENT_DIR . '/themes';

In this case, additional theme directories can be registered as described in the article entitled Register theme directory.

Plugins Directory

As for moving the Plugins folder, it can be easily changed by using the following code snippets in the wp-config.php file.

define( 'WP_PLUGIN_DIR', dirname(__FILE__) . '/wp-content/new-folder/plugins' );
define( 'WP_PLUGIN_URL', 'http://yourdomain/wp-content/new-folder/plugins' );

The first code line sets the WP_PLUGIN_DIR and the second one sets the  WP_PLUGIN_URL value.

Custom User Table and User Meta Table

WordPress has the wp_user table in the database to store user data. If you need a custom user table, add the following code in wp-config.

define( 'CUSTOM_USER_TABLE', $table_prefix.'my_users' );

If you created a custom user table, then you need to create a custom user metadata table as well.

define( 'CUSTOM_USER_META_TABLE', $table_prefix.'my_usermeta' );

Language and Language Directory

WordPress version 4.0 users can change language in WP Dashboard > Settings > General.

It’s also possible to change language via the wp-config.php file during the WordPress installation process. Use this code to change language and define the language directory where the language files will be stored.

define( 'WPLANG', 'it_IT' );
define( 'WP_LANG_DIR', dirname(__FILE__) . 'wordpress/languages' );

The WPLANG language code can be found here in the WP Locale column.

Memory Size Limit

In WordPress, you can set the amount of PHP memory that is required to execute scripts by using the WP_MEMORY_LIMIT option. The thing you need to consider is this option changes PHP Memory only for WordPress and not other applications. By default, WordPress allocates 40M for a single site and 64M for multisite. To increase, for example, to 256M, you need to add this code in wp-config.

define( 'WP_MEMORY_LIMIT', '256M' );

Also, you can increase or decrease PHP memory from the WP_MEMORY_LIMIT for the administration area by defining WP_MAX_MEMORY_LIMIT.

define( 'WP_MAX_MEMORY_LIMIT', '256M' );

File Permissions

The file permission setting determines who can view, modify and execute files and folders of the site. Each permission level is represented by a 3-digit code that consists of the following:

no access0 (-)
execute1 (x)
write2 (w)
read4 (r)

In wp-config you can override the default file permissions with help of two constants: FS_CHMOD_DIR and FS_CHMOD_FILE. In the example below we will set permissions for directories to “755” (read, write and execute for the owner; read and execute for the group; read and execute for others), and for the files to “644” (read, write and execute for the owner; read for the group; read for others).

define( 'FS_CHMOD_DIR', ( 0755 & ~ umask() ) );
define( 'FS_CHMOD_FILE', ( 0644 & ~ umask() ) );

As the permissions are octal values they are prefixed with a 0. You can find more information about file permissions in this article.

WordPress Auto Updates

WordPress allows the auto-update feature during the installation process. However, there are different situations when autoupdate can affect your site functionality, and in this case, it’s better to disable the auto-updates by adding the following code.

define( 'AUTOMATIC_UPDATER_DISABLED', true );

Also, since WordPress version 3.7 you can manage core updates with the WP_AUTO_UPDATE_CORE constant. To disable all core updates use this code.

define( 'WP_AUTO_UPDATE_CORE', false );

There is also the ability to enable core updates for minor releases.

define( 'WP_AUTO_UPDATE_CORE', 'minor' );

Content Related Settings (autosave interval, post revisions)

These types of settings may be useful as your website grows. When you edit any posts, WordPress adds an entry to the posts table, which allows you to restore previous posts/pages revisions. Though it’s a cool functionality, it can generate a problem when your site gets big. In this case you can disable/reduce the number of post revisions and reduce the autosave interval. WordPress saves revisions each 60 seconds automatically, but it can be changed (for example, to 180 sec) using this code:

define( 'AUTOSAVE_INTERVAL', 180 );

To decrease the number of posts revision (set to 5) add this code:

define( 'WP_POST_REVISIONS', 5 );

or disable them at all using:

define( 'WP_POST_REVISIONS', false );

Debugging Mode advanced settings

Earlier in this article we described how to enable the debug mode in the wp-config.php file. However, in this case all errors and notices will be visible to our site’s visitors, which poses a security risk. After setting WP_DEBUG constant to “true” you need to add a few lines of code below, so the full code will look like this:

define( 'WP_DEBUG', true );
define( 'WP_DEBUG_LOG', true );
define( 'WP_DEBUG_DISPLAY', false );
@ini_set( 'display_errors', 0 );

In this way, all errors, notices and warnings will log to a file called debug.log, which will be generated in the wp-content directory so that no errors are shown on the site.

Lockdown the wp-config.php file

As you can see, the wp-config.php file contains not only the database settings, but also other important configurations of your WordPress site, so there is a reasonable question as to how to protect it. One of the methods is to use the following directives in the web server settings:

For Apache web servers, add this code to the .htaccess file:

<files wp-config.php>
order allow,deny
deny from all
</files>

For Nginx web servers, add this code to the configuration file:

location ~* wp-config.php { deny all; }

Note: These directives should be applied only after all configurations are completed.

Conclusion

In this article we described the WordPress configuration file called wp-config and defined its functional purpose. This file is created during the WordPress installation process and, mainly, it contains the database credentials to establish a connection between the site and the database. Along with the basic configurations (secret keys, database table prefix, etc.), it can be supplemented with other advanced settings, such as: changing location of the uploads, wp-content and plugins directories; customizing user table; allocating WP Memory size; setting file permissions and much more. Unfortunately, it’s hard to review all possible custom configurations of the wp-config.php file in one article, so in this one we provided the most popular settings that can be helpful when configuring WordPress in the wp-config.php file.

Customizing WordPress RSS Feed with Code: The Easy Way

Is RSS dead? That was the question that I was asking myself when I decided to write this post. Veteran users of the internet are probably familiar with Google Reader. The golden days of RSS were those days that everyone was aggregating their beloved website feeds using apps such as Google Reader and had everything in one place. Many still believe that Google’s most successful attempt to run a social network was Google Reader, although it went offline in 2013. But with the  shutting down of feed aggregators such as GReader, is RSS dead? Not exactly. RSS is still alive; however, it is being used less than before. You may still find apps and websites that allow you to aggregate RSS feeds in one place and have your beloved blogs in your pocket, but they are more useful than you might think.

Honestly, the reason that I was encouraged to write this post is that one of our clients wanted to modify the RSS feed of their website to be able to connect it to an app that was pulling their events data from one of the custom post types created on their WordPress website. But, instead of the event date, it was pulling the post publish date. He asked this question at the support desk and I thought it was a really interesting question. After searching around a little bit, I decided to share what I knew about customizing the WordPress RSS feed in this article. Let’s take a closer look.

What is a feed and what types of feed does WordPress support?

Based on what Wikipedia says: A web feed (or news feed) is a data format used for providing users with frequently updated content in raw format. Simply put, it allows users to see a website’s updated content without visuals. Common web feed formats are ATOM, RSS and JSON. RSS and ATOM are presented in XML format.

RSS or Really Simple Syndication is a web feed that allows users and applications to access updates to websites in XML format. Subscribing to RSS feeds can allow a user to keep track of many different websites in a single news aggregator app or website and removes the need for users to manually check them. 

WordPress supports both ATOM and RSS and RDF feeds by default. Using this doc, you can get the default WordPress feeds link like this:

For RSS 2.0 feed:

<?php bloginfo('rss2_url'); ?>

And for ATOM feed:

<?php bloginfo('atom_url'); ?>
customizing WordPress RSS feed
Example of a RSS 2.0 feed, default web feed of WordPress

What are the use cases for RSS feeds?

Most of the time, RSS feeds are used in news aggregators such as Feedly or Inoreader. They simply allow you to compile all the websites you love in one place. This is particularly useful if you are a geek, author, stock trader or bibliophile. More than that, if you want to show another website feed somewhere on your website, you can simply use a feed reader widget on it.

Earlier I mentioned that one of our clients wanted to show their Event post type feed in an app. They created the Event post type using the bundled plugin Jet Engine and the Jupiter X theme to easily add their meta field, but they needed the date field to show instead of the publish date of the post. This is probably a popular topic out there for those who want to showcase events on their Mailchimp RSS campaigns (to be able to send event dates through the newsletters once the event is published)! 

There are many more use cases than what I’ve written about here for sure, but it’s enough to show the importance of RSS feed customization methods.

How to modify feed content using WordPress actions and filters

I’m going to show you how you can modify feed content using WordPress actions and filters. But wait a minute… if it’s possible, why not just use third party plugins to modify the feed content? Customizing the WordPress RSS feed using a plugin is quite simple—just search for RSS in the WordPress plugin repository to find a good RSS editor plugin. However, you may find it time consuming to find a plugin that is capable of doing what you want, learning how to use it and then customizing it to fit your needs. It would be simpler to dig into the code yourself and start customizing the WordPress RSS feed the way you want. Fortunately, WordPress has good documentation explaining Feed Customization. You can find it here.

By default, if you add /feed/ or /rss/ to the end of your website URL, you can see the feed entry in XML format. You can use a more specific URL to filter the content on the feed. For example, if you add the “post_type” parameter to the end of your RSS feed address, you will limit the posts to your custom post type. Below you can see some examples of how WordPress targets RSS feeds:

http://www.example.com/?cat=-123&feed=rss2     //exclude category with ID 123 from the RSS feed
http://www.example.com/category/cat1+cat2/feed //show the RSS feed of cat1 and cat2 posts
http://www.example.com/tag/tag1+tag2/feed         //show the RSS feed of posts having tag1 and tag2
http://www.example.com/category/cat1,cat2/feed  //show the RSS feed of cat1 or cat2 posts
http://example.com/author/authorname/feed/         //show the RSS feed of posts that have written by authorname
http://example.com/?s=searchterm&feed=rss2     //show the RSS feed of searchterm
http://www.example.com/feed/?post_type=event   //show the RSS feed of post type "event"

You can also use a combination of the parameters above to provide a specific feed output. However, in the following example I’m going to show you a way to build a specific feed to fit your needs.

By default, the RSS feed only shows the posts categorized under the “post” type. If you want to include other posts from different post types on the feed, you need to add this to your child theme’s functions.php file. The example below will add the “event” post type to the default RSS feed output.

function myfeed_request( $qv ) {
      if ( isset( $qv['feed'] ) && !isset( $qv['post_type'] ) ) {
            $qv['post_type'] = array( 'post', 'event' );
     }
     return $qv;
}
add_filter( 'request', 'myfeed_request' );

One important part of coding for RSS is that you need to hard refresh the browser after each update–otherwise you won’t be able to see your change. I fell into this trap for an hour or more and, after making sure the code was working fine, tried incognito mode and realized I couldn’t see my changes because of the browser caching. Hit CTRL+F5 or CMD+SHIFT+R to hard refresh your feed’s page and see the changes. 

As an example, I created an “event” post type using Jet Engine (a bundled plugin with the Jupiter X theme) and added an “event-date” meta field into it. The event-date receives the data in text, but the field will display a date-time picker like the one below. 

customizing WordPress RSS feed
Adding an event with a proper event date

After publishing this post, I can’t see it among my default RSS feeds. However, if I add the above code to my child theme’s functions.php file, the RSS feed will display this post as well.

customizing WordPress RSS feed
Custom post type “event” showing up in the default RSS feed.

In the above feed, I can see that the pubDate field is set to the date that I published the post, and not the event-date time that I chose in the meta fields:

<pubDate>Thu, 11 Nov 2021 18:04:34 +0000</pubDate>

If I want to add a new field to each item and not touch the <pubDate> field, I would use this code:

function add_custom_fields_to_rss() {
    if(get_post_type() == 'event' && $my_meta_value = get_post_meta(get_the_ID(), 'event-date', true)) {
        ?>
        <event-date><?php echo $my_meta_value ?></event-date>
        <?php
    }
}

add_action('rss2_item', 'add_custom_fields_to_rss');

This will add  <event-date>DATETIME</event-date> to each item, if its post type is “event”.

customizing WordPress RSS feed
Add a new field to each item in the RSS feed

But if I want to modify the <pubDate> field directly, I can use this code:

add_filter( 'get_post_time', 'return_event_date_rss_2_feed_func', 10, 3 ); 

function return_event_date_rss_2_feed_func( $time, $d, $gmt )
{
    if( did_action( 'rss2_head' ) )
    {
    	 if(get_post_type() == 'event' && $my_meta_value = get_post_meta(get_the_ID(), 'event-date', true)) {
    	 	 $time = $my_meta_value;
    	 }
      
    }
       
    return $time;
}

The result would look like this:

Modifying the <pubDate> value in the RSS feed for custom post type “event”

If you want to do the same for the ATOM feed, you need to add this as well:

add_filter( 'get_post_time',          'return_event_date_atom_feed_func', 10, 3 ); 
add_filter( 'get_post_modified_time', 'return_event_date_atom_feed_func', 10, 3 ); 

function return_event_date_atom_feed_func( $time, $d, $gmt )
{
    if( did_action( 'atom_head' ) )
         if(get_post_type() == 'event' && $my_meta_value = get_post_meta(get_the_ID(), 'event-date', true)) {
    	 	 $time = $my_meta_value;
    	 }
    return $time;
}

You can modify the post content, post title or post excerpts with regular WordPress actions. You just need to check if you are modifying them through the RSS or not or use the filters that are specifically designed for RSS feeds.

Adding the featured image to RSS feed items is possible with this code:

function add_image_to_rss($content) {
	global $post;
	if(has_post_thumbnail($post->ID)) {
		$content = '<p>' . get_the_post_thumbnail($post->ID) .
		'</p>' . get_the_content();
	}
	return $content;
}
add_filter('the_excerpt_rss', 'add_image_to_rss');
add_filter('the_content_feed', 'add_image_to_rss');
Inserting the featured image to the RSS feed

I highly recommend that you follow this article to get to know which actions you can use to modify your website’s RSS feed. 

So far, we understand that there are actions and filters we can use to customize the feed output. However, sometimes we need to do more than this. I personally like the idea of having an exclusive feed populated from my own feed template. The good thing about this is that WordPress allows you to have custom feeds even with a custom template. Let’s see an example of this approach. I will add a new feed to my website and will use my own template to render the RSS content. This feed will have a separate URL and would be useful when I want to use it as an app or widget that is exclusively developed and requires specific data. First I will use the default RSS feed template copied from wp-includes/feed-rss2.php, which is the default RSS template of WordPress, and then modify the template as I wish. Then I’ll copy every single line of it into the function customRSSFunc().

add_action('init', 'customRSS');
function customRSS(){
    add_feed('custom-event', 'customRSSFunc');
}

function customRSSFunc(){

/**
 * RSS2 Feed Template for displaying RSS2 Posts feed.
 *
 * @package WordPress
 */

header( 'Content-Type: ' . feed_content_type( 'rss2' ) . '; charset=' . get_option( 'blog_charset' ), true );
$more = 1;

echo '<?xml version="1.0" encoding="' . get_option( 'blog_charset' ) . '"?' . '>';

/**
 * Fires between the xml and rss tags in a feed.
 *
 * @since 4.0.0
 *
 * @param string $context Type of feed. Possible values include 'rss2', 'rss2-comments',
 *                        'rdf', 'atom', and 'atom-comments'.
 */
do_action( 'rss_tag_pre', 'rss2' );
?>
<rss version="2.0"
	xmlns:content="http://purl.org/rss/1.0/modules/content/"
	xmlns:wfw="http://wellformedweb.org/CommentAPI/"
	xmlns:dc="http://purl.org/dc/elements/1.1/"
	xmlns:atom="http://www.w3.org/2005/Atom"
	xmlns:sy="http://purl.org/rss/1.0/modules/syndication/"
	xmlns:slash="http://purl.org/rss/1.0/modules/slash/"
	<?php
	/**
	 * Fires at the end of the RSS root to add namespaces.
	 *
	 * @since 2.0.0
	 */
	do_action( 'rss2_ns' );
	?>
>

<channel>
	<title><?php wp_title_rss(); ?></title>
	<atom:link href="<?php self_link(); ?>" rel="self" type="application/rss+xml" />
	<link><?php bloginfo_rss( 'url' ); ?></link>
	<description><?php bloginfo_rss( 'description' ); ?></description>
	<lastBuildDate><?php echo get_feed_build_date( 'r' ); ?></lastBuildDate>
	<language><?php bloginfo_rss( 'language' ); ?></language>
	<sy:updatePeriod>
	<?php
		$duration = 'hourly';

		/**
		 * Filters how often to update the RSS feed.
		 *
		 * @since 2.1.0
		 *
		 * @param string $duration The update period. Accepts 'hourly', 'daily', 'weekly', 'monthly',
		 *                         'yearly'. Default 'hourly'.
		 */
		echo apply_filters( 'rss_update_period', $duration );
	?>
	</sy:updatePeriod>
	<sy:updateFrequency>
	<?php
		$frequency = '1';

		/**
		 * Filters the RSS update frequency.
		 *
		 * @since 2.1.0
		 *
		 * @param string $frequency An integer passed as a string representing the frequency
		 *                          of RSS updates within the update period. Default '1'.
		 */
		echo apply_filters( 'rss_update_frequency', $frequency );
	?>
	</sy:updateFrequency>
	<?php
	/**
	 * Fires at the end of the RSS2 Feed Header.
	 *
	 * @since 2.0.0
	 */
	do_action( 'rss2_head' );

	while ( have_posts() ) :
		the_post();
		?>
	<item>
		<title><?php the_title_rss(); ?></title>
		<link><?php the_permalink_rss(); ?></link>
		<?php if ( get_comments_number() || comments_open() ) : ?>
			<comments><?php comments_link_feed(); ?></comments>
		<?php endif; ?>

		<dc:creator><![CDATA[<?php the_author(); ?>]]></dc:creator>
		<pubDate><?php echo  get_post_meta(get_the_ID(), 'test_meta_field', true); // mysql2date( 'D, d M Y H:i:s +0000', get_post_time( 'Y-m-d H:i:s', true ), false ); ?></pubDate>
		<?php the_category_rss( 'rss2' ); ?>
		<guid isPermaLink="false"><?php the_guid(); ?></guid>

		<?php if ( get_option( 'rss_use_excerpt' ) ) : ?>
			<description><![CDATA[<?php the_excerpt_rss(); ?>]]></description>
		<?php else : ?>
			<description><![CDATA[<?php the_excerpt_rss(); ?>]]></description>
			<?php $content = get_the_content_feed( 'rss2' ); ?>
			<?php if ( strlen( $content ) > 0 ) : ?>
				<content:encoded><![CDATA[<?php echo $content; ?>]]></content:encoded>
			<?php else : ?>
				<content:encoded><![CDATA[<?php the_excerpt_rss(); ?>]]></content:encoded>
			<?php endif; ?>
		<?php endif; ?>

		<?php if ( get_comments_number() || comments_open() ) : ?>
			<wfw:commentRss><?php echo esc_url( get_post_comments_feed_link( null, 'rss2' ) ); ?></wfw:commentRss>
			<slash:comments><?php echo get_comments_number(); ?></slash:comments>
		<?php endif; ?>

		<?php rss_enclosure(); ?>

		<?php
		/**
		 * Fires at the end of each RSS2 feed item.
		 *
		 * @since 2.0.0
		 */
		do_action( 'rss2_item' );
		?>
	</item>
	<?php endwhile; ?>
</channel>
</rss>


<?php 
}

This code requires you to save your permalinks in Settings -> Permalinks once, otherwise you will see a 404 error if you open the feed URL. 

Custom field, outputs the feed template.

The good thing about this approach is that you won’t have any limitations on modifying the RSS output. That’s why I like it the most. Now I can modify the template in customRSSFunc() or move it to a template file on my child theme and call it via template_parts() function to organize the code.

That’s it, guys–customizing the WordPress RSS feed using code is not that complicated! Let me know your thoughts about it and ask your questions below if you have any. 

How to Migrate a WordPress Site from One Hosting Server to Another

Website migration is the process of changing a website configuration or technology that can affect its online visibility and search engine optimization. A site migration includes changes such as changing the domain name or switching the hosting provider and server location, changing the structure of the site, site redesign, moving from HTTP to HTTPS protocol and moving the site to a new platform (CMS or Framework). In this article we will focus on changing the hosting server as the main process to migrate a WordPress site.

The reason for the migration is obvious when it comes to uploading a site on a production server after its development in the local environment, since the site needs to be made publicly available. If you are considering transferring an already working site from one server to another one, then there may be several most common reasons for that:

  • Balanced pricing plan
  • More hosting resources and useful features
  • Good server security
  • Great customer support

So if you are ready to publish your site or decide to switch to a new hosting provider, you will be faced with the question of how to migrate it. Here we will consider the technical aspects of two  methods for migrating a WordPress site to a new server: a plugin-based method using the most popular migration plugins and a manual method. 

The main risks involved in moving a site are data loss and downtime, which can make your site inaccessible for users and search engines, which in turn can lead to search engine rankings loss. Nevertheless, if everything is done in the right way, downtime will be minimized or won’t happen at all. 

Choosing and setting up the new hosting environment

If you are looking for information on how to migrate the website, you clearly have reasons why you are leaving your current hosting provider and you don’t want to suffer any problems on a new host. There are different kinds of hostings available to choose from and it’s important to understand how they work. Here is a list of hosting types: 

  • Shared hosting –  Usually the most common type of hosting, when one server houses many websites and shares resources between them.
  • Virtual Private Server (VPS) –  The virtual partitions of a dedicated physical server are used in this hosting type and an actual area of the server is dedicated to your site.
  • Dedicated server – A physical server supports only your website and you have  full access to the server’s resources.
  • Managed and WordPress optimized hosting – A hosting service where all WordPress technical aspects are managed by the hosting provider. This type of hosting includes technologies and tools that help your site run smoothly.

Before starting to migrate your site, you need to add your site (domain name) to the new hosting panel so that the necessary records will be created for your domain on a new server.

An important thing to remember: Don’t cancel your current hosting plan before the migration and further testing are completed, as you could lose your entire site’s data.

Backing up the site before you get started

A good practice before making any crucial changes to the site is making a full backup (site files and database). It can be done manually or with the help of any backup WordPress plugin. Since creating a backup is one of the steps of site transfer, we will cover it later in this article.

The plugins-based method to migrate a WordPress site

Migrating a WordPress site using any cloning plugin is a popular solution that helps to ease the process: Just install the plugin and make a few clicks. There are dozens of WordPress plugins for migration in the repository. However, in this article we will consider the two most popular ones: All-in-One WP Migration and Duplicator.

The All-in-One WP Migration plugin

The All-in-One WP Migration plugin specializes in website migration and provides all the necessary tools for that. It’s easy to use and has drag-and-drop import functionality, which simplifies the migration process.

At first you need to install and activate the cloning plugin on your old and new hosting environment. To do that, log in to your site’s WP Dashboard, navigate to the Plugins > Add New section, type the plugin name in the Search field and then click the Install Now button for the necessary plugin.

migrate a WordPress site

When installation is complete, just click the Activate button to turn on the plugin.

The steps below will show you how to move your WordPress site.

1. In the WP Dashboard of the site you want to move, go to the All-in-One WP Migration -> Export section.

2. Select the File option from the Export to dropdown menu.

3. Wait for the plugin to finish exporting the site data and then download the generated file in the .wpress format.

migrate a WordPress site

4. Log in to your new site’s WP Dashboard and navigate to the All-in-One WP Migration -> Import section.

5. Click the Import from buttonand select the File option.After that, locate the .wpress file you downloaded in step 3.

6. Click the Finish button once the import process is completed. In case the backup file can’t be uploaded via the web interface due to the max_upload_filesize limitation, you can upload it via File Manager in your hosting panel or via FTP. Upload the generated .wpress file into the wp-content/ai1wm-backups folder of your new site and then it should be displayed in WP Dashboard > All-In-One WP Migration > Backups. Click the Restore button and proceed with the restoration process. When migration is done you need to resave the permalinks structure in WP Dashboard > Settings > Permalinks, so it will regenerate the .htaccess file.

Important note, All-in-One Migration is a freemium plugin and it has free and premium features, but one of the main limitations you need to pay attention to is the size of the site’s backup file. If it’s bigger than 512M, you need to have a premium version of the plugin to proceed with the migration process.

The Duplicator plugin

Duplicator is another migration plugin that is also on the list of the best WordPress migration plugins. With the help of this plugin you can simply clone your site to a new server without downtime. When migrating, Duplicator creates a package with all the pre-configured files, so you don’t even need to install WordPress on your new host, as Duplicator does it itself.

The plugin installation is the same as the one  described in the previous section. Once it is installed and activated, you will see the Duplicator menu in the WP Dashboard panel.The following steps will show the process of migrating the WordPress site using Duplicator.

  1. Opent the Duplicator > Packages section and click the Create New button in the top right corner. Give a name to your package and click Next
migrate a WordPress site

At this stage Duplicator will scan your site and let you know if there are any potential issues. If there are problems highlighted, resolve them and scan again before proceeding.

migrate a WordPress site

2. When the backup file is ready, download it by clicking the One-Click Download link. It will download both the backup file and the installer.php file to your computer.

3. In this step you need to create a database on your new host. This can be done in the hosting panel; for example, if it’s the cPanel, you need to log in to it and find the Databases section. In that section, select MySQL Databases and click Create a New Database. Enter a name for your database and click Create Database. Then under Add a New User, enter a username and password and click Create a User. After that, scroll down to Add a User to a Database and select the user and database you just created and click Add. On the Manage User Privileges section tick the ALL PRIVILEGES checkbox and click Make Changes.

Important: You need to remember the database name, its username and the password for later actions.

You can check more about managing databases in the cPanel documentation.

4. Upload the files you got in step 2 into the site’s root directory on your new hosting server (usually it is the public_html folder). 

5. If you are migrating the site while keeping the same domain name, then you will need to modify your hosts file on a local machine. It allows you to override which server is hit when you browse a site and real domain switch (DNS change) will be done only after the migration and testing processes are completed. It’s important to prevent any downtime. To do that, you need to determine the IP address of your new server. You can find it in the new hosting panel or just ask the new hosting provider support. Now find the hosts file on your local machine (for Windows users its location is c:\windows\system32\drivers\etc\hosts, for Unix-based operating systems it is /etc/hosts) and in the bottom line of the file add the entry in the following view:

 the_new_ip_address your_domain_name

For example, if the new server’s IP is 123.123.123.123 with the domain name mydomain.tld, the entry will be:

123.123.123.123 mydomain.tld

6. Navigate to the installer.php file in the browser by entering the address http://yourdomainname.tld/installer.php to start the installation process. In the duplicator installation wizard, enter the database credentials you created in step 3 (leave the Host field as “localhost”) and click the Test Connection button. If everything is fine then click Run Deployment.

7. When the migration process is completed, test the site and then you may switch the name servers for your domain to the new host and remove the entry made in the hosts file in step 5. Note that name server changes may take effect after up to 24 hours.

The manual method of migrating a WordPress site

Migrating a WordPress site manually requires some technical skills, as you need to move the site files and database, and then configure the wp-config.php file. Using this method you need to know how to access files via the File Manager in your hosting control panel or via FTP (File Transfer Protocol). Also, knowledge of managing the database is required, in most cases using the phpMyAdmin environment.

Backing up your current WordPress site files and MySQL database

Files can be downloaded from the server via FTP using the FileZilla FTP Client. After connecting to the old server, navigate to the site’s root directory (public_html in most cases), select all WordPress files, then open the context menu by right click and select Download.

migrate a WordPress site

When the download is complete, open the phpMyAdmin tool in the hosting control panel to access the databases, select the database of your site and open the Export tab.

migrate a WordPress site

In the Export Method section select the Quick method, then choose the SQL option as the format and click the Go button.

The database dump will be downloaded to your computer.

Uploading the files and exporting the database to a new server

Now you can upload the site files to your new server. Connect to it via FTP with the FileZilla FTP Client and navigate to the public_html folder. From the left side of the client (Local site) locate the files you downloaded in step 1, select them all and then click Upload from the context menu.

migrate a WordPress site

While the files are uploading you can enter your new hosting panel and create a new database and note the database name, database username and database password. Then open the phpMyAdmin tool, select the created database and navigate to the Import section. In the Import screen, click Choose File and upload the database dump file you downloaded earlier and click Go.

Once the upload is complete you need to edit the wp-config.php file. In FileZilla, locate wp-config.php and open it to edit.

Change the following values to match your new database credentials:

DB_NAME – database name
DB_USER – database username
DB_PASSWORD – database password
DB_HOST – database hostname (Usually it should be localhost, otherwise you can specify it from your new hosting provider).

And lastly, you can do the trick with the hosts file, which we described earlier, to be able to test the migrated site on a new server. If everything is working fine then you can switch nameservers for your domain to the new hosting.

Conclusion

In this article we described one type of migration of a WordPress site—moving to a new hosting provider (a new server). The benefits of this can vary, such as better customer support, more hosting resources and useful features as well as better server security. We showed two different approaches to achieve this: plugin based migration and manual migration methods. These methods can be applicable in different situations, so it’s important to know the steps of the process to prevent your site’s data loss and downtime.