How to Show Product Lead Times in WooCommerce with Artbees
Set clear preparation times with Artbees Lead Time for WooCommerce. Follow this guide to storewide promises, product exceptions, working days and checkout messages.


“In stock” answers whether someone can buy a product. It does not explain how long your team needs to prepare it. A stocked beanie might need two working days for packing, while a version made to order needs longer. Showing that difference before checkout helps shoppers decide whether an order fits their plans.
Meet Artbees Lead Time for WooCommerce, part of our WooCommerce plugin family. This guide shows you how to set a storewide readiness promise, add a slower-product exception, and keep both messages visible through cart and checkout. Use preparation times your own fulfilment process can support.
Tested with: Lead Time 1.0.2, WordPress 7.1.3, WooCommerce 10.9.4, Jupiter X, and block cart/checkout on October 9, 2026. Demo calendar: UTC, Monday to Friday.
1. Decide whether you mean readiness or arrival
A readiness promise describes when your team expects a product to be prepared. An arrival estimate describes when the shopper expects to receive it. Those are different events: an item can be ready on Monday and spend several more days with a carrier.
For this example, choose Ready to ship. The ordinary product uses two business days of preparation. We leave shipping time out of that calculation, so the result does not imply that delivery takes two days.
Use wording that matches your operations. “Ready to ship” suits dispatch preparation; pickup readiness should describe collection. Avoid a bare “2 days” if customers might include weekends that your team does not work. Keep the message consistent with your shipping information, especially where a delivery service is described as next day.
2. Install and connect Lead Time
Download Lead Time through your Artbees account. In WordPress, open Plugins → Add New Plugin → Upload Plugin, choose the plugin ZIP, install it, and activate it. You can check the current version and requirements in the Artbees release log.
Open Artbees → Lead Time, then Settings & support. In MyArtbees license, enter your license key and select Connect license. Once connected, the card shows the plan, license duration and access expiry. Keep the key private when sharing screenshots or requesting support.
Use a demo or staging store for the first walkthrough. Publishing a promise rule makes it eligible to affect what customers see, so choose realistic preparation times before repeating these steps on a live store.
3. Create a calculated storewide promise
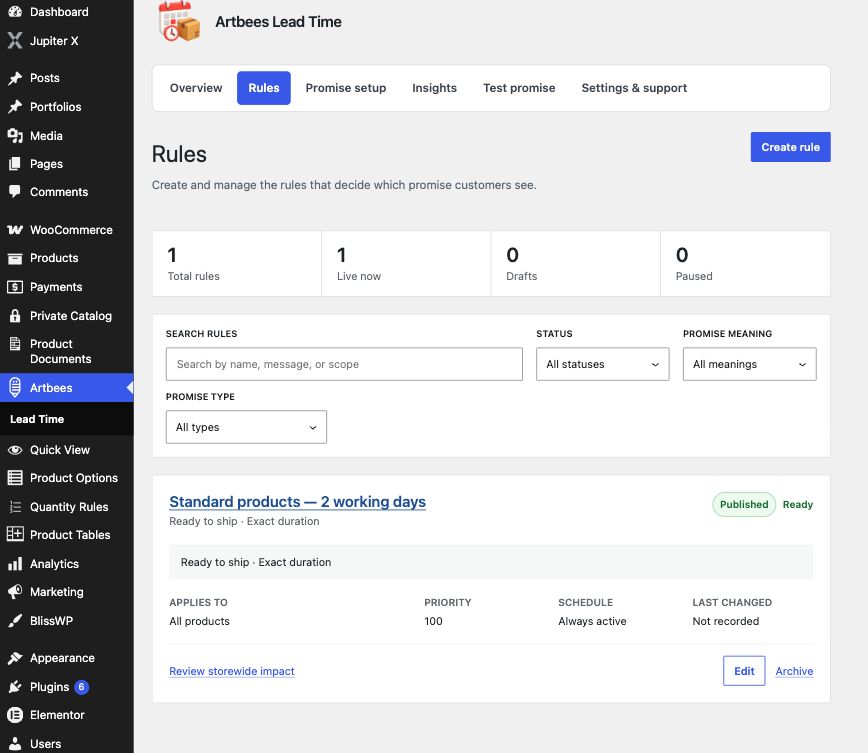
Open Rules → Create rule. Give the rule a name that explains its purpose, such as Standard products — 2 working days. Select Ready to ship for Customer promise, and All products for the condition.
Choose Exact duration under Promise value, then enter 2 in Business days. Leave Include shipping time unchecked for this preparation-only example. Keep the priority at 100 and leave the start and end dates empty if the rule should remain active without a scheduled expiry.
Save stores a draft. Publish makes the rule live after the plugin’s checks. In our walkthrough, the rules list showed one live rule, a Published badge, and All products as its scope.
Check an ordinary product before adding exceptions. Our Beanie inherited the calculation and displayed Estimated readiness is 2026-10-12 on the test date, October 9. That result came from counting Friday and Monday and skipping the weekend.
There is also a separate fallback message under Promise setup → Storefront display → Default message. It is the wording used when no rule applies, rather than the calculated promise created above. Choose useful fallback wording, such as asking shoppers to contact you for preparation timing, then select Save changes.
4. Give a slower product its own message
Open Products → All Products, then edit the product that needs a different promise. Find the Artbees Lead Time promise panel. It shows the effective promise so you can see what the product currently inherits.
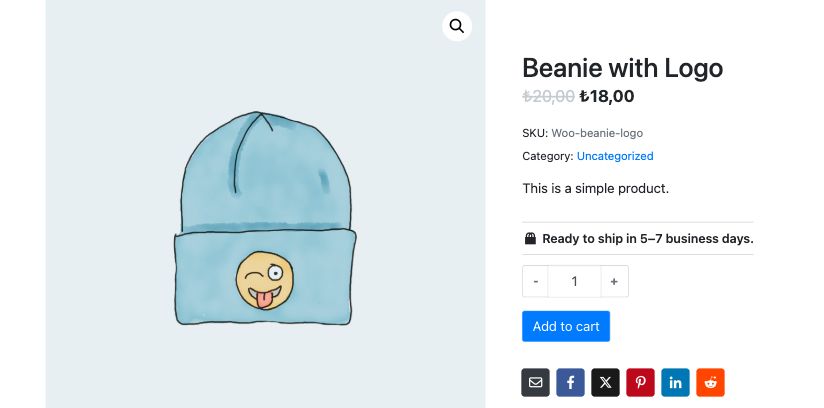
Change Promise source from Inherit published promise to Use a custom promise. Enter Ready to ship in 5–7 business days. in Customer promise, then select Update. We used Beanie with Logo as the slower-product example.
This field creates a fixed customer message. It does not turn the numbers in that sentence into a calculated date. If your preparation time changes, update the text too. Use a calculated rule when you need a date derived from working days and cutoff settings.
To return the product to the shared setup, select Inherit published promise and update the product. The panel also offers options to hide or clear the inherited promise; use those deliberately rather than treating them as another way to enter an exception.
5. Test working days and the order cutoff
Open Promise setup → Calendars. Confirm the Preparation timezone and the weekly working days. Our example uses +00:00 and checks Monday through Friday, leaving Saturday and Sunday closed.
The Count from test section lets you try the working days and cutoff currently shown without first saving them. Enter an Order date and time, the number of Business days, and a Same-day order cutoff, then select Run calendar test.
We tested two business days with a 14:00 cutoff. For an order placed on Friday, October 16, 2026 at 13:30, the result was Monday, October 19 at 13:30 UTC. The explanation counted Friday, skipped Saturday and Sunday, and counted Monday.
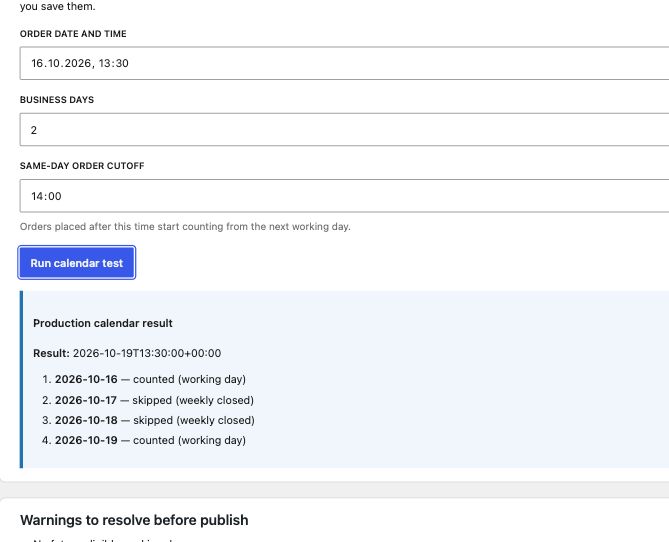
Changing only the order time to 14:30 moved the result to Tuesday, October 20 at 14:30 UTC. Friday was skipped because the order was after the cutoff. The weekend stayed closed, leaving Monday and Tuesday as the two counted days.
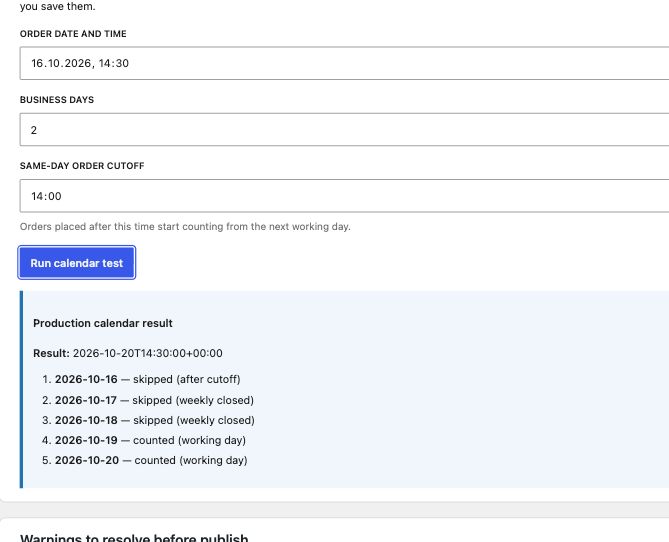
Use the explanation to check the result against your actual schedule. The test previews the settings on screen without saving them. Select Save working calendar when you intend to keep your configuration, follow any review prompts, and test the product again. Repeat these checks whenever your operating schedule changes.
6. Check product, cart, checkout and mobile
Under Promise setup → Storefront display, choose the locations where customers need timing information. For the standard WooCommerce product summary, Product page position includes Above add to cart, which we used here. Save wording, appearance and placement changes with Save changes.
Open the actual product page, rather than relying solely on the style preview. Custom product templates can handle placement differently, so follow the placement guidance shown in the plugin if your message is missing.
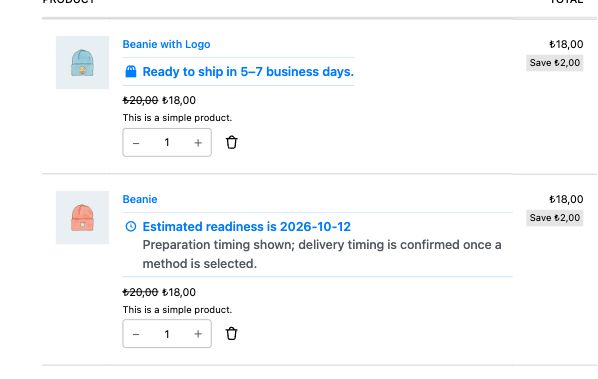
Add both example products to the cart. Our block cart showed Ready to ship in 5–7 business days. for Beanie with Logo and Estimated readiness is 2026-10-12 for Beanie. The calculated item also explained that preparation timing was shown and delivery timing would be confirmed once a method was selected.
Continue to checkout and inspect the order summary. Both messages remained attached to the correct items in our test.
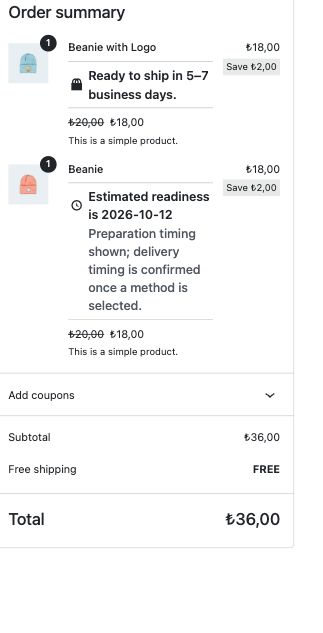
Do not interpret the earlier item’s date as a dispatch date for the whole mixed order. In this example, one product uses fixed text, so that text alone does not establish a calculated combined date. Your fulfilment policy still needs to explain whether items ship together or separately.
Finally, repeat the check on a narrow screen. Confirm that the full message remains readable, that wrapping preserves its meaning, and that the promise stays close to the buying controls. Check your own cart and checkout layout as well as the product page.
A useful lead-time setup starts with a realistic shared promise, deliberate exceptions and a calendar that matches your working schedule. Keep preparation separate from delivery, and inspect the complete shopping journey whenever you change the setup. Learn more about Artbees Lead Time for WooCommerce.
If shoppers need to save a product while deciding whether its preparation time suits them, see our guide to adding a wishlist to WooCommerce.
If shoppers also need size, care or shipping details next to the lead time, see how to add custom product tabs in WooCommerce.